1. Living in the iPad
Remember how Mary Poppins kept pulling stuff out of her magic little satchel when she first moved into the Banks household? Your iPad is a lot like that satchel.
No, you can’t really live in your iPad, but it can contain much of the stuff that you use in your daily life and that you ordinarily might keep elsewhere: calendars, address book, mail, notebooks, and so on. This stuff would be really useful to have on an iPad.
That’s what this chapter is about: projects that show you how to get your stuff into and out of your iPad, as well as a few cool things you can do with that stuff after it takes up residence on the iPad.
Information Syncing Project
Software needed: iTunes
iPad model: Any
Additional hardware: None
If you’ve been using a computer for any length of time, it probably stores a lot of information that you use regularly, such as contact lists, browser bookmarks, calendars, and notes. This information would be really useful to have on your iPad—not just have on your iPad, but also have there in such a way that you can get any changes you make on the iPad back on your computer.
Doing this information shuffle with your iPad is easy, but first, you have to make it possible. Setting things up so that your computer and iPad can exchange your information is what this simple project is for.
The act of getting your information from your computer to your iPad and back is called syncing (short for synchronizing), and it’s more than just a simple matter of copying your stuff from your computer to your iPad or from your iPad to your computer.
Syncing involves looking at two similar sets of information (such as the contacts in your address book on your computer and the contacts on your iPad), figuring out what’s different between those two sets, and sorting things so that the differences between those two sets of information are resolved. Contacts that you created on your iPad go to your computer, for example; contacts that you created on your computer go to your iPad; and contacts that you changed on one device or the other are brought into alignment.
In Apple’s world of handheld devices, the key to getting your stuff from here to there and back again is iTunes.
Yes, we know—things like contact lists, appointment books, and browser bookmarks aren’t songs, so it does seem a little odd (OK, more than a little odd) to use iTunes to move them back and forth between your computer and your iPad. Don’t question. That’s just the way it is. Embrace it.
So how do you sync your iPad and your computer? Simple: Connect them with the dock connector, and stand back. Unless you’ve fiddled around with the default settings, iTunes opens and automatically syncs the two devices. It does this each and every time you connect your iPad to your computer.
Any time you don’t want iTunes to sync your iPad and your computer automatically, you can hold down the Option and Command keys (Mac) or the Shift and Ctrl keys (Windows) when you connect your iPad. Keep holding those keys down until your iPad appears in the iTunes Source list.
View your sync settings
Your iPad can sync with a lot of sources in a lot of ways—directly over the air with MobileMe, for example, or with Google. You can mix and match syncing methods, but the number of combinations can become complex. In this project, we’re going to go with the simplest case: syncing by way of direct connection between your iPad and your computer.
First, you connect your iPad to your computer and confirm a general option that controls how your iPad and iTunes interact.
Connecting your iPad and viewing general options:
- Connect your iPad to your computer with the dock connector.
If you haven’t changed any of the default settings for the iPad or iTunes, iTunes begins syncing with your iPad after a few seconds, and the iPad appears in the iTunes Source list—that’s the sidebar on the left side of the iTunes window—below the Devices heading (Figure 1.1 on the next page). Go ahead and let it sync; that won’t hurt anything.
Figure 1.1. The iPad appears in the iTunes Source list when you connect it to your computer.

- Select your iPad in the iTunes Source list.
In the main iTunes display on the right, a Summary pane appears (Figure 1.2). This pane gives you information about your iPad and offers you a variety of options.
Figure 1.2. The iTunes Summary pane for an iPad is more than just a summary; it also has options you can set.
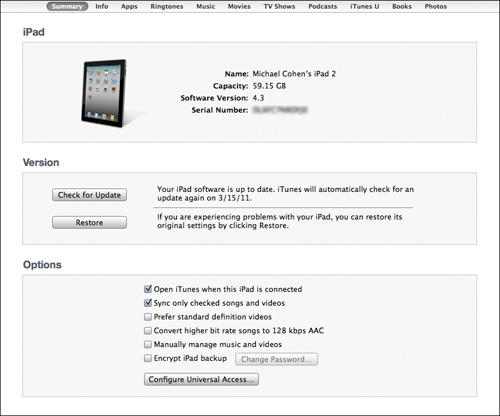
- Make sure that the check box titled Open iTunes when this iPad is connected is checked.
This setting is the best one to use if you want to sync your iPad with iTunes regularly.
The other options aren’t relevant for syncing your general information with your iPad. You can ignore them for now (but not forever).
The real fun stuff is on the pane associated with the Info button, which is located in the header area at the top of the main iTunes display. That pane is where you set up syncing for your contacts, calendars, bookmarks, mail settings, and notes.
Sync contacts
First, you need to set up contact syncing. iTunes knows about various contact sources on your computer and on the Internet, and it allows you to pick which ones to sync with your iPad, depending on your operating system:
• On a Mac, you can sync from Address Book as well as from other contact sources, such as Yahoo Address Book and Google Contacts.
• In Windows, you can sync from only one source of contacts at a time. Your options include Yahoo Address Book, Google Contacts, Windows Address Book (Microsoft Outlook Express), Windows Vista Contacts, and Microsoft Outlook (2003, 2007, or 2010).
On both a Mac and a Windows PC, you can organize your contacts in groups. iPad contact syncing lets you sync only specific groups of contacts, if you like.
Setting contact sync options:
- Make sure that the iPad is connected to your computer, that iTunes is open, and that the iPad is selected in the iTunes Source list.
This will be the case if you just completed the steps in “Connecting your iPad and viewing general options” earlier in this project.
- Above the main iTunes display, click the Info button.
Near the top of the Info pane, a panel displays the contact syncing options. The options in this panel differ, depending on whether you have a Mac or a PC running Windows.
- Do one of the following:
• On a Mac, check Sync Address Book Contacts (Figure 1.3).
Figure 1.3. The contact syncing options on the Mac allow you to sync from several contact sources at the same time.

• In Windows, check Sync contacts from and then choose the source of the contacts that you want to sync from the menu. Depending on the source you choose, you may have to enter login credentials so that iTunes and your iPad can access the contacts.
- If you want to sync only specific contact groups, click Selected groups and then check the contact groups that you want to appear on your iPad; otherwise, click All contacts.
- If you want the new contacts you create on your iPad to belong to a specific contact group, check the box titled Add contacts created outside of groups on this iPad to; then choose a group from the pop-up menu.
- (Optional) On a Mac, check Sync Yahoo! Address Book contacts and then enter your Yahoo login information.
- (Optional) Also on a Mac, check Sync Google Contacts and then enter your Google login information.
When you apply these changes, described later in this project, iTunes syncs your iPad with the new settings.
Sync calendars
When your contact sync settings are squared away, the next step is setting up the calendars that you want to sync. Depending on your operating system, do this:
• On a Mac, you can sync your iCal calendars, which can include calendars from any application that syncs with iCal.
• In Windows, you can choose to sync calendars with Microsoft Outlook 2003, 2007, or 2010.
Setting calendar sync options:
- On the Info pane, do one of the following:
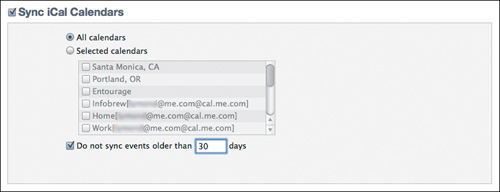
• On a Mac, check Sync iCal Calendars (Figure 1.4).
Figure 1.4. The calendar syncing options allow you to choose specific calendars.
• In Windows, check Sync calendars with; then, from the drop-down menu, choose the application that manages the calendars you want to sync.
- If you want to sync only specific calendars, click Selected calendars and then check the calendars that you want to appear on your iPad; otherwise, click All calendars.
- (Optional) Click Do not sync events older than x days and then enter a number in the text box.
Unless you think you’ll need to refer to past events on your iPad, choosing not to sync events older than 30 days (the default) helps keep your iPad calendar uncluttered.
Sync mail settings
First, let’s be clear: iTunes does not sync mail between your iPad and your computer. Instead, both your computer and your iPad obtain and display your email directly from your email provider (or providers; Michael currently has email accounts with four providers, for example).
What iTunes does sync are the settings you’ve enabled for each of your email accounts. This feature is a shortcut, really: It helps you skip the sometimes-confusing task of specifying settings for each email account manually on your iPad by copying those settings directly from your computer.
Apple calls this process syncing, but the syncing goes only one way: from your computer to your iPad. If you change email settings on your iPad, they don’t sync back to your computer.
Although a plethora of email programs is available for both Mac and Windows, iTunes can sync settings from only a few of those programs—specifically, Mail on a Mac and Microsoft Outlook (2003, 2007, or 2010) or Outlook Express on a PC.
If you have and use any of the iTunes-blessed mail programs, you can quickly get your mail settings onto your iPad.
Syncing mail settings:
- On the Info pane, check Sync Mail Accounts (Figure 1.5).
Figure 1.5. Choose the mail-account settings you want to copy to your iPad.
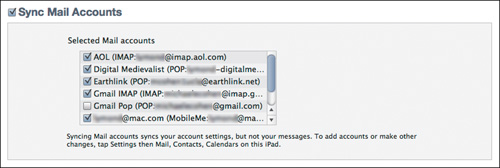
- In the list of mail accounts, check each account that contains settings you want to sync to your iPad.
Sync notes and bookmarks
The iPad has a built-in browser (Mobile Safari) and a note-taking app (Notes), and you can sync bookmarks and notes from these apps between your iPad and your computer, based on your operating system:
• On a Mac, you can sync your bookmarks between Mobile Safari on the iPad and Safari. (Sorry, Mozilla Firefox fans—no soup for you.)
• In Windows, you can sync bookmarks between your iPad and either Safari or Internet Explorer. (Still no soup for you, Firefox fans.)
The notes you create on your iPad can sync to the Mail application on the Mac or to Microsoft Outlook in Windows, and vice versa.
Syncing notes and bookmarks:
- In the Other section of the Info pane, check the bookmark syncing option you prefer:
• On a Mac, your only choice is Safari.
• In Windows, you can choose Internet Explorer or (if it’s installed) Safari.
- Check the notes-syncing option.
From now on, whenever you make or change a note on your iPad, or add a bookmark, the info gets synced to your computer. Similarly, any notes or bookmarks that you add or change on your computer (if you’re using one of the iTunes-supported programs) appear on your iPad the next time you sync.
Apply your sync settings
Finally, it’s time to apply the settings that you specified and get your iPad resynced the way you want it.
Applying sync-settings changes:
- In the bottom-right corner of the Info pane, click Apply.
iTunes applies the changes you made and syncs your iPad.
- When the sync is complete, disconnect your iPad.
The iPad disappears from the iTunes Source list, and you’re ready to go enjoy your newly synced iPad.
In the future, whenever you connect your iPad to your computer, the sync settings you made in this project are in effect, syncing just the information you want to sync between your iPad and your computer.
If you never want your iPad to sync with your computer when you connect it, open iTunes Preferences (choose iTunes > Preferences on a Mac or Edit > Preferences in Windows), click Devices, and select Prevent iPods, iPhones, and iPads from syncing automatically.
Wireless Syncing Project
Difficulty level: Intermediate
Software needed: MobileMe account
iPad model: Any
Additional hardware: None
When you begin living with your iPad, you soon discover that it’s really convenient to put a lot of the personal information that you keep on your desktop or laptop computer on your iPad as well. The preceding Information Syncing Project shows how to bring all that stuff into alignment every time you connect your iPad to your computer.
But using that method of syncing your information means that you have to connect your iPad to your computer every so often to keep each device up to date, and for best results, you need do this regularly and frequently. It’s just like brushing your teeth.
We live, however, in an age of miracles and wonder—and of wireless technology. There’s no reason why your iPad and your computer can’t share their information over the air so you can avoid the daily chore of getting them all synced up. (You should still brush your teeth, of course.)
No matter whether you have a Wi-Fi or 3G iPad, you can make use of cloud services to sync your information between your computer and your iPad. (To find out what we mean by cloud services, see the nearby sidebar “What Is This Cloud of Which You Speak?”) This project describes how to use a cloud service offered by Apple: MobileMe. In this project, you sync your contacts, calendars, and bookmarks with MobileMe from both your computer and your iPad.
If you already have a MobileMe account and use it to sync your contacts, calendars, and bookmarks between your computer and MobileMe, you can skip the next two sections and go right to “Cut the cord.” Otherwise, read on.
Get a MobileMe account
To use a cloud-based service, you need to have an account with that service, such as Apple’s MobileMe.
A MobileMe account is free for the first 60 days so that you can try out the service; it costs $99 a year after that. If you have a Mac, Apple makes it very easy to get a MobileMe account; if you don’t already have one, you’ve probably been asked by your Mac to set one up on more than one occasion.
Signing up for MobileMe
• On a Mac, open System Preferences, click the MobileMe icon, and follow the onscreen instructions.
• In Windows, go to www.apple.com/mobileme, and click the prominently displayed Sign up for MobileMe Free Trial button. When you create a MobileMe account in Windows, Apple provides a MobileMe control panel for your Windows system so that you can control the service’s various features.
MobileMe’s features—both on the Mac and in Windows—include email; contacts; calendars; gigabytes of file storage on Apple’s servers; and quite a bit more, including a valuable Find My iPhone/iPad service that you can use to locate your device, should you lose it.
Go from computer to cloud
Now that you have a MobileMe account, you need to sync your information between it and your computer so that your iPad can get your information from MobileMe, as follows:
• On a Mac, you can sync your contacts from Address Book, your calendars from iCal, and your bookmarks from Safari.
• In Windows, you can sync your contacts from Microsoft Outlook 2003, 2007, or 2010 (32-bit); from Vista Contacts; or from Windows Address Book. You sync your calendars from Outlook; if you use another calendar program, you need to move your calendar events to Outlook if you want to sync them with MobileMe. You can sync your bookmarks from either Internet Explorer or Safari. (Yes, Apple offers a Windows version of Safari.)
If you currently have a MobileMe account and already sync your Mac or PC data with MobileMe, skip to “Cut the cord,” a few pages ahead.
After you sync your information between your computer and MobileMe, you can access it from any computer with a modern Web browser. Just go to www.me.com and log in.
Syncing from a Mac with MobileMe:
- Open System Preferences, and click MobileMe.
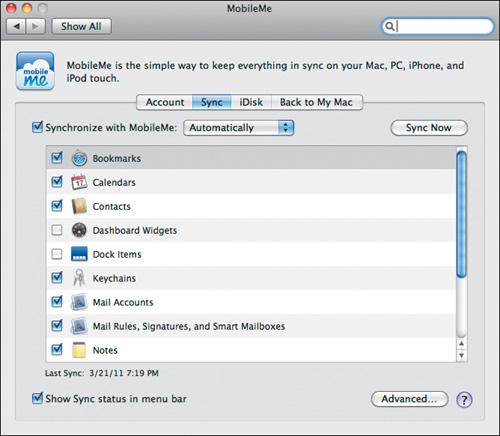
- In the MobileMe window, click the Sync tab.
- Select the Synchronize with MobileMe check box, and choose Automatically from the adjacent pop-up menu.
When you choose Automatically, your Mac and MobileMe will sync information as soon as you change it.
- In the list of items that you can sync, select Bookmarks, Calendars, and Contacts (Figure 1.6).
Figure 1.6. The Sync tab of the MobileMe System Preferences window in Mac OS X.
- Click the Sync Now button.
- Close System Preferences.
Your Mac sends your information to the cloud, ready to be synced with your iPad (or with any other computers and devices that you sync with the same MobileMe account).
If you use iCal and have never synced with MobileMe, read the nearby sidebar “Using iCal with the New MobileMe Calendar” to see how to get your On My Mac iCal events into MobileMe.
Syncing from a Windows PC with MobileMe:
- Choose Start > Control Panel to open Control Panel.
- In the Network and Internet section, choose the MobileMe control panel.
- Sign in with the MobileMe member name and password that you created when you set up your MobileMe account.
- Click the Sync tab.
- Select Sync with MobileMe, and choose Automatically from the drop-down menu.
- Select Contacts, and choose the application that manages your contacts from the drop-down menu.
- Select Calendars, and choose the calendar application from the drop-down menu.
- Select Bookmarks, and choose the Web browser that you use from the drop-down menu.
- Click the Sync Now button.
- Close the MobileMe control panel.
Cut the cord
Reading this section is necessary only if you’ve completed the Information Syncing Project earlier in this chapter. In this section, you undo what you did in the earlier project: You turn off wired syncing of contacts, calendars, and bookmarks between your iPad and your computer.
Most likely, nothing will go wrong if you don’t turn off wired syncing of your information. When you sync the same information over a dock-connector cable with iTunes and wirelessly with MobileMe, however, you may end up with duplicate information.
Turning off wired syncing of your information:
- Launch iTunes, if it’s not already running.
- Connect your iPad, and let the sync take place.
After the sync, your iPad and your computer have the same information. What’s more, your computer and MobileMe should also be in sync if you set up MobileMe to sync automatically (as we show you how to do in “Go from computer to cloud” earlier in this project).
- In the iTunes Source list, select your iPad.
- At the top of the main iTunes pane, click the Info button.
- Clear the check box titled Sync Address Book Contacts (Mac) or Sync Contacts (Windows).
- Clear the check box titled Sync iCal Calendars (Mac) or Sync Calendars (Windows).
- In the Other section, clear the check box titled Sync Safari Bookmarks (Mac) or the corresponding check box in Windows.
In Windows, the name of this option depends on the browser with which you sync bookmarks. Internet Explorer, for example, calls bookmarks favorites, so if you use it to sync bookmarks, this option would be called Sync Favorites.
- Disconnect your iPad from the dock-connector cable.
Go from cloud to iPad
Now you’re ready to set up your MobileMe account on your iPad and activate contact, calendar, and bookmark syncing. If you previously synced these items with iTunes, you also specify what to do with the information that remains on your iPad.
Creating a MobileMe account on the iPad:
- On the iPad, tap the Settings app.
- In the pane on the left side of the Settings screen, tap Mail, Contacts, Calendars.
- In the Accounts section of the resulting screen, tap Add Account.
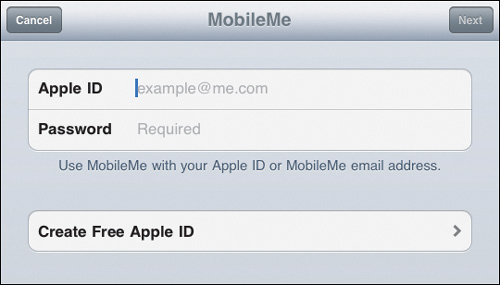
- In the Add Account screen, tap MobileMe.
An account-entry form appears (Figure 1.7 on the next page).
Figure 1.7. The MobileMe account form.
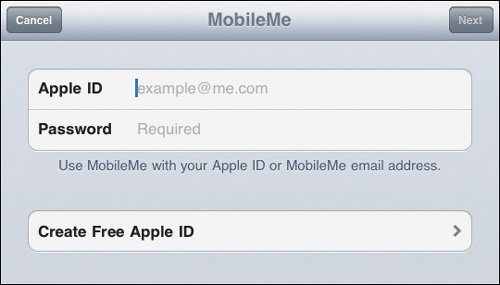
- Tap and type to enter the requested information: the email address assigned to your MobileMe account and the password for your MobileMe account.
- Tap the Next button in the top-right corner.
A second account form appears, in which you can turn MobileMe features on or off for your account.
- Tap the Contacts switch in the form to turn on contacts syncing.
If you have any contacts on your iPad (and you probably do, if you’ve completed the Information Syncing Project earlier in this chapter), a Merge Contacts dialog appears, asking you what to do with any existing contacts on your iPad (Figure 1.8).
Figure 1.8. The Merge Contacts dialog asks you to merge your iPad information with MobileMe.
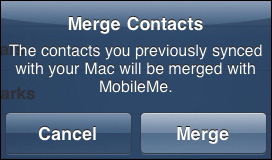
- If you see the Merge Contacts dialog, tap the Merge button.
If you’ve worked through the preceding sections of this project, the contacts on your iPad already are the same as the ones in MobileMe, so merging should have no effect; identical contacts are ignored.
- Tap the Calendars switch, and if the Merge Calendars dialog appears, tap the Merge button.
Again, if you followed the instructions earlier in this project, the calendars on your iPad should already match those in MobileMe, so merging them has no effect.
- Tap the Bookmarks switch to open the Merge Bookmarks dialog.
- Tap the Merge button.
- Tap the Save button in the top-right corner of the MobileMe account form.
The form closes, and you return to the Mail, Contacts, Calendars page.
- Tap Fetch New Data.
- In the screen that appears, tap the Push switch to turn it on.
When Push is turned on, MobileMe gets in touch with your iPad whenever mail is sent to your MobileMe address, no matter whether your iPad is awake or asleep—as long as your iPad is connected to the Internet, that is.
- Press the Home button on your iPad.
Now your iPad and MobileMe are set to communicate. Whenever you make a change in your calendars, contacts, or bookmarks on your computer, the change is sent to your iPad over the Internet. Similarly, any changes you make in your contacts, calendars, or bookmarks on your iPad are sent over the Internet to your computer. It’s magical!
Mail Management Project
Software needed: Working email account (free or paid), MobileMe account (optional; $99 per year)
iPad model: Any
Additional hardware: None
The iPad, aside from its many other virtues, is a useful device for reading, responding to, and managing your email at those times when you aren’t shackled to your computer (and how sweet those times can be!).
Managing your email on your iPad is much easier, however, if you use the IMAP email protocol. Most Web-mail applications use IMAP (see the sidebar “IMAP and POP Mail Accounts” later in this project for details), which means that your email is synchronized across devices automatically. If you sync your email accounts and contacts via iTunes or MobileMe, you may not even have to add any accounts to your iPad by hand, but you may want to stop right now and check out the Information Syncing Project earlier in this chapter to make sure that your account data is the same on your iPad as it is on your other devices.
In the following pages, we use the word folder to refer to what is sometimes called a mailbox or directory, simply because the iPad icon for mailboxes and mail directories is a folder, one of which is named Inbox. The terms are really equivalents in practical terms.
Add contacts
The easiest way to add contacts to the Contacts app on your iPad initially is to sync with your contacts on your computer, via iTunes or MobileMe. But Mail has a couple of smart ways to make adding contacts much easier than filling out the Contact screen by hand (though that’s always an option too).
The second-easiest way is to add contacts from emails you receive. You can add information to any extant contact or create a new contact based on information in an email, as we show you in the following tasks.
Adding contacts from email address fields:
- Find an email in your Inbox (or any other mail folder on your iPad) containing an address that you want to add to your Contacts app.
You’re going to create a new contact entry for that address.
- Tap the person’s name or email address in the From, To, or CC field of the email.
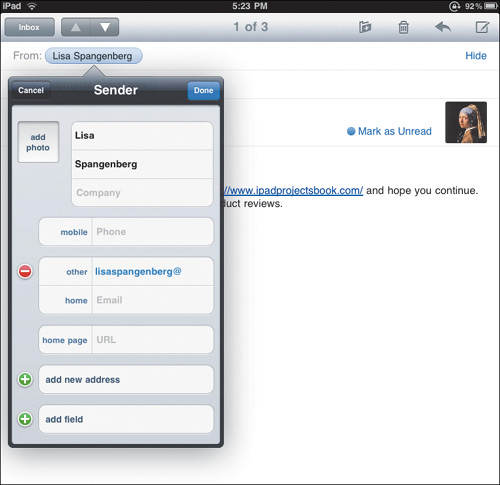
You see a popover similar to the one shown in Figure 1.9. If you tapped the From field, this window is titled Sender; if you tapped the To field, it’s Recipient; and if you tapped the CC field, it’s CC. Your contact form may have more or less information than the one shown in the figure.
Figure 1.9. Using the From line in an email to create a new contact.
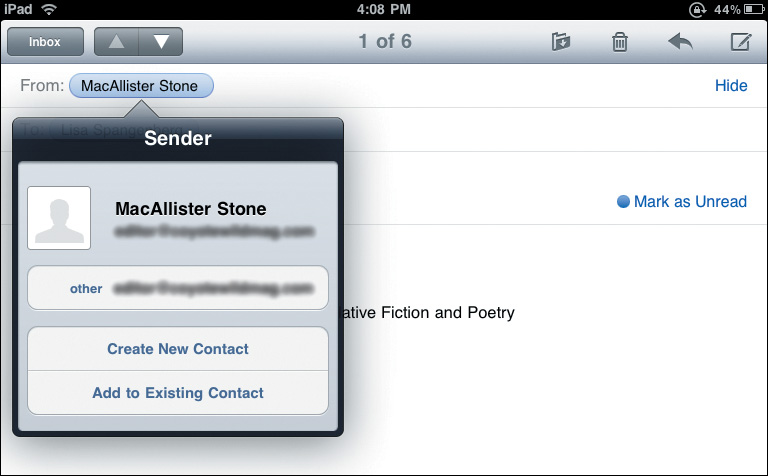
The email address used in the email is already filled in for you. Below the address are two buttons: Create New Contact and Add to Existing Contact.
- Tap Create New Contact.
The popover (Sender, Recipient, or CC) is replaced by the New Contact form (Figure 1.10).
Figure 1.10. New Contact form.
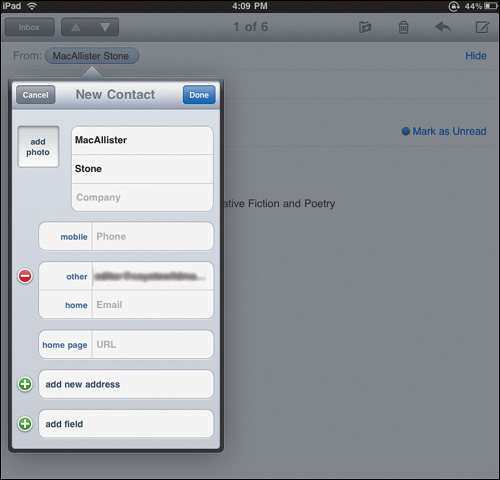
The Contacts app works in part by matching email addresses, so if you have a contact who has more than one email address, you may accidentally create a second contact for that person. When in doubt, tap the Add to Existing Contact button instead of Create New Contact. You’ll see a list of all your contacts in a popover. If the contact doesn’t already exist, just tap Cancel, and you’ll return to the popover shown in Figure 1.9, where you can tap Create New Contact.
- Fill out the First and Last name fields (if your correspondent doesn’t use them as part of his or her email address).
- Tap the blue Done button in the top-right corner to save the new contact information and close the New Contact form.
You’ll see a contact form similar to Figure 1.11. You can edit the information in this form, as we show you in the following task.

Editing a contact created from an email address:
- Tap the Edit button in the contact form (refer to Figure 1.11) to edit or add to the existing information.
The form expands as shown in Figure 1.12.
Figure 1.12. Expanding a contact form.
- Edit or enter new information in any of the fields.
- If you want to add an image to the contact, tap the Add Photo rectangle in the top-left corner, and insert an image from the iPad’s Photos app.
- Tap the blue Done button in the top-right corner to save your changes and close the form.
Adding contact data from an email body:
- Find an email with an email address in its body that you want to add to a contact.
You can also add a street address, phone number, or URL (see the nearby sidebar “Adding Other Kinds of Data to Contacts from Mail”), but in this task, we’re going to show you how to add an email address. The basic procedure for adding all the other types of contact data is the same, though the contact form will look slightly different for each type.
- Tap and hold the address until you see a popover similar to the one shown in Figure 1.13.
Figure 1.13. Contact options for an address in an email body.
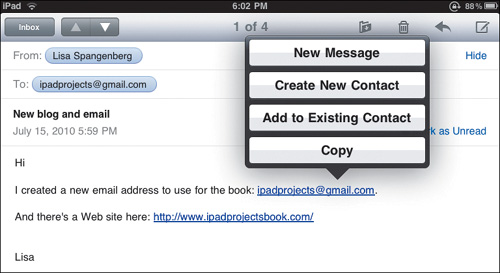
The “tap and hold” part is important. If you merely tap an email address, Mail assumes that you want to send an email immediately, so it creates a blank email form with the tapped address placed in the To field.
- Tap one of the following buttons to accomplish the associated task:
• New Message, which creates a new email for you, already addressed to the email address you tapped
• Create New Contact, which opens a New Contact form with the email address already filled in (refer to Figure 1.9 earlier in this project)
• Add to Existing Contact, which lets you select and modify an existing contact in the Contacts app
• Copy, which places the email address on the iPad’s clipboard so that you can paste it into another application or a draft email
At the bottom of every contact form, just to the right of the Edit button, is a Share button. Tap this button to attach a .vcf (vCard) file to an email. The recipient can automatically add the information in the vCard to his Contacts app or another contact database that supports the .vcf format. We show you how to use this feature in the next task.
Sharing a contact entry:
- Open an entry in the Contacts app that you want to share via email (Figure 1.14).
Figure 1.14. Contact form with Share button visible.

- Tap the Share button in the bottom-right corner.
(You may have to scroll down the form to see the Share button, depending on how much information the contact contains.)
You see a blank email form, ready to be addressed, that includes a vCard attachment. The icon for the vCard looks like a small card with a blue human figure.

- Complete the email form by adding a recipient and a message; then send it.
Your recipient probably can simply tap (on an iPad) or double-click the icon to add that information to her own contacts list.
Draft an email
Sometimes when you’re writing an email, you need to set it aside and return to it later. Mail will save a copy of an unfinished email for you as a draft. You can find it in the special Drafts folder in the account that would have sent the mail, had you finished writing and tapped Send.
Saving a draft email:
- Tap the gray Cancel button in the top-left corner of the email form.
You see a popover with a red Delete Draft button and a gray Save Draft button (Figure 1.15).
Figure 1.15. Email draft options.

- Tap Save Draft.
The draft is saved to the Drafts folder for that email account.
Manage your mailboxes
If you have multiple devices that can check email and multiple email accounts, the best mail-management tip we can offer you is to let your email server manage mail for you. Leaving your mail on the server and letting the server be the primary email source means that you’ll see the same mailboxes—and find the same messages in the same read or unread states—on all your devices.
Navigating your mailboxes may mean navigating multiple email accounts. The iPad Mail app has a separate Inbox for each account, as well as a unified All Inboxes folder that displays the Inbox contents for all email accounts. (For more information on the latter folder, see the “All Inboxes” sidebar at the end of this project.)
Another challenge associated with email is spam. People we don’t know send us email we don’t want. When you scan your Inbox, one way to isolate the real mail from spam (some legitimate bulk mail sent to mailing lists isn’t spam) is to see whether a particular piece of mail was sent to you alone or to you and a bunch of other people. In the following task, we show you how.
Turning on Show To/Cc Label to check for spam:
- Launch the Settings app on your iPad to open the Settings screen.
- Tap Mail, Contacts, Calendars in the Settings column.
You see the pane shown in Figure 1.16.
Figure 1.16. The Mail, Contacts, Calendars pane.

- Tap the switch to the right of Show To/Cc Label to set it to On (Figure 1.17).
Figure 1.17. Set the Show To/Cc Label switch to On.

 From now on, popovers listing mail in your Inbox and other mail folders display a small gray To icon next to messages addressed only to you.
Deleting a single email:
- Open an email that you want to delete.
- Tap the trash-can icon in the top-right corner of the message.
 The email shrinks and disappears into the trash can in what Apple calls the genie effect.
If you happen to delete an email by mistake and realize your error immediately (or very soon thereafter), you can recover the email by opening the Trash folder associated with the account in question (by tapping the trash-can icon) and moving the email from Trash to your Inbox.
Depending on your email account settings and the settings of your ISP’s mail server, mail that you delete on your iPad may remain in a Deleted Email or Trash folder for a while. Deleting the email in that folder should get rid of it permanently.
You can also delete or move several emails from one mail folder to another at the same time, as we show you in the next task.
Deleting multiple emails:
- Tap a mail folder on your iPad.
You see a popover similar to the one shown in Figure 1.18.
Figure 1.18. A mail list in Mail.
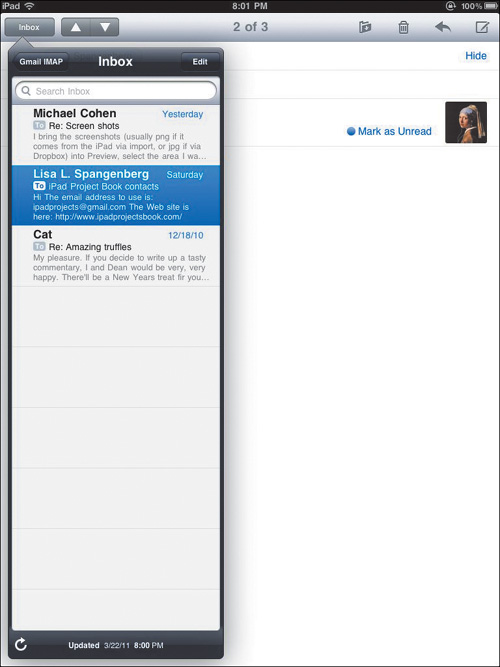
- Tap the Edit button in the top-right corner of the popover.
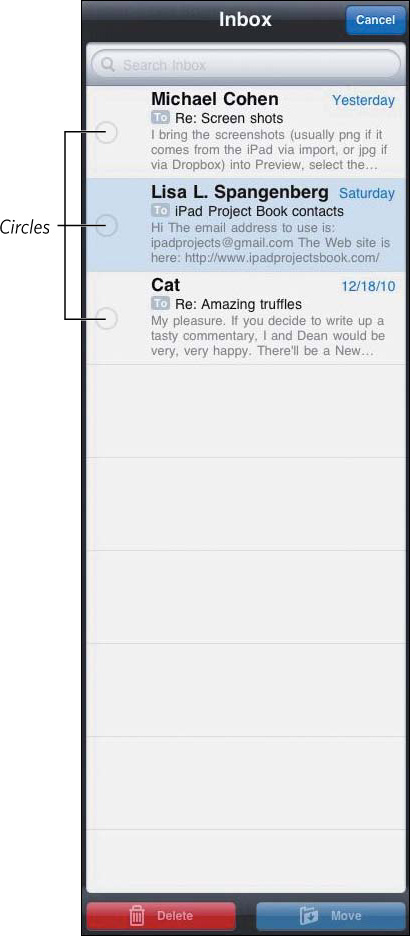
You see a new popover listing the email in that folder, with a circle to the left of each message (Figure 1.19).
Figure 1.19. A mail list, ready to be edited.
- Tap the circle to the left of a message that you want to delete.
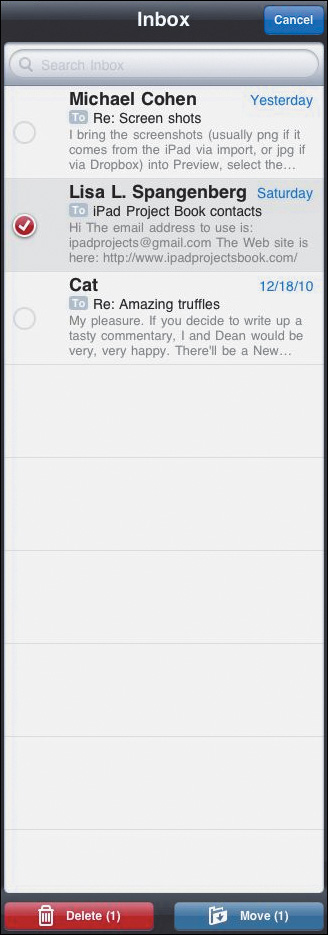
The circle turns red with a white check in its center (Figure 1.20).
Figure 1.20. Selecting mail for deletion.
- Repeat step 3 to select as many emails as you want.
- When you’ve selected all the emails that you want to delete, tap the red Delete button at the bottom of the popover.
The selected emails disappear (via the genie effect) into the top-left corner of the popover.
For a Gmail account, you may see a red Archive button instead of a Delete button on iPads using iOS 4.2 and later. Archived mail is placed in your Gmail account’s All Mail folder. To delete mail, move it to the Gmail account’s Trash folder. You can disable this feature by choosing iPad Settings > Mail, Contacts, Calendars > Gmail Account > Archive Messages.
Any time you see a list of emails in a floating Mail window, you can swipe a finger across an individual email in the list and then tap the red Delete button to delete it. Tap the blue Done button when you’re ready to return to reading email.
Moving a single email to a different folder:
- Open an email that you want to move from one mailbox to another.
- Tap the folder icon in the top-right section of the window.
 You see a popover listing your mail folders, similar to the one shown in Figure 1.21 (though likely with very different folders).
Figure 1.21. List of mail folders for a single email account.
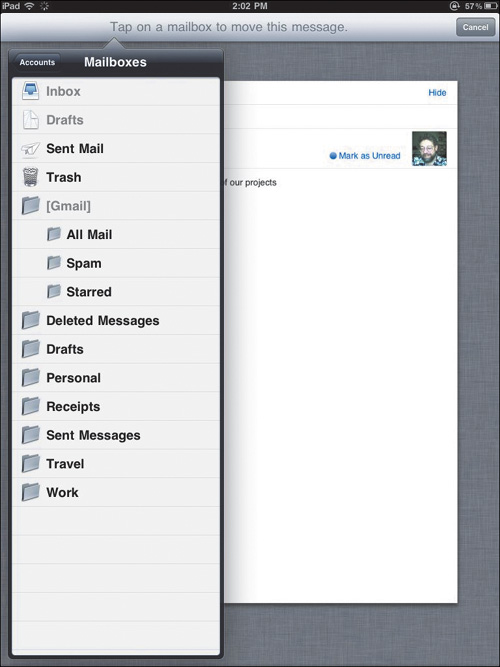
- Tap the folder to which you want to move the open email.
The email shrinks into that folder via the genie effect.
Moving multiple emails to a single folder:
- Open a mail folder.
You see a popover listing the mail in that folder (similar to the one shown in Figure 1.18 earlier in this project).
- Tap the Edit button in the top-right corner of the popover.
You see a new popover (similar to the one shown in Figure 1.19 earlier in this project).
- Select the messages you want to move by tapping them.
The gray circle to the immediate left of each selected email becomes a red circle with a white check in it (Figure 1.22).
Figure 1.22. Selecting multiple emails in a list to be moved to a new folder.

- Tap the blue Move button in the bottom-right corner of the popover (not visible in Figure 1.22).
You see a list of mail folders similar to the one shown in Figure 1.21 earlier in this project.
- Tap the destination mailbox or folder in the popover.
You see the emails shrink into that folder via the genie effect, and the iPad returns you to your open email.
- Tap the Mailbox button in the top-left corner of the All Inboxes window to display a popover list of Mail’s Inboxes and, below that, a list of all the accounts (Figure 1.23).
Figure 1.23. List of mail inboxes and accounts.
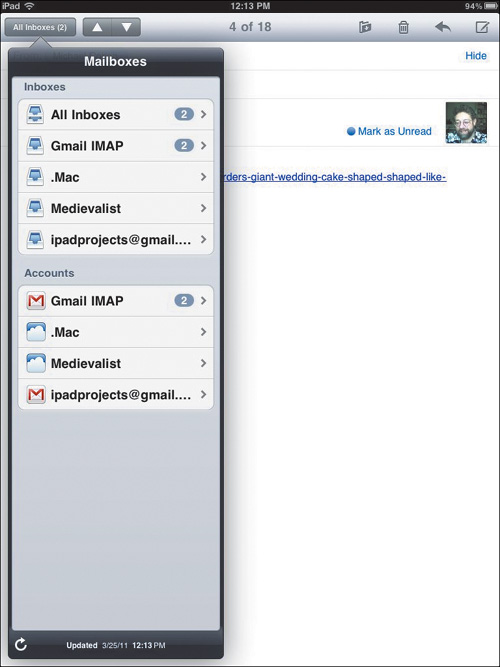
- Tap an Inbox to see just that account’s Inbox.
- Tap an account to see a hierarchical list of all that account’s mailboxes.
- Tap a mailbox to see its contents.
Contact and Calendar Management Project
Software needed: None
iPad model: Any
Additional hardware: None
Earlier projects in this chapter show you how to move your information from your computer to your iPad. This simple project helps you arrange and view your information in different ways after it’s on your iPad.
Suppose that you like to look up your contacts by first name, and we like to look up ours by last name. Although this scenario may seem like a case of “You say po-tay-toe, and I say po-tah-toe,” wars have been fought over less. (No, really! Check out the War of Jenkins’ Ear.) Therefore, in an attempt to foster universal harmony and peace among all people of goodwill, follow along as we show you the simple settings you can control to tailor the way you interact with your information on your iPad.
Sort your contacts
Our trivial example is actually not so trivial. A business user may want her contacts to be arranged by surname, just as in a phone book or a corporate directory, but someone whose contacts list consists mostly of friends and relatives may well want to find his contacts by those names he knows best: first names.
You can sort your contacts either way. What’s more, no matter how you sort them, the iPad offers a way to present those contacts with the first name shown either before or after the last name.
Changing the sort order and presentation of contact names:
- Tap Settings > Mail, Contacts, Calendars.
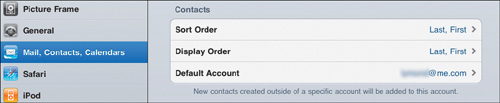
- In the Mail, Contacts, Calendars screen, swipe down until you see the Contacts section (Figure 1.24).
Figure 1.24. The sort settings for contacts are near the bottom of the screen.
- Tap Sort Order to open the Sort Order screen.
- Tap the sort order that you prefer.
- At the top of the Sort Order screen, tap Mail, Contacts, Calendars and then tap Display Order.
- In the resulting Display Order screen, tap the display order that you prefer.
In case you don’t know what we (and the iPad) mean by display order, see Figure 1.25.
Figure 1.25. Two of this book’s authors listed in the Contacts app in each of the available display orders.


- Press the Home button to close the Display Order screen and return to the home screen.
- Open the Contacts app.
Your contacts appear in the sort order that you specified, with each contact appearing in the specified display order.
Set a default contacts account
On your iPad, you can have contact lists from a variety of sources: MobileMe, Google, Microsoft Exchange, and more. So what happens when you create a new contact on your iPad? Where does it go? You can specify that by setting a default contacts account.
Setting a default account for new contacts:
- Tap Settings > Mail, Contacts, Calendars, and then, in the Mail, Contacts, Calendars screen, swipe down until you see the Contacts section.
- Tap Default Account.
- On the Default Account screen, tap the account into which you want your new contacts to go.
Set a calendar
Your iPad’s Calendar app can display events from a lot of calendars. You can have a Home calendar, a Work calendar, a Holidays calendar, a Bills Due calendar, and more. Adding to the fun, the Calendar app can display calendars from several sources: those that come from your computer, those that you sync with MobileMe, those to which you subscribe, and so on. But on what calendar do the events that you create on your iPad go?
That’s where the default calendar comes in. You can (and should) specify a default calendar so that when you create an event, you don’t have to worry about what calendar will receive it. Unless you specify otherwise, newly created events end up in your default calendar.
Although you can subscribe to and sync with a plethora of calendars from various sources, the iPad doesn’t give you a way to create new calendars directly on it.
Setting a default calendar:
- Tap Settings > Mail, Contacts, Calendars.
- Swipe down the resulting Mail, Contacts, Calendars screen until you see the Calendars section, way down at the bottom.
- Tap Default Calendar.
The Default Calendar screen appears, listing some or all of the calendars displayed by your iPad’s Calendar app (Figure 1.26).
Figure 1.26. You can pick a default calendar from those on your iPad.
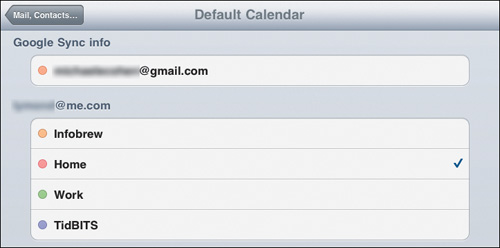
- Tap the calendar that you want to use as your default.
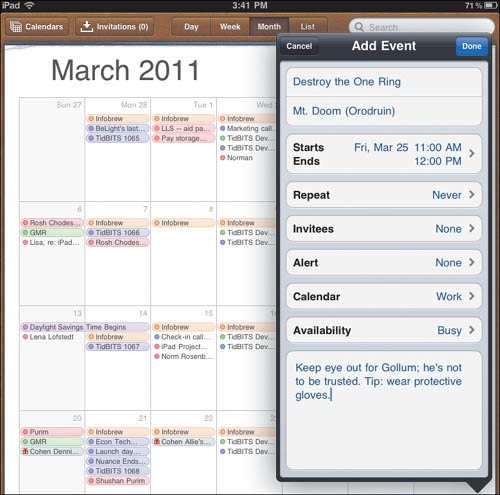
The next time you create an event in the Calendar app, the event is placed in your default calendar—that is, unless you choose another calendar for the event when you create it. For an example, see the Calendar setting in the Add Event dialog shown in Figure 1.27.
Figure 1.27. You can assign an event to a nondefault calendar when you create it.
Subscribe to a calendar
In the preceding section, we discuss calendars to which you subscribe. You may be wondering “What’s that all about?” Here’s what: Your iPad can display calendars that use the iCalendar format. Many people and organizations create calendars in that format and put them on the Web. If you like baseball, for example, you can find such calendars on the Major League Baseball site for your favorite teams. You can view such calendars, but you can’t modify them.
Here, we show you how to subscribe to a Web-based calendar that presents daily history trivia as served up by a cartoon coffee bean. (Yes, the Web is stranger than you can imagine.)
Subscribing to a Web-based calendar:
- Tap Safari, and go to http://homepage.mac.com/lymond/infobrew.html.
This Web page contains the most current pieces of coffee-flavored history trivia.
- Scroll down to the bottom-left corner of the page, and tap the link titled Subscribe to Infobrew Calendar.
- In the dialog that appears, tap Subscribe.
- In the confirmation dialog, tap View Events.
The Calendar app opens, and you can see the Infobrew calendar entries.
If you don’t want that calendar anymore (Infobrew, like coffee, is an acquired taste), getting rid of it is easy; just follow the next set of steps.
Removing a Web-based calendar subscription:
- Tap Settings > Mail, Contacts, Calendars.
- In the Accounts list, tap Subscribed Calendars.
- On the Calendars screen, tap the calendar you want to delete.
- At the bottom of the calendar information dialog that appears, tap Delete Account.
- In the Delete Account dialog that appears, tap Delete.
The calendar account is removed from your iPad, and its entries no longer appear in the Calendar app.
Hear calendar alerts
The calendar-alert settings are relatively minor—unless you miss an appointment or invitation because your iPad happened to be asleep at the critical time. The iPad has two sound-related settings that are associated with calendars: Calendar Alerts and New Invitation Alerts. When these settings are turned on, your iPad makes a sound when a calendar event is set and when one of your calendars receives a new invitation.
Invitations go directly to one of your calendars in certain types of mail accounts, such as accounts on Microsoft Exchange servers.
Turning on alert sounds:
- Tap Settings > General > Sounds to open the Sounds screen.
- If the Calendar Alerts switch is off, tap it to turn it on.
- In the Settings pane on the left side of the screen, tap Mail, Contacts, Calendars.
- Swipe down the resulting Mail, Contacts, Calendars screen until you see the Calendars section at the bottom.
- If the New Invitation Alerts switch is off, tap it to turn it on.
From now on, whenever one of your calendars needs to alert you about an event or an invitation, your iPad makes a sound.
Use Time Zone Support
The Time Zone Support feature on your iPad seems to cause no end of confusion, if the number of posts on the Internet about it means anything. We’ll try to clarify.
Your iPad has a Time Zone setting in its Date & Time settings pane. When you set your device for a different time zone, all the events in your calendars shift their times to accommodate that change.
Your iPad also has a Time Zone Support setting in its Calendar settings pane. When you turn that setting on and set a time zone, all the events in your calendars shift their times to match that time zone, regardless of what your iPad’s Date & Time time-zone setting happens to be.
We imagine that you’re still confused—enough so that you may have started drinking a little too early in the day. Put down that bottle. Here’s a simple example that shows how you might use this confusing feature.
Suppose that you’re traveling from Los Angeles to Boston via a connecting flight in Chicago. Your flight from Los Angeles leaves at 8 a.m. Pacific time. According to your flight itinerary, your connecting flight to Boston from Chicago leaves at 2 p.m. Central time. Here’s what you do:
- On your calendar, enter two events: your takeoff at 8 a.m. and your connecting flight at 2 p.m.
(Yes, even though the second flight takes off at noon Los Angeles time, you don’t need to do the math to figure that out.)
- Turn on Time Zone Support, and set the time zone for Los Angeles.
- Go catch your 8 a.m. flight out of LA.
- When you land in Chicago, your iPad’s clock is 2 hours off, so set your iPad’s Date & Time time-zone setting to Chicago time.
Now your iPad’s clock is correct, but because you turned on Time Zone Support, the events in your calendars don’t move. The departure time for your connecting flight is still 2 p.m. on your calendar, which is where you want it to be.
That’s all there is to it. For everything to work properly, of course, your iPad needs to have its Date & Time setting properly set for Los Angeles when you start.
Setting the Date & Time time-zone setting:
- Tap Settings > General to open the General settings screen.
- Tap Date & Time to open the Date & Time screen.
- Tap Time Zone to open the Time Zone screen.
- In the search field at the top of the screen, begin to type the name of the closest big city in your time zone.
A list of city names appears below the search field (Figure 1.28).
Figure 1.28. Pick a city in your time zone.
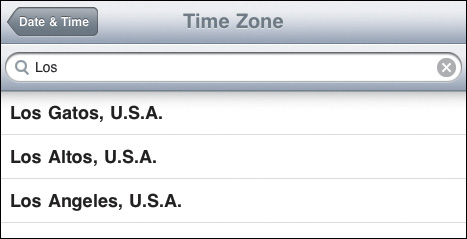
- Tap a city that’s in the same time zone as yours.
- If necessary, tap the Date & Time arrow at the top of the screen to return to the Date & Time page, and set your iPad’s clock to the current time.
Setting Time Zone Support:
- Tap Settings > Mail, Contacts, Calendars.
- Swipe down the resulting Mail, Contacts, Calendars screen until you see the Calendars section; then tap Time Zone Support.
The Time Zone Support screen appears.
- If the Time Zone Support switch is off, tap it to turn it on.
- Tap Time Zone to open the Time Zone screen.
- In the search field at the top of the screen, begin to type the name of a city in the time zone that you want.
A list of cities appears below the search field.
- Tap the city that’s in the time zone you want.
You’re done!
Turn off Time Zone Support when you’re not using it. If it’s on and set for a different time zone from the one you’re in, your calendar events may appear at the wrong times the next time you sync your iPad.
Get directions
This feature is a fun one to use and a real time-saver. In your Contacts app, every street address for each contact is linked to your iPad’s Maps app. Here’s how to use it.
Seeing a contact’s address with the Maps app:
- Open the Contacts app.
- Choose a contact who has a street address.
- Tap that street address.
The Maps app opens, showing the location of the address you just tapped.
This feature is particularly helpful when you’re traveling. Suppose that you’re in a hotel, and you have a meeting with a client at her office. It’s a simple matter to get directions from your hotel to your client’s office. Read on.
Getting directions from your location to a contact’s address:
- In the Contacts app, tap a contact’s address.
The Maps app opens, with your contact’s address pinpointed on the map and the address displayed in the search field in the top-right corner.
- Tap the Directions button in the top-left corner of the map.
The contact’s address appears in the rightmost field at the top of the map, which is the Destination field. In most cases, your current location appears in the Start field.
- If your current location doesn’t appear in the Start field, tap the Start field and then choose Current Location from the Recents list.
A blue line highlights the route on the map from your current location to the destination. At the bottom of the screen is a blue panel that offers you detailed instructions for getting there by walking, driving, or taking public transportation (Figure 1.29).
Figure 1.29. You can get there from here—just tap Start and follow the directions.

- In the blue panel, tap the icon for the method of transportation you prefer, and then tap Start.
A step-by-step list of instructions for getting to the destination appears.
iPad Protection Project
Software needed: MobileMe account (optional)
iPad model: Any
Additional hardware: None
In the 1976 film Marathon Man, the malevolent Dr. Christian Szell asks the protagonist, “Is it safe?” If he’d been asking about your iPad, the answer would have to be “Probably not.”
As configured right out of the box, the iPad is open to anyone. Pick it up, press the Sleep/Wake button, and drag the onscreen slider to the right—or, even easier, just flip open the Smart Cover on an iPad 2—and all your iPad’s secrets are revealed. Naturally, this revelation isn’t much of a problem if you live alone and your iPad stays at home with you. (Trust us—your cat doesn’t care what’s on your iPad.) But the iPad is a very portable object, and an attractive one, too; it cries out to be picked up, tried out, played with. If you leave it lying around, someone—even someone you know, trust, and love—can easily find it irresistible.
There isn’t any way to make the iPad completely impervious to prying eyes. A knowledgeable person with enough time and the right software can crack almost any security scheme. Nonetheless, you can protect your iPad’s contents from the casual snooper and even give determined data thieves pause.
Also, if you share your iPad with your children from time to time (it’s a great way to keep kids entertained on long car trips, for example), you can protect them from content that might be too mature for young eyes and ears.
Finally, you can even have the iPad tell you where it is if you misplace it (easy to do; these things love to hide under magazines and pillows) or if someone “accidentally” wanders off with it.
Fasten the passcode lock
The iPad has a built-in passcode lock that you can use to halt snoopers dead in their tracks when they wake it up. As soon as a snooper slides the Slide to Unlock slider or opens the Smart Cover, he’s greeted by a dialog demanding a passcode. Without that passcode, all the snooper can see is your Lock Screen wallpaper. You can choose a simple passcode that consists of a four-digit number (easy to remember, time-consuming to crack) or a longer passcode that combines letters, numbers, and punctuation (even safer, but harder to remember and to type). Which kind of passcode you choose depends on just how much trouble you want to give a snooper.
When you set a passcode, all versions of iOS 4 encrypt the data on your iPad, making your information much harder to steal, even for sophisticated data thieves. If you’ve upgraded an original iPad from iOS 3, however, the encryption may not be complete. Apple has provided instructions for encrypting all the data on such iPads; see “iOS 4: Understanding data protection” at http://support.apple.com/kb/HT4175.
Setting a passcode:
- On the home screen, tap the Settings app’s icon.
- On the left side of the Settings screen, tap General.
- On the right side of the resulting General screen, tap Passcode Lock.
The Passcode Lock screen appears (Figure 1.30).
Figure 1.30. Use the Passcode Lock screen to set a passcode and decide what kind of passcode to use.

- (Optional) Tap the Simple Passcode switch to turn it off if you want to use a longer, safer passcode that combines letters, numbers, and punctuation.
- Tap Turn Passcode On.
The Set Passcode dialog appears (Figure 1.31). If you chose to turn off Simple Passcode in Step 4, the onscreen keyboard also appears so that you can type a complicated passcode.
Figure 1.31. Set either a simple four-digit passcode (left) or a longer, safer one (right).

- Enter the passcode of your choosing and then repeat it when you’re asked to confirm the passcode.
As soon as you enter the passcode, the passcode lock takes effect. By default, the next time you put your iPad to sleep and then wake it up, you must enter the passcode in the Passcode Lock screen—even if you put the device to sleep for only a few seconds. You can change how long the iPad has to be asleep before the passcode lock takes effect, however.
If you want to use your iPad’s picture-frame feature when you have a passcode enabled, tap the Picture Frame switch on the Passcode Lock screen to turn it on.
Changing the passcode-lock interval:
- In the Passcode Lock screen (see the preceding section), tap Require Passcode.
- In the Require Passcode screen, tap the length of time you want to elapse before the lock kicks in.
As the screen points out, shorter intervals are safer.
- (Optional) At the top of the Require Passcode screen, tap Passcode Lock; then, in the Passcode Lock screen, tap the Erase Data switch to turn it on.
This feature guards your iPad against those who might abscond with it and then try passcode after passcode to unlock it. After ten attempts, your iPad is erased, so the thief has only your valuable iPad, not the possibly even more valuable data that it contains.
If you manage to erase your data accidentally, you can recover it from the automatic backup that iTunes creates each time you sync your iPad with iTunes—another good reason to sync with iTunes periodically, even if you normally sync your information wirelessly. See the Apple article at http://support.apple.com/kb/HT1414 for details on restoring your iPad.
Think of the children—and the adults
As we mention earlier in this project, the iPad is a wonderful child-distraction device. Even pudgy toddler fingers can manage to tap their way around it. But your iPad may contain some items—such as movies, songs, or TV shows—that you really don’t want your toddler to see. Neither do you want your 9-year-old daughter wandering into the iTunes Store and buying a few hundred dollars’ worth of tunes to die for. For that matter, if you share your iPad with anyone, child or adult, you may want to make sure that this person won’t mess up your mail-account settings or inadvertently add a few dozen “friends” to any multiplayer games you may enjoy.
You can set restrictions to guard against the accidental viewing of certain media or the semiaccidental use of certain apps.
Setting up restrictions:
- Tap Settings > General > Restrictions to open the Restrictions screen.
- At the top of the screen, tap Enable Restrictions.
A passcode dialog appears, similar to the one you use to set simple passcodes (refer to Figure 1.31 earlier in this project).
- Tap out a four-digit passcode of your choosing and then repeat it to confirm the passcode.
This passcode can be the same as your simple passcode (refer to “Setting a passcode” earlier in this project), but for better security, you should choose a different one.
After you establish the passcode, the rest of the choices in this screen become available. With them, you can disallow access to certain apps and features, as well as restrict access to certain types of media based on parental ratings (Figure 1.32).
Figure 1.32. Restrict access to various apps, actions, and types of content here.

- Set your restrictions:
• Purchases, privacy, and Web surfing. In the Allow section, for example, you can make the iTunes Store inaccessible, so that guest users can’t buy music or video; you can block the installation or deletion of apps; and you can hide the built-in YouTube and Safari apps to keep young, inquisitive eyes from gazing on some of the Internet’s seamier sights. If you have an iPad 2, you can also disable the cameras and block the use of FaceTime (useful if you share your iPad with hormonally overloaded adolescents).
Disabling Safari doesn’t guarantee that iPad users can’t get onto the Web; many apps contain built-in browsers that continue to work even when Safari is disabled.
• Location and accounts. If you’re worried that your iPad might violate your privacy by reporting your current location to a third party, you can tap Location in the Allow Changes section to specify which apps can (and can’t) use the iPad’s Location Services feature, and after you’ve chosen a set of apps that can use Location Services, you can lock down those settings. To protect your current Mail, Calendar, and Contact account settings, you can tap Accounts in the Allow Changes section.
• In-app purchases. You can further protect your pocketbook by turning off In-App Purchases in the Allowed Content section.
• Movies and TV shows. In the same Allowed Content section, you can tap Ratings For to specify the national ratings system that the iPad uses when you restrict access to movies and TV shows. You can restrict movie viewing to G and PG movies when the ratings are set for the United States, for example. Switch the Ratings For setting to France instead, and you can restrict movies by the age-level ratings used in that country.
• Explicit songs and apps. You can ban music with explicit lyrics as listed in the iTunes Store, and you can hide apps that have age restrictions as listed in the App Store.
• Games. The iPad’s Game Center allows you to participate in multiplayer games and add friends to your gaming environment. You can disable either action in the Game Center section of the Restrictions screen.
This system isn’t perfect. Determined children (and childlike adults) can find their way around seemingly impervious obstacles, so you still need to exercise some oversight. But the available restriction options do go a long way toward making your iPad more child-friendly and sharable.
Search and recover with Find My iPad
Lost may have been great TV entertainment, but it’s not so entertaining when it’s your precious iPad that’s lost. By using MobileMe’s Find My iPad feature, however, you may be able to find your lost device and rescue it from the island. Even if you can’t rescue it, you can still use the Find My iPad feature to lock your iPad with a new passcode or even wipe out its contents so that your information can’t be hijacked and misused.
You don’t need a MobileMe account to use the Find My iPad feature, however. All you need is a free Apple ID. Getting an Apple ID is easy, and when you have one (or if you do have a MobileMe account), activating Find My iPad takes just a few taps.
Getting a free Apple ID:
- Tap Settings > Mail, Contacts, Calendars.
- At the bottom of the Accounts list on the right side of the screen, tap Add Account, and then, in the Add Accounts pane, tap MobileMe.
The MobileMe dialog appears (Figure 1.33).
Figure 1.33. Create a free Apple ID via MobileMe.
- Tap Create Free Apple ID.
A series of New Apple ID dialogs appears, requesting information like the country where you’re located, your date of birth, and—most important—an email account that will serve as your Apple ID.
- Supply the information requested in each of the New Apple ID dialogs, tapping Next as you finish filling out each one.
After you supply the required information, you’re asked to agree to the MobileMe terms of service.
- Read the terms of service and then tap Agree.
Naturally, if you don’t agree, you can’t use the service.
After you agree, Apple sends a verification email to the email address you specified in Step 4. If you’ve already set up a mail account on your iPad for that email address, you can open the verification email on your iPad; otherwise, you should be at a computer that can receive email for that address.
- In the verification email that Apple sends you, click the link to verify the account.
If you received the email on a computer, your Web browser opens to a page where you can sign in to MobileMe with your Apple ID and password. On your iPad, you see a sign-in screen.
- Sign in with your Apple ID and password to complete the account-creation process.
Enabling Find My iPad:
- Tap Settings > Mail, Contacts, Calendars.
- In the list of accounts on the right side of the Mail, Contacts, Calendars screen, tap your MobileMe account.
An account-settings dialog appears (Figure 1.34).
Figure 1.34. Find My iPad is linked to your MobileMe account, whether that account is one you pay for or is associated with a free Apple ID.
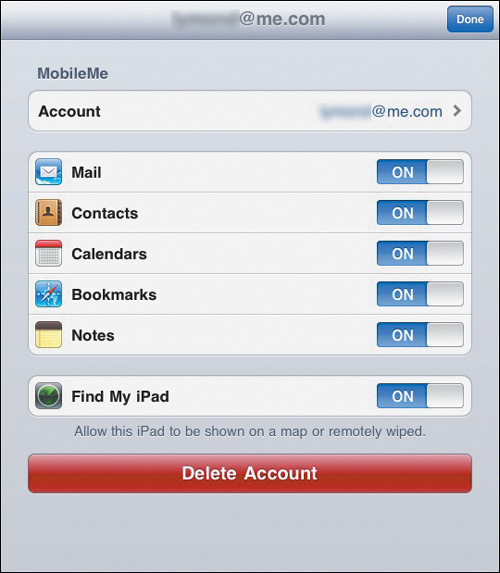
- Tap the Find My iPad to switch to set it to On.
- Tap the blue Done button in the top-right corner.
Now that Find My iPad is activated, you can ask Apple to locate your device for you, which it can do as long as (a) your iPad is awake, (b) your iPad is sleeping within range of a Wi-Fi network connected to the Internet, or (c) your 3G iPad is within range of the mobile-phone network.
You can also ask Apple to find your iPad with its Find My iPhone service, which works with iPhones, iPod touches, and iPads. You can use this service in a Web browser, or you can download and use the free Find My iPhone app from the App Store.
Finding your iPad with a Web browser:
- Go to www.me.com, and sign in with your MobileMe ID or Apple ID and its associated password.
If you have a free Apple ID, a map appears after a few moments, pinpointing your iPad’s current whereabouts. You can skip to step 4.
If you have a paid MobileMe account, however, you need to complete the next two steps.
- Click the cloud symbol in the top-left corner of the browser window and then click Find My iPhone.
- Enter your MobileMe password again.
The map appears, with your iPad pinpointed on it.
- Decide what to do about your iPad.
When you click your iPad’s location on the map (Figure 1.35 on the next page), you can choose to have your iPad display a message and play a sound for 2 minutes (useful if you’ve misplaced your iPad around the house; just listen for the sound to track the wandering iPad down).
Figure 1.35. Choose what to do with the iPad that MobileMe found.
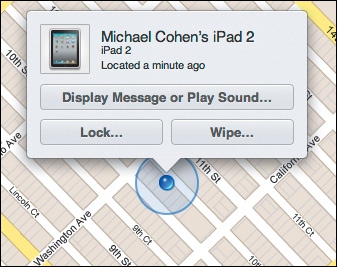
If, however, your iPad is in some strange, unanticipated place, in the grasp of some foul iPad-snatcher, you can set a new passcode for your iPad (to prevent the evildoer from accessing your information easily) or even erase the information on your iPad (if you suspect that the evildoer is particularly nefarious and dastardly). See “Fasten the passcode lock” earlier in this project for details.
If you do choose to wipe your iPad’s information and are fortunate enough to recover the device later, you can use the Restore feature to put the most recent backup of your information back on your iPad. See http://support.apple.com/kb/HT1414 for more information about restoring your iPad. This tip also works if you have to obtain a replacement iPad instead.
Weave a Wiki Project
Difficulty level: Intermediate
Software needed: Trunk Notes 2.4.3 ($3.99)
Optional software: TextExpander touch app ($4.99), Dropbox (free)
iPad model: Any
Additional hardware: None
A wiki is a Web site that allows you to create and edit any number of interlinked Web pages or documents via a Web browser, using a simplified markup language called Markdown to control formatting, layout, and linking. Wikis were invented by programmer Ward Cunningham, who described a wiki as “the simplest online database that could possibly work.”
Wikis are often used to share information, organize notes, and create collaborative works such as the best-known wiki: Wikipedia (http://en.wikipedia.org/wiki/Main_Page).
The Trunk Notes app, which you use in this project, gives you an efficient, simple way to organize documents and information—such as shopping lists, lists of books you want to read, recipes, and class notes—in the form of wiki pages.
Work with Trunk Notes
Before you start creating your own Trunk Notes wiki, you need to know how to browse and search Trunk Notes.
Trunk Notes is modal, which means that whenever you use it, you’re always in one of three modes: browse, edit, or search mode. If you’re in browse mode, you see an Edit button to the right of the Search field and a Home button in the bottom-left corner of the screen. If you’re in edit mode, you see a Save button to the right of the Search field. Finally, if you’re in search mode, you see a Cancel button to the right of the Search field.
Viewing Trunk Notes:
- Launch the Trunk Notes app by tapping its icon.
You see the default home page (Figure 1.36).
Figure 1.36. Trunk Notes Home page.
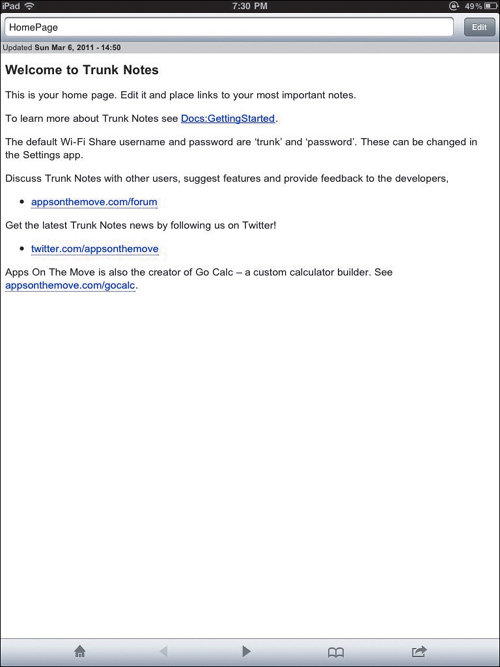
The Search field at the top of the screen displays the name of the current entry as a wikiword.
A wikiword is two or more words joined together without spaces and with each word beginning with a capital letter, like this: WikiWord.
The second sentence from the top of the home page reads To learn more about Trunk Notes see Docs:GettingStarted. The words Docs:GettingStarted are in blue and underlined to indicate that they link to a page or entry in Trunk Notes.
- Tap the Docs:GettingStarted hyperlink.
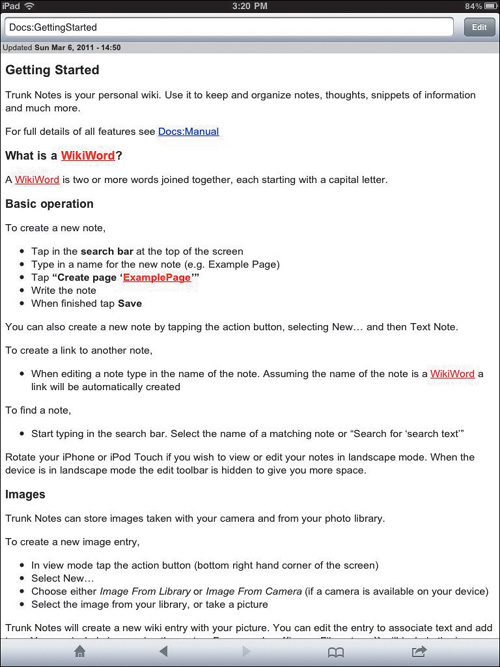
You’re taken to the Getting Started page (Figure 1.37).
Figure 1.37. Getting Started page.
At the bottom of the Getting Started page is the navigation bar (Figure 1.38)—a row of small icons used for wiki navigation.
Figure 1.38. Trunk Notes navigation bar.

Here’s how you use the navigation-bar icons:
• The Home icon, which looks like a small house, returns you to the home page from any page you’re browsing.
• The Back and Forward icons allow you to navigate your wiki based on your navigation history. Tapping the left triangle takes you to the preceding page in your Trunk Notes browsing history; tapping the right triangle takes you to the next page in your history. A triangle is grayed out if you don’t yet have any entries for that direction in your Trunk Notes history.
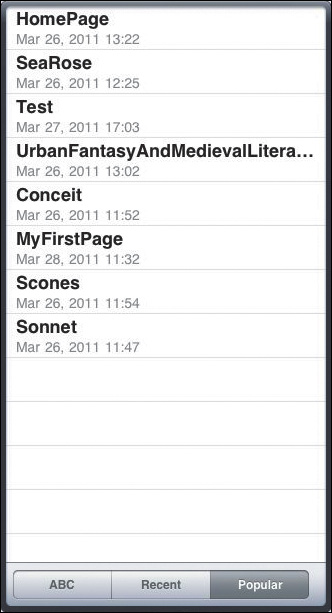
• The Bookmark icon displays a popover listing all the existing pages in your wiki, as shown in Figure 1.39 (though you won’t have the same pages). The buttons at the bottom of the popover allow you to display wiki entries sorted alphabetically by name, by age (Today, Yesterday, This Month, Earlier), and by popularity.
• Tapping the curved-arrow Action icon while you’re in browse mode displays a popover that lists the following options:
• New. This option allows you to create an image-only page by selecting an image from the Photos app or (on an iPad 2) to photograph a new image and create a page for it.
• Duplicate. This option copies the current page and lets you give the copy a new name.
Choose Duplicate to create a template containing text and images that you want to use on more than one page. You could create a note-taking template, for example, that has areas for a summary, important points, or a to-do list.
• Wi-Fi Sharing. For details on this option, see “Share your wiki” later in this project.
• Mail. Tapping Mail displays a second popover, providing the options Mail Entry, Mail Entry As Text, and Mail Backup. Mail Entry emails a formatted copy of the page to an address you supply. Mail Entry As Text sends a copy of the page in Markdown syntax. Mail Backup sends a zipped backup of your entire wiki (the current version doesn’t include images) to an email address you supply. Depending on the size of your wiki, compiling the pages and zipping them could take a while.
• Dropbox Sync. This option allows you to sync your entire wiki (via the free Dropbox app) on other iOS devices or your computer.
Searching Trunk Notes:
- If Trunk Notes isn’t open, tap the Trunk Notes icon to launch the app.
- If you aren’t on the home page (refer to Figure 1.36 earlier in this project), tap the Home icon in the navigation bar at the bottom of the page.
- Do one of the following things:
• If you’re in edit mode, tap the Save button in the top-right corner of the screen.
• If you’re in search mode, tap the Cancel button in the top-right corner of the screen.
- Tap inside the Search field at the top of the screen, and type (exactly as printed here) Docs:GettingStarted.
As soon as you start typing, the existing text in the Search field (probably the name of the Trunk Notes page you were on when you started typing) is replaced by the text you’re entering, because now you’re now in search mode.
Before you finish typing, Trunk Notes displays a list of options on a screen that resembles lined paper (Figure 1.40).
Figure 1.40. Search-results screen.

The second line has a magnifying glass to its left. Tap that icon to search for the text you entered in the body of all the Trunk Notes pages.
The remaining lines have a green check to their left, which means that those lines represent Trunk Notes entries or pages that already exist. One of the pages in the list should be Docs:GettingStarted.
- Tap Docs:GettingStarted.
Trunk Notes displays the Getting Started page (refer to Figure 1.37 earlier in this project).
Now you can find the Getting Started page any time you need help. This page contains links to other help pages and to the Trunk Notes manual.
Create Trunk Notes pages
Trunk Notes pages or entries (both terms are accurate) can be about anything you want. They can contain images, text, links to other Trunk Notes pages or to the Web, or even sound that you record with Trunk Notes.
You can create pages at any time without having to create their contents; you can always go back later to edit pages.
Creating a wiki entry:
- To create a new page, tap inside the Search field at the top of the Trunk Notes window (refer to Figure 1.36 earlier in this project).
- Type (exactly as printed here) MyFirstEntry in the Search field.
As you begin to type, the existing text in the field disappears, and you see a new page that resembles lined paper (Figure 1.41). The first line displays a green plus sign next to Create page ‘MyFirstEntry’, and the second line displays a magnifying glass next to Search for ‘My First Entry’.
Figure 1.41. The Create Page screen.

- Tap the first line (the one with the green plus sign).
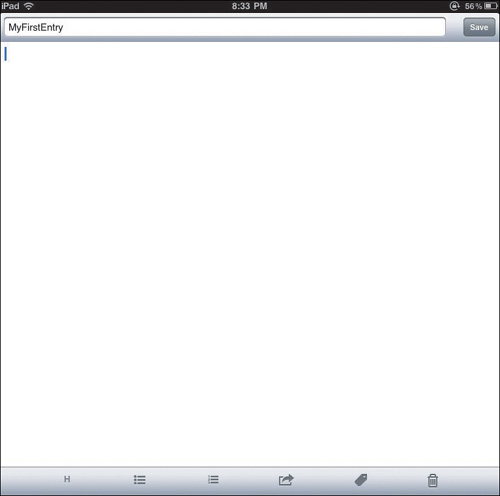
You see a new page in edit mode (Figure 1.42). You know that you’re in edit mode because you see a Save button in the top-right corner of the screen. The title of the page is in the Search field. Below that is a large blank body-text area, ready for you to type.
Figure 1.42. A blank MyFirstEntry page, ready for your text.
- Enter some text.
For now, it doesn’t matter what you type, because you’re going to delete it later.
- When you’ve entered a line or two, tap the Save button.
You’ll see something like Figure 1.43 (on the next page), though your text will probably be different.
Figure 1.43. MyFirstEntry, with text in the body of the page.

Format wiki text
Trunk Notes uses Markdown syntax for formatting (see the sidebar “Markdown Syntax” later in this section), because it’s an easy way to format text by using simple codes. But you’ll usually use the formatting buttons at the bottom of edit screens for most of your formatting. If you know HTML, you can also use most HTML tags in Trunk Notes pages.
Formatting text in Trunk Notes:
- If Trunk Notes isn’t open, open it by tapping the Trunk Notes icon.
- If the app doesn’t open to the MyFirstEntry page, search for MyFirstEntry (see “Searching Trunk Notes” earlier in this project).
- Tap the Edit button in the top-left corner of the MyFirstEntry page.
You’re in edit mode. At the bottom of the screen is a row of formatting buttons (Figure 1.44). These buttons insert Markdown codes that tell Trunk Notes how to format your text.
Figure 1.44. Formatting-bar buttons.

You can read more about Markdown in the Trunk Notes online manual at www.appsonthemove.com/Docs_MarkdownSyntax.html.
Here’s how you use the formatting-bar buttons:
• Tapping the Heading button (H) creates a heading. You can have up to five levels of subheads by tapping the Heading button up to five more times before entering the heading text. The headings get smaller with each additional level.
• Tapping the Bulleted List or Numbered List button once creates a list; tapping either button a second time creates a nested list. When you finish adding items to a list, insert two returns (using the iPad’s digital keyboard or a Bluetooth keyboard) to indicate the end of one paragraph and the start of another.
• Tapping the Action button displays a popover of options for the entry, including Clear Text, Insert Timestamp, Insert Link To, Insert, Encrypt, and Update Geotag.
• Tapping the Tag button tags an entry with descriptive keywords called tags. When you tap Tag, you can enter a new tag or search for words you’ve used before as tags; Trunk Notes displays a list of all the entries that have those tags.
• Tapping the Trash button deletes the current entry.
- Tap the Action button at the bottom of the screen.
You see a popover like the one shown in Figure 1.45.
Figure 1.45. Action-button popover.
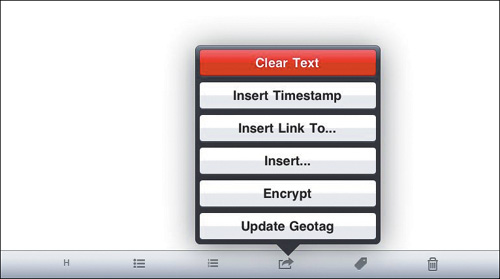
- Tap the red Clear Text button to clear all your text from MyFirstPage.
- Tap the Heading button at the bottom of the screen.
This button inserts a pound sign (#) followed by a space and tells Trunk Notes to format the following text as a heading when you save.
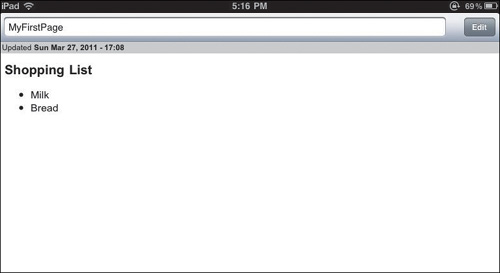
- Type Shopping List after the # and the space, and tap the Return key on your iPad keyboard to start a new line.
- Tap the Bulleted List button at the bottom of the screen.
Trunk Notes inserts the Markdown code for a bulleted-list item: an asterisk (*) followed by a space.
- Type Milk, and tap the Return key.
- Type Bread, and tap the Return key.
- Tap the Save button.
Your screen should look something like Figure 1.46.
- Tap the Edit button in the top-right corner of the screen.
Your cursor should be right after the d in Bread.
- Tap Return on the iPad’s digital keyboard and then tap the Bulleted List button at the bottom of the screen.
- Type Whole wheat and then tap the Save button.
You’ve made an indented list—a list with a sublist—that should look something like Figure 1.47.
Figure 1.47. A bulleted list with a sublist.

The TextExpander touch app, from Smile software, allows you to create snippets of reusable text and use them in any app that allows you to paste. In apps like Trunk Notes that support TextExpander touch, you can invoke TextExpander touch from within the app and save yourself a considerable amount of typing.
Adding internal links to Trunk Notes pages:
- Open Trunk Notes to its home page.
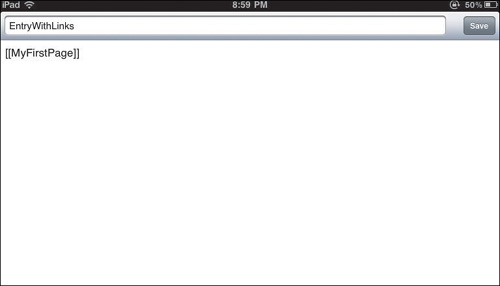
- Tap inside the Search field, and type EntryWithLinks.
- On the search-results screen, tap Create page ‘EntryWithLinks’.
- Tap the Action button at the bottom of the screen.
A popover appears (refer to Figure 1.45 earlier in this project).
- Tap Insert Link To in the popover.
A list of Trunk Notes entries appears.
- Tap MyFirstPage.
Trunk Notes inserts [[MyFirstPage]], as shown in Figure 1.48. The double brackets around a wikiword are Markdown code for a Trunk Notes page.
Figure 1.48. A page showing the Markdown code for an internal link.
- Tap the Save button.
Your page should look similar to Figure 1.49. The phrase MyFirstPage is now a hyperlink; tap it to go to that entry.
Figure 1.49. A page showing a hyperlink.

You can create a link to a Web page that will open in Safari by formatting the link this way: Put the link text in square brackets and the actual URL in parentheses, like this:
[Example link](http://www.example.com).
Adding an image to a Trunk Notes page:
- Open Trunk Notes to its home page.
- Tap inside the Search field, and type MyImageEntry.
- In the resulting edit page, tap Create page ‘MyImageEntry’.
- Tap the Action button at the bottom of the screen to display a popover.
- Choose Insert from the popover.
A new popover appears (Figure 1.50).
Figure 1.50. The Insert popover.
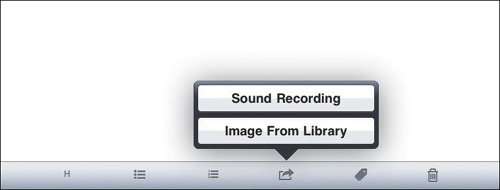
- Tap Image From Library.
Another new popover opens, listing the albums in your Photos app. Your albums will be different, but the list will look something like Figure 1.51.
Figure 1.51. The Photo Albums popover.

- Tap an album to select it.
- Tap the thumbnail of the image you want to use in your MyImageEntry page.
Trunk Notes inserts Markdown syntax that will display your image when you tap Save. This code looks something like Figure 1.52.
Figure 1.52. A page showing Markdown syntax for an image.
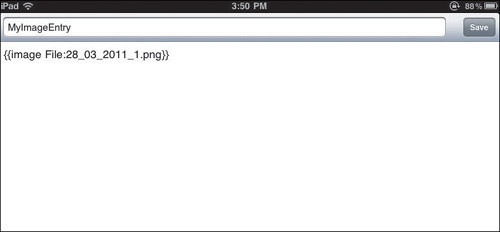
- Tap the Save button in the top-right corner of the screen.
Your entry will have a different image, of course, but should look similar to Figure 1.53.
Figure 1.53. Trunk Notes page with an image.

Share your wiki
If you share your Trunk Notes wiki on your iPad over a local Wi-Fi connection, you can browse, edit, and search for your wiki pages on your computer by using a Web browser. First, however, you need to configure Trunk Notes settings on your iPad to allow sharing.
Configuring Trunk Notes for sharing:
- Tap the Settings icon on your iPad to open the Settings screen.
- Scroll down to tap Trunk Notes in the Apps category (Figure 1.54).
Figure 1.54. The Trunk Notes panel in iPad Settings.
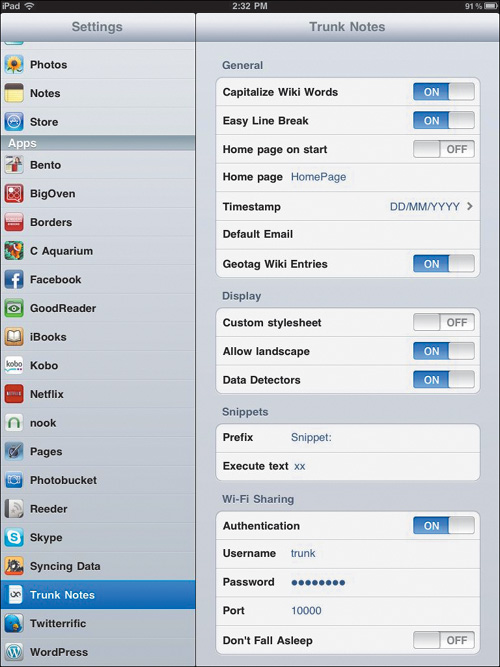
- In the Wi-Fi Sharing section at the bottom of the screen, make sure that the Authentication switch is set to On.
- Change the Username entry from the default setting (trunk).
- Change the password from the default password to something that you’ll remember easily.
- Unless you have a good reason to change the Port setting, leave it at its default setting (10000), which is part of the address Trunk Notes will use for sharing your wiki.
The Don’t Fall Asleep setting means that the Wi-Fi connection between your iPad and computer will be kept live. Instead of running down the iPad’s battery, you may want to leave Don’t Fall Asleep turned off. If your iPad falls asleep, you need to wake it again by touching the screen.
Sharing over Wi-Fi:
- Open Trunk Notes to its home page.
- Tap the Action button at the bottom of the screen.
A popover appears (Figure 1.55).
Figure 1.55. The navigation bar’s Action-button popover.

- From the popover, choose Wi-Fi Sharing.
You see a Wi-Fi Sharing window similar to the one shown in Figure 1.56. This window displays a URL for you to enter in a Web browser on your computer; this URL may differ from one time to another.
Figure 1.56. The Wi-Fi Sharing window.

- Enter the URL from this window in the address field of a Web browser on your computer.
- Tap the blue Done button in the top-left corner of the Wi-Fi Sharing window on your iPad.
- On your computer, go to the address you entered in your Web browser.
You should see the Trunk Notes home page (Figure 1.57), where you can browse your Trunk Notes pages, edit them, or create new ones.
Figure 1.57. The Trunk Notes home page, viewed in a Web browser.
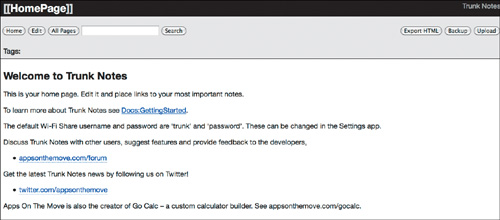
Click the All Pages button at the top of the home page to see a list of all your Trunk Notes pages.
Any changes you make will be saved to your iPad when you click the Save button in your Web browser (Figure 1.58).
Figure 1.58. The edit screen in a Web browser.
