3. Music, Books, and Movies on the iPad
In the preceding chapter, we take issue with the conventional notion that the iPad is just a media-consumption device. We think that we prove our point.
Nonetheless, the iPad really is a delightful media-consumption device if you want to use it as one. The trick is getting the media you want on it, when you want it, and in the form that you want it. This chapter shows you those tricks.
Our philosophy is this: If you’re a consumer, you owe it to yourself to be the best consumer that you can be.
Make Music Project
Software needed: GarageBand for iPad ($4.99)
iPad model: Any
Additional hardware: None
Whether or not you think that calling the iPad “magical” is an egregious example of marketing exaggeration, the first time you start to play with Apple’s GarageBand app, you may find that the adjective gains credibility.
Think of it: a home recording studio that fits into a wafer-thin slab of glass and metal, and that’s priced lower than a burger and fries. Not only that, but also, it’s a recording studio equipped with musical instruments that know how to play themselves. GarageBand may not be magical, but it’ll do until Merlin drops by with his psaltery for a jam session.
In this project, you use GarageBand’s Smart Instruments to compose and record a simple song.
Obtain the GarageBand app
If you’re a Mac owner, chances are that you’ve already seen the Mac version of GarageBand, which has shipped with every new Mac for years as part of Apple’s iLife software suite. Recently, Apple has made it available for separate purchase from the Mac App Store. You don’t need a Mac or the Mac version of GarageBand to use the GarageBand app on your iPad, however. All you need are an iPad and $4.99.
Getting the app
• Purchase the GarageBand app from the App Store, either directly on your iPad or via iTunes on your computer.
Figure 3.1 shows its icon.
Figure 3.1. The icon for GarageBand.

You can enter the following URL in your computer’s Web browser to have it open iTunes and take you right to the download page:
http://itunes.apple.com/us/app/garageband/id408709785?mt=8
Set up a song
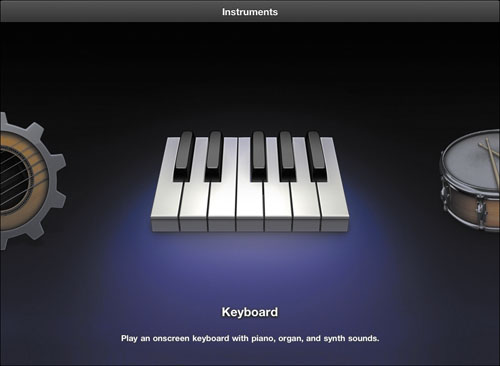
When you open a newly installed copy of GarageBand, it creates a new song for you and shows you the Instruments screen (Figure 3.2). If you see anything else, you need to create a new song yourself.
Figure 3.2. The Instruments screen, where you pick an instrument to play and record.
Here’s what you may see when you open a previously used GarageBand app:
• The My Songs screen, showing the songs you’ve created so far
• The My Songs screen, telling you that no songs have been created yet
• An incomplete song on which you’ve been working
Starting a new song:
- Open the GarageBand app.
- Do one of the following things:
• If you see the My Songs screen, which shows one or more existing songs, tap the New Song button at the bottom of the screen and then tap New Song in the popover (Figure 3.3 on the next page).
Figure 3.3. Making a new song when you have other songs available.

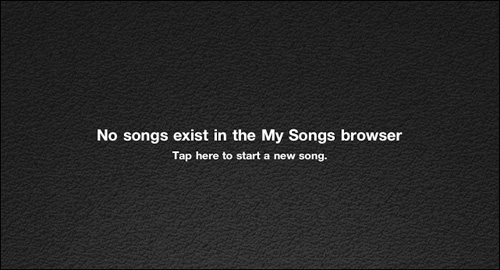
• If you see an empty My Songs screen (Figure 3.4), tap the center of the screen to start a new song.
Figure 3.4. The My Songs screen when you haven’t created a song yet.
• If you see a song screen of some sort, tap the My Songs button in the top-left left corner (Figure 3.5); then tap the New Song icon at the bottom of the My Songs screen, and tap New Song in the popover (refer to Figure 3.3).
Figure 3.5. The My Songs button takes you to the My Songs screen from within a song.
• If you see the Instruments screen (refer to Figure 3.2), take a deep breath: The new song has already been created, and you’re ready for the next step.
At this point, no matter what you saw when you opened the app, you should see the Instruments screen. Now you’re ready to choose an instrument to play.
Picking a guitar:
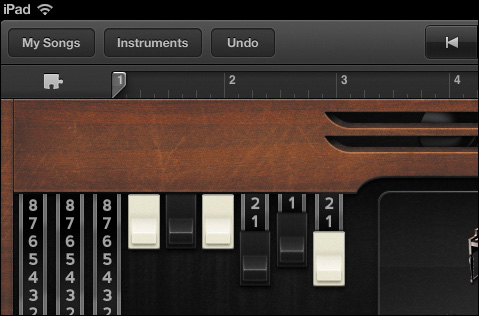
- On the Instruments screen, scroll to the left until you see the Smart Guitar and then tap it.
The Smart Guitar instrument screen appears (Figure 3.6). Here, you can choose a different kind of guitar, adjust the key and tempo, and set other options. Most important, the Smart Guitar is preset with various chords that harmonize, ready for you to play without hitting a wrong note!
Figure 3.6. An acoustic Smart Guitar, ready for strumming.

- Make sure that the Chords/Notes switch is set to Chords and then strum various chord strips to hear what they sound like.
- Tap a few strings in various chord strips to hear how they sound when played individually.
- Tap the chord label above a chord strip.
Tapping a chord label plays the complete chord.
Autoplaying your guitar:
- In the ring of numbers around the Autoplay dial (refer to Figure 3.6), tap 1.
The Autoplay dial indicator points to 1, and the strings vanish from the guitar fretboard (Figure 3.7).
Figure 3.7. Setting Autoplay to 1 makes the strings vanish—but that’s a good thing.

- Tap any chord strip with a single finger.
You hear the chord strummed in a rhythmic pattern.
- Tap the same chord strip with two fingers.
The strum pattern changes.
- Tap the same chord strip with three fingers.
The strum pattern changes slightly again.
- Tap the 2 above the Autoplay dial and listen for a moment; tap 3 and listen for a moment; and then tap 4.
You hear a finger-picking rhythm. Each time you tap a number, the rhythm changes.
- Tap the chord strip that’s currently playing with a single finger.
The playing stops.
As you’ve just seen and heard, each number on the Autoplay dial provides three different strumming and finger-picking patterns for each chord, depending on the number of fingers with which you tap a chord strip. All told, you can choose among 12 Autoplay patterns for each Smart Guitar chord.
Prepare to record
With GarageBand, you can record songs with up to eight tracks. By default, you record each track in eight-bar sections. If you don’t know what a bar is, don’t worry; you don’t have to know. By some strange coincidence, each strumming and picking pattern (refer to “Autoplaying your guitar” earlier in this project) lasts for one bar before it repeats.
In this part of the project, you use those patterns to your advantage. You record an eight-bar selection of chords, using four chords and playing each chord pattern twice. When you finish, you’ll end up with a portion of a song that probably sounds familiar to you, because it’s been used in several songs over the years.
First, though, you need to set up the tempo (how fast the patterns play, in number of beats per minute). You also set up a metronome count-in so that you can become familiar with the tempo before you start playing.
Setting up the recording:
- In the top-right corner of the Smart Guitar screen, tap the Song Settings button to open the Song Settings popover (Figure 3.8).
Figure 3.8. Use the Song Settings popover to set the metronome, song tempo, and song key.
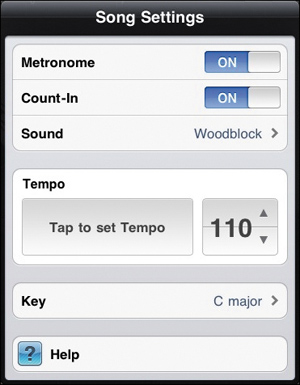
- Make sure that the Metronome and Count-In switches are both set to On.
The metronome plays a click or tap for each beat. Because each bar lasts four beats by default (you can change this setting but won’t for this project), it plays four clicks per bar for this task. When Count-In is on, the metronome plays one bar of beats before the recording begins so that you have time to get ready to play.
- In the Tempo section of the popover, tap slowly and steadily in the Tap to set Tempo box so that the Tempo indicator (which displays beats per minute) displays 80.
The faster you tap, the higher the number in the Tempo indicator and the faster the song plays. You want a slow tempo to make recording easier. You can change the song’s tempo later—as, in fact, you will in “Resetting the tempo” later in this project.
Tap the arrows in the Tempo indicator to fine-tune the setting so that it’s exactly 80. Tapping the up arrow increases the tempo, and tapping the down arrow decreases it.
You don’t need to change the other settings in the Song Settings popover: Sound, which changes the sound of the metronome, and Key, which changes the key in which the chords are set (by default, C major).
Recording a track
When you make a recording or play it back, a playhead moves across the control bar at the top of the screen (Figure 3.9). Pay attention to the playhead: it shows you where you are in the recording. You can drag the playhead around with your finger to move it to different parts of the recording. While you’re recording, the duration appears in red on the timeline; when you’ve completed the recording, the duration appears in green on the timeline.
Figure 3.9. The playhead and transport controls. Red indicates the recording’s progress.

Centered above the timeline and playhead are the transport controls: Go to Beginning/Stop, Play, and Record. You tap the transport controls to position the playhead at the beginning of the song section, start or stop playback, and begin recording.
In the following task, you record a take.
We recommend that you read the steps first to become familiar with what you’ll do and the chords you’ll play. You may even want to do a run-through or two before you begin recording.
Doing a take:
- Tap the Go to Beginning/Stop transport control to set the playhead at the far-left end of the timeline (refer to Figure 3.9).
Recording begins at the playhead position, and you want to begin at the beginning.
- Set the Autoplay dial to 2.
This setting gives you a nice folksy finger-picking rhythm.
- Tap the red Record transport control.
GarageBand begins the count-in (which you set in “Setting up the recording” earlier in this project).
- Following the fourth count-in beat, tap the C (C major) chord strip (refer to Figure 3.6 earlier in this project) with a single finger.
- As soon as the finger-picking rhythm has played twice (and the playhead is approaching the bar 3 mark in the timeline), tap the Am (A minor) chord strip.
- At the end of two A-minor repetitions, when the playhead is approaching the bar 5 mark in the timeline, tap the Dm (D minor) chord strip.
- At the end of two D-minor repetitions, when the playhead is coming up on the bar 7 mark in the timeline, tap the G (G major) chord strip.
When the playhead reaches the end of the song segment, GarageBand automatically stops recording and immediately begins to play back what it just recorded.
- Listen to your recording.
If you don’t like your recording, don’t worry. Just repeat these steps to erase the recording and redo it. You won’t be charged for extra studio time.
You hear the metronome during playback, but it’s not part of the recording. If the sound bothers you, tap the Song Settings button to open the Song Settings popover (refer to Figure 3.8) and then tap the Metronome switch to turn it off.
Adding a new instrument in a new section:
- In the control bar, to the left of the transport controls, tap the View button.
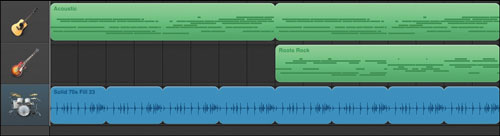
 The screen changes to show GarageBand’s track view (Figure 3.10). You use this view to add or remove song sections, add or remove instrument tracks, and arrange your recordings.
Figure 3.10. Track view shows the instrument tracks and the recordings in your song.

Currently, your song has one instrument track and one eight-bar section. The big green area below the control bar is the Acoustic Smart Guitar recording region that you created in the preceding section.
All recordings you make are stored in regions, which you can edit and move around (as you will in “Looping a region” later in this project).
- At the left end of the control bar, tap the Song Sections button (refer to Figure 3.9) to bring up the Song Sections popover (Figure 3.11).
Figure 3.11. Use the Song Sections popover to add or remove sections and to choose which sections are displayed.
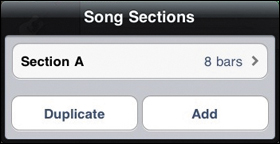
- In the popover, tap the Add button.
A new section appears in the popover (Figure 3.12). You may notice that the track view now shows more bars for the moment.
Figure 3.12. A new section has been added to the song.

- Tap anywhere outside the popover.
The popover goes away, and the track view shows bars 9–16. The Smart Guitar track is empty because you haven’t yet recorded those bars.
- In the bottom-left corner of the track-view screen, tap the plus sign (+) to add a new instrument track.
You see the same Instruments screen that you saw early in this project (refer to Figure 3.2).
- As you did earlier, scroll left and choose Smart Guitar.
You see the same Smart Guitar screen shown in Figure 3.6 earlier in this project.
- Tap the Smart Guitar selection button to see the available guitars (Figure 3.13).
Figure 3.13. A choice of Smart Guitars.
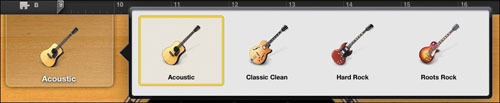
- Tap the Rock Roots guitar.
The Smart Guitar screen updates to reflect your choice.
Although the Roots Rock screen looks different from the Acoustic screen and has a couple of new features (to be precise, two stompbox effects that you can turn on to change the sound of the guitar), the new guitar operates much like the acoustic one that you’ve been playing.
- Switch the Autoplay dial to 3 (Figure 3.14).
Figure 3.14. A new look for a new guitar.

- Tap the Go to Beginning/Stop transport control (refer to Figure 3.9) to set the playhead at the far-left end of the timeline.
- Complete steps 3–8 of “Doing a take” earlier in this project to record the new song segment in the Roots Rock guitar track.
You’ll notice that the Roots Rock Smart Guitar has a distinctly different sound and Autoplay pattern from the Acoustic Smart Guitar. Also, the count-in includes the final bar of the first song section.
- If you muffed the take, repeat steps 10–11 to redo it.
Arrange the recording
The two recordings you’ve made are a good start. Now you get a chance to fill out the arrangement.
In the following sections, you perform several tasks:
- Make one of your recordings loop.
- Add a drum track.
- Reset the tempo to give your song a livelier feel.
Looping a region:
- Switch back to the track-view screen (refer to Figure 3.10 earlier in this project).
- Tap the Song Sections button at the left end of the timeline to open the Song Sections popover.
- Tap the All Sections button.
- Tap anywhere in the track-view screen to dismiss the Song Sections popover.
- Tap the Acoustic Smart Guitar region to select it; then tap that region again to display the editing controls (Figure 3.15).
Figure 3.15. Editing controls for a selected region.

- In the editing-controls bar, tap Loop.
The Acoustic Smart Guitar region expands to fill the entire track (Figure 3.16).
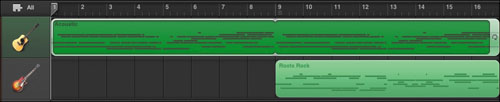
You can loop any of GarageBand’s built-in instruments to create repetitions of a recording. In this case, the eight bars you recorded with the Acoustic Smart Guitar are repeated again for bars 9–16.
Adding a drum track:
- Tap the Loop button near the top-right corner of the track-view screen to open the Apple Loops popover (Figure 3.17).
Figure 3.17. Apple Loops contains hundreds of tasty recorded loops.

You can preview a loop simply by tapping it. You can also narrow the selection of loops by tapping the Instrument, Genre, and Descriptors options near the top of the popover and then tapping the kinds of loops you want to see. If you know the name of the loop that you want to use, however, you can search for it.
For this task, you want to use a drum loop called Solid 70s Fill 23.
- Tap the search field at the top of the Apple Loops popover to display an onscreen keyboard; then type solid and tap Search on the keyboard.
The popover now displays a much shorter list of loops, all of which have solid in their names.
- Find the Solid 70s Fill 23 loop in the popover, and drag it to the left side of the track-view screen, below the Acoustic and Roots Rock Smart Guitar icons.
As you drag, a new track appears, filled with the loop.
- Lift your finger off the screen.
The drum track spans the entire song (Figure 3.18).
Figure 3.18. A prerecorded drum loop has been added to the song.
Resetting the tempo:
- Tap the Song Settings button to open the Song Settings popover (refer to Figure 3.8 earlier in this project).
- In the Tempo section, use the Tempo controls to set the tempo to 110.
For details on setting the tempo, refer to “Setting up the recording” earlier in this project.
- Set the Metronome switch to Off.
- Tap outside the Song Settings popover to dismiss it.
- Tap the Play transport control to play your finished song.
The song plays faster, with an added drum track, and the acoustic guitar plays along with the rock guitar in the last eight bars.
Congratulations—you’re an iPad recording artist!
Share your performance
A recording artist needs an audience, and GarageBand makes it easy for you to reach yours. You can save your song to iTunes or email it to your fans. The iTunes option makes a copy of your song that you can access via iTunes File Sharing when you connect your iPad to your computer. In the following sections, we show you how to use both distribution methods.
Saving to iTunes:
- In the top-left corner of the track-view screen, tap the My Songs button.
The My Songs screen appears, displaying the song you just finished.
- Tap the Action button at the bottom of the screen to see your distribution choices (Figure 3.19).
Figure 3.19. Choose an export method for your song.
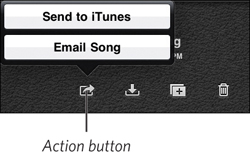
- Tap Send to iTunes.
The Choose Format window opens (Figure 3.20). You have two choices in this window:
• iTunes: This option creates an AAC file that you can play in iTunes on a computer or on an iPad, iPod, or any other device that can play AAC recordings. (Most modern music players can play them.)
• GarageBand: This option creates a GarageBand file that you can open in the Mac version of GarageBand.
Figure 3.20. You can export your song to iTunes in either of two flavors.
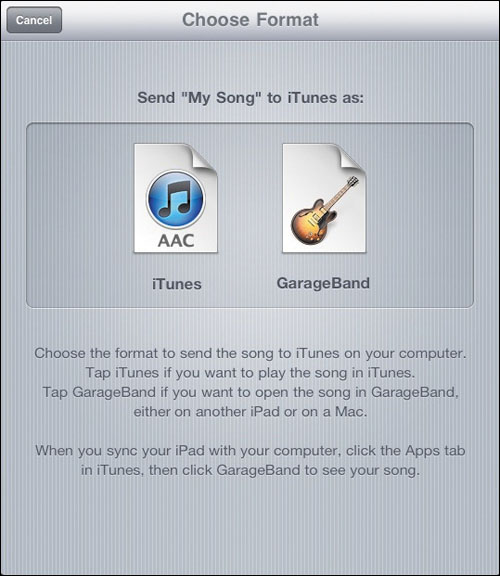
- Tap a format to export the song to your iPad.
You can access the song via iTunes File Sharing when your iPad is connected to your computer.
Mailing your music:
- In the My Songs screen, tap the Action button to open the popover (refer to Figure 3.19) and then tap Email Song.
A mail message appears, with your song file (in AAC format) attached to it.
- Address your message, add any other information you want, and then send it.
All you have to do now is wait for your fans to line up for your next concert.
Music Syncing Project
Software needed: iTunes (Mac or Windows)
iPad model: Any
Additional hardware: Mac or PC
More than a year into the iPad era, most technology pundits have finally moved on from the blithe critique stated so often at the device’s introduction: “It’s nothing but a giant iPod touch!”
In fact, though, this facile critique has some basis. Setting aside the iPad’s unique capabilities, it does have much in common with the iPod touch. In particular, your iPad has a built-in iPod that you can use to play the thousands of songs your iPad can hold.
To act in its secret identity as a giant iPod touch, however, your iPad needs songs to play. If you’re among the ever-shrinking number of souls who’ve never had an iPod—or even if you have one but find the whole music-syncing thing to be mystifying—this project shows you how to get the songs you want, by the artists you want, in the styles you want, from your iTunes Library to your plus-size iPod touch.
Sync everything
If you have a relatively small iTunes Library (that is, one that can fit easily into your particular iPad’s storage space), deciding what music to put on your iPad is simple: Just put your whole Music library on the device, and don’t worry about it. Even the smallest-capacity iPad has ample room to hold several thousand songs.
Apple provides a ballpark estimate of about 250 songs per gigabyte. Going by that estimate, a 16 GB iPad can store 4,000 songs and still have a third of its storage space left for documents, pictures, apps, and other stuff.
Assuming that your Music library fits on your iPad, getting it there is just a few clicks and a sync away.
Syncing your entire Music library to your iPad:
- Connect your iPad to your computer.
- Launch iTunes, if it doesn’t launch automatically.
- In the Source list on the left side of the iTunes window, select your iPad.
- Click the Music button at the top of the main pane of the iTunes window.
The contents of the music syncing pane for your iPad appear, with the main syncing options laid out at the top (Figure 3.21).
Figure 3.21. The main music syncing options for your iPad.

- Select the Sync Music check box and the Entire music library radio button.
- (Optional) Select Include music videos.
Keep in mind that each music video takes up considerably more space than a typical song. But if you have the space (see the nearby sidebar), why not?
- Click the Apply button in the bottom-right corner of the iTunes window.
iTunes begins copying your entire Music library to your iPad. Depending on the size of the library and the speed of your computer, this process can take several minutes, so be patient; you have to do this only once. When you add more songs to your iTunes Library, only the additional songs will be copied to your iPad the next time you sync.
Sync artists and genres
If your iTunes Music library is too large for your iPad, or if you just don’t want to copy the whole thing, you can narrow down which songs get synced in several ways. One of the easiest ways is to choose your favorite musical artists, musical genres, and albums, and then sync only the music that matches your choices.
iTunes presents the artists, genres, and albums associated with your songs in the music syncing pane for your iPad, right below the main music-syncing options (Figure 3.22). You use the check boxes in these lists to select your favorites.
Figure 3.22. The music syncing pane lists artists, genres, and albums.

Syncing selected artists and genres to your iPad:
- Follow steps 1–3 of “Syncing your entire Music library to your iPad” earlier in this project.
- Select the Sync Music check box and the radio button titled Selected playlists, artists, albums, and genres.
The Playlists, Artists, Genres, and Albums lists become accessible so that you can check or clear the check boxes in them.
We’ll ignore the Playlists list for now, because we cover it in the next section of this project.
If some of the items in the Playlists list happen to be checked, you can easily clear all of them so that they don’t interfere with this part of the project. To do so, hold down the Command (Mac) or Ctrl (Windows) key, and click one selected check-box item to deselect everything in the list. Similarly, clicking an unselected check box with the key held down selects every item in the list. This technique, by the way, works with almost every list in iTunes that has check boxes.
- In the Artists list, select the artists whose songs you want to sync with your iPad.
- In the Genres list, select the genres that you prefer.
iTunes uses the genre assigned to the song by the vendor from which you obtained the song, such as the iTunes Store. It also uses information from an online database when you rip a CD to add its songs to your Music library. You can modify this information if you like; see the iTunes help topic “Edit Song and CD Information” to find out how.
- In the Albums list, select the albums you want on your iPad.
- Click Apply in the bottom-right corner of the iTunes window.
iTunes syncs the songs that match your artist, album, and genre selections to your iPad, and removes any songs from your iPad that don’t match your selections.
Make and sync playlists for your iPad
Some people who spend a lot of time with iTunes delight in arranging their songs in all sorts of ways by using iTunes’ playlist features. Many other people, however, find playlists abstract and confusing, and shy away from them as though they were a nest of snakes.
If you’re comfortable with playlists, simply skip to “Selecting and syncing playlists” later in this project. The rest of you, read on.
Playlists are actually quite simple: They’re lists of one or more songs. That’s it. They don’t contain any actual songs—just references to songs. That’s the part that seems to confuse people, because in iTunes, the act of adding songs to a playlist looks very much like copying the actual songs. It isn’t. When you add songs to a playlist, you’re simply adding references to those songs, as Figure 3.23 illustrates.
Figure 3.23. It may look like we’re copying four songs into a playlist, but we’re really copying references to those songs.
Think of a room full of people. You can make a list of everyone in the room, and you can make another list of, say, just the left-handed people in the room. The people themselves aren’t cloned and embedded magically in your lists; the lists contain only references to the people. The people themselves stay in the room where they were all along.
Similarly, when you add a song from your iTunes Music library to a playlist, the song itself isn’t copied to the playlist; it stays where it is, in your Music library. You can add the same song to as many playlists as you like, just as you can add the same person to as many lists as you like, but no matter how many times a person is added to a list or a song is added to a playlist, only one physical person or only one actual song is involved.
When you sync a playlist from iTunes to your iPad, iTunes checks the songs that are already on your iPad. If a song in the playlist is already there, iTunes doesn’t copy it to your iPad; if it isn’t, iTunes copies the song to your device. That way, you can sync as many playlists to your iPad as you want, and even if the same song appears in all those playlists, only one copy of that song goes from your Music library to your iPad.
Playlists appear in the Source list on the left side of the iTunes window. Over time, you may find that you’ve made dozens of playlists. You can shorten the Source list by creating folders where you can store various playlists.
When you sync playlists between iTunes and your iPad, you can choose individual playlists, folders full of playlists, or individual playlists inside folders.
When you select a folder of playlists in iTunes and sync that playlist folder to your iPad, all the playlists inside that folder are synced to your iPad. The icons for the playlist folders on your iPad don’t look much like folders, however; they look more like stacks of playlists.
In the following tasks, you create a folder for the playlists that you want to have on your iPad, create a playlist inside that folder, add songs to that playlist, and then sync everything. When you have these steps down, you can go through your iTunes Library at leisure and create playlists and folders for your iPad to suit your needs and desires.
Making a playlist and playlist folder in iTunes:
- In the iTunes Source list, click Music.
All your music in iTunes appears in a list (Figure 3.24).
Figure 3.24. The Music library lives near the top of the Source list.

- Choose File > New Playlist Folder.
A folder appears in the Playlists section of the Source list with its title selected, ready for you to edit it (Figure 3.25).
Figure 3.25. A new playlist folder awaiting its new name.
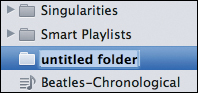
- Type a folder name, and press Return (Mac) or Enter (Windows).
For this task, type iPad songs. When you press Return or Enter, the folder is renamed. If your Playlist section contains other folders, they appear in alphabetical order, and the newly named folder moves to its correct alphabetical position among them.
- Click the new folder to select it and then choose File > New Playlist.
An untitled playlist appears inside the folder, ready for you to rename it.
- Type a new name for the playlist (whatever name you like), and press Return or Enter.
- Add songs to your new playlist.
You can add songs to a playlist whether that playlist is in a folder or not, of course, but putting playlists inside folders makes it more convenient to sync them with your iPad. In this project, you’re using only one playlist, but you can use the folder you just created to contain all the playlists destined for your iPad.
You can drag any playlist in the Source list onto a folder to put it in the folder, and you can take a playlist out of a folder by dragging it to the left edge of the iTunes window.
Adding songs to a playlist:
- Click Music in the iTunes Source list.
All the content in your Music library is displayed in the main pane of the iTunes window.
- Click a song to select it.
You can select multiple songs by Shift-clicking. If your iTunes Library is displaying songs by album cover in iTunes’ grid layout, you can select the album by clicking its cover. (To view your Music library in grid layout, choose View > as Grid.)
- Drag the song to the playlist to which you want to add it.
You can delete a song from a playlist at any time. First, click the playlist to see its contents; then select the song and press the Delete key. Don’t worry—the song is still in your Music library.
Selecting and syncing playlists:
- Follow steps 1–3 of “Syncing your entire Music library to your iPad” earlier in this project.
- If they aren’t already selected, select the Sync Music check box and the radio button titled Selected playlists, artists, albums, and genres.
- In the Playlists list, select a folder.
The Playlists list displays folders before individual playlists, so chances are that your iPad songs folder for this project is near the top, as shown in Figure 3.26.
Figure 3.26. Selecting a playlist folder for syncing.
- Click Apply in the bottom-right corner of the iTunes window.
iTunes syncs your new playlist, along with any other items selected in the four lists in the music syncing pane (refer to Figure 3.22 earlier in this project).
Create a playlist on your iPad
While we’re on the subject of playlists, we should point out that you can make a playlist on your iPad, using any of the songs, artists, albums, and genres there. Any playlist that you make on your iPad syncs back to iTunes, where you can modify it and then sync it back to your iPad.
Making a playlist on the iPad:
- Tap the iPod app’s icon on your iPad to open it.
- Tap Music at the top of the Library column.
Your Music library appears in a list (Figure 3.27).
Figure 3.27. All your songs in the iPod on the iPad.

- At the bottom of the screen, tap the Songs button; then, in the bottom-left corner, tap the plus (+) icon.
A New Playlist dialog appears.
- Enter a name for your playlist, and tap Save.
Your iPad displays the songs that it contains in alphabetical order and instructs you to add songs to the playlist.
- Swipe through the list of songs, tapping the ones you want to add to your new playlist.
As you tap a song’s title, it turns gray, indicating that it’s been added.
- Tap the blue Done button.
Your new playlist appears (Figure 3.28).
Figure 3.28. A new iPad playlist awaiting final approval.

- Tap any song to delete it from the playlist, or tap the playlist in the Library column to delete the whole thing.
- When the playlist is the way you want it, tap Done again.
Manage your music by hand
Some people like total control of every single item on their iPads, preferring to add and remove songs manually rather than rely on syncing. If you’re one of those people, this last section and iTunes’ Manually manage music and video option are for you.
The aforementioned setting allows you to drag songs, albums, playlists, videos, and TV shows from your iTunes libraries directly to your iPad’s Source list, but it stops iTunes from syncing any of these items automatically. If, for example, you’ve set iTunes to sync movies you haven’t finished watching (see the Movie and TV-Show Syncing Project later in this chapter), that syncing capability is disabled when you choose the Manually manage option. Manually really does mean manually.
Managing music manually:
- Connect your iPad to your computer.
- Launch iTunes.
- Select the iPad in the Source list.
- Click the Summary button in the main iTunes pane.
- In the Options section at the bottom of the pane, select Manually manage music and videos.
- Click Apply in the bottom-right corner of the iTunes window.
Make Your Own E-Books Project
Difficulty level: Intermediate
Software needed: Mac OS X; Scrivener; Microsoft Word, Pages, or another word processor
iPad model: Any
Additional hardware: Mac or Windows PC
Although it’s not the only e-book reader for the iPad, iBooks is the “Marian, Madam Librarian” of your iPad’s electronic book repository. iBooks recognizes two document formats from the e-book Tower of Babel: ePub and PDF. Adobe introduced PDF to the computer scene in 1993, and in the almost two decades since, PDF documents have become ubiquitous. ePub is newer but based on technology that’s every bit as common: XHTML, CSS, and Zip.
The PDF format’s downside is that it presents static pages—a concept of fixed dimensions. Therefore, PDFs are less well suited to dynamic presentations, the target audience for which may be using iPads, iPhones, or computer screens (with resizable windows, no less). The upside of the format is that you see the same content in the same typefaces, with the same organization and relative scaling, regardless of the device on which you view it.
ePub is designed for reflowable content, in which readers get the same detail in the same order, fitted to the presentation device.
To summarize, if you receive a PDF “book” of 300 pages on your Mac or Dell PC, it will also be 300 pages on your iPad (or iPhone or iPod touch), and you’ll probably need to do the scrolling or deal with the scaling issues yourself. That same 300-page book in ePub format may be 700 pages on your iPad at the default font size and 1,600 pages on your iPhone, but iBooks takes care of the details for you so that you get a seamless rendition irrespective of the viewing platform.
PDF support greatly simplifies the process of putting your own content on the iPad. Using a third-party PDF-creation tool or Mac OS X’s built-in printer support for writing PDF files, converting your documents to PDFs is a simple matter of opening them and choosing the right printer or print option. Drag the resulting PDF into iTunes and sync your iPad to make the PDF accessible on the go.
Create a PDF from a document
The following task demonstrates just how simple it is for a Mac user to create a PDF, using the Microsoft Word document for this project as the source.
Creating a PDF:
- On your computer, open the document in your application of choice.
For this example, we’re using this project file in Microsoft Word 2008.
- Choose File > Print.
The Print dialog opens. Ours appears in Figure 3.29. Although the basics will be the same, the application and printer you’re using could make the dialog sport more or fewer features.
Figure 3.29. The Print dialog.

- Click and hold the PDF button in the bottom-left corner to display the PDF menu (Figure 3.30).
Figure 3.30. Use the Print dialog to create PDFs.
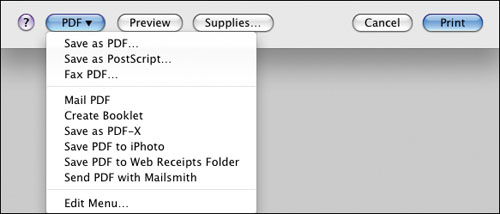
- Choose Save As PDF.
A Save As dialog appears, letting you name your PDF and specify where it should be saved.
Now you have your PDF, and if you want to, you can drag it into iTunes for syncing to your iPad.
Microsoft doesn’t provide built-in PDF generation in its operating system, but Windows users do have a free solution: CutePDF Writer (www.cutepdf.com/products/cutepdf/writer.asp). You’ll need to install the free Ghostscript package; the Web page has links and instructions.
Make an e-book with Scrivener
Creating an ePub document is analogous to creating a PDF, with the primary difference being the final step that renders the content in the desired form. As Shakespeare wrote in Hamlet, however, “Therein lies the rub!” Although tools for producing PDF output abound, ePub compilers are less pervasive.
Apple provides one solution: its Pages software (desktop version only), which lets you export your documents in ePub format, which is suitable for use on your iPad, iPhone, or iPod touch.
Although Pages is a very fine word processor and a pretty nifty desktop publishing application too, we prefer Scrivener (www.literatureandlatte.com) when it comes to producing e-books. Scrivener is a writing tool and environment that specifically targets book authors and scriptwriters. Whereas programs such as Word and Pages focus on creating and formatting documents, Scrivener focuses on creating and organizing content. Until very recently, Scrivener was specific to Mac OS X, but Literature & Latte has released a public beta for Windows.
The public beta is free but is accompanied by the usual caveats concerning stability. When the tool is released commercially, it will cost $40 ($35 for an educational license). The Mac version is currently priced at $45 but is available for a fully functional free 30-day trial.
Space prohibits us from giving you a Scrivener tutorial here, but the included documentation (a user manual available in the Help menu) is both extensive and coherent, and the video and interactive tutorials should get you up and running in short order.
Creating an e-book with Scrivener:
- Launch Scrivener.
- Create a new project.
For this exercise, you’re going to create an ePub of Scrivener’s interactive tutorial, so choose Help > Interactive Tutorial. Follow the prompts, and the Scrivener project opens, fully loaded with the tutorial’s content.
- Choose File > Compile.
The Compile dialog drops down (Figure 3.31).
Figure 3.31. Set your output options in the Compile dialog.

- Choose ePub eBook (.epub) from the Compile For pop-up menu at the bottom of the dialog.
- Click Contents in the Compilation Options list on the left side of the dialog.
- In the Pg Break Before column, check the items that you want to include in the table of contents.
- (Optional) In the Meta-Data options, fill in the fields you want the ePub to contain, such as Subject, Description, Publisher, and Publication Date.
- Click the Compile button.
- When Scrivener asks you to do so, name the file and specify where you want to save it.
Now that you have your ePub file, you can drag it to iTunes and sync it to your iPad. Figure 3.32 shows the tutorial saved in iBooks on an iPad, open to the table of contents.
Figure 3.32. Here’s the Scrivener interactive tutorial e-book on the iPad.

We receive a lot of documentation in HTML, RTF, and Word formats, and we’ve come to rely on Scrivener to repurpose that documentation into e-books that we can carry around on our iPads and iPhones. Also, reading documentation on our iOS devices is like having lightweight, adjustable second monitors for the documentation while we explore the software on our Macs.
Movie and TV-Show Syncing Project
Software needed: iTunes
iPad model: Any
Additional hardware: None
Back in the dawn of time, when we were in film school, movies came in big metal boxes on multiple reels (five or so per movie), and moving a movie from place to place required a very strong back. As for watching that movie, have you ever tried to lug around a 35mm movie projector?
Today, you can carry dozens of movies from place to place in a device that you can lift with your fingertips, and you can watch those movies in glorious high resolution on that same device with a tap of the finger. If you love movies (and we do), today is a Golden Age coated in platinum and sprinkled with diamonds.
In this project, you see how to get movies (and TV shows—we love them too) synced between your iPad and your computer so that no matter where you are, you can get the video fix you crave. No sweat.
Sync movies
Whether you get your movies from the iTunes Store or somewhere else (and we discuss some of the “somewhere else” options elsewhere in this chapter), getting them from your iTunes Library to your iPad and back again isn’t rocket science, even though the technology underlying it may be.
You can sync movies in the following ways:
- All movies
- Unwatched movies (unwatched movies being those that you haven’t watched all the way through to the end)
- The most or least recently obtained unwatched movies
- Selected movies
- Selected playlists of movies
Some of these criteria aren’t mutually exclusive. You can sync five recent unwatched movies as well as additional selected movies and playlists of movies, for example.
Also, you can create iTunes playlists that contain movies—especially useful for short movies, such as the ones you make yourself with iMovie or some other movie-creation application.
In this section of the project, you get to experiment with various movie-syncing settings to see how they work.
Turning on movie syncing:
- Connect your iPad to your computer.
- Launch iTunes.
- Select your iPad in the iTunes Source list, below the Devices heading.
- At the top of the main pane of the iTunes window, click the Movies button.
- At the top of the Movies pane, select Sync Movies (Figure 3.34).
Figure 3.34. This check box is the master key to iPad movie syncing.

When movie syncing is enabled, you have access to the other controls and lists in the Sync Movies section. First, you see how to turn on syncing for all movies.
If Manually manage music and videos is selected in the Options section of the Summary pane, turning on movie syncing deselects that option. When that happens, the syncing options in the Music pane and TV Shows pane take effect, so you need to look in those panes as well and adjust your syncing options.
Syncing all movies:
- Below the Sync Movies heading in the Movies pane, click the Automatically include x movies check box.
- Choose the option titled all from the pop-up menu in the middle of the preceding option’s name (Figure 3.35).
Figure 3.35. When you sync all movies, the other options in the Movies syncing pane vanish.

The rest of the options in the Movies pane vanish at this point; with all movies set to be synced, you don’t need them.
In most cases, you probably don’t want to sync all your movies, just as you wouldn’t pack every piece of clothing you own when you go on a trip. You usually want your iPad to have the newest movies in your collection or the ones that you haven’t yet viewed. In the following task, we show you how to make it so.
Keep in mind that movies take up a lot of room. If you sync all movies, iTunes copies only as many as can fit on your iPad. You may find that you don’t have room for many apps, books, or songs if you fill your iPad with movies.
Syncing new or old movies:
- Below the Sync Movies check box in the Movies pane, check the Automatically include x movies option, if it isn’t already checked.
- From the pop-up menu in the middle of the preceding option’s name, choose any option other than all or all unwatched (Figure 3.36).
Figure 3.36. Your choices for syncing movies automatically.
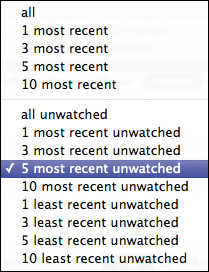
When you make any choice other than all or all unwatched, all the lists of movies and playlists in the Movies syncing pane become active.
iTunes uses the date when each movie was added to the iTunes Library—not the movie’s release date—to figure out which movies are the most or least recent. From the pop-up menu, you can choose to sync automatically one or more of the most recent watched movies; you can choose one or more of the most recent unwatched movies; or you can choose one or more of the least recent unwatched movies. For some reason, however, you can’t choose to sync the least recent watched movies: those, you have to select manually.
Syncing selected movies and movie playlists:
- Below the Sync Movies check box in the Movies tab, do one of the following things:
• Clear the Automatically include x movies check box.
• From the pop-up menu in the middle of the Automatically include option’s name, choose an item other than all.
The lists below the option’s name become available (Figure 3.37 on the next page).
Figure 3.37. You can pick movies individually and choose playlists of movies.
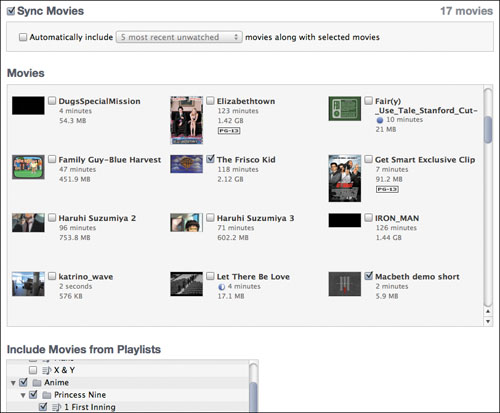
- Click to select the movies you want to include along with your choices from step 1.
- In the Include Movies from Playlists list (scroll down in the Movies syncing pane to see it), click to select the playlists you want to sync.
Sync TV-show episodes
The videos in your iTunes Library that are categorized as TV shows have two special items of information associated with them that affect syncing: the name of the TV series and the episode of that series. You can use these two pieces of information to specify which TV-show episodes get synced.
The choices you have for syncing TV-show episodes are similar to those for movies:
- All episodes
- Unwatched episodes
- The most or least recently obtained unwatched episodes
- Selected episodes
- Selected playlists that contain TV-show episodes
Because episodes “belong” to TV shows, you can specify whether the unwatched and recent criteria apply to all TV shows or only to selected TV shows. If you’re an avid fan of William Daniels, for example, you can choose to sync only the five oldest unwatched episodes of Captain Nice and no others.
As with movies, in this part of the project you get to experiment with various syncing settings to see how they work. Also as with movies, any changes you make in TV-show syncing don’t take effect without your approval.
Turning on TV-show syncing:
- Connect your iPad to your computer.
- Launch iTunes.
- Select your iPad in the iTunes Source list, below the Devices heading.
- At the top of the main pane of the iTunes window, click the TV Shows button.
- At the top of the TV Shows pane, select Sync TV Shows (Figure 3.38).
Figure 3.38. Now showing in the TV Shows pane.

Because TV shows consist of many episodes, only some of which you may have seen, the options for syncing new and old episodes are more flexible than they are for movies, as you see in the following task.
Syncing new or old episodes:
- Below the Sync TV Shows check box in the TV Shows pane, check the Automatically include x episodes of x option, if it isn’t already checked.
- From the first pop-up menu in the Automatically include option, choose any item other than all.
- From the second pop-up menu in the Automatically include option, choose all shows.
(You deal with selected TV shows a little later in this project.)
- Select a TV show in the Shows list.
The Episodes list to the right shows which, if any, of the show’s episodes are set to sync automatically (Figure 3.39). You can click the check boxes next to other episodes in a show’s Episodes list to include those episodes in the sync.
Figure 3.39. You can choose other episodes in addition to those that sync automatically.

In addition to the episodes that fall within the syncing criteria you set, you can put TV episodes in playlists and select those playlists in the Include Episodes from Playlists list at the bottom of the TV Shows syncing pane.
Syncing episodes of selected TV shows:
- Below the Sync TV Shows check box in the TV Shows pane, click the Automatically include option, if it isn’t already checked.
- From the second pop-up menu in the preceding option (the choice in the first pop-up menu doesn’t matter), choose selected shows.
Check boxes appear beside each show’s name in the Shows list.
- In the Shows list, click a show’s check box to select it.
Only the episodes from the selected TV shows that match the criteria in the first pop-up menu sync automatically. As shown in Figure 3.40, however, you can select other shows in the Shows list and sync individual episodes of them as well.
Figure 3.40. You can sync episodes from shows other than the ones you’ve chosen to sync automatically.

Syncing all TV shows:
- Below the Sync TV Shows check box in the TV Shows pane, click the Automatically include option, if it isn’t already checked.
- From the first pop-up menu in the Automatically include option, choose all.
- From the second pop-up menu in the Automatically include option, choose all shows.
All the lists in the TV Shows syncing pane vanish. After all, you don’t need these lists if you’re syncing everything.
- In the bottom-right corner of the iTunes window, click Revert.
In this project, you’ve been playing around with a lot of settings to see what they do. Unless you want them to take effect—and chances are excellent that you don’t—it’s best to revert to your original settings and then plan how you really want to sync your TV shows and movies. After all, now you know how to do it; that’s what this project has been about.
Happy viewing! But first, stay tuned for these important messages....
Streaming Internet Video Project
Difficulty level: Intermediate
Software needed: ABC Player (free), Netflix app (free)
iPad model: Any
Additional hardware: None
Everywhere we turn, we find people catching TV shows at times other than the scheduled broadcast times and, frequently, on devices other than a TV set. Battling viewership loss to cable, and in an attempt to recoup ad revenue lost to cable and other competition, network television has begun to embrace alternative delivery systems—in particular, the Internet and iTunes.
Time and venue shifting have become so pervasive that Nielsen Media Research, in an attempt to stay relevant, purchased NetRatings to measure the demographics of the rapidly growing Internet viewing population. Nielsen also factors iTunes and YouTube viewing into its ratings.
Also, Netflix, the Big Kahuna of video rental, is deemphasizing sending DVD and Blu-ray discs by mail in favor of streaming rentals to customers’ Web browsers or mobile devices. As we all know, the best mobile device for receiving these rentals is the iPad. For $7.99 per month, you can watch an awful lot of video without making a single trip to rental sites or the mailbox.
Get the TV software
Although all the networks stream their shows via their Web sites, and though Safari on the iPad provides a competent content conduit, ABC has taken things a step further, providing a dedicated iPad app called ABC Player to stream its shows to handheld devices.
This app offers a viewing experience that’s tailored to the iPad rather than the lowest-common-denominator Web browser interface—as you see in Figure 3.41 and Figure 3.42, which were taken seconds apart on the same day.
Figure 3.41. ABC’s Web interface.
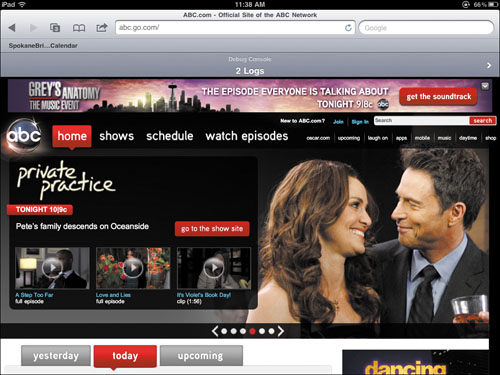
Figure 3.42. ABC Player’s interface.

Obtaining ABC Player:
- Tap the App Store icon on your iPad’s home screen.
- In the Search field in the top-right corner of the App Store’s home screen, type ABC; then tap ABC Player in the list that appears.
- Tap the ABC Player entry (which should appear in the top-left corner of the iPad Apps section).
The ABC Player product page appears.
- Tap the Free button below the icon in the top-left corner.
Free flips over and becomes Install.
- Tap Install.
- When you’re asked to enter your Apple ID and password, do so.
You’re back at the home screen, and ABC Player is downloading. You’re ready to start enjoying ABC’s network TV shows. (At least, ABC hopes that you’ll enjoy them.) Tap the ABC Player icon to enter the world of ABC prime-time (and more) television.
Use ABC Player
When you have ABC Player running, you find five buttons along the bottom of the screen: Featured, Schedule, All Shows, Me, and Info (refer to Figure 3.42 earlier in this project).
Viewing ABC’s featured favorites:
- If it isn’t already selected (as it is by default), tap the Featured button at the bottom of the ABC Player screen.
You see a large thumbnail at the top of the screen, displaying a show that ABC is—wait for it—featuring (Figure 3.43). This display slides to the left about every 5 seconds to bring a new show’s thumbnail into view.
Figure 3.43. ABC’s featured shows and episodes on a spring day in 2011. Your mileage may vary.

- To speed the movement of the large thumbnail display or to make it go in the opposite direction, touch the thumbnail and then flick your finger in the desired direction.
- To watch a recent episode, do one of the following things:
• To watch the most recent episode of a series during its regular season, tap the Watch Latest Episode button to—yes—watch the latest episode of that show.
• To watch the first episode of a new series (like Body of Proof in Figure 3.43), tap the Watch the Series Premiere! button.
• To watch episodes of a series that’s between seasons, tap the button labeled Catch Up on Season n (where n is the number of the just-completed season).
- To view a specific episode of one of the shows displayed below the scrolling thumbnail, tap that episode’s thumbnail.
- To modify what’s being displayed in the various thumbnails, tap Most Popular, Most Recent, or Staff Picks.
Seeing what’s on the schedule:
- To check out the network schedule, tap the Schedule button at the bottom of the ABC Player screen.
You see a screen resembling the one shown in Figure 3.44.
Figure 3.44. Pick an ABC episode from the weekly calendar display.
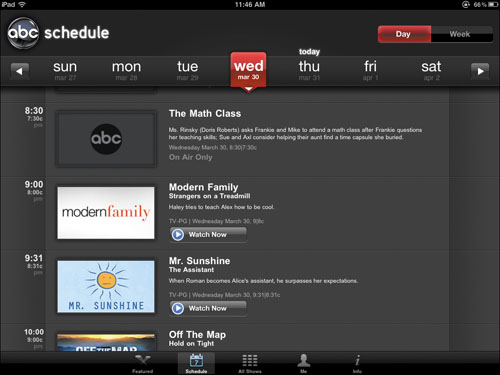
- Tap the desired day of the week to find that day’s shows in their ABC time slots.
As you can see in Figure 3.44, some shows aren’t available for viewing on the iPad—usually, local broadcasts, sporting events, and the like. Also, shows that are available in the iTunes Store are so marked, with a button you can tap to buy them.
Checking it all:
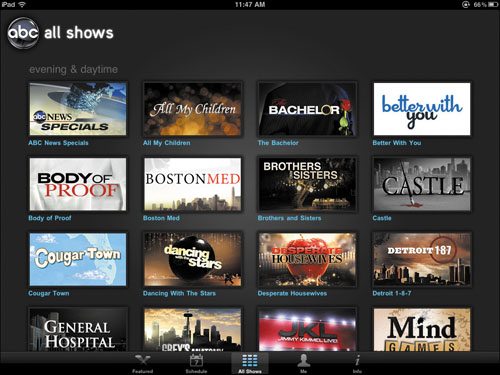
- Tap the All Shows button at the bottom of the ABC Player screen.
You see a grid of all available ABC shows (Figure 3.45).
Figure 3.45. Find the show you want in ABC’s All Shows grid.
- Tap a show’s thumbnail to see a pop-up list of episodes (Figure 3.46).
Figure 3.46. Tap the show to see a list of available episodes.
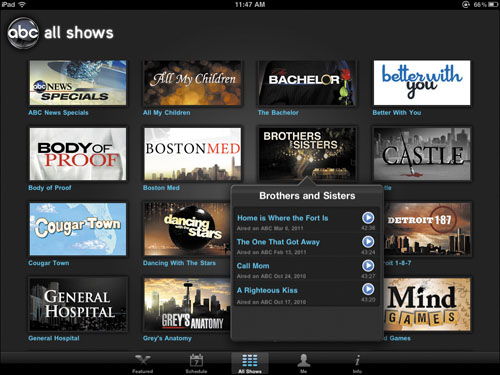
- Tap the desired episode to start viewing.
Reviewing your viewing history:
- Tap the Me button at the bottom of the ABC Player screen.
You see a thumbnail (or grid of thumbnails) representing the episode(s) you’ve seen so far At the top of each thumbnail is a timeline, with a down-pointing arrow showing where you left off watching the episode (Figure 3.47). Near the top-right corner of each thumbnail is a small x that you can tap to remove the episode from your history.
Figure 3.47. Check here in case you don’t remember what you’ve already watched (or if you like reruns).

- (Optional) If you see an episode you want to watch again or want to pick up watching an episode where you left off, tap its thumbnail.
This feature is great if you regularly watch a few TV series and have seen multiple episodes of each one. It’s very easy to lose track of which episodes you’ve viewed and which you haven’t. Thanks to the Me button, you don’t have to remember multiple episode names in multiple series.
Giving ABC feedback:
- Tap the Info button at the bottom of the ABC Player screen.
A feedback form appears (Figure 3.48). This form is a lot less colorful than the player’s other pages, but you hold sway here.
Figure 3.48. Tell ABC what you think, or make suggestions.
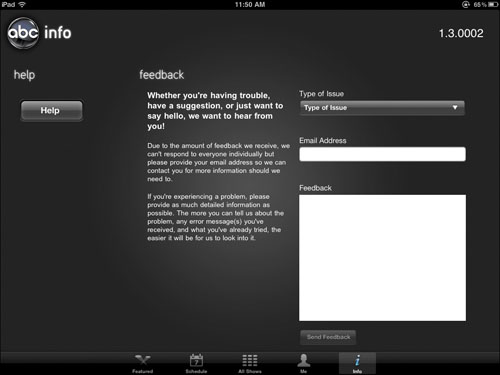
- Fill out the form to tell ABC what you consider to be good or bad, or to suggest features you’d like to see in future versions.
- When you’ve had your say, tap the Send Feedback button.
View the video stream
After you tap an episode in the Featured, Schedule, All Shows, or Me screen (well, some people like to watch shows multiple times, so if you’re not one of them, you don’t need to tap an episode in your history), ABC Player starts loading the episode.
During the loading process, the player displays a placard stating that the following episode is being presented with limited commercials. That may be true, especially if you’re defining limited by counting the distinct advertising spots, because you generally get the same two or three commercials repeated ad nauseam through the show. It also may be true if your tolerance for interruptions is greater than ours. We count four interruptions per hourlong episode in addition to the lead-in commercials, with two commercials per interruption. (Actually, an “hourlong” episode viewed in ABC Player is typically 42 to 43 minutes long, not counting commercials, but that’s the norm for network television these days.)
When the introductory commercial break is over, the episode starts to play.
Controlling video playback:
- While you’re viewing an episode in ABC Player, tap a video to display viewing controls at the bottom of the screen (Figure 3.49).
Figure 3.49. Tap an episode to control its playback.
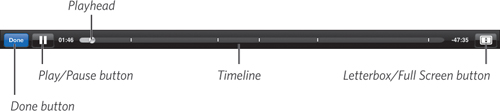
- Do any of the following things:
• Tap the blue Done button to go back to the show’s episode screen.
• Tap the Play/Pause button to toggle between playing and pausing.
• Tap the Letterbox/Full Screen button to control the video’s aspect ratio.
• Drag the playhead in the timeline to move to a different point inthe episode.
Be aware, however, that if you drag over one of the tick marks (each of which denotes a “limited commercial interruption”), the playhead lands on the commercial rather than on the particular point you chose.
Watch movies and TV on demand
Netflix introduced flat-rate DVD rental by mail, letting subscribers create lists of what they wanted to see and get those DVDs in their mailboxes (with prepaid return envelopes) so that steady streams of discs were wending their way back and forth.
A few years ago, the company tested the waters of streaming video, letting subscribers watch their videos over the Internet for a flat monthly fee. As more and more people have acquired broadband connections to the Internet, the viable customer base for online service has increased, to the point that most of Netflix’s business now is online. An online subscription costs $7.99 per month and lets you have unlimited rentals on your iPad, iPhone, iPod touch, and/or computer.
Be aware, though, that what’s available for online viewing is only a subset of what’s available on DVD. Further, at the time we’re writing this chapter, HD content isn’t available via online subscription. Finally, the Netflix app doesn’t yet support AirPlay, so if you want to view what’s streaming on a larger screen, you need a composite, component, or digital connector kit (as appropriate for your TV set).
Make sure that you have a good wireless signal and a fast Internet connection when you’re viewing streaming video, as a weak signal or erratic connection can easily result in poor picture and sound quality.
Getting started with Netflix:
- Purchase the Netflix app from the App Store, if you haven’t already.
- Tap the Netflix app’s icon to launch it on your iPad.
The login page opens (Figure 3.50).
Figure 3.50. Log in to your Netflix account, or create one.

- Do one of the following:
• If you already have a Netflix account, enter your email address and password, and tap the Sign In button.
• If you don’t have an account, tap the Netflix.com link. Safari ferries you to the Netflix site, where you can sign up.
Picking a genre and movie to watch:
- Log in to Netflix, and select the Genres tab (Figure 3.51 on the next page), and tap the genre that interests you.
Figure 3.51. Specify the kind of movie you want to view.

A selection of titles in the selected genre appears.
- Tap a movie’s title.
The movie’s Info screen appears, presenting a brief description and buttons you can tap to add the movie to your queue or play it.
- Do one of the following:
• Tap the Play button. Netflix spins the wait cursor for a few seconds and then starts playing your selection.
• Tap the Add to Instant button. Netflix adds the movie to a list of movies you want to watch when you get a chance.
Searching for video:
- Log in to Netflix, and select the Search tab.
- Type key words in the Search box.
Netflix presents a list of matches (Figure 3.52). Some matches are marked as being unavailable, however, and others are marked as being available only via disc subscription (for an additional $2 per month and a lack of instant gratification).
Figure 3.52. Sometimes Netflix tells you about titles that you can’t stream, along with the ones you can.

- Tap the title of something that is available.
That movie’s Info screen appears.
- Do one of the following:
• Tap the Play button. Netflix spins the wait cursor for a few seconds and then starts playing your selection.
• Tap the Add to Instant button. Netflix adds the movie to a list of movies you want to watch when you get a chance.
Playing what’s queued:
- Log in to Netflix, and select the Instant Queue tab.
Netflix displays the items in your queue (Figure 3.53).
Figure 3.53. This screen displays the movies and TV shows you’ve put in your waiting list.

- Tap the title you want to view.
If you select a movie, it starts playing. If you select a TV series, you see a list of episodes; tap the Play button for the one you want to view (Figure 3.54).
Figure 3.54. Select an episode of a queued TV series.

Make a Movie Project
Software needed: iMovie app ($4.99)
iPad model: iPad 2
Additional hardware: None
Apple led the way in personal-computer video creation when it released the iMac DV and iMovie in 1999. iMovie has gone through multiple iterations but has consistently been reviewed as a compelling combination of power and ease of use. The latest version of iMovie—for the iPad 2, iPhone 4, and iPod touch (fourth generation)—is adapted to the iOS touchscreen interface for the low, low price of just $4.99.
This version has some drawbacks. You can’t edit any video other than what you’ve taken with an iOS device, for example—nothing that you’ve downloaded from the Internet, received in email, or acquired from anything other than another iOS device. One nice touch, though, is that you don’t have to have a wired connection to your Mac or PC running iTunes to transfer an iMovie project. If you have a wireless connection, you can use iTunes File Sharing to save a project to iTunes from an iPhone or iPod touch; retrieve that content on your iPad; and edit the project there to take advantage of the iPad’s larger screen.
In this project, you use Apple’s iMovie app to assemble your video clips and photos into a movie, with optional background music and narration, and then share it with friends and family, post it to the Internet, or just keep it for your own reference or enjoyment.
Get your project started
All right, you have some video segments you’ve shot with your iPad’s cameras, and you want to turn them into a movie. The following task shows you how.
To access iMovie’s integrated help system, tap the question-mark icon in the bottom-left corner of an iMovie screen. Just about anything you may want to know about the various controls and features are well covered in this help system, but it doesn’t provide a “Getting Started” tutorial, so that’s what we’re providing in this first section.
Starting the movie:
- If you don’t have the iMovie app installed on your iPad, go to the App Store and purchase it ($4.99 at this writing).
- Tap the iMovie icon on your iPad’s home screen.
You see the My Projects screen, shown in Figure 3.55. This screen is your project gallery.
Figure 3.55. iMovie’s My Projects screen, waiting for you to create your first project.

- Tap the plus sign in the center of the screen, as directed, to create a new project.
A new My Project screen opens (Figure 3.56). The top-left pane shows content that’s available to be added to your project—in Figure 3.56, a short video clip, shot with the iPad’s camera, that resides in the Camera Roll album.
Figure 3.56. A new project, waiting for you to start creating and editing your movie.
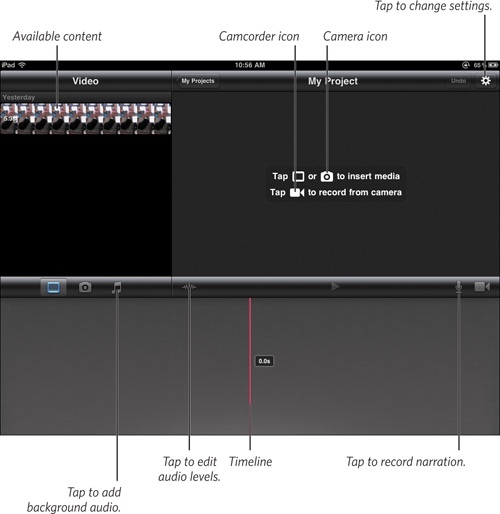
- To add some footage to your project, do one (or more) of the following:
• Tap a video clip to select it. An orange outline appears around the selected clip, and a curved arrow appears in the center of the clip. Tap the arrow, and iMovie moves the clip into the timeline at the bottom of the screen.
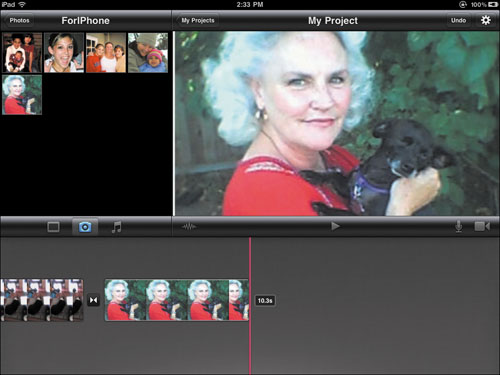
• Tap the camera icon to select a still image. Navigate through your photos to find a still image that you want to add to the timeline (a handy way to create a slideshow). Figure 3.57 (on the next page) shows the project with both a video clip and a still image in the timeline.
Figure 3.57. You can turn still images into short video segments.
• Tap the camcorder icon to record video for direct insertion into the timeline. You’re using the Camera app from within iMovie, with access to all the expected features (front or back camera, still or video recording). Tap the Done button when you finish shooting or filming, and you return to the My Project screen, with your freshly shot footage added to the timeline.
- (Optional) Tap the musical-notes icon above the timeline (refer to Figure 3.56) to add background audio to your project.
- (Optional) Tap the gear icon (refer to Figure 3.56) to change various settings, such as the theme.
The Project Settings popover opens (Figure 3.58).
Figure 3.58. Pick a theme and establish your project settings here.

In the Project Settings popover shown in Figure 3.58, background audio has been added to the timeline; the green background represents the duration of the audio.
- (Optional) Tap the waveform icon (refer to Figure 3.56) to edit audio levels.
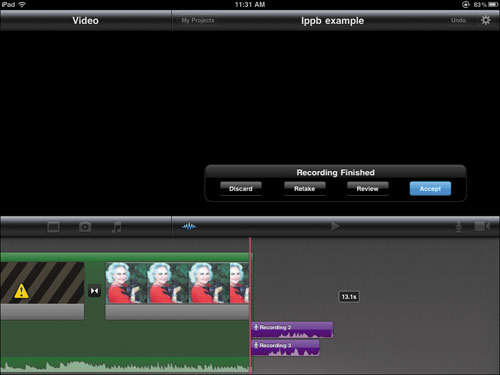
- (Optional) Tap the microphone icon (refer to Figure 3.56) to record narration.
An overlay displaying your audio level (volume) and a Record button appears (Figure 3.59).
Figure 3.59. Ready to start recording narration.

Tap Record, and after a 3-second countdown, recording begins. Tap the Stop button when you finish; then tap Discard, Retake, Review, or Accept in the resulting display (Figure 3.60).
Figure 3.60. Decide what to do with your most recent narrative take.
- When you have the project the way you want it, return to the original My Projects screen by tapping the My Projects button at the top-center of the My Project screen.
Your project is front and center in the My Projects screen below a “Now Playing” marquee that lists the project’s name.
Give your project a name
Although My Project could be a functional movie title, it isn’t as compelling as The High and the Mighty or even as descriptive as Marcus’s Little League Opener. You really want to add an evocative title so that you can find the movie easily later.
Naming your movie:
- Tap the project title in the marquee to select it.
The project’s title is highlighted, and the virtual keyboard appears (Figure 3.61 on the next page).
Figure 3.61. Selected project.
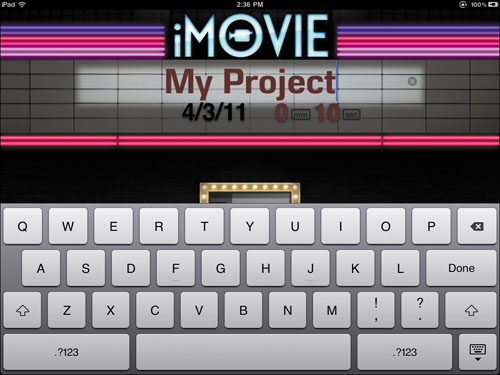
- Tap the little x at the right end of the highlighted area.
The current title disappears.
- Type your new project title.
Fill your distribution channels
Sometimes, people create videos for their own use, but most movies are created for a wider audience: friends, family members, or the world at large. Now that the project has a name, it’s time to determine where you want it to be distributed. iMovie makes it easy for you to send the project to several video-sharing sites.
Sharing your movie:
- Tap the curved-arrow Action button at the bottom of the My Project screen.
A popover appears, listing six common destinations (Figure 3.62).
Figure 3.62. Pick a place to send your video.
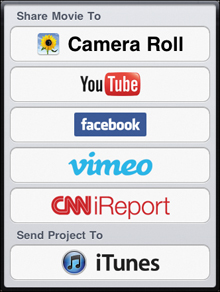
- Tap one of the destinations:
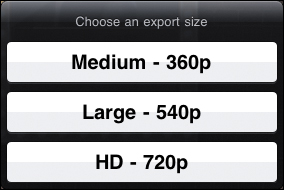
• Camera Roll saves your movie in your iPad’s Camera Roll album in your choice of three sizes (Figure 3.63). Then you can view it in the Photos app, share it via email or MobileMe, or sync it back to your Mac or PC.
Figure 3.63. Choose a size for the video you’re saving to the Camera Roll album.
• YouTube is the 800-pound gorilla of modern video sharing. You need a free account to post your movies on YouTube.
• Facebook is the preeminent social-networking site of the day. If you have a free Facebook membership, you can host your movies on your personal page for your friends and acquaintances to view and comment on.
• Vimeo is another popular video-sharing site, best known for leading the way in hosting high-definition video, White House broadcasts, and famous performers’ work. The basic (and limited) membership is free; the Plus membership currently costs $60 per year.
• CNN iReport lets everyday folk submit videos about breaking news. It’s a sort of news wiki, without any fact-checking or peer review.
• iTunes lets you save your project via iTunes File Sharing so that it’s accessible to other iPads, iPhones, and iPod touches.
If you want your movie to go to multiple destinations, you need to choose them one at a time, because each destination requires its own settings or sign-in process.
Streaming Your Own Video Project
Difficulty level: Intermediate
Software needed: Air Video ($2.99) or Air Video Free (free), Air Video Server (free)
iPad model: Any
Additional hardware: Mac or Windows computer
We love TV and movies, and the iPad is a fantastic platform on which to watch our video. Unfortunately, the iPad’s Videos and iPod apps don’t support most of the formats in which video is commonly distributed. The iPad likes only MPEG-4 (MP4 or M4V). It doesn’t like several common formats that you’d need to transcode to play on your iPad, including MPEG-1 and MPEG-2 (used for VCDs [video compact discs] and DVDs); QuickTime; AVI, DivX, and Xvid (the last two are also MPEG-4, but not the preferred variant); Matroska (MKV); and Adobe Flash. Transcoding every one of these formats involves a diminution of quality resulting from recompression to the new format.
Add to that fact this consideration: Video takes a lot of space, and your iPad’s storage space is fairly limited. Your desktop (or laptop) computer, on the other hand, usually has a pretty large hard drive, and you can extend that space with additional drives. Wouldn’t it be nice to use your iPad to view the video stored on your computer without having to sync it? Thanks to InMethod’s Air Video products, you can do just that. Read on.
Get Air Video
You need two pieces of InMethod software:
• Air Video or Air Video Free. You can get Air Video at www.inmethod.com or from the App Store. If Air Video’s $2.99 price tag puts you off, or if you just feel compelled to try before you buy, you can obtain Air Video Free (available from the same sources), which limits the number of videos accessible in each folder.
• Air Video Server. You also need the free server software, available at www.inmethod.com. Air Video Server requires Mac OS X 10.5 (Leopard) or later, or Windows XP Service Pack 3 or later (the same Windows software required for iPad support).
Air Video streams virtually any video on your computer’s hard drive, transcoding it as necessary. The lone exception is copy-protected video, which you usually purchase or rent from the iTunes Store (see the nearby “Copy Protection and DRM” sidebar, if you’re curious).
Although Air Video transcodes on the fly, which is the way that most users employ it, you can perform the conversions before streaming the content. If you have a slower network (or a computer slower than a Core 2 Duo), you may want to perform the up-front conversion.
Obtaining the Air Video software:
- Point your Web browser to www.inmethod.com.
- Click the button labeled Get Air Video from the iTunes App Store, or click the link for the free version.
- In the App Store, follow the familiar steps to complete your acquisition and download the app to your iTunes Library.
- Sync your iPad so that the software is installed on your iPad.
- Back on the InMethod Web site, click the graphic for your operating system (the blue Apple logo if you’re using a Mac or the Windows logo if that’s your platform) to download the Air Video Server software for your computer.
The Server software for your platform downloads and installs itself on your computer.
If the Server software doesn’t install automatically when you download it, run the installer (Windows) or drag the Server application’s icon to your Applications folder (Mac).
Introduce your iPad to Air Video Server
Now that you have Air Video on your iPad and Air Video Server on your computer, it’s time to open the lines of communication.
Setting up Air Video Server:
- Launch Air Video Server.
You should see the dialog shown in Figure 3.64.
Figure 3.64. The Air Video Server Preferences dialog.
- If you want to specify a folder (such as your Movies folder on a Mac or your MyMovies folder in Windows), click the Add Folder button, and navigate in the Open dialog to select your folder.
Now your specified folder appears in the dialog’s list box, as shown in Figure 3.65.
Figure 3.65. Your first entry in the folders that Air Video can access.

- Repeat step 2 for any additional folders you want to make available.
Note that selecting a folder makes all subordinate folders accessible.
- To add iTunes playlists to the list of streamable locations, click the Add iTunes Playlist button.
The iTunes Playlists dialog opens (Figure 3.66).
Figure 3.66. Select any iTunes playlists you want to access.
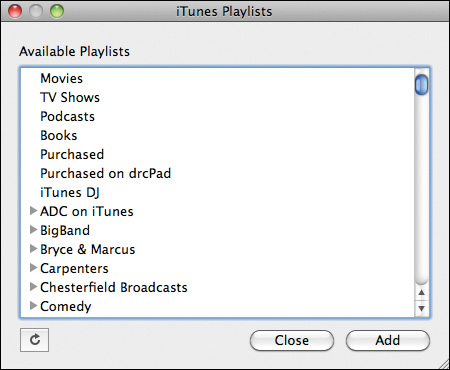
- Select the iTunes playlists (or categories) you want to add, and click Add.
You return to the Air Video Server Preferences dialog.
- Make sure that the Server Running switch at the top of the window is set to Yes, as shown in Figure 3.67.
Figure 3.67. Make sure that Server is turned on.

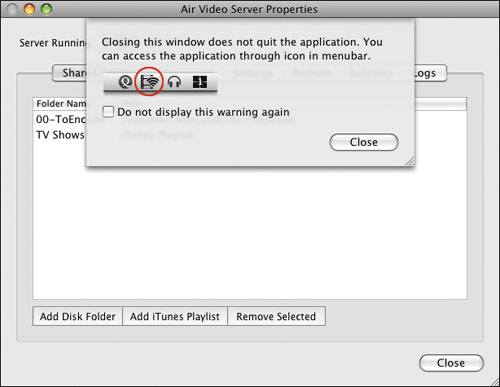
Air Video Server runs as a background process. No icon for it appears in either the Mac OS X Dock or the Windows taskbar. If you close the window, the application continues to run, and a dialog (Figure 3.68) informs you that you can still access it via an icon in the main menu bar (Mac) or system tray (Windows).
Figure 3.68. Use the menu-bar or system-tray icon to access the faceless Server application.
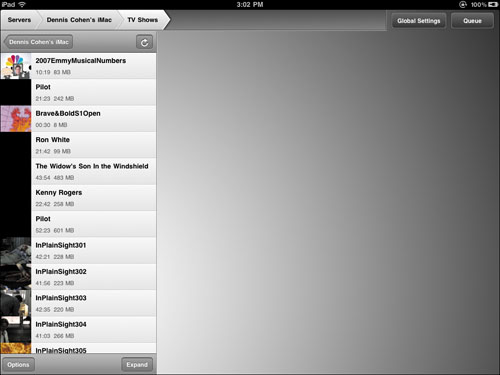
You’re good to go and should find your specified content available in the Air Server app on your iPad (Figure 3.69).
Figure 3.69. Your selected folders and their contents are now available on your iPad.
Play your content
Playing your content is simple, just as you’d expect on the iPad. Air Video’s iPad user interface operates in landscape orientation, even when the iPad is vertical. We find this fact somewhat amusing because Air Video started as an iPhone app and the iPhone user interface is portrait, even though playback is landscape.
At any rate, if you’re using your iPad in portrait orientation, rotate it 90 degrees to landscape or tilt your head 90 degrees (if you don’t mind being uncomfortable).
Playing a video:
- Select the video you want to play, tunneling down through your folder hierarchy if necessary.
The beginning of your video appears in the preview pane on the right side of the iPad screen (Figure 3.70).
Figure 3.70. The preview pane includes controls that start your video, convert your video, and manage the conversion queue.
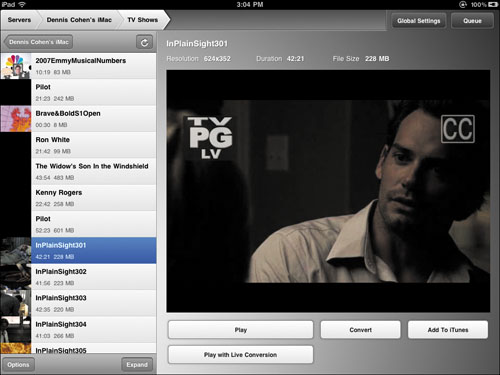
You can tap the Play with Live Conversion button if you’re into immediate gratification; tap the Convert button if you’re a disciple of Job; or, if the content is available in a compatible form, tap the Play button to stream it without having to do any conversion.
- For the purposes of this task, choose to be impatient, and tap Play with Live Conversion.
After a quick spin of the wait cursor, your video starts to play in the preview pane.
- Tap the double-arrow button in the bottom-right corner of the preview pane (Figure 3.71) to have your video appear full screen, if it doesn’t transition to full screen automatically.
Figure 3.71. When video is playing, controls are available at the bottom of the preview pane.

- In the controller overlay (Figure 3.72), do any of the following:
• Tap the 30-Second Rewind button to go backward in 30-second increments.
• Tap the Play/Pause button to switch from playing to pausing, and vice versa.
• Tap the Advance button to move to the next chapter marker (or the end of the video, if the video has no remaining chapter markers).
• Tap the Full Screen button again if you want to go back to the screen with the preview pane (refer to Figure 3.71).
• Drag the scrubber in the timeline to move to any point in the video you want. The current time code (how far into the video you are) is shown at the left end of the timeline, and the remaining time in the video is displayed at the right end.
Figure 3.72. Video displayed in full-screen mode and the controls available in that mode.

With the release of iOS 4.3 (coincident with the iPad 2’s debut), Air Video will play your videos over AirPlay in the background, so you can stream your content to an AppleTV-equipped HD television set.
Home Sharing Project
Difficulty level: Easy to intermediate
Software needed: iTunes (free), AirView (free)
iPad model: Any
Additional hardware: Another iOS 4.3 device (iPhone, iPod touch, iPad), AppleTV, Mac or PC
Long before the iPhone or iPad came to be, Apple introduced AirTunes, which supported streaming the music from a Mac or Windows PC running iTunes to remote speakers on a wireless network. (This feature sold a fair number of AirPort Express wireless units.) Later came AppleTV, which supported streaming video and audio content from computers to high-definition TV sets, as well as direct access to the iTunes Store for content. In iTunes 10, Apple upped the ante. The resulting feature, Home Sharing, let users share iTunes content with other wireless devices in a home network.
In iOS 4.3, Apple introduced AirPlay, which once again raises the bar. Now, in addition to sharing what’s in a computer’s iTunes Library, you can stream the content from one AirPlay-capable device to another—from your iPad to another iPad, an iPhone, or AppleTV, for example.
Although Home Sharing and AirPlay may seem to be similar, they’re quite different technologies:
• Home Sharing emanates strictly from a computer running iTunes. Other wireless devices on the home network request content from the computer. (Dennis’s iMac, for example, frequently streams video to AppleTV while his wife accesses songs from the garden.)
• AirPlay, on the other hand is a broadcast model. You start something playing on your computer or iPad, iPhone, or iPod touch, and AirPlay-capable devices pluck the stream from the air.
Stream from one iOS device to another
AirPlay, with the assistance of the free AirView app, lets you stream audio and video from a computer running iTunes or an iOS device to an iOS device running AirView or to any AirPlay-compliant receiver, such as AppleTV or remote speakers (with AirPlay circuitry or an AirPort Express connection). You might think of AirPlay as being a way to redirect the audio or video you’re playing.
AirPlay-capable speakers are available from manufacturers such as Denon, Marantz, and iHome. Bloomberg reports that AirPlay-capable devices such as TVs are coming in 2011, but no announcements were made while we were writing this book.
In the following section, we demonstrate streaming video from one iPad to another. (You can also stream from an iPad to an iPhone, an iPod touch, or AppleTV, but because you’re reading The iPad 2 Project Book, the following task is all iPad.)
Streaming from iPad to iPad:
- If you don’t have AirView installed, go to the App Store and download it.
- On the iPad that will receive the stream, tap the AirView app’s icon to get it running.
You should see the screen shown in Figure 3.73.
Figure 3.73. AirView is waiting to be served some content.

- On the iPad that contains the content you want to stream, start playing that content.
- In the control strip at the bottom of the screen, tap the AirPlay button (Figure 3.74).
Figure 3.74. The AirPlay button lets you select a destination device.

A pop-up menu appears, listing all the devices that are AirPlay clients.
- Tap the destination iPad.
Your video (or audio) stops playing on the originating iPad and starts playing on the destination iPad.
You can’t use AirPlay to transmit digital rights management (DRM) material, as we discuss in the Streaming Your Own Video Project earlier in this chapter.
You can use Air Video and AirPlay to stream convert-on-the-fly content to AppleTV with the help of Air Video Server 2.4.5 or later. At this writing, this method is the only known way to view certain types of content (Adobe Flash, DivX, MKV, and so on) via AppleTV.
Share your iTunes Library
Almost from the start, iTunes has supported sharing an iTunes Library from one Mac or PC to other computers. The addition of Home Sharing takes this functionality one step further. Now you can access your iTunes content not only on other computers, but also on any iOS device that contains your iTunes Store account information.
After an iTunes Library is set up as a server, all activity is initiated by devices on the network. Therefore, you can’t use Home Sharing to get content to AppleTV or to wireless speakers, which have no user interface for requesting data.
Accessing a shared iTunes Library on an iPad:
- Launch iTunes on your Mac or PC.
- Turn on Home Sharing by choosing Advanced > Turn On Home Sharing.
- Enter your Apple ID and password in the Home Sharing screen (Figure 3.75), and click the Create Home Share button.
Figure 3.75. The Home Sharing screen.
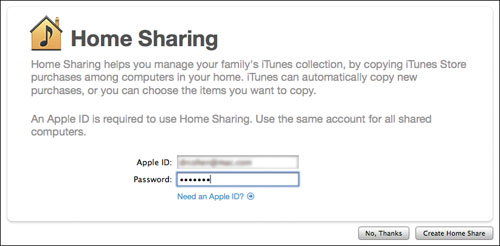
- Do one of the following things:
• Open your iPad’s iPod app, tap the Library entry to open a Home Sharing popover, and choose the library from which you intend to share audio (Figure 3.76).
Figure 3.76. Choose the library from which you want to retrieve songs.
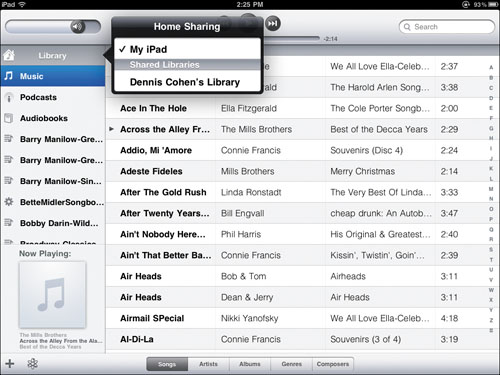
• Open your iPad’s Video app, tap the Shared tab, and choose the library from which you intend to play video (Figure 3.77). (We had only one shared library at the time we wrote this project, so that’s what you see in the figure.)
Figure 3.77. Select the library from which you want to retrieve video in the Shared pane.
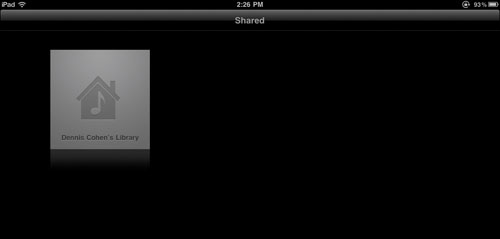
- At the top of the resulting screen, tap the tab that represents the type of content you want to share: Movies, TV Shows, Podcasts, Music Videos, or iTunes U (Figure 3.78).
Figure 3.78. Select the category of the content you want to play.
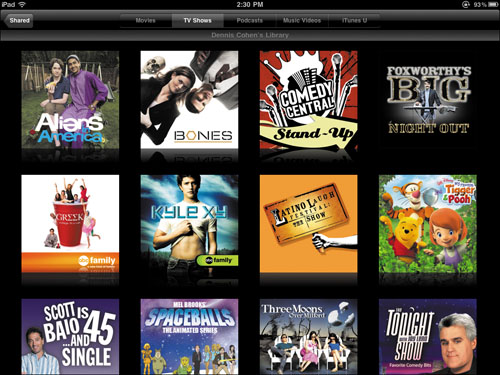
- Tap the thumbnail that represents the actual content you want to share; then tap the Play button that appears.
The content starts to play on your iPad.