2. Working and Playing in the iPad
When the iPad made its debut in 2010, the conventional wisdom branded it as just a media-consumption device, and the conventional wisdom was right...except for that four-letter word just.
In this chapter, we show you how to do more with your iPad. Turn the page and follow along as we demonstrate how to get real work done with it: in the kitchen, in the classroom, in the office, on the Web. In case you get exhausted by all that work, we also show you how to plan a vacation with the iPad.
Why do we do all this? We do it because the iPad is more than just a media-consumption device. That’s our unconventional wisdom.
Go to Meeting Project
Software needed: iTunes 10.2 or later, Dropbox 1.3.1 (free), GoodReader 3.5 ($4.99), Instapaper 3.0.1 ($4.99)
iPad model: Any
Additional hardware: None
Your iPad is fabulous, and you take it just about everywhere you go. Why not use it for work, in or out of the office? This project talks about moving files back and forth among your iPad, your computer, your colleagues, and the ’net. We show you how to download and read files via email, iTunes, and Dropbox; how to read and mark up a PDF in GoodReader; and how to use Instapaper to mark Web content for later reading.
Email files to yourself
Probably the easiest way to move a file between your computer and your iPad (or smartphone) is to send the file as an email attachment. You create the email on your computer and attach the file you want to be able to use on your iPad. Then you send the file to yourself, using an address in a mail account that you can access on your iPad. Mail on the iPad can preview PDFs; iWork files; and Microsoft Word, Excel, and PowerPoint files.
There’s a catch, however: The iPad can preview only certain file formats (see the nearby sidebar “Mail Attachments That the iPad Can Preview”). You can view these files in Mail—or see them or hear them—but you can’t edit them in Mail. If you want to modify or edit these files, you need another app. We describe some of the ways to edit files later in this project.
If you do have an app that can edit a file type, Mail may know about it and ask whether you want to open the attached file in that app—another task that we cover later in this project.
If Mail or the iPad doesn’t support the format of an attached file, you see the name of the attached file in the body of the email, but you can’t open it on your iPad. You may be able to open it on a computer, however.
Emailing yourself a file to preview on the iPad:
- Using a computer instead of your iPad, address an email to yourself.
Be sure to use an address in an email account that you’ve set up on your iPad (see the Mail Management Project in Chapter 1). Fill out the Subject line, too, so that your Internet service provider won’t think it’s spam.
- Attach a file that you want to read on your iPad.
For the purposes of this task and the next one, attach a Microsoft Word .doc file.
The process for previewing other kinds of files on your iPad is very similar. The “Mail Attachments That the iPad Can Preview” sidebar lists files that the iPad and Mail can read natively.
- Send the email to yourself.
Previewing a Microsoft Word file in Mail:
- Open an email with an attached Word file (see the preceding task).
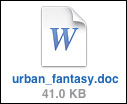
You see an icon in the body of the email like the one shown in Figure 2.1. (If you’ve installed another app that can read Word files on the iPad, you may see that app’s icon instead.)
Figure 2.1. Icon for an attached Word file in Mail.
- Tap the icon.
A preview screen opens (Figure 2.2).
Figure 2.2. Mail showing a preview of a Word document.

- Read the document.
If the attached file is a multiple-page document, you can swipe up or down to page through the file. You can copy and paste from the previewed document, though you can’t edit it.
- When you finish reading, tap the blue Done button in the top-left corner.
The preview screen disappears, and the email you began with is revealed.
If you tap the curved-arrow Action button in the top-right corner of a Mail preview screen, you see a popover like the one in Figure 2.3.

Use Dropbox to share and sync files
Dropbox allows you to share data between computers and other devices by storing your files on its servers. A free account gives you 2 GB of file storage. (You’ll be warned before you reach the limit.) You can access any files that you upload from any device that has Dropbox installed or from the Dropbox Web site:
• On your computer, Dropbox creates a Dropbox folder. Any file or folder that you add to the Dropbox folder is available to you via Dropbox on your iPad.
• On your iPad, you can share any file in your Dropbox by dragging a file into your Public folder, and you can sync files that you’ve marked as favorites in Dropbox.
In the following sections, we show you how to log in to Dropbox on your iPad, favorite a file in Dropbox, sync individual files in Dropbox, and share a file and a folder using Dropbox.
Syncing files in Dropbox works a little differently on an iPad than it does on a computer. On a computer, the files in your Dropbox sync automatically, but on an iPad, files sync on demand. You have to mark any file you want to sync on your iPad as a favorite before you can sync, so we present those tasks in that order.
Getting the software:
- Register for a free Dropbox account at www.dropbox.com.
- Download the software for your operating system (Mac, Windows, or Linux).
- Download the free Dropbox for iPad app from the App Store.
Logging in to Dropbox:
- Launch Dropbox by tapping its icon.
You see the login screen (Figure 2.4).
Figure 2.4. The Dropbox login screen.
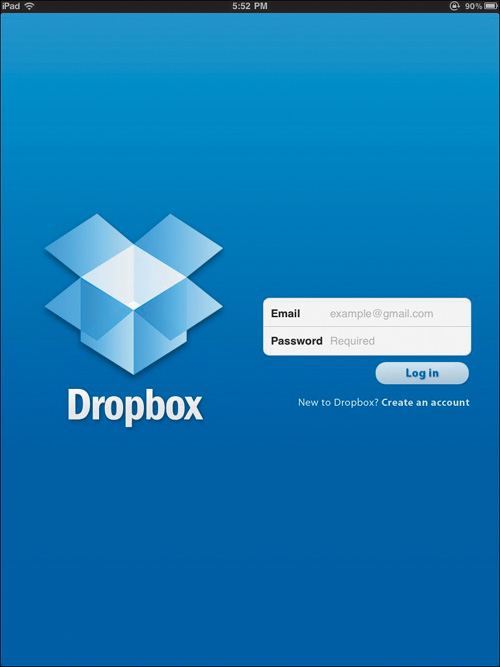
- Enter the email address and password you used to register with Dropbox; then tap Log in.
You see the Welcome to Dropbox! screen (Figure 2.5).
Figure 2.5. Dropbox welcome screen.

- Tap the My Dropbox icon.
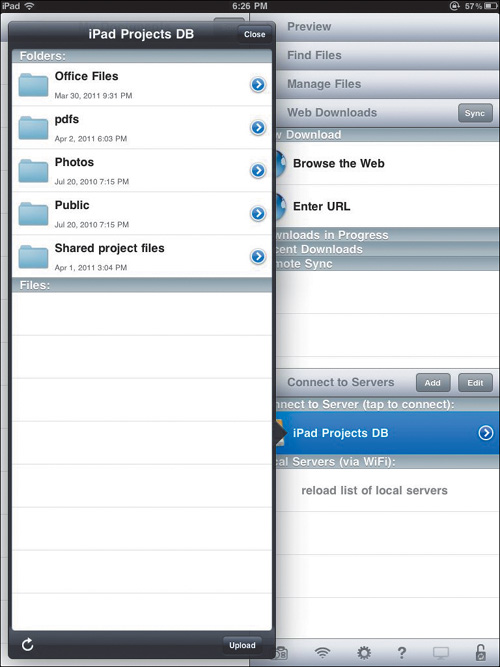
You see the My Dropbox popover (Figure 2.6 on the next page). (Your list of folders and files may look different.) Dropbox automatically creates the Photos and Public folders for you; these folders have special properties and purposes.
Figure 2.6. My Dropbox popover.
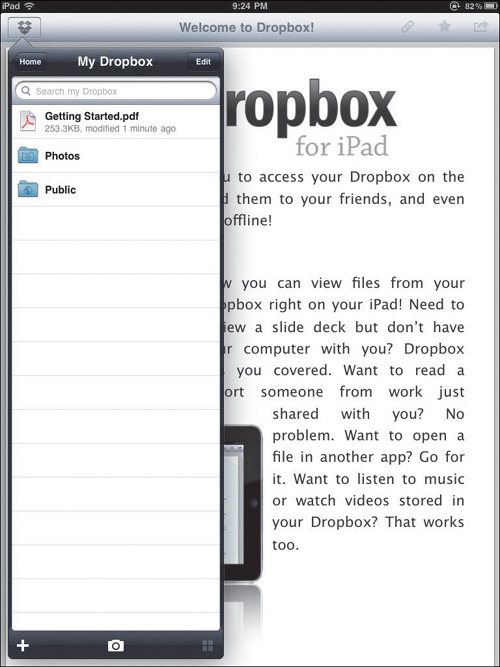
You can create a new folder by tapping the plus sign in the bottom-left corner of any Dropbox file list, including the My Dropbox popover.
My Dropbox is the heart of Dropbox on an iPad. Almost everything you do with the app starts with My Dropbox.
Favoriting a file in Dropbox:
- Launch the Dropbox app on your iPad.
You should see the My Dropbox popover (refer to Figure 2.6). If you don’t see My Dropbox, tap the My Dropbox icon.
- Tap a file in the list.
The file opens in Dropbox’s preview screen (Figure 2.7).
Figure 2.7. Dropbox preview screen.
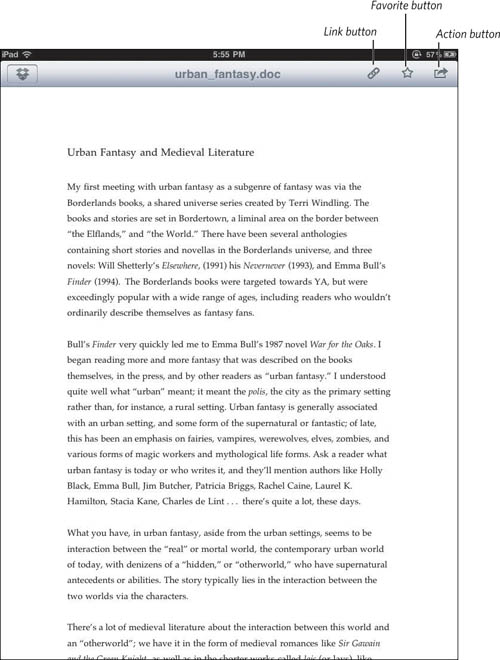
- Tap the Favorite button at the right end of the screen’s toolbar.
The star turns dark to indicate that you’ve marked the file as a favorite. You also see a small star-in-blue-circle badge on the icons of any files you’ve favorited in Dropbox lists.
Syncing on demand:
- Tap the Home button in the top-left corner of the My Dropbox popover (refer to Figure 2.6 earlier in this project).
The Home popover opens.
- Tap Favorites.
You see a Favorites popover. Any files that need to be synced and updated to a later version on another device have a green-circle-and-white-arrow badge on their icons.
- Tap a single file to update and sync it, or tap the Update All button in the bottom-right corner.
The icon badges change to a small green circle with a white check to reflect that the files have been updated (Figure 2.8).
Figure 2.8. Dropbox icon badge showing updated status for a synced file.

Sharing a file via Dropbox:
- Open the file in Dropbox.
- Tap the Link button in the top-right corner of the screen (refer to Figure 2.7).
The resulting popover displays two options: Email Link and Copy Link to Clipboard (Figure 2.9).
Figure 2.9. Popover showing linking options.

- Tap Email Link.
You may briefly see a spinning-gear “busy” screen, followed by an email invitation containing the link (Figure 2.10).
Figure 2.10. Email invitation to share a Dropbox file.
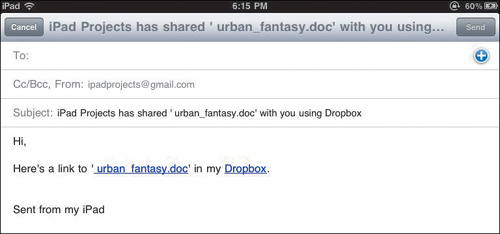
- Add an address to the email, and possibly a note; then tap Send.
The recipient doesn’t have to have a Dropbox account to access the linked file; he just clicks the link in your email and downloads the file.
Sharing a folder via Dropbox:
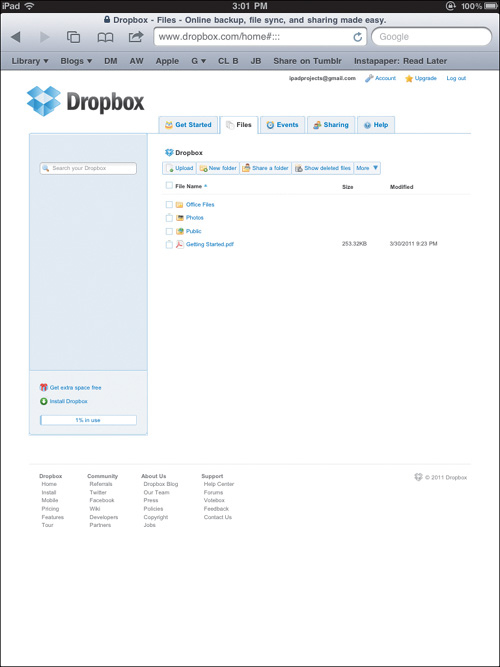
- Open Safari on your iPad, and go to www.dropbox.com.
- Log in to your Dropbox account.
You see your home page (Figure 2.11).
Figure 2.11. Dropbox home page on the Web.
- Tap the Sharing tab at the top of the page.
A page like Figure 2.12 opens.
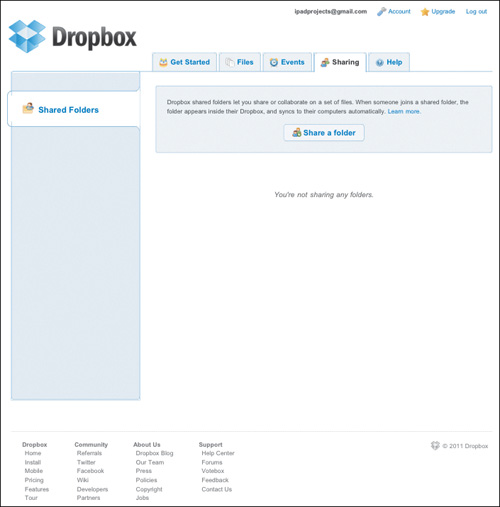
- Tap the Share a Folder button in the top center of the page.
You see a dialog like the one in Figure 2.13.
Figure 2.13. Sharing-options dialog.

- Select the radio button titled I’d like to create and share a new folder, and type Shared project files in the adjacent field; then tap the blue Next button.
You see a form like the one shown in Figure 2.14.
Figure 2.14. Web-sharing invitation.
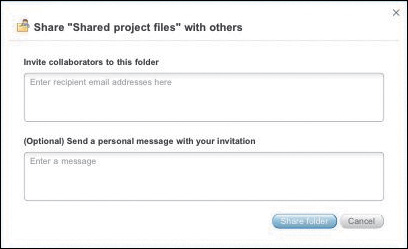
- Enter email addresses in the top field and a short message in the bottom field; then tap the blue Share folder button.
You can share a folder with someone who doesn’t have Dropbox installed on her computer but who has a Dropbox account. She can access the folder via www.dropbox.com.
 After a second or so, you see your new shared folder (Figure 2.15). If you look in My Dropbox on your iPad, you’ll see the new folder there too. Shared folders have a badge on their icon like the one shown in the margin.
Figure 2.15. A new shared folder.

Your collaborators receive your email invitation with a link inviting them to join the shared folder. (It’s a good idea to email them first to let them know to watch for the invitation from Dropbox.) After they do, you receive a confirmation email.
You can place files or other folders in a shared folder and share the contents with anyone whom you invite. Your collaborators can also add and remove folders and files.
Get started with GoodReader
GoodReader is a reader designed for the iPad. It can read many kinds of files, and even share them, but it is most useful for reading and annotating PDF files. In this project, we show you how to transfer files to GoodReader, personalize your annotations, and annotate a PDF file.
We can’t possibly cover all the things you can do with GoodReader. To find out more, tap the question-mark icon in any screen in GoodReader, or visit the helpful manual at www.goodreader.net/gr-man.html.
Getting the app
• Purchase (for $4.99) and download the GoodReader app from the App Store.
Transfer a file from a computer to GoodReader
Email isn’t the only way to transfer files to your iPad. You can use iTunes to copy files to your computer from your iPad and from your iPad to your computer. When your iPad is connected to your computer via a USB port and the dock connector, the iTunes Apps tab contains a File Sharing section.
In the following task, we show how to transfer files from your computer to GoodReader, but the process is the same for any app that supports iTunes file transfer.
GoodReader uses the iPad’s built in viewing engine (see the “Mail Attachments That the iPad Can Preview” sidebar earlier in this project) as well as its own to read the following file types: .pdf, .txt, .jpg, .jpeg, .gif, .tif, .tiff, .bmp, .bmpf, .png, .ico, .cur, and .xbm.
Transferring files to your iPad via iTunes:
- Connect your iPad to your computer.
- Launch iTunes, if it doesn’t open automatically.
- Select your iPad in the iTunes Source list.
- In the main iTunes window, click the iPad’s Apps tab.
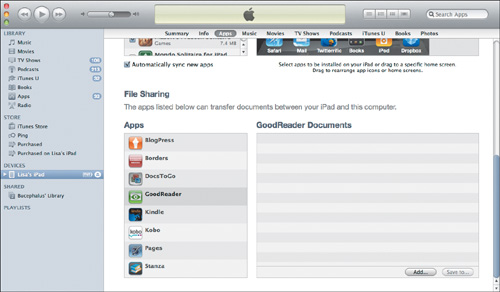
- Scroll down until you see the File Sharing pane (Figure 2.16).
Figure 2.16. iTunes File Sharing pane.

- Select GoodReader in the Apps list on the left side of the pane.
A GoodReader Documents list appears (Figure 2.17 on the next page).
Figure 2.17. GoodReader Documents list.
- Click the Add button in the bottom-right corner of the pane.
You see a familiar Open dialog for Windows or for Mac.
- Navigate to and select the files you want to transfer to your iPad.
For this task, select Word, PDF, and ePub files.
- Click the Choose button.
Your selected files appear in the GoodReader Documents list (Figure 2.18).
Figure 2.18. The Documents list with new files.

When the file is in GoodReader for iPad, you can read and annotate it, as we show you in the following section.
On a Mac, instead of completing steps 8 and 9, you can drag a file from a Finder window to the Pages Documents list.
If you want to transfer a file from your iPad to your computer via iTunes, the process is almost exactly the same until step 7; to transfer a file from your iPad to your computer, click the Save button.
Download and read files from Dropbox in GoodReader
In the following tasks, we show you how to connect GoodReader with your Dropbox account and download files.
Adding a Dropbox server to GoodReader:
- Launch GoodReader.
You see the My Documents screen (Figure 2.19).
Figure 2.19. My Documents screen.
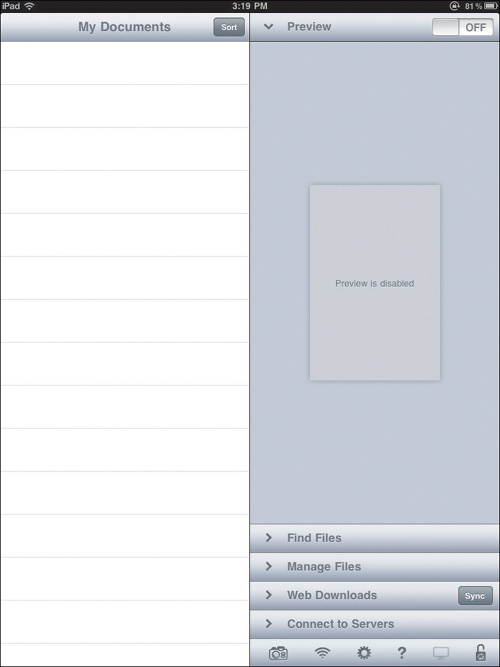
- Below the Preview list, tap the Connect to Servers bar.
You see the buttons shown in Figure 2.20.
Figure 2.20. Connect to Servers bar.

- Tap the Add button.
The Create New Connection popover opens (Figure 2.21), listing the servers GoodReader can connect to.
Figure 2.21. Create New Connection popover.
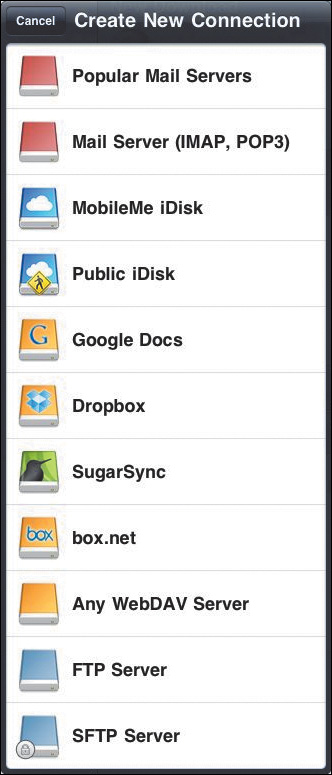
- Tap Dropbox.
A Dropbox login screen opens (Figure 2.22).
Figure 2.22. Dropbox login screen.

- Enter a title in the Readable Title field.
The name that you give this server account (such as iPad Projects DB) will identify it for you when it appears in the list of servers in the My Documents screen. You must enter something in this field.
- (Optional) Enter your Dropbox login information in the User and Password fields.
If you leave these fields empty, GoodReader will ask you for the information each time you access your Dropbox account from GoodReader.
- Tap the blue Add button in the top-right corner.
Your new Dropbox server is added to the Connect to Servers bar in the My Documents screen (Figure 2.23).
Figure 2.23. Connect to Servers bar showing the new server.

Downloading a file to GoodReader:
- Open GoodReader.
- Navigate to the My Documents screen, tapping the My Documents button if that screen isn’t open.
- Tap your Dropbox server in the Connect to Servers bar (refer to Figure 2.23).
You see a popover similar to the one in Figure 2.24.
Figure 2.24. Dropbox server popover.
- Select a file to view in GoodReader (Figure 2.25).
Figure 2.25. Selected PDF file.

For this task, select a PDF file, but the steps are the same for opening any type of file.
- Tap the Download button in the bottom-right corner of the popover.
A My Documents popover opens (Figure 2.26). The dialog in the figure shows previously downloaded files, which are dimmed and unavailable.
Figure 2.26. My Documents popover.
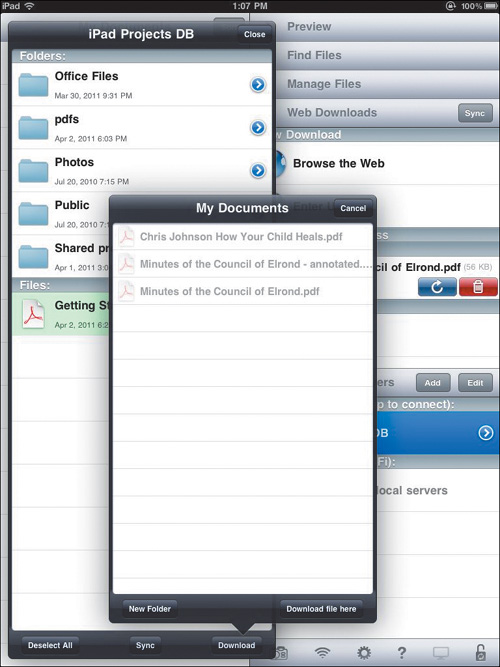
- Tap the Download File Here button in the bottom-right corner of the My Documents popover.
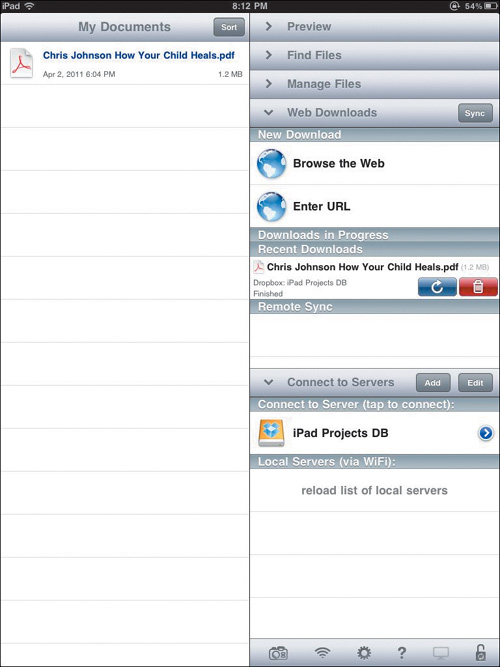
If you’re very observant, or if the file is quite large, you may see a downloading progress bar. Then the downloaded PDF file is listed in the My Documents screen (Figure 2.27).
Figure 2.27. My Documents screen showing the newly downloaded file.
If you opened a folder in Dropbox, tap the Close button in the top-right corner of the folder’s popover.
Reading a PDF in GoodReader:
- Launch GoodReader, and tap a file in the My Documents screen.
For this task, select a PDF file, but the procedure is the same for any type of file.
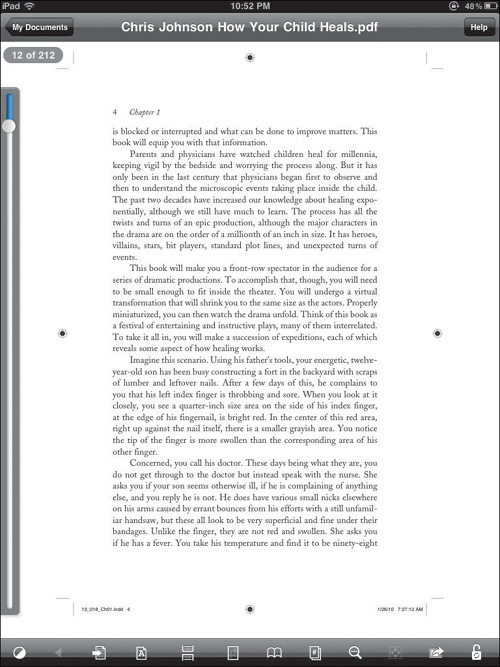
You see a screen that’s similar to Figure 2.28, showing the first page of the PDF file. The navigation bar at the bottom of the screen disappears fairly quickly to let you concentrate on reading.
Figure 2.28. First page of a PDF.

- Tap the center of the screen to make the navigation bar reappear, along with the scroll bar on the left side of the screen (Figure 2.29).
Figure 2.29. GoodReader’s scroll bar and navigation bar.
The buttons in the navigation bar (Figure 2.30) perform the following functions:
Figure 2.30. PDF navigation bar.
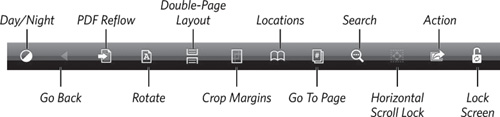
• Day/Night toggles the screen between black text on a white background (for reading by day) to white text on a black background (for reading at night).
• Go Back is similar to the Back button in a Web browser. Tapping this button takes you back one page in your GoodReader history.
• PDF Reflow extracts text from a PDF page so that you can read it comfortably, without left/right scrolling and in the font size of your choice. Tap the button again to return to the PDF file.
• Rotate rotates a file, which is useful for files that contain scanned images.
• Double-Page Layout lets you view two pages at a time.
• Crop Margins temporarily reduces margins to save screen space.
• Locations displays your own bookmarks, the table of contents, and your annotations for the current PDF (covered later in this project).
• Go To Page lets you enter a page number to find.
• Search lets you search for text within the document.
• Horizontal Scroll Lock toggles horizontal scroll lock. When the lock is on, you can move a page only vertically. This button appears with other kinds of files.
• Action performs different tasks based on the kind of file being viewed. It always includes options to email the file, to open it in another app on the iPad, and to delete it.
• Screen Lock locks screen rotation temporarily.
- Read the file as you’d read any other onscreen file.
Annotate PDFs in GoodReader
Annotating PDFs—making notes that contain your name or initials—makes it easier for your colleagues who share files with you to keep track of who said what.
In this section, we show you how to personalize GoodReader so that your initials or name will be associated with the annotations you make in the next task.
Personalizing GoodReader’s PDF settings:
- Open GoodReader’s My Documents screen.
- Tap the gear icon at the bottom of the screen to display GoodReader’s Settings popover (Figure 2.31).
Figure 2.31. Settings popover.
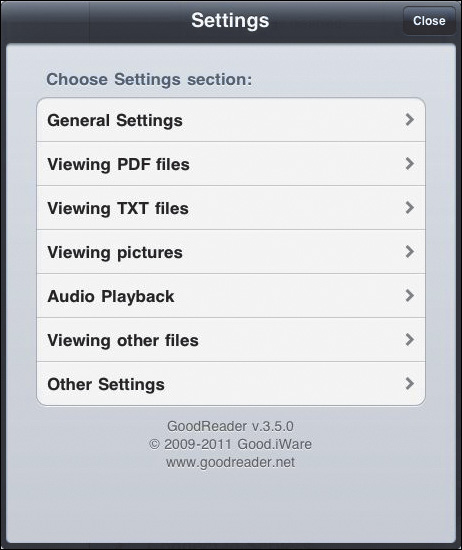
- Tap Viewing PDF files.
The PDF files popover opens (Figure 2.32).
Figure 2.32. PDF files popover.
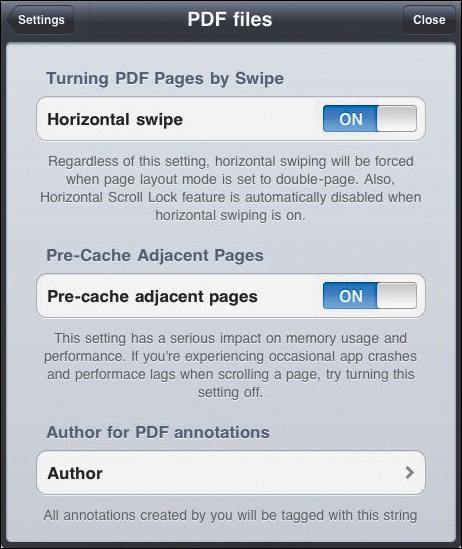
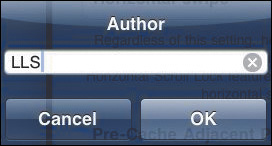
- Tap the Author field.
- Enter your name or initials in the pop-up Author dialog (Figure 2.33), and tap OK.
Annotating a PDF file:
- Open a PDF file in GoodReader.
- Tap and hold anywhere on the PDF page where you want to add a note.
When you tap and hold, GoodReader attempts to select the nearest word in preparation for an annotation. Use the drag handles to increase or decrease the selection.
The annotation bar appears (Figure 2.34).
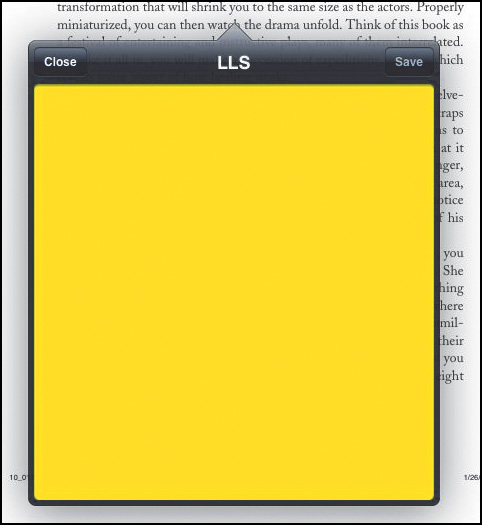
- Tap Note.
If you’re making your first annotation or modification in a PDF, a dialog like the one shown in Figure 2.35 appears. This dialog appears only the first time; it doesn’t appear again.
Figure 2.35. You can annotate a copy or the original PDF file.

- Tap Save to this file.
The yellow window shown in Figure 2.36 appears, ready for you to type a note.
Figure 2.36. A note annotation.
- Type something in the window and then tap the Save button.
A yellow note marker appears on the PDF page (Figure 2.37).

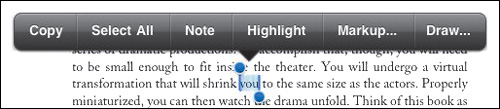
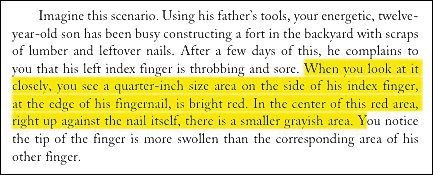
- Tap and hold somewhere else on the page to display the annotation bar, and use the drag handles to select several words of text.
- Tap Highlight in the annotation bar (refer to Figure 2.34).
The passage of text you selected is highlighted in the PDF file (Figure 2.38).
Figure 2.38. Highlighting in GoodReader.
- Tap Markup or Draw in the annotation bar.
A new button bar appears.
- Experiment with the options in the new button bar to annotate the PDF further.
All of GoodReader’s annotation tools work with either a quick tap or a tap and hold. If one technique doesn’t do what you expect, try the other.
Use Instapaper to read on the go
Instapaper allows you to save articles or blog posts in a Web browser to read later, even on another computer, a smartphone, or an iPad. After you link your Instapaper account to one of the supported social-networking services, you also have an option to share stories through Facebook, Twitter, Tumblr, Pinboard, Evernote, and many other apps and services.
In this section, we show you how to open your free Instapaper account and get the Instapaper app.
It’s quite possible to use Instapaper only on your iPad, but if you browse the Web on more than one device, it’s convenient to have access to your saved content everywhere.
Getting started with Instapaper:
- On your computer, go to www.instapaper.com, and click the Create Account link.
- Follow the onscreen instructions to create your account.
- On your iPad, purchase and download the Instapaper app from the App Store.
- Launch the Instapaper app on your iPad.
You see the login screen (Figure 2.39).
Figure 2.39. Instapaper login screen.

- Enter your email address and Instapaper password; then tap Done on your iPad’s onscreen keyboard.
The Read Later screen opens (Figure 2.40). This screen is where you’ll find content that you’ve saved to read later.
Figure 2.40. Read Later screen.

Install the Read it Later bookmarklet
To use Instapaper to mark Web content for later reading on both your computer and iPad, you need to install the Instapaper bookmarklet on your computer’s Web browser and in Safari on your iPad, as we show you how to do in this section.
Installing the Read it Later bookmarklet on your iPad is laborious because of the way Safari works on the iPad. If you use Safari on your computer, it’s much easier to install the Read it Later bookmarklet there and sync with your iPad. We show you both methods in the following tasks.
Installing the bookmarklet in any Web browser on your computer:
- On your computer, launch your preferred Web browser.
- Go to www.instapaper.com/extras.
- Follow the instructions on the page to install the bookmarklet in your Web browser.
The Read it Later bookmarklet works beautifully in the Mac OS X and Windows versions of Mozilla Firefox and Google Chrome, as well as in Safari (see the next task). Just drag the bookmarklet to your toolbar or bookmark bar.
Installing the bookmarklet in Safari on your computer:
- Launch Safari on your computer.
- Go to www.instapaper.com/extras.
- Follow the instructions on the page to install the bookmarklet in Safari.
- Sync your iPad and your computer, following the instructions in the Information Syncing Project in Chapter 1 of this book.
Your bookmarklet is magically transported to Safari on your iPad, along with your other Safari bookmarks.
If the bookmarks bar isn’t visible in Safari on your iPad, open the Settings app, tap Safari, and select Always Show Bookmarks Bar.
Installing the bookmarklet in Safari on your iPad:
- Launch and log in to Instapaper on your iPad.
- Tap the Settings button at the top of the Read Later screen (refer to Figure 2.40 earlier in this project).
You see the Settings popover (Figure 2.41).
Figure 2.41. Instapaper Settings popover.
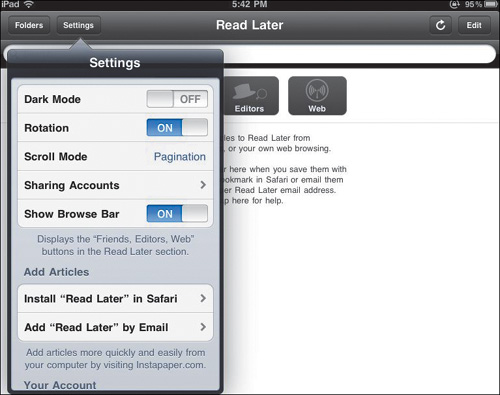
- Tap Install “Read Later” in Safari.
- Follow the instructions on your iPad’s screen.
Save and read content in Instapaper
Now that you have Instapaper and the Read it Later bookmarklet installed, you can save Web pages for reading later in Instapaper.
Saving and reading Web content:
- Find a page on the Web that you want to read later.
- Select the Read it Later bookmarklet in your browser’s toolbar.
A graphic flashes in the top-left corner of the browser page, saying first Instapaper Saving and then Instapaper Saved!
- Launch and log in to the Instapaper app on your iPad.
The Read Later screen lists your saved content (Figure 2.42) and offers several options:
• The Folders button lets you see a list of folders, as well as create new folders.
• The Edit button lets you select articles to be deleted permanently.
• The Friends and Editors buttons display article lists saved by your friends and by specially selected Instapaper editors.
• The Web button lets you browse for more content directly in Instapaper.
Figure 2.42. Read Later screen with content.

- Tap an article in the list to read it.
You see the article reformatted for the screen (Figure 2.43).
Figure 2.43. An article screen in Instapaper.

You can also share Web content that you’ve saved in Instapaper with colleagues via email or by using several apps listed at www.instapaper.com/extras.
iPad Chef Project
Software needed: Epicurious Recipes & Shopping List 3.0 app (free), BigOven app (free), Apple’s Pages for iPad ($9.99)
iPad model: Any
Additional hardware: Kitchen and camera (optional)
This project is about finding recipes with the Epicurious and BigOven apps, favoriting the recipes you want to try, emailing recipes that you want to share, and creating your own recipe scrapbook in Pages for iPad.
Find recipes with Epicurious
Long before the iPad, there were cookbooks; glossy cooking and food magazines, many with equally glossy Web sites; and large community sites for cooks and lovers of food of all sorts. There still are. With so many resources available, searching for just the right recipe can be confusing.
Fortunately, iPad apps are available to save you time and effort. Epicurious.com, the Web home of Epicurious magazine, recently released a version of its iPhone app for the iPad. This free app (available at the App Store) makes it easy to browse or search thousands of recipes provided by Gourmet and Bon Appetit magazines, professional chefs, popular cookbooks, and famous restaurants. Here’s how.
Using Epicurious to browse recipes:
- Tap the Epicurious icon on your iPad to launch the app.
The Epicurious splash screen appears very briefly, followed by the home screen, with its Control Panel popover showing recipes in the Featured category (Figure 2.44).
Figure 2.44. Epicurious home screen.
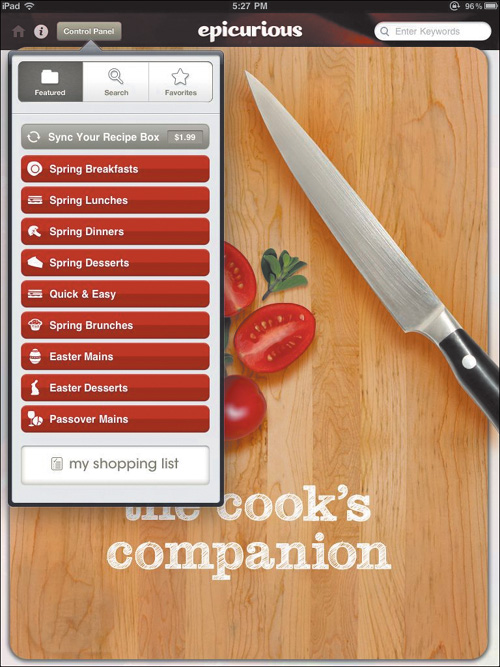
The categories change based on season, so your Control Panel will be different from the figure. It may also display an advertisement for additional pay-for features.
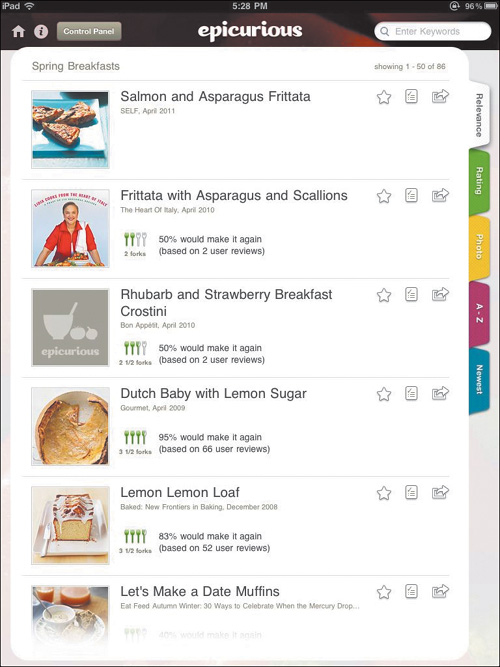
- Tap one of the categories to browse recipes by type.
You see a screen that looks very much like a page in a printed cookbook, with navigational tabs along the right side (Figure 2.45 on the next page).
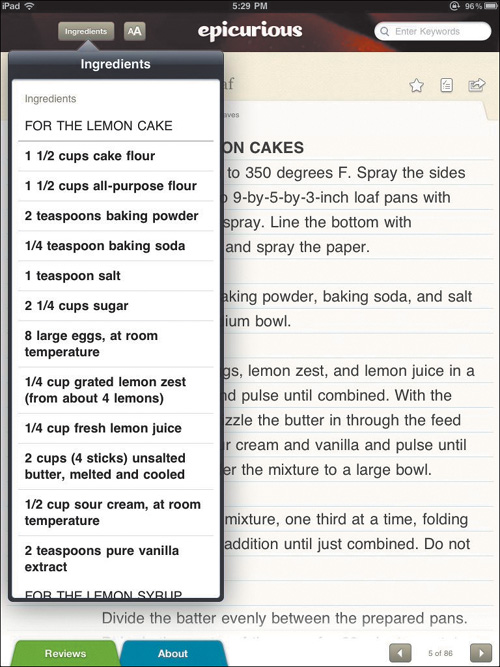
- Tap a recipe to see that recipe in its own screen, with the Ingredients popover open (Figure 2.46 on the next page).
Figure 2.46. Recipe screen with Ingredients popover.
- Tap the recipe to make the Ingredients window disappear and see information about preparing the dish (Figure 2.47).
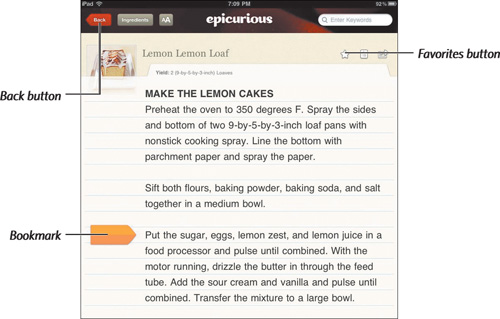
- For purposes of this project, tap the red Back button in the top-left corner of the recipe screen to return to the preceding category screen.
A display bug in version 3.0 of Epicurious may prevent the Back button from appearing. If you’re viewing a single-recipe screen and don’t see this button, rotate your iPad to change its orientation. The button will appear.
Searching for recipes in Epicurious:
- If a category screen isn’t already open on your iPad, tap the Back button to reach a category screen.
- Tap the gray Control Panel button in the top-left corner of the screen.
The Control Panel popover appears (refer to Figure 2.44 earlier in this project). Notice the row of buttons along the top (Figure 2.48).
Figure 2.48. Control Panel buttons.

- Tap the Search button at the top of the control panel to perform advanced searches.
You can search for a specific type of food or drink, a meal or course, the main ingredient in a recipe, or a cuisine. You can even search by dietary restriction or special occasion.
You can also search via the Search field in the top-right corner of each recipe screen, but that field limits you to a keyword search.
When you find a recipe you like by browsing or searching, you can favorite the recipe, much as you might bookmark a Web site, so that you can find it easily later. In the next task, we show you how.
Favoriting Epicurious recipes:
- Tap the Epicurious icon to open the app, if it isn’t already open.
- Locate a recipe that you want to be able to find later (see the preceding two tasks).
When you’re looking at that recipe’s page, you’ll find a white star to the right of the recipe title (refer to Figure 2.47).
- Tap the star to favorite the recipe.
The star turns blue to show that the recipe has been added to your favorites list.
If you want to remove a recipe from your favorites list, tap its blue star. The recipe is deleted from the list, and its star reverts to white.
Displaying your Epicurious favorites:
- Launch Epicurious, if it isn’t already open.
- If the control panel doesn’t appear on the home page, tap the gray Control Panel button in the top-left corner.
- Tap the Favorites button at the top of the control panel.
The My Favorites screen opens (Figure 2.49). (Yours will be different from ours, of course.)
Figure 2.49. My Favorites screen.

Each recipe in the list has three icons to the right of its title, as shown in Figure 2.50. All these icons work the same way wherever they occur in Epicurious.
Figure 2.50. My Favorites screen recipe icons.
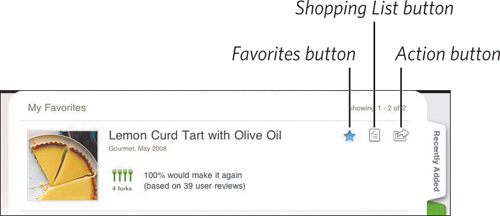
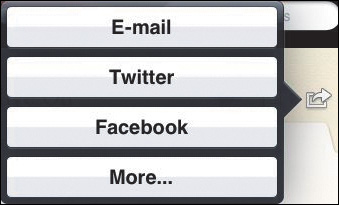
The Action button, for example, displays a popover when you tap it (Figure 2.51). The More option in this popover makes it easy for you to share recipes via email, Twitter, Facebook, and many other services, including Instapaper (discussed in the Go to Meeting Project earlier in this chapter).
Figure 2.51. Action-button popover.
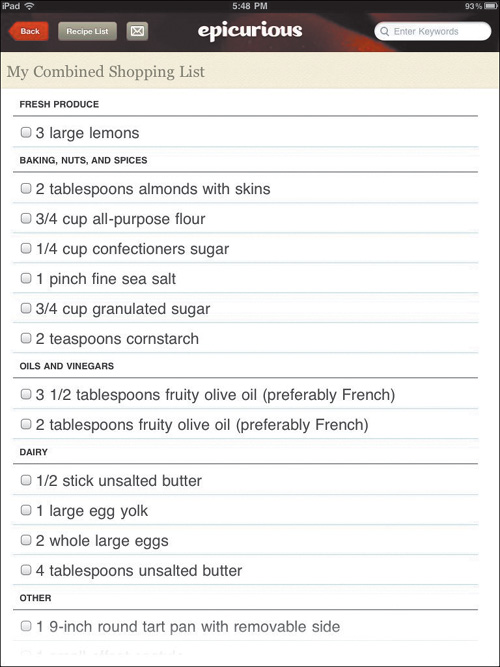
Viewing and emailing a recipe’s shopping list in Epicurious:
- Display your My Favorites screen (see the preceding task).
- Tap the Shopping List button to the right of a recipe’s name (refer to Figure 2.50) to generate a shopping list for that recipe.
- Display the shopping list by tapping the Control Panel button in the top-left corner to open the Control Panel popover and then tapping My Shopping List at the bottom of that screen.
You see a nicely laid-out My Combined Shopping List screen (Figure 2.52).
Figure 2.52. My Combined Shopping List screen.
- To email yourself a copy of a recipe, tap the red Back button in the top-left corner of the My Combined Shopping List screen to return to your My Favorites screen; then tap the Action button to the right of the recipe you want to send.
You see the Action-button popover (refer to Figure 2.51).
- Tap E-mail.
Epicurious creates a blank email ready for you to add addresses, with the Subject line listing the recipe’s title and the body containing the recipe (Figure 2.53).
Figure 2.53. Epicurious recipe in a ready-to-address email.

- Add the recipient’s email address and a brief message.
For this task, address the email to yourself.
- Tap the Send button.
In a minute or two, if you check your email, you should see a nicely formatted recipe in your inbox.
Get the BigOven app and create an account
You need to download the free BigOven app from the App Store. You also need a free BigOven account if you want to sync favorite recipes with the Web site and your iPad (or smartphone).
The $15.99 paid BigOven app allows you to create grocery shopping lists that sync across devices, email grocery lists, and look up terms in a glossary. It’s also ad-free.
In the following tasks, you use the free version. though the steps work for both versions.
Getting started with BigOven:
- Get the BigOven app from the App Store.
- Go to www.bigoven.com.
- Click the Join Us! button to create a free account.
Entering your BigOven account info in the app:
- Tap the Settings icon on your iPad to open the Settings screen.
- Tap BigOven in the Apps section on the left side of the screen.
The app’s account settings appear on the right side (Figure 2.54).
Figure 2.54. BigOven account settings.
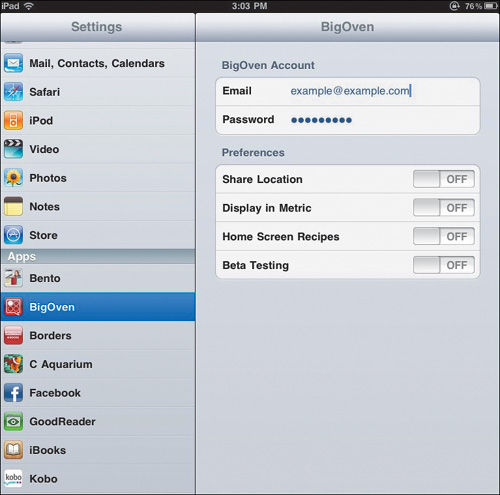
- Enter your account email address and password in the BigOven Account section.
- Press the iPad’s Home button to exit Settings.
Find recipes with BigOven
BigOven began as a Web site for people who love to cook but who face the never-ending question “What do I make for dinner tonight?” on a regular basis. The Web site and apps are designed to help people plan meals and exchange recipes.
Searching for recipes in BigOven:
- Tap the BigOven icon to launch the app.
- Tap the BigOven button in the top-left corner of the splash screen.
You see the BigOven navigation popover (Figure 2.55), which displays categories you can search.
Figure 2.55. BigOven navigation popover.
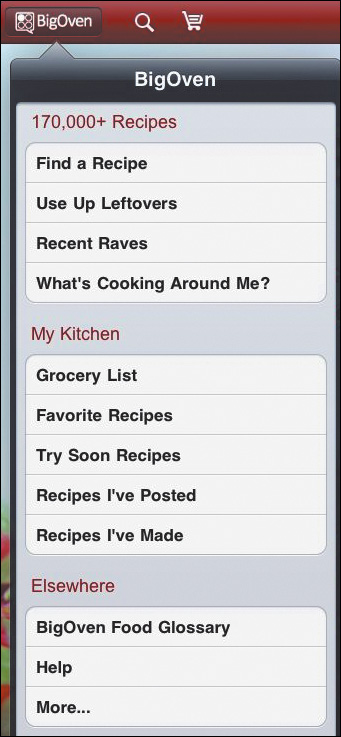
- Tap Find a Recipe.
A search form opens (Figure 2.56).
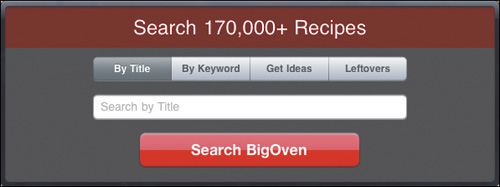
You can perform a variety of searches, including those restricted to the title of a recipe or keywords. The basic functions of all search types are the same, however, so we’ll go through one search step by step and leave the other types for you to explore on your own.
- Tap the Leftovers button at the top of the search form.
You see a search window similar to the one shown in Figure 2.57.
Figure 2.57. Leftovers search form.
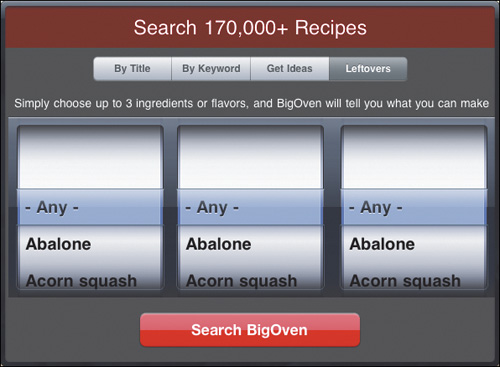
- Select up to three leftover ingredients in the spin wheels (Figure 2.58), and tap the large red Search BigOven button.
Figure 2.58. Leftovers search form showing search terms.

A list of search results appears (Figure 2.59).
Figure 2.59. Leftovers recipe search results.

- Tap a recipe in the list of search results.
The app displays the recipe in easy-to-read form (Figure 2.60 on the next page).

- If you want to return to the search results from a recipe screen, tap the BigOven button in the top-left corner.
Mark and find favorite recipes in BigOven
When you’ve found a recipe you like, it’s useful to mark it as a favorite so that you can find it again easily, as we show you in the following tasks.
Marking favorite recipes in BigOven:
- Tap BigOven’s icon to open the app, if it isn’t already open.
- Find a recipe you like (see the preceding task).
- Tap the Action button at the far-right end of the toolbar (refer to Figure 2.60).
You see the options shown in Figure 2.61.
Figure 2.61. Action-button popover options.

- Tap Add to Favorites.
BigOven adds the recipe to your favorites list.
After you favorite a recipe, Add to Favorites is replaced by Remove from Favorites in the Action-button popover. Tap it to remove the recipe.
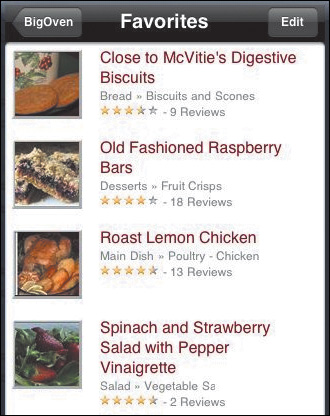
Viewing favorite recipes in BigOven:
- Tap the BigOven button in the top-left corner of the screen.
You see the navigation popover (refer to Figure 2.55 earlier in this project).
- In the My Kitchen section, tap Favorite Recipes to see your favorites (Figure 2.62).
Share BigOven recipes
After you find and favorite recipes, you can email them to yourself or to a friend, as you see in the next task.
Emailing a recipe from BigOven:
- Launch BigOven, if it isn’t already running.
- Find a recipe by searching for it (see “Searching for recipes in BigOven” earlier in this project), or tap a recipe in your favorites list (see the preceding task).
- Tap the Action button at the far-right end of the toolbar.
You see a list of options in a popover (refer to Figure 2.61).
- Tap Email it.
A formatted email message opens, with your default email address displayed in the From field (Figure 2.63).
Figure 2.63. Recipe ready to email.

- Enter the recipient’s address, add a short message, and tap Send to send the email.
Create a recipe scrapbook in Pages
Now that you know how to find, favorite, and email recipes, the next step is creating a personal recipe collection on your iPad that you can add to at will. In the following tasks, you use Pages for iPad to create a recipe scrapbook.
Creating a recipe scrapbook is a great way not only to preserve your own recipes, but also to keep recipes that you’ve collected from the Internet or from friends who emailed their recipes to you. You can create an attractive recipe scrapbook quite easily in Pages for iPad. The process involves four steps:
- Get the recipe text into Pages.
- Prepare the dish (which we’ll let you do on your own).
- Take a picture of the finished dish.
- Import and position the image in the Pages recipe.
You can enter a recipe directly in Pages or email it to yourself as a Microsoft Word file, a rich-text (.rtf) file, or a Pages file attachment and then import the file into Pages by using Mail’s Open in option. For step-by-step instructions, see the Go to Meeting Project earlier in this chapter.
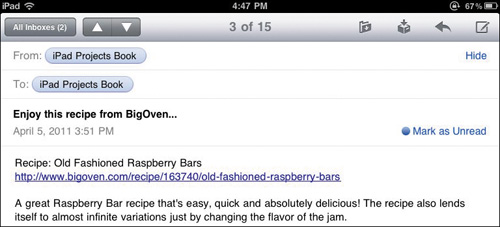
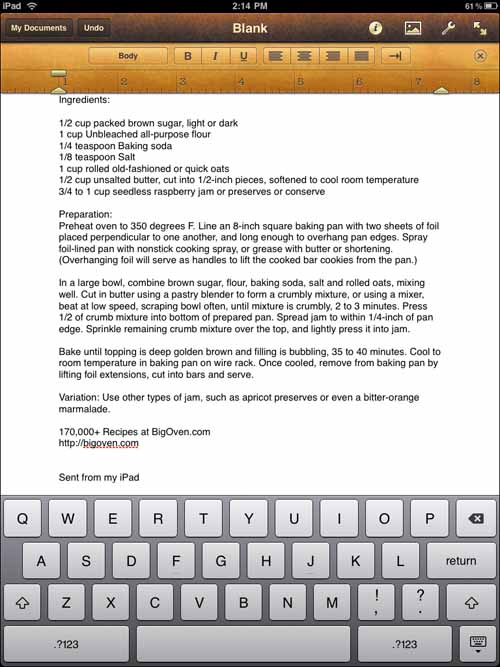
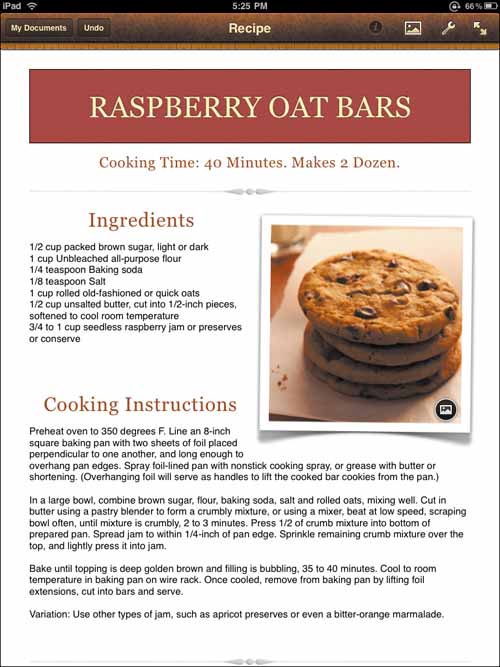
In the following tasks, we show you how to start your recipe scrapbook by importing an emailed recipe into Pages for iPad and then formatting it, adding artwork. You’ll be working with the recipe for Old Fashioned Raspberry Bars from BigOven, which you can find in the BigOven app by searching for it by title (see “Searching for recipes in BigOven” earlier in this project).
Importing an emailed recipe into Pages:
- Open a recipe that you received by email (see “Emailing a recipe from BigOven” earlier in this project).
The recipe will have basic formatting even in email form (Figure 2.64 on the next page).
Figure 2.64. Recipe emailed from BigOven.
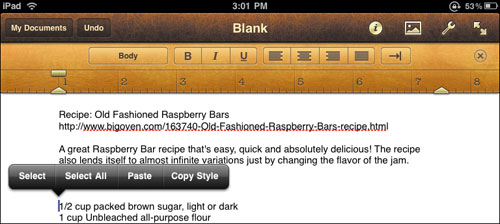
- Tap and hold anywhere in the body of the email except on a hyperlink.
You see Select and Select All buttons (Figure 2.65).
Figure 2.65. Selection buttons.
- Tap Select All to select the entire body of the email—in this case, the recipe.
- Tap the Copy button that appears.
The button briefly flashes blue to indicate that the selected text has been copied to your iPad’s internal clipboard, ready to paste.
At this point, you could paste the selected text into the Notes app on your iPad, Trunk Notes, or one of the many simple note apps available for iPad. For this project, however, you use Pages because you want to include images.
- Launch Pages on your iPad.
- If you don’t see the My Documents screen when Pages opens, tap the My Documents button in the top-left corner.
- Tap the New Document button in the top-left corner of the My Documents screen.
The Choose a Template screen opens (Figure 2.66).
Figure 2.66. Choose a Template screen.
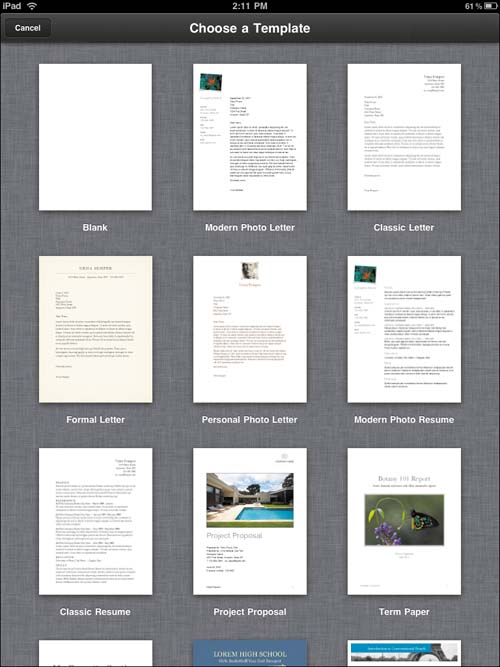
- Tap Blank.
A blank document opens.
- Tap and hold in the body of the document until you see Paste and Copy Style buttons (Figure 2.67).
Figure 2.67. Paste and Copy Style buttons.
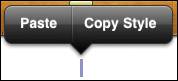
- Tap Paste.
The text you copied from the email in step 4 appears in the Pages document (Figure 2.68).
Figure 2.68. Text pasted from the iPad clipboard.
You’ll use this Blank document as a staging document while you build the recipe scrapbook in the following task.
Creating a recipe file for your scrapbook:
- Tap the Pages icon to open the app.
- If Pages opens to a file instead of the My Documents window, tap the My Document button in the opening screen.
- Tap the New Document button in the top-left corner of the My Documents screen.
- Scroll down to tap the Recipe template.
A document based on that template opens in Pages (Figure 2.69).

- To change the title text from Nona’s Holiday Cookies, rapidly triple-tap that text to select the entire line.
A selection rectangle appears around the title.
- Type new title text.
- If you want to, tap and hold the text below the title to select and edit the cooking time and quantity of your recipe.
Copying recipe ingredients to the scrapbook:
- Tap the My Documents button in the top-left corner of the recipe screen.
- In the My Documents screen, tap to open the Blank document where you pasted the recipe (see “Importing an emailed recipe into Pages” earlier in this project).
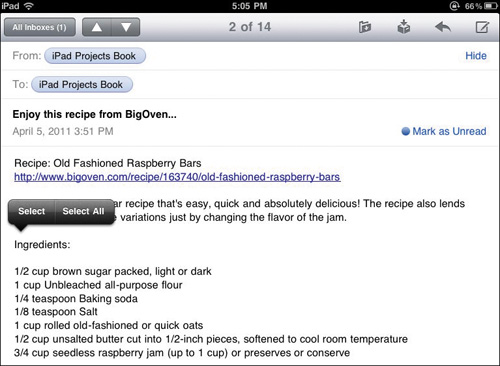
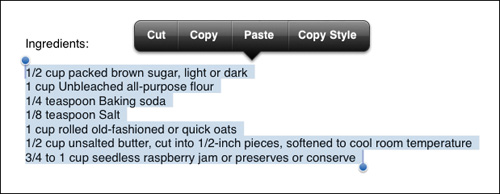
- Tap and hold to the left of where the ingredients list begins.
Selection buttons appear (Figure 2.70).
Figure 2.70. Displaying selection buttons.
- Tap Select, and drag the selection rectangle around the entire list of ingredients (Figure 2.71).
Figure 2.71. Selecting the ingredients list.
As soon as you lift your finger off the screen, the Copy button appears.
- Tap Copy to copy the selected text to your iPad’s clipboard.
- Tap the My Documents button to open the My Documents screen.
- Tap the Recipe document (see the preceding task) to open it.
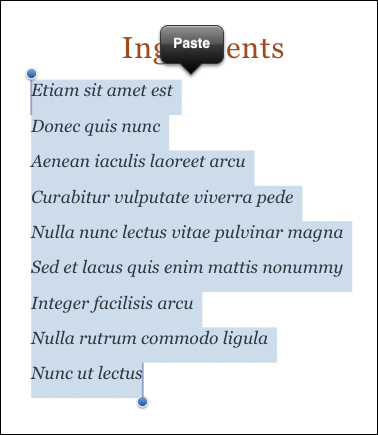
- Tap and hold to the left of the italic placeholder text that begins Etiam sit amet est to display selection buttons.
- Tap Select.
Pages selects the entire block of placeholder text and displays the Paste button (Figure 2.72).
Figure 2.72. Selecting placeholder text.
- Tap Paste.
The template’s placeholder text is replaced by the ingredients for your recipe.
- Repeat steps 1–10, copying the procedure or preparation section of your recipe from the Blank staging document and pasting it in the Cooking Instructions section of the Recipe document (Figure 2.73 on the next page).
Figure 2.73. The Recipe document with all the template text replaced by a new recipe.
Now all you need to do is replace the image from the template with the image for your recipe.
Importing an image into Pages:
- Launch Safari on your iPad.
- Go to a Web site that has suitable images.
For this task, go to the Old Fashioned Raspberry Bars page at www.bigoven.com/recipe/163740/old-fashioned-raspberry-bars.
- Tap and hold the image you want to use.
Open, Open in New Page, Save Image, and Copy buttons pop up (Figure 2.74).
Figure 2.74. Copying an image from a Web site.

- Tap Save Image.
The image is downloaded to your iPad’s Photos app.
Downloaded images are saved in the Saved Photos album on an original iPad and in the Photos app’s Camera Roll album on an iPad 2.
Inserting an image into the scrapbook:
- In Pages, open the Recipe document you created in “Creating a recipe file for your scrapbook” earlier in this project.
If the document isn’t currently open in Pages, tap the My Documents button; then tap the Recipe document’s icon in the My Documents screen.
- Tap the Image icon in the bottom-right corner of the placeholder image.

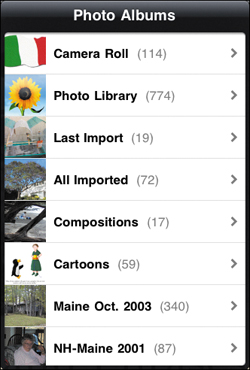
The Photo Albums popover opens (Figure 2.75), listing the albums in your Photos app.
Figure 2.75. List of albums in Photos.

- Tap Saved Photos or Camera Roll, depending on which iPad model you’re using.
You see the images that you’ve saved to your iPad, including the one you saved from a Web site in the preceding task (Figure 2.76).
Figure 2.76. Saved Photos album showing the newly saved image.

- Tap the image you saved from the Web site.
Your image replaces the placeholder image in the template (Figure 2.77).
Figure 2.77. The template image replaced by the correct image.

- Adjust the size of the image, if you want, by tapping it and then dragging the selection rectangle.
- Drag the image to a different place on the page, if you want.
Flash Card Project
Difficulty level: Intermediate
Software needed: Keynote for iPad ($10)
iPad model: Any
Additional hardware: Optional AirPrint-compatible printer
Remember flash cards? Those old-school handheld teaching devices? Well, in this project, you’re going to make some.
But put down the posterboard, the scissors, the glue stick, and the colored markers, because you won’t be needing them. Instead, you’ll make your flash cards on the iPad, using one for-pay app and your iPad’s Safari Web browser.
The object of this particular project is to create a set of flash cards to teach words and phrases in another language, but the project really is open-ended. You can use the techniques you develop here to create flash cards on a variety of subjects.
Get your app in gear
Let’s start by getting the app you need: Apple’s Keynote for the iPad. Its icon is shown in Figure 2.78.
Figure 2.78. The Keynote app’s icon.

Keynote for the iPad is a scaled-down version of the Keynote application that Apple sells in the Mac App Store. In its Macintosh incarnation, Keynote is a powerful alternative to the widely used Microsoft PowerPoint presentation application. Although the iPad incarnation of the software is somewhat less powerful (and less expensive), you can still make surprisingly sophisticated presentations with it.
In this project, you use Keynote to create a small deck of simple flash cards—a task well within its capabilities.
Acquiring Keynote
• Purchase Keynote from the App Store, either directly on your iPad or via iTunes on your computer.
Just in case you have trouble finding it (although you probably won’t), you can open the following URL in a Web browser on your computer, which opens iTunes and takes you right to the app:
http://itunes.apple.com/us/app/keynote/id361285480?mt=8
As soon as you have this app installed on your iPad, you’re ready to begin.
This project requires you to move back and forth between Keynote and Safari several times. To make all this navigation easier, you can use the Recent apps list. Double-click the Home button to reveal a panel that shows the currently running apps at the bottom of the screen; then tap the icon for the app you want to open.
Translate some words and phrases
The flash-card deck you build can be as thick as you like (or as the storage of your iPad can accommodate). We’re going to limit ourselves to three common and useful phrases here, but if you feel ambitious, feel free to add as many as you like. The language we’ll use is Italian.
Here are the phrases:
• Hello. My name is ______.
• Where is the restroom?
• Excuse me. Would you take a picture of us?
To perform the translation, we’ll use Google Translate, which we’ll access with the Safari Web browser. This translation engine can translate dozens of languages, and even though it’s not perfect, it’s more than adequate for our purposes.
Translating with Google Translate:
- Open Safari.
- Enter http://translate.google.com in the location bar and then tap Go on the onscreen keyboard.
The appearance of this page can vary, because Google always likes to tinker with things. Figure 2.79 shows the classic version of the page at this writing.
Figure 2.79. The Google Translate page in mobile Safari.
- If the Google Translate page shown is the mobile version, tap Classic at the bottom of the page.
- Tap the To button above the text-entry field (Figure 2.80), and choose English from the drop-down list of languages; then tap the From button, and choose Italian from the drop-down list.
Figure 2.80. Use the From and To buttons to choose languages.
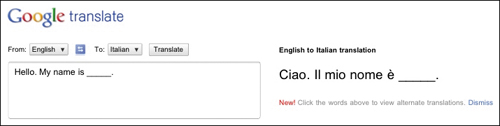
- In the text-entry field, type a phrase to translate—in this case, Hello. My name is ______.
As you type, Google displays the translated text, as shown in Figure 2.81.
Figure 2.81. Google translates your words as you type them.
- Tap Return and then type the second phrase in our list of phrases: Where is the restroom?
The translation of the second phrase appears below the translation of the first one.
- Once again, tap Return and then type the third phrase in our list: Excuse me. Would you take a picture of us?
Now all three translated phrases appear on the page (Figure 2.82).
Figure 2.82. All three translations are on the same page.

Collect some illustrations
All you really need for your flash cards in this project are Italian phrases and their translations, but flash cards are far more fun and attractive if you can spice them up with some illustrations. In this section, you use Safari to find and collect appropriate illustrations via Google’s image search.
![]() If you’ve completed the preceding steps, Safari is still open on your iPad. Fortunately, you don’t have to discard the Google Translate page to search for images, because Safari allows you to have more than one page open at a time. You can move among the open Safari pages by tapping the Pages button in Safari’s toolbar.
If you’ve completed the preceding steps, Safari is still open on your iPad. Fortunately, you don’t have to discard the Google Translate page to search for images, because Safari allows you to have more than one page open at a time. You can move among the open Safari pages by tapping the Pages button in Safari’s toolbar.
If more than one page is open in Safari, the Pages button displays a number showing how many pages you currently have open. You can have as many as nine pages open at the same time, if you want.
Gathering images with Google Images:
- In Safari’s toolbar, tap the Pages button.
A black screen appears, containing small versions of the pages that are currently open in Safari (Figure 2.83).
Figure 2.83. You can see which pages are open in Safari and tap one to work with, or you can tap New Page to open a different one.

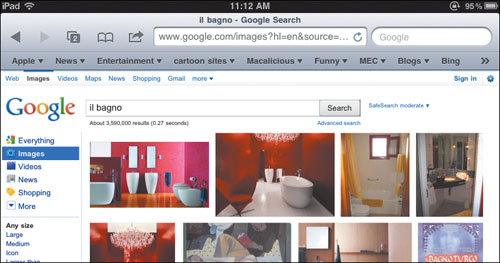
- In Safari, go to www.google.com/images.
- On the Google Images page, type il bagno in the search field and then tap Search Images.
Google displays a page of image results (Figure 2.84).
In case you haven’t guessed, il bagno is Italian for bathroom, and in fact, most of the images shown are of Italian bathrooms. You could have searched for bathroom, of course, but why not be authentic?
Figure 2.84. Google claims to have millions of Italian bathroom images, one of which is probably right for your needs.
- Tap an image that you think would make a good illustration.
The image pops out of the page so that you can see it more clearly.
- Tap the image again.
Google displays a split screen, with the Web page on which the image appears on the left side and a set of display choices on the right side (Figure 2.85).
Figure 2.85. Google shows the image in context, along with information about the image and some additional options.

- Tap the Full-size image link on the right side of the screen.
The image appears by itself in Safari.
- Tap and hold the image.
Two option buttons appear (Figure 2.86).
Figure 2.86. You can save any image from the Web in your iPad’s Photos app.
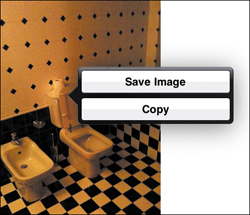
- Tap Save Image.
The image is saved in your iPad’s Photos app. On an original iPad, you can find it in the Saved Photos album; on an iPad 2, it’s in the Camera Roll album.
- In the top-left corner of the Safari screen, tap the Back navigation button twice.
The Google Images search results reappear. Notice the search field at the top of the results page. (You can see it in Figure 2.84 earlier in this project.) You’ll use this field to perform additional image searches.
- Delete the current keyword in the search field, search for name tag, and save a suitable image from the search results.
- Search for photography, and choose and save a suitable image.
- Search for, choose, and save an image of the Italian flag.
- Press the iPad’s Home button to close Safari.
Even when you close Safari, it keeps the pages you’ve been viewing in memory, so the translations you made earlier won’t be lost. In fact, you’ll use them again later in this project.
Create your flash-card deck
Now that you’ve gathered all the text and images you need, you’re ready to create your flash-card deck with Keynote.
Keep in mind as you work through this section that Keynote automatically saves all your additions and changes, so you can leave and come back to Keynote without worrying about saving your work or losing your place.
Keynote works only in landscape orientation. If you turn your iPad to portrait orientation, Keynote remains in landscape orientation.
A terminology note: Keynote creates and displays what it calls slides. Although we’ve been talking about flash cards, we’ll use the term slides when we discuss flash cards in the context of Keynote.
Creating a new presentation:
- Launch Keynote, and tap New Presentation in the top-left corner of the screen.
The Choose a Theme screen appears (Figure 2.87).
Figure 2.87. Keynote offers you many presentation themes to choose among.

- Tap the Renaissance theme.
A new presentation using the theme appears, displaying a placeholder image provided by that theme and two text fields (Figure 2.88). Tap a field to cut, copy, or delete it; double-tap a field to edit its contents.
Figure 2.88. The new presentation, with placeholder image and fields.
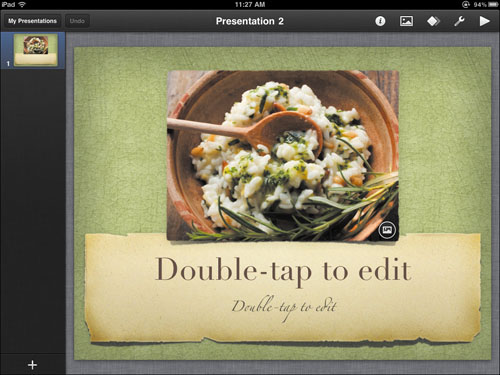
- Double-tap the large text field below the picture, and type Italian Words and Phrases.
- Tap the small text field at the bottom of the slide once to select it; then tap it again to produce a set of options (Figure 2.89).
Figure 2.89. Tap a selected field to cut, copy, or delete it.

- You don’t need the field at the bottom of the first slide, so tap Delete to get rid of it.
- In the bottom-right corner of the placeholder picture in the center of the slide, tap the camera icon.
A Photo Albums popover appears (Figure 2.90).
Figure 2.90. Pick a picture from a photo album to put on the slide.
- Tap Saved Photos (on an original iPad) or Camera Roll (on an iPad 2), swipe through the displayed photos until you see the Italian-flag image (which will be on your iPad if you completed the steps in “Gathering images with Google Images” earlier in this project), and then tap it.
The Italian flag replaces the placeholder picture.
- Drag the picture until it’s centered on the slide above the text (Figure 2.91).
Figure 2.91. The replacement picture is in place.

Now that you have a title slide for the flash-card deck, you can use it to create the other slides.
As you drag the picture, guidelines appear when the image approaches the center of the slide vertically or horizontally. Keynote provides these guidelines to help you place objects on a slide more precisely. When the guidelines appear, you can lift your finger; the picture snaps into place.
Duplicating and editing a slide:
- In the column on the left side of the screen, tap the thumbnail of the slide to display the image-editing options (Figure 2.92).
Figure 2.92. Slide-editing options in Keynote.

The thumbnails in the left column show the order of slides in your presentation. You can drag them around, edit them, and skip them. If you have more than one slide, you have to tap an unselected slide once to select it and then tap it again to see its editing options. Because you have only one slide at this point, however, and it’s selected, a single tap displays the options.
- Tap Copy, tap the thumbnail again, and then tap Paste.
A second thumbnail appears in the column below the first, and its contents are displayed in Keynote’s main viewing area. As you’d expect, this image is a duplicate of the first slide—for the moment.
- Double-tap the text field on the slide, and enter the new text Hello. My name is ______.
- Tap the picture once, pause, tap again to display the image-editing options (see the nearby sidebar “iPad Editing Techniques”), and then tap Replace.
You want to put a different picture on the slide, so you need to get rid of the existing one first. When you tap Replace, the Photo Albums popover appears.
- Tap either Saved Photos (original iPad) or Camera Roll (iPad 2) and then tap the name-tag image (which will be on your iPad if you completed the steps in “Gathering images with Google Images” earlier in this project).
- Drag the photo so that it’s centered above the text field.
You have the English version of a phrase slide. Next, you make the slide that has the Italian translation.
• Tap to select a location in the text.
• Tap and hold to see a magnified view of the text and then drag to position the cursor.
• Double-tap a word to select it and then drag the selection handles to adjust the selection.
• Tap a selection or a location in the text to open the text-editing controls shown in Figure 2.93.
Figure 2.93. Editing options for a Keynote text field.

Making an Italian slide and completing the deck:
- Follow steps 1–2 of the preceding task, “Duplicating and editing a slide,” to make a duplicate of the English slide you just completed.
- Double-click the iPad’s Home button to display the apps panel at the bottom of the screen.
- Tap the Safari icon to open Safari, tap the Pages button in Safari’s toolbar, and then tap the thumbnail for the page of translated text that you created earlier in this project.
You want to copy the Italian translation of the English text that currently appears on the duplicate slide.
- Just to the right of the translated text, tap and hold the screen until a blue selection rectangle appears (Figure 2.94).
Figure 2.94. Selecting the text to copy.

You tap and hold to the right of the translation because when you tap the text itself, Google helpfully supplies alternative translations for the text you tapped instead of selecting the text. Tapping beside the text selects the entire translated text area so that you can adjust your selection and then copy it.
- Drag the blue control handles on the selected text until just the first sentence is selected; then tap Copy.
- Double-click the Home button on your iPad; then tap the Keynote icon in the Recent apps panel at the bottom of the screen.
The slide that you just duplicated is displayed.
- Double-tap the text field to edit the text, select all the text, and then paste the Italian translation that’s on the clipboard.
The English text on the duplicated slide is replaced by the Italian translation. Now you have an Italian slide to match the English one. Next, you’ll duplicate this slide and make it into the next English slide in the presentation.
- Repeat all the steps in “Duplicating and editing a slide” earlier in this project, but with the following changes:
In step 3, enter the second English phrase: Where is the restroom?
In step 5, select the bathroom image.
- Make an Italian slide by repeating steps 1–7 of this list.
- Repeat steps 8–9 of this list, substituting the appropriate pictures and text (when you get to the step where you enter the English text, enter Excuse me. Would you take a picture of us?), to make the third set of slides.
Voila! You have a short flash-card presentation of Italian words and phrases. If you like, you can add to the presentation at any time.
Viewing the presentation:
- In the thumbnail column on the left side of the Keynote screen, tap the topmost thumbnail.
This thumbnail represents the title slide that you made in “Creating a new presentation” earlier in this project. Keynote displays the title slide in the main work area.
- Tap the Play button in the top-right corner.
The slide expands to fill the entire screen.
- Tap anywhere on the slide.
The next slide is displayed.
- Continue to tap until the last slide is displayed.
- Tap the last slide.
Tapping the last slide ends the presentation and displays the slide-composition screen again.
Now that your flash-card composition is complete, it’s ready to share. Naturally, you can share it simply by using your iPad to display it, but if you want to give it to someone, you need to export it or print it.
To print from an iPad, you must have an AirPrint-capable printer on a Wi-Fi network to which the iPad is connected. To find out more about AirPrint, see www.apple.com/ipad/features/airprint.html.
Printing the flash cards:
- Tap the Tools button near the right end of the Keynote toolbar to see the Tools popover (Figure 2.95).
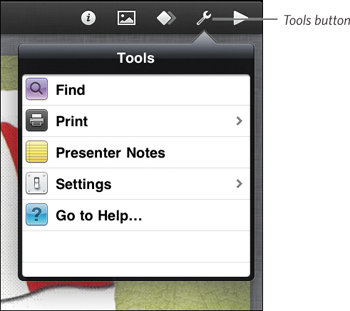
- In the Tools popover, tap Print.
The Printer Options popover appears.
- Tap Printer to open the Printer popover, which shows the AirPrint printers on your Wi-Fi network.
- Tap a printer to select it and then tap Printer options to return to the Printer Options popover.
- Set the printing options, if necessary (Figure 2.96).
Figure 2.96. Use the Printer Options popover to specify what gets printed and on which printer.
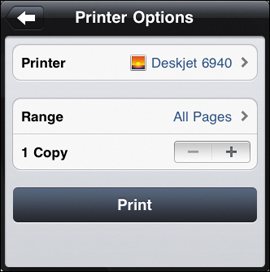
The printing options include the range of pages to print and the number of copies to print.
- Tap the Print button.
Exporting the flash cards:
- In the top-left corner of the Keynote screen, tap My Presentations.
Keynote displays the available presentations, with a large thumbnail of the flash-card presentation centered onscreen. You need to rename the presentation, because it currently has a generic name (such as Presentation 1).
- Tap the presentation’s name, delete the existing name in the editable title field that appears, and type a new name.
- Tap the thumbnail to complete the renaming.
- Tap the Action button (the leftmost button at the bottom of the screen).
A dialog offers you several choices:
• You can send the presentation via email. If you choose this option, you can send a Keynote file or a PDF version of that file.
• You can share the presentation on the iWork.com site so that other people can download a copy, and you can share it as a Keynote file or a PDF. When you choose this option, Keynote creates an email with download information that you can send to your intended recipients.
• You can export the presentation in either Keynote or PDF format to your iPad’s file-sharing area and then use iTunes to copy the file from your iPad to your computer. We explain this process in the Go to Meeting Project earlier in this chapter.
• You can copy the presentation to your MobileMe iDisk if you subscribe to MobileMe.
• You can copy the presentation to a WebDAV server if you have access to such a server.
- Tap the option of your choice, and follow the onscreen instructions.
Vacation Planning Project
Software needed: KAYAK HD (free), TravelTracker ($2.99)
iPad models: Any
Additional hardware: None
The whole point of a vacation is to get away from the stress of daily life. Ironically, most vacations begin with the stress of planning the vacation: picking the dates; planning the itinerary; and then (one of the biggest stressors of them all) dancing the airline online tango, which can involve stepping from one airline Web site to another, searching for a flight that you can afford but that doesn’t involve three intermediate stops and a 3 a.m. departure time.
In this project, you use two apps that help ameliorate the stress of getting away to be unstressed. With them, you can find the right flights and manage the trivia of planning your voyage away from it all—or almost all, because you’re going to take your iPad with you, right?
Don’t forget the charger.
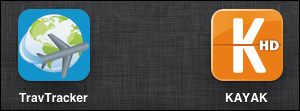
Pack your apps
The first app you need is TravelTracker. This app has existed in one form or another since back in the 20th century, when Apple made the proto-iPad that it called the Newton. Through many incarnations, it has helped travelers track their traveling trivia: the itineraries, the frequent-flyer miles accrued, the places to visit, the stuff to pack, the things to do, and the places to stay. No, it won’t magically handle all these things for you—you still have to enter these bits of information into the app—but it keeps them in one place, easily available and nicely arranged.
The second app is KAYAK (technically called KAYAK HD in the iTunes Store). This app, and the associated KAYAK Web site for which the app is a convenient front end, links with most major airlines. With it, you can search for flight information, and pick the flights that fit your budget and your traveling preferences.
The icons for the apps are shown in Figure 2.97. Go and get them.
Figure 2.97. The two apps you need for this project.
Getting the apps:
- Purchase the inexpensive TravelTracker app from the App Store, either directly on your iPad or via iTunes on your computer.
You can enter the following URL in your computer’s Web browser to have it open iTunes and take you right to the download page:
http://itunes.apple.com/us/app/traveltracker-personal-travel/id284918921?mt=8
- Download the free KAYAK app from the App Store, either directly on your iPad or via iTunes on your computer.
Enter the following URL in your computer’s Web browser to have it open iTunes to the app’s page in the App Store:
http://itunes.apple.com/us/app/kayak-explore-flight-search/id363205965?mt=8
Set up a trip with TravelTracker
To set up a trip in TravelTracker, you need (of course) a trip to set up. For the purposes of this project, we’re going to make up a trip just so we have something to illustrate when we walk you through the steps. Feel free to use your own trip details, if you prefer, substituting your entries for what we show here.
Our imaginary trip is from Los Angeles to Portland, Oregon, for the week of Thanksgiving. The visit starts on November 21, 2011, and ends on November 28, 2011. (If you’re reading this book after those dates, you’ll need to adjust the dates accordingly.) Near the end of the trip, we’ll plan a post-Thanksgiving dinner at an exclusive restaurant to thank our hosts for putting us up.
In this part of the project, you create a new trip and schedule the dinner.
Creating a new trip:
- Launch the TravelTracker app on your iPad.
The first time you open the app, it provides a helpful tip, as shown in Figure 2.98. The app tells you about the screen you’re looking at and mentions another service, TripIt, that makes TravelTracker even more useful. We won’t use TripIt in this project, but it’s worth checking out.
Figure 2.98. The All Trips page in TravelTracker, complete with a tip.

- If the tip appears, tap OK to dismiss it; then tap the New Trip button in the top-right corner of the screen.
A popover containing a New Trip form appears (Figure 2.99). Note that the form starts the trip on the current date. You need to change that date, but first, you should give the trip a name.
Figure 2.99. Creating a new trip.
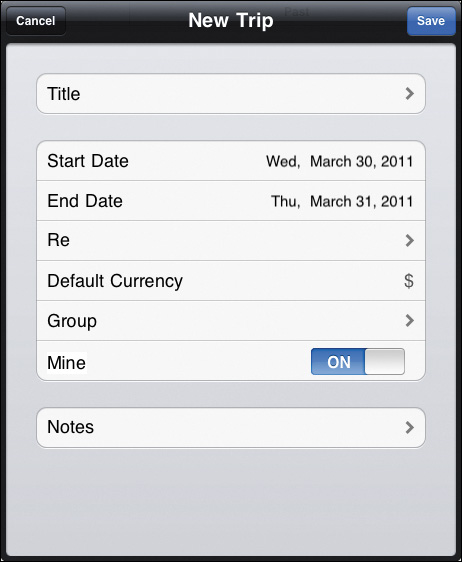
- In the form, tap Title.
An Edit Trip Name form appears.
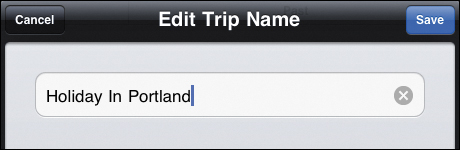
- Type a title, such as Holiday In Portland (Figure 2.100).
Figure 2.100. Every trip needs a name.
- Tap the Save button in the top-right corner to save your work and close the form.
The New Trip form returns.
- Tap Start Date.
An Edit Trip Dates form opens, featuring a standard iPad date-selection widget.
- Tap the Start field, and use the widget to dial the start date—for this project, November 21, 2011.
Your selected date appears in the Start field (Figure 2.101 on the next page).
Figure 2.101. Select your trip dates with the date-dialing widget.

- Tap the End field, and use the widget to dial the end date—for this project, November 28, 2011.
The selected end date appears in the End field.
- Tap Save in the top-right corner to save your work and close the form.
The New Trip Form returns.
- Tap Save.
The trip is saved, and you see a blank itinerary screen for the Holiday In Portland trip (or whatever you called the trip you just created), as shown in Figure 2.102.
Figure 2.102. The Holiday In Portland trip has a blank itinerary for now.
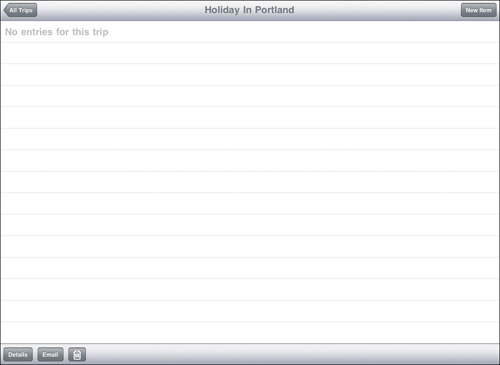
If you’re using TravelTracker for the first time, a help tip explains the itinerary screen that you just created. This itinerary screen holds various items for your trip, such as flights, planned meals, and lodging—or will hold these items when you create them. Right now, it’s stunningly empty.
It’s time to put something in your itinerary. Something tasty.
You can buy add-ons that expand TravelTracker’s capabilities. One such add-on, which currently costs 99 cents, provides checklists for items to pack and pretrip tasks to perform (such as stopping mail delivery). If you find yourself worrying about whether you remembered to start the dishwasher as you stand in line waiting to board, that add-on may be just what you need.
Scheduling a dinner:
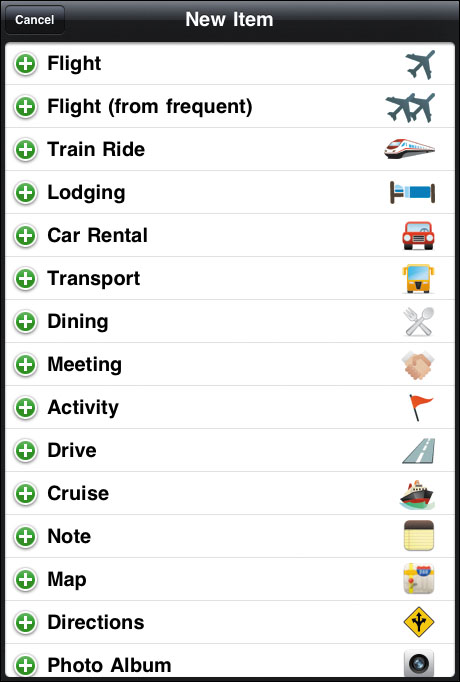
- In the top-right corner of the itinerary screen (refer to Figure 2.102), tap New Item.
The New Item popover displays a list of items that you can add to the itinerary (Figure 2.103).
Figure 2.103. Any or all of these items can go in your itinerary.
- Tap Dining.
A New Dining screen appears (Figure 2.104). This screen, where you add restaurant and reservation information, sets the reservation to the first day of the trip by default. The time is also set by default to 6 p.m.; you won’t need to change it for this task. (After all, 6 p.m. is a good time for dinner.)
Figure 2.104. Enter information about your dining plans here.

- Tap the When field.
A date-and-time-selection widget appears, displaying the default date and time (Figure 2.105).
Figure 2.105. Set this widget so that you won’t miss dinner.

- Set the date to November 26 and then tap Save.
You return to the New Dining screen.
- Tap the Restaurant field.
A blank Edit Name screen appears (Figure 2.106).
Figure 2.106. In TravelTracker, the restaurant name includes phone, address, city, and country as well.
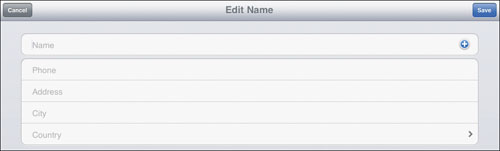
- Tap each field, and enter some appropriate information (using a real restaurant or just making something up).
If you happen to have the restaurant in your iPad’s Contacts app, you can tap the blue plus sign (+) at the right end of the Name field to add the restaurant’s name, address, phone number, and city to the Edit Name screen. If you don’t, you can enter each item manually.
- Tap Save to save your work and close the Edit Name screen.
The New Dining screen reappears, with the restaurant information filled in.
- (Optional) Tap each field in the New Dining screen, and enter information for each one.
A typical New Dining screen looks like Figure 2.107 when it’s filled out.
Figure 2.107. Dinner at an exclusive restaurant, ready to be added to your itinerary.
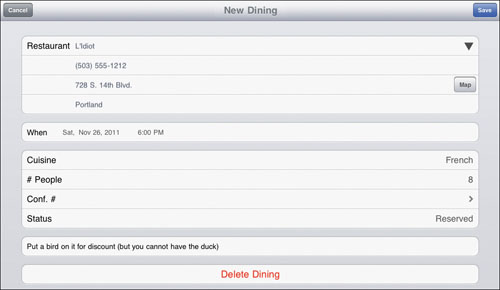
- Tap Save.
Your itinerary now has a dining item scheduled (Figure 2.108).
Figure 2.108. At last, your itinerary has something in it.

- Press your iPad’s Home button to exit TravelTracker.
It’s time to move to KAYAK and schedule a flight.
Find flights with KAYAK
As you may have noticed in TravelTracker, you can add flights to your itinerary. Before you can do that, though, you have to have some flights to add. You use KAYAK to find those flights and even book them.
The flight information shown in this section is subject to change and is shown only for example purposes. No endorsement of particular airlines is intended.
Setting flight routes with KAYAK:
- Launch the KAYAK app on your iPad.
KAYAK opens, showing you its main screen.
- In the Flight Search pane on the left side of the screen, tap the From field.
A Choose Origin Airport pane appears next to the Flight Search pane (Figure 2.109).
Figure 2.109. Use the Choose Origin Airport pane to search for the airport from which you want to depart.
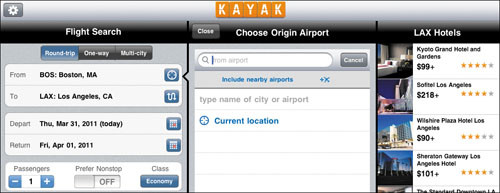
- In the search field at the top of the pane, begin typing Los Angeles.
As you type, airport abbreviations begin to appear below the search field. As soon as you see LAX, you can stop typing (Figure 2.110).
Figure 2.110. KAYAK knows about a lot of airports.

Alternatively, you can tap Current Location in the Choose Origin Airport pane (refer to Figure 2.109) to have KAYAK list the airports in your general area.
- Tap LAX in the list of airports that appears.
The origin airport you selected appears in the From field of the Flight Search pane.
- At the top of the Flight Search pane, tap Round Trip if it isn’t already selected.
- In the Flight Search pane, tap the To location, and in the Choose Destination Airport pane that appears, begin to type Portland, Oregon (Figure 2.111).
Figure 2.111. Pick a destination airport.
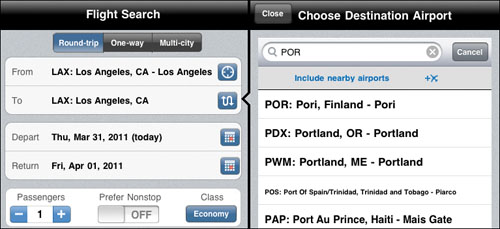
- When PDX (the airport in Portland, Oregon) appears in the pane, tap that entry; then tap Close at the top of the screen.
In the Flight Search pane, PDX is listed as the destination.
Next, you’ll set the travel dates and search for a flight.
Setting travel dates and finding a flight:
- In the Flight Search pane (refer to Figure 2.109), tap the Depart field to open the Choose Depart Date pane.
- Swipe down the Choose Depart Date form to November, and tap 21 on the calendar (Figure 2.112).
Figure 2.112. KAYAK uses calendars instead of date-dialing widgets.

- In the Flight Search pane, tap the Return field to open the Choose Return Date pane to the right.
- Swipe down the Choose Return Date pane, and tap November 28; then tap the Close button.
- Back in the Flight Search pane, find the Passengers indicator; tap the + button to increase the number of passengers to 2; tap the Prefer Nonstop switch to turn that setting on; and tap the Class button if you want to choose a flight class other than Economy (Figure 2.113).
Figure 2.113. Set the number of passengers, and tell KAYAK whether you want to go nonstop and what class you want to travel in.

- Tap the big orange Search button above the map (refer to Figure 2.112).
KAYAK displays the flight search results.
- Swipe up and down the search results to find a suitable flight, and when you do, tap it.
The Flight Details pane appears on the right side of the screen, with a Booking pane below it (Figure 2.114).
Figure 2.114. Click a link or make a phone call to book the flight that you’ve chosen.
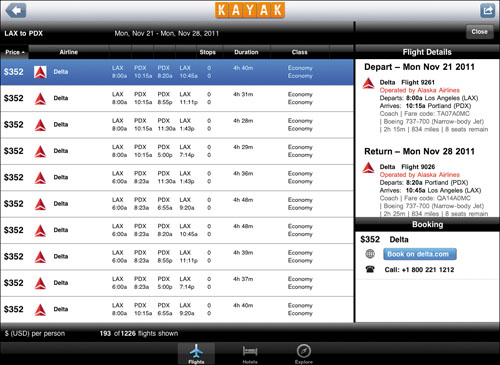
At this point, you can call one of the listed numbers or click a link in the Booking pane to book your flight. Because this task is just an example, however, make a note of the airlines and the flight numbers so that you can use them in the next section.
- Press the iPad’s Home button to exit the KAYAK app.
Add flight information to your itinerary
Now that you have your flight information, you can add your departure and return flights to your TravelTracker itinerary.
Entering flight information with TravelTracker:
- Launch TravelTracker on your iPad again.
You see your itinerary screen just as you left it (refer to Figure 2.108).
- Tap New Item in the top-right corner to open the New Item form.
- Tap Flight.
The New Flight screen appears (Figure 2.115).
Figure 2.115. The New Flight screen holds a lot of information about your flight, and TravelTracker helps you fill it out.
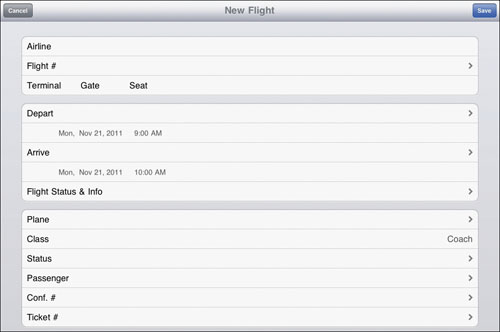
- Tap the Airline field at the top of the screen.
The Select Airline screen appears (Figure 2.116).
Figure 2.116. Select an airline.
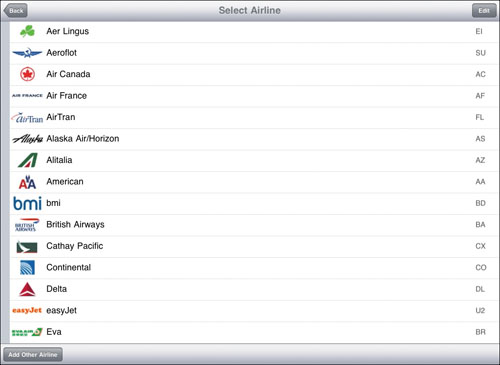
- Find the airline for your departure flight, and tap it.
In the unlikely event that your airline isn’t listed in the Select Airline screen, tap the Add Other Airline button in the bottom-left corner and then follow the onscreen instructions to add it.
The New Flight screen reappears.
- Tap the Flight # field to open the Edit Flight # screen.
- Type the flight number (Figure 2.117), and tap Save.
Figure 2.117. The flight-number field can hold a very long flight number.

The New Flight screen returns briefly but is quickly replaced by the Departure Date screen, which contains a date-selection widget.
- If the departure date for this project—November 21, 2011—isn’t already selected, use the widget to dial it in and then tap Save.
TravelTracker looks up the flight and fills out the rest of the form, as shown in Figure 2.118.
Figure 2.118. TravelTracker fills out the rest of the New Flight form as soon as it has an airline, a flight number, and a date.
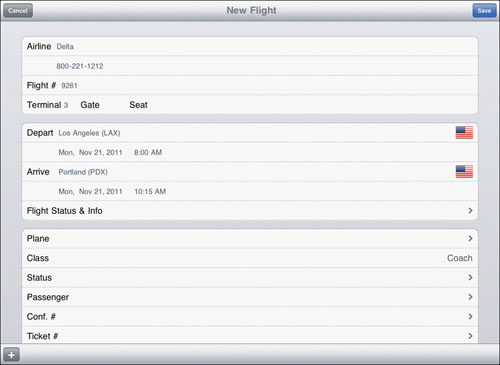
- Tap Save.
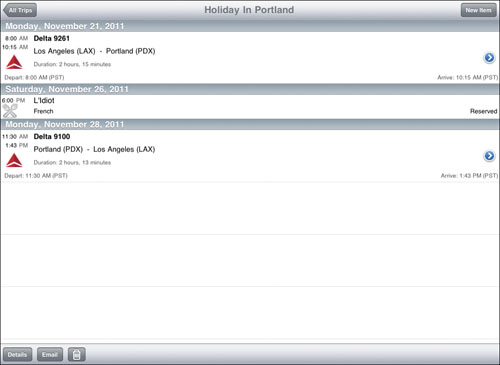
The departure flight appears in your itinerary screen.
- Repeat steps 2–9, using the return-flight number, the airline, and the return date that you got from your KAYAK search (assuming that you completed both tasks in “Find flights with KAYAK” earlier in this project).
Your itinerary now contains your departure flight, your return flight, and your dinner information (Figure 2.119).
Figure 2.119. Your itinerary is starting to look useful.
- Press the iPad’s Home button to exit TravelTracker.
The beginnings of your vacation plan are stored in TravelTracker, with an assist from KAYAK. Have a great trip! Remember to drop us a postcard!