Chapter 3: Setting Up Billing and Cost Controls
If you’re reading this book, then I’m going to go out on a limb and guess that you work with computers and IT. Do you ever get asked what you do for a living, and you run through a mental evaluation process wherein you decide how technical to be with your response? “I work with computers” is one of my typical go-to options. The person nods, but then comes the real question: “I thought so – listen, I have this printer, and it won’t print!” You know about computers, so you must know everything in the world related to them, right?
Sigh. It always makes me feel sorry for medical doctors. How many times they must hear, “Oh, you’re a doctor? Listen – when I do this, it hurts. Why, Doc, why?”
Why the story? Well, you might be tempted to think that billing is all about paying for stuff, so why not just skip this chapter? But like my computer printer story, even if you already work with Google Cloud, that doesn’t always prepare you to configure billing properly or to implement good cost controls.
In this chapter, we are going to lay some foundational knowledge and then take the next major step toward laying our foundation in Google Cloud. To do so, we will be covering the following topics:
- Understanding billing terminology
- Step 4 – setting up billing and cost controls
Understanding billing terminology
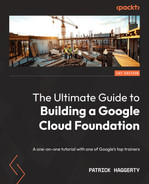
To help us understand the various pieces and parts that play a role in billing, let’s start with a diagram:
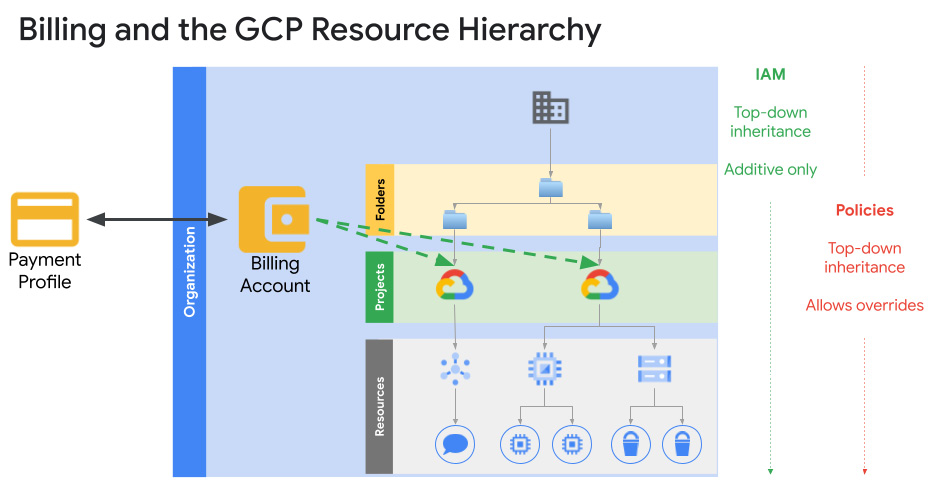
Figure 3.1 – Billing and resource management visualization
At the bottom of the preceding diagram, we can see what we want most out of Google Cloud – its resources. The word resource in English comes from the old French word resorse, which means to help or aid. That’s pretty much what the bottom level does – it helps or aids our business by providing on-demand, scalable, metered services. From Pub/Sub messaging, to Compute Engine VMs, to Cloud buckets, the offerings are vast and powerful. Each of these Google Cloud services is logically managed by a single project.
Projects are special types of Google Cloud resources that let you directly enable, create, and logically group services. Every create command for a service, whether it’s used via the UI, the command line, or a Google API, must be associated with a project. The project, in turn, owns and, through its associated billing account, pays for the resource. Projects and folders play a key role in organizing our resources, which we will discuss in the next chapter.
Projects, by necessity, are tied to a Cloud Billing account, which pays for whatever costs the services have incurred using one of the Payments Profiles (think a credit card or invoice) that’s been configured. Payments Profiles are initially created as part of the Google onboarding process. Payments Profiles are Google-level resources that are managed outside of Google Cloud. They have users, permissions, and payment methods, all of which are managed at the Google payments centre: https://pay.google.com.
Great – with the general terminology under our belts, let’s set up billing!
Step 4 – setting up billing and cost controls
As we’ve already mentioned, Google Cloud offers virtually any organization of any size a huge list of easily usable measured services. By measured, I mean that Google keeps track of the amount you use that service and then bills you accordingly. How such billing works is what we will discuss here.
It starts with how you pay
Google offers two main ways you can pay for services: self-service with a credit card, or via a monthly invoice that’s paid by check or wire transfer. Organizations that want to move toward invoicing will need to configure a self-serve Payments Profile initially and then apply for invoicing once the organization meets the following criteria:
- The business must be at least 1 year old.
- Their Google spending must have exceeded $2,500 monthly for the last 3 months running.
- The company’s name and billing address in the self-serve Payments Profile must match that in the company’s legal registration.
The person applying for the invoicing must do the following:
- Accept the Google Terms of Service (https://cloud.google.com/terms/). This means they must have created, or at least viewed, a project in Google Cloud.
- Be a billing administrator for the organization.
Applications can be made at https://support.google.com/cloud/contact/apply_for_invoiced_billing.
Payments Profile user configuration options
You likely configured a self-serve Payments Profile indirectly when you first signed up for Google Cloud. As I mentioned earlier, the Payments Profile itself is not truly part of Google Cloud and as such, it has permissions and roles that are not related to Google Cloud IAM configurations. Two key job roles related to the Payments Profile that you need to identify are Payments Profile Admin and Payments Profile Read-only Access.
A Payments Profile Admin can view and manage payment methods, view payment accounts and invoices, modify account settings, see all the Google services associated with the Payments Profile, and make payments. Payments Profile Admins should be identified from the finance or accounting teams.
If it was you who initially set up your Google Cloud organization (organizational administrator), then you are likely already a Payments Profile Admin. If not, then you need to reach out to finance or accounting and determine who did the original setup.
To see whether you are already a Payments Profile Admin, go to the Google payments centre at https://pay.google.com/. If you get a page asking you to add a payment method, or if, when you look at the Settings page, you see Account type set to Individual, then you either aren’t a Payments Profile Admin or you aren’t logged in with the user you used when you initially set Google Cloud up. Mouse over the user’s avatar in the top-right corner to see which account you are logged in under. Here’s an example:

Figure 3.2 – My [email protected] user
If you believe that you are the Payments Profile Admin, then you may need to log in using the organizational administrator account you used when you first set up your organization in Google Cloud. For me, that was my [email protected] account. If you are the Payments Profile Admin, the Settings tab should look similar to the following. Note that Account type is Organization (Business will appear for some) and that in the Organization name and address section, I can see my organization’s name, gcp.how:
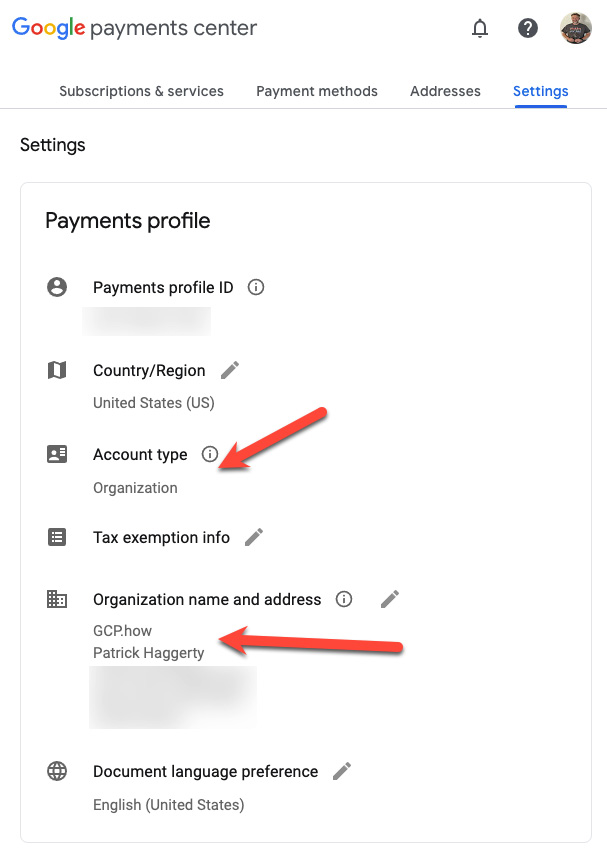
Figure 3.3 – GCP.how Payments Profile Admin
Below the general organization-related information and settings, you will see the current Payments Profile users list. If you have just set up your Google Cloud organization, then it’s likely that you, as the organizational administrator, will be the only user. Below the current users, you can click Manage payment users, which will take you to a general Payments Profile user management area. This is where you can create Payments Profile users and set their permissions. Make sure you have at least two users with full (Payments Profile Admin) sets of permissions in case one is out of reach or no longer with the business. Typically, these users should be part of the finance or accounting teams. There are other individual permissions you can assign to personnel as needed. You will likely need to talk to your accounting/finance team to determine which users will need which, if any, of the following permissions:
- Read access: Read-only access to the Payments Profile
- Edit payments profile: Read and write access to the Payments Profile
- Sign-up and purchase: Pay for Google products
- Manage users: Add and remove users to/from the Payments Profile
- Admin with all permissions: All current and future permissions
Note
Payments Profiles span all the Google services that have been paid for by that profile, and they are not restricted to a single organization.
Regardless of permissions, Payments Profile users can also be configured to receive related emails:
- All payments email: All emails related to Payments Profile administration, receipts, invoices, statements, and other transaction-related messages.
- Administrative payments email only: Administrative emails, including suspensions, tax forms, Terms of Service updates, and account closures.
- No emails.
One – and only one – user will need to be configured as the primary contact. This is the person who Google will contact regarding payments-related inquiries. If you are the current primary contact, probably because you set up the organization in Google originally, then you need to consider if that makes sense. I’m on the tech side of the business, so even though I set up my organization in Google Cloud, I would likely not be the right person to contact regarding payment-related issues. I’d want to delegate that to someone in my finance department. Also, make sure the emails don’t end up in spam!
Payments Profile configuration best practices
While Payments Profiles aren’t one of the more complex parts of laying your Google Cloud foundation, there are still some things that you should keep in mind. To help, Google has a list of recommended best practices, including the following:
- Only use a single Payments Profile unless you need to separate personal from business profiles, profiles for multiple businesses you manage, or unless you need different profiles for different countries. New Payments Profiles may be created from the Settings page by clicking the pencil icon next to Country/Region.
- Set up at least two Payments Profile Admins but keep the number small overall.
- Make sure multiple individuals receive Payments Profile-related emails. Missed emails could lead to missed notifications, missed payments, and possibly even to account suspension.
- If you are using invoiced billing, configure multiple invoice delivery addresses for both paper and email delivery.
- For organizations not using invoiced billing, set up multiple payment methods on the Payment methods tab.
- Set policies and procedures to regularly review the payments profile. Is the list of paid services correct? Is the primary contact appropriate? Are the people getting billing-related communications correct? Is the physical address correct?
- Regularly review cost and payment history in Google Cloud (more soon), and the invoice if appropriate.
- If you have a dedicated finance team and a high level of Google Cloud spend, evaluate whether applying for invoiced billing makes sense.
With the Payments Profile configured, let’s go back to Google Cloud and set up our Cloud Billing account.
Next comes Cloud Billing
As we mentioned earlier, projects help organizations create logical units of Google Cloud services. They encapsulate given sets of configurations, permissions, metadata, data, and other elements that comprise your cloud presence. Associated with each project is a Cloud Billing account, which will pay for any chargeable services that are used by the project through a given Payments Profile.
If each project needs a Cloud Billing account to measure and pay for spending, an early decision you need to make is how many Cloud Billing accounts your organization requires. Like Payments Profiles, less is usually more. Google recommends creating a single Cloud Billing account that you use to pay for all your Google Cloud spend. Besides making billing harder to track and manage, multiple billing accounts may not work the way you expect with committed use discounts. Committed use discounts are discounted prices associated with contractually agreeing to use resources for a specified time or amount (https://cloud.google.com/docs/cuds). The only exceptions to the single billing account recommendation would be if your organization needs to pay in multiple currencies or physically split charges for legal, accounting, or regulatory compliance reasons. Do not use multiple billing accounts because you think it will make spend tracking easier. Things such as resource labeling, billing reports, and BigQuery exports work much better when it comes to visibility.
At the very least, to set up billing for Google Cloud, you need to identify one organizational administrator and one billing administrator. If you are moving through the Google Cloud foundational steps in order and following Google’s recommendations, then please recall the Step 3 – Enabling administrator access section of Chapter 2, IAM, Users, Groups, and Admin Access, where you created the gcp-organization-admins and gcp-billing-admins security groups. If you haven’t already done so, make sure your two users have been added to their respective groups.
Billing-related IAM roles
Later in the book, we are going to dig into some details related to security roles in GCP, but since we are talking about billing, it’s probably worth examining a few key related roles and how they may map to your organization.
Billing Account Manager
The Billing Account Manager has full control and access to all aspects of billing and billing accounts, including managing payments, viewing invoices, setting budget alerts, viewing spending, delegating billing-related roles, and communicating spending to parts of the organization that need it. This role is assigned at the Billing Account level and cannot be limited to a project.
The following users in the organization might be assigned this role:
- In small to medium-sized organizations, this could be some combination of CEO, CTO, and CFO, with the CEO or CFO likely managing and delegating billing-related tasks and managing Payments Profiles, while the CFO and/or CTO set budgets and view spending.
- In larger organizations, this might be someone in procurement or central IT. Besides managing Payments Profiles, they will likely set budgets and communicate spending to individual development teams.
Besides the Billing Account Manager, Google also offers a role with full read only access to billing data, the Billing Account Viewer.
Billing Account Viewer
The Billing Account Viewer is another role associated with the billing account, and it does exactly what you think. It allows users to view all cost and transactional data related to billing, including viewing invoices, billing reports, and all spending. This role may not be used at all in some organizations.
If used, the following users in the organization might be assigned this role:
- In small to medium-sized organizations, this might be someone in accounts payable that’s responsible for approving invoices.
- In larger organizations, it could be someone approving invoices, or perhaps someone in financial planning working to interpret spending for others in the organization or C-Suite.
Between the Billing Account Manager and Viewer, Google offers a role to help view and manages costs, the Billing Account Costs Manager.
Billing Account Costs Manager
The Billing Account Costs Manager, like a viewer, can view all cost and transactional data related to billing, including viewing invoices, billing reports, and all spending. In addition, they have full control over budgets.
If used, the following users in the organization might be assigned this role:
- In small organizations, this role might not be used at all.
- In larger organizations, this should be someone in finance, accounting, or technical management who needs to monitor and make recommendations related to spending, as well as someone who needs to create, monitor, and manage billing budgets and alerts.
Another billing related role is the Billing Account User.
Billing Account User
The Billing Account User is also associated with the billing account itself and primarily lets someone associate a billing account with a project. Typically, this role will be granted to whoever is creating new projects for the organization.
The following users might be assigned this role:
- Small to medium-sized organizations may not use this role at all or may grant it to development team leads to help them create projects.
- In larger organizations, this might be a project lead or, again, someone in development.
Configuring the gcp-billing-admins group
In Step 3 – Enabling administrator access section of Chapter 2, IAM, Users, Groups, and Admin Access, we created the gcp-billing-admins group and identified at least one person for membership, but we didn’t assign any permissions for the group in Google Cloud. In the official steps from Google, they set the permissions for this group in Step 4. The new setup wizard from Google, however, has recently started to assign group permissions in Step 3. Let’s start by checking for proper group permissions before setting them when appropriate.
Assuming you are an organization administrator and are a member of the gcp-organization-admins group we created in Step 3 – Enabling administrator access, then you already have all the permissions you need to complete the following steps. However, since most Google Cloud organizational administrators aren’t typically part of the finance and accounting units in their businesses, even if you are performing the following steps, make sure that you coordinate with your identified billing administrator so that they are aware of their new responsibilities. Let’s get started:
- Make sure you have logged into Google Cloud using your organizational administrator account. If you used my naming scheme from the previous chapter, then it should be in the following format: gcp-orgadmin-first.last@<yourdomain>.
- Log in to the Google Cloud Console and navigate to the IAM | Groups page (https://console.cloud.google.com/iam-admin/groups). You may have to select your organization since groups are organizational resources and not project-specific. Check your group list and make sure you see the billing administrator group you created back in Step 3 – Enabling administrator access – that is, gcp-billing-admins. Take note of the group’s email address (likely gcp-billing-admins@<yourdomain>) – you’ll need that to verify group permissions in the next step.
- With the group’s existence verified, use the left-hand navigation menu to switch to the base IAM page. If permissions have already been assigned to the group, then its email address should appear as a principal on the page of organizational permissions, and the Role column should contain the Billing Account Administrator, Billing Account Creator, and Organizational Viewer roles, as shown in the following screenshot. If the group email address isn’t in the list of permissioned principals or if the Role column doesn’t display those roles, then you need to rectify that:
Figure 3.4 – The IAM page showing gcp-billing-admins and roles
If the group doesn’t appear at all, click the Add button at the top of the page, enter the group email address in the New principals text box, and configure the group’s security roles, as described next. If the group appears, but it doesn’t have the security roles mentioned in the previous paragraph, then click the pencil icon next to the group to edit its permissions. Add/verify the requisite Billing Account Administrator, Billing Account Creator, and Organizational Viewer roles. Once you’ve done this, the group permissions should look as follows:
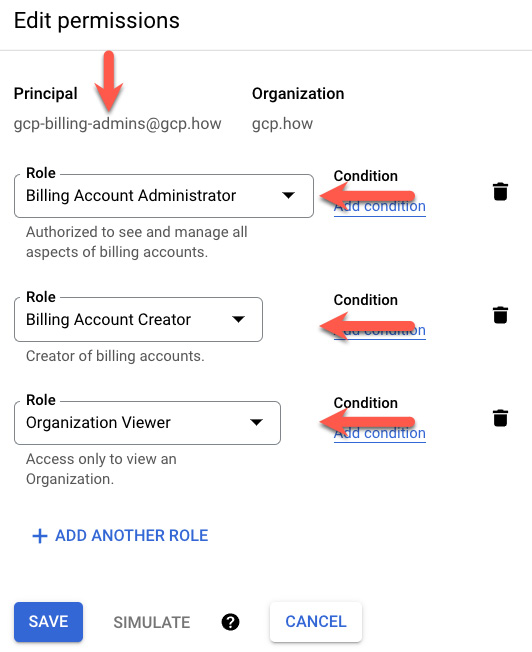
Figure 3.5 – The Edit permissions page showing the correctly assigned roles
- Lastly, go to your Cloud Identity/Google Workspace admin page (https://admin.google.com/) so that you can assign your billing admin(s). From the admin home page, navigate to Directory | Groups. Mouse over your gcp-billing-admins group, as shown in the following screenshot, and click Add members. Add who you need to the billing admins group. Remember that you should always have at least two billing account administrators:
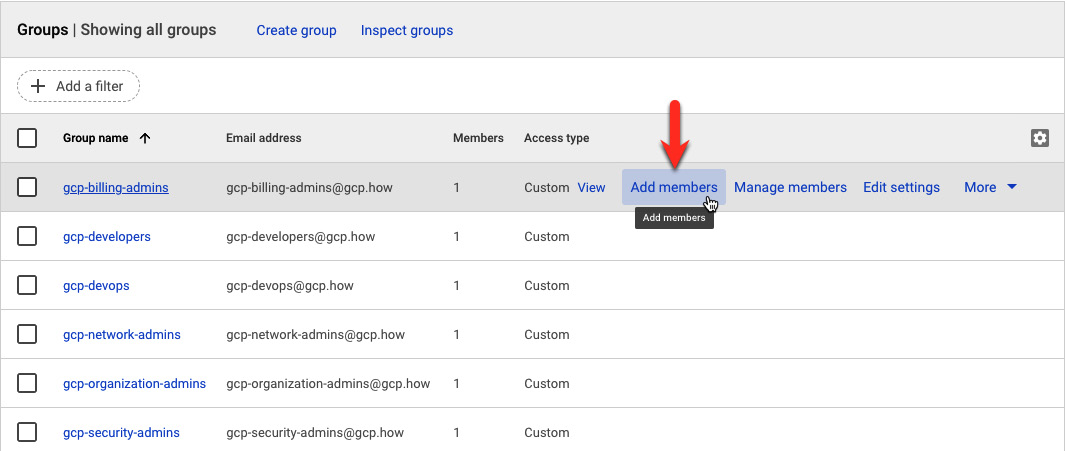
Figure 3.6 – Adding members to the gcp-billing-admins group
Optional Recommendation
Previously, we discussed some of the other key billing-related Google Cloud IAM roles. It might not be a bad idea to start identifying people who may apply to those roles and set them up. You could, for example, create a group for Billing Account Viewers and add anyone relevant from the finance and accounting departments. Remember that this group would be able to see all the spending across all projects, so it would contain those that need to view organizational Google Cloud spending to aid with costing recommendations, investigating unusual spend, approving invoices, or communicating spending trends and relevant details with people who need to know. Once the group has been created and the members have been assigned, go back into Google Cloud IAM and assign the Billing Account Viewer role to the group.
Identifying your main billing account(s) and closing those you no longer need
Earlier in this chapter, I mentioned that Google recommends that you have a single billing account, bar a few exceptions. You, or whoever initially set things up for your organization in Google Cloud, may not have realized this best practice, and you may currently have multiple unneeded billing accounts. To check your billing account status, go to the main Google Cloud Billing page: https://console.cloud.google.com/billing.
First, identify the account(s) you want to keep and those you no longer need. For the account(s) you want to keep, decide whether the account names make sense, especially if you’re keeping more than one. I’m following Google’s best practice and only keeping a single account in GCP.how. My main account is called My Billing Account, which I don’t particularly like. To rename a billing account, click on its name on the billing page to view its details. Using the left-hand menu, scroll to the bottom and select Account management. At the top of the page, click the pencil icon and enter a new name. Do this with any accounts you are keeping to clearly define what they are for.
Once you’re happy with the names, it’s time to clean out the billing accounts you no longer need. Before you can close a billing account, you will need to switch any projects it is paying for over to an account you are keeping. If the account that you want to remove is invoiced rather than self-served, then you’ll have to contact Cloud Billing Support to close it: https://cloud.google.com/billing/docs/support#contact-billing-support.
Before moving projects to alternative billing accounts, another thing you will want to check for is commercial, non-free, products that have been installed from the Google Cloud Marketplace. You will need to make sure those items have been switched over or repurchased under the new billing account. For details, go to https://cloud.google.com/marketplace/docs/manage-billing#manage_project_billing.
To remove non-invoiced billing accounts, follow these steps:
- On the main Google Cloud Billing page, https://console.cloud.google.com/billing, identify an account that needs to be removed and click on its Overview page.
- Navigate to Account Management (where you can also rename accounts). One by one, click the triple dot menu next to each project to be removed from the billing account and Change billing to the main account. If you have a lot of projects to reassign, you may want to do some basic automation by using the gcloud billing command, which will link the projects to the main billing account (https://cloud.google.com/sdk/gcloud/reference/billing).
- Verify that the billing account is no longer linked to any projects by visiting the Account Management page and ensuring that it is now empty.
- Wait 2 days for any outstanding charges to hit the account. Charges may take up to 24 hours to appear on a bill, so the extra day will make sure they have all come in.
- Settle the billing account by navigating to its Overview page. At the top, click Payment Overview | Make a payment.
- Close the billing account from its Overview page by clicking Close Billing Account at the top of the page.
Pro Tip
On the main Billing page (https://console.cloud.google.com/billing), up at the top is a My Projects tab. Clicking this tab will provide you with a list of all your projects. Not only is this a quick way to see all the projects and which billing accounts they are associated with, but also at the right-hand side of the page is a down-arrow Download CSV button. This CSV file contains all the project names and their associated billing accounts. This may help you (automation) when you’re trying to move a lot of projects to a central billing account.
With that, we have covered most of the core settings and changes that are required for a basic Google Cloud Billing foundation, but there are some best practices we need to discuss before moving on.
Google Cloud Billing best practices
My dad is one of those old-school southern gentlemen who does not discuss his finances – not with my mom, and certainly not with us kids. When I was growing up and things related to spending money happened, it was his deal, and he didn’t want any of us to know the details. He’s the same way today.
I’m sure some of you can relate, while others of you may roll your eyes and think, “how odd.” Would it surprise you that most organizations act much like my dad when it comes to spending in Google Cloud? The number one billing-related problem I see organizations make when it comes to GCP is not letting enough people in on the cost-making decisions.
In 2021, Google joined the FinOps Foundation. You can read about basic FinOps at https://www.finops.org/introduction/what-is-finops/ if you like, but in a nutshell, FinOps advocates an organizational cloud spend culture where a central best practices group helps multi-skill FinOps teams decide and optimize cloud spending. That way, instead of someone in accounting looking at two products and making a decision based strictly on a Google Cloud line-item price, you get the costing knowledge out to a wider portion of the organization and involve people with multiple organizational skills in the decision-making process. It’s not always the cheapest product that’s best, and GCP products are rarely used in a completely isolated way, so involving more people with broader knowledge skill sets has a lot of benefits. Then, as you expand and grow in the cloud, you iterate the process and optimize as you go.
To put it bluntly, I want anyone making cloud-related product decisions to understand not just their technical capability set, but their cost ramifications. This means that if costs aren’t transparent, then your employees won’t know how to make cost-conscious decisions. I also want you to think bigger than just your Google Cloud bill. How much you spend on GCP services is important, but so are all the organizational costs related to cloud utilization.
Back in Chapter 1, Getting to Know Google’s Cloud, I mentioned Total Cost of Ownership (TCO). I defined TCO as what you pay Google, plus any related non-GCP costs. So, if you want a MySQL database (DB) in Google Cloud, you could spin up a VM in Compute Engine that’s running Ubuntu and load MySQL yourself, or you could go to Cloud SQL and have Google spin up a managed MySQL instance for you. The Cloud SQL option would be a bit more expensive on your Google bill, but it would be substantially lower in terms of TCO. With Cloud SQL, Google manages the machine, the OS, the security, the database software, the backups, and the OS and DB patches for you. Compare that to what you are going to pay internally for all the same management on that VM you built, and Cloud SQL is likely to be significantly less expensive in terms of TCO.
To start controlling costs in Google Cloud, you need to know what you are spending.
Reading billing reports
Google provides multiple billing-related reports and information sets in the billing part of the Google Cloud Console. To view most of the reports, you will need to be a Billing Account Admin, Viewer, or Costs Manager. If you are a Project Owner, Editor, or Viewer, then you will be able to view a project-specific subset. Going back to the FinOps discussion, cost-related decisions should also percolate down to project managers and technical team leads – really, anyone that’s responsible for making product choices in GCP.
To find the billing reports for your billing account, use the navigation menu and open Billing. If you have multiple billing accounts, you may need to click Go to linked billing account.
The Overview page will show your current spending, predicted end of month spending, cost trends for the last year, and the top spending projects and services, each with a link to a report with more details:

Figure 3.7 – Top services graphic
Reports is probably the most versatile of the GCP billing views (https://cloud.google.com/billing/docs/how-to/reports). Here, you can specify a filter for things such as date range, project, service, or SKU. Then, you can group the results by Project, Service, SKU, Location, or even by label keys. Labels are arbitrary key-value identifiers, and I’ll discuss them later in this book. Here’s an example where I’m looking at December 2021’s spending for all my projects, grouped by service, and displayed as a daily cumulative stacked line chart. Here, I can easily see my three biggest spends by service:
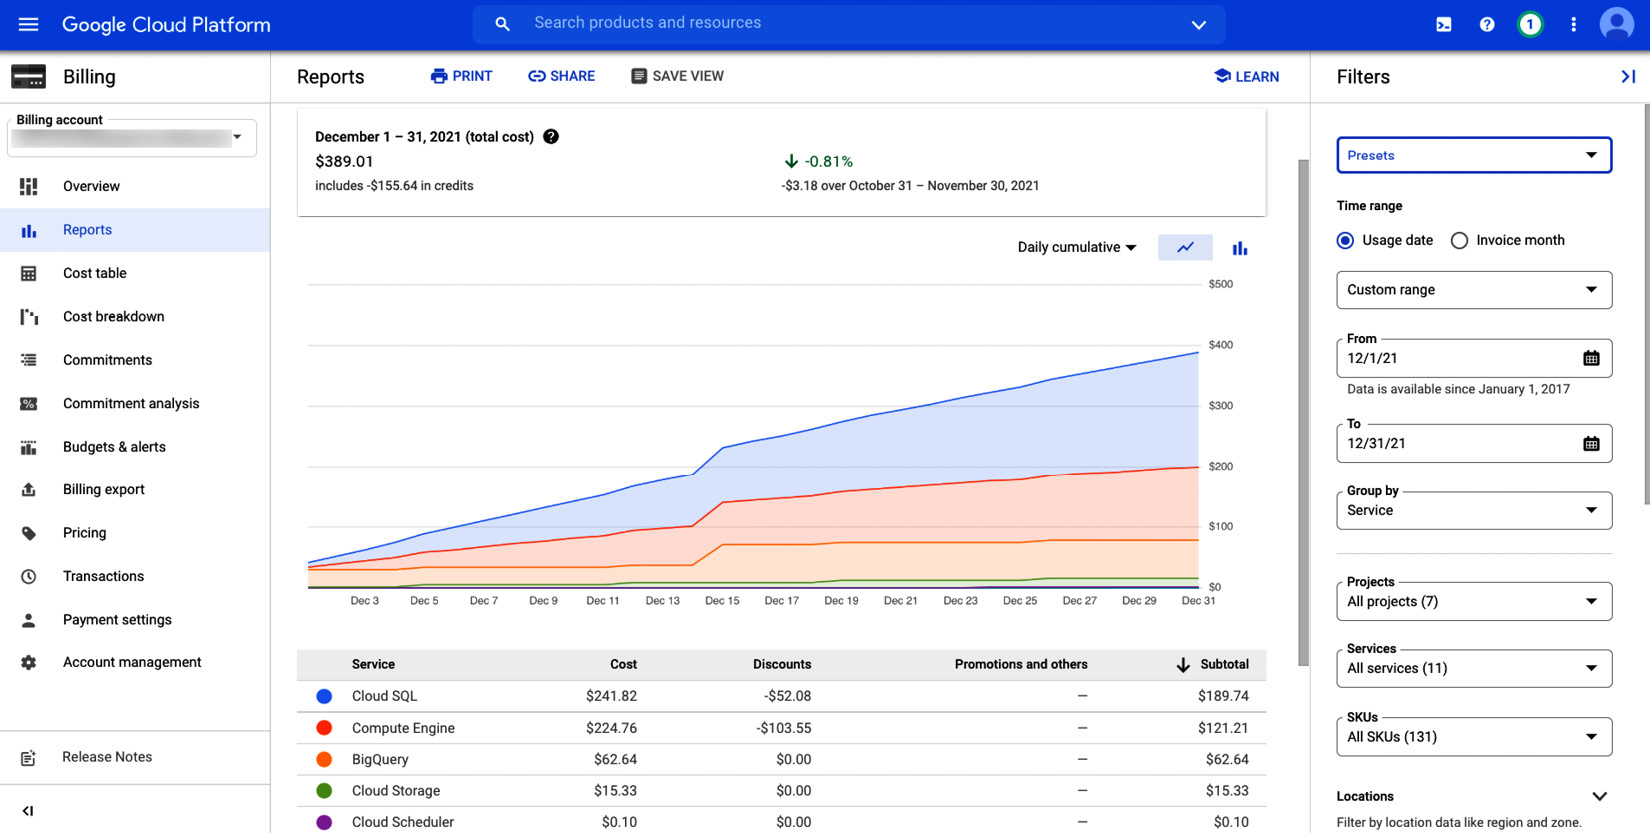
Figure 3.8 – Top spending services across all projects
Since the monthly statements are PDFs that provide limited details, you can use the Cost table view (https://cloud.google.com/billing/docs/how-to/cost-table), which gives you a customizable way to explore a detailed breakdown of your costs and credits for the selected invoice month. Details may also be downloaded as CSVs. Here’s an example from December 2021. Notice how it has an itemized breakdown by project and service. As you check the sub-sections, you will see a running total in the popup summary box (in blue):
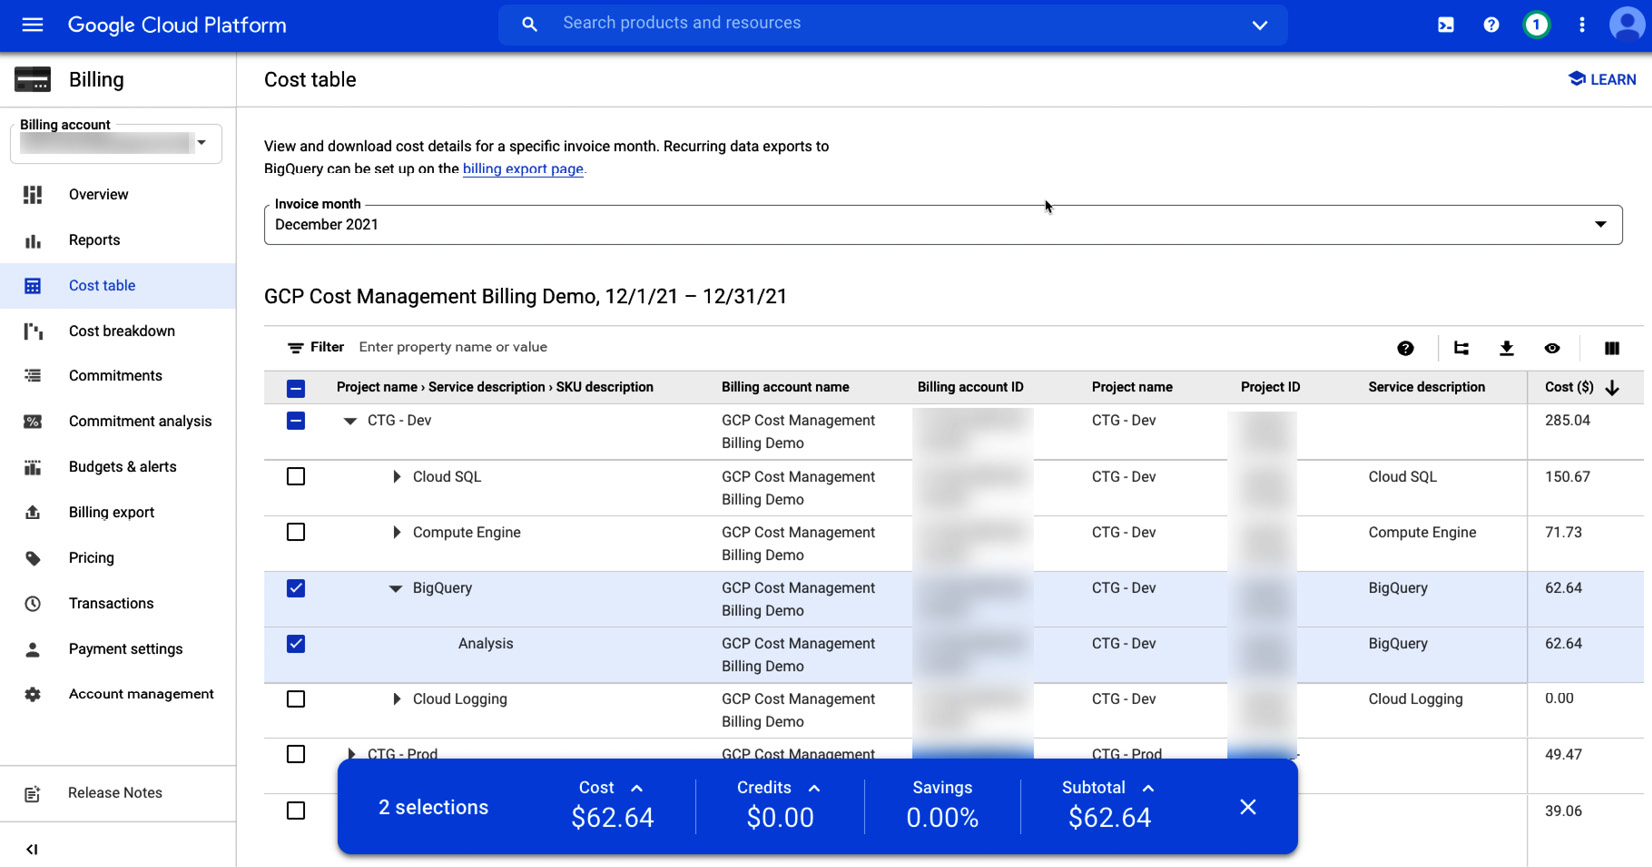
Figure 3.9 – Cost table for the Dev project’s BigQuery spending
The Cost breakdown report (https://cloud.google.com/billing/docs/how-to/cost-breakdown) shows a filterable waterfall overview of your monthly costs and where you are currently realizing savings thanks to things such as committed use and sustained use discounts. Here, you can see my total would have been $544.65, but I saved some money thanks to committed and sustained use discounts:

Figure 3.10 – Cost breakdown showing current savings
The Commitments and Commitment analysis reports allow you to analyze your current committed use discounts and can recommend areas where further commitments could save you more. For details, see https://cloud.google.com/billing/docs/how-to/cud-analysis.
Once you have a good grip on what you are spending and how to get details from Google Cloud Billing reports, you should consider exporting your billing information to BigQuery for more detailed data science exploration.
Configuring daily billing data exports to BigQuery (sooner rather than later)
While billing console reports offer a lot of detailed information on how and where you are spending money in Google Cloud, its filters can only do so much. If you want to get your billing data someplace your data scientists can query with SQL or maybe even create custom BI dashboards for it, then your best option is to configure exports to BigQuery.
Tip – Set Up Billing Exports as Soon as You Configure Billing
Billing exports can only export daily billing information from the day you configure them. As a best practice, you should set up exports to BigQuery as a standard step when you’re configuring Google Cloud Billing.
I’m going to walk you through how to manually configure billing exports now, but when we start infrastructure automation in the next chapter, you may want to update the project the exports are made into, since my automation will create a project expressly for that purpose.
BigQuery does two main things well: store data and query data. The queries are created in classic, ANSI 2011 standard SQL with a few extensions. But what about getting the data stored in BigQuery in the first place? That’s what billing exports do for you.
There are three types of Cloud Billing data that you can export (https://cloud.google.com/billing/docs/how-to/export-data-bigquery-tables):
- Standard usage cost data: Account ID, invoice dates, services, SKUs, projects, labels, locations, costs, usage, credits, adjustments, and currencies.
- Detailed usage cost data: Everything from standard plus resource-level cost data related to Google Compute Engine VMs.
- Pricing data: Detailed pricing information.
For billing exports, you will need to specify the location that the billing data will be exported to. Google recommends using a new GCP project so that you can have a central location for anything billing administration-related. Within the project, you will also need to create a BigQuery dataset – that is, a location where tables of data can be stored.
To configure billing exports (https://cloud.google.com/billing/docs/how-to/export-data-bigquery-setup), follow these steps:
- If needed, create a new project in Google Cloud to use for central billing administration support.
- Within the project, go to the BigQuery Data Transfer API page by typing the API’s name into the Google Cloud search box or by going to https://console.cloud.google.com/apis/library/bigquerydatatransfer.googleapis.com.
- Make sure that the project selector has been set to your billing admin project. Then, Enable the API if needed.
- Use the navigation menu (or the search box at the top of the Google Cloud Console) to navigate to the BigQuery page.
- In the Explorer panel at the left of the BigQuery SQL workspace, click the triple dot menu next to your billing project’s name and click Create dataset.
- Enter a Dataset ID name; I’m going to use all_billing_data. I don’t have any regulatory compliance to worry about as it relates to data location, so I’m going to store my dataset in us. I don’t want my billing data to auto-delete, so I’m going to leave the Enable table expiration box unchecked and click Create Dataset.
- Use the navigation menu to pull up Billing. If you have more than one billing account, make sure that you have selected the correct one. Then, click Billing export.
- Click the Edit settings button for the type of billing export you’d like to configure. Select your billing admin project and the all_billing_data dataset you created. Then, click Save.
- Optionally, enable any combination of billing exports by editing the settings for all the types you desire.
Again, remember that I will use automation to create a project for billing export storage in the next chapter, so if you want to wait on configuring exports for now, and come back next chapter, feel free.
Congratulations – you are now exporting your billing data! Take some time to explore the data table schemas at https://cloud.google.com/billing/docs/how-to/export-data-bigquery-tables. Google has some nice billing-related query examples at https://cloud.google.com/billing/docs/how-to/bq-examples.
Now that we have explored a couple of different ways to investigate spending, let’s talk about what you are paying for.
Knowing what you are paying for
Traditionally, business IT costs tend to operate as a mix of Capital Expenditures (CapEx) and Operational Expenditures (OpEx). CapEx deals with things such as buying servers, where you have a big outlay to purchase the hardware, but the monthly cost after that initial purchase is small, with the CapEx spending typically amortized over several years. On the other hand, OpEx covers things such as employee salaries, rent, taxes, and more. Moving to the cloud is a major change in the way businesses spend on infrastructure because most or all of the CapEx goes away, and everything becomes OpEx.
In the OpEx cloud model, you pay based on metered consumption. It might be by time, amount of data, operations executed, or various similar metrics. Understanding how Google charges you on a resource-by-resource basis is important.
As you are evaluating services in Google Cloud, look at the pricing pages for the products you are contemplating. If you go to https://cloud.google.com/pricing/list, you will see that Google has a link to the pricing page for each of its products. If you are working on deploying a new application and you know that you could use either Cloud Run or Google Kubernetes Engine, because either one could run the container-based application you are building, don’t just learn the technical pros and cons, learn the differences in how you get charged both in terms of your Google bill and the related TCO. Now, we are making solid, well-informed FinOps decisions.
Something else to consider when you’re selecting products is if they have a free tier, and if so, where it ends. Free tiers (https://cloud.google.com/free/docs/gcp-free-tier#free-tier-usage-limits) allow you to use certain GCP products up to some base level without charge. Free tiers may cover early development and testing and may even allow some low-use applications to continue to run in production for next to nothing.
Lastly, make sure that you investigate the committed use discounts I mentioned earlier. If you know that you will need to use Compute Engine, Cloud SQL, Cloud Run, Google Kubernetes Engine, or VMware Engine at some base level for long periods, then signing a contract for using those products could save you a lot of dough. For details, go to https://cloud.google.com/docs/cuds.
If you’re attempting to predict pricing, fortunately, Google does have a price calculator that can help: https://cloud.google.com/products/calculator. This price calculator can give you very specific pricing information, but its results are only as good as the values you plug in. You’re going to have to get into some of these products and roll around a bit to understand how much you will need and how the product generates spend.
That’s another thing about FinOps, by the way – costing, as it relates to Google Cloud, needs to be an iterative process. You use a product and as you get better at it, you optimize your costs – and yes, sometimes, that optimization means you pick up and move to a different product.
For product-specific details related to controlling costs, go to https://cloud.google.com/architecture/cost-efficiency-on-google-cloud.
But you can’t stop after simply knowing how products in Google Cloud spend – you need to set up some guardrails. Let’s take a look at budgets and our first level of cost protection.
Creating and using budgets
A few years ago, a buddy of mine called me out of the blue and asked me if I’d like to spend a couple of weeks in Greece. It seemed he was going to Tinos, an island out in the Aegean Sea, to learn how to carve marble, and he invited me to keep him company. I’m about as artistic as a post, but a couple of spring weeks in Greece? Hell yeah.
While my friend was learning to carve beautiful Greek marble (and making his hands extremely sore), I rented a car and drove it all over various islands off the coast of Greece. Now, the Greeks aren’t big on guard rails. I’d be cruising along some road on the side of a mountain where, at the edge of the road, there would be a cliff that dropped away to the rocks and blue waters of the Aegean, and there wouldn’t be a guard rail in sight. To say it made me a little nervous would be an understatement. One time, I met this bus on a curve, and I was on the outside, as was the cliff…
It’s true – your whole life really can pass before your eyes.
Learning things the hard way has its benefits, but I’m telling you this for your own good so that you don’t make the same mistakes as other cloud newbies. People using the cloud need to know how their spending works regarding the products they are using, and they also need to know how to implement cost controls.
Google Cloud Billing budgets are alert notifications related to spending, and they are typically sent out through email to up to five recipients. They are Google Cloud’s way of tapping you on the shoulder and saying, “Hey, you’ve spent (or are on track to spend) x% of your specified budget amount.” They can be attached to services, projects, and/or entire billing accounts, and you can specify monthly, quarterly, yearly, or custom calculation periods.
Now that you know what a budget alert is, let’s look at an example where using one could have saved an organization a lot of money.
Once upon a time, I did some work for an organization where a genetic researcher created a Cloud Storage bucket. Cloud Storage bills per byte for what you store, and you can select one of four storage classes, depending on your Cloud Storage usage pattern. The standard storage class is the most expensive for storage, but you pay no penalty for accessing files. However, the other three storage classes each bill for storage and access. For example, a regional storage bucket that’s been created in the us-central1 region with a standard storage class currently bills $20 a TiB for storage and there’s no access penalty for using data. If you store a 1 TiB file and read it 10 times in the month, you pay $20. The Archive storage class for the same bucket in the same region bills storage at only $1.20 a TiB, but there’s a $50 per TiB access penalty. This storage class is for files that you hope you will never use or certainly don’t need to use more than once a year. Store that same 1 TiB file and read it 10 times in a month and your bill is going to end up being $501.20, almost entirely thanks to the access penalty.
Can you guess where my story is going?
So, the geneticist is storing a lot of files in Cloud Storage – big, sequenced DNA files if you can believe it. The storage that’s required for a single person’s fully sequenced DNA is about 200 GB. So, if you have hundreds or thousands of people and you’re running some ML, then that’s lots of data. The geneticist is thinking about storing all this data, so she looks at the Cloud Storage price sheet (https://cloud.google.com/storage/pricing#price-tables) and she picks Archive because it’s by far the least expensive. She doesn’t read the whole article (boring), so she never notices the Retrieval and early deletion section, which discusses data retrieval costs. At the end of the month, she and her manager, as well as her manager’s manager, all are a bit surprised by the $5,000 bill for storage.
Have you ever heard Einstein’s famous quote, “Everybody is a genius. But if you judge a fish by its ability to climb a tree, it will live its whole life believing that it is stupid.” I think it applies quite nicely here.
There are a lot of things wrong in this story. Why was the geneticist making decisions on Google Cloud architecture, without the aid of someone who knows Google Cloud as well as she knows genetics? There were a lot of researchers doing very similar sorts of things, so why wasn’t automation in place to build out the infrastructure, perhaps in the form of a Google Cloud project per researcher? Why in the world were there no budgets in place to spot unusually high spending before the bill came at the end of the month?
As a side note, this is exactly the sort of example where FinOps makes sense. I need a geneticist on the FinOps team because they know what the business is trying to do a lot better than me. That 200 GiB per sequenced human metric came from her. But there also needs to be someone on the team who knows how spending in Cloud Storage works, as well as how spending works in all the other products related to Cloud Storage.
As I mentioned previously, budgets would have helped here too. Guesstimate the monthly spend for your whole presence in Google Cloud and set it as a budget on the billing account. Guesstimate your total spend for every project you have, and you can set that as a series of budgets too. When you are using a particularly heavy spending service, or are experimenting with a service you don’t know, set a budget on that specific service. Budgets can be attached to specific amounts, forecasted amounts, and percentages of the same.
It works like this: “I think I’m going to spend a total of $1,000 this month in Google Cloud.”
Great – then let’s set a budget for that $1,000, with alerts that fire at 25%, 50%, 75%, 90%, and 100% of actual spend, and at 75%, 90%, and 100% of the forecasted spend. That might be a bit heavy on alerts, but especially when you’re starting, it can be useful to see how close to your budget you’re going to be. If your 100% forecasted and 25% actual alerts both fire in the first 3 days of the first week, then you’re not going to come close to your budget.
Initially, you may need to adjust your budgets and alerts daily, moving to weekly, then moving to a few times a year. You should set a policy for regular budget reviews while checking the quality and applicability for each alert, modifying some, and weeding others out completely.
Warning – Budgets Trigger Alerts, They Don’t Limit Spend
When you run through 100% of a budget, it will not stop or slow down your total spending. Budgets are alerts related to actual and forecasted spending; they don’t turn off the tap. If you need to stop spending, consider creating a budget that sends out an alert message through Pub/Sub to a Cloud Function or Cloud Run container with a Pub/Sub trigger attached. This code could power down a specific service. One quick trick to stop spending is to remove the billing account from a project. This would cause all the products in the project to shut down until a new billing account is attached.
To create budgets and budget alerts, you need to have the Billing Account Administrator or Billing Account Costs Manager IAM security role.
To create a budget in the Google Cloud Console, from the navigation menu, go to Billing. From the left menu, navigate to Budgets & alerts. Then, at the top of the page, go to Create Budget. Provide the following information:
- Name: Make it descriptive so that you can recognize it in a list. My initial alert is going to be Total Monthly Spend.
- Scope: Monthly alerts for All projects and All services is a good place to start. Later, once you have the broad alerts set up, you can come back as needed with alerts for specific projects and even for specific services. If you are thinking about using a service that’s new to you, that’s probably an excellent time to add a service-specific alert constructed to your predicted spend numbers.
- Amount: Alerts tied to specific dollar amounts are the simplest. In the long run, adding alerts relating the current month’s spend to last month’s spending may also be helpful.
- Actions: Initially, alerts with a good spread of actual as well as forecasted percentages can be really helpful. Over time, you may want to trim out some of the notification thresholds.
Email alerts to billing admins and users is good, but you may wish to consider linking in monitoring email notifications as it will allow you to arbitrarily choose a notification technology (email, Slack, and so on) and the people who get notified through it.
Warning – Make Sure People are Seeing the Alerts
One major gotcha with billing alerts is tying them to individual email addresses. If you send all your alerts to Pat in finance, and Pat is on a cruise or has moved on to that job in IT she’s always secretly wanted, then she may not see the alert, and alerts to bad email addresses aren’t reported anywhere in GCP. Instead of alerting individuals, you may consider alerting a group of people. When users come and go from finance, adding and removing them from the group can ensure that someone appropriate is always notified.
On the right-hand side of the budget window, you’ll see a Cost trend chart, as shown in the following screenshot. As you refine the budget’s scope, the chart will update to allow you to see historic amounts based on your selections (projects, services). The chart works as a good sanity check, displaying a red dashed line where your configured alert would hit 100%:

Figure 3.11 – Cost trend showing monthly spending with a $1k budget line
In addition to setting budgets to notify your billing admins and key personnel on what’s happening with spending, you may also want to consider creating alerts in Monitoring.
Warning – Google Updates Billing Data About Once a Day
This means it’s completely possible for you to spend lots of money before you get any alerts. You should know how products generate spending, and how the configurations you select relate to spending, along with product-specific spending recommendations, before enabling those products in your project.
Creating alerts in Monitoring
We will cover monitoring in detail in a later chapter. For now, Google Cloud Monitoring allows you to collect metrics about services running in Google Cloud. A metric might be the CPU utilization for a running VM. The data is aligned (bucketized) and you get back data points on some schedule, once a minute most commonly. Not only can you throw those data points on a nice visualization (dashboard), but you can also use them to create alerts.
We need to talk a lot more about monitoring and alerts, but I have mentioned it here in the billing section because while billing alerts take, on average, 24 hours to update, things in Cloud Monitoring tend to update in a matter of minutes.
Here’s how monitoring could help you spot overspending:
- You’ve identified a new Google Cloud service, X, and are starting to experiment with it. You know how it generates spending, have read a bit about keeping costs down, and you may have even created a service-specific budget alert just in case.
- You take a peek at Google Cloud’s metrics page (https://cloud.google.com/monitoring/api/metrics) and locate the product. You are looking to see whether there’s a metric that takes measurements related to how service X generates spending.
- If you find one, then you could build a dashboard and/or monitoring alert to notify you if that metric goes over some threshold.
Monitoring alerts can’t always help you spot out-of-control spending, but sometimes, they can give you better visibility into things before the costs get to the billing alerts. Something else that may help you cap spending is quotas.
Setting up quotas
Resource quotas are artificial caps that limit how much of a given service you can use, in a given time, within a given project. Quotas are designed to limit unintentional resource overruns and their corresponding costs. There are two major types of quota:
- Rate quotas: Limits the number of times you can use a service API in a particular period.
- Allocation quotas: Limits the amount of something you can use, such as the total number of VMs or networks, within a given project.
For quota-related details, most products in Google Cloud have a Quotas and limits page you can easily find by searching for it. You can view and set quotas in a project by going to the navigation menu and selecting IAM & Admin | Quotas.
Here’s how to make quotas work for you.
Imagine that you are about to start using BigQuery. You’ve done your due diligence and you know how BigQuery pricing works (https://cloud.google.com/bigquery/pricing). You’ve determined that you aren’t going to use BigQuery enough to make flat-rate pricing worth the money, so you’ll be paying per query at $5/TiB data processed. You also know how to tell how much a query costs using the UI, and you have your budget in place – perhaps even set at the BigQuery service level – but you’d still like to limit the total daily spend.
Here’s where a quota helps.
You head over to Google Search, where you enter GCP BigQuery quotas and limits. In the results, the first choice is https://cloud.google.com/bigquery/quotas. You do a little reading, and you see there’s a Query usage per day quota, and that, by default, it has no limit.
Yup – by default, there’s no limit on how much you can spend on BigQuery queries in a single day. You’ve come up with a $1,000 query? It’s legal. If you have a billing budget attached to the BigQuery service, with the budget amount set to $25, then sometime in the next 24 hours when Google updates the billing data, and that single $1,000 query appears on the bill, you’ll get all your alerts at the same time. If you decide to investigate, then you’ll realize that you overspent, just a bit. Granted, as far as I’m concerned, anyone with the power to use BigQuery should have been educated on how to tell how much a query is going to cost before it’s run, but an actual limit might be nice here.
Time for a quota.
You navigate to the project where you are going to start using BigQuery and use the navigation menu to go to IAM & Admin | Quotas. In the quota filter box, search for Query usage per day. When you see the quota in the list, check it off, and, at the top of the page, click Edit Quotas:

Figure 3.12 – Editing the BigQuery quota
If you get billed $5 per TiB, and this quota is looking at being queried data daily, then if you enter 5 and set the unit to TiB, that would cap your max BigQuery usage to $25 a day. When you exhaust that quota, the queries will start to throw an “out of quota” error message.
This isn’t a bad trick, and it’s one that far too few people take advantage of.
Great job! You should now have a solid Google Cloud Billing foundation in place in terms of budgets, quotas, and billing exports, and you should also have the skills to know what you’re spending money on and why. You can safely tick off Step 4 in our 10 steps to laying a foundation in Google Cloud. Great work – but don’t stop now.
Summary
In this chapter, we continued laying our foundation in Google Cloud by completing Step 4, Setting Up Billing and Cost Controls, from Google’s 10-step recipe. You now have a better understanding of how Google Cloud Billing works and can configure both Payments Profiles and billing accounts. You know how to find billing reports, can create budgets and budget alerts, and can cap usage by creating quotas. You also learned a little bit about the new FinOps approach to keeping cloud costs under control and have a path to breaking down the cost knowledge walls your organization likely has. This will help keep more of the organization in the loop when it comes to what things cost in Google Cloud. You’ve done a fantastic job and just think – you’re almost halfway there!
If you want to keep moving through the checklist steps with me, your tutor, then please move on to Chapter 4, Terraforming a Resource Hierarchy.