
Chapter 5: Controlling Access with IAM Roles
Do you remember in the last chapter when you got to figure out where you and all your fellow employees would sit in the new office building? Remember how we decided that a good way to attack the problem would be to examine how employees should be grouped both from a logical team sort of perspective and with an eye on security needs? Well, just like when building our resource hierarchy, Google Cloud is going to require the same type of thinking when we start to lay in our access control.
Google believes that the way you get security right is by thinking in cybersecurity terms from the ground up, and from day zero forward. As a result, Google Cloud has created an industry-leading, zero-trust architecture with a proven track record of security and reliability. Let’s do it.
In this chapter, we’re going to start with an introduction to Identity and Access Management (IAM), and then continue to use Terraform to ensure security is applied where and how we need it, and thus stratify the sixth step in Google’s foundation-laying plan:
- Understanding IAM in Google Cloud
- Step 6 – Adding IAM trust boundaries to the resource hierarchy
Understanding IAM in Google Cloud
Imagine you are taking a trip, maybe heading on vacation to Walt Disney World in Florida. You head to your local airport with your ID and your plane ticket in hand, and you make your way to security. Typically, the first officer you talk to at security performs two major tasks. First, they check your ID to make sure you are who you say you are. Once you are authenticated, they then check your ID against your ticket and determine whether you are authorized to proceed through security.
Even if you are passed through security, your authorization level will only allow you to go into specific airport areas and do specific things. You likely can’t carry a gun with you through security because you don’t have that level of access, just like there will be parts of the airport you aren’t allowed into.
Now, let’s transition away from airports and back into Google Cloud. Back in foundational step one, we configured our Google Cloud identity management. Then, in step two, we added an initial set of users and security groups. What we didn’t address past a few key groups was how Google Cloud handles authorizing users and groups to do things in Google Cloud. Google Cloud IAM is all about who can do what and where – something like the following graphic.
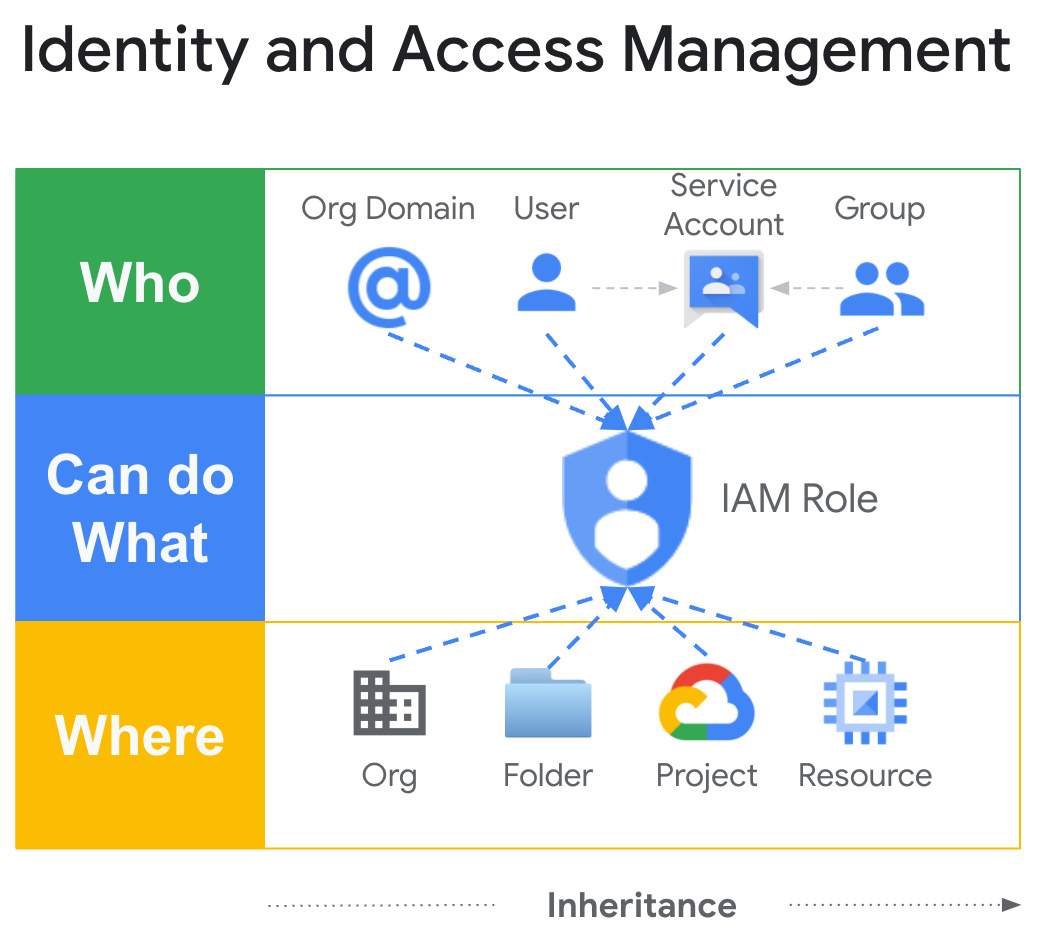
Figure 5.1 – Who can do what where
Let’s start with the who.
Who?
The who? in authentication and authorization in Google Cloud is technically defined by a principal. Google Cloud supports several different principal types, including the following:
- Google Account: Essentially a valid user in Google Cloud. Typically, these users come from a Google Workspace, Cloud Identity domain, or a Gmail account.
- Service account (SA): An account managed in Google Cloud used to authenticate applications or compute workloads into Google Cloud services.
- Google group: A collection of Google accounts and service accounts
- Google Workspace account: A collection of Google accounts defined as part of a Google Workspace.
- Cloud Identity domain: A collection of Google accounts defined as part of a Cloud Identity domain, much like a Google Workspace account.
- All authenticated users: allAuthenticatedUsers is a special placeholder representing all service accounts and Google accounts, in any organization (not just yours), including Gmail.
- All users: allUsers is a special placeholder representing all authenticated and unauthenticated users (anonymous access).
Most principals are created and managed in the identity management system we configured in step one. Exceptions include Gmail accounts, the special allAuthenticatedUsers and allUsers placeholders, and Google Cloud service accounts.
Service accounts
I was teaching the other day when the topic of Google Translate came up. How hard would it be to create a piece of code that could translate text from English to Spanish? The group I was training worked with many different programming languages, but JavaScript seemed to be a lingua franca. So, I pulled up the Node.js (JavaScript) documentation for the Google Cloud Translate library, and right on its home page (https://cloud.google.com/nodejs/docs/reference/translate/latest) is a quick example. I copied the code, put it in a code editor on my laptop, changed the ru Russian language code to the es Spanish code I needed, and ran the demo on my laptop.
The demo worked perfectly, but how did code running on my laptop access a service provided by Google Cloud? The answer: service accounts.
Services accounts are used to provide non-human access to Google Cloud services. Unlike user Google accounts, they don’t belong to your Google Workspace or Cloud Identity domain and are created and managed inside of Google Cloud projects. Also, they have no associated password and cannot log in via a browser. Authentication is accomplished via public/private key pairs.
There are three service account types:
- User-managed service accounts: Created by you using the console, CLI, or API. By default, any project can create up to 100 SAs, though that quota may be raised. You can choose the name of your SA, which will be combined with project-id to create an SA email address username in the format [email protected].
- Default service accounts: Created by Google to run App Engine ([email protected]) and/or Compute Engine ([email protected]). As a best practice you likely don’t want to use these accounts, but you shouldn’t try and delete them – it will break stuff.
- Google managed service accounts (robots): Created by Google in conjunction with various Google Cloud services and used when those services act on your behalf. Examples would include robot accounts set up behind Kubernetes and Compute Engine, Cloud Storage, or Data Fusion.
So, the who? In Google Cloud, the principal, is usually a person or a service account. With that established, let’s talk about what the principal can do.
Can do what?
In my English-to-Spanish translation example, the SA my code ran under needed to access the translation service through a particular project, but it didn’t need to do much more than that. From a principle of least privilege perspective, I’d like to be able to grant that specific level of access at a fine-grained level. Enter IAM.
Google Cloud IAM allows you to granularly grant different levels of access to specific resources. If a user or SA needs access to a resource, you first need to determine what level of access they require. Permissions define precisely what a principal can do, and take the form service.resource.verb. Then, instead of allowing the direct assignation of permissions, Google combines permissions into roles. So, you don’t grant a user a permission, instead you create an IAM policy and bind the user to the role, and the role defines a set of permissions. Typically, rather than configuring IAM policies for individual users, you will gather your users into security groups and then configure the binding policy for the group, rather than an individual.
In the grand scheme of things, this isn’t new or revolutionary. Controlling security by granting access via role bindings is used in a lot of security-related systems. One thing a little different here is that the user base and authentication mechanism are defined outside of Google Cloud, but the roles, role bindings, and authorization are defined inside. Regardless, can do what? is something that’s going to take thought and consideration. We will get more into specific role recommendations later in this chapter. For now, let’s dig a little deeper into how Google Cloud roles work.
Google defines three role types: basic, predefined, and custom. A great reference related to this entire Google Cloud role discussion can be found here: https://cloud.google.com/iam/docs/understanding-roles.
Basic roles, sometimes called primitive roles, were the original Google Cloud roles, and they predate today’s IAM system. Their strength, and their weakness, is that they are very coarse-grained. They are typically granted at the project level where they apply to most, if not all, of the services in the project. The three basic roles are as follows:
- roles/viewer (Viewer): Read-only access to most project resources, data, and configurations.
- roles/editor (Editor): All viewer permissions, plus the ability to modify most resources, data, and configurations. In addition, editors can create and delete resources.
- roles/owner (Owner): All editor permissions, plus the power to manage roles and permissions for others, and to configure project billing.
The problem with basic roles is that they are too coarse-grained. How many times have I heard the words, “Alicia couldn’t read that contract file in Cloud Storage but no worries, I made her a viewer and she can now.”?
Palm to forehead.
From a laziness perspective, basic roles are very attractive. Yes, making Alicia a viewer allowed her to see that file, and it was an easy fix, but Alicia can now also read the tables in that Spanner database, see all the settings for all the project Compute Engine VMs, and run queries in BigQuery. Did she need all those extra permissions? Probably not. One thing I know is that making Alicia a viewer likely violated the principle of least permissions.
There are a few cases where users doing experimentation or development might use things such as viewer or editor, but even in those cases, the basic roles make me nervous. A much better option tends to be to grant permissions by putting people into groups and then binding the groups to a set of predefined roles.
Where basic roles apply to everything in the project, predefined roles are fine-grained roles tied to individual Google Cloud services, and to specific jobs related to those services. Predefined roles are created and managed by Google, so as cloud features evolve and change, Google can update and adapt the roles. Did you take a peek at the page I recommended earlier in this section? If not, do so now: https://cloud.google.com/iam/docs/understanding-roles. Did you notice how long that page took to load? That’s because there are a lot of Google Cloud services, and each one comes with its own set of predefined roles.
You remember Alicia and her need to access files in Cloud Storage? On the right side of the preceding page is a list of predefined roles grouped by service type. Scroll through the list and click on Cloud Storage roles. In addition to this huge list of roles all on a single page, many Google Cloud products have documentation pages dedicated to access, roles, and permissions for that single product. If the huge list doesn’t provide enough information for you to make a decision, do a little Googling. For example, I just did a search for GCP Cloud Storage IAM and the first result is the Cloud Storage detail page here: https://cloud.google.com/storage/docs/access-control/iam-roles.
Note – When Using Google Search to Look for Google Cloud Related Information, Prefix Your Search with GCP
Google Search knows that GCP is short for Google Cloud Platform. Searching for Compute returns a whole mess of non-cloud results, starting with a definition. Searching for GCP Compute gets you right to the Compute Engine documentation.
Looking in the Cloud Storage roles on either of the preceding pages you will see that Cloud Storage calls a file an object. Essentially, a Cloud Storage object is the file plus any metadata related to the file. Looking through the object roles, it won’t take you long to locate roles/storage.objectViewer (Storage Object Viewer), which grants access to view objects and their metadata. The column to the right of the role name and description details the specific individual permissions the role grants – in this case, the following:
- resourcemanager.projects.get
- resourcemanager.projects.list
- storage.objects.get
- storage.objects.list
With that, Alicia could see the project and if she had the URL to the bucket, she could see (list) the files and read (get) any she needed to view. Interestingly, she couldn’t get a list of the project’s buckets, so that’s something to keep in mind.
Best Practice – Use Predefined Roles Where Possible
Google recommends as a best practice that predefined roles be used wherever possible. Google has put a lot of thought into how resources and roles relate and set up the predefined roles accordingly. Also, as the cloud evolves, Google continues to update and maintain the roles, making forward-moving role management easier.
If predefined roles won’t work for some reason, such as one doesn’t grant quite enough permissions and the next grants too many, then consider creating your own custom roles.
Custom roles are created and maintained by organizations rather than Google and they contain user-specified sets of individual permissions. I see custom roles used a lot by organizations, but all too often they are used for tradition or ignorance reasons, more than for any compelling need.
“We’ve always used custom roles.”
“Listen, I looked at that huge list of predefined permissions, and it just looked too hard, so I went custom instead.”
Likely, you will regret an over-dependence on custom-created roles. Not only are they difficult to construct and get right in the first place, but then you also have to manage them over time and through cloud evolutionary changes.
We could have used a custom role when solving Alicia’s file access problem. Perhaps you don’t like that as a Storage Object Viewer she can see the files in the bucket, but can’t get a list of available buckets from the project through the UI. One possible solution would be to create a custom role very close to Storage Object Viewer. You can’t edit predefined roles, but you can clone them and use the clone as a foundation for new roles. You could open the Storage Object Viewer role, make a copy, and then add in the permission to list buckets, then bind Alicia to your new custom role and she will be able to list buckets and files and read the files themselves.
Excellent – now that we have a little foundational knowledge on IAM and role usage, let’s use what we’ve learned to secure the resource hierarchy we’ve constructed.
Step 6 – Adding IAM trust boundaries to the resource hierarchy
It’s time to add some access control into our resource hierarchy in Google Cloud. The details of how and where precisely you will apply permissions in the access management stage of your Google Cloud setup will vary based on your organizational needs. After the last section, you probably have at least some ideas about how you will use the various role types, but I’m sure there are a lot of gaps that need filling.
You may not have realized it but our Google Cloud security posture started much earlier than this chapter. In our first major Google Cloud foundation-laying step, we set up our user identities, linked in an authentication service, and created a Google Cloud organization, all so we could have a way to control user management and authentication. From there, we set up some admin users and groups, established administrative access to Google Cloud, and then in the last chapter, we proposed and built a resource hierarchy, based on Google’s security foundations guide. The hierarchical plan we came up with looked like the following figure:

Figure 5.2 – A possible resource hierarchy
You might have tweaked the design, perhaps adding a layer of business unit folders above the environments, but as long as you kept both security and organization in mind, the design will do just fine. What’s nice about this design is both its simplicity, with one folder for each of the major environment types, a folder for the CI/CD projects, and a folder for all our common shared projects, and its flexibility in letting us assign major permissions and other policies at a high level, so we can get security in place sooner rather than later. If you used the example best practice scripts from Google’s Example Foundation, then you have already built some security into what you’ve constructed. We will talk about that, and more as we see to our access control in Google Cloud. Let’s start by examining security roles and what they are really telling us.
Reading a security role
If you recall our earlier example, where Alicia needed access to a file in Cloud Storage, we solved the problem by making her a Storage Object Viewer. If you look at the big page of predefined Google Cloud security roles (https://cloud.google.com/iam/docs/understanding-roles#predefined), then the entry for Storage Object Viewer resembles the following:
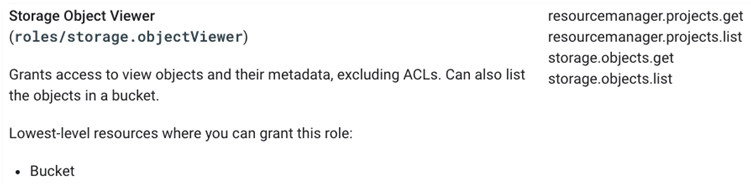
Figure 5.3 – Storage Object Viewer
In the upper left, we see the human-readable name, Storage Object Viewer, and the technical name, roles/storage.objectViewer. The individual permissions, as discussed earlier in this chapter, are listed down the right side, and in the lower-left corner, we see the lowest-level resources where the permission may be applied.
The lowest-level resource identifies where, in the context of the resource hierarchy, this permission may be used. Essentially, it’s saying that I could grant Alicia the Storage Object Viewer permission on a single bucket, at the lowest level, or I could grant her the permission on the project so she could see all the files in all the project buckets. Lastly, I could go all the way up and grant her the permission at the organization level, so she could read any file in any bucket in any project in any folder across the entire organization.
The supplied technical name is useful because if we need to apply this permission with the command line, code, or with Terraform, it lets us know the value to use. If you examine the permissions setting with Terraform for a bucket you’ll see: https://registry.terraform.io/providers/hashicorp/google/latest/docs/resources/storage_bucket_iam#google_storage_bucket_iam_member. So, if we wanted to directly grant Alicia the Object Viewer role, we could do it with something like this:
resource "google_storage_bucket_iam_member" "alicia_r" {bucket = "some-bucket-name"
role = "roles/storage.objectViewer"
member = "user:[email protected]"
}
Though we’d be much more likely to drop her into a group and control her permissions from there. Speaking of groups…
Use groups where you can
We said in an earlier chapter that one way to simplify your user management was to place users in groups and then bind the roles to set the permissions at the group level. It’s also possible in GCP to nest groups in other groups, so when building out your security role assignments, that’s a nice trick to make group creation more modular.
Before we get into setting the access control for our hierarchy, let’s establish some naming guidelines.
If you open the naming standards document we created back in Chapter 2, IAM, Users, Groups, and Admin Access, the last couple of entries you should see relate to standard folder and project names. Let’s add a few new entries for groups, custom roles, and service accounts:
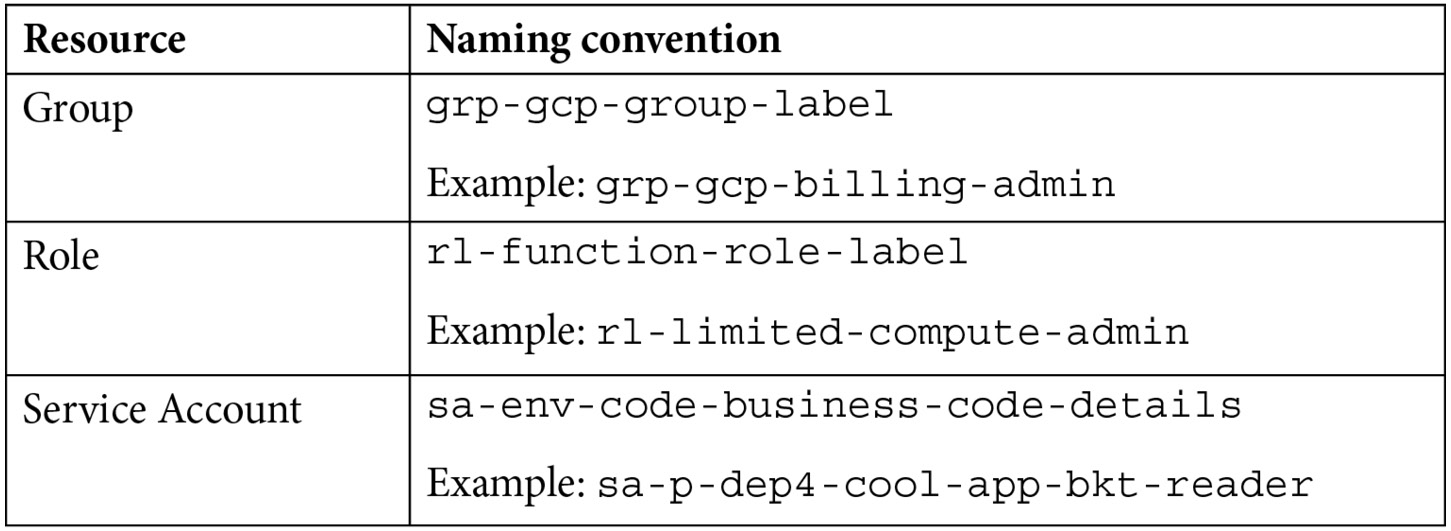
Table 5.1 – Group, role, and service account names
You’ll notice in my recommended name for groups that I’ve added a gcp to the prefix. I’m doing that to keep the groups that are specific to Google Cloud separate from the groups that might be related to other parts of the organization. Remember, these groups will be created in your user store and authenticated with your identity provider. You’ll likely have groups that are broad-reaching across your business, with importance both in GCP and in other areas of the organization. Those groups might have names such as sales-members or accounting-admins. As such, it’s handy if you can easily identify the groups you are creating specifically for use in Google Cloud, thus the prefix.
If Alicia is one of several staff members who need to read contracts across one-to-many buckets, then it would be a good idea to create a group to help them do just that, perhaps grp-gcp-contracts-team. To create the group itself, you’d need to determine the best approach given your environment. Your organization likely already has policies and procedures around security group creation, in which case you’ll need to do some research there. Perhaps you submit the request to a security team, and they create the group and assign the membership in Active Directory. If you are managing your groups in Cloud Identity, then you can use the web UI to create groups over at https://admin.google.com/ac/groups. Google does have a group creation helper Terraform script for use with Cloud Identity over with the other Terraform blueprints (https://cloud.google.com/docs/terraform/blueprints/terraform-blueprints) and it can get the job done, but make sure to pay attention to its limitations.
Just like creating the group itself, you should check with your org on how user-to-group assignments are normally handled. Typically, someone on the security management side of the org would again use the user/group management identity service directly to accomplish the task, so they would assign the users to the group in AD or Cloud Identity.
Once the group has been configured and the personnel associated, we need to get the role assignments handled over in Google cloud. Groups typically will receive a set of role assignments, to allow the folk in the group to do their jobs while following a principle of least permissions model. This can most easily be accomplished with Terraform, though using the IAM page in the Google Cloud Console or gcloud identity groups memberships will also work.
For help setting up group role bindings with Terraform, look in Google’s Terraform Blueprints, specifically in the IAM sub-section. There, you will see that Google has scripts to help set permissions on a set of storage buckets, for projects, for folders, and for the whole organization. To take our grp-gcp-contracts-team group and grant it read access on a set of buckets, we could use the Storage Buckets IAM Terraform script:
module "storage_bucket-iam-bindings" {source = "…details omitted for space"
storage_buckets = ["bkt_1", "bkt_2"]
mode = "additive"
bindings = {"roles/storage.objectViewer" = [
"group: [email protected]"
]
}
}
Notice that both the bindings and storage_buckets sections can accept arrays of values. An especially nice feature of the Google blueprint IAM Terraform scripts is the mode option. When the mode is additive as in this example, it adds the specified permissions to whatever permissions currently exist on the buckets. If the mode is authoritative, then the script’s application overwrites any already assigned permissions with the specified authoritative set.
Good – with an idea of how we could leverage Terraform to apply GCP security roles, let’s talk about some major security groups we might want to create.
Google Cloud starter security group ideas
You might recall that we created some security groups back when first establishing our Google Cloud foundational administrative access, including the following:
- gcp-billing-admins: Full control over setup, configuring, and monitoring billing accounts.
- gcp-developers: Can design, code, and test applications.
- gcp-devops: Create and manage CI/CD pipelines and manage infrastructure for applications.
- gcp-network-admins: Create and manage networks, subnets, firewalls, and other network-related resources. We’re going to need this in our next chapter.
- gcp-organization-admins: Google Cloud organization administrators, with full control over the logical structure of your organization in GCP.
- gcp-security-admins: Core security personnel, responsible for setting security policies across the org structure.
If you read through the Google Cloud security foundation’s guide, the bases of the Example Foundation Terraform scripts we used in the last chapter, you will see that they suggest several additional security groups, including the following:
- grp-gcp-scc-admins: Administrators for the Security Command Center.
Security Center Admin Editor on the SCC project.
- grp-gcp-monitoring-admins: Have the ability to use Cloud Monitoring across the various monitoring projects. (Note: the current version of the Google Example Foundation projects named this group gcp-monitoring-admins.)
Monitoring Editor on the production, non-production, and development monitoring projects.
- grp-gcp-security-reviewers: Security team members responsible for reviewing org-wide security.
Security Reviewer on the whole org.
- grp-gcp-billing-viewers: Mostly for people on the finance team who need access to view spend, billing alerts, reports, and the like.
Billing Account Viewer on the organization.
BigQuery Data Viewer / BigQuery User on the billing project.
- grp-gcp-network-viewers: Network team members who need to review network configurations.
Compute Network Viewer on the root organization node.
- grp-gcp-audit-viewers: Security and audit team members who need to see audit logs.
Logs Viewer / Private Logs Viewer / BigQuery Data Viewer on the logging projects.
- grp-gcp-platform-viewers: Anyone who needs the ability to view resources across the entire organization.
Viewer on the root organization node.
Instead of, or in addition to, that global developers group created when we established initial admin access, we might want to add other developers groups, something like grp-gcp-business-code-environment-code-developers. Here, we could put developers who need access across a portion of the projects in a given environment. The environment-specific permissions would then be set based on need.
Terraforming the permissions
I’m not going to walk through Terraforming all these proposed groups and permissions, but let’s do a couple to see how it would work with the CI/CD process we have in place. After you know the approach, you can plan your groups, permissions, and use Terraform to put things together.
For my examples, I’m going to set up the billing viewers and security reviewer’s groups and permissions.
First, you need to construct the groups themselves. To do that, you’d go to your source of truth for users and create the groups. For me, that’s Cloud Identity. I head over to https://admin.google.com/, locate the Directory | Groups page, and create the two groups, something like the following:

Figure 5.4 – New security reviewers’ group
With the groups created, remember how the Terraform scripts and our CI/CD project work. Start by deciding where each group needs to be applied and what exact roles it will need. Is this something that’s org-wide, or something that’s tied to the three development environments? Remember, at this point, we have a gcp-org repo with scripts that impact the entire organization and the common folder, and we have a gcp-environments repo for scripts impacting the dev, non-prod, and prod environments. In this case, these are org-wide security settings and groups, so the process would be essentially this:
- Clone the gcp-org repo.
- Check out the plan branch.
- Make the requisite changes to the Terraform scripts.
- Add the updated files to the branch and commit the changes.
- Push the plan branch to the origin to generate a Terraform plan.
- Verify the plan generated by the trigger.
- If all’s good, check out the production branch, merge the plan branch into it, and push it to the origin to apply the change.
- Verify the plan’s application and that there were no errors.
So, I start by opening my terminal window and cloning down the gcp-org repo from my CI/CD project, and checking out the plan branch:
- Clone down the gcp-org repo using the terminal. If you already have a copy, you might consider removing it, if you’re not sure of its status:
gcloud source repos clone gcp-org
--project=<CICD_PROJECT_ID>
- Check out the plan branch:
cd gcp-org
git checkout plan
With the plan branch down and ready for editing, I open my editor and have it open the gcp-org folder. Under that, in the envs/shared folder, I already have an iam.tf file containing the IAM Terraform configurations. These configurations rely on Terraform’s Google Cloud IAM resources, found for the most part in the Terraform for Google documentation under Cloud Platform | Resources, with a few additional bits under individual products. Since the two groups I’m using as examples both get applied at the organization level, I’d look here: https://registry.terraform.io/providers/hashicorp/google/latest/docs/resources/google_organization_iam.
To make things easy in this case, it turns out the example iam.tf from Google already has policies for the groups I’ve selected, and all the groups in my list. If you are not using the example scripts, you can still look at them to see how they take care of the assignments. If you scroll through the file, you’ll see there’s a section that starts with a Billing BigQuery - IAM header comment that looks like this:
resource "google_project_iam_member" "billing_bq_user" {project = module.org_billing_logs.project_id
role = "roles/bigquery.user"
member = "group:${var.billing_data_users}"}
resource "google_project_iam_member" "billing_bq_viewer" {project = module.org_billing_logs.project_id
role = "roles/bigquery.dataViewer"
member = "group:${var.billing_data_users}"}
resource "google_organization_iam_member" "billing_viewer" {org_id = var.org_id
role = "roles/billing.viewer"
member = "group:${var.billing_data_users}"}
That’s a nice example of how you use the google_organization and project_iam_member resources, and how they bind the roles to the billing data user’s group. Later in the same file, you will find another section doing something similar for the security reviewer. You’ll notice that in both sections the only requirement is to drop in values for the gcp_security_reviewer and billing_data_users variables.
To make the changes to the variables file, take these steps:
- Open the envsshared erraform.tfvars file. You’ll notice that you already have a billing_data_users variable set. You’ll need to update that variable, changing it to your new group, and you’ll need to add the new gcp_security_reviewer variable. Your domain name will be different than mine:
gcp_security_reviewer =
billing_data_users = "[email protected]"
- Add the updated files and commit the change:
git add .
git commit -m "IAM for billing view and sec review"
- Push the update to the CI/CD project and generate the plan:
git push -u origin plan
- To view and approve the plan, visit the Cloud Build history page in your CI/CD project: https://console.cloud.google.com/cloud-build/builds?project=<YOUR_CICD_PROJECT_ID>.
- In the plan, you’ll see how the updates are being applied, first by removing the old billing viewer permission and recreating it with the new. Then there is also a new binding for the security reviewer. If all looks good, merge the plan into production and push the change:
git checkout production
git merge plan
git push -u origin production
- To verify the successful run of the apply trigger, check the Cloud Build history: https://console.cloud.google.com/cloud-build/builds?project=<YOUR_CICD_PROJECT_ID>.
That’s it, we’ve successfully added a pair of new security groups, and set their IAM permissions where and how we need with Terraform. Nice job. If you want to see the results, you can open and examine the IAM settings in your organization and for the prj-c-billing-logs projects.
But what if simply applying a role binding won’t exactly solve your problem and you really need to do some fine-tuning? Well, you might be able to solve your problem with conditions.
Fine-tuning IAM permissions with conditions
Though most of our IAM configurations will be set at the group and role levels, there are some other things we can do to help refine user permissioning. Org policies are one tool but I’m going to talk about them in a later security chapter. For now, let’s talk IAM conditions.
IAM conditions allow us to fine-tune permissions by implementing a level of attribute-based access control. Essentially, you add a condition using something called the Common Expression Language (CEL), which expresses a logical test and, based on the test results, the IAM role will be selectively applied. Common types of conditions would be tied to things such as resource types, names, tags, and date/time of the request. Details of the CEL spec can be found here: https://github.com/google/cel-spec/blob/master/doc/langdef.md.
Let’s look at some example conditions, and then how to use the conditions in Terraform.
Do you remember Alicia? We granted her and her contract readers group access to a series of buckets by explicitly naming them. What if we wanted instead to grant her access to any bucket with a name ending in -contracts? Well, if that was the need, then we could use a condition to grant the permission:
resource.type == "storage.googleapis.com/Bucket" &&
resource.name.endsWith("-contracts")Before I provide another example, does that last example make you nervous? It does me. Attribute-based permissions are a double-edged sword. They can solve some permission issues and provide detailed refinements, but I’m not a fan of a condition that could inadvertently grant someone access they shouldn’t have. In the preceding case, if someone in some part of the org happens to create a bucket with that naming suffix, Alicia and her group will all get access. The issue is somewhat mitigated by the fact that we are funneling resource creation through Terraform, and will likely be able to control naming from there, but still. If you are granting permissions on things such as resource names, make sure you also properly control the naming.
Another example would be a restriction on access to a 9-5 New York window of working hours:
request.time.getHours("America/New_York") >= 9 &&request.time.getHours("America/New_York ") <= 17As a final example, what if you wanted to grant the contract reader team access to a particular bucket but you wanted the access to expire at the end of 2025. Here, the condition might look like this:
request.time < timestamp("2025-01-01T00:00:00Z")
Okay, now that we’ve seen some conditions, how would they work with Terraform? That part is actually easy. All of the Terraform direct resources and those Google has extended in their Google Cloud helpers will accept conditions. For a Terraform native example, check out https://registry.terraform.io/providers/hashicorp/google/latest/docs/resources/google_organization_iam#google_organization_iam_binding. If we were using the condition with our Google Terraform blueprint example, then we would change bindings to conditional_bindings, like this:
module "storage_bucket-iam-bindings" {source = "...details omitted for space"
storage_buckets = ["bkt_1", "bkt_2"]
mode = "additive"
conditional_bindings = [
{role = "roles/storage.objectViewer"
title = "expires_2025_01_01"
expression =
"request.time < timestamp('2025-01-01T00:00:00Z')"members = ["group: [email protected]"]
}
]}
Not bad. Conditional permissions offer a nice way to tune permissions based on attributes, but they do have some limits. For a start, not all resources support conditional role bindings so make sure to check the supported resource list before trying to use this feature: https://cloud.google.com/iam/docs/conditions-overview#resources. Also, there are limits to how many logical operators a given condition can have (12), and how many variations of the same member-to-role binding are allowed (20). Check out the latest quotas and limits for IAM here: https://cloud.google.com/iam/quotas.
Note – Don’t Accidentally Empower the User to Remove the Condition
When using IAM bindings with a condition, keep in mind that resource roles containing the setIamPolicy permission have the power to modify IAM bindings for that resource and as such, users with that permission could simply remove any conditional restrictions placed on them.
Before we leave the conditional IAM permissions discussion, let’s take a few minutes to discuss tagging.
Linking conditional IAM permissions to resource hierarchy tags
A final way of using conditions deals with something we’ve never discussed: resource tags. On the surface, tagging looks a lot like something we have seen, labeling. Both tagging and labeling leverage key-value pairs to help identify resources, but while labels can be attached to most resources and tend to be used for better log searchability and finer-grained billing export analysis, few resources currently support tagging (https://cloud.google.com/resource-manager/docs/tags/tags-supported-services#supported_service_resources) and it is designed for use with IAM conditional permissions and organizational policies.
Resource Tagging Is Different than Network Tagging
Unfortunately, tagging isn’t a unique term, even within Google Cloud. For years in GCP, network firewalls have used a form of tagging to grant or deny access to Compute Engine VMs. It is a totally different, similarly named, concept. Tagging in relation to the resource hierarchy, as it’s discussed in this section and as it is used with organizational policies, is something new in Google Cloud, so don’t confuse your types of tagging.
Since both IAM permissions and org policies can be linked to tags, their creation should be tightly controlled, and automated. For tagging related permissions, you can find Tag Administrator, User, and Viewer in the Resource Manager section of the big roles page: https://cloud.google.com/iam/docs/understanding-roles#resource-manager-roles.
To use a tag, first, it and its values need to be defined at the organizational level. Make sure to check the documentation on what characters are allowed in both the names and values: https://cloud.google.com/resource-manager/docs/tags/tags-creating-and-managing#creating_tag.
Creating tags can be accomplished in one of three ways: using the IAM | Tags page in the console, using the Google Cloud gcloud resource-manager tags command, or via the API, which is how our good friend Terraform gets tags done.
When you create a tag, you specify a short name, a description, and an organizational ID. Google will create the tag and assign it a globally unique (and never reused) name, and a more human-readable namespaced name.
Creating a value for a tag will again need a short name (with slightly different acceptable character requirements) and a description, and it will again get a unique name and a more readable namespaced name.
To accomplish these steps in Terraform, you’d start by creating the key:
resource "google_tags_tag_key" "c_key" {parent = "organizations/123456789"
short_name = "contains_contracts"
description = "To help grant contract reader access."
}
That numeric value would be your organizational ID. With the key created, the values would come next. Notice below the Terraform reference to the key’s name. Remember, that’s not the short name we are defining, it’s the unique identifier name that Google will autogenerate on key creation:
resource "google_tags_tag_value" "c_value" { parent = "tagKeys/${google_tags_tag_key.c_key.name}"short_name = "true"
description = "Project contains contracts."
}
With the key and value created, now you could bind the desired key/value to the requisite project, folder, or organization. By default, tags are inherited from parent to child in the resource hierarchy. The only way for a child resource to change this behavior would be to bind the same key with a different (or no) value.
When binding resources, the full resource name must be used. For a list of resource names, see https://cloud.google.com/asset-inventory/docs/resource-name-format. Here, I’m binding to a project:
resource "google_tags_tag_binding" "c_binding" {# The "join" below is a multi-line string hack:
parent = join("", ["//cloudresourcemanager.googleapis.com/projects/",
"some-project-id" #This can also accept a proj num
])
tag_value =
"tagValues/${google_tags_tag_value.c_value.name}"}
Since the tag value name alone is unique, I don’t need the key name to help identify the unique key/value pair.
Last, but not least, let’s create a conditional IAM binding tied to our new pair. It’s possible to create the condition on the namespaced name or the globally unique name. The namespaced name is easier to read, but if someone removes a key/value pair, and recreates a new one with the same name, you could end up with the same namespaced name only with a totally new meaning, and thus have legacy policies inadvertently keying off of an unrelated tag. Globally unique names are more random but never reused. When using automation and to minimize risk, it’s probably a better practice to use unique ID names:
module "storage_bucket-iam-bindings" {source = "…details omitted for space"
mode = "additive"
conditional_bindings = [
{role = "roles/storage.objectViewer"
title = "contract_reviewer"
expression = join("", [ "resource.matchTagId(", "${google_tags_tag_value.c_key.name},", "${google_tags_tag_value.c_value.name})"])
members = ["group: [email protected]"]
}
]}
Excellent – so in addition to setting up conditions tied to things such as resource names, we can also build them for tags. Good job.
Now, let’s take a small peek at a totally new IAM feature, deny policies.
Deny policies
At the time of writing, Google has just released in preview a new ability to create deny policies. Deny policies allow for the ability to create deny rules tied to selected principles, forbidding them from using a set of permissions no matter what IAM access policies stipulate.
Imagine, for example, you want to restrict the ability to create custom IAM roles to members of a particular team. With deny policies, you could define a rule that denies the role management permissions from everyone in the org who isn’t part of the super special role team. The rule would look something like this:
{"deniedPrincipals": [
"principalSet://goog/public:all"
],
"exceptionPrincipals": [
"principalSet://goog/group/[email protected]"
],
"deniedPermissions": [
"iam.googleapis.com/roles.create",
"iam.googleapis.com/roles.delete",
"iam.googleapis.com/roles.update",
]
}
You would wrap the above rule in a deny policy file and apply it with a new --kind=denypolicies switch on the gcloud iam policies create command. If you’d like to read more specifics, see https://cloud.google.com/iam/docs/deny-access.
With this rule in place, even if you were in the org administrator group and should have the ability to create custom roles, the deny policy would take precedence over your assigned IAM allow policies, and you would be unable to create custom IAM roles (at least until you added yourself to the allowed group).
Nice – that’s one more way we can fine-tune our IAM assignments. Speaking of IAM assignments, let’s take a moment to give some special attention to a subset of our user identities.
Limiting the use of privileged identities
Privileged identities, with the exception of those associated with our Terraform service account, should be tightly controlled and typically only accessed through some sort of firecall process. An example case might be that something in our Terraform CI/CD pipeline has broken down, the automation is no longer working properly, and you need to get in there with an account with an extremely high level of access to try and figure out what’s happening.
The firecall process procedure should be well known and documented. To enforce limited use of privileged accounts, a requirement should be put in place that the approval of multiple individuals is required for the accounts to be used. One way of enforcing such a requirement would be to separate those who know the password from those who can access the required MFA token.
Principals should be considered privileged if they have any of the following roles:
- Super Administrator (group: gcp-superadmin@), with full control over Cloud Identity (https://admin.google.com/). Remember, this user is created directly in Cloud Identity / Google Workspace and doesn’t come from the org identity provider or authenticate through standard SSO. It’s great if there’s a configuration issue with Cloud Identity / Google Workspace, but it also means it exists outside of typical controls related to your user management and identity provider systems.
- Organization Administrator (gcp-orgadmin@), with the ability to control the resource hierarchy, set IAM role bindings, and control org policies.
- Billing Account Creator (gcp-billingcreator@), with the ability to create new billing accounts for the organization, which are then administered by the following.
- Billing Account Administrator (gcp-billingadmin@), with the ability to manage anything billing-related from viewing usage and pricing to associating a given billing account with a project.
Now, before we put this chapter to bed, let’s take a brief look at what to do when things go wrong with IAM permissions.
Troubleshooting access
If you ever run into a situation where a user or group seems to have more or fewer permissions than they should, troubleshooting can be trickier than you might think, at least without the right tools. As a result, all too often, users get assigned more permissions than they need, which can adversely affect a principle of least privileges approach to security.
Let’s start with Policy Troubleshooter.
Policy Troubleshooter was developed by Google to help troubleshoot access issues. The process starts when a user attempts to visit a resource they don’t have access to. The GCP console pops up a message resembling the following figure.
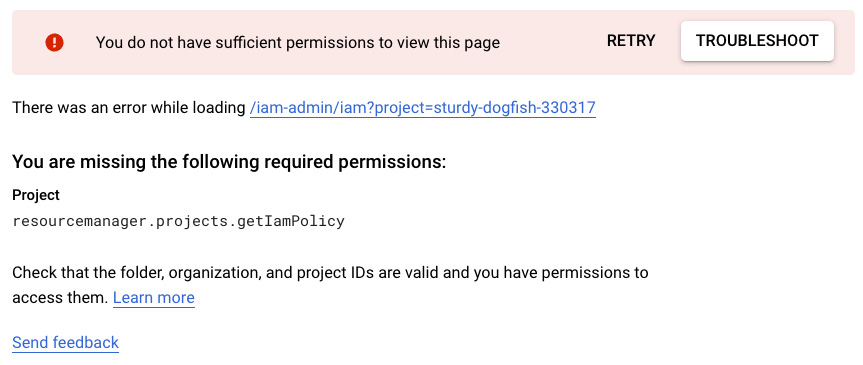
Figure 5.5 – Ready to troubleshoot
The message is telling my test user that she doesn’t have access to view IAM settings, more specifically, that she’s missing the getIamPolicy permission. If she hits the TROUBLESHOOT button, Google Cloud will forward her to the Policy Troubleshooter.
The problem for my user in this case is that she can see the Troubleshooter page, but she doesn’t actually have the power to run the tool herself. But what she can do is copy the URL and pass it to her admin… Me! This is an important step if you are ever troubleshooting access for a user. You can talk the user through explaining what happened, and attempt to get the details that way, but it’s so much easier if they just provide you with the URL.
When I drop the URL into my browser, it takes me directly to the Policy Troubleshooter all pre-filled with the user’s information and exactly what permission they were missing, as shown in the following figure.

Figure 5.6 – Policy Troubleshooter
You will see that the tool needs three pieces of information:
- The principal’s email, which could be a user or group address.
- The name of the resource, again using the full technical names found here: https://cloud.google.com/asset-inventory/docs/resource-name-format. In this case, it’s a project since my user was trying to view IAM permissions.
- The precise permission being tested.
When I execute the test, the page returned provides a hierarchal analysis of the permission and the principal. It displays what roles at the org, folder, and project levels possess the requisite permission, and which users and/or groups are bound into those levels of access. This way, if you think the user should have the permission because you thought they were in a particular group, it will let you know if a) the group has access, and b) whether or not the user is in the group. The tool will also analyze conditions. So, if the user should have access, but only 9-5 NYC time, the Policy Troubleshooter tool will allow you to easily determine so.
Another tool in this IAM troubleshooting section of the Cloud Console that can work in a related way is Policy Analyzer. The home page of Policy Analyzer prompts you with several pre-created queries for things such as “Who can impersonate a service account?” and “What access does my employee have?” If I select the what access query example, I can pick the scope from project to org. I’m going to go with org and drop in the principal for my test user. I can then generate a report of everything my test user has access to across the organization.
Let’s say I’d like to get a list of everyone who can run queries using BigQuery in my billing logs project.
The Policy Analyzer provides a lot of good information on permissions by resource, principal, role, or specific permission, but remember with the resource and permission versions, you will have to do a little research so you can get the names precisely right (for an easier way, see the Cloud Asset Inventory tool). For BigQuery in the billing logs project example, I would need to determine the full resource path. If I research the document I’ve shared with you several times for the specific resource name, I see it has an example for access to a particular dataset, but it turns out the resource list isn’t complete. If instead, you type bigquery into the resource field in the Policy Analyzer, it will present you with a list of options. With a little experimentation you will find something like the following:
//serviceusage.googleapis.com/projects/<project numeric ID>/services/bigquery.googleapis.com
Since it requires the project’s numeric ID, I do a quick trip to the billing logs export project itself and on its home page, I see the numeric ID listed. I drop that into the resource name and when I run my query, I can see exactly which users and groups have the ability to access BigQuery within the project, and why exactly they have the access. In the details, you can even check the Policy History and see changes to permissions within the last 35 days.
Policy Analyzer is actually part of one final tool I’d like to mention from the IAM and Admin section of Google Cloud, Cloud Asset Inventory. Google’s Cloud Asset Inventory tool can help you find assets by metadata, export asset metadata at moments of time, examine changes over a time range, receive real-time notifications of asset changes, and analyze IAM policies to find out which principal has access to what resource.
In this discussion, I’m going to focus on how Cloud Asset Inventory helps with IAM Policy analysis, and how it links back to the aforementioned Policy Analyzer.
The home page of Asset Inventory displays a curated list of assets, projects, and locations. Clicking on the RESOURCE tab will give you the opportunity to search by resource.
As an example, say I want to know who exactly has access to my Terraform state bucket that I set up when I bootstrapped the CI/CD and seed projects. In the Asset Inventory Resource search box, I could search storage. Not only do I get a list of buckets and other resources using the name storage, but I also see the asset types on the left side. Checking storage.Bucket will give me just the list of buckets. You can see the results in the following figure:
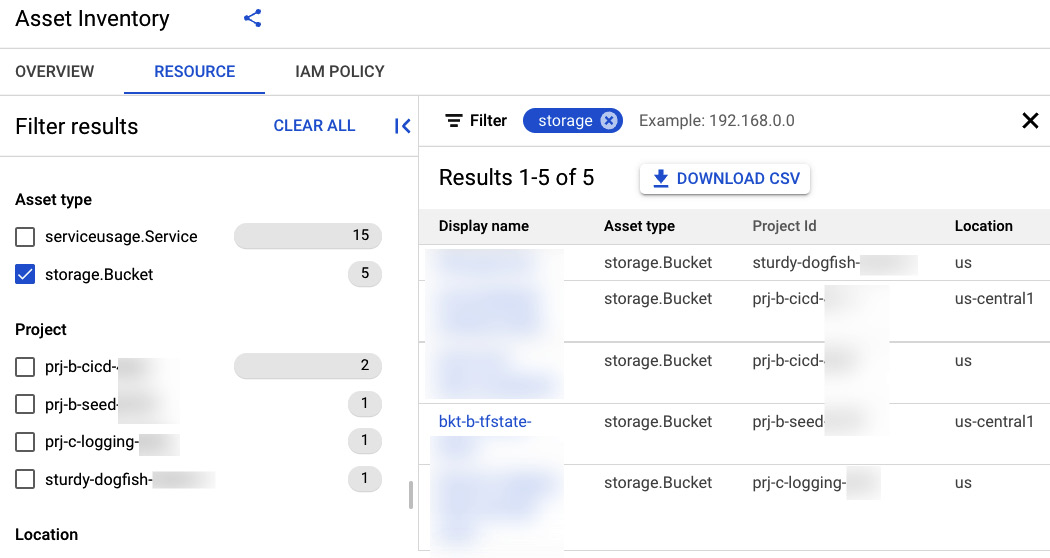
Figure 5.7 – Assent Inventory results
Clicking on the state bucket will pop up details. Clicking on any of the details, such as location or project ID will add those fields to the search filters. Clicking over to the IAM POLICIES tab will display all the principals with access to the selected bucket, and which roles they get that access from.
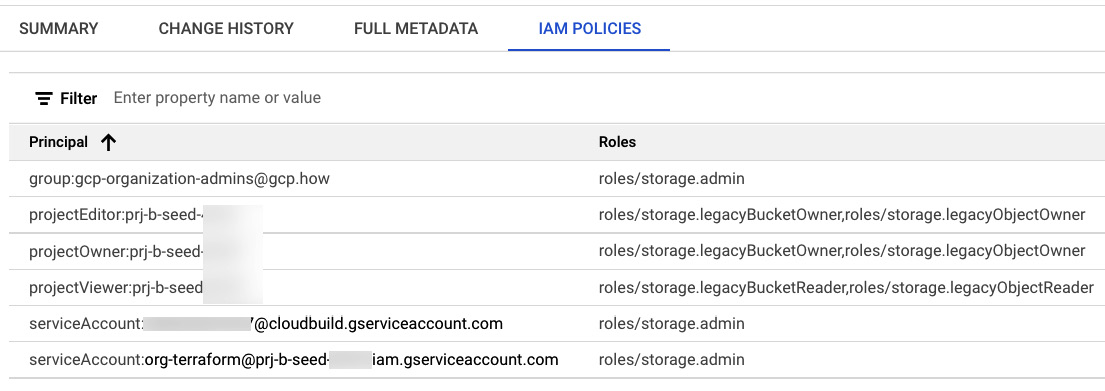
Figure 5.8 – State bucket IAM POLICIES
A good way to get more details is to close the search results and navigate to the Asset Inventory IAM Policy tab. There, if I check the box to filter by the same storage.Bucket type, I will see right in the results the principals and roles for my various buckets. If I again click into my state bucket details, I will get a list of roles, with principals for each role, as you can see in the following figure:

Figure 5.9 – State bucket role list
Clicking ANALYZE FULL ACCESS for any of the choices will take you back to the Policy Analyzer where you can modify or simply run the query that was generated for you by the Asset Inventory tool.
So, If I wanted to know who could run queries over the dataset where my billing logs are being exported, I could do the following:
- Launch the Asset Inventory tool and switch to the IAM POLICY tab.
- Filter to the billing logs project.
- In the results, there will be a link to the datasets in the project. Click on the one where billing data is being exported.
- Examine the principals with access, like in the following figure:

Figure 5.10 – Access to billing exports
Great stuff, and with that, it’s time to wrap up our access discussion and move on to see what our Google Cloud foundation has in store for us next.
Summary
In this chapter, we continued to build a secure and extensible foundation in Google Cloud by completing step 6 and added IAM trust boundaries to our resource hierarchy. We learned how Google Cloud IAM works, and how to select appropriately from the three IAM role types. We then learned how to plan access control in our resource hierarchy and how to use Terraform infrastructure as code automation to implement our plan. Lastly, we learned how we can troubleshoot access problems as they arise.
Fantastic job y’all, really!
If you want to keep on keeping on through Google’s ten-step checklist with me, your personal tutor, by your side, flip the page to the next chapter where it will be time to get to building our Google Cloud VPC network.