Chapter 4: Terraforming a Resource Hierarchy
Imagine that your business is based in a large city, and management has decided to move all the employees from several small satellite locations to a centrally located office building. Your boss calls you in and tells you that you are going to volunteer to head the committee, who gets to decide where everyone is going to sit in the new building. Aren’t you lucky? So, how would you go about it?
There are a lot of right ways you could organize the employees, but if it were me, I’d say we need to attack the problem on two main fronts: organizational and security.
A good place to start would be to examine the natural employee order you already have in place, all while identifying major job types and existing teams and groupings. But looking at the employees strictly from an organizational perspective isn’t going to be enough. This is mainly because, in real life, people don’t all sit in locked offices with security at the office door and nowhere else. Some people are in private offices, some in cubes, some in open work areas, and wherever they may sit, they tend to work and interact in groups. To facilitate that, building security is typically handled in multiple layers, from the entrance to the floor, to the building section, and sometimes down to the room itself. Organizing the employees so that the groupings make sense from both an organizational and a security viewpoint will drastically simplify things.
Google Cloud may not be an office building, but there are a lot of conceptual similarities when it comes to setting up our resource hierarchy and, later, your access control.
We’ve mentioned a few times that Google Cloud projects are logical collections of services with a billing account attached, as well as that folders are logical groupings of projects and other folders that are used for organization purposes and to define trust boundaries.
I can’t tell you how many times I’ve shown up at an organization and discovered that they had a hundred projects and not a single folder in sight. In my mind, I was thinking, “You’re doing it wrong.” Not that working without folders can’t work – it’s that using only projects means that all the security and policy settings are handled on a project-by-project basis. You can’t tell me that there aren’t groups of projects with the same organization policies and security settings, perhaps managed by the same teams? Instead of a hundred projects, each with their own settings, it would be much easier to group projects with similar policy configurations into folders, apply the policies at the folder level, and then let those policies inherit down to the projects themselves. In the long run, that’s so much easier to manage.
Time to get to work! In this chapter, we’re going to introduce infrastructure automation with Terraform, and then use Terraform to help set up our resources. We will be covering the following topics:
- Automating infrastructure with Terraform
- Step 5 – creating a resource hierarchy to control logical organization
Automating infrastructure with Terraform
When I was in high school, my dad got his pilot’s license and bought a small, twin-engine Comanche. Imagine a smallish four-seater car with wings, with some luggage thrown behind the two back seats – that’s pretty much what it’s like. The plane rolled off the assembly line in 1965, but my dad upgrades it constantly. Commercial pilots would drool over that little plane’s electronics. Honestly, I’m not sure if he likes flying as much as he likes upgrading his plane.
When I was a senior in high school, I remember that we took a trip. As the pilot, he was in the left front seat, and I was riding shotgun in the seat next to him. We were getting ready to take off and out he pulled out a laminated card of steps. It looked like original 1965 equipment.
I said, “What’s the matter, can’t you remember how to take off?”
He looked at me through these big black rectangular glasses and deadpan said, “Sure, but this way, if some smartass interrupts me in the middle of things, I’m much less likely to forget a step and kill us all.”
We have all worked through something using a checklist. Checklists are both good and bad. They’re good because they remind us what to do, and in which order, but they’re bad because when we go through them manually, there’s always a chance we will forget something. As the list gets longer, and as we go through it more times, the chance of us missing something increases. Going through checklists can also be quite tedious.
Google calls most cloud-related checklists toil. In Google’s original book on building and running production systems, Site Reliability Engineering (SRE), which you can read for free at https://sre.google/books, Google defines toil as, “the kind of work tied to running a production service that tends to be manual, repetitive, automatable, tactical, devoid of enduring value, and that scales linearly as a service grows.”
Planning a resource hierarchy of projects and folders is an art and a science. Building it, and managing that structure over time, is toil.
Imagine planning the resource hierarchy for a data processing application you are moving into Google Cloud. Throughout the week, various company websites generate a folder full of files containing website usage data from direct web visitors and various banner advertisement services. Every Saturday, the application runs a Spark job that extracts and transforms the data in the files and throws the results into a big on-premises database. During the week, data scientists run queries against the database to study website usage trends. Since the table size has increased (it now contains over a trillion records), the query efficiency has dropped. A decision has been made to move the whole kit-n-caboodle to Google Cloud. The plan is to collect and store the files in Cloud Storage, do the Saturday Spark job on an ephemeral Dataproc cluster, and store and query the results in BigQuery.
From a project perspective, how would you approach this problem? Build a single project and do everything there? You could, sure, but Google would recommend that you build at least three projects – one for development; one for non-production staging, testing, and QA work; and one for the production system itself. To make things toil-worthy, you don’t just have to create three identical projects. At first, you don’t know all the infrastructural pieces that you will need, which means elements could change over time. This means that not only do you need to build three identical sets of infrastructure, but you will need to evolve them as your design changes and make sure they are as similar to each other as possible.
Another related decision would be, are you going to store the data, process the data, and query the data out of a single set of projects, or are you going to store and process the data in one set, then move the results into a more centralized data warehousing project? So, you may not be talking about three projects – there could be considerably more.
Now, imagine the problem multiplying as the number of applications and systems expand.
Toil.
Let’s see how Terraform and other Infrastructure as Code (IaC) technologies can help.
Infrastructure as Code to the rescue!
If you need to create and manage three identical projects, the manual way would be to use checklists, build your initial development project, and document all the infrastructure. As the application evolves through various infrastructural changes, you must keep tweaking the checklist (and please lord, don’t miss documenting anything). Hold off on the non-production and production projects until you get close to your minimum viable product. As late in the game as possible, use your checklist to create the non-production project. Do your testing and QA work, and if any changes are needed, then document them, and retrofit them into development and non-production until you are ready to go to production. Finally, take your checklist and build the production project.
Matter of fact, where’s the new guy? Following a super long and detailed checklist sounds boring, so why don’t we get him to do it?
A much better approach would be to create a script that, in effect, is an executable version of a checklist. Basic scripting using bash files based on gcloud and other commands may not have much elegance, but they are tried and true and can get the job done. Like any scripting, if possible, store the files in a version control system such as Git. Even better, why not automate how the scripts are applied with a continuous integration (CI) and continuous delivery (CD) pipeline? Now, we’re getting code-like – that is, creating our infrastructure with code.
And thus, Infrastructure as Code (IaC) was born. IaC is the process of provisioning and managing your cloud infrastructure using scripts and other configuration files, which are typically stored in Git version control and ideally applied using CI/CD pipelines.
Though the bash scripting approach will work and is quite common in a lot of environments, it lacks many key benefits that are brought to you by tools specifically designed for IaC. Bash scripts, while flexible, are also wordy and complex when it comes to creating infrastructure. It’s even harder to code scripts so that they’re flexible enough to adapt to inevitable change, without you having to tear out the whole environment and start from scratch. While there are several IaC tools, the two most commonly used with Google Cloud are Deployment Manager and Terraform.
Deployment Manager is an IaC tool built right into Google Cloud. It came out as Generally Available (GA) in 2015 and has been a core GCP tool ever since. Using a mix of YAML, Python, and jinja files, it can automate how infrastructure is created, managed, and removed. Though it is nicely integrated right into Google Cloud, it has always felt a bit clunky, and its popularity has never really taken off. Also, with more and more companies operating their infrastructure over a mix of on-premises and cloud environments, a tool with a broader possible application does have its draw. Enter Terraform:

Figure 4.1 – Terraform logo
Terraform (TF) is an open source IaC tool created by HashiCorp (https://www.hashicorp.com). HashiCorp provides several freemium products, including Terraform, Packer, and Vault. TF has more than 1,000 community-created providers, allowing it to create and manage infrastructure in most cloud and on-premises environments. TF configuration files are written in a human-readable format known as HashiCorp Configuration Language (HCL), and the overall creation and application of those files can be accomplished using the same steps, everywhere.
While this information is accurate, it’s also sort of misleading. Yes, TF can create and manage infrastructure in all the major cloud providers, as well as most on-premises environments. Yes, the major steps you go through to use TF in any environment are always the same. And yes, the majority of your work will be creating and using HCL files.
But.
The HCL to create a VM in AWS, and the HCL that’s used to create a VM in GCP, while sharing a lot of logical similarities, are quite different. When I hear people say, “Terraform is cloud-agnostic,” it makes my eye twitch. To me, cloud-agnostic would be one configuration file that works in all the major clouds with little to no changes. That isn’t true in TF. Using TF for different environments, if that is one of your goals, will require you to get good at working with different HCL resources and their nested key-value configurations.
But even with the need to create environmentally-specific HCL, the fact that the logical process for using TF never changes has a lot of advantages. That, when combined with TF’s capabilities in the Google Cloud space, means that TF is a far superior option compared to Google Cloud’s Deployment Manager. This is likely why, starting in 2022, Google now recommends TF as the first choice when selecting an IaC tool for use with Google Cloud. Using it will reduce toil, improve consistency, and allow you to build security and infrastructure best practices right into your resource hierarchy. So, let’s get TF working for us.
Terraform – the least you need to know
TF is a command-line utility written in Go that can be downloaded from the HashiCorp website. Since it’s commonly used with Google Cloud, you can also find it pre-installed in Cloud Shell. If you’d like to install it yourself on a laptop or VM, please go to https://learn.hashicorp.com/tutorials/terraform/install-cli.
To use TF, you must run through five logical steps:
- Scope: Identify and plan your Google Cloud infrastructure.
- Write: Create the HCL files needed to realize the plan.
- Init: Download the requisite plugins and prepare the current folder for executing any TF scripts in it.
- Plan: View and approve the changes TF will make to your current infrastructure.
- Apply/Destroy: Apply (create/update) or destroy the infrastructure that’s specified in the current folder of .tf configuration files.
Since these steps are used to create, modify, and destroy infrastructure, you tend to iterate through them multiple times. Putting them into a simplified graphic, they would look like this:

Figure 4.2 – Terraform steps
To help learn how TF works, let’s look at an example. We’ll start by setting up the recommended TF folder and file structure, with a set of scripts we’ll use to create a virtual machine and a Cloud Storage bucket. Then, we’ll learn how to use TF to apply the scripts and build the infrastructure with the Terraform CLI. Next, we’ll examine the results in the cloud and the state files that TF creates and uses to speed up future infrastructure changes. With some general TF knowledge under our belt, we’ll turn back to our foundation laying and create a foundation for future TF usage in GCP, all while following the recommendations laid out in Google’s security foundations guide.
Let’s get to work.
Setting up an example Terraform module
Imagine that you have a basic Linux, Apache, MySQL, and PHP (LAMP) stack application you are planning to build on a VM, and you know it will need to be able to store files in a Cloud Storage bucket. You would like to use TF to create the VM and Cloud Storage bucket. In reality, a lot of ancillary components would need to be added into the mix to make this work at the production level – from a service account to network configurations to firewall rules – but we’ll leave them out for now to simplify this example.
Note – The Files for This Example Can Be Found on GitHub
If you check out the GitHub repository at https://github.com/PacktPublishing/The-Ultimate-Guide-to-Building-a-Google-Cloud-Foundation, you will see the complete and working tf_lamp_fun subfolder.
To get started, you need to set up the TF folder structure. Though it’s possible to create a single folder and do everything within that, even using a single .tf script file, as your infrastructure becomes more and more complex, it’s very helpful to divide and conquer with TF modules. A Terraform module is a subfolder of TF files (literally, files with a .tf extension) that all work to handle some part of your infrastructure. The root module is either the top-level folder itself or some folder just off the top level (for example, if you wanted to have a development and separate production root module, which we will see later in this chapter). The root module controls the overall process, mostly by putting all the modules into play. Folders that are typically in a nested /modules folder are submodules of that overall process. By default, you should create README.md, main.tf, variables.tf, and outputs.tf text files in each module. README is where you document what that module/submodule is doing. Main is where you enter the configurations to do the work. Variables allows you to define and describe any dynamic variable the script expects, as well as provide default values where appropriate. Finally, outputs defines and describes any output values from that particular script.
Note – Terraform Doesn’t Care about Filenames, It’s about the Extension
While the filenames and purposes I have used in this example are typical, and even a recommended best practice, they are in no way required. TF will evaluate any .tf files it finds in the current folder and process them in the order that TF feels is best. The folder structure and naming conventions are helpful only so far in that they remind you what’s defined where. If you feel that it is helpful to subdivide a module by splitting the main.tf file into multiple, smaller .tf files, then that is perfectly acceptable.
So, before I do anything else, let me go ahead and get that initial structure set up. For now, all the files are empty text files. For this example, the folder structure may look as follows. main.tf 1 would be the root script, main.tf 3 would be responsible for creating computing resources (in this example, a VM), and main.tf 2 would handle storage – that is, the Cloud Storage bucket:

Figure 4.3 – Example TF folder and file structure
Let’s start with the compute module. Defining resources in Terraform HCL can be accomplished by creating resource blocks in your TF files with the following syntax:
resource "some_resource_type" "name_for_this_resource" {key = "value"
key2 = "value"
}
Here, some_resource_type is a provider-specific name for what resource is being created, name_for_this_resource will be a reference name created by you and used inside the TF script files for reference, and the key-value pairs are configurations that the resource type expects.
So, if you’re going to use TF to create a VM in Google Cloud, you need to check out the documentation for the TF Google Cloud provider for Compute Engine. A TF provider is like a driver of sorts, and it provides TF with a set of resources it knows how to implement. We’ll see in a bit how the provider gets loaded into the root module, but for now, let’s focus on the Google Cloud provider we’ll be using to create a VM.
The documentation for the Google Cloud provider can be found here: https://registry.terraform.io/providers/hashicorp/google/latest/docs. On the Google Cloud Platform Provider home page, down the left-hand side, you will see links to various resource types that it knows how to manage. Expanding Compute Engine | google_compute_instance will lead you to the documentation for creating VMs in Google Cloud. There are a lot of options you could specify for a new VM, but many of them have default values. I don’t need anything fancy, so I’m going to create my VM like this:
resource "google_compute_instance" "app_vm" {name = "demo-vm"
machine_type = var.machine_type
zone = var.zone
allow_stopping_for_update = true
boot_disk { initialize_params {image = "ubuntu-2110-impish-v20220204" //ver 21.10
}
}
network_interface {network = "default"
access_config { //This adds an ephemeral public IP}
}
}
This script creates a GCP VM. How can I tell? Because the resource type is set to google_compute_instance. The name and boot image values for the VM have also been explicitly declared. The machine type of the VM (chipset, CPU count, and amount of RAM) and the Google Cloud zone where the VM will be created were pulled from variables. The referenced variables (var.xxx) should be declared in the variables.tf file and their values can be provided in several different ways, as we’ll cover soon:
variable "zone" {description = "Zone for compute resources."
type = string
}
variable "machine_type" {description = "GCE machine type."
type = string
default = "n1-standard-4"
}
Anyone using this module can look at my variables.tf and learn something about the variables, which ones have default values, and which ones must be assigned a value.
If you’d like to pass anything back from a module to the caller – either something needed as input to some other module (such as a machine IP address) or something you’d simply like to be printed back to the user when they run the script – you can add that to the outputs.tf file:
output "vm_public_ip" {//Note: The following line of code should all be on a single line.
value = google_compute_instance.app_vm.network_
interface.0.access_config.0.nat_ip
description = "The public IP for the new VM"
}
Once the submodule has been fully defined, it can be called from your root module. Before doing that, though, the top of your root module (main.tf 1 in Figure 4.3) should start by loading the provider you are using for this series of scripts. For us, that’s Google Cloud’s provider, which is documented here: https://registry.terraform.io/providers/hashicorp/google/latest/docs. Our root script will start something like this:
provider "google" {project = var.project_id
}
After loading the provider, a typical root module will call all the child modules, pass them any variable values they require, and let them do the majority – if not all – of the work. So, the rest of my main.tf file might look like this:
module "compute" {source = "./modules/compute"
zone = var.zone
depends_on = [
module.storage
]
}
module "storage" {source = "./modules/storage"
region = var.region
project_id = var.project_id
}
Notice that for compute, I’m specifying the VM’s zone using another variable, but I left out the machine type because I was happy with its default. I also wanted to make sure the GCS bucket was defined before the VM, so I added depends_on to the VM, which tells TF to make sure the storage module has been fully created before processing compute. TF can typically determine a good order of creation based on physical dependencies between resources, but if there is a dependency that TF can’t glean from the script, then this is a way to force ordering.
Since I passed in values to the modules that, once again, came from variables, I must declare or re-declare those variables in the variables.tf file for the root module, like so:
variable "project_id" {description = "Project owning defined resources"
type = string
}
variable "zone" {description = "The default GCP zone"
type = string
}
variable "region" {description = "The default GCP region"
type = string
}
Let’s get back to the variables. There are several ways TF variable values can be provided when executing your scripts, including the following:
- Via command-line prompts when the script is applied with terraform apply (the default). Upon running the script, TF sees a variable missing a value, and asks you for it then and there.
- By storing the values in environmental variables on the machine where you are executing the script using TF_VAR_your_variable_name, like so:
export TF_VAR_zone=us-central1-a
- By passing the values in with the apply command, like so:
terraform apply -var=”zone=us-central1-a”
- By using a .tfvars file
I don’t want to have to specify the variables manually, so I’m going to create a .tfvars file:
project_id = "patrick-haggerty"
region="us-central1"
zone="us-central1-a"
With all the files in place, including the Cloud Storage files I’ve omitted from this book, let’s create our infrastructure.
Using Terraform
Even though your TF module structure and files are in place, there are several key TF CLI commands you will need to continue. These commands will all be executed from within the root module folder:
- terraform init: Download any provider files needed to implement the current TF modules.
- terraform validate: Check the TF configurations for validity.
- terraform plan: Generate a human-readable plan of what the application of the current configurations would do to the infrastructure.
- terraform apply: Implement or update the infrastructure defined in the TF scripts.
- terraform destroy: Remove any infrastructure created by the current scripts.
To implement my example, I’m running my scripts out of Cloud Shell, which comes with the TF CLI pre-installed. To use the CLI, I change to the folder containing my root module. Here, that would be the tf_lamp_fun folder. First, I must run init to download all the requisite provider files, and then run validate to sanity check the various TF files throughout the module structure.
When you think everything is ready to roll, you can use terraform plan. A hierarchical view of exactly what the scripts, when applied, will do will be returned. It will include several common symbols, including the following:
- +: Create
- -: Destroy
- -/+: Replace by destroying and re-creating
- ~: Update in place
This is your chance to examine what TF is about to do. You’ll notice that the resources display the values for all the properties – the ones you explicitly assigned and the ones with defaults. If the plan appears to be doing what you like, then terraform apply it.
A note on Terraform state
If you create and run a series of TF scripts from the command line, you’ll notice that several files are created:
- terraform.tfstate: A JSON file of what was implemented by TF in your environment the last time the modules were applied with terraform apply.
- terraform.tfstate.backup: A backup copy, one generation back, of what was applied by TF.
- .terraform.lock.hcl: Version information for modules and providers.
By default, each time terraform plan/apply is executed, a refresh will be completed of the state file from the live infrastructure. This ensures that no changes have been made behind TF’s back. As a best practice, all infrastructure changes should be made through TF, making this an unneeded and potentially time-consuming process. Adding -refresh=false will disable this functionality.
Two additional TF CLI commands related to state are as follows:
- terraform output: Shows any output values from the last terraform apply command.
- terraform show: Shows the contents of the last state snapshot in full.
Remember that TF isn’t just used to create and destroy infrastructure – it’s also used to update it. After some testing, I’ve decided that the default n1-standard-4 machine type for my VM is too big, wasting both resources and money. I’d like to change it down to n1-standard-1. The compute module already has the variable set up for machine_type, but the root module doesn’t. One option would be to update the variables.tf and terraform.tfvars files, just like we did with our other variables, but I’d like to show a slightly different approach this time. I’m going to go to the top of my root main.tf file and, just below provider, I’m going to add some locals. locals are used by Terraform to create and define variables directly in a specific .tf file:
locals{cpu_count = "4"
chip_type = "standard"
chip_family = "n1"
machine_type = format("%s-%s-%s", local.chip_family,local.chip_type, local.cpu_count)
}
If you’re thinking, “Hey, we could use locals to define all the variables,” you could, but I wouldn’t. This approach tends to work best when you use the .tfvars file for key naming elements, such as base names, and then use tricks such as the format() function, to combine the base elements into variable values. Say you’re creating a bucket, and your buckets all use the bkt-business_name-app_name-#### format, where the business name and app name could be defined in .tfvars and then used as name parts for multiple resources.
To use the local variables I created here, I could update the compute module’s details, like so:
module "compute" {source = "./modules/compute"
zone = var.zone
machine_type = local.machine_type //notice the local.
depends_on = [
module.storage
]
}
When I run terraform plan, I will see the following:
~ resource "google_compute_instance" "app_vm" {
…
~ machine_type = "n1-standard-4" -> "n1-standard-1"
Note ~, indicating that the resource will be updated in place. So, TF is going to power the machine down, edit its machine type specification, and then restart it. Nice.
Note – Terraform Has a Lot of Useful Functions
You can find them documented at https://www.terraform.io/language/functions.
Laying a foundation for Terraform use in Google Cloud
Running TF scripts out of Cloud Shell, as I did for my demo, is nice and easy, but it will quickly become problematic if you try to use that same approach to manage an organization full of infrastructure. Some such problems are as follows:
- Terraforming infrastructure, when done right, starts with you creating the GCP resource folders and projects themselves (which we will be doing soon). This means there needs to be a central location (project) from where all TF scripts are run.
- The TF scripts themselves should be stored and versioned, and infrastructure changes should be applied automatically. This implies the usage of an automated CI/CD pipeline, starting with a Git repository containing the scripts, and ending with the implemented changes.
- The power to create and manage all infrastructure across the entire organization would require a very high level of access for the person running the script. A better way to do this would be to run TF under some high-powered service account and then control access at the entrance of the CI/CD pipeline.
- The need to manage infrastructure will be bigger than the need to manage an individual, so besides a central Git repository driving the automated Terraform CI/CD pipeline, a secure storage location for the state files, which frequently contain sensitive information, will also be required.
Since Google has switched its recommended IaC automation tool from Deployment Manager to TF, they have also released some foundational best practices in a PDF with corresponding TF scripts. Many of the best practices have been built into this book, but you can check out Google’s latest security foundations guide at https://services.google.com/fh/files/misc/google-cloud-security-foundations-guide.pdf. The corresponding TF scripts can be found at https://github.com/terraform-google-modules/terraform-example-foundation. They are, in turn, based on Google’s more general examples of Terraform scripts, which can be found in their Cloud Foundation Toolkit at https://cloud.google.com/docs/terraform/blueprints/terraform-blueprints.
You don’t have to use all of Google’s TF scripts as-is, but they can make a good foundation for scripts you create on your own.
To get a solid foundation in place where you can use TF to manage the infrastructure across your entire Google Cloud footprint, you should start by creating two projects and placing them in a GCP folder toward the very top of your organizational structure: seed and cicd. Why two? Mostly because it keeps things very clean from a separation of concerns (SoC) point of view. CI/CD has its own set of requirements, so let’s package them all into one project, while everything TF lives in the other:
- cicd: This hosts the CI/CD pipeline itself, along with the Git repositories containing the TF scripts. If you are using Jenkins as a CI/CD tool, its build servers will live here. CI/CD will also host a pipeline service account, which will impersonate a high-level seed project service account. This, in turn, will contain all the requisite access to make infrastructure changes. Access to this project, as well as the various Git repositories in it, will be granted to personnel that need to manage infrastructure.
- seed: This is where the shared TF state file will be encrypted and stored, and where the highly privileged service account that will be used to make infrastructure changes will live. Access to this project will be highly privileged.
The easiest way to implement these two projects is to use the first part (0-bootstrap) of Google’s Example Foundation at https://github.com/terraform-google-modules/terraform-example-foundation/. This repository was built to implement an entire foundation layer that follows the Google Security Best Practice Guide, which can be found at https://cloud.google.com/docs/terraform/blueprints/terraform-blueprints. It’s constructed from other Google TF blueprints, including bootstrap, folders, and project-factory. If the full sample org scripts don’t work for you, see if you can mix and match some of the others to get the work done the way you need.
The Example Foundation scripts can use Google’s Cloud Build or OSS Jenkins to do the CI/CD build work. To keep things simple, I’m going to stick with the default: Cloud Build.
To start, you will need an existing project in your organization that you can use as a launching pad. Alternatively, you could perform these steps using the Google Cloud SDK on your laptop. You will also need to log in to Google using your organizational administrator account. If you are using my naming scheme, then this will be in gcp-orgadmin-<first>.<last>@<domain> format.
Next, you must fork Google’s sample foundation repository of scripts so that you can edit them as you need. I’ve done exactly that, and I’ve put my copy in with the rest of the code from this book, so you can find it as a terraform-example-foundation sub-folder in my repository at https://github.com/PacktPublishing/The-Ultimate-Guide-to-Building-a-Google-Cloud-Foundation.
Note – You Should Use the Latest Version of the Example Foundation
I’m currently working with the 2021-12 version of Google’s blueprint guide and the 2022-06 latest version of the TF scripts. I don’t doubt that Google will be updating these files and that as they do, the steps I’m putting in this book – the steps that work with my fork of Google’s scripts – may start to drift from what you are seeing with the latest version. Please check the main repository and its documentation for updates.
A note on labels. In Google Cloud, a label is an extra identifier that helps you track resources at a finer grain. I’ll talk more about labels later in this chapter, so for now, when I have you editing labels, think of using them to identify data that’s been placed on sticky notes and stuck to the side of various resources. Both the label key and its value must contain UTF-8 lowercase letters, numeric characters, underscores, and dashes.
Either on your laptop or in your launching pad project’s Cloud Shell window, clone down your copy of Google’s Cloud Foundation Toolkit scripts. Here’s an example where I’m using my copy. Again, this should be updated to reflect your fork of Google’s scripts:
git clone
https://github.com/PacktPublishing/The-Ultimate-Guide-to-Building-a-Google-Cloud-Foundation
cd The-Ultimate-Guide-to-Building-a-Google-Cloud-Foundation/chapter04/terraform-example-foundation
Now that you have downloaded the scripts, let’s make some variable and value edits:
- Change to the 0-bootstrap subfolder.
- Take a minute to examine the documentation for the possible variables that the bootstrap TF scripts will accept by examining the variables.tf file.
- Copy the terraform.example.tfvars file and change its name to terraform.tfvars. As a side note, it’s not uncommon to use the provided .example file as a starting point for new .tfvars files.
- Edit your terraform.tfvars file. Insert values for your org_id and billing_account ID. These can be retrieved using the console, or by running the following commands:
gcloud organizations list
gcloud beta billing accounts list
- Next, edit the group_org_admins and group_billing_admins security group names. If you have been following along and using mine and Google’s recommended names, then all you should need to do is change the domain names.
- Lastly, edit default_region and set it to whichever region would work best for you. By default, any region-specific resources that are created by the sample TF scripts will be physically put here. It should be a region with BigQuery support.
- Check the documentation for the 0-bootstrap TF module and make sure you don’t need to make any other variable changes. Save and close the terraform.tfvars file.
- Open the root module’s main.tf file from the root of the 0-bootstrap folder. Find the two project_labels blocks. These two blocks are going to assign some identifying labels (sticky notes) to the seed and cicd projects. Feel free to use whatever values make sense to you. If you use internal billing codes to track spending (remember that this will be a shared-use project), change the two billing_code values as appropriate.
- Next, add a primary and, optionally, secondary contact. If there are questions about these projects, it’s these people who should be contacted. Remember the labeling naming requirements. I typically use something in the form of first-last (patrick-haggerty), though a team name may work even better than an individual here (gcp-coe-team).
- The business code should uniquely identify the business unit or group within your organization that’s responsible for these projects. Since these projects don’t belong to a business unit, as they will be commonly used, I’m going to use zzzz to denote that.
- Make sure both of your project_labels sections have been updated, then save and close the file.
Excellent! Now that changes have been made to the variables, let’s use the scripts. Again, if you are using a newer version of Google’s example scripts, double-check their latest documentation and make sure these steps haven’t changed:
- Open a command-line terminal and change to the 0-bootstrap subfolder.
- Use terraform init to load all the required TF provider and remote module files.
- Use terraform plan and review the output, which will be quite extensive.
- terraform apply the scripts. It will take several minutes for them to run.
- Use terraform output terraform_service_account to retrieve the service account that TF will run under. Put this value in a note file as you will need it in a later step.
- Use terraform output gcs_bucket_tfstate to grab the GCS bucket where the state file will be stored. Add this to your notes from the preceding step.
- Use terraform output cloudbuild_project_id to get the project ID for the cicd project. Add this to your notes.
- Make a copy of the backend.tf.example file and name it backend.tf.
- Open the backend.tf file and replace UPDATE_ME with the name of the TF state bucket you copied a couple of steps back.
- Rerun terraform init. The TF backend resource type can be used to define a remote storage location for the TF state file. Re-running init will move the state file from the directory where you are applying the commands to a newly created Cloud Storage bucket in the seed project.
That should be it. If you look at the resource hierarchy for your organization in the GCP Console, by going to Navigation menu | IAM & Admin | Manage Resources, you should see a new fldr-bootstrap folder with the two new projects under it – that is, proj-b-cicd and proj-b-seed. You will also see the project labels we applied. This will look similar to the following:

Figure 4.4 – Resource Manager view of new projects
Remember, the seed project will be doing the work, but next to no one should have direct access to it. The people administering your organizational structure will be doing that from the cicd project.
If you use the project selector (remember, that’s a little to the right of the Navigation menu’s hamburger button), you can navigate to your prj-b-cicd project. Once there, look at the project’s source repositories. You will see a series of Git repositories that have been created by the bootstrap process. Once you finish this book and have a better grasp of how this structure works, you will need to consider if this exact set of repositories makes sense in your organization, or if you will need something different. The list of repositories that have been created by the bootstrap TF scripts is one of its variables, so adding, removing, or renaming repositories will be easy to do, thanks to TF.
We will work with these various repositories and see how the CI/CD pipeline works shortly. First, though, it’s time to get to the fifth major step in Google’s 10 steps of foundation laying and start building our resource hierarchy.
Step 5 – creating a resource hierarchy to control logical organization
Do you remember how we started this chapter? With figuring out where everyone got to sit in the new office building? It’s time to do exactly that, only for Google Cloud.
A well-planned Google Cloud resource hierarchy can help the entire GCP footprint by implementing key configuration and security principles in an automated way. If you’ve set up your bootstrap infrastructure, then you will have the CI/CD-driven TF projects in place, so let’s start laying in other key folders and projects. To do that, we’ll start by laying down some naming guidelines.
Naming resources
It is doable, if you want to willy-nilly name your GCP folders and projects, but when you’re implementing a level of automation, consistency in naming makes sense. Do you remember the document we created back in Chapter 2, IAM, Users, Groups, and Admin Access, where we put the names for things such as our organizational administrator email address format? It’s time to break that out again, or time to create a new infrastructure naming document.
One of the standard naming features you may or may not decide to implement is Hungarian Notation. Throughout grade and high school, I attended an all-boys Catholic school in Irving, Texas named Cistercian. Most of the Cistercian monks at that time had escaped Hungry in or around the 1956 Hungarian Revolution, when Hungry temporarily threw out the Stalinist USSR government they’d been under since the end of WWII. Hungarians traditionally reverse their name, placing their family name before their given name. So, Hungarian-style naming would change my name from Patrick Haggerty to Haggerty Patrick.
In the 1970s, a Hungarian named Charles Simonyi, a programmer who started at Xerox PARC and later became the Chief Architect at Microsoft, came up with what we now call Hungarian Notation. Hungarian Notation advocates starting names with a prefix that indicates what exactly is being named. For this book, I’m going to use Google’s naming recommendations, which will leverage a type of Hungarian Notation. You can decide if Google’s naming style works for you, or if you’d like to implement naming some other way.
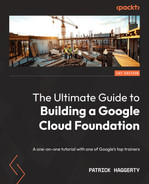
To see the naming guidelines from Google, check out their Security Foundations guide at https://services.google.com/fh/files/misc/google-cloud-security-foundations-guide.pdf. Let’s start with the names we are going to need to create an initial resource hierarchy. Note that {something} implies something is optional:
Following Google’s recommendation, notice that I’m starting my names with a Hungarian Notation that identifies what is being named, such as fldr for folder. Then, I’m using a mix of standard and user-selected naming components. The following is for reference purposes:
- environment: A folder-level resource within the organization. Values include bootstrap, common, prod, non-prod, and dev.
- environment-code: A short form of the environment name. Values include b, c, p, n, and d.
- label: Descriptive element to enhance the name.
Now that we have an idea of how we are going to name things, let’s discuss how we will lay out our resource hierarchy.
Designing the resource hierarchy
There are lots of ways your resource hierarchy can be laid out, and many would be perfectly acceptable. Instead of looking at lots of examples, let’s look at two good and one not-so-good designs. First, let me show you a very common design that is, unfortunately, what you shouldn’t do:

Figure 4.5 – Bad resource hierarchy example
I can hear some of you now. “What? This is the bad example? But this is exactly what I was planning on doing!”
To get this design, I imagined looking at a company org chart, and I created a resource hierarchy that matched it. On the surface, this seems reasonable (which is why I see it all the time, unfortunately). So, what’s wrong with it? Let’s take a look:
- Org charts change, so how would you implement those changes? And if you ignore them, how soon before the logical structure has no relationship with the org chart?
- There’s no place for shared resources. So, where would I put the seed and cicd projects? How about a shared VPC or the VPN connection to our on-premises data center?
- Security might be tough to implement. Does each of the departments have internal developers? If so, there’s no easy way to control their access, other than doing it project by project.
- How could you easily apply an organizational policy to all the development environments while forbidding them from having external IPs? Here, you’d have to do it department by department or something.
Note – Folders Have Limits
Whichever design you decide on, keep in mind that there are some limits with folders. Currently, Google limits folder depth to no more than 10 levels, and any given folder can have up to 300 direct subfolders.
OK; if the org chart approach is wrong, what might be better?
Well, let’s start with a few Google Cloud principles and behaviors:
- Folders logically divide projects, which, in turn, wrap resources and attach billing.
- Organizational policies allow organization policy administrators to define guardrails that limit particular types of resource configurations. For example, an org policy could be created to forbid Compute Engine VMs from having public IP addresses or to ensure that data is only stored in Cloud Storage buckets in a particular part of the world. Exceptions to policies may be made for particular subfolders or projects, but the ability to override policies requires a high level of access.
- IAM policy bindings allow permissions to be assigned to users or groups at any point, from top to bottom, from organization to resource. However, permissions assigned at a higher level, such as a folder, may not be revoked at a lower level, such as a project. We will discuss this more in Chapter 5, Controlling Access with IAM Roles.
Google is a big fan of a basic folder structure, just enough to simplify policy application, and filled with lots of purpose-built projects that follow a consistent naming convention. I think the recommendation makes sense. Have you ever heard of the Keep It Simple Stupid (KISS) principle? You should apply it to your resource hierarchy design. Imagine your organization and what it does, then split that purpose along the most major lines, not department lines, but more “what can Google do for you” lines.
It might be because of my development background and my introduction to Google Cloud from that perspective, but I like the basic approach Google takes to its security blueprint guide. This is a design focused on the belief that you’re using Google primarily as a place to build and run applications. It’s simple but easily extensible. It may look like this:

Figure 4.6 – By environment design
See? Simple, right? All the shared resources sit in a common folder and the application-related projects all sit in folders related to their stage of development, ending with the bootstrap folder that hosts the cicd and seed projects. The layout allows us to assign base permissions and organizational policies at a very high, centralized folder level, and we can add any projects we need while following a pre-agreed-on naming convention.
While the design is nice from an application development and deployment view of the world, it doesn’t address needs around centralized data storage, regulatory isolation requirements, or multiple departments doing development. The fix? Add a few more folders.
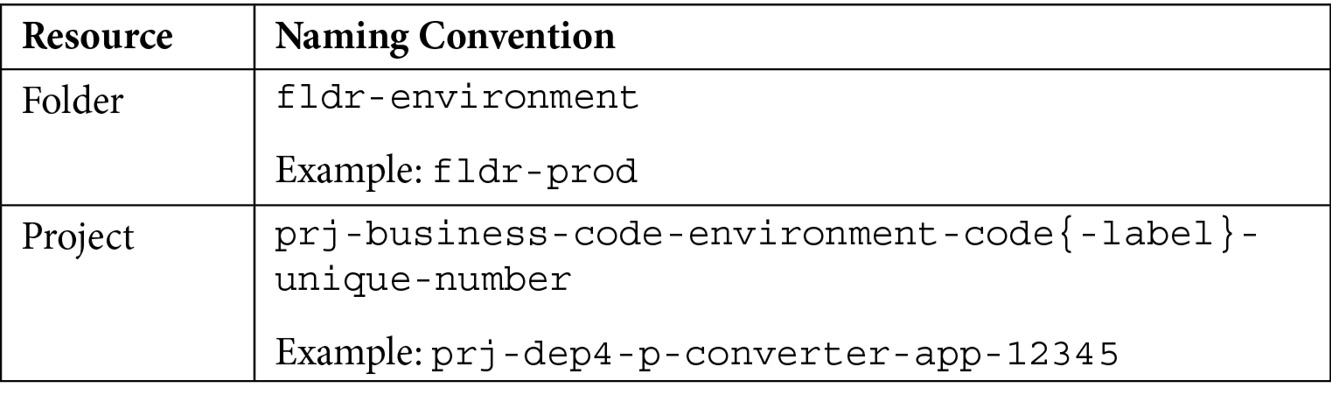
If your operating units have a lot of autonomy, then you may wish to consider adding a layer of business unit folders between the org and env folders. This would allow the EMEA business unit to have their copy of the environments, and then the AMER business unit could do the same. If you have multiple development teams, then you could add team folders just inside each environment folder. If you have centralized data and data warehousing needs, then a folder for that can either be in the common folder, or you could add a new top-level folder and put those things there. In the end, including our folder naming convention, the design might be closer to this:
Figure 4.7 – By business unit, environment, and team
To fully flush out your design, but you should also consider things such as the following:
- Do you want to leverage the folder approach for separating by business unit, or do you want the business units to share the same folders and then use project naming to identify which project belongs to which business unit?
- In Google Cloud, an organization can have sub-organizations that are completely isolated, with different users, projects, and policies – everything (https://cloud.google.com/resource-manager/docs/managing-multiple-orgs). Does your business need this extreme level of isolation? This change would eliminate my business unit folders and replace them with multiple organizations.
- Do you need to comply with any regulatory requirements? If so, how can projects and folders help? (https://cloud.google.com/security/compliance)
- Do the bootstrap projects belong at the highest level of the organizational structure, inside the business unit, or both?
But your planning won’t stop with folders – you will also likely need some common-use projects to go along with them.
Planning common projects
The most obvious type of Google Cloud project is one where you need to accomplish some specific task or application goal. Need to build a data warehouse in Big Query? You’re going to need a project. Planning on building a REST service that does currency conversion? You’ll need a dev/non-prod/prod project for that too. But what about projects for background tasks? I’m not talking about the background as in behind a UI – I’m talking more about handling core Google Cloud resources such as secrets, centralized networking, and DNS configurations. Luckily, the Google Cloud security blueprint and its related Example Foundation Terraform project have some suggestions.
Let’s start with ideas for the common folder. Remember that fldr-common (don’t forget our naming convention) will be used to house projects serving broad, cross-department needs. Some project suggestions from the Google security blueprint are as follows:
- prj-c-logging and prj-c-billing-logs: These will act as centralized locations to hold org (or business unit) wide log exports, with auditing in the first and billing in the second. Remember the billing exports we configured? We would need to redirect that here.
- prj-c-base-net-hub and prj-c-restricted-net-hub: These will hold the hubs, if you’re using a hub and spoke network design. This will allow environment-specific shared VPCs to route cross-environment traffic and/or traffic that needs to rout out through Interconnect.
- prj-c-dns-hub: This is a central project where all the org/business-wide DNS configurations will reside.
- prj-c-secrets: This is for org-wide secrets and encryption keys.
- prj-c-interconnect: This holds the GCP end of your Interconnect (fiber) connection back to your on-premises data center.
- prj-c-scc: This is the central location for managing Security Command Center alerting.
Once you have your common folders planned out, think about projects that you may need in every environment. If you are using the dev/non-prod/prod design, then you may want to pre-construct projects that can centralize resources at the environment level. Some examples are as follows:
- prj-d/n/p-monitoring: This hosts cross-project metric scopes, for any monitoring that needs to happen across the entire environment.
- prj-d/n/p-secrets: This contains environment-wide secrets and keys.
- prj-d/n/p-shared-base and prj-d/n/p-shared-restricted: These are for environment-specific shared VPC networks. These may be linked to hubs in the common folder, depending on your design.
While these are two nice starter lists, they are in no way meant to be exhaustive or mandatory. You may not be using Interconnect, so you wouldn’t need that project. You also may not want a way to cross-share VPC traffic, in which case the hubs would be unnecessary. And there’s no telling what other centralized or environmental services you may need that are specific to your organization, so make sure that you tweak the design to something that makes sense to your organization.
Before we move on and apply our infrastructure, let’s talk a little about resource labeling.
Labeling resources in Google Cloud
To help you manage organizations as they grow, you should seriously consider coming up with and using a core set of labels. As I mentioned earlier, in Google Cloud, a label is an arbitrary key-value piece of metadata you can stick to the side of most GCP resources. They can be used for tracking spend at a more granular level, and to help better filter GCP logs, among other things.
Common labels include things such as team, owner, region, business unit, department, data classification, cost center, component, environment, and state. We are going to apply a nice standard set of labels to our projects, starting with the following:
- environment: dev/nonprod/prod/common/bootstrap.
- application_name: Exactly what it says.
- billing_code: An internal billing code. It’s up to you how you implement it.
- primary and secondary_contact: A contact person or preferably group.
- business_code: A four-character code that describes the business unit. Again, make of it what you will.
- env_code: d/n/p/c/b: Our aforementioned environments.
For more information about labels, go to https://cloud.google.com/resource-manager/docs/creating-managing-labels. As a best practice, using a labeling tool or applying labels via automation such as TF, is advisable.
Implementing a resource hierarchy
To implement my resource hierarchy, I’m going to continue using Google’s Example Foundation, which is, in turn, built on several of their other blueprints. All the blueprints can be found at https://cloud.google.com/docs/terraform/blueprints/terraform-blueprints. The ones you should pay most attention to at this point are:
- The Example Foundation, which, as I’ve said, is built by combining and modifying several of the other blueprints.
- The bootstrap module, which we’ve already used as part of the Example Foundation to create our CI/CD and seed projects.
- The folders module, which can create multiple folders under the same parent, assigning per folder and all folder admins.
- The project-factory, which we will use later to build projects with a default set of network configurations, IAM policies, service accounts, and enabled APIs.
The resource hierarchy I’m going to implement at this point is the basic five-folder version I first showed you as a form of good design. It would be trivial to use the folders module to add the extra business unit and team folders if I decided to go that route.
One thing to keep in mind is that your folder design isn’t set in stone. It is possible to move projects from one folder to another, so it’s possible to start with one design and decide to modify it. Having said that, it’s a lot easier to begin with a simple design that works and then grow from there, thus minimizing the need to move things around.
Note – Moving Projects Will Have IAM Repercussions
If you move a project from one point in the resource hierarchy to another, any IAM configurations you’ve directly set inside the project will move with it. However, the inherited permissions will change based on the project’s new location in the hierarchy. For more information on moving projects, go to https://cloud.google.com/resource-manager/docs/moving-projects-folders.
Before we dive deeper into creating our folder structure, let’s talk about how the cicd and seed projects work.
Using the cicd and seed projects
When we created the cicd and seed projects, we didn’t talk about how to use them. As you may recall, the seed project is where the high-powered TF service account lives, and where the TF state information is stored and encrypted. The cicd project is where infrastructure managers will work to submit changes to the CI/CD pipeline.
Note – You May Not Have the Project Quota You Need
The following example creates a passel of projects. As a result, Google may throw an error related to your TF service account, essentially saying that the user doesn’t have enough of a quota to create and set up billing on so many projects. You should go ahead and ask Google to increase the SA’s quota. Go to https://support.google.com/code/contact/billing_quota_increase and request a quota increase of 50 for the TF service account you generated while creating your bootstrap project. This should be in your notes.
If you navigate to your cicd project (proj-b-cicd) and then go to Navigation menu | Source Repositories, you will see that you currently have several Git repositories. The 0-bootstap module created them as part of its setup task, and the actual repository list was controlled by the cloud_source_repos TF variable. The current set of repositories includes gcp-environments, gcp-networks, gcp-org, gcp-policies, and gcp-projects. We will cover the purposes of these different repositories soon.
Next, if you return to the cloud console and navigate to Navigation Menu | Cloud Build | Triggers, you will see that there are several pairs of Cloud Build triggers attached to these same repositories. Cloud Build triggers watch for repository changes and respond by following a prescribed set of actions defined in a YAML file.
The CI/CD pipeline is going to integrate with Git via a persistent branch strategy. That is, we are going to create and use Git branches to differentiate stages, such as dev, non-prod, and prod, and split between planning and applying TF scripts.
So, the plan/apply triggers work against the dev, non-prod, and prod environments. If you want to plan a job in the production environment, you would need to do the following:
- Edit your various TF-related files.
- Create a plan branch in Git, add your changed files to it, and push it to your repository up in GCP. This will trigger a plan build, which you can inspect.
- Now, you must decide which environment you want to push your changes to. Let’s say it’s production. Here, you would switch to a production branch created from the same plan branch you just pushed to your CI/CD project.
- When you push the production branch to origin, up to GCP, it will trigger terraform apply and run it against your production resources.
Not too shabby. It makes good, logical sense and is easy to use.
To understand this process, let’s implement the 1-org and 2-environments parts of the Example Foundation.
Creating our organizational base folders
The next step in Google’s TF Example Foundation is 1-org. It sets up several projects in the common folder for things such as org-level secrets, central networking, and org-level logging. It also configures a slew of base security features. Most of this step deals with things we will discuss later in this book (access, security, and logging) since Google’s 10-step Cloud Foundation deals with them in a slightly different order.
Though we don’t get into the details of exactly what 1-org does at this point, it will nicely illustrate how our CI/CD pipeline works.
To check out the latest instructions for 1-org, go to https://github.com/terraform-google-modules/terraform-example-foundation/tree/master/1-org.
To start, make sure you are logged into your organizational administrator account. Then, either open Cloud Shell in the same launchpad project you used to deploy the bootstrap project or go back to the terminal window on your laptop if that’s where you deployed from. You will need to locate the folder where you cloned down the Example Foundation. Some of the steps we will follow use the new beta TF validator to check some of the things we will do against a set of policy configurations. This is not a required component, but one that the Example Foundation uses, so I’m leaving it in.
Let’s get started by loading the Terraform validator policies into the related Git repository:
- In Cloud Shell or your laptop terminal window, change to the same top-level folder where you cloned terraform-example-foundation, but don’t change to the Example Foundation folder itself.
- In the text file containing the notes that you started when creating the bootstrap projects, retrieve the project ID of the CI/CD project. If you didn’t grab the name, you can also look at your resource hierarchy by going to IAM & Admin | Manage Resources. Locate the CI/CD project and copy the ID from the ID column.
- Clone the gcp-policies repository you created in your CI/CD project as part of building the bootstrap projects. Make sure that you insert the ID of your CI/CD project:
gcloud source repos clone gcp-policies
--project=CICD_PROJECT_ID
- Change to the cloned empty folder:
cd gcp-policies
- Copy the contents of the provided example Terraform policy library into the new folder:
cp -RT ../terraform-example-foundation/policy-library/ .
- Commit the changes and push your policies master branch into your CI/CD project:
git add .
git commit -m ‘Initial commit, sample policies’
git push --set-upstream origin master
With the policies where we need them, let’s get a copy of Google’s base example organization in place. This will create the common folder and the central use projects we mentioned earlier in this chapter. Before we apply it, though, let’s get the files ready:
- Navigate out of your policies repository and back into the main working folder by using cd ...
- Clone down your empty gcp-org repository. If you get any warnings about the repository being empty, ignore them:
gcloud source repos clone gcp-org
--project=CICD_PROJECT_ID
- Change into the newly created gcp-org folder, then create and check out a plan branch. Remember that when we push the plan branch up to our source repository in our CI/CD project, it does a terraform plan:
cd gcp-org
git checkout -b plan
- Copy the example 1-org folder we cloned from Google into your gcp-org folder:
cp -RT ../terraform-example-foundation/1-org/ .
- The plan and apply triggers that we created when setting up the bootstrap project expect us to provide Cloud Build YAML configuration files. Let’s copy in Google’s starter YAML files:
cp ../terraform-example-foundation/build/cloudbuild-tf-* .
- Also, copy in the wrapper script and make it executable:
cp ../terraform-example-foundation/build/tf-wrapper.sh .
chmod 755 ./tf-wrapper.sh
- One of the things this example script does is set up an Access Context Manager Policy to allow access from particular IP ranges. First, though, you’ll need to check if you have an existing ACM policy. You will need your organization ID for this command, which you can find next to the root organizational node by going to Navigation Menu | IAM & Admin | Manage Resources. If you receive a message about needing to enable an API, enable it, wait a minute, and try the command again. If no value is returned, then you’re fine. If you get a policy name back, record its name in your notes for use later:
gcloud access-context-manager policies list
--organization YOUR_ORGANIZATION_ID
--format=”value(name)”
- Make a copy of the example.tfvars file so that you can add your configurations:
cp ./envs/shared/terraform.example.tfvars ./envs/shared/terraform.tfvars
Excellent! At this point, we have everything prepped. Let’s examine what we have and make a few configuration changes before we apply them.
- Open an editor of your choice to explore and, where needed, modify the files in the gcp-org folder. If you are in Cloud Shell, Cloud Shell Editor will work well. If not, anything from VI to Visual Studio Code should work.
- In the editor, navigate to the gcp-org folder and open the plan and apply YAML files.
Here, you will see a pair of basic Cloud Build configuration files. Cloud Build, as I mentioned earlier, is a serverless Google Cloud CI/CD tool. To tell it what you want it to do, you must create a configuration file, similar to the two we are examining. These scripts will decide whether to use your account or to use a central service account (we will be using the SA), drop the name of our central TF state bucket in where needed, and then call a bash script file to do the TF work. Here, you can see how the bash scripts (entrypoint: /bin/bash) are called and the arguments that are passed to each.
- In your editor, open the tf-wrapper.sh file.
The script contains wrappers for all the TF steps, from init through apply, passing in appropriate arguments where needed.
Next, if you look in the base of your gcp-org folder, you’ll see a subfolder named shared. Expanding it, you will see all the .tf files Google has created to do the work. Remember how TF works – any file ending in .tf will be applied. In this case, instead of a main.tf file that calls a bunch of modules, the designers simply broke the process down into a single folder containing lots of .tf files. We’ve seen some of these files previously (*.tfvars, backend.tf, and so on). Some of the others you should note are as follows:
- folders.tf: This uses the folders blueprint to create a fldr-common folder under the specified parent, which is pulled from a TF variable. In my example, this will be directly under my organizational root.
- iam.tf: This makes a slew of IAM configuration changes, including setting up permissions for various audit and billing log exports on those projects, setting permissions for billing log exports, configuring billing viewers, security reviewers, audit log viewers, and more. Essentially, if any of our common projects need particular access to be configured, it’s done here.
- log_sinks.tf: This sends a copy of all the logs for all the projects to a storage bucket. In addition, it configures sinks for all Google Cloud audit logs (which we will discuss later in this book) to BigQuery and Pub/Sub. If you’d like to disable any of these sinks, simply comment out the related section.
- org_policy.tf: This sets a host of organizational policies, which we will discuss more later in this book.
- projects.tf: This uses the Google TF project factory project to create the projects in the common folder.
- scc_notification.tf: This configures a Security Command Center (SCC) alert to a pub/sub topic, along with the related subscription, for all SCC notifications.
Now that we’ve taken our tour, let’s tweak a few things:
- In your editor, open the projects.tf file.
- Search for labels and update the GCP labels that are being applied to each of the common folder projects. The environment, application_names, and env_code labels are probably fine, but you will probably want to update the others.
- Open your terraform.tfvars file for editing. As we’ve seen previously, this file will be used to set the variables that will be used in the various TF files.
- Before I talk about some of the optional variables you may want to add, let’s start with the ones that are already in the file. domains_to_allow will limit permissions that are granted to users in this list of domains. I’m only configuring my gcp.how domain, so that’s my only value.
- billing and audit_data_users: If you used the recommended names for these two security groups, all you should have to do is change the domain names.
- Fill in your org_id and billing_account values. Remember, they can be retrieved using the following commands:
gcloud organizations list
gcloud beta billing accounts list
- terraform_service_account: Check your notes. This is a value that you recorded when you performed the bootstrap project setup. It was one of the outputs in that step.
- default_region: This is your preferred default region for the common projects. Make sure that the region supports BigQuery since we are syncing some data to it.
- scc_notification_name: If needed, set a unique name for the SCC notification being created. Notification names need to be unique.
That’s it for the required variables. Now, let’s look at some you may want to consider. For a full description of all the variables and their use, see the variables.tf file. Let’s look at a few key options.
- parent_folder: If you aren’t applying this to the root of your organization, provide the ID of the parent folder where it should be applied.
- data_access_logs_enabled (a default value of true): This enables Data Access logs on all GCP services. That means that any time a user modifies data, a log is recorded. Data Access logs in GCP are typically disabled by default, and although enabling them provides a lot of useful information, the extra logs are a billable expense. You can decide if you would like to disable this or not.
- Enable_hub_and_spoke: We will talk more about hub and spoke network designs later. I’m not going to use it in my example, so I will leave this set to the default of false.
- create_access_context_manager_access_policy: By default, the example configuration creates and enables an Access Context Manager to help restrict access to our environment. In this case, it will limit what user rights are granted to accounts that belong to your domain. If you want to disable this, set this value to false. We will discuss Access Context Managers later in this book, but if you’re like more information, go to https://cloud.google.com/access-context-manager/docs/overview.
Excellent! With the variables all set, it’s time to finish the 1-org segment of the Example Foundation.
- Commit the changes you’ve made. Make sure you are still in the gcp-org folder, then add the files to your local Git plan branch and commit them:
git add .
git commit -m ‘Initial org commit’
- Push your plan branch to the CI/CD project repository, which will trigger a plan for your environment:
git push --set-upstream origin plan
- Check your notes for the bootstrap build and copy the name of your CI/CD project. Then, use it in the following URL:
https://console.cloud.google.com/cloud-build/builds?project=YOUR_CLOUD_BUILD_PROJECT_ID.
- This is a list of the Cloud Build jobs. Locate the build job that corresponds to the gcp-org source that has an appropriate created time. Click on the job to view its details.
- Scroll through the build log and examine the plan. If it looks good, apply the change. If you see errors related to the validator, ignore them at this point.
- To apply the changes, you create a production branch and push it. This will fire the apply trigger and apply the changes to production, which includes the common folder:
git checkout -b production
git push origin production
- Wait a minute and revisit your build jobs: https://console.cloud.google.com/cloud-build/builds?project=YOUR_CLOUD_BUILD_PROJECT_ID.
- Wait for the latest production build job to complete, which will likely take more than 5 minutes but less than 10, then click to investigate the logs.
Fantastic! At this point, you should have the shared folder and all its related projects in place. To see them, go to Navigation menu | IAM & Admin | Manage Resources, and investigate the new structure.
Now that you know how all this stuff works, I’m going to let you build out the prod/non-prod/dev environments using the steps at https://github.com/terraform-google-modules/terraform-example-foundation/tree/master/2-environments. You’ll see that the process is almost identical to what you just did:
- Check out your gcp-environments repository.
- Create a plan branch.
- Copy in Google’s starter files, Cloud Build YAML files, and wrapper bash script.
- Edit a few TF variables.
- Commit the changes to your plan branch.
- Push the changes to the remote origin repository.
- If you’re happy with the plan, use the same files to create a development branch and push it to implement it.
- Lather, rinse, and repeat with the non-production branch and environment.
- Lather, rinse, and repeat with the production branch and environment.
Before you tackle these steps, I want to point out a few interesting things and variable settings. First, you’ll notice that this time, there are a couple of subfolders in gcp-environments:
- envs: These are our root modules. Each one matches one of our three environments and contains a fairly basic main.tf file that essentially says, “apply the env_baseline module with these names and tags.”
- modules/env_baseline: This is what’s doing most of the work. It creates a folder for the environment and uses the project factory to create a monitoring project, a couple of shared VPC projects, and a secret project. These are the same common, environment-specific projects we discussed earlier.
If you examine the variables file in the top-most gcp-environments folder, you will find some of the same configurations we’ve changed in other projects (org_id, billing_account, and so on).
Before you add and push your plan branch, make sure that you update the root terraform.tfvars file. You will notice that one of the variables references a security group that doesn’t exist yet, designed to hold users that need to be monitored at the environment level. We will discuss this group later, but for now, add the group with no specific permissions to your Google Cloud environment.
Also, the env_baseline TF files, once again, apply labels to the projects. You may want to edit those before implementing the plan.
I’m going to hold off on implementing 3-networks and 4-projects as we need to discuss a few other things first.
Fabulous work! You now have a CI/CD process in place to manage infrastructure in a toil-free, automated way. You can create TF scripts to set up Google Cloud resources and you’ve completed the fifth step in our 10-step foundation plan. Hey, you’re halfway there!
Summary
In this chapter, we made fantastic progress laying our Google Cloud foundation by completing step 5 and creating a resource hierarchy to control logical organization, from Google’s 10-step recipe. Not only did we learn how to plan and build a resource hierarchy, but we also simplified all our future steps by learning how to automate infrastructure management using a popular IaC product: Terraform. To make using TF easy and standard, we also implemented a CI/CD pipeline to allow us to continue working with our infrastructure from a central pair of projects.
If you want to keep moving through the checklist steps with me, your tutor, please move on to the next chapter, where you will learn how to use GCP security roles to control access across your presence in Google Cloud.