Chapter One
Monitoring
The first and perhaps most important thing to appreciate is that unless you have a monitoring system that is reasonably accurate, you’ll never be able to create a mix that translates reliably to the outside world, because you have no means of knowing what your mix really sounds like. That may sound obvious, but it is surprising how often we encounter monitoring systems that are quite simply not up to the job. It is worth bearing in mind that even the most expensive professional monitoring systems generate orders of magnitude more distortion and have a far less uniform frequency response than any other element in the entire recording system. Loudspeakers are far and away the weakest link in the chain, and anything you can do to help them work as well as intended has to be worth doing!
Secondly, there’s a lot more to good monitoring than simply buying a pair of suitably specified speakers. Both the placement of the speakers and the acoustic properties of the room play a huge part in how accurate, reliable and trustworthy the monitoring system really is. Again, these factors are often significantly underestimated.
When you look at the technical specification of a loudspeaker, what you’re seeing is a measurement of the sound projected from the front of the cabinet in an environment where there are no significant reflections from the wall, floor, or ceiling. In other words, you are seeing how the speaker performs in an anechoic test chamber, with around two metres or more of acoustic absorption on every surface, or outdoors, suspended above the ground on a test tower. As soon as you put that speaker into a normal room you will hear the combination of the direct sound from the front of the speaker plus all the reflections of that sound as it bounces off the walls, ceiling and from objects within the room. In addition, you’ll also hear any sounds being generated by the speaker’s cabinet panels vibrating, (and maybe also the desk on which they are standing) and sometimes air movement noise from any bass ports fitted to the front or back of the cabinet. All these extraneous and inherently very ‘coloured’ sounds will also be bouncing around in the room and influencing your overall perception of the speaker’s sound balance.
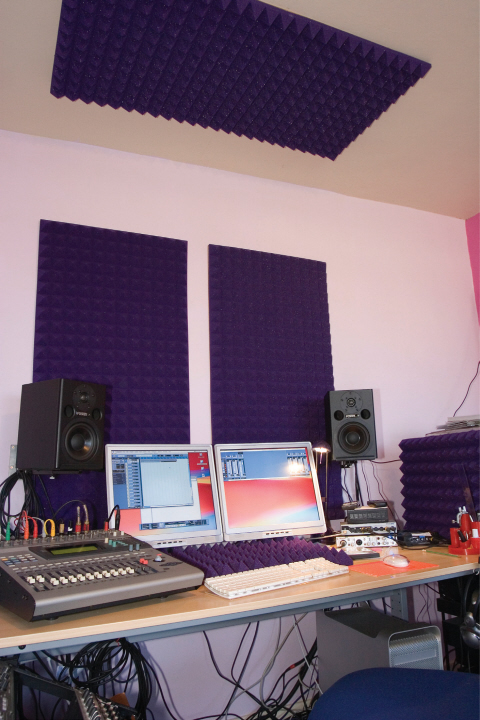
Your speakers and acoustic treatment are amongst the most important elements of your studio – without accurate monitoring you have no means of knowing what your recordings really sound like.
What is ‘Coloured’ sound?
If we look at the sound that we want or expect to hear as the audio equivalent of white light, then anything that changes the balance of frequencies within that sound is the equivalent of a change in the colour of the light – like viewing the world through yellow-tinted glasses. In a similar way, if you cup your hands around your ears you alter the balance of frequencies reaching your eardrums, and the sound becomes coloured. Sound reflections in the room can also compromise the accuracy of the wanted sound from the speakers in several ways, creating inaccuracies both in the frequency spectrum and in the time that different groups of frequencies arrive at the ear – their ‘arrival time’. As sound takes a finite time to travel through the air, the reflected sound, which has further to travel, arrives fractionally later than the direct sound, and is also coloured or tonally altered by the reflective properties of the surfaces that it has bounced off. Few materials reflect all frequencies equally, so what bounces back into the room is tonally altered, or coloured by the mechanical characteristics of the wall surfaces.
To compound this effect, most manufacturers only publish the ‘on-axis’ frequency response, which shows the sound projected directly forward from the speaker. However, the sound doesn’t just project forwards in a nice neat ‘beam’, but actually projects in all directions at once, in varying degrees, and some sound is also generated to a lesser extent by all the surfaces of the speaker cabinet. So every loudspeaker actually has a ‘polar pattern’ – just like a microphone – and the ‘off-axis’ sound gets progressively less accurate as the listening position gets further away from the frontal axis. In particular, the high frequencies tend to fall off and bumps and dips start to appear in the overall frequency response. In other words, if you were to sit off to one side of the speaker, what you’d hear would be significantly less accurate than if you sat directly in front of it, which is why studio monitors are normally directed towards the engineer’s seat.

Sound reflections compromise the accuracy of the sound from your speakers in several ways, creating inaccuracies both in the frequency spectrum and in the ‘arrival time’ of different groups of frequencies.
In an acoustically reflective room, all these less accurate, off-axis sounds bounce off the walls and other large surfaces, and become even more coloured as they are modified by the characteristics of the reflecting surfaces. Even in the ideal listening position, what you actually hear is always a combination of the ‘accurate’ sound directly from the speakers mixed with a significant amount of reflected sound whose frequency response may be very far from flat, with the reflected sound also arriving at your ears a few milliseconds later than the direct sound.
When those reflections occur within a short time frame – as they do in a typical small-room home studio – our ears are unable to perceive the direct and reflected sounds as separate sources. Thus, our perception of the total sound is determined by the combination of direct on-axis, reflected on-axis, and reflected off-axis elements. Since every listening room will be different in size, shape, construction and contents, it is impossible for a loudspeaker designer to build a monitor speaker that will sound ‘right’ everywhere: certain assumptions have to be made when the speaker is designed. That’s why different speakers can sound so radically different in the same room, even if their on-axis responses appear very similar. However, by using acoustic absorbers to reduce the amount of off-axis sound reflected back to the listening position, we can approach the ‘ideal room’ acoustics that the speaker designer had in mind, and thus minimize the ‘room colouration’ – and we’ll look at that in more detail in a moment.
Another side-effect of those off-axis reflections is that they come from many different directions, and that can severely confuse or blur the sense of stereo imaging you get when sounds are panned or recorded in true stereo. Fortunately, this problem can be resolved fairly easily with a few strategicallyplaced acoustic absorbers, as will become evident later.
Resonant Modes
We also need to consider the effect of room ‘modes’, also known as ‘standing waves’ or ‘Eigentones’. This might sound technical, but what it boils down to is that, in a room with reflective surfaces, the room resonates at frequencies that are dependent on how far apart the surfaces are. There are also further resonances at multiples of those frequencies: if the lowest resonance is at 50Hz, then you’d also expect resonances at 100Hz, 150Hz, 200Hz, and so on. The practical effect of this is to make some bass notes stand out and become dominant or boomy, while other bass notes may sound very weak or even seem to disappear altogether!
There will be independent sets of resonant modes corresponding to the width, the height and the length of the room (these are all called axial modes), and further modes based on sound reflecting between the walls in more complex ways (called tangential and oblique modes). These last two modes, where the sound bounces off two or more surfaces, tend to produce less intense resonances and can actually work in our favour, as they help fill in the more extreme peaks and troughs associated with the primary modes. Rooms with non-parallel walls can spread the distribution of mode frequencies out a little, but it’s not the magic fix for room modes that we might hope for.
Some Recommended Room Ratios for Optimal Mode Distribution
|
(H, W, L): |
Richard H. Bolt, 1946
| 1.00: 1.50: 2.50
|
Richard H. Bolt, 1946
| 1.00: 1.26: 1.59
|
The Golden Ratio, 1968
| 1.00: 1.62: 2.62
|
Dolby Labs
| 1.00: 1.49: 2.31
|
IEC 60268-13, 1998
| 1.00: 1.96: 2.59
|
Undesirable Ratios
| |
Worst ratio (RPG Inc.)
| 1.00: 1.07: 1.87
|
Cube - Not recommended
| 1.00: 1.00: 1.00
|
Exact multiples
| 2.00: 1.00: 1.00
|

Unless you build a room where all of the walls act as perfect absorbers down to very low frequencies (if you do, you will have built yourself an anechoic chamber!) there will inevitably be resonances due to room modes in your studio. This is just a fact of life, so rather than fight the room modes we have to try to design our studio to work with them. A very important fact to keep in mind is that in a good-sounding room, the resonant modes will be spread around as evenly as possible to effectively average out the resonant response of the room. In a poor-sounding room, the modes will be unevenly spaced, with several bunched together around specific frequencies. And where there’s bunching, you’ll hear a corresponding increase in perceived level.
To achieve an even modal response, the room needs to have dimensions that are not exact multiples of each other. Not surprisingly there has been a lot of research into this and, while there is no absolute perfect set of dimensions, several optimal ratios of room width, height and length have been calculated, most notably by Richard H Bolt in 1946.
Room Shape and Size
It is also a factor that the larger the room, the more room modes you have. This is because low-frequency audio has very long wavelengths – 60Hz has a fundamental of just over 5.7 metres (roughly 19 feet) – resulting in some multiples simply not fitting within the dimensions of smaller rooms.
In a larger room, with more modes, the chances are that they will average out to something close to a nominally flat response. In contrast, a small, cube-shaped room with very solid walls is pretty much the worst-case scenario: because the room is small, the room modes are fewer in number and so more widely spaced in frequency, and because all three sets of dimensions are the same, the resonant modes for all three sets of surfaces will occur at the same frequencies. This creates huge resonant peaks at some frequencies where the reflected energy combines constructively, because it is in phase, but there will also be very deep notches or dead spots at other frequencies where the reflected energy cancels out because it combines out-of-phase. The practical outcome of trying to mix in rooms with dominant modes is that the level of your bass line will appear to vary dramatically depending on which note is played, even though they may really all be at the same level. Music in one key might sound fine, while other keys could sound terrible! Experimenting with the speaker placement can often improve the situation (by not exciting the major modes so easily), as can installing purpose-designed ‘bass traps’. The lightweight walls of modern houses are a big help too, as they allow the bass to effectively ‘leak out’ of the room – but we always know we’re in for a tough day if we come across a small, cube-shaped room.
Another feature of small, cube-shaped rooms that we encounter often during our Studio SOS adventures, and one that I haven’t seen mentioned in many other recording books, is that if you place your head in the exact centre of the room the overall perceived level of bass drops off alarmingly. This seems to occur in a roughly spherical ‘void’ of 0.5–1 metre across, prompting us to nickname it ‘The Spherical Bermuda Triangle of Death!’ Thankfully, only the music ‘dies’ there, though – no humans have been harmed as far as we know!
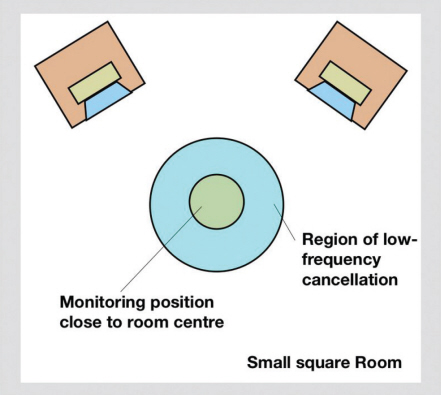
In a very small, square room, there is sometimes nothing you can do to avoid sitting in the middle, in the area where low-frequency cancellation occurs.
Unfortunately, many small, bedroom studios are very close to cube-shaped, and by the time the equipment desk has been set up, the engineer’s chair inevitably ends up being very close to the centre of the room, and this is compounded by the engineer’s head being almost midway between the floor and ceiling. This is the absolute worst monitoring situation and should be avoided if at all possible, as you’ll get a very misleading impression of how much bass end you have in your mixes. We have some tips for working in less-than-ideal rooms, but these do inevitably involve a degree of compromise.
Another unfortunate room shape is one in which one set of dimensions is an exact integer multiple of one of the others: a room that is twice as long as it is wide is a prime example. While not quite as disastrous as a cube, you’ll still find resonances stacking up at the same frequencies to create hot spots and dead spots in the low frequency spectrum. In this situation there is probably a better chance of being able to arrange the room to get away from any dead spots created in the exact centre, but having unrelated width, height and length dimensions is always the best option (See box and diagram for recommended room dimension ratios).
Note that in a room with a lightweight suspended ceiling of the types used in offices, the modal behaviour of the room will depend on the original, structural roof ceiling height, as the false ceiling will be virtually non-existent to low-frequency sound.
Checking for Bass Problems
While a professional studio designer will use sophisticated measuring equipment and software to determine how the room response behaves, such software can be misleading in inexperienced hands. We have found that playing a chromatic sequence of staccato sine-wave tones, all at equal level running for around three octaves from around 250 Hz (C4) down to 31Hz (B0), can be very revealing in a more intuitive way. This can usually be done quite easily within most DAW software, using either a software synth, or an oscillator plug-in (see p. 18 – Making A Sine Wave Test Sequence). All you have to do is run the sequence while listening from your usual mix position: any serious bumps and dips in the room’s frequency response will be clearly audible as individual notes in the series being too loud or too quiet in comparison with their neighbours. The speaker positioning can then be adjusted, as described later in this chapter, to try to minimise these irregularities. If the room is behaving correctly, the overall level will appear to fall away as the frequency gets lower (because of the loudspeaker’s own low frequency roll-off) but no individual notes should stand out as being particularly louder or quieter than the adjacent notes.
Across or Along?
In large commercial studios, you’ll often find that the room is wider than it is from front to back. However, if space is limited – and in home studios it invariably is – you’ll almost certainly get better results by arranging the monitors to point down the long dimension of the room rather than across it. In virtually every case we’ve tried, having the speakers firing down the length of a small or medium-sized room has produced a more even bass response than firing across it.
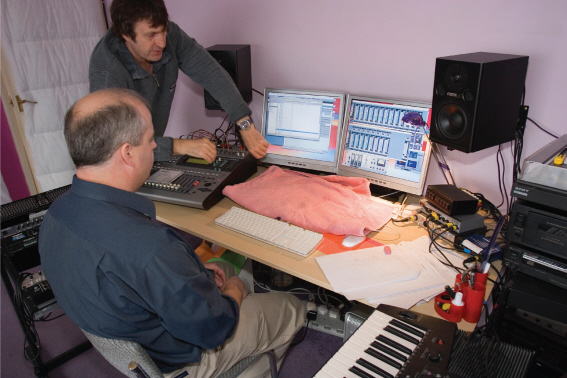
Case Study – Paul White
My own studio is roughly 16 feet long, 11 feet wide and 7.5 feet high. I’ve tried orientating the room and monitors both ways and the difference is remarkable. With the speakers firing across the room, the perceived level of bass changed quite drastically as I moved my listening position even slightly, and there were very noticeable cold spots where some notes were much quieter than others. This effect is partly due to the fact that when working across the room, the listening position ends up being roughly mid-way between the front and rear walls where the most significant bass cancellation effects occur. The practical outcome was that I was unable to make any meaningful judgment about how the bass end of my mixes really sounded.
“By contrast, working with the monitors firing down the length of the room, as I do now, shows up no such problems, and the perceived level of bass stays pretty constant regardless of where you are in the room, unless you stand very close to a wall or corner. The ‘bass boost’ in these positions is to be expected because low frequencies always build up in the ‘pressure zone’ close to walls or corners due to the way the direct and reflected energy combines.”

Note that the speakers are normally set up symmetrically with regard to the room boundaries and the listening position, and preferable pointing into the longer dimension of the room, rather than across it... In some rooms, the difference between the two orientation options can make the difference between a ‘problem room’ and a very effective one.
TIP : As a rule, the level of bass will double when you’re very close to a wall, and quadruple if you’re in a corner, so these locations must be avoided when choosing your engineering position. Similarly, avoid placing monitor speakers very close to a wall unless the manufacturers clearly specify that they are designed to be used that way, or provide EQ facilities to correct for such a position. Never put speakers right into corners as the bass end will become very uneven and inaccurate. Many active speakers have rear-panel switch settings to adjust the bass level for when the speakers have to be placed closer than might be ideal to walls or corners.
Monitor Placement
To create a correctly symmetrical stereo image, your monitor speakers should, ideally, be set up symmetrically within the room. Although this isn’t always possible in a domestic environment, you should aim initially to get as close to true symmetry as is possible. In other words, your speakers should be the same distance from both of the side walls while, the distance between each speaker and the wall behind them should also be the same. You should also try to arrange any furniture in the room as symmetrically as possible so that the reflections are similarly balanced. Theory also dictates that if you can place the speakers at a point 38% of the room’s length from one end, you’ll get the smoothest bass response, though in most real-life situations, space constrains means that the speakers usually have to be rather closer to one end of the room.
TIP : In a small room it is sometimes impossible to get the speakers as far away from corners as you would like, but it helps considerably if you arrange the speakers so that the distance between them and the side wall is different from the distance between the speakers and the wall behind them. If possible, also avoid setting the speaker height so that the woofer (bass driver) is exactly midway between the floor and ceiling.
Asymmetry Can Help
In very small rooms, or rooms where other factors have meant the speakers have to fire across the room, we have found through our Studio SOS visits that there can often be a benefit in breaking the ‘perfect symmetry’ rule slightly. Shifting the line of symmetry a few inches left or right of centre – which means moving the two speakers, the listening position and the whole setup a little way left or right of where they should be in a perfectly symmetrical set up – can often make a worthwhile improvement in the linearity of the low frequency response. This is because the speaker-to-wall dimensions are now different for each side, which affects the efficiency with which they are able to energise standing waves at different frequencies. Changing the distance of the speakers from the wall behind them a small amount may also help.
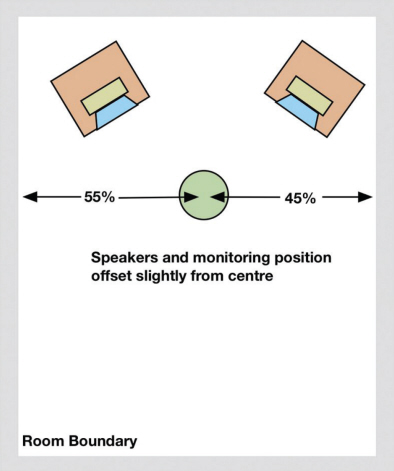
Although speakers are normally set up symmetrically with regard to the room boundaries, in a small room, moving both the speakers and the listening position slightly off centre can sometimes make a worthwhile improvement in the evenness of the low frequency response. Here, the monitors have been offset slightly to the right.
The Magic Triangle
The accepted optimum monitoring geometry is to set up compact, or ‘nearfield’ speakers (which most home and project studios use) so that they form two points of an equilateral triangle with the listener at (or slightly in front of) the third point. In most cases you should angle the speakers inwards so the high-frequency drivers (‘tweeters’) point directly at, or slightly behind your head when you’re seated in your normal listening position, and if you have to tilt the speakers slightly to achieve this in the vertical plane, that’s fine too. However, check what the manufacturer’s handbook has to say about positioning and the angle (often referred to as the toe-in angle) as a few speakers are designed to sound most balanced when aimed well behind the listening position or even straight down the room. As a rule, the speakers will end up fairly close to the front wall in a small room but try to keep them at least a 30cm (12 inches) away from it if at all possible. This is particularly important for speakers that have ports or passive radiators on the rear panel as being very close to a wall can compromise their operation.
Stands
Where possible, put the speakers on rigid floor stands. Stands are often made from tubular metal and filling this type with dry ‘play-pit’ sand, lead shot or ‘kitty litter’ will make them more stable and also damp out any resonances in the metalwork. A pea-sized blob of the type of putty used for fixing posters to walls (such as Blu Tak) under each corner of the loudspeaker reduces the risk it being knocked off the stand – just allow the speakers to compress the putty as far as their weight allows – and this also provides some useful vibration decoupling between the speaker and the stand.
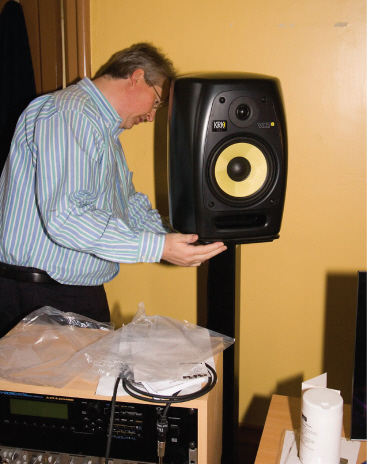
Where possible, speakers should be mounted on rigid floor stands, elevating the speakers so the tweeters are around ear height for a seated listener.
Where the speakers must be placed directly onto a desk, on a shelf, or on the meter bridge of a mixing console, you will almost certainly get better results if you use commercial high density foam supports to isolate them from the desk – characterised by a firmer, tighter bass sound. These sometimes also come with additional foam wedges that can be used to adjust the vertical angle of the speakers. The foam helps prevent vibration from the speakers getting into the structure they are sitting on and causing audible resonances. As a rule we wouldn’t recommend this type of foam decoupling for use with rigid speaker stands, but for table-top or shelf mounting, they have produced consistently good results.
Some speakers, however, are so small and light that they don’t compress the foam sufficiently for it to absorb low frequency energy very efficiently. The foam needs to be compressed sufficiently to allow it to behave as a ‘damped spring’. In such cases we have found that placing a heavy ceramic tile between the foam and speaker often does the trick. There are also commercial speaker platforms with heavy metal plates fixed on top of the foam to work in the same way and these also work very well, producing a worthwhile increase in low-end clarity.
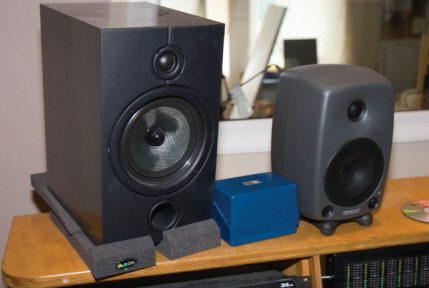
Speakers placed directly onto a desk or shelf can sometimes benefit from the use of high-density foam pads to provide a degree of decoupling. The Genelec monitor on the right has its own built-in Isopod feet, designed to do the same job.

Adding a high-mass plate, as used in these Recoil Stabilizers from Primeacoustic, ensures that the foam underneath will act as a ‘damped spring’.
Room Reflections
Having dealt with monitor positioning, it is also very important to examine more closely the influence of room surfaces on the sound and to take appropriate measures to minimise unwanted reflections arriving back at your listening position. When sound hits a hard, flat surface, it bounces off it much like light from a mirror, and just as a light bulb viewed in a mirror emits its own ‘phantom’ light source, a hard surface that reflects sound from a speaker produces a similar effect, just as though there was a phantom loudspeaker behind the wall. The best way to understand this is to get somebody to hold a mirror flat against the side walls of your studio room while you sit in your mixing chair. When the mirror is in a position that allows you to see the monitor speakers, you know that sound reflections from that point will also bounce back to your listening position. The sonic effect is very much the same as if the speaker you saw in the mirror was real and emitting the same sound as the main speakers, but very slightly later and with a different tonal balance, as we’ve already explained – and these reflections will compromise the accuracy of your monitoring and confuse the stereo imaging. While we can simply paint a mirror black to stop it reflecting light, devising an audio equivalent of black paint isn’t quite so straightforward.
Note that in a typical domestic room, the dimensions are such that any reflections from walls, the floor and the ceiling will arrive back at the listener so quickly that they blend in with the original sound rather than being perceived as separate echoes. The effect of this is that the overall sound appears to be coloured – there’s no sense of hearing accurate direct sound alongside delayed coloured sound. Effects due to multiple reflection paths are audible mainly at mid and high frequencies and are fairly easy to deal with, whilst modal problems related to room geometry result in mainly low-frequency problems.
TIP : Don’t allow any such as the edge of a computer monitor screen. Southing to come between you and the loudspeaker,nd reflections from such surfaces compromises accuracy and degrade the stereo imaging quite dramatically, especially if the tweeter becomes partially obscured. Ideally, the computer monitor screen, and anything else placed between the speakers, should be positioned well behind a line drawn between the speakers’ front baffles.
TIP : Don’t lay speakers on their sides unless the manufacturer’s instructions confirm that they are specifically designed to be used that way. Normally the tweeter should be directly above the woofer so that the high and low frequencies remain correctly time-aligned as you move to the left or right of the normal mixing position at the apex of the equilateral triangle we mentioned earlier. Using such speakers horizontally can destroy that time-alignment and will not only significantly narrow the monitoring ‘sweet spot’ within which the mix sounds accurate, but it will also result in comb-filtering colouration if you move from side to side as you work.
If the tweeter is mounted above and to one side of the woofer, it may be an indication that the speaker has been designed to work in either orientation, and some dual-woofer speakers are also designed to work horizontally, with the tweeter located between the woofers. However, you should always check the manufacturer’s instructions for clarification as other design factors may influence the mounting options.
When looking for reflection paths, don’t forget the surface you are sitting at! Angling the speakers up and away from the table surface, or adding something absorbent can make a significant difference to the accuracy of what you are hearing.
Monitoring accuracy also suffers if speakers are set up with a large area of reflecting surface, such as a table top, directly in front and below them. This is because both direct and reflected sound reaches the listener causing phase cancelation problems, resulting in peaks and dips in the mid and upper frequency range. If the speakers are set up on floor stands or a shelf, aim to keep this as high above the desk surface as possible and try to angle the speaker to minimise the amount of sound projected down to the table surface. Where the speakers must sit on the desk itself, move them as close towards you as is practical and angle them upwards so the sound is directed towards your head and not towards the table top. Minimising the size of the desk can help too, especially if you can work with one that is narrower than the space between your speakers so that you can place speaker stands at the sides of the table instead of directly behind it. In extreme cases, we’ve had success placing one- or two-inch-thick acoustic foam panels on the desktop in front of the speakers to help kill reflections. If you’re installing acoustic foam in other parts of the studio, you may have some off-cuts that can be used for this purpose. Another viable alternative is to use a perforated metal computer desk so that most sound will pass through it rather than bounce off it.
So much for the problems, it’s time now for some practical solutions.
Making a Sine Wave Test Sequence
A very simple and intuitive way to identify and assess uneven bass problems caused by room modes is to play a chromatic sine wave test sequence and listen for which notes stand out as too loud or too soft – and here’s how to set it up. It may be worth burning the results to an audio CD to make future tests easier to carry out.
Using an oscillator plug-in, a software synth, or a software sampler (some play sine waves by default until you load a sample) in your DAW, program a MIDI sequence to play a pure sine tone over the bottom couple of octaves starting at C4 (250Hz) and running in semitone steps down to about 55Hz (low A0) or even 41Hz (low E0). The lowest fundamental of a five-string bass is 31Hz (low B0) and very high quality speakers in a large room might be able to reproduce that, but few compact two-way speakers will be able to generate much energy at such low frequencies, so in most cases there’s little point in taking the sequence much lower than 41Hz.
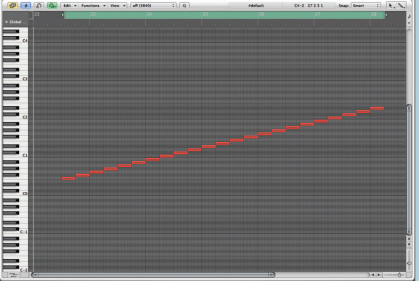
Chromatic sine-wave test sequence created in DAW software.
Each note in the sequence needs to be about one second in duration – long enough for any standing waves to have time to build – but with gaps between notes so that you can hear any modal ringing effects when the note
stops. Make sure all the notes have the same MIDI velocity, and then arrange for them to play in a ascending sequence. At the starting higher frequencies the levels of adjacent notes should remain very consistent as they are above the frequency range usually affected by room modes, but as the sequence descends you will become aware of some notes being louder and boomy, and others being very weak or even absent altogether!
As the sequence plays listen to the relative loudness of each note, both from the listening position and as you walk around the room. If they sound more or less even you’re in luck but, if not, try moving the speakers by a few inches and try again, and if that doesn’t help, consider installing bass traps (see Chapter Two).
