
Getting a good vocal sound is easier than you might think, although it seems to be one of the subjects that people have difficulty with. You don’t need fabulously expensive mics or preamps to get the job done to a high standard, so long as you follow a few basic rules. Large-diaphragm capacitor microphones, including suitable back-electret models, are most often used in this application because of their ability to capture high frequencies more accurately, but a good dynamic mic designed for live stage use will still work perfectly well, and is even sometimes preferred for some styles, such as heavy rock or rap.

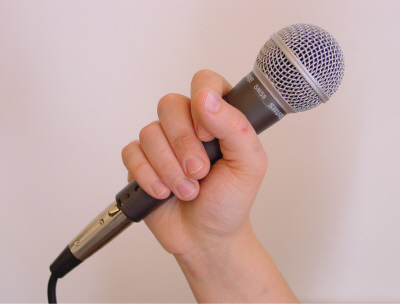
Large-diaphragm capacitor mics are usually first choice for vocals, but you can get perfectly acceptable results with dynamic models too.
Mic Powering
Capacitor mics always need a power source to operate, both to polarise the capsule element and to power the electronics of the on-board impedance converter that they require. If you have a mic that can run on an internal battery, it will usually be a type of capacitor mic called an electret, which has a permanently pre-polarised capsule – the power isn’t needed to bias the capsule, but is still needed to run the impedance converter. Tube (or valve, as we tend to say in the UK) microphones need much higher voltages to operate than other types of capacitor mic, and usually have a dedicated power supply unit. Most studio mics, however, can be ‘invisibly’ powered via the same cable that carries their output signal – this is where the term ‘phantom’ power comes from – so, if you want to use capacitor mics, you need to have a preamp or mixer that can supply the necessary voltage (48V DC is the standard, but lower-voltage phantom systems are sometimes employed, mainly in older equipment).
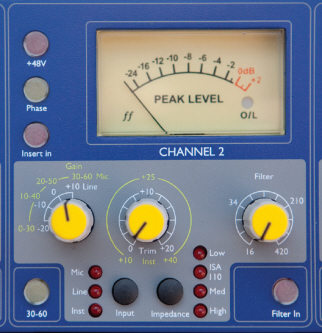
Capacitor mics always need a power source to operate – either an external high-voltage supply in the case of tube mics, an internal battery for many electret mics, or a special ‘phantom power’ supplied invisibly via the balanced mic cable that also carries the audio.
‘Boxy-sounding’ vocals are often identified as a particular problem area, with studio owners frequently thinking that upgrading their mics or preamps will fix the problem. In the vast majority of cases, however, the real problem lies in the acoustic environment in which they are recording. Any unwanted ‘roominess’ in the sound at the recording stage will be further emphasised by any compression added at the mixing stage, so even what seems initially to be a relatively small amount of colouration can still become a significant problem when you come to mix. The simple fact is that even budget mics and preamps can give great results on vocal recording, provided you are working in a good acoustic environment. Fortunately, creating the right acoustic for recording vocals is both simple and far less expensive than upgrading your mics and preamps. Once you’ve got your room controlled in an appropriate way you might be in a better position to judge if more expensive gear will further improve your recordings. All you need to do at this stage, however, is to find a way to stop the room interfering with your recording. Fortunately, we have arrived at a cheap and virtually foolproof solution.
Directionality
Most people use cardioid pattern microphones when recording vocals, and these will, to some extent, reject unwanted sounds or room reflections from behind them. However, the cardioid pattern is only slightly less sensitive at the sides than the front (typically only about 6dB or so), so you can’t rely on the pickup pattern alone to deal with all the unwanted room reflections. While it might ignore reflections coming directly from the rear, it will capture everything from the sides, above, below and from in front. This last point is particularly important because strong reflections from whatever is directly behind the singer, will bounce straight into the most sensitive ‘business end’ of the microphone.
So, the initial aim should always be to prevent as much as possible of the sound being reflected from the walls and ceiling from getting into the front and sides of the microphone, and one of the cheapest and most effective ways to do this is simply to hang a heavy polyester-filled, king-size duvet (or continental quilt) to form a concave U- or V-shaped curtain behind the singer. We don’t recommend using feather duvets, as they cost rather more and, even more significantly in this application, all the feathers tend to sink to the bottom when they are hung upright! You can also hang duvets directly from the walls of the room to form a U- or V-shape across one corner, but try to keep as far out from the corner as you can to avoid bass build-up problems. You’ll always get better absorption to a lower frequency if you can space the duvet away from the wall a little, or by doubling it up to increase the thickness. Where wall hanging isn’t practical, we’ve often used hefty mic stands or cheap T-bar lighting stands, but there are countless options open to anyone with minimal DIY skills. For example, you could stitch curtain rings to one edge of the duvet then hang it from a curtain rail fixed to the ceiling or across a corner.
The role of the duvet here is essentially to absorb any reflected sounds that pass behind the singer and that would otherwise reflect off the back wall straight into the front of the microphone – and that alone can make a huge difference. By extending the duvet around to the sides you can also reduce the sound reflected into the sides of the mic, with further significant benefits.
Where the ceiling is low, which is the case in many home and garage studios, you may also need an absorber above the singer and microphone to deal with reflections from that surface, although this can be as simple as an acoustic foam panel or another duvet, if you can find a means to suspend it. On more than one occasion we’ve fitted hooks on opposite walls or picture rails to allow us to create a ‘web’ of nylon cord allowing foam panels to simply be rested on top.
Of course, if the acoustic treatment you’ve already applied to your studio to improve the monitoring acoustics includes a large area of absorber somewhere, with enough space for the singer to stand in front of it, you might find this alone does the trick, and you may not need that duvet after all!
You may well have seen commercially-produced curved absorbers, intended to be mounted behind the microphone. These can bring about a further worthwhile improvement in the recorded sound by shielding the sides and rear of the mic, and also by absorbing some of the direct sound from the singer that would otherwise go out into the room to be reflected from other room surfaces. In our experience, these behind-the-mic absorbers are rarely adequate on their own, but certainly bring a worthwhile further improvement once you have already dealt with the rear and side wall reflections.
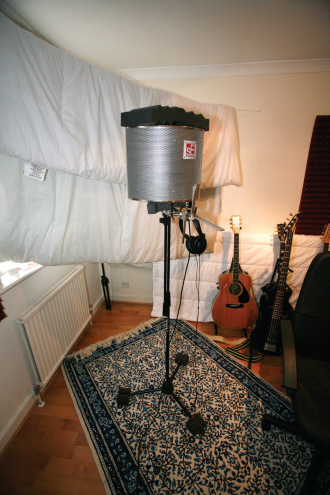
An improvised vocal booth, using a duvet and a behind-the-mic absorber, such as this Reflexion Filter, can often produce better results than a purpose-built set up, unless the latter is very carefully designed.
Overall, by using the V-shaped duvet corner in concert with a curved absorber behind the mic, the vocal sound you get is often much better than that which can be achieved using a small vocal booth, because unless the latter is extremely carefully designed it can very easily make vocals sound boxy and congested. Unless the acoustic treatment inside a vocal booth is very thick, the low-end and lower midrange isn’t absorbed as effectively as the upper mids and highs, and these lower frequencies will therefore tend to dominate the overall sound captured by the mic. We’ve come across several DIY vocal booths on our travels and none of them sounded good without undergoing significant modification, and in some instances there just wasn’t enough physical space to apply any practical acoustic fixes so the only option was to rebuild or abandon them.
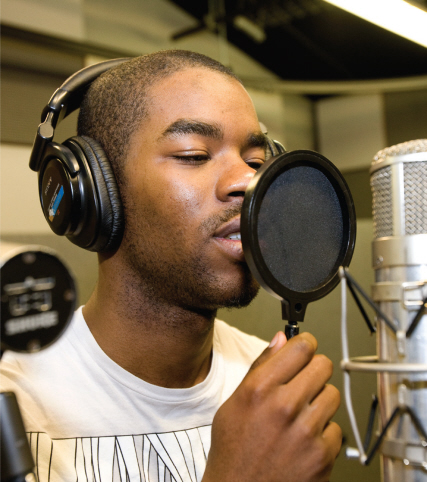
Always check the spec to see which part of the mic you should sing into. Most large diaphragm studio capacitor mics are so-called ‘side-fire’ designs, which means you sing into the side of them, whereas in contrast, most stage vocal mics are ‘end-fire’ mics where you sing directly into the end. (These side- and end-fire terms are nonsensical, of course: nothing comes out of them; sound only goes in, but they are widely used, nonetheless!). Usually the ‘hot’, or active side of a side-address microphone is designated by the manufacturer’s logo, or in the case of Røde, a gold spot – we mention the latter only because on one Studio SOS visit we noticed that the user had a ‘side-fire’ mic set up in an ‘end-fire’ configuration, with a pop shield over the end of it.
When we asked why, he said it was because he’d, “tried using the side, but it sounded very ‘roomy’... and that singing into the end seemed a lot better”. Of course, what had happened was that he’d initially tried the back of the mic which, being a cardioid-pattern model, would indeed sound dull and very roomy indeed, but then rather than check the other side, he’d assumed that it was an ‘end-fire’ mic, and rigged it accordingly. Singing into the top of the mic meant he was actually using it 90 degrees off-axis, where the output level is only about 6dB lower than the on-axis level, and only slightly duller than it should have been! That was clearly a massive improvement on using it directly from the back in the cardioid null, but still not as good as it was capable of!
If in doubt about the polar pattern or the orientation, listen to the output of the mic while moving around it in a complete circle talking or singing as you go. That will quickly reveal the polar pattern and intended main axis!
Position
Because of the acoustic anomalies that often occur in the exact centre of a square or rectangular room, it is best to avoid placing the singer and mic in the centre, but at the same time you don’t want them too close to walls either, and especially not in a corner, as the bass-end builds in intensity close to boundaries. Also, if there is a computer in the room, try to arrange things so your vocalist is set up as far away as possible, with the rear of the mic facing the computer, in order to minimise the amount of fan noise picked up.
Pop shields should always be used, regardless of the type of microphone or any claims made by its manufacturer as to its inherent resistance to popping. An inexpensive mesh, foam, or perforated-metal pop screen, placed one to two inches in front of the mic capsule, will prevent unwanted pops or thumps whenever loud ‘plosives’ – ‘P’ and ‘B’ sounds – are sung. What happens is that the very strong air blasts strike the mic capsule’s diaphragm with such energy that they cause it to ‘hit the end stops’ generating a huge and unwanted low-frequency output that is very hard to remove after the event. Of course, it’s best if the vocalist develops the technique of turning their head slightly when singing those plosives, in order to avoid sending strong blasts of air straight towards the mic in the first place, but few untrained singers have the ability to do that without it getting in the way of their performance. Engaging the low-cut switch on the mic or preamp, where available, will help slightly, but you need to be sure that it doesn’t compromise the recorded vocal tonality.
It’s always worth using a pop shield for vocal recording. It shouldn’t compromise the recorded sound at all, but a destructive ‘plosive’ in the recording can’t really be fixed by subsequent processing.

If you find yourself desperately in need of a pop screen without having one to hand, you can always improvise one using a couple of layers of fine nylon stocking material stretched over an opened out wire coat hanger. We’ve also used the fine-wire mesh splashguards designed to fit over frying pans, with good results – you just need to improvise a means of fixing them in place. The inherent nature of a pop shield is that most tend to attenuate the very highest frequencies to some degree, with multi-layer nylon screens being the worst and open-cell foam being the best. However, any losses can be made up easily with a little ‘air EQ’ in the mix, and this minor drawback is far more acceptable than the huge plosive pops that would occur without a pop shield in place!
The distance between the mic and the singer should normally be about 200 to 300mm – or slightly further if the mic has a strong proximity effect – with the pop-shield about 100mm from the mic. It often helps to set the mic capsule around forehead height, so the singer has to project slightly up towards it. This sometimes achieves an improved posture that may help them sing more effectively, but it also helps to make sure plosive blasts go below the mic rather than straight into it, and also tends to pick up less sibilance.
TIP : Even a good vocal recording made with a pop shield will show some unwanted low-frequency information when you look at the recording using a spectrum analyser. That’s because some air blasts from the singer’s mouth still get through the pop shield, albeit heavily attenuated. Using a low-cut, 18dB/octave filter, set somewhere between 80 to 200Hz, will address this, but always listen to the audio as you’re adjusting the filter to ensure that you don’t unduly affect the intentional low end of the voice.
With many singers, it helps to set the capsule slightly higher than their mouth height, making them project slightly upwards.
Mic Choices
We said at the outset that you didn’t necessarily need an expensive mic to get a good vocal sound, but there is an important caveat to add: the critical aspect is to use a microphone with a tonality that fundamentally complements the voice of the singer you are recording. For example, some vocal microphones are quite bright and ‘airy’, some have a strong ‘presence’ character, and others are warm-sounding to the point almost of being dull. All mics have a tonal character of some kind, even the ‘neutral’ ones. One of the first principles in achieving a good vocal sound is to find a mic that doesn’t require much (or indeed any) EQ to make the singer’s voice sound natural. It sometimes helps if the mic’s fundamental characteristic tends to lean in the opposite direction to the singer’s own vocal character – a warm-sounding mic for a singer with a thin, shrill voice, whilst someone with a warm voice, perhaps lacking in definition, might pair up well with a bright-sounding microphone.
If you can only afford one microphone, and you need that model to work with a number of different singers, then try to pick something fairly neutral, as you have more chance of being able to use a modest amount of EQ to get the sound close to where you want it. In general we have found that finding a suitable microphone for a male vocalist is relatively easy – most mics seem to give acceptable results in most cases. With female voices, however, it seems to be far more difficult to find the ideal combination, possibly because the ‘presence peak’ built into the response of many mics tends to emphasise a naturally more resonant area in female voices. In the various shootout tests we’ve done, the suitability of a mic to a particular voice really has had little correlation with its price. Experimentation is the key.
‘Comfort Reverb’
Those may be the practicalities of setting up for vocal recording, but no amount of technology will help if your singer doesn’t turn in a good performance. To maximise your chances of achieving this you have to work with them to set up the best possible headphone mix with exactly the right balance of the backing track and their own voice, as well as just the right amount of ‘comfort reverb’ for them to feel confident. We have found that this is an area that’s often neglected in home studios with some users even being unsure as to how to set this up.
When working with DAW software-based setup, there are two general scenarios: firstly, using the DAW’s ‘software monitoring’ facility so you hear the voice after it has passed through the DAW’s processing, usually with a tiny delay; secondly, using the ‘direct monitoring’ facility often built into audio interfaces – this allows you to hear the input signal before it passes through the software. Using a hardware mixer in conjunction with the interface, as many people do, is effectively just another way of achieving direct monitoring.
If you are using software monitoring, the perceived delay is usually manageable with buffer sizes up to 128, although some singers and instrumentalists are far less tolerant of this than others. The problem is that they hear their own voice immediately through internal bone conduction, followed by their voice arriving back in their headphones a couple of milliseconds later (after passing through the mic, interface, computer and interface again). The delayed signal interacts with the direct signal to cause colourations that can be surprisingly off-putting for some, but completely innocuous to others!
Setting up a comfort reverb using software monitoring of the live input in the computer is very easy, as you can simply set up an aux send routed to a reverb plug-in from the input channel itself. You can choose whatever type and amount of reverb makes the singer comfortable, as it won’t be recorded with the track.
Achieving the same when using direct monitoring via hardware is slightly more tricky, and I’ve always found the easiest way to do it is to leave software monitoring on in the DAW and then set up a pre-fade aux send on the track you’re recording to, feeding this to an aux bus with a suitable reverb inserted.
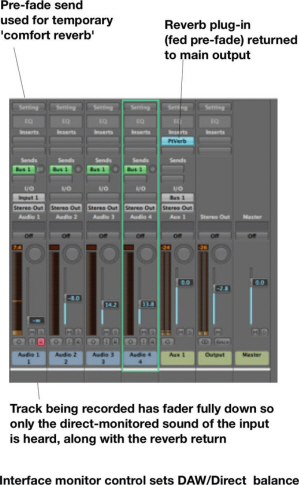
Configuration for achieving ‘comfort reverb’ from your DAW in the headphone feed, whilst using latency-free, direct input monitoring via the hardware interface.
The channel fader can then be turned right off to avoid you hearing the voice slightly delayed ‘through the DAW’ – you will get the direct voice from the direct monitoring path in the interface. Since the aux send is pre-fader, though, you can still send some vocal to your comfort reverb without the processing delay being noticeable – effectively, a few milliseconds will just be added to the reverb’s pre-delay parameter. Again, use whatever type and amount of reverb makes the singer comfortable.
If this comfort reverb facility is a feature you’re likely to use regularly, it is well worth setting up the necessary pre-fade send and a suitable comfort reverb as part of your template song. It always surprises me when we visit readers’ studios how few of them work from a template – instead they’ll waste a lot of time setting up the tracks, busses and plug-ins over and over again for each new song they start. Templates can save a lot of time and you can always update them when you discover new things you’re likely to need on a regular basis.
The Studio ‘Vibe’
Even in a bedroom or garage studio, you can do a lot to make the singer feel more comfortable – even when the singer is you! Ensure sure the room is a comfortable temperature and always have a glass of water (at room temperature) on hand. Turn off the lights or use subdued table lamps if that helps create a better atmosphere, and if a guest singer is still feeling self-conscious, send all unnecessary musicians out of the studio until you’re done. Always be positive and encouraging, so rather than telling them they’ve done a dreadful take, just say you think they’ve got an even better one in them! Always record everything, too, even the warmup, as some of the best moments sometimes occur then. As a rule I’ll record three or four takes of the whole song, then compile a ‘best of’ version from the best phrases. If any further replacements are necessary, then I’ll resort to recording individual phrases, offering advice on performance where necessary. We now have software that can correct small tuning discrepancies pretty effectively, but the feel of the performance still needs to be there.
While recording, vocalists always need to hear the recorded backing parts, of course, and this is generally best accomplished via headphones. It is usually sensible create a conventional balance of everything as a starting point, and then adapt the mix as the vocalist directs, remembering that it is vitally important to have clear backing instruments that guide the vocalist’s pitching.
For singers who prefer to work with one side of the headphones pushed back so they can hear a little of their voice directly, it is important to make sure that the unused side of the phones is kept snug against the side of their head to prevent sound leaking into the microphone. If they can’t do this (‘big hair’ can be a problem) it might even be necessary to route the cue track only to the side that is actually being used.
Some singers prefer a thinned-out mix in their headphones when overdubbing vocals, but you need to make sure there are still enough cues for accurate timing and pitching.

Headphone ‘spill’ can have a seriously detrimental effect on the tonality of your recorded track, especially if the singer prefers to only use one earpiece. Make sure your performer keeps the unused earpiece pressed tightly against them, or change your foldback routing to only feed the other side.
Some vocalists are simply never comfortable singing with headphones on, however. It is actually perfectly possible to use loudspeaker playback whilst recording vocals, particularly for louder musical styles where a relentless backing track will tend to mask the additional spill that inevitably results. Switching to a hand-held, stage-type, vocal microphone, designed to be used close-up, helps to minimise spill from speaker playback and keep it to manageable levels, and make sure the playback speaker is aimed at the null of the mic’s polar pattern. If you want to get really ambitious with speaker monitoring and still be able to use a proper studio mic, there is a technique involving using two speakers fed the same (mono) signal, but in opposite polarities, placed on either side of the microphone. With careful positioning, it is usually possible to achieve substantial cancellation of the playback signal as it is ‘heard’ by the microphone, whilst the singer can hear the track perfectly, due to the spacing between the ears and the shadowing effect of the head.

Two speakers carrying the same mono signal, but with the polarity reversed on one of them, can be rigged on opposite sides of the mic, at exactly the same distance to create a headphone-free overdub setup. The out-of-phase speaker signals cancel out at the microphone, but are audible to the singer due to the distance between the ears and the shadowing effect of the head.
TIP : When you do your initial sound-level check, leave at least 12dB of headroom (and maybe as much as 18dB) because the singer will almost certainly turn in a louder performance when the red light goes on. On so many of our Studio SOS visits we’ve found DAW mixes with individual tracks peaking so high that the stereo bus is clipping. There’s no significant noise or resolution penalty for leaving a generous amount of headroom on today’s DAW systems, so we’d recommend leaving at least 12dB for whatever source you’re recording. No matter what the DAW designers tell you about the ‘floating-point cleverness’ of their mixers, we’ve always found that mixes sound cleaner and less fatiguing when you leave plenty of headroom.
Processing Prior to Recording
Many professional engineers use compression both during recording and then again when mixing. Compressing the signal while recording increases its average level, and that was an important consideration when recording to analogue tape or early 16-bit digital systems. Now that we have 24-bit recording, however, there’s no technical reason to compress during recording at all unless you have a hardware compressor that imparts a particularly desirable quality to the sound. Even if you have an analogue compressor that sounds very special, it’s usually best to err on the side of applying less compression than you think you may ultimately need – it is very easy to compress more when you’re mixing if there isn’t enough, but virtually impossible to undo the effects of over-compression. When working on Mix Rescue projects for Sound On Sound we often come across tracks that have been over-processed at source, and this makes mixing very difficult. If in doubt, record vocals and other instruments completely clean and flat – no compression, no EQ. If the sound isn’t close to what you want, then change the mic position or the microphone, and get it sounding as close as possible to the way you want it before reaching for the EQ.
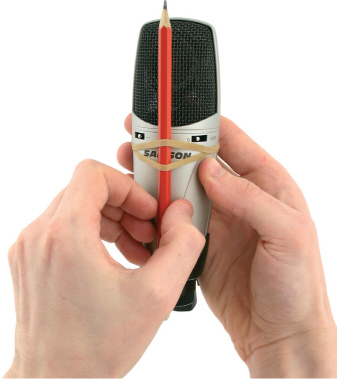
TIP : If you are experiencing sibilance problems – over-prominent ‘s’ and ‘t’ sounds – with a particular singer and changing mics doesn’t help, try this little trick: take a pencil or ball-point pen, hold it vertically against the front of the microphone keeping it central and then fix in place with a couple of elastic bands. Often this will reduce the offending sibilance enough so that you won’t need to resort to using a de-esser processor when you mix. Moving the mic higher – around forehead height – also sometimes does the trick, by moving it away from the front of the teeth and nose.
Summary
The most important areas to attend to when making a vocal recording are the acoustics of the recording space and the comfort of the artist themselves. Neither of these is particularly budget-intensive: a duvet or two, plus a few minutes setting up a good monitor mix with the right amount of comfort reverb, will make more difference to the end result than upgrading your mics and preamps.