
One thing that has surprised us during our many Studio SOS visits is the number of home studio owners who play guitar as their primary instrument. It is often assumed that keyboard players are the ones who take most naturally to computer recording techniques, mainly because they were at the leading edge of the widespread adoption of MIDI, which revolutionised music production from the mid-80s onwards, but we’ve come across home studios with high powered Marshall stacks set up in cupboards underneath the stairs, innumerable Line 6 POD processors, and even a band trying to record two large guitar stacks and a bass amp in a small garden shed alongside a miked drum kit! It is probably fair to say that there are more ways of recording the electric guitar than just about any other instrument.
The electric guitar is perhaps unique in that the amplifier and speaker cabinet it is connected to are just as important as the instrument itself in influencing the final sound.
The electric guitar is perhaps unique in that the amplifier and speaker cabinet it is connected to are just as important as the instrument itself when it comes to creating the final sound. Take Leo Fender’s wonderful Stratocaster guitar design and give it to a bunch of different players, with different amplifiers – or even the same amps with different settings – and you get sounds as diverse as those made by Jimi Hendrix, Hank Marvin of the Shadows, Mark Knopfler of Dire Straits, Dave Gilmour of Pink Floyd, Eric Clapton and countless others. Since the amplifier is so important, how you choose to record the electric guitar is an important creative decision, yet so many people just use whatever amp-modelling plug-in they have to hand in their DAW simply because it is convenient. That’s not to say you can’t get good results this way, but so much depends on the style of music and on the player.
Model Behaviour
Digital-modelling preamps and their software plug-in equivalents vary in quality, with some sounding very close to the amps they purport to model, but to our ears none manage to fully convey the essence of a high-energy rock sound in the same way as a miked amp. Part of the reason for this is that when you stand in front of a guitar amplifier some of the sound energy from the speakers interacts with the strings and guitar body to help sustain and energise the sound. Despite a number of electronic and software-based sustain innovations, we think it is fair to say that nobody has found a way to emulate this complex interaction with any degree of authenticity. For many less assertive styles, however, you can get a very acceptable sound using a modelling preamp or plug-in, and in those cases all you have to do is set the record level, leaving a sensible amount of headroom, as always, and then go for it.
Digital guitar-amp modelling devices offer an easy and effective route to a wide variety of recorded guitar tones for the small home-studio owner who may not be able to record a real amplifier, perhaps due to noise constraints.
TIP : If you’re using a modelling amp plug-in you can often get better overdrive sounds if you use a real hardware overdrive pedal connected between the guitar and the input to the recording system, rather than using a software model of an overdrive pedal. The hardware pedal feeds into your virtual guitar amp plug-in, just as it would with a real amp. This technique has a further advantage in that the pedal output can be plugged into a regular line input in your recording interface if you don’t have a high impedance DI box or instrument input available. This works because most pedals don’t mind driving the relatively low line-input impedance, whereas an electric guitar’s pickups would object with a low level and a compromised tone. Just be aware that there’s no point in cranking the pedal’s output up to drive the input harder, as you might with a real valve amp, when the pedal is feeding a solid-state, line-level input. In this context, you are using the pedal for tonal shaping and a bit of compression and distortion, rather than achieving overdrive through level boosting.
If you happen to have both a hardware modelling preamp and a recording system that offers an amp modelling plug-in, then try recording via the hardware unit using a little less distortion than you think you’ll ultimately need – or even split the guitar signal so that you can also record a clean version that you can process later using plug-ins. You can always add more distortion and make further tonal changes by processing the recorded parts via your amp modelling plug-ins when you come to balance the mix. You can also add further sustain to a recorded guitar part by using compression, rather than more overdrive, a technique that can keep a mix sounding lively while avoiding the muddy congestion that layering too many heavily distorted guitar parts can cause.
The latter is a surprisingly common problem: guitar parts recorded with far too much distortion can make the part sound indistinct and muddy in the context of a mix, and this is something that is very hard if not impossible to redress with signal processing. We occasionally also find parts recorded so high in level that the recording itself clips in places, and this can lead to a harsh and unpleasant sound that is impossible to rescue or disguise adequately, even using a distorted-amp plug-in.
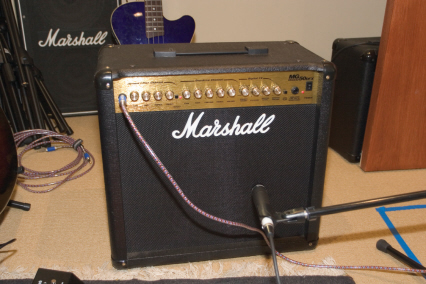
Miking a Guitar Amp
A surprising number of classic rock albums achieved their big guitar sound through the use of small tube amplifiers driven hard – a methodology that is well suited to the home studio, as long as noise leakage isn’t an issue. Many of the classic Led Zeppelin albums were recorded using a small practice amp, while Eric Clapton’s Layla album was recorded using a very low-power Fender combo with a small single speaker. It is much easier to get the right recorded sound at a manageable volume this way than with a big stack – although if you have enough space and tolerant neighbours a big stack can sound great too!
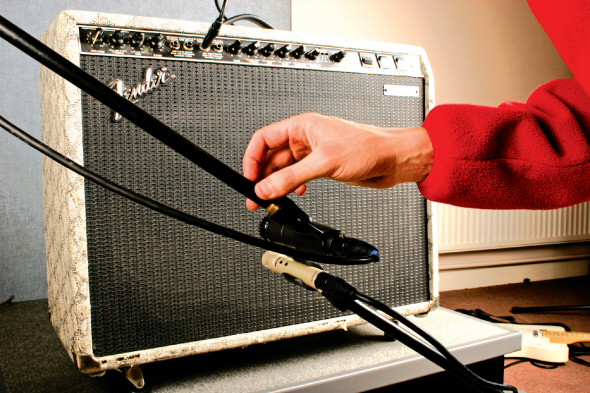
A typical scenario we encounter during our Studio SOS visits is that the operator hasn’t taken the time to experiment with the microphone type and position to achieve the best sound, assuming that the required sound can be found by processing when mixing. The reality is that the degree to which an already overdriven electric guitar sound can be knocked into shape using EQ and other plug-ins is more limited than you might imagine, so it pays to try to get close to the desired final sound at the miking stage.
The usual technique with a 4x12 is to first locate the best-sounding speaker in the cabinet and then mic only that one. Effectively, the rest of the speakers are just there to annoy the neighbours, hence our preference for working with smaller combos! In a very large, good-sounding studio, a big stack might be miked up using three or more microphones at the same time: one close, one a few feet away, and one (or a stereo pair) at the back of the room. Additionally, the engineer may close-mic two of the speakers and record them to separate tracks as they may sound usefully different. These two signals might be combined in various ways to give the mix engineer plenty of options in finding the most appropriate sound. Realistically though, this approach is impractical in most small project studios where one close-mic and maybe a second at a greater distance is about as sophisticated as it gets.
Keep it Down, Lads!
Even if you do have the space and a choice of mics to get a great sound from a stack, the chances are that it will only produce the rock sound you’re after at a level where the rest of the street can also hear it. If you really like the sound of your stack, or just don’t have a suitable small amplifier, there is always the option of using a ‘power soak’. These consist of some high-power, wire-wound resistors that connect between the power amplifier output and the speaker cabinet, allowing the amplifier to be run at a high-power setting, whilst greatly reducing the power passed to the speakers. Most of these power soak units have switchable attenuation settings enabling you to feed just a few Watts to the speaker when the amplifier is running flat out. The rest of the power is dissipated as heat within the power soak unit.
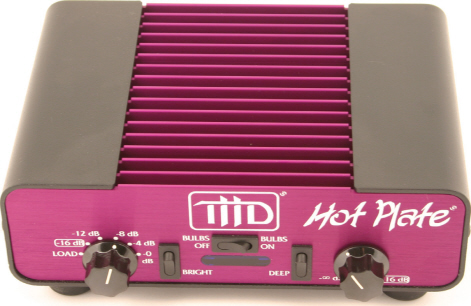
A ‘power soak’ connects between the power amplifier output and the speaker cabinet, allowing the amplifier to be run at a high-power setting to generate distortion and compression, whilst greatly reducing the power passed to the speakers. The rest of the power is dissipated as heat within the power soak unit’s high-power, wire-wound resistors.
Case Study – Rock Band in the Garden Shed!
The following example came about as a request for help from a band recording rock music in a garden shed just about large enough to accommodate all of the band members at the same time! Noise leakage wasn’t a problem, as they were well away from any neighbours and they were already using power soaks for recording two large, closed-back guitar stacks and a bass amp, alongside a miked drum kit. Their problem was that, even with the power soaks, too much of the guitar sound was getting into the drum overhead mics, making their tracks difficult to mix.
We improved the spill situation by keeping the power soaks on the guitar amps but turned their speaker cabinets around to face directly into the mattress-lined walls of the shed, leaving just enough space in front of each cabinet to place a microphone. In this way most of the high frequency amp sound was absorbed by the mattresses instead of bouncing around the room and finding its way into the drum overheads. We also took a DI feed from the preamp output of the bass amp as that can sometimes be used in addition to, or instead of, the miked feed. The band was still able to monitor their performance as loudly as they liked via headphones, but when we did our first take the amount of guitar spilling into the drum mics was too low to worry about whereas before, with the amps facing the centre of the room, the drum overheads were picking up more guitar than drums! The lesson here is that it may sometimes take a combination of two or more techniques and tricks to solve a problem.
Dummy Loads, Speaker Emulation and Beyond
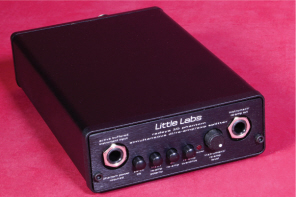
A number of products combine a dummy speaker load with filtering circuitry that is designed to create a response similar to that of a guitar speaker. The filtering is usually adjustable to enable a few different cabinet types to be emulated. A more hi-tech take on the concept comes in the form of dummy load combined with a digital convolution-based speaker simulator. This works in a similar way to those reverb units and plug-ins that use an Impulse Response recorded in a real room or space, and will often include a library of responses taken from real guitar speakers, miked using a range of studio microphones. Some models also include power amp modelling, which allows you to take an input signal from a guitar preamp – the effects-loop send on the back of an amp, perhaps – or even from a modelling preamp.
Guitar sound is a very personal thing, so you just have to try as many options as possible until you find one that works for you. Just keep in mind that your ultimate aim is to get the right recorded guitar sound, which is not the same thing as having a fully realistic playing experience – nothing feels quite like standing in front of a loud amp!
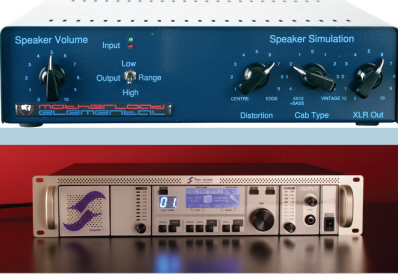
The Motherload from Sequis combines analogue, passive filtering to simulate the response of a typical guitar speaker, whilst Two Notes’ Torpedo range uses digital convolution to recreate the responses of a library of real speaker/microphone combinations. Despite the different technologies, both are highly effective.
Today, in addition to traditional all-tube, or solid-state amplifiers we also have hybrid designs using every possible permutation of digital, tube and solid-state circuitry. While enthusiasts argue over the merits of each, the bottom line is that whatever sounds right, is right – only you know what you want your guitar to sound like. A practical advantage of some of the hybrid and solid-state designs is that their power stage can be turned down while the preamp (or intermediate tube stages, where used) can still be driven as hard as necessary to get the desired sound. This often means you can get exactly the sound you want at any volume you want, unlike many tube amps that have to be cranked up to a certain volume (or used with a power soak) to deliver their best sound. While some of these hybrid designs offer a ‘speaker-emulated’ DI output that can be used for recording, we still generally feel that the best results are achieved by miking an actual guitar speaker.
TIP : If you are using a modelling pre-amp, you may find you get a better rock guitar sound by feeding it into a small PA speaker or into the poweramp input (or effects-loop return) of a guitar combo, and then miking the speaker, rather than simply DI’ing it. This can give you back some of the interaction between the guitar and the speaker that is missing when you DI. If you feed your modelling processor into a guitar-combo power stage, though, remember to disable the speaker simulation – you don’t need an emulated guitar speaker as well as a real one! However, if you’re using a full-range PA speaker, be sure to leave the preamp’s speaker modelling switched on.
Software Emulations
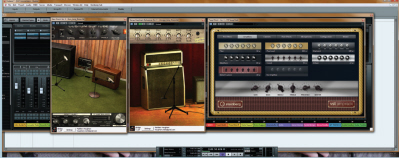
It’s not just in hardware that guitar-amp emulation has progressed in recent years: there are now more software plug-in emulations of amplifiers, cabs and speakers than we can count. The quality of many of them is very good indeed, and the prospect of getting your computer to do all the work for a fraction of the price of equivalent hardware is enticing. To get the best out of such software, though, there are a few things you need to consider:
Monitoring Latency
If you’ve read this book from the beginning, you’ll remember that we discussed the problems of latency in relation to monitoring a signal as you record it. While the issue is easily overcome when recording a vocal – because you can monitor the input signal and blend some reverb in with it (the delay isn’t such an issue for reverbs, as it’s just a little extra pre-delay) – it can, for some guitarists, be far more problematic, particularly when they need to monitor their playing via a software-emulated amp signal. Why? Well, the sound has to go into the computer, be processed via the software, and pass back out

again before you can hear it and get a feel for what you’re playing. Listening to a clean DI signal straight off the input just isn’t the same, as you don’t get any feel for the processed sound of the guitar as you’re playing it – and the recording often suffers because the player isn’t interacting with the sound.
Bear in mind that every six milliseconds of latency is equivalent to you being about another two metres away from the source. That’s not a huge distance when you consider how far a guitarist might be from their amp on a big stage, so if you can get a good, low-latency performance from your interface this may be a non-issue for you.
Anyway, try to get the latency as low as you can while tracking by setting as low a buffer size as you can viably work with for your audio interface without introducing unwanted clicks, pops and the like. If you’re planning to do overdubs later on – during a busy mix, for example – you might not be able to get as low a latency as you’d like. In these circumstances, we often find that it’s better to bounce a rough backing track down as a mono or stereo mix and record alongside that in a different project, as without all that mix processing you are often able to set a much lower latency. The result can then be imported back into the main mix session.
There are other tactics you can use to get around the latency issue, though. For example, you could use a DI box to split the guitar signal, with one side going to a small practice amp for monitoring, and the other going to your audio interface’s mic input for recording purposes. You might not get to hear the actual sound you’ll eventually settle on in the mix, but it’s much better than listening to a clean DI, and you can virtually ‘reamp’ the signal using your software after you’ve recorded it.
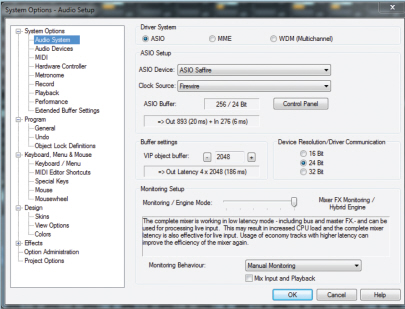
The ‘right’ audio buffer size setting is always a case of finding the best compromise – smaller gives you lower latency and a faster response to controls, but larger will allow you computer to run more power-hungry plug-ins.
Presets
As with synths, so much guitar-orientated software comes with some impressive-sounding presets which might catch your attention while searching for the sound you want, but end up sounding awful when you’re trying to use the guitar sound in a mix! Drenching a preset in delay, reverb and modulation can easily mask a poor amp/speaker sound, so it’s a good idea to peel back those effects and hear what’s going on with just the amp and speaker emulation. You can always add effects back in later on.
Try All Your Mics
Since the electric guitar doesn’t have a specific ‘natural’ sound, you can use just about any type of microphone that comes to hand and still get something musically valid. Furthermore, because a typical guitar loudspeaker rolls off quite sharply above 4kHz or so, you don’t need to choose a mic with an extended frequency response. It’s perfectly possible to get a great electric guitar sound using a cheap dynamic mic with a terrible technical spec! Noise and sensitivity aren’t issues either, because a guitar amp is a very loud sound source when close-miked and, in any event, the amp itself is likely to produce more hiss than just about any combination of mic and preamp! The moral here is to try every mic you have, even that cheap and nasty one you discovered at the back of the cupboard, as you never know what’s going to deliver that magical sound!
Case Study – Play it Again, Sam
One mix we tried to help out on suffered because the original guitar had been DI’d with too much input gain, resulting in a significant amount of digital clipping. The player had then used the amp-modelling software that came with his DAW to try to shape this into a suitable overdriven guitar sound, but the result was far too unfocussed and messy to work properly in the track. After a few futile minutes spent adding EQ and trying different amp models, we persuaded him to play the part again, this time using his small valve combo. We set up a back-electret capacitor mic a few inches from the speaker grille and re-recorded the part using slightly less distortion than was used on the original track. The new part sat perfectly in the mix and the player was amazed how much difference miking his little amp had made.
This again demonstrates that too often we are tempted to take the most convenient approach to a recording when that approach might compromise the end result to a very significant degree. It also underlines the reality that it is often much quicker to play or sing a substandard part again than to spend ages trying to salvage something with plug-ins and still not getting it to sound good!
Guitar Sound Styles
Taste in guitar tones has pretty much globalized these days, but it certainly used to be the case that the typical American rock guitar sound associated with many classic recordings was considered by many British players to be rather ‘fizzy’ or harsh. This may have been due, to some extent, on the popularity of capacitor microphones with US engineers when recording electric guitar, although it’s equally possible that they simply liked a slightly different sound from British players and set their controls accordingly. The typically British rock guitar sound is slightly less brittle, and tends to be more strongly associated with the use of dynamic microphones.
Don’t be afraid to experiment with combinations of microphones, and make notes of anything that works particularly well, recording the exact mic positions and level setting, so that you can recreate the setup on subsequent occasions. One classic combination miking setup for guitar recording involves both a dynamic and a capacitor model, with the dynamic mic used close up and the capacitor model placed a few feet out in front, capturing a more complete picture of the speaker’s interaction with the floor and the room.

The midrange emphasis offered by Shure’s ubiquitous SM57 model has allowed it to remain a popular choice for guitar-amp recording throughout several decades.
The recent arrival on the market of a host of more affordable ribbon mics has further expanded the options for home-studio operators, because the inherent, gentle high-frequency roll-off of most ribbon mics tends to produce a smoother tonality than capacitor mics. At the same time they seem capable of delivering a more gutsy, detailed tone than most moving-coil models, some of which can sound quite nasal. Somehow ribbons are able to focus on the all the elements of the sound that you want to hear, while smoothing over the less desirable elements.
Some additional care with placement is sometimes needed, though, as ribbon mics can be quite susceptible to radiated hum fields from amplifier power transformers, while their strong proximity effect means you often need to roll off some of the low end. They are also prone to damage from strong air currents. Ribbon mics usually have a figure-of-eight pickup pattern, meaning they are equally sensitive to the rear as the front, but spill is rarely a problem in this application as they will almost always be placed fairly close to a very loud sound source. In cases where more spill attenuation is desirable, you can place an acoustic absorber behind the mic – this will also help attenuate the influence of any unwanted room resonances and reflections. Many modern ribbon mics are deliberately designed with different tonalities from the front and rear pickup lobes – one side often sounds distinctly brighter or darker than the other – so experiment with the sound from each side.
It is sensible to handle ribbon mics rather more carefully than most other microphone types, and putting them safely back into storage as soon as you’ve finished using them should become part of your studio routine. Never put a ribbon mic down on the floor or a desk as the strong internal magnets will draw in any metallic particles that may end up causing problems. As mentioned above, ribbon mics are prone to damage if exposed to very strong air currents or blasts – if you can feel air movement from the sound source on the back of your hand you need to think about how best to protect the mic! One solution is to put a pop shield between the mic and the speaker, although often it’s sufficient to just angle the mic at around 40–45 degrees to the speaker instead of facing it straight on. In this way air blasts from the cone ‘brush’ across the ribbon diaphragm instead of slamming it square on, and that helps to protect it from the effects of strong air currents without compromising the sound. If you need to protect the mic when not in use, but don’t want to de-rig and pack it away, you can cover the mic on its stand with a polythene bag, so that any strong air currents can’t hit the diaphragm directly.
The inherent, gentle high-frequency roll-off of most ribbon mics tends to produce a smoother tonality than capacitor mics, whilst delivering a more detailed sound than moving-coil models.
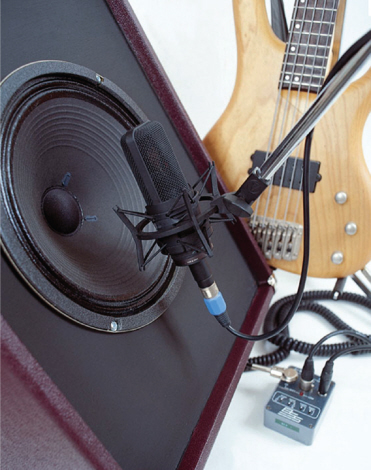
Shaping the Sound via Mic Position
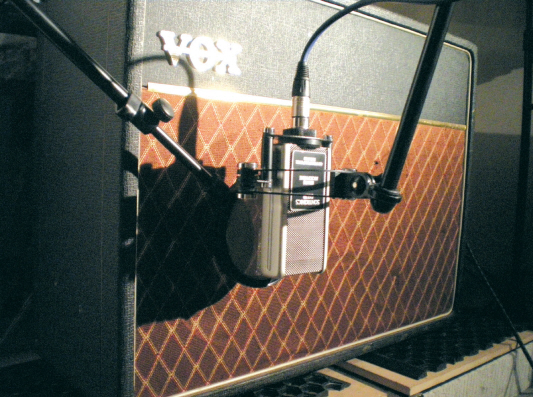
Mics that sound great on vocals or acoustic guitar won’t necessarily be the best for electric guitar, and a budget mic that sounds terrible on just about everything else might actually give you exactly the results you want! Whatever mic you pick, it will typically be placed fairly close to the speaker grille, but we’d still suggest trying different distances to see what difference that makes to the tone. If you want to mic from further back in the room for a less ‘in your face’ sound, then a hard reflective floor surface will help keep the sound bright and lively. The position of the mic relative to the centre of the speaker cone also has a big influence on the tone. As a rule you’ll get a more focused sound with strong upper mids if you place the mic near the centre of the cone, while moving the mic towards the edge of the speaker cone creates a warmer tonality with a different character to the high end. You can even mic the rear of an open-back combo to give more tonal possibilities.
You’ll get a more focused sound with strong upper mids by placing the mic near the centre of the cone, whilst moving the mic out to the edge of the speaker cone creates a warmer tonality.
TIP : Experiment with changing both the mic position relative to the centre of the speaker, and its distance from the speaker, as these two parameters interact. For example, when close miking you’ll hear a very different tonality when the speaker is miked on-axis compared to miking close to its edge, but as you move the mic further away these lateral adjustments will have less influence on the tonality. Despite the number of textbooks telling you to mic the amp very close to the grille, backing off by 200mm or so can often improve the sound.
A close-miked guitar speaker can sometimes seem to produce a disappointingly ‘small’ sound, compared to the sound of the speaker in the room. Under those circumstances, it is always worth augmenting the close mic with a second microphone placed a few feet from the speaker, if you have the space. As with acoustic guitars, place the amp on a hard floor or piece of board to create some reflections. This combined close-far mic technique will inevitably introduce some phase cancellation effects because of the distance between the two mics, but whereas this might be a problem with a natural sound source, it actually becomes another creative possibility with the electric guitar.
By changing the distance of the farther mic and adjusting the height of the amp off the floor, you can ‘tune’ these phase effects until you hear something you like.
Since at least one mic is normally close to the speaker, room acoustics and low-level noise from computers are usually inaudible, so it’s perfectly feasible to record and play in the same room while monitoring via speakers rather than headphones. As long as you are close-miking the amplifier and the mic is faced away from the studio monitors, the amount of spill picked up should be very small. When working this way, it’s sensible to turn down the DAW monitoring level for the guitar track during recording so that you only hear the guitar from its own amplifier, with just the backing track over the studio monitors. This avoids any latency problems and also allows you to adjust your monitor balance while recording by physically adjusting your position towards the guitar amp for more guitar level or towards the studio monitors for more backing track level.
If you try some of the more distant miking positions, room acoustics and computer fan noise may become an issue. If so, deploy a few duvets or other sound absorbers to tame any reflections that might otherwise reach the microphone. Propping a mattress or folded duvet across a corner and facing the amp towards it works well and will also help reduce the amount of spill from the guitar amp that gets into other mics in the room, if you are recording two or more parts at the same time.
Remote Amping
You can also record with the amplifier in the live room (or even in a cupboard or buried beneath a pile of blankets) while you stay in the control room. This has the benefit that what you hear over the studio monitors is the exact sound being recorded – although you lose out on the acoustic interaction between the guitar and speaker, which can be an issue with high-energy rock sounds or performances that rely on controlled feedback. We’ve taken this approach on several Studio SOS jobs by running cables out to a guitar speaker placed in a hallway or behind a sofa in a different room in the house with blankets draped over it.
TIP : If you’re not sure what sound you’ll eventually need in the mix, arrange a direct feed from the guitar to the recording system via a high-impedance DI box or dedicated instrument input on your interface, and record this ‘dry’ guitar signal on a separate track to the miked version. That way if you don’t get quite the result you want you can use the dry signal in combination with, or instead of, the miked version, using the re-amping technique.
Re-amping
A guitar part recorded ‘dry’ can of course be processed using an amp modelling plug-in, but an alternative approach is to feed it back out to a guitar amplifier, which can then be miked normally and re-recorded. Re-amping, as this technique is known, is a useful way to change the guitar sound if the one you originally chose didn’t work out in the context of the final mix.
Of course, guitar amps are designed for the low-level, unbalanced, high-impedance signal from an electric guitar, not the line-level, balanced signal from a computer interface. The ideal solution is to use a ‘re-amping’ box, which is a bit like a passive DI box in reverse: it takes the balanced line level output from the computer interface, attenuates and unbalances it, and provides an instrument-level output to feed the guitar amplifier. Usually there is also a ground-lift facility to avoid ground loops, and sometimes a level control to help optimise the level matching. If you don’t have a re-amping box, you can take an unbalanced line out from your audio interface directly to a guitar amp input, but you’ll need to adjust the output level so that the signal going in to the amp is similar to the level you get when feeding it from your guitar.
A DI’d guitar part can be fed back out to a guitar amplifier (which can then be miked normally and re-recorded), using a ‘re-amping’ box, which takes the balanced, line-level output from the computer interface and provides an instrument-level unbalanced output to feed the guitar amplifier.
Hiss and Hum
Hiss is a fact of life for guitar players whenever distortion is used because the high-gain involved boosts any inherent circuit noise and pickup of extraneous interference along with the wanted guitar sound. In a number of cases we’ve found that the level of background noise is far higher than it needs to be simply because the player is sitting close to a computer. The electrical interference generated by most computer systems can significantly add your guitar/ amp noise, so it’s always best to stand well away from your computer while recording.
Hum is a particular problem when working with guitars that are fitted with single coil pickups, such as Fender’s classic Stratocaster and Telecaster models, as their pickup coils are susceptible to stray magnetic fields from any other electrical equipment nearby.
Putting a noise gate plug-in on the guitar track after recording can help kill any remaining hiss and hum during pauses in the playing, where the noise is most obvious, but it is important that any gating is done before adding reverb or delay, otherwise the action of the gate will tend to mute the tail end of the reverb or echo decay effect. It is also a good plan to set the attenuation amount on the noise gate to pull down the noise by say 10 to 15dB rather than killing it altogether, as the modest attenuation sounds more natural on any exposed guitar parts.
Noise-Reducing Guitar Modifications
There are after-market humbucking replacement pickups for most guitars that are much less susceptible to hum, although purists will tell you that even the best of these changes the tone of the guitar slightly, so the choice is a personal one.
If you like to indulge in DIY you can often make a useful improvement to guitars fitted with single-coil pickups by lining the body cavities of the guitar with self-adhesive copper foil to form an electrostatic screen. The separate pieces of foil should be overlapped and soldered at one or more points to maintain electrical conductivity and then linked to the ground of the output jack socket or the rear of the pots using a short piece of insulated wire. The foil forms an effective screen around the pickups, wiring and controls, reducing the amount of buzz picked up. You can buy suitable self-adhesive copper foil from most guitar parts specialists and it can be cut to shape easily using scissors. Conductive paint, also available from some guitar parts specialists, is a practical alternative to copper foil.
However, this technique won’t help to reduce hum, which is induced magnetically directly into the coils – the only solution here is to use replacement, stacked humbuckers or a bespoke, after-market hum-cancelling solution (see picture).

If you use copper foil for screening, make sure that there is electrical continuity across all the individual pieces, and also that there is a ground wire attached to somewhere!
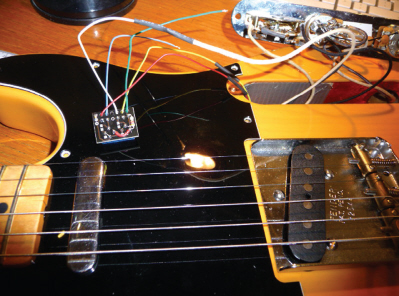
The one really successful, although not cheap, way to reduce noise from a single-coil instrument without changing the sound is to fit an Illitch Electronics coil. This is a special hum-cancelling coil that resides inside the temolo back-plate in the case of Stratocasters, or the scratchplate, in the case of Telecasters. They are highly effective, but are only available for a limited range of guitar models at present.
Where modification of the guitar isn’t viable, the only practical solution is to sit as far away as possible from sources of interference, such as amplifier power transformers and computers, and then to find the orientation within the room at which the guitar picks up the least amount of hum and interference. Some professional engineers get the player to turn until the hum is at a minimum, then they tape a line on the floor so the player always knows exactly which way to point the guitar for the cleanest results. Old fashioned CRT (cathode ray tube) computer displays are also a common source of buzz, so switch these off when recording, or replace with flat LCD screens, which don’t cause hum and buzz problems.
Other gear powered by external power supplies or containing large internal power transformers can also cause interference, so switch off anything not being used and try to keep as far away as possible from anything that seems to be giving problems. Lighting dimmers, fluorescent lights and some fan-speed controllers cause an annoying buzz rather than hum, so either turn these off or set them to maximum to alleviate the problem.
TIP : We’ve met players who have screened their guitar with foil, but then failed to ground the foil. This usually results in more noise pickup, rather than less, as the foil then acts as an aerial. It is also good practice to cut out a piece of thin plastic packaging to line the base of the cavity to prevent the foil shorting out the back of the pickup selector switch.
Bass Guitar
For many kinds of music, a clean DI’d bass guitar signal with a touch of EQ and compression is all that is needed. However, if you are into rock territory you’ll find that the ‘dirt’ introduced by a bass amp and speaker actually helps the bass to stay audible and keeps it sounding punchy. You can sometimes improve the sound of a DI’d bass by adding a modest degree of overdrive using an amp-modelling plug-in, and most guitar amp plug-ins can also produce useful bass sounds, although a dedicated bass version will always give you a bit more tonal scope.
Equally, you can record the bass part through a dedicated bass preamp or bass amp-modelling processor, or even a six-stringguitar-modelling preamp, as they will often have several suitable amp and speaker models that will give a good bass sound. The main difference between the hardware and plug-in approaches is that computer-based users who have suitable plug-ins get the opportunity to change the sound after recording, whereas if you record through hardware, you are somewhat more limited as to the changes you can make after the event, unless you record a clean DI track at the same time.
DI’d electric bass is often recorded with just a little EQ and compression, but combining this with an amp signal as well will usually give the sound more character and help it remain audible in a busy mix.
If you are miking a bass amp, try starting with a mic position between 6 and 12 inches from the speaker grille and, as with the guitar, move the mic across the speaker cone to find the most suitable tone. Obviously, use a mic with a good bass response, rather one that has a steep low-frequency roll-off with distance from the source (such as is common on vocal mics). But, again, don’t be afraid to try whatever you have available as you may be pleasantly surprised. Many large-diaphragm, capacitor vocal mics work well on bass, as long as they don’t exhibit excessive low-frequency roll-off.
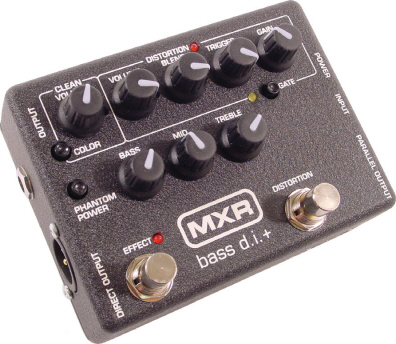
Dedicated bass-guitar preamps are sometimes used for the character they impart, making a DI recording sound more controlled and complete by blending in a little distortion.
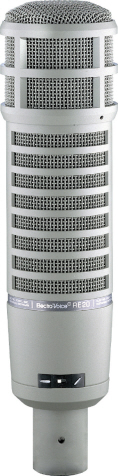

Electrovoice’s RE20 and Sennheiser’s MD 421 dynamic mics are both popular choices for bass amps, although many large-diaphragm, capacitor models will also work well.
TIP : To make the bass stand out in the mix it is often necessary to apply some EQ boost in the 200 to 300Hz region, rather than at the low end. Play your mix back over small speakers or a compact home hi-fi system and make sure the bass is still properly balanced and audible. If you rely too much on deep bass the sound may lose impact when played over smaller speaker systems. Always EQ the bass when the rest of the track is playing and pay particular attention to the way the sound sits alongside the kick drum, as the character of each should remain distinct.
If you prefer the DI option, the main thing to be aware of is that what sounds perfect when heard in isolation may tend to get lost in the mix when the other instruments are faded up. Indeed this is a common problem we’ve come up against on both our Studio SOS and Mix Rescue projects. The temptation is to think that a bass sound with lots of powerful low end will sound good in the mix, but in reality it also needs plenty of mid-range too – if only the deep bass was there the bass guitar would be inaudible on most small transistor radios or computer speakers.
Reality Check
Although this chapter has focused on techniques to record electric guitar and bass, a significant number of quality issues we’ve encountered on our travels have been down to the sound source rather than the method of recording. Guitars that are badly set up and improperly intonated crop up with alarming regularity, so if you are unable to carry out a basic setup yourself, it is well worth having a guitar tech do it for you. Then there are worn and dirty strings, which do the tone no favours and can also affect tuning – and talking of tuning, even some of the better mixes we’ve been asked to polish have suffered from slightly out-of-tune electric and acoustic guitars, so it’s well worth checking your tuning before every take.
With bass guitar, a surprising amount of the final sound comes from the way the instrument is played in the first place. We’ve had to deal with a lot of bass parts that were played very unevenly, timidly or with excessive fret buzz, and in most cases you can’t fix these types of problems with plug-ins or processors. The bass part is so important in most contemporary music that if the bass isn’t played well, you’re often better off replacing it with suitable bass samples played using a keyboard.