
The majority of project studio operators will have a requirement to record vocals at some time or other, even if all their other instruments come from samplers, soft synths and commercial loops. As long as there’s not too much sound leakage from the outside world or from excessively noisy computers, it’s actually pretty easy to make good vocal recordings almost anywhere, but there’s more to it than simply buying a good mic and preamp. The acoustics of the recording space are massively more important than the precise make and model of microphone or preamp, yet they’re all too often not given the same degree of consideration. Fortunately, when you’re recording vocals you don’t have to treat the whole space, only the area around the microphone and singer.
You may have seen adverts for special acoustic screens, designed to be positioned directly behind a microphone, and we often use them as part of our Studio SOS solutions. However, while these devices can certainly help to reduce the amount of reflected room sound getting into the rear and sides of the mic, they don’t offer any protection from sound coming from above, or indeed sound reflected from the wall behind the singer. The latter is usually the most significant source of unwanted ‘room sound’ in a vocal recording, because that’s the direction in which the microphone is most sensitive.
For this reason we always recommend that such screens be used in combination with a large absorber hung directly behind (and if possible around the sides of) the singer. Where the ceiling is low, a piece of acoustic foam suspended above the singer and mic often helps as well. We always raise a smile when mentioning duvets as suitable absorbers for vocal recording, but they’re cheap, they’re readily available, and they work remarkably well.
The acoustics of the recording space are massively more important than the precise make and model of microphone or preamp, yet they’re all too often not given the same degree of consideration.
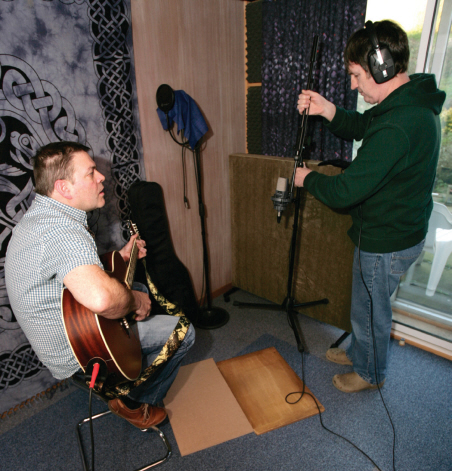
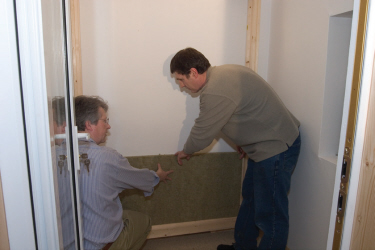
Our typical setup uses a vocal acoustic screen placed so that the mic is roughly level with the front of it, and the ‘live’ side of the mic pointing outwards! If the mic is placed too far inside a curved screen internal reflections can cause obvious colourations. The duvet (or other appropriate absorber) works best if placed across the corner of a room and arranged to hang directly behind the singer. Where necessary, a single 600 x 600mm square of acoustic foam is suspended above the singer by whatever means we can improvise at the time – on another mic stand, or from cord fixed to pins or hooks in the ceiling, for example. Most people are surprised at the dramatic
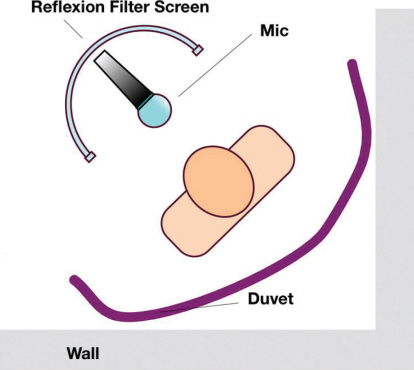
Our favourite improvised vocal booth, using an sE Electronics Reflexion Filter and a duvet can produce first-class results in almost any room, so long as you don’t need to isolate the mic from any external sounds.
improvement in vocal sound these simple measures provide, even though they may have read about us doing exactly this on many occasions. Without this basic acoustic treatment a vocal recording will always be compromised by room reflections and, once compression has been used to process the track, the vocal will sound very boxy. No amount of processing can rescue a poor vocal recording with a lot of boxy room colouration. You can read more about this approach in Chapter Seven where we look at vocal recording in more depth.
Vocal Booths
Improvised duvet absorbers are cheap and reliable, but are only suitable where there is little background noise to worry about. If ambient noise is an issue then a proper vocal booth may be the only answer, although we usually try to talk people out of building stand-alone vocal booths if we can! It is all too easy to end up with something that sounds boxy and horrible – indeed we’ve had to try to rescue a few poorly designed vocal booths. The usual problem is a vocal booth which is far too small (and so inevitably sounds boxy), which has been treated with an excessive amount of mid and HF absorption to try to remove the boxiness, leaving it sounding very dead but also boomy and bass-heavy.
The more reasonably sized but over-damped booths sometimes respond well to adding a little ‘hard surface’ high frequency reflection around head height using old CDs as reflectors. However, those set up in small cupboards under the stairs are usually irredeemable and we have to persuade the owners that recording vocals out in the main room using the ‘screen and duvet’ approach will actually give far better results.
On another occasion we found a vocal booth that was adequately large but the acoustic treatment applied inside it was too thin so all the life was sucked out of the high end while leaving the lower mids to run rampant. All that was available to us for impromptu corrective treatment was carpet and rugs, and although any significant area of carpet stuck onto a wall is usually disastrous from an acoustic standpoint (as explained in Chapter Two), we managed to hang some rugs inside the booth spaced away from the walls. This improved the sound to a useful extent because the rugs were behaving a little like our suspended barrier mat low frequency absorbers but with the carpet fabric also soaking up higher frequencies too. Hardly a calculated solution, but it does show how you can often improvise a reasonable solution to a difficult acoustic problem through science and lateral thinking!
For one Studio SOS visit to a home studio in the USA, the owner was using a large walk-in clothes closet as a temporary vocal booth, with long mic and headphone cables running across the bedroom and landing back to his studio room. As the closet was directly behind the back wall of his studio room, we drilled a hole in the studio wall to connect cables through, which was a much more practical and convenient solution. Whenever we’ve had to make a cable hole through a drywall partition, we’ve made holes on both sides and then inserted a section of plastic waste pipe to ensure an unobstructed passage for cables – it only needs to be large enough to feed XLR connectors through one at a time. The pipe is then fixed into the wall using flexible mastic filler leaving a nice tidy job. Foam offcuts can be jammed into the pipe to form an effective sound seal.
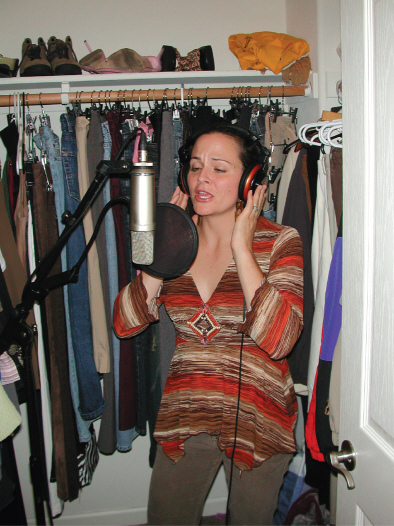
A well-stocked walk-in clothes closet actually makes an ideal vocal booth!
In this particular example, the closet was around 1700mm square and easily large enough to provide plenty of space for a standing vocalist, while the racks of clothing hanging on three sides provided excellent broadband absorption. Acoustic foam on the ceiling would have made it even better but there’s a limit to what you can do in a space designed for living rather than music.
Vocal Booth Treatment
On two Studio SOS visits we’ve helped build vocal booths and, as always, we’ve learned something from each one. The first was built into a space that had already been constructed by the reader but he left us to handle the internal acoustic treatment. We’d warned him beforehand to make sure the basic room was large enough and it worked out OK.
Our approach was to make the wall behind the singer a fullsize trap comprising mineral-wool slabs against the back wall, with a curtain of carpet felt underlay hanging in front of it, and then a sheet of barrier mat, both hanging freely. The idea behind this simple rear wall trap is that the felt absorbs the higher frequencies while the barrier mat sucks the energy out of the lower frequencies. We used a cotton/polyester bed sheet stapled over a wooden frame to hide the rear wall trap, using enough internal bracing to prevent singers leaning into the trap and damaging it.
We also covered the side walls at head height with acoustic foam around 75mm thick and spaced from the wall slightly on foam blocks, but left the lower side walls untreated so as not to kill all the HF reflections. Some foam was also fixed to the ceiling but again we were careful to leave some reflective areas so the high end didn’t suffer. The double-glazed entry door was of course entirely reflective though there was room within the booth to fit a curved reflection screen behind the mic. The combined acoustic treatment worked exceptionally well and produced well-balanced, sufficiently dry-sounding vocals.
We also floated the idea of fitting a movable mic arm mounted to a wall or to the ceiling, as this would avoid having to take a mic stand into the booth to clutter up the limited floor space. The owner found one with an arm much like the mechanism of an Anglepoise lamp and it worked out really well. Though not strictly an acoustic consideration, we also suggested that LED lights would cause less heat build-up inside the booth than conventional halogen spots, and these were also installed in due course.
When building our next ‘from scratch’ booth, we were told we had a space of just over 1220mm square to work with, although we managed to negotiate a little more depth as we wanted to incorporate a similar rear-wall trap that had been so successful previously. The studio owner phoned around all the local double-glazing firms to see if they had a surplus window (they often have a few windows that were made up to the wrong size or from cancelled orders that they’re happy to sell off cheaply) and eventually located a small window that would allow the singer to view any musicians working off to one side of the booth. He also bought a door with double-glazed plain glass in the top half for use as the entry door.
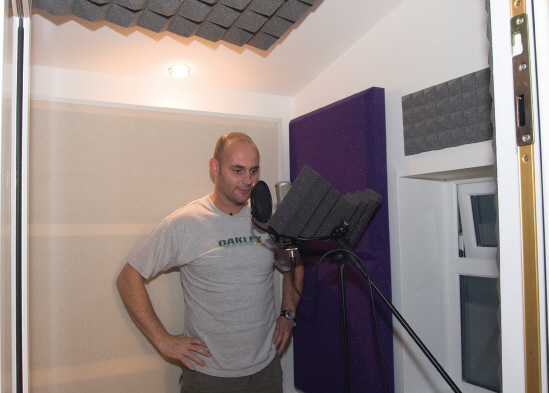
The most successful DIY vocal booths incorporate a balance of absorbent and reflective surfaces in their acoustic treatment – it is important to retain some high frequencies to prevent the space sounding boxy and coloured.
We built the frame of the vocal booth using 50 x 100mm reclaimed timber and then screwed two layers of 12mm plasterboard on either side with loft insulation stuffed into the frame spaces to give us some internal damping. All the joints were sealed with mastic and adhesive was applied to the frame and blobbed between the plasterboard sheets. We decided to cover the outside with thin cord carpet, as that was a cheap way to make the booth look tidy and the carpet also helped damp the panels a little more.
With the right materials and an understanding of the principles involved, you can create a quite sophisticated vocal booth using just basic DIY skills.

1. Installing the frame for the rear-wall limp-mass absorber.
2. Attaching mineral- wool slabs to the rear wall.
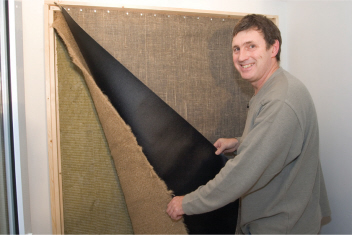
3. A layer of heavy felt underlay hangs in front of the back wall mineral wool slabs, with the mineral-loaded vinyl ‘barrier mat’ sheet hanging in front of that.
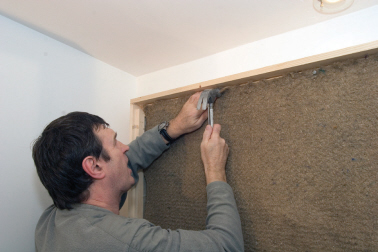
4. Attaching the heavy felt underlay.

5. Gluing a foam absorber panel to the ceiling.
Combining traditional foam absorbers with a broadband rear-wall trap seemed to be the way to go, again leaving some reflective space around and below the foam. The untreated plasterboard plus the door and window added sufficient reflection to keep the sound reasonably bright, while our hanging absorber and foam panels cleaned up the sound very nicely and balanced the reverberation spectrum.
Instrument Recording Space
There are countless documented examples of how a studio should be designed to accommodate the recording of acoustic instruments, including drum kits, but in the real world of the home/project studio you generally have to make the best of what you have, augmented by a little improvisation. Second-hand office dividers form a useful basis for constructing acoustic screens to provide separation between adjacent instruments. However, the thin foam covering they come with is only effective at speech frequencies. One cheap solution to upgrade their performance is just to hang a winter-grade polyester duvet or a few layers of blanket over them, although better solutions involve attaching mineral wool or foam absorption panels, as we described in Chapter Two. You can also improvise acoustic screens simply by hanging duvets, folded blankets or sleeping bags over clothes-drying frames, chair backs or spare mic stands, if you need to dry up the room’s acoustics and improve the separation between musicians playing at the same time. In combination with careful microphone placement, such simple measures can make all the difference to the quality of a recording.

You can fabricate simple DIY acoustic screens to achieve more separation between musicians playing at the same time, or even just improvise by hanging duvets, folded blankets or sleeping bags over clothes-drying frames or spare mic stands.
Reflective floors usually help in the recording of acoustic instruments, because most instruments are designed so sound best when played in that kind of environment. So if your studio room has a fitted carpet, laying a sheet of MDF, hardboard or plywood beneath the recording area, extending from the instrument to the microphone, will often help breathe a little life into the high end. We’ve even resorted to using readers’ melamine-covered tea trays and place mats to create a temporary reflective floor area when nothing else was available – and it really worked!
If your studio room is carpeted, laying a sheet of MDF, hardboard or plywood beneath the recording area, extending from the instrument to the microphone, will often help breathe a little life into the high end.
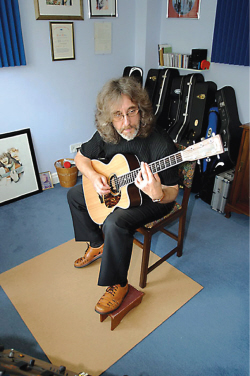
One often overlooked aspect of recording acoustic instruments is to try different parts of the room to find a ‘sweet spot’. In Chapter Two where we discussed acoustic treatment we explained how room modes, which are essentially resonances, can affect the bass balance of your monitoring. These same room modes also affect the way an instrument sounds in a room, and what the microphone captures. On one of our studio SOS visits, in which we were concentrating on acoustic guitar recording, our host was very surprised at just how dramatically the sound changed when using the same mic setup in different parts of the room.
Drums can pose a particularly difficult recording challenge in smaller rooms, as the detrimental effect of reflections from nearby walls and low ceilings is compounded when multiple mics are used. Close mics on individual drums can usually be positioned to give an acceptably dry, tight sound as the ratio of direct to reflected sound is fairly high – although you may still need to experiment with the kit position within the room to get the best kick and snare sounds because of those pesky room modes again! The overhead mics are more problematic, however, as they generally need to be positioned a metre or more above the height of the tom-toms which, in a domestic room, puts them so close to the ceiling that the strong reflections will cause significant colouration. We will look at a few possible workarounds in Chapter Ten, dedicated to drum recording, but most practical solutions involve placing absorbers between the overhead mics and those surfaces causing reflection problems.
Where the studio room itself is too small to allow much in the way of mic placement experimentation, we have had occasion to try recording instruments in different spaces throughout the owner’s house. This can be tricky if you’re working entirely alone, although a wireless keyboard can be useful for starting and stopping DAW recorders.
Although your vocals might sound more flattering to you when you sing in a tiled bathroom, the excessive reverberation is rarely appropriate to a contemporary music mix, but the same space might turn out to be well-suited to acoustic guitars, guitar amps, violins, wind instruments, hand percussion and so on, so it’s well worth getting yourself long microphone and headphone extension cables to enable you to audition bathrooms, stairwells, hallways and conservatories. Facing a guitar cab down a long corridor, for example, opens up the opportunity to try combined close and distant mic setups that may be physically impossible in a small bedroom studio. Communication with musicians playing elsewhere in the house shouldn’t be a problem as you can hear the performer via their instrument mic, and you can talk to them via a talkback mic routed to their headphones.
The tight, bright-sounding ambience of a reflective corridor or bathroom is well suited to acoustic guitars and some electric guitar sounds.
Where additional rooms are off-limits, we’ve resorted to putting loud guitar speakers or combos in a clothes closet along with the microphone, or building a tent over them using a clothes-drying frame and then heaping blankets and duvets on top – don’t do this with a tube combo, however, as it will get very hot! If your tube combo’s speaker is not hardwired to the amp, you could unplug it and use the speaker output to feed a separate cabinet to allow you to take advantage of these techniques. Similarly, we’ve put them behind sofas, facing into the back of the sofa with a duvet or two draped over the top to contain the sound. Because the duvets and blankets are fairly good sound absorbers, containing a guitar speaker in this way doesn’t usually make it sound too boxy, and it certainly removes any ambient room sound! More guitar recording approaches are examined in Chapter Eight and Nine.
Keyboards – Real and Virtual
We’ve written most of this book on the assumption that the reader is working with one of the mainstream DAW programmes, and therefore also utilising its bundled virtual instruments for any keyboard parts that are required. Many of these now offer superb audio quality and playability, and for most people who aren’t serious keyboard players, there is little reason to look elsewhere for keyboard sounds. Triggered via MIDI, either down a MIDI cable, or, increasingly, via MIDI over USB, virtual instruments generate their sounds in real-time within the DAW itself, and therefore there are no issues with capturing their audio. You may wish (or need) to bounce a real-time audio source into an actual audio track on occasions, in order to free up some processing resources, but even this presents no challenge in terms of creating the audio recording.
There may be performance issues, caused by a slow response (latency) if your DAW’s audio buffer setting is high, but most of the mainstream programmes now have a ‘low latency’ mode that temporarily disables processor-hungry plug-ins in favour of a faster response to help deal with this situation. The only other factor to think about with virtual instruments is their default output level, which is generally very high. If you want to leave enough headroom in your mix bus and have your virtual instruments balance well with audio tracks recorded at sensible levels, it is worth cultivating the habit of routinely trimming the virtual instruments’ output level settings by 6 to 10dB as soon as you load them up, and saving attenuated versions of your favourite presets.
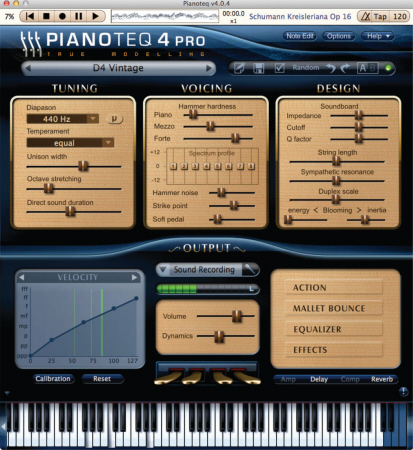
Unless you already have a collection of classic keyboards and the ability to record them well, you’ll struggle to create better results than those offered by the best software instrument plug-ins, or even the bundled virtual instruments that come with most of the popular DAW programmes.
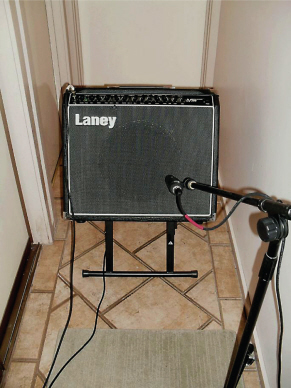
Recording hardware electric keyboards presents much the same challenge as recording a bass guitar, in so far as a straight, clean DI is often sufficient, but there will also often be instances when you also want the character of an amp/speaker combination as well, or instead.
With a DI’d signal you only really have to be concerned with level matching: if your keyboard requires a power supply, it will almost certainly have a low-impedance, line-level output. Set its output level control to about 75% and there should be no problems at all connecting to a dedicated line input or, by using a passive DI box, to a microphone input. Using a DI box has the advantage of allowing the input and output ground paths to be kept separate to avoid the possibility of a ground-loop hum problem.
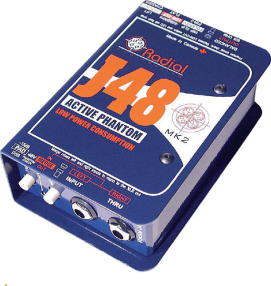
DI boxes provide level and impedance matching, but they also offer isolation of the source and destination ground connections, thereby minimizing the risk of ground-loop hum getting into the signal path.
If you are using an active DI box to feed the signal to a microphone input, however, you should look for the input attenuation switch and drop it to at least its first attenuation setting. The unattenuated setting on an active DI box is usually optimised for a passive instrument connection and may well be overloaded by the line-level output of an active keyboard instrument. Recording a line-level source is easy, but you can still get it wrong if you fail to understand the gain structure.
Using keyboards with amps requires recording via mics, but as you will probably only be doing this in the pursuit of ‘character’ in the sound, there really is no right or wrong. Dynamic mics will offer plenty of midrange punch, especially on electric piano, whilst ribbon and capacitor models will sound a little more open and balanced. The techniques are very little different than recording guitar amps, benefiting equally from treatment of the primary reflection areas and control of any major room colouration.
Acoustic piano recording is in many ways analogous to recording acoustic guitars, as discussed in Chapter Eight: the choices between detail or distance, and true stereo or spread spot mics, are actually precisely the same. Small-diaphragm capacitor mics are often preferred in this application, for their low off-axis colouration – piano presents a wide sound source, even when close-miked. The further back your mics are, the more of the room they will be ‘hearing’ and piano is such a familiar sound to most of us that excessive room colouration is particularly noticeable in piano recordings.
Treatment of the environment in all the ways described in this book will make a worthwhile improvement to the sound of a good piano in a poor room, but the pragmatic solution in the majority of home studios lucky enough to have an acoustic piano, is to close mic the frame about 12 inches back from the hammers with a pair of cardioid or omnidirectional microphones, and then create an artificial environment with a good-quality digital reverb.