
The ideal recording or monitoring room is one where the reflections and reverberation of all frequencies decay fairly quickly and at a similar rate, so that the sound remains tonally balanced. In a room with a lot of hard, reflective surfaces – wood, glass, tiles, polished concrete, etc. – the high frequencies bounce around a lot longer than the mid and low frequencies, and we perceive the space as being ‘bright-sounding’. Conversely, a room with a lot of carpet and soft furnishings, where the high frequencies are absorbed and therefore decay more rapidly than the low frequencies, will tend to sound warmer or perhaps even rather dull. The fundamental aim of acoustic treatment, therefore, is to try to control the sound reflections in a room in a way that maintains a good balance across the whole frequency spectrum.
Whilst a professional studio installation will incorporate some very sophisticated (and usually expensive) acoustic treatment and involve a lot of calculations and measurements, the reality is that even the sometimes very basic acoustic treatment we can install during a typical Studio SOS visit brings about a vast improvement when compared with the original untreated room.
Absorbing Sound
There are numerous ways of dealing with sound reflections in a room, the majority of them using what are known as porous absorbers – a porous absorber is one that allows air to pass through it, absorbing some of the sound energy from the air as it does so, leaving less energy to be reflected back into the room. Popular examples of porous absorbers are acoustic foam, mineral wool, glass fibre and woven blankets. However, the important thing to note about all of these materials is that the thicker they are, the better they are able to absorb low-frequency energy – because lower frequencies have longer wavelengths. Their effectiveness is also improved if they are spaced slightly away from their mounting surface rather than stuck directly to it, although where space is limited, fixing the absorbers directly to the wall will still be of value. Some commercial foam products even come with additional foam spacing blocks for this purpose. The technical explanation for the preference for spacing arises from the fact that there is no actual air movement immediately in front of a reflective surface, just variation in pressure, and, of course, an absorber that works by taking acoustic energy out of the moving air only works well when air is actually trying to move through it! To achieve maximum effectiveness with a porous absorber, you would locate it a quarter wavelength from the wall, as that is the region where the air molecules are moving most.
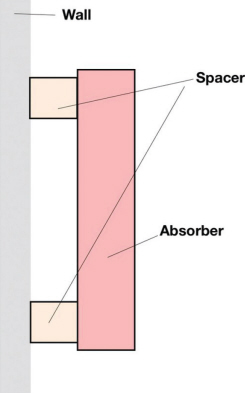
The efficiency of an acoustic absorber can always be improved by spacing it off the wall a little.
Although the physics behind all of this can seem rather complicated, the practical outcome is that to be optimally effective absorbers need to be a quarter wavelength thick (or more) for the lowest frequency you are trying to absorb. When you consider that the quarter wavelength of a 50Hz bass note is around 1715mm you can see you’d need a five-foot thickness of absorber to be effective, and although you could get worthwhile results by using a lesser thickness spaced five feet from the reflective wall, you’d lose a lot of floor area which ever approach you take! Of course, some reflected sound hits the absorbers at an oblique angle and therefore travels through a greater thickness of the material before reaching the reflective back wall. The practical outcome of this is that a given thickness of absorber still offers some useful attenuation below the quarter-wavelength frequency to off-axis sounds.
TIP : At 1kHz, a quarter of a wavelength is approximately 86mm while at 100Hz it is 858mm, assuming that sound travels at around 343m per second (it varies slightly with the ambient temperature and humidity).
Clearly then, purely porous absorbers are not entirely practical as low-frequency absorbers, although there are ways of deploying them to make them more effective than you might imagine without filling your entire studio with foam or mineral wool! Shallower acoustic absorbers can be very effective at mid and high frequencies and are very easy to implement, and there are other, more practical, strategies for helping to deal with the low end.
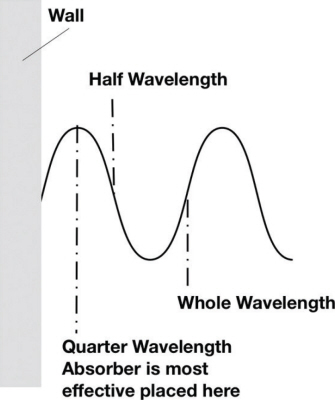
To be optimally effective, an absorber needs to be at least as thick as a quarter wavelength of the lowest frequency that you want to attenuate.
A panel of acoustic foam or mineral wool around 100mm thick and spaced 50mm or so from a wall gives useful absorption down to around 250Hz, although it is most effective above 500Hz. A 50mm foam or mineral wool panel fixed directly to a wall, by contrast, will start to lose effectiveness at somewhat higher frequencies and is only useful down to 750Hz or so, with the greatest effect being above 1.5kHz. While such absorbers do little to help control bass problems, they are vitally important in controlling those mid/high reflections that would otherwise cause colouration and blurring of the stereo image.
A number of companies make acoustic foam with profiled surfaces in the form of wedges, waves or pyramids. These probably make the foam more effective at intercepting sound approaching at an angle but they also reduce the average thickness of the foam and thus affect its efficiency at lower frequencies. However, if you can space these off the wall, the impact on low-frequency effectiveness will be lessened and the overall efficiency of the absorber improved.
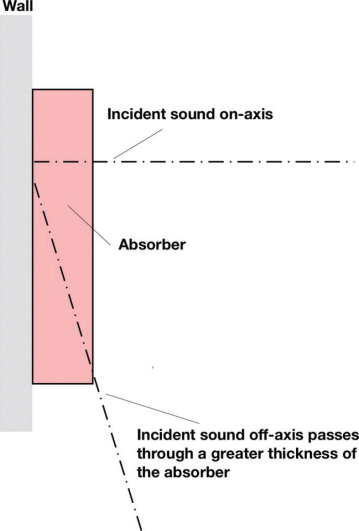
Off-axis sound actually travels through the absorbent material for a greater distance and is thus attenuated slightly more than directly incident sound.
TIP : While there are no acoustic problems in mixing and matching different thickness acoustic foam tiles from different manufacturers, beware that they are not all made to the same dimensions. Most American-made tiles are 2ft square, while European-sourced designs tend to be 600mm square. The difference is roughly 1cm in each dimension!
Where you don’t want to glue the foam permanently to a wall, you can attach it to a ply or MDF panel and hang it as you would a picture frame. However, if you choose a heavily perforated board (such as the type designed to cover domestic radiators) rather than a solid one, you can space the panel around 50mm from the wall using wooden or foam blocks behind, to improve its low-frequency efficiency. (There would be no advantage in spacing it from the wall if you used a solid backing board as that wouldn’t allow sound waves to pass through.)
Acoustic foam panels often have a profiled surface to increase their efficiency at high frequencies, at the expense of some low frequency performance.
TIP : If gluing acoustic foam tiles to walls, be careful to use a spray adhesive specifically designed for the job. Many forms of adhesive will dissolve foam, destroying your expensive acoustic tiles in seconds!
If spacing the foam away from the wall is not essential, as may be the case with thicker foam, you can also hang it ‘picture-style’ by gluing an old CD to the centre of the top rear edge and then hanging the hole in the CD over a nail or screw placed in the wall. This is a good solution for working in rented accommodation as gluing directly to the wall invariably damages the wall surface when you come to remove the tiles. We’ve also used the picture rails in those older houses that still have them, by hanging the panels from metal hooks designed to hang on the rail’s profile.
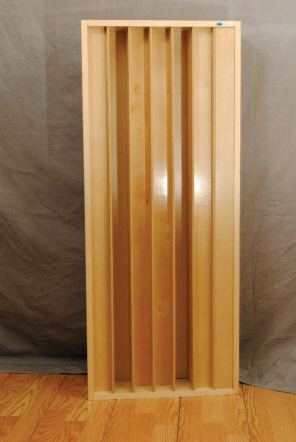
A commonly used alternative to acoustic foam is mineral wool; the rigid type sold for cavity wall insulation (often in 600 x 1200mm slabs, 30 or 60mm thick) is both inexpensive and very effective as acoustic treatment. Multiple layers can be used to build up the desired thickness, but even a single layer of 30mm material makes a useful mid/high trap if spaced away from the wall. In theory this dense 60kg per square metre grade may not be quite as efficient at absorbing higher frequencies as the slightly less dense 45kg per square metre variety, but we’ve found it to be adequate in practice and it is much easier to handle than the less compacted forms.
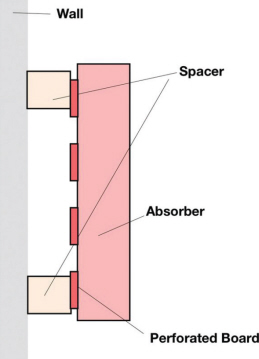
If you use a backing board to space foam panels off the wall, the board must be perforated, otherwise the foam will perform just as if it were mounted directly on to the wall.
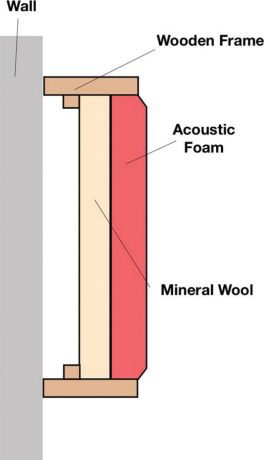
A good-looking, easy-to-make absorber can be created by layering an acoustic foam tile on top of a slab of mineral wool.
On several of our Studio SOS missions we’ve built traps that combine inexpensive mineral wool, to provide the bulk of the absorption, with a thin acoustic foam panel mounted on the front to provide a more cosmetically acceptable finish, and to prevent mineral fibres from breaking free. The foam also adds a little more thickness to the absorber to extend its effective bandwidth slightly. This type of trap is affordable, looks very professional, and is very simple to make. Our design utilises a simple wooden frame 100 to 150mm deep with the mineral wool slab set back by a few millimetres from the front edge. The mineral wool is held in place by wooden battens pinned into the frame directly behind it; this arrangement leaves a useful air gap behind the mineral wool. The acoustic foam is then glued directly onto the mineral wool using a light spray of the contact adhesive supplied for fixing foam tiles and, because the mineral wool is set back a little way, the edges of the foam can be tucked inside the frame to give a neat finish.
A more cost-effective DIY option for those on a tighter budget is to use the same mineral wool slab fixed in a wooden frame again, but this time positioned flush with the front edge, and leaving an air gap of 25 to 75mm behind it. The whole frame can then be covered with a thin, porous cloth, held in place using staples around the back of the frame.
Note that mineral wool should be handled carefully to avoid exposure to the loose fibres that can cause irritation to the lungs and skin to some people. Spraying the surface lightly with a very dilute (1:4) mix of PVA glue and water can help to prevent shedding of surface fibres without affecting the acoustic performance of the mineral wool. Commercial absorbers are often covered with an acoustically transparent fabric called ‘Cara’, but while this looks very good and is available in many colours, it can be quite expensive. The cheapest suitable covering we’ve found is the black, weedcontrol, treated paper sheet available from garden centres. It looks surprisingly good and is completely breathable, although it isn’t very tough for use in high traffic areas.
Some commercial acoustic panel manufacturers now prefer to enclose the mineral wool in very thin polythene bags prior to use. Most of the sound will still be absorbed by the mineral wool because the thin polythene is able to move slightly when sound waves hit it, recreating the air movement from one side on the other where its energy is absorbed by the mineral wool. Although a small amount of very high-frequency reflection also occurs from the polythene, most of that will be taken care of by the covering fabric.
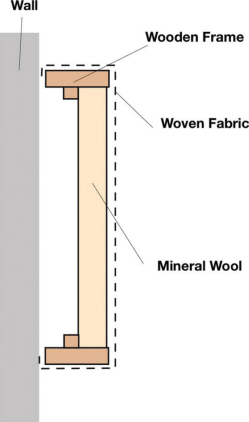
A simple mineral wool absorber can be given a professional look by attaching a breathable fabric covering to the frame.
Carpet, Egg Boxes and Other Myths
From what we’ve said about the relationship between thickness and the lowest frequency that can be absorbed by a porous absorber, you’ll now see why sticking carpet directly to walls in the hope of providing cheap and attractive sound absorption is just not going to work. Carpet is too thin to be effective at frequencies lower than several kHz. When a studio is lined only with carpet on the walls, the carpet absorbs the very high frequencies but leaves the midrange and low end completely untreated. That, in turn, leads to the mid- and low- frequency reflections dominating the acoustic of the room, making it sound boxy and dull. Remember, in our ideal room all frequencies should decay at an approximately equal rate.
In fact, we have visited a number of studios treated with carpet glued directly to the walls and they have all exhibited a dull, boxy sound, just as theory predicts. The only way to rescue such a room without stripping away all the carpet and starting again is to add some high frequency reflective material to try to rebalance the tonality of the room, and if possible introduce some additional mid- and low-frequency absorption to help dry up the lower. Any thin, rigid hard material will reflect high frequencies, so carpeted rooms can be rescued by the application of some MDF, glass or perspex panels, in conjunction with some more effective mid-range mineral wool or thick foam absorbers.
However, if you have a lot of spare carpet, or particularly like the padded-cell look, you could use a thin, porous carpet (not a rubber-backed one!) to provide an acceptable cosmetic front to DIY absorbers based on mineral wool or other suitable material, mounted on the walls. We’ve seen very attractive and effective studio acoustic treatment where entire walls have been covered in deep mineral wool absorbers, which were hidden from view by being covered with a porous carpet to give a neat, hardwearing acoustic wall!
Carpeted floors, however, are not particularly problematic – and we’ll get to egg boxes later!
Case Study – CD Distribution!
Picture frames with glass fronts, or mirrors, combine useful acoustic reflection with decoration, and this is something we used when fixing up one carpet-treated studio: in this instance, the walls of both the control room and live performance space were completely covered in thin cord ‘contractors’ carpet. However, a few picture frames were insufficient to produce a large enough reflective surface to redress the balance so additional hard surfaces needed to be added. We’ve used the thin, rigid plastic-foam panels designed to be used beneath laminate flooring to good effect, and also thin MDF sheets. We’ve even had success sticking old CDs inside over-absorbent vocal booths to bring back some high-frequency liveliness. Once you’ve correctly analysed what the problem is, it is usually fairly easy to improvise a solution, as any hard material will reflect high frequencies reasonably well. The trick is to spread out the reflecting panels rather put them all in the same place, as you may need to cover up to 50% of the wall surface to put some life back into the room.
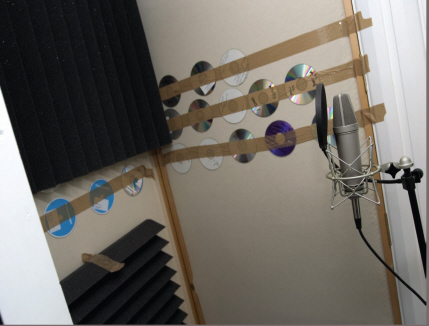
A small vocal booth with too much high-frequency absorption can be brought back to life with some improvised distributed reflective surfaces – unwanted CDs are ideal!. We taped them to the wall as a temporary measure to find out how many it would take to do the job and where best to site them!
As we have established, most good-sounding rooms have a decay time that is nominally similar at all frequencies, although it is acceptable for the low-frequency decay time to be slightly longer as very low frequencies are difficult to absorb. Technically, the term ‘reverberation’ (or ‘reverb’) isn’t really applicable to very small rooms as the sound reflections never manage to build up into true reverberation, but the various resonances within the room do mean that different frequencies take different times to decay.
The average decay time for a studio space across all the frequencies will vary enormously depending on the size of room and its intended application. A concert hall will have a fairly long reverb time – typically between one and two seconds, designed to flatter the sound of an orchestra – whilst a contemporary music studio will have a much shorter decay time that sounds ‘live’ without having any dominant resonances (usually less than one second). A studio control room, or radio/ television voice-over booth, by contrast, will have a very short decay time, perhaps around 0.6 seconds or less. The decay time of a reverberant space is often specified as its RT60, which is the time it takes for a sound to decay in level by 60dB.
Less Effective Solutions
Other near-useless ‘absorbers’ that we have seen set up in studios we’ve visited include expanded polystyrene panels, which actually reflect high-frequency sound, and canvascovered mineral-wool absorbers where the canvas has been painted for decorative purposes making it more or less airtight! You’ll remember that an absorber can only work if air can move through it, and whilst painted canvas will still pass some sound, its heavy weight means that the performance of the absorber will be much less efficient and quite unpredictable, with the painted surface likely to reflect more high frequency energy than is desirable.
Open-plan-office dividing screens can also seem an attractive, ready-made solution for general acoustic treatment, or for screening off instruments to gain better separation when recording. However, most of these are designed to offer only modest absorption, primarily at voice frequencies – mainly above about 2kHz. Their effectiveness can, however, be increased by draping heavy blankets or duvets over them, or you could simply glue acoustic foam panels directly to one side.
Then there’s also the old egg box myth! Egg boxes don’t help at all with soundproofing (which is a very different subject from acoustic treatment and will be discussed later), and their rigid surface doesn’t do much in the way of absorbing either. Their shape makes them marginally useful as diffusors (discussed in the next section) but the indentations are too small to make them effective even for this purpose other than at fairly high frequencies. There are far better solutions for diffusing sound, and let’s face it, egg boxes don’t look very professional!
Flutter Echo
Clap your hands when standing between two closely-spaced parallel walls with untreated hard surfaces and you’ll hear a noticeably resonant ringing sound following the handclap. That is flutter echo in action! In addition to reflecting sound from the speakers back to the listening position, sound will also bounce back and forth between the walls. Fortunately, it is relatively easy to deal with flutter echoes by using absorbers, as already discussed, or by creating a deeply irregular surface that scatters the sound equally in all directions, rather than directly back where it came from.
Scattering
When deliberately introducing high-frequency reflective areas it is preferable not to use large flat surfaces parallel to the walls. This is because their influence on the sound, and particularly on the stereo imaging, can be disruptive, especially if they are close to the monitoring position. Although multiple small flat panels are OK for a quick fix, it is usually better to use areas of curved (convex), angled or irregular material if possible as this helps to diffuse or scatter the reflected sound rather than bouncing it straight back like a mirror. Pursuing our mirror analogy, you can think of diffusion as replacing a normal flat mirror with a surface made up from irregularly fixed mirror tiles at different angles, forcing it to reflect in a random way. We have successfully used old CDs as small reflectors, but you can use thin wood strips, or small plastic or metal items, as the aesthetic requirements dictate. Split logs can be good too, as their curved surface scatters sound very effectively. There are also, of course, a range of elaborate commercial diffusers that work well and look great, but they tend to be quite expensive. It is possible to build your own diffuser by gluing wooden blocks of different lengths to a back board, but a shelf full of gear, books and CDs often works almost as well – provided they are randomly distributed – and may be a better use of space in the smaller studio.
The distribution of shapes and spaces in a commercial diffuser is carefully calculated for optimum results, using complex mathematical formulae, but that doesn’t mean you can’t achieve worthwhile results with something a bit more DIY.
Commercial studio designs may use angled wall panels as well as non-parallel walls and shaped ceilings to divert reflections away from the listening position. As a rule though, this only works well in large rooms and involves a lot of design expertise and expensive building work. Most of us have to make do with domestic rooms or converted garages with parallel walls.
Bass Traps
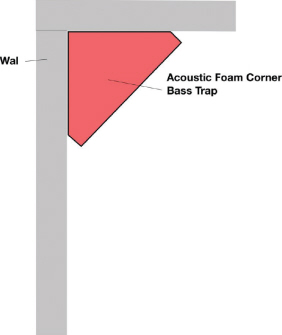
Low frequencies are the hardest to deal with, because of the relatively high acoustic energy involved and their long wavelengths. Simple absorbers generally need to be very deep to deal with low frequencies effectively, as we have already explained, which isn’t usually very practical. However, it is possible to use corner absorbers to help smooth out the lows without taking up too much floor area, and we’ll come back to that technique shortly.
If you look at traditional acoustic design textbooks you’ll often find so-called ‘tuned’ traps recommended for controlling room modes, and these are essentially tuned resonant chambers designed to absorb only around a specific narrow range of low frequencies. If you have only one or two prominent room mode hot spots then this can be a very effective solution, but these traps are notoriously difficult to get right as any variation in dimensions or material specifications can result in them absorbing at a frequency outside the range you wish to deal with. We have yet to use tuned traps on a Studio SOS job as we generally have only one day to address the problems we find.
Broadband Bass Traps
The simplest bass traps to build for the home studio owner are broadband traps using simple absorbing material, or a combination of absorbing material and ‘limp-mass’ absorbers (see below). These can be effective, and because they are broadband, no calculations are involved. The principal low-frequency room modes are ‘anchored’ in the corners of the room making the space across corners the most effective place to put bass traps.
You may have seen commercial foam wedges that fit into corners and these can be useful when the problem isn’t too severe. They can be placed in any corner but, as with all acoustic treatment, it is best to keep the layout reasonably symmetrical from left to right, if possible, as they will also absorb mid- and high-frequency sound. If the vertical corners of the room are unsuitable for whatever reason, you can also utilise the corners between the walls and ceiling or even the wall/floor corner behind your mixing desk. Ideally the traps should run the full length from floor to ceiling or, if fitted to the wall/ceiling junction, across the full width and/or length of the room. The thicker and larger the foam used to form the corner trap, the lower the frequency to which it will be effective, but the length of the trap is arguably equally important as this design relies on a long length of trap presenting a greater ‘depth’ of foam to waves approaching from an angle rather than simply square-on.
Commercial foam bass traps can be expensive but a DIY alternative is to build a frame that holds a standard 600 x 1200mm high-density mineral wool slab diagonally across a corner, then fix several of these across the corners to fill the desired space. The triangular void behind the traps can then be filled with lower density mineral wool or standard loft insulation – but acoustic foam offcuts or even old blankets will help (but ensure you use fire-retardant materials for the sake of safety). If you have some old furniture foam you’d like to use, check that it is porous by trying to blow through it. If you can blow through it fairly easily, it is porous. If not, it may be the type with sealed cells rendering it useless for acoustic treatment.
Rooms with unused alcoves, fireplaces or ceiling voids may provide you with space to add deeper absorptive traps made from compressed mineral wool. In the bedroom studio you can sometimes get a useful amount of ‘free’ bass trapping by storing unused bedding on top of wardrobes and also by leaving the doors of well stocked wardrobes open. Mattresses and sofas also provide a degree of useful trapping, though you need to let your ears be the judge if it is enough. We’ve even created instant bass trapping by stacking rolls of loft insulation in room corners, still in the original polythene packing. The polythene allows most of the bass energy to pass through so you still get a worthwhile degree of bass absorption.
This type of trap is most effective when occupying the full height or length of a corner.
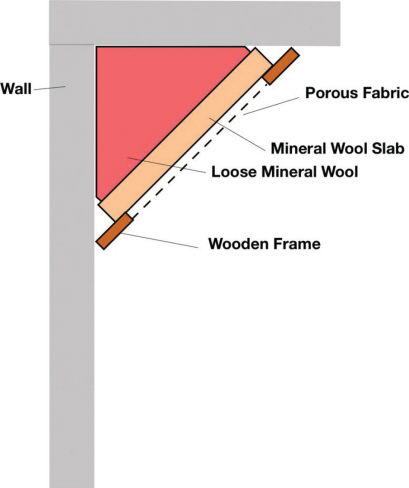
An affordable, DIY bass trap can be created by building a frame to hold a high-density mineral wool slab diagonally across a corner.
Limp-mass Absorbers
Limp-mass Absorbers are a form of ‘membrane’ absorber often constructed from a material known as ‘barrier mat’ or ‘sheet rock’. This is a flexible but incredibly heavy, mineral-loaded material that is physically not unlike very heavy linoleum (but more expensive!). It is typically 10 or 20kg per square metre and the best type has a fabric reinforced backing to prevent it from deforming under its own weight.
The idea of a membrane absorber is that the sound wave energy is absorbed through frictional losses as it tries to move the membrane. Some system use aluminium foil between sheets of mineral wool, others use forms of polythene in a similar way. The materials and the design determine the frequency range affected. Barrier mat absorbs low frequency energy quite efficiently if you hang an area of this material in the path of the sound wave, because as the sound energy attempts to force the sheet into vibration, the heavy selfdamping nature of the material absorbs much of the energy through frictional losses. I like to visualise the process as the difference between someone trying to bounce a tennis ball off a solid wall, then trying the same thing against a heavy carpet hanging on a washing line. Because the carpet ‘gives’ and absorbs some of the energy, the ball doesn’t bounce far after hitting the carpet whereas it would bounce a long way after hitting a solid wall. The heavier the ball, the less bounce there would be, and similarly with barrier mat; the lower the frequency, the more effective it becomes.
While limp-mass absorbers are effective at absorbing low frequencies, they still need to be spaced as far from the wall as possible so that they are in the zone where air movement occurs rather than in the pressure zone next to the wall. A distance of 200mm or more is desirable although you can also use this material across corners. The traps also need to cover a large area so that they interact with as much of the low-frequency wavefront as possible – a perfect bass trap of this type can be no more effective than the same area of open window. The nature of the material also means that the surface is also fairly reflective at higher frequencies, so it makes sense to hang them behind foam or mineral-wool absorbers if you want to create a full-range trap.
During the course of our Studio SOS series we’ve used barrier mat ‘curtains’ hung behind mineral wool-based wall traps, and also behind mineral wool fronted corner traps. We also used it in the construction of a couple of vocal booths to improve low frequency absorption in conjunction with hanging curtains of carpet felt in front of the barrier mat to soak up the highs. It is important to leave space for the barrier mat to hang freely and to secure it along the whole length of the top edge due to its heavy weight. As a rule, the heavier the barrier mat, the more effective it is at low frequencies. This material is also very useful in soundproofing applications where it can be laid directly onto a floor or sandwiched between other building materials such as plasterboard, chipboard and so on, to reduce the transmission of low-frequency sound through the structure.
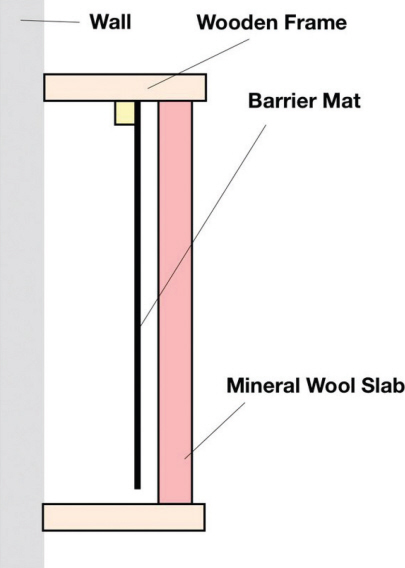
You can create a full-range trap by hanging a barriermat trap behind a layer of mineral wool, as the low frequencies will pass through the mineral wool layer.
In small studios where the rear wall is close to the engineer’s seat, a good strategy is to try to make the whole of the rear wall, or at least the centre section of it, into a full range trap around 200mm or more deep, and using barrier matting in conjunction with mineral wool, carpet felt, or foam is the most effective and simple way of achieving that.
Low frequencies are reflected most effectively from solid walls made from dense fixed materials such as stone, brick or concrete. Stud partition or ‘dry-walls’ made from plasterboard fixed to wooden studding inevitably allow some bass to pass through the wall. However, a lightweight wall also has some ‘give’ and draws some energy from the sound wave as the sound energy tries to force the material into vibration. This means that home studios set up in rooms with dry-wall construction have an advantage from an acoustic point of view, although they may not be so good from the sound leakage perspective. Dry-wall can also resonate, returning some sound back to the room, so adding a second plasterboard sheet bonded to the first with a resilient glue layer can greatly reduce the problem.
Windows and most domestic doors are also too thin and flexible to reflect much bass energy, so much of it passes though. Obviously, if some sound energy passes through a surface it can’t then be reflected back into the room, so although you may face other issues relating to sound isolation and annoyed neighbours, from an acoustics perspective you’re better off than someone working in a very solidly built room or in a basement!
Some soft-furnishings and other items of furniture also provides accidental bass trapping, which is why it is so difficult to calculate the acoustic treatment required for small rooms. Fortunately, you can’t have too much bass trapping as the overall level of bass put into the room by the loudspeakers isn’t significantly reduced by the process. Bass trapping is all about reducing the reflection of low frequencies that would otherwise augment or cancel the direct sound from the loudspeakers. It doesn’t take bass out of the room – it stops the bass from bouncing around inside the room in unhelpful ways! The main difference you’ll notice when the amount of bass trapping is sufficient is that the bass notes in a piece of music now sound much more consistent in level, whereas in an untrapped or inadequately trapped room some bass notes may sound very loudly whereas others are virtually inaudible.
In addition to the acoustic foam panels and corner wedges already described, there are numerous commercial traps that combine the benefits of porous and membrane absorbers. These tend to be around 100mm thick and often work best when placed across corners as this improves their ability to trap low frequencies. There are also free-standing panels that can be deployed in the control room or used as movable absorbers in a live room. Often the manufacturers have websites where you can find out how much treatment you need for any given size and shape of room, and some even let you feed in your own room specifications and they’ll work out a solution for you. Many of these companies provide lots of additional background information on their websites about the principles of acoustic treatment, making them a valuable free resource.