
Digital ‘post-production’ is now a standard procedure for most digital wedding photographers. But because image manipulation and enhancement can be beguiling, it’s easy to get too involved – leading to wasted time. What you need is a good ratio between time in and value out. Every minute spent in Photoshop must be rewarded with a corresponding income.
So you should question everything you do, measure the time it takes you to complete tasks, assess the finished results, and ask yourself, ‘Could I charge more for my pictures if I spent more time working on the files in post-production?’ Equally valid isthe question, ‘If I cut the time in post-production, would it affect the amount I can charge for the prints?’ There are obvious ‘no value added’ stages in any workflow that need careful scrutiny to achieve optimum efficiency. When you are dealing with a thousand or more files with each job, it’s easy to waste time on nonessential or duplicated tasks. You need to protect the integrity of the files, back up the right data, and avoid repeating the same tasks on the same image.

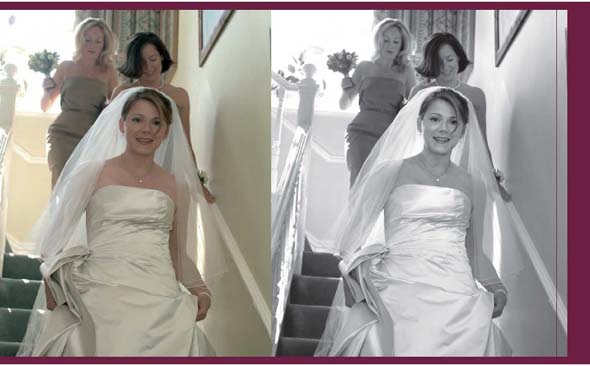
Fig. 2A & B ISO 800 f/4 at 1/360th
This file needed just minor tweaks to become wanted by the bride. Marko tucked the bodice back to meet the bride’s chest and removed the nails from the back wall before adding an overall punch to the picture
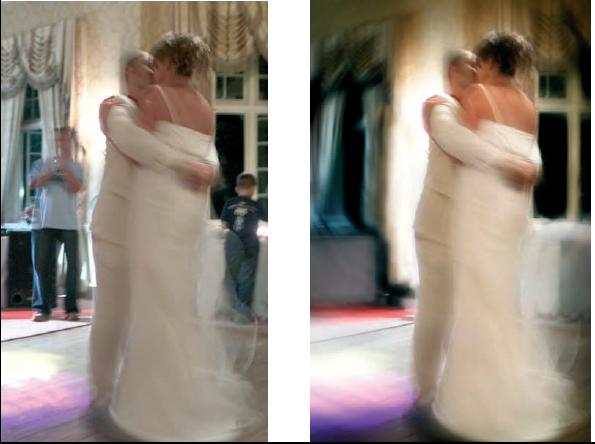
Fig. 3A & B ISO 800 f/4 at 1/2
This dancing shot was void of any endearing qualities so a little help in post- production was needed to prepare it for the viewing and subsequently the album too
Here’s another time-saving tip: never hang around waiting for the computer. If you keep seeing the hour glass (PC) or beachball (Mac) it’s probably time to upgrade your computer, buy it a bigger memory chip, or review any processor-intensive tasks. Time is money, or in some cases, the difference between having a life or not.
As for the more mundane jobs, there are many ways to do most of the picture editing or sorting tasks. But you need to ask whether the methods you use are the quickest and produce the best results? Explore alternative systems rather than just sticking to what you know. Having an open mind will lead you to time - saving opportunities like programming the function keys on your keyboard or using actions and scripts more effectively. When I started using Photoshop back in version 3, I used the color balance, levels, and brightness/contrast controls. On version 9, Marko and I use the curves tool to do all these tasks and more.

Fig. 4A & B ISO 800 f/4 at 1/250th
This beautiful bride wanted some complexion softening and a smaller nose. It is important for our clients that their true character remains. Over blurring of skin can ruin a picture
camera change. That happens about every 2 years. At that point, the old editing machine becomes the new server, the old server becomes the new admin computer, and the old admin computer becomes the new home computer and so on. So with one upgrade everyone is happy. We started shooting weddings digitally on 3. 2 megapixel cameras, then after 2 years we moved on to 6 megapixel cameras. This change doubled our data processing. Now we are shooting on 12 megapixel and 22 megapixel cameras and the amount of data processing has quadrupled again. Next time you look at increasing the pixel count on your cameras remember to review your image processing and storage capability at the same time.
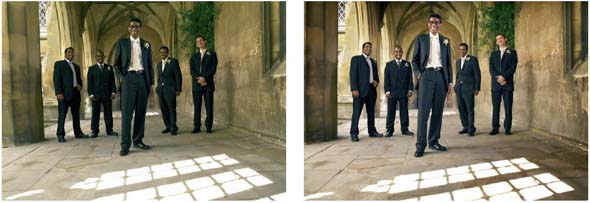
Fig. 5A & B ISO 200 f/6.8 at 1/60th
This Phase One file had a slight green cast when it was processed from RAW. Marko sorted the color, the tonal range, and the verticals in Photoshop. Just 90 seconds was all that was needed to prepare this picture
Let’s take a look at our workflow for a typical wedding. Julie and I shoot between 1000 and 1200 pictures on the wedding day. We usually start the download process to a small 120 Gb bus- powered USB2 drive at the wedding in the evening. We create a new session on the drive using Capture One software and the Compact Flash cards are downloaded one at a time. This process is completed in our hotel room after the wedding or at home the next morning.
Capture One is well scripted and produces instant previews of our R AW files. But there are a growing number of alternative R AW file processing and organizing software solutions available. Apple Aperture and Adobe Lightroom are the two new big players. I regularly assess each of these to check whether there are significant image quality, usability, or speed gains over Capture One that can be integrated into our workflow. New software costs money, but if it fits well with your working practices, it could well pay dividends in increased efficiency and time saved.
Once all the cards have been downloaded we have two copies of all the pictures. One copy is on the 120 Gb hard drive and the other is still on the Compact Flash cards. It is a good principle to have more than one copy of your work at all times. Julie then spends about 3 or 4 hours the next day using Capture One to select the 350 or so files to keep and writes notes for Marko for the pictures that require combining. The selection process is made using the tagging tools in Capture One. The unselected files are dragged to the trash folder within the session. Marko, our picture editor, then plugs the hard drive into his computer and adjusts the image settings on the ‘keepers.’
It is worth bearing in mind that all our screens are calibrated with a Gretag Mcbeth Eye One device. Marko’s screen – a 22 in CRT – is the best quality we have.
First of all, Marko arranges or sorts the files by size. This separates Julie’s and my shots as we use different cameras. He sets a global change to all of Julie’s files to increase contrast and remove a slight warm cast. Then he selects my shots and adjusts the film curve to minimize the differences between the two cameras. Next, he arranges the files by capture date. (When we prepare the kit before a wedding, we always synchronize the clocks on all our cameras including the spare bodies.)
With the files now sorted chronologically, Marko makes the changes necessary to ensure a great, consistent-looking set of images. This process takes about 2 hours for the 350 or so pictures. This process could be done more quickly but with less accuracy. Marko ensures all the detail we need in the files is present and the color is spot on, which saves time in Photoshop later. These settings are saved on the run by Capture One and are stored in the session ready for use at any time. The whole set of images can be processed on any of our computers that are available. Our server has plenty of processing power to spare so we usually get this computer to do the processing for us, leaving Marko’s machine free for other tasks. We process the files to JPEGs at the highest quality, 100% size, 254 dpi, and with the Adobe 1998 RGB color profile.
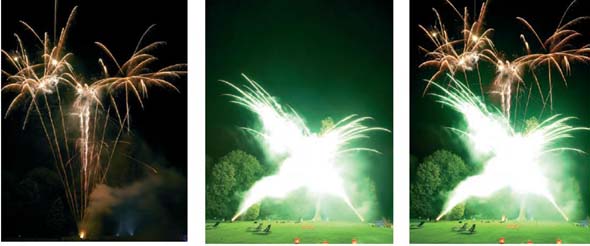
Fig. 6A–C ISO 400 f/8 at 1 and 3 seconds, respectively
Sometimes it is necessary to combine firework pictures to get a true reflection of their intensity. Here, Marko used a lighten blending mode in Photoshop to quickly merge these separate frames
’Why JPEGs?’ I hear you ask. ‘Why not?’ is my reply. JPEGs are the most universally accepted digital image format. You can do anything with a JPEG, use it online, in spreadsheets, page layout programs, image editing software, on iPods and so on. TIFFs on the other hand are about eight times the size, and less versatile. Our aim at this stage is to get a set of color accurate‘digital negatives’ that hold all the detail information we need. All the JPEGs will fit on one disk for archiving. There are otheradvantages of JPEGs, as you will discover. One such advantage is time saving when each of the files are opened in turn to do further editing or when the files are written to DVD. With in-camera image-processing becoming better all the time there is a lot to be said for capturing in JPEG from the start and missing out the raw conversion work all together. Many of the world’s finest wedding photographers use a JPEG capture system, and for very good reasons. My Phase One P25 digital back only captures in RAW hence we are forced to use a RAW workflow.
Once a set of JPEGs has been created, Marko combines the files that need ‘head swaps’ or merges the files he has processed twice for high dynamic range reasons. An image with high contrast can be processed in Capture One twice with very different exposure settings, one dark and one light. By opening both images in Photoshop and dragging one on top of the other while holding down the shift key, you get a two-layer image in perfect register. By painting with black in a mask on the top layer you can reveal the detail from the layer below, thus combining the two images.
Marko then passes the final set of JPEGs – still on the same120 Gb drive – to Julie who loads them into Iview Media Pro, building big previews at the same time. JPEGs load quickly and easily in Iview Media Pro, and within minutes, Julie is able to drag and drop the images into the final order that we want to show them to the client. The files are nearly in the correct order already because she has chosen to sort them by capture date. Some pictures were taken out of sequence; the table settings for instance and others will be jumbled especially the ones taken earlier in the day. Julie may remove a few ‘similars’ too.
Once Julie is happy that the set of images is in the correct order, she will renumber them like: smith001.jpg to smith350.jpg using the batch rename command.
The resulting set of JPEGs is considered our ‘digital negatives’ folder and from now on the file names of all images will stay the same. Julie backs up this set of JPEGs onto one DVD and that gets stored at her parents’ house as the ‘official’ off-site backup. The Compact Flash cards are then cleared down and the JPEGs are copied onto Marko’s main external computer drive. This is a1Tb raid formatted, Firewire2 disk array.
If we ever need to return to the original JPEGs, we know that all the detail is there and the color is right. All the RAW files except the ‘trashed’ ones get thrown out at this stage. You may decide to keep your RAW files, it’s up to you. We only keep the trashed RAW files until after the viewing when they too finally get thrown out if the client is happy with our coverage.
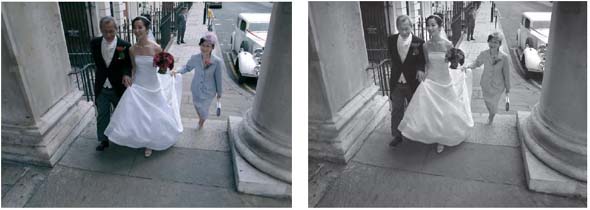
Fig. 7A & B ISO 400 f/5.7 at 1/250th
Just a few simple adjustments helped this picture. Some correction of the verticals and a tidying up of the background was dealt with before the black and white version was created
The next process is to bring the 350 or so chosen pictures to life. Marko does this using our ‘speed editing’ technique. Speed editing involves opening the JPEGs 10 at a time and working on selected areas using curves to add drama and a little cosmetic retouching. Occasionally some files need perspective correction or a little tidying with the clone tool. The aim is to get the pictures to 95% of their potential within 2 minutes each. Some will need 5 minutes while others are fine straight from Capture One. Over 2 days the whole set will be transformed by Marko. Each file is saved as a layered 8-bit TIFF. When Marko decides to make a file black and white, the color image is edited first, then it is duplicated on a new layer before making it monochrome using the channel mixer. Keeping the layers separate ensuresboth color and mono versions are always available within the file without further editing. Any effort put in at this stage to improve the pictures is reflected in the value of the whole set. Having a consistently good set of images at the viewing will result in a big order. We never show a picture that is not flattering, so cosmetic changes always get done before the viewing.
Once all the image enhancements have been done, an action is run on the edited set to create a set of viewing files. A viewing file is made using Photoshop’s ‘auto fit’ function to match our projector’s resolution of 1280 pixels by 1024 pixels. It is flattened, sharpened, and has a 2 pixel white stroke applied to the inside edge before being converted to the standard RGB (Red Green Blue) color space. The next part of the action saves the files as JPEGs at quality 12 in a new folder. The folder of JPEGs is then loaded in a new Iview Media Pro catalogue ready for the viewing. Each viewing file is between 1 and 2 Mb in size. These small files require less processing by the viewing room computer when making slideshows on the fly than full resolution pictures. This allows both smooth transitions and fast full screen previews during the viewing process.
For the viewing session our aim is to create separate sets of images for each of the wedding albums and picture frames ordered. We use the ‘catalogue sets’ feature in Iview Media Pro for this purpose. Unlike tagging, catalogue sets allow each image to be in as many places as you want. We may have as many as seven sets after a viewing:
-
Bride and groom’s album
-
Bride’s Mum’s album
-
Bride’s Dad’s album
-
Groom’s parents’ album
-
Multiframe for the kitchen
-
Folder prints for thank you gifts
-
Internet set for upload to our site
-
Delete set, images never to be seen again.
Any additional editing requested by the clients at the viewing will be carried out on the high-resolution files. Occasionally, there will be requests for Marko to do his magic: straightening teeth, dropping dress sizes, putting hair back on the men, or taking years off the bride. This, along with other editing Marko sees fit, will be done prior to creating any album designs. Marko will only do further work on the files that have been bought. The album sets will be recreated with the high-resolution files by duplicating a selection of the original edited files into newly named folders.
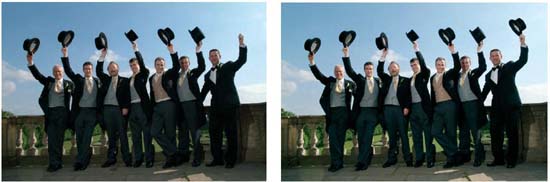
Fig. 8A & B ISO 200 f/16 at 1/125th
The ushers were all in morning suit and one of the men was in a dinner jacket and without a hat. I asked him to pretend he had a hat and Marko did the rest back at the studio. I lit this picture with a splash of flash and as my flash sync speed on my Fujifilm S2 was just 1/125th I had to use f/16 to get the required exposure
Marko now designs the albums for the clients using Jorgensen Album Designer (JAD). Once the layouts have been created he emails the clients with PDF versions of the plans for approval. After any required changes to the album plans have been made, Marko uses JAD to output the printing files as complete sheets for each page. The pages go through another Photoshop action to prepare them for print by our lab. This action shrinks the files very slightly to compensate for linear gains in the print process. It also sharpens the images and applies a small color balance tweak and finally a gamma adjustment using curves before saving each file as a flat sRGB JPEG. Each digital output device has its own characteristic. We create a new action for each device or lab we use to ensure we are getting the same look in our prints that we have on our calibrated cathode ray tube(CRT) screens. Our printing files are sent to our lab over the Internet using FTP software.
Most commercial labs enlarge images to give their paper cutters some bleed to trim. If your album designs have print borders revealed under the overlays, or multiple images whose layout position is critical, the size of the borders and position of the prints on the page will vary unless some pre-shrinking has been applied to the files.
Once all the printing is complete, the job goes through to the album and frame construction phase. The digital files for the job get archived to DVD and the 1Tb hard drive eventually gets cleared down. The archiving is the last very important step in the post-production workflow. We archive the following files:
-
The original untouched JPEGs (our digital negatives).
-
The edited high-resolution multilayer TIFFs.
-
The Iview Media catalog from the viewing.
-
The JAD album designs.
These files are about 20 Gb in total and fit on four or five DVDs. The DVDs are consecutively numbered and their contents are entered in our dedicated Filemaker Pro database. We currentlyarchive about 1Tb of data each year. We periodically spot-check our archive to ensure there is no deterioration of the data. Even our 10-year-old CD-Rs seem fine at the moment. All the disks are stored in a cupboard in the studio, and each disk is in a paper sleeve with a clear acetate window. Our backup disks containing the ‘digital negatives’ are at Julie’s parents’ house for safekeeping.
Other systems to consider when designing your back-up procedure include: using fireproof safes, magnetic tapes and readers, hard drive arrays, and online server space. Alternatively, if your product includes all the files at high resolution on disk, you could of course let your client take care of their own archiving.