The Finder is Mac OS X's built-in tool for managing files, folders, and drives. The Finder runs all the time Mac OS X is running, and is a vital tool for getting things done in Mac OS X. This chapter shows you how to perform essential tasks in the Finder.

Understanding Where to Store Files on Your iMac 68
Using the Finder's Four Views Effectively 70
Look Through a File without Opening It 72
Search for a File or Folder 74
Save a Search in a Smart Folder 76
Create and Name a New Folder 78
Copy a File from One Folder to Another 80
Move a File from One Folder to Another 82
Rename a File 84
View the Information about a File or Folder 86
Compress Files for Easy Transfer 88
Burn Files to a CD or DVD 90
Erase a CD or DVD 92
Throw a File in the Trash 94
For each user account you set up, Mac OS X automatically creates a structure of folders for storing files. The key folder is the Home folder, which contains the Desktop, Documents, Downloads, Library, Movies, Music, Pictures, Public, and Sites folders.
You can create extra folders of your own as needed, but for most people the built-in folders are plenty to start with.

Understanding Where to Store Files on Your iMac
Go to the Home Folder

A Finder window opens to your default folder.
Note
The default folder may be your Home folder. If so, skip step 2.

The Finder window shows your Home folder.
Note
You can also go to the Home folder by clicking the desktop and then choosing Go and Home from the menu bar.
The contents of the Documents folder appear.
Note
The Documents folder is your storage place for word processing documents, spreadsheets, and similar files. Most applications that create these types of documents use the Documents folder automatically.
The Finder window displays the previous folder, the Home folder.

The contents of the Music folder appear.


Meet the Movies Folder and the Pictures Folder

Note
If you have not yet used iMovie, the iMovie Projects folder does not appear in the Movies folder.
The Pictures folder appears. This folder contains an iChat Icons folder and your iPhoto Library.


Tip
What are the Library folder and the Sites folder?
The Library folder in your Home folder contains files and settings for your user account. For example, the Mail folder contains details of your e-mail accounts. Normally you change the contents of the Library folder by using applications rather than directly through the Finder. The Sites folder is for any Web sites you host on your iMac using the Web Sharing feature.
What is the Public folder in my Home folder for?
When you place files in your Public folder, other users of your iMac and other computers on your network can see them, open them, and copy them, but not change them. Your Public folder contains a Drop Box folder (

To help you find and identify your files, the Finder has four different views. Icon view shows each file or folder as a large icon, whereas List view shows folders as a collapsible hierarchy. Column view lets you navigate quickly through folders and see where each item is located, and Cover Flow view is great for identifying files visually by looking at their contents.

Using the Finder's Four Views Effectively
Icon View
A Finder window opens showing your default folder.
The files and folders appear in Icon view.
List View
The files and folders appear in List view.
The folder's contents appear.
Note
In List view, you can expand the contents of multiple folders at the same time.

The files and folders appear in Column view.
The folder's contents appear in the next column.
Cover Flow View
The files and folders appear in Cover Flow view.


Tip
Can I change the size of icons used in Icon view?
Click and drag the slider in the lower-right corner of a Finder window in Icon view to set the size for that folder. To set a default size in Icon view, choose View and Show View Options. Click and drag the Icon size slider (

Is there an easy way to use different views for different folders?
You can tell the Finder to use a particular view for any folder. Click the folder and choose View and Show View Options. In the main window, click the view icon you want and then click the Always open option (
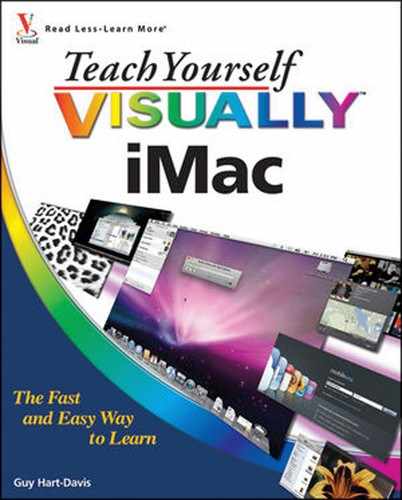
When you have many files with similar names or contents, it can be difficult to identify the document you need without opening the document and looking at its contents. To help you find the right document, Mac OS X's Quick Look feature enables you to look quickly inside many widely used types of documents right from the Finder without opening the document in an application.

Look Through a File without Opening It
A Finder window opens to your default folder.
The Action pop-up menu opens.

Note
You can also click

A Quick Look window opens showing a preview of the file.
Note
When you use Quick Look on a video file, Mac OS X starts playing the file.


The Quick Look window expands to fill the screen.
Note
To see more of the file in full-screen view, click and drag the scroll bar, or press


Note
Instead of closing the Quick Look window, you can press
Tip
Why does the Quick Look preview of a file look different from the actual file?
Quick Look does not actually open the file fully, so the Quick Look preview of the file may look somewhat different from the actual file. Normally, all text and objects such as graphics are visible, but the layout and formatting may be different. When Quick Look is not accurate enough to identify a file visually, open the file in an application to see it better.

Can I use Quick Look on more than one file at a time?
You can use Quick Look on as many files as you want. Select the files and then launch Quick Look. Click

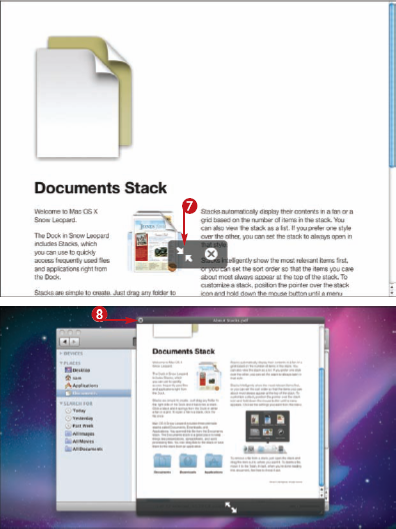
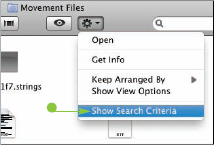
To help you find the files and folders you need to work with, Mac OS X includes a powerful search feature called Spotlight. You can search quickly from the desktop or from a Finder window, using either straightforward search keywords or complex search criteria.

Search for a File or Folder
Search Quickly from the Desktop
The Spotlight search field opens.
Note
Spotlight searches automatically for the keywords within the contents of files as well as in the names of files.
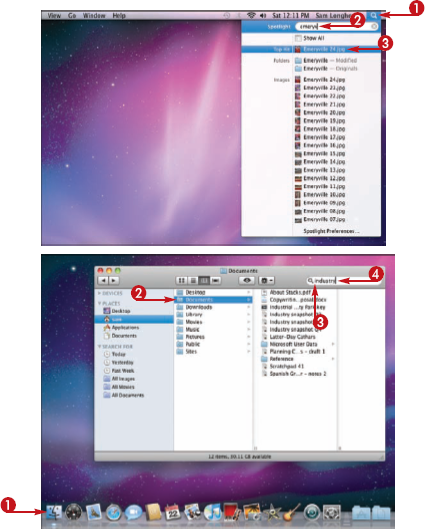
Spotlight displays a list of matches as you type.
The file opens in the application associated with it.
Search from a Finder Window
A Finder window opens to your default folder.
The Finder window's title bar changes to Searching, and the list of search results appears.


The search results appear.

Tip
How can I tell the difference between two search results that seem to be the same?
When you have two or more files with the same name in different folders, it can be hard to tell them apart in the Spotlight search results. For a quick check, position the mouse pointer over a search result for a moment. A ScreenTip (
Can I change where Spotlight searches for files?
You can customize the list of folders that Spotlight searches. See Chapter 12 for instructions on customizing Spotlight.
After a successful search, you can save the search in a smart folder so that you can use it again quickly and easily. Unlike a regular folder, a smart folder does not actually contain the items it shows because each item remains in its original folder. The smart folder gives you a way to locate items swiftly by their characteristics.

Save a Search in a Smart Folder
A Finder window opens.
Your search results appear in the Finder window.
The Specify a Name and Location for Your Smart Folder dialog opens.

The Specify a Name and Location for Your Smart Folder dialog expands.
The Specify a Name and Location for Your Smart Folder dialog closes.
If you left Add to Sidebar selected, Mac OS X adds the smart folder to the Search For category in the Finder's sidebar.
Note
To use a smart folder that you did not add to the sidebar, open a Finder window to the folder in which you stored the smart folder.

Tip
Should I add my smart folders to the sidebar?
If you create only a few smart folders, adding them to the sidebar is usually helpful. If you create many smart folders, you may prefer to keep them in different folders. Alternatively, add each smart folder to the sidebar, and then remove those you do not need to keep. To remove a smart folder from the sidebar,
How do I change a smart folder?
Click the smart folder in the sidebar or in the folder in which you saved it. Click
Mac OS X builds a hierarchy of folders in your user account, but you will normally need to create other folders to keep different types of files or different projects organized. You can create as many folders as needed, and you can create subfolders within other folders.

Create and Name a New Folder
A Finder window opens to your default folder.
The Action pop-up menu opens.
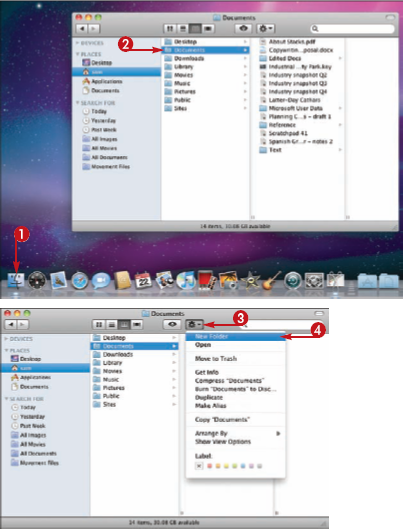
The new folder shows an edit box around the default name, Untitled Folder.
The folder takes on the new name.
The folder opens. You can now add files to the folder or create subfolders inside it.

Tip
Are there other ways of creating a new folder?
You can also create a new folder in three other ways. In a Finder window in any view, press

Why can I not create a new folder inside some other folders?
Most likely, you do not have permission to create a folder in that folder. Each user can create new items in the folders in his or her user account, and administrators can create folders in some other folders. But Mac OS X protects other folders, such as the System folder and the Users folder, from anybody creating new folders.
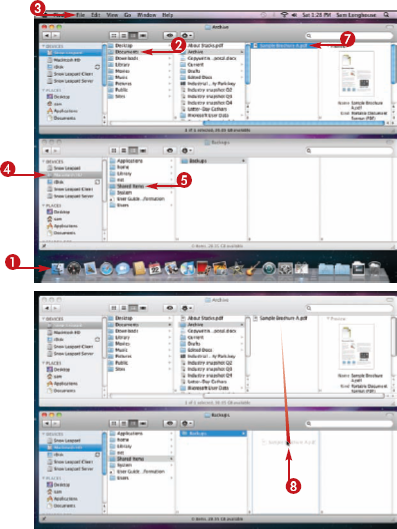
Mac OS X makes it easy to copy a file from one folder to another. Copying is useful when you need to share a file with other people or when you need to keep a copy of the file safe against harm.
You can copy one or more files at a time either by clicking and dragging or by using the Copy and Paste commands.

Copy a File from One Folder to Another
Copy a File by Clicking and Dragging
A Finder window opens to your default folder.
A new Finder window opens.
Note
When you

A copy of the file appears in the folder.

Copy a File by Using Copy and Paste
A Finder window opens to your default folder.
The Action pop-up menu opens.
Mac OS X copies the file's details to the clipboard.
The Action pop-up menu opens.
A copy of the file appears in the destination folder.
Note
You can use the Paste command in either the same Finder window or another Finder window — whichever you find more convenient.

Tip
How do I copy a folder?
You can copy one or more folders by using either of the techniques for copying files: Either
Can I make a copy of a file in the same folder as the original?
To make a copy of a file in the same folder as the original, click the file, click

When organizing your files, you will often need to move a file from one folder to another.

You can move files quickly by selecting the file or files and then clicking and dragging. But you must use a different technique if the destination folder is on a different drive from the source folder than if it is on the same drive.
Move a File between Folders on the Same Drive
Move a File from One Folder to Another
A Finder window opens to your default folder.
A new Finder window opens.
The file appears in the destination folder and disappears from the source folder.

Move a File from One Drive to Another
A Finder window opens to your default folder.
A new Finder window opens.
The file appears in the destination folder and disappears from the source folder.
Tip
Can I move files by using menu commands instead of clicking and dragging?
If you find it awkward to click and drag files from one folder to another, you can use a two-stage process with menu commands. First, use the Copy and Paste commands to copy the files to the destination folder. Second, delete the original files from the source folder. This method is workable and effective if a little cumbersome.

When you create a new file or folder, you normally give it a name that describes its contents or what you intend it to be.
To keep your iMac's file system well organized, you will often need to rename files and folders after creating them. You can rename a file or folder in seconds by using the Finder.

A Finder window opens to your default folder.
Note
You can also display the edit box by clicking the file's name again after selecting it. Be careful to pause between the clicks, or Mac OS X registers a double-click and opens the file.
An edit box appears around the file name.

You can now open the file by double-clicking it or pressing


Tip
Can I rename any file or folder in Mac OS X?
You can rename many items within your Home folder. It is best not to rename the folders that Mac OS X creates for you, such as Desktop, Documents, Downloads, and Library, but you can freely rename any folders you create. In addition, you can safely rename your iMac's hard disk, but do not rename any of the system folders. For example, do not rename the Applications folder, the System folder, the Users folder, or your Home folder, because renaming these folders may cause Mac OS X problems.

Can I rename several files at once?
There is no convenient way to rename several files at once from the Finder manually. Each file in a folder must have a unique name, so you cannot apply the same name to two or more files at once. Some applications and scripts have features for renaming multiple files at once, usually by giving them sequential names using numbers appended to a base name — for example, Photo01, Photo02, Photo03, and so on.

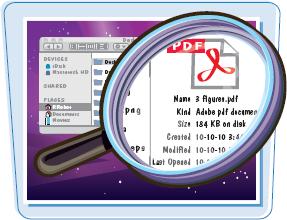
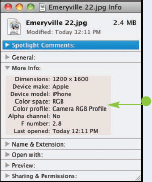
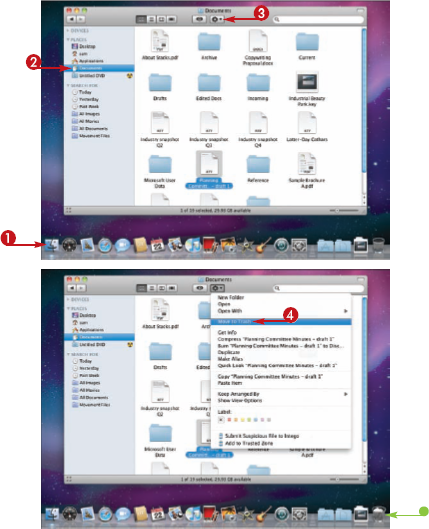
When you click a file or folder in a Finder window, the Finder displays its file name in all views. In all views but Icon view, the Finder displays basic information, such as the file's kind, size, and date last modified. To see extra information about the file or folder, and to add information, you can open the Info window.
View the Information about a File or Folder
The Info window for the file opens.
Note
The Info window has several sections. You can expand each section by clicking

Kind shows the file's type. Size shows the file's size on disk. Where shows the folder that contains the file. Created shows when the file was created. Modified shows when the file was last changed.
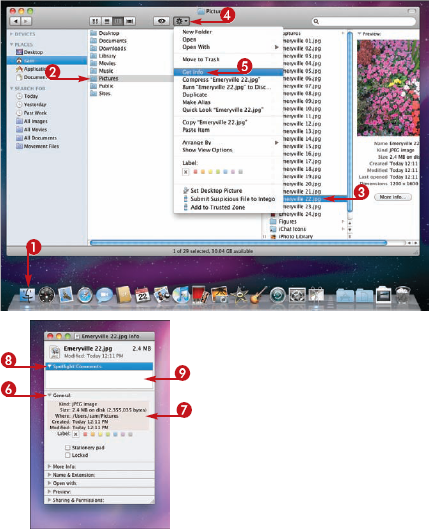
The Open With area appears.
The Preview area appears, and you can see a preview of the file.

The Sharing & Permissions area appears.

Note
Normally, it is best not to change the permissions Mac OS X has set for a file.


To transfer files faster and more easily across the Internet, or to fit more files onto a CD, DVD, or removable disk, you can compress the files. Compressing creates a compressed file in the widely used zip format, often called a "zip file," that contains a copy of the files. The original files remain unchanged in their folder.

Compress Files for Easy Transfer
Compress Files to a Zip File
A Finder window opens to your default folder.
The Action pop-up menu opens.
Note
If you selected one file, Mac OS X gives the file the same name with .zip added to the end. If you selected two or more files, Mac OS X names the zip file Archive.zip.
An edit box opens around the file name.
The file takes on the new name.

Note
If you receive the zip file attached to an e-mail message, save the file as explained in Chapter 6.
Archive Utility unzips the zip file, creates a folder with the same name as the zip file, and places the contents of the zip file in it.

Tip
Can I exchange zip files with Windows users?
The zip file is a standard format used by Macs, Windows PCs, and other operating systems. This means that you can normally exchange zip files with users of Windows or other operating systems without needing to worry about compatibility.

When I compress a music file, the zip file is bigger than the original file. What have I done wrong?
You have done nothing wrong. Compression removes extra space from the file, and can squeeze some graphics down by as much as 90 percent. But if you try to compress a file that is already compressed, such as an MP3 audio file or an MPEG video file, Archive Utility cannot compress it further — and the zip file packaging adds a small amount to the file size.

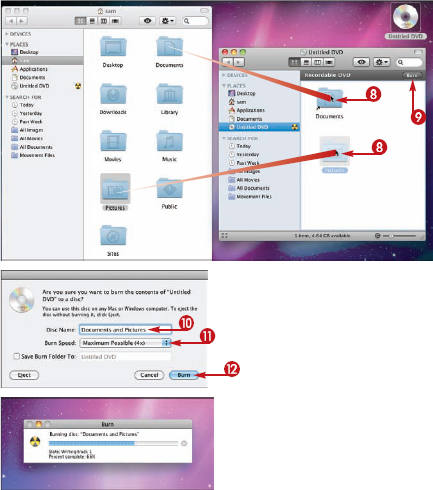
A CD or DVD is a useful means of storing files and folders, either for transferring them to another computer or keeping a copy as a backup. Mac OS X enables you to easily copy files and folders to a CD or DVD. The process of creating a CD or DVD is called burning.

Burn Files to a CD or DVD
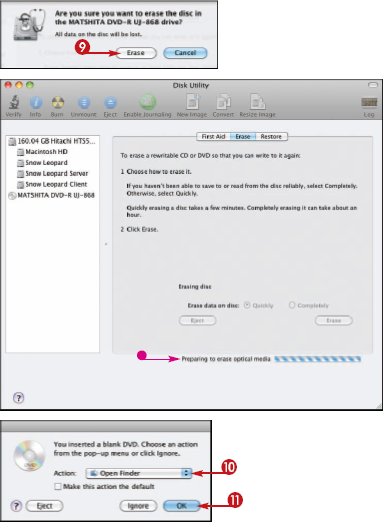
A dialog opens asking what you want to do with the disc.
Note
If you always want to burn this type of disc using the Finder, click Make this action the default (

The Action pop-up menu opens.
The blank CD or blank DVD appears on your desktop.

Note
When you drag files to the CD or DVD, Mac OS X adds aliases, or shortcuts, to the files. It does not add the files to the CD or DVD yet.
A dialog opens.
Note
The Maximum Possible speed is usually the best choice.
The iMac starts burning the CD or DVD.
The Burn dialog shows you the progress of the burn.
When the burn has completed, your iMac ejects the disc.
Note
Before labeling and storing the disc, it is a good idea to reinsert it in your iMac and check that the disc's contents are as you intended them to be.
Tip
Should I use a CD or a DVD for my files?
Use a CD when you have only a modest amount of data to store. Most recordable CDs can hold 650 MB or 700 MB. Use a DVD when you need to store more data than this. A single-layer DVD holds 4.7GB, whereas a dual-layer DVD holds 9.4GB.

Is it better to use rewriteable discs or single-use discs?
Use single-use recordable discs when you want to make a permanent copy of data — for example, on a backup that you intend to keep indefinitely. Use rewriteable discs for data you plan to store for only a short time. For example, if you back up documents to DVD each day, keep a rewriteable DVD for each day of the week.

After you have burned a rewriteable CD or DVD, you can erase its contents so that you can use the disc again. To erase a rewriteable disc like this, you use the Disk Utility tool, which also works with hard disks and removable disks.

Erase a CD or DVD
The Finder becomes active.
A Finder window opens showing the Utilities folder.
Note
Pressing and holding down

The Finder window closes and Disk Utility opens.
The Erase pane opens.

A dialog opens to confirm that you want to erase the disc.
When Disk Utility finishes erasing the disc, a dialog opens.
Tip
How many times can I reuse a rewriteable CD or DVD?
You should be able to reuse a rewriteable CD or DVD several dozen times before needing to replace it. However, if the disc suffers wear and tear, or if it is several years old, it is better to err on the side of caution and replace the disc. Similarly, if the disc gives errors but is not scratched, try using the Completely option in Disk Utility to erase it thoroughly and make it work properly again — but if your data is valuable, it is safer to replace the disc instead.

When you do not need a file any more, you can throw it in the Trash. The Trash is a special folder in which Mac OS X keeps files and folders you intend to dispose of.
Like a real-world trash can, the Trash retains files until you actually empty it. So if you find you have thrown away a file that you need after all, you can recover the file from the Trash.

Throw a File in the Trash
Throw a File in the Trash
A Finder window opens to your default folder.
The Action pop-up menu opens.
Note
You can also throw a file in the Trash by clicking and dragging it to the Trash icon on the Dock. From the keyboard, press
The Trash window opens.
Note
If you want to restore the file to the folder it was in, you do not need to open a new Finder window. Just click the file in the Trash and then choose File and Put Back.
A new Finder window opens.
You can now work with the file again.

Tip
When and how do I get rid of the Trash?
You can empty the Trash at any time you find convenient. Chapter 15 shows you how to empty the Trash. Unless you need to dispose of sensitive files immediately, it is normally a good idea to leave files in the Trash until you are certain that you never need them again.

What else do I need to know about the Trash?
When you click a CD, DVD, or removable disk and drag it toward the Trash, the Trash icon changes to an Eject icon (
