
Mac OS X looks great and is easy to use straight out of the box, but you can customize it further to suit your needs. You can change many aspects of Mac OS X. For example, you can change the desktop background, apply a screen saver, change the icons on the Dock, give yourself more screen space, and make the keyboard and mouse easier to use. You can also give your iMac commands with your voice, run applications each time you log in, or put your iMac to sleep when you are not using it.
Change Your Desktop Background 268
Set Up a Screen Saver 270
Make the Dock Show the Icons You Need 272
Create Hot Corners to Run Exposé Easily 274
Give Yourself More Desktop Space 276
Add a Second Monitor So You Can See More 278
Make the Keyboard and Mouse Easier to Use 280
Make the Screen Easier to See 282
Tell Spotlight Which Folders to Search 284
Control Your iMac with Your Voice 286
Save Time by Running Applications Each Time You Log In 288
Save Power by Putting Your iMac to Sleep 290
Choose When to Check for Software Updates 292
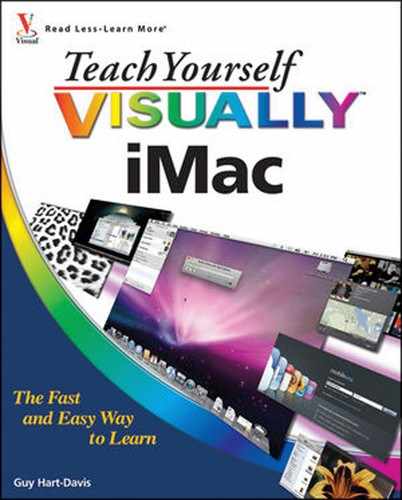
The easiest way to make your iMac look different is to change the desktop background. Mac OS X includes a wide variety of backgrounds, but you can also use your own photos.
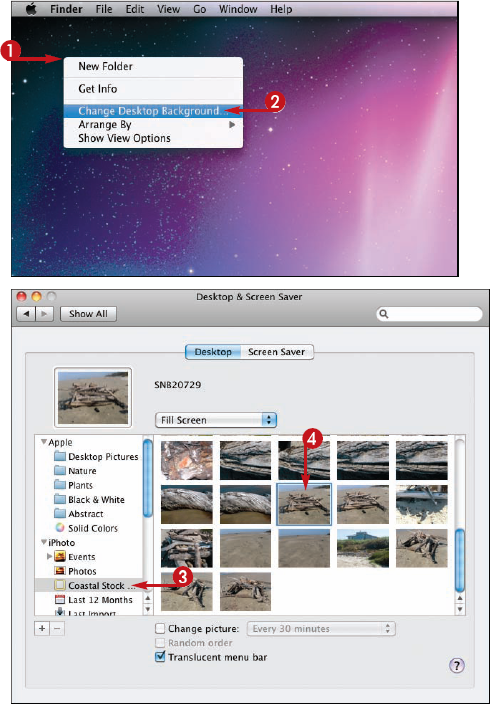
You can choose between displaying a single picture on the desktop and displaying a series of images that change automatically.

Change Your Desktop Background

The shortcut menu opens.

The Desktop tab of Desktop & Screen Saver preferences opens.

Note
The Apple section of the categories list contains the built-in desktop backgrounds. The iPhoto section contains your iPhoto albums. If you add folders, as described in the tip, they appear in the Folders section.
The images in the category appear in the right-hand pane.


Tip
Which option should I choose for fitting the image to the screen?
In the Desktop & Screen Saver preferences, choose Fit to Screen to match the image's height or width (whichever is nearest) to the screen. Choose Fill Screen to make an image fill the screen without distortion but cropping off parts that do not fit. Choose Stretch to Fill Screen to stretch the image to fit the screen exactly, distorting it as needed. Choose Tile to cover the desktop with multiple copies of the image. Choose Center to display the image at full size in the middle of the desktop.

I have a folder of pictures I want to use as desktop backgrounds. Can I add them to the Desktop tab?
Click Add (
A screen saver is an image, a sequence of images, or a moving pattern that Mac OS X displays to hide what your screen is showing when you leave your iMac idle. You can choose what screen saver to use and how soon to start it. If you prefer, you can use no screen saver at all.

Set Up a Screen Saver
The shortcut menu opens.

The Screen Saver pane appears.
Note
The Apple category of screen savers contains the screen savers supplied with Mac OS X. The Pictures category enables you to create screen savers from your photos or from pictures included with Mac OS X.

The screen saver you clicked starts playing in the Preview area.
Note
To turn the screen saver off, click and drag Start screen saver to Never, all the way to the right.
The screen saver plays full screen.
The Screen Saver pane of the Desktop & Screen Saver pane appears again.

Tip
Must I use a screen saver to protect my iMac's screen from damage?
Screen savers originally protected cathode ray tube (CRT) monitors from having static images "burned in" to their screens. LCD screens, such as that on your iMac, do not suffer from this problem, so you need not use a screen saver. Nowadays you can use a screen saver to protect the information on-screen or to provide visual entertainment.
What are the Display Style buttons that appear when I click a screen saver in the Pictures category?
After selecting a Pictures screen saver, you can click Slideshow (

The Dock is your control center for the applications you run on your iMac, so it is well worth spending a few minutes customizing the Dock to contain the icons you need. You can add applications, files, or folders to the Dock or remove existing items.

Make the Dock Show the Icons You Need
Add an Application to the Dock
An icon for the application appears on the Dock.
Note
After you open an application from the Applications folder, you can
Add a File or Folder to the Dock
An icon for the file or folder appears on the Dock.
Remove an Item from the Dock
The icon vanishes in a puff of smoke.
Resize the Dock
The Dock icons grow or shrink so that they occupy all the space on the Dock.

Tip
Can I customize the Dock further?
You can position the Dock on the left or right side of the screen instead of at the bottom. You can hide the Dock so that it appears only when you move the mouse pointer to the bottom or side of the screen. You can also turn on magnification, which makes the Dock icons grow for easy identification when you position the mouse pointer over them. To reach these options,

As discussed in Chapter 3, Exposé lets you see all your open windows and pick the one you need.
To run Exposé with the mouse, set up a hot corner, a screen corner that automatically triggers Exposé when you position the mouse pointer there. You can also set up hot corners for starting and stopping the screen saver or putting the display to sleep.

Create Hot Corners to Run Exposé Easily
Set Up a Hot Corner
The Apple menu opens.
The Exposé & Spaces preference pane opens.
The Exposé pane opens.
Note
If the Exposé & Spaces pane opens with the Exposé pane already at the front, you do not need to click Exposé.

The pop-up menu opens.
Note
You can set up two or more hot corners for the same action if you want.
Use a Hot Corner to Run Exposé
Exposé resizes and moves the windows. For example, Exposé shows all the windows.

Tip
Are there other ways I can run Exposé using the mouse?
As well as using a hot corner, you can use the mouse's secondary button or middle button to run Exposé. In the Exposé section on the Exposé pane, click the

No matter how large your iMac's screen is, it is often useful to have more space to spread out your projects. The Spaces feature lets you create from 2 to 16 virtual desktops, separate desktop areas that you can switch among as needed. You can tether an application to a particular space or allow it to appear in any space.

Give Yourself More Desktop Space
Set Up Spaces
Note
If the application appears on the pop-up menu, click it to add it.

The applications you added appear in the Application Assignments list box.
The pop-up menu opens.


Going to a Space
Spaces displays each Space on a grid.
Spaces displays that space full screen.

Tip
Can I use other ways of switching among spaces?
If you added the Spaces menu to the menu bar in step 6, click the menu (

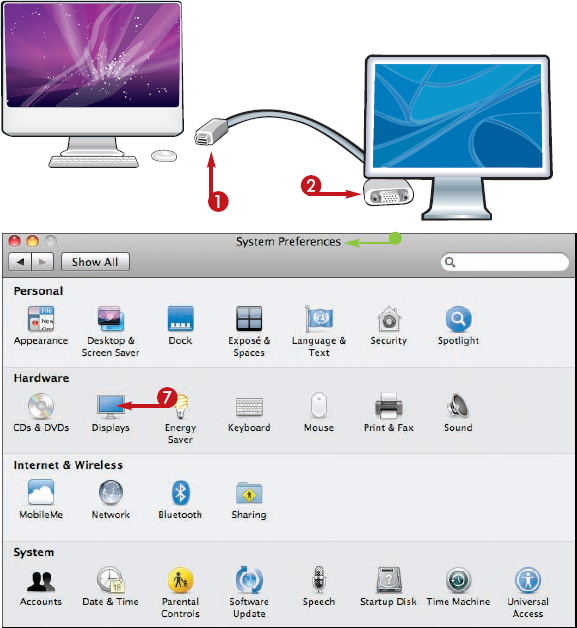
Your iMac has a bright and beautiful screen built in, but you can also add an external monitor to give yourself more space for your work. For a digital LCD screen, you need a mini DisplayPort–to-DVI connector cable. For a CRT monitor or analog LCD screen, you need a mini DisplayPort–to-VGA connector.

Add a Second Monitor So You Can See More
The Apple menu opens.
Note
Your iMac may automatically open the Displays pane of System Preferences after you connect the monitor and turn it on.


Tip
How big of an external monitor can I connect to my iMac?
Recent iMacs can drive an external LCD as large as Apple's 30-inch Cinema display, which has a resolution of 2560 × 1600 pixels. For this, you need a Mini DisplayPort to Dual-Link DVI Adapter cable. Older iMacs can drive external LCDs at resolutions of up to 1920 × 1200 pixels. Check your iMac's documentation for details of its capabilities.

Is there any way to add a third monitor?
Your iMac is built to use only its own screen and one external monitor, but you can add further external monitors by using a USB device such as the ViBook from Village Tronic (villagetronic.com). Such a device adds an extra graphics port via USB, enabling you to connect an extra monitor. You can use two or more ViBooks at once.

Your iMac's keyboard and mouse come with default settings that work well for many people, but you may need to change the settings to make the keyboard and mouse easier and more comfortable for you to use.

Make the Keyboard and Mouse Easier to Use
Control the Keyboard's Repeat Rate
Make the Mouse Easier to Use


Tip
What are the options on the Keyboard tab in Universal Access?
The Keyboard tab in Universal Access contains options for making the keyboard easier to use if you have trouble pressing multiple keys at once. The Sticky Keys feature (

If you have trouble seeing the screen on your iMac, you can use the Universal Access preferences to make it easier to see.

Make the Screen Easier to See
The Apple menu opens.
The Universal Access pane opens.

The Options dialog for zooming opens.
The Options dialog for zooming closes.

Tip
What is the quickest way to turn on the Universal Access features for seeing the screen?
To turn on the Universal Access features for seeing the screen, use keyboard shortcuts. Press

Mac OS X's Spotlight feature is great for locating the files and folders you need. But if Spotlight finds irrelevant results, or if it does not find the results you are looking for, you can change the folders that Spotlight searches. This is easy to do, but it makes a huge difference to the search results you get.
Tell Spotlight Which Folders to Search
The Spotlight search field opens.
The list of search results appears.
The System Preferences window opens with the Spotlight pane at the front.
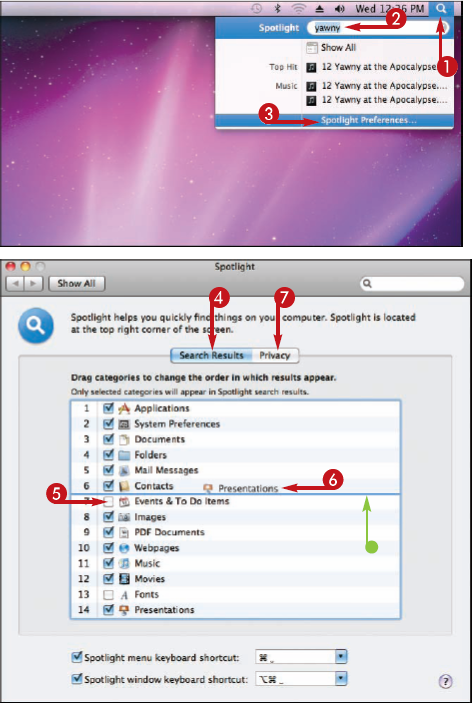
A dialog opens.
Note
You can select two or more folders by clicking the first and then

The dialog closes, and the folder appears in the list.

Tip
Is there another way to add folders to the Privacy list?
Instead of using the dialog to build the list of folders you do not want Spotlight to search, you can work from a Finder window instead. Click Finder (

To save wear and tear on your fingers and wrists, Mac OS X enables you to control your iMac by speaking commands into a microphone.
For best results, you will need to connect an external microphone to your iMac rather than use the built-in microphone. The best kind is a headset microphone that keeps the microphone positioned near to your mouth.

Control Your iMac with Your Voice
The Apple menu opens.
The Speech preference pane opens.
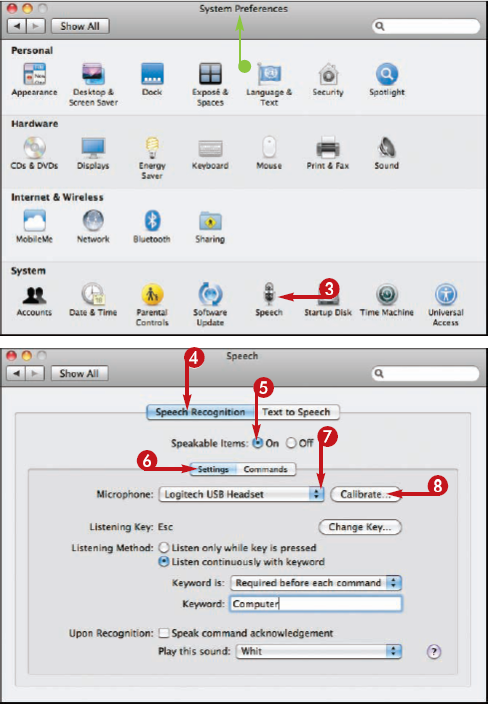
The Microphone Calibration dialog opens.
The Commands sub-tab opens.
A configuration dialog opens.
Note
Different sets of commands have different options. Some sets have no options.

Tip
Should I choose Listen Only While Key Is Pressed or Listen Continuously with Keyword?
This depends on how much you will use spoken commands. Click Listen only while key is pressed (

Of the many applications installed on your iMac, you most likely run some every day, others less frequently, and the rest hardly ever. You can save time by setting Mac OS X to open your most-used applications automatically each time you log in to your iMac. You can set this up either from the Dock or from System Preferences.

Save Time by Running Applications Each Time You Log In
Use the Dock to Set an Application to Run at Login
The shortcut menu opens.
The Options submenu opens.
Mac OS X places a check mark next to Open at Login.
Use System Preferences to Set an Application to Run at Login
The Apple menu opens.
The System Preferences window opens.
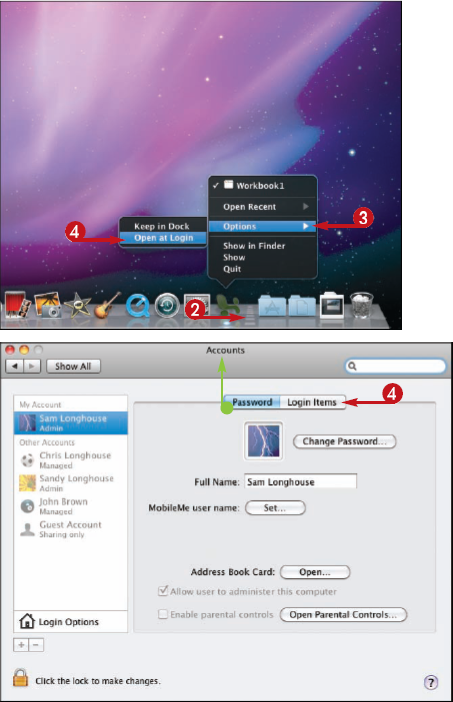
The list of login items appears.
Note
You can click

A dialog opens showing a list of the applications in the Applications folder.
Note
To select multiple applications, click the first, and then

The dialog closes, and the application appears in the list on the Login Items pane.

Tip
Is there another way to add an application to the Login Items pane of Accounts preferences?
Instead of clicking
Is there a disadvantage to running applications at login?
The more applications you run at login, the longer the login process takes. Normally, it is best to run only a handful of applications at login – those you use in every computing session. Run other applications from the Dock when you need them instead of launching them at login in case you need them later.

When you are not using your iMac, you can put it to sleep to save electricity. When you know you will be away from your iMac for a while, you can put it to sleep manually, but you can also set the Energy Saver feature to put your iMac to sleep after a period of inactivity.

Save Power by Putting Your iMac to Sleep

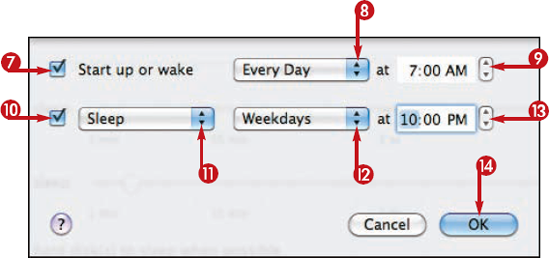
Tip
Which button do I press to wake my iMac from sleep?
You can press any key on the keyboard to wake the iMac. If you are not certain whether the iMac is asleep or preparing to run a screen saver, press

Is it a good idea to select the Automatically Dim the Display Brightness Before Display Sleep check box?
Dimming the screen saves some power, but having the screen dim when you are taking a moment to compose your thoughts can be distracting. You may find it more helpful to set a shorter Display sleep time and clear the Automatically Dim the Display Brightness Before Display Sleep check box.

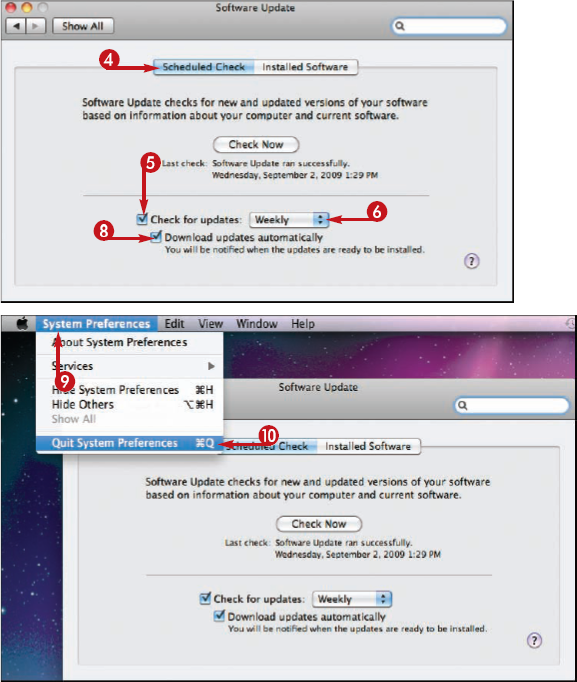
To keep your iMac running smoothly and protect it from both online and offline threats, you should apply the software updates that Apple releases for Mac OS X and for Apple applications. Usually, it is easiest to have the Software Update utility check for updates automatically, but you can check manually instead if you prefer.

Choose When to Check for Software Updates
The Apple menu opens.
The System Preferences window opens.

The Software Update pane opens.
The Check for Updates pop-up menu opens.
The System Preferences menu opens.
The System Preferences window closes.
Tip
How frequently should I check for software updates?
If you have an always-on Internet connection, set Software Update to check for updates daily. This ensures you receive the updates as soon as possible, so that your iMac remains up to date and protected against the latest threats. Use the Weekly setting if you find the updates frequent enough to interrupt your work. Avoid the Monthly setting because it may leave your iMac unprotected for several weeks.

Will I need to restart my iMac after installing updates?
Some updates to Mac OS X require you to restart your iMac, whereas most updates to Apple applications do not need a restart. Software Update always warns you when an update requires a restart, so you can delay applying the update if the timing is not convenient.
