
APPENDIX E
Extending Hardware Inventory
System Center Configuration Manager (ConfigMgr)’s hardware inventory component queries Windows Management Instrumentation (WMI) on each ConfigMgr managed client to gather data about that device. What is queried depends on the classes that are enabled; these are specified using client settings. Chapter 3, “Looking Inside Configuration Manager,” discusses WMI and how ConfigMgr interacts with it.
CAUTION: BE CAREFUL WHEN EXTENDING INVENTORY
Before extending hardware inventory, confirm that it is necessary. Application deployment types now handle many scenarios that previously required extending inventory. Be careful when extending hardware inventory, understand how it works, and test each modification on a standalone client, as described in the following section. Errors could lead to WMI corruption on all clients receiving the modifications. Modifications to hardware inventory are more difficult to remove than to add. Examine the existing classes to see if they will meet your needs before making any modifications.
How to Extend Hardware Inventory
Extending hardware inventory consists of executing the following tasks:
![]() Creating a new version of Configuration.mof for testing and checking and testing modifications to this file using Mofcomp.exe and WBEMTest.exe.
Creating a new version of Configuration.mof for testing and checking and testing modifications to this file using Mofcomp.exe and WBEMTest.exe.
![]() Replacing the current Configuration.mof, found in <ConfigMgrInstallPath> under inboxesclifiles.srchinv, with this new Configuration.mof.
Replacing the current Configuration.mof, found in <ConfigMgrInstallPath> under inboxesclifiles.srchinv, with this new Configuration.mof.
![]() Checking whether your Configuration.mof changes were accepted by inspecting the dataldr.log file residing on the site server and that the changes were executed on your clients by checking the inventoryagent.log file on the client.
Checking whether your Configuration.mof changes were accepted by inspecting the dataldr.log file residing on the site server and that the changes were executed on your clients by checking the inventoryagent.log file on the client.
![]() Selecting the classes with their attributes to be inventoried by modifying the hardware inventory settings, using the default settings at the hierarchy level.
Selecting the classes with their attributes to be inventoried by modifying the hardware inventory settings, using the default settings at the hierarchy level.
![]() Enabling the classes and attributes that should be inventoried with custom client settings.
Enabling the classes and attributes that should be inventoried with custom client settings.
TIP: USING COMMUNITY TOOLS TO EXTEND HARDWARE INVENTORY
Numerous community-written tools and guidelines address challenges associated with extending hardware inventory. Although the majority of these focus on ConfigMgr 2007, the information is still valid, with minimal modifications required for ConfigMgr Current Branch.
Sherry Kissinger, a former Enterprise Mobility MVP, provides extensive examples of how to extend hardware inventory, including some that can help solve your hardware inventory challenges. Sherry blogs at https://mnscug.org/blogs/sherry-kissinger.
Mark Cochrane’s RegKeyToMOF tool can assist in using the hardware inventory feature to inventory a specific Registry key. The tool allows you to browse for a Registry key and presents the corresponding sections to add to Configuration.mof and information to import in the hardware inventoried classes. RegKeyToMOF is available at http://mnscug.org/images/Sherry/RegKeyToMOFv33a.zip.
Using tools does not absolve you from understanding what is occurring and how custom MOF files work before implementing them in a production environment. Test all your MOF file edits in an offline environment; if in doubt, consult one of the experts on the Microsoft forums, at https://social.technet.microsoft.com/Forums/en-US/home?forum=ConfigMgrCBGeneral.
After modifying Configuration.mof and adding the classes using the client agent settings, the Resource Explorer shows the new hardware. You can report on this by using ConfigMgr reporting, discussed in Chapter 21, “Configuration Manager Reporting.”
Example of Extending Inventory
The examples in the next sections show how to inventory several values from the HKLMSoftwareMicrosoftMPSDOSD key, created during operating system deployment (OSD) when using Microsoft Deployment Toolkit (MDT) integration. This key includes information about when the deployment took place and the version of the task sequence used, captured by setting a TSVersion task sequence variable. Test your customizations on a test system; use a standalone system, preferably a virtual machine, to perform your tests.
CAUTION: PRECAUTIONS WHEN MODIFYING MOF FILES
Always open MOF files using Windows Notepad or another script editor. Verify that there are no special characters. To take additional precautions, modify Configuration.mof offline and check the file with the mofcomp.exe utility, using the -check switch to check syntax. This utility is located in %windir%System32wbem. You can also use mofcomp.exe to import the MOF file into the local WMI repository and WBEMTest.exe to verify that the changes end up in the expected location.
Creating MOF Files Using the RegKeyToMOF Tool
The following procedure shows how to use RegKeyToMOF to convert a Registry key into MOF files you can import into ConfigMgr. Follow these steps:
1. Download RegKeyToMOF from http://mnscug.org/images/Sherry/RegKeyToMOFv33a.zip. Start the utility on a test machine containing the Registry key and its necessary values. The key in this example is located at HKEY_LOCAL_MACHINESOFTWAREMicrosoftMPSDOSD, as shown in Figure E.1.

FIGURE E.1 Registry Editor showing the OSD Registry key.
2. On the central administration site (CAS), copy Configuration.mof from <ConfigMgrInstallPath>inboxesclifiles.srchinv to your test machine.
3. Start RegKeyToMOF and browse to the HKEY_LOCAL_MACHINESOFTWAREMicrosoftMPSDOSD Registry value. You can modify the values of Group, ClassName (which must be unique and in this case is Unleashed), and Version, as shown in Figure E.2. The RegKeyToMOF utility displays the changes to be made to ConfigMgr 2012, ConfigMgr 2007, and Systems Management Server (SMS) 2003; this example uses ConfigMgr 2012 suggested modifications, which are also valid for ConfigMgr Current Branch. Click Save MOF to export the settings specified in the configuration.mof tab and the to import in… tab of the utility.
To add Registry keys for 32-bit applications on 64 bit-Windows, enable the Enable 64bits (for Regkeys not written in Wow6432Node) option and add the following two lines to the CM12Import.mof file, which tell it to look in the 32-bit Registry on 64-bit systems:
SMS_Context_1("__ProviderArchitecture=32|uint32"),
SMS_Context_2("__RequiredArchitecture=true|boolean")

FIGURE E.2 RegKeyToMOF utility.
4. Add the content of the CM12Config.mof file (available in Appendix D, “Available Online,”) to your offline Configuration.mof file, between the Added extensions Start and Added extensions End sections.
Adding the content in Listing E.1 to Configuration.mof creates the Unleashed data class in WMI under the rootCIMV2 namespace, which contains the data classes and instances. This namespace is used because the rootCIMV2 namespace is selected in Configuration.mof just before the Added extensions section; thus, this namespace is used to fill values of the Unleashed class unless declared otherwise. Data classes can reside in other classes.
Within rootCIMV2, you can access the data class information or use a pointer to where the data can be retrieved. The Unleashed data class will be created on the machines receiving Configuration.mof, which are all in the ConfigMgr hierarchy.
LISTING E.1 Content to Add from the CM12Config.mof File
// RegKeyToMOF by Mark Cochrane (with help from Skissinger, SteveRac, Jonas Hettich,
➥Kent Agerlund & Barker)
// this section tells the inventory agent what to collect
// 10/20/2016 9:56:56 AM


#pragma namespace ("\\.\root\cimv2")
#pragma deleteclass("Unleashed", NOFAIL)
[DYNPROPS]
Class Unleashed
{
[key] string KeyName;
String InstalledOn;
String DeploymentType;
String OSDAdapterCount;
String OSDAnswerFilePath;
String OSDAnswerFilePathSysprep;
String OSDBaseVariableName;
String OSDComputerName;
String OSDDiskPart;
String OSDEnableTCPIPFiltering;
String OSDEndTime;
String OSDImageCreator;
String OSDImagePackageId;
String OSDImageVersion;
String OSDInstallType;
String OSDPartitionActive;
String OSDPartitionWithDriveLetter;
String OSDPreserveDriveLetter;
String OSDRandomAdminPassword;
String OSDStartTime;
String OSDStateSMPRetryCount;
String OSDStateSMPRetryTime;
String OSDTargetDriveCache;
String OSDTargetSystemDrive;
String OSDTargetSystemParition;
String OSDTargetSystemRoot;
String OSDisk;
String TSVersion;
String TsApplicationBaseVariable;
};


[DYNPROPS]
Instance of Unleashed
{
KeyName="RegKeyToMOF_32";
[PropertyContext("Local|HKEY_LOCAL_MACHINE\SOFTWARE\Microsoft\MPSD\OSD|
➥InstalledOn")
,Dynamic,Provider("RegPropProv")] InstalledOn;
[PropertyContext("Local|HKEY_LOCAL_MACHINE\SOFTWARE\Microsoft\MPSD\OSD|
➥DeploymentType")
,Dynamic,Provider("RegPropProv")] DeploymentType;
[PropertyContext("Local|HKEY_LOCAL_MACHINE\SOFTWARE\Microsoft\MPSD\OSD|
➥OSDAdapterCount")
,Dynamic,Provider("RegPropProv")] OSDAdapterCount;
[PropertyContext("Local|HKEY_LOCAL_MACHINE\SOFTWARE\Microsoft\MPSD\OSD|
➥OSDAnswerFilePath")
,Dynamic,Provider("RegPropProv")] OSDAnswerFilePath;
[PropertyContext("Local|HKEY_LOCAL_MACHINE\SOFTWARE\Microsoft\MPSD\OSD|
➥OSDAnswerFilePathSysprep")
,Dynamic,Provider("RegPropProv")] OSDAnswerFilePathSysprep;
[PropertyContext("Local|HKEY_LOCAL_MACHINE\SOFTWARE\Microsoft\MPSD\OSD|
➥OSDBaseVariableName")
,Dynamic,Provider("RegPropProv")] OSDBaseVariableName;
[PropertyContext("Local|HKEY_LOCAL_MACHINE\SOFTWARE\Microsoft\MPSD\OSD|
➥OSDComputerName")
,Dynamic,Provider("RegPropProv")] OSDComputerName;
[PropertyContext("Local|HKEY_LOCAL_MACHINE\SOFTWARE\Microsoft\MPSD\OSD|
➥OSDDiskPart")
,Dynamic,Provider("RegPropProv")] OSDDiskPart;
[PropertyContext("Local|HKEY_LOCAL_MACHINE\SOFTWARE\Microsoft\MPSD\OSD|
➥OSDEnableTCPIPFiltering")
,Dynamic,Provider("RegPropProv")] OSDEnableTCPIPFiltering;
[PropertyContext("Local|HKEY_LOCAL_MACHINE\SOFTWARE\Microsoft\MPSD\OSD|
➥OSDEndTime")
,Dynamic,Provider("RegPropProv")] OSDEndTime;
[PropertyContext("Local|HKEY_LOCAL_MACHINE\SOFTWARE\Microsoft\MPSD\OSD|
➥OSDImageCreator")
,Dynamic,Provider("RegPropProv")] OSDImageCreator;
[PropertyContext("Local|HKEY_LOCAL_MACHINE\SOFTWARE\Microsoft\MPSD\OSD|
➥OSDImagePackageId")
,Dynamic,Provider("RegPropProv")] OSDImagePackageId;
[PropertyContext("Local|HKEY_LOCAL_MACHINE\SOFTWARE\Microsoft\MPSD\OSD|
➥OSDImageVersion")
,Dynamic,Provider("RegPropProv")] OSDImageVersion;
[PropertyContext("Local|HKEY_LOCAL_MACHINE\SOFTWARE\Microsoft\MPSD\OSD|
➥OSDInstallType")
,Dynamic,Provider("RegPropProv")] OSDInstallType;
[PropertyContext("Local|HKEY_LOCAL_MACHINE\SOFTWARE\Microsoft\MPSD\OSD|
➥OSDPartitionActive")
,Dynamic,Provider("RegPropProv")] OSDPartitionActive;
[PropertyContext("Local|HKEY_LOCAL_MACHINE\SOFTWARE\Microsoft\MPSD\OSD|
➥OSDPartitionWithDriveLetter")
,Dynamic,Provider("RegPropProv")] OSDPartitionWithDriveLetter;
[PropertyContext("Local|HKEY_LOCAL_MACHINE\SOFTWARE\Microsoft\MPSD\OSD|
➥OSDPreserveDriveLetter")
,Dynamic,Provider("RegPropProv")] OSDPreserveDriveLetter;
[PropertyContext("Local|HKEY_LOCAL_MACHINE\SOFTWARE\Microsoft\MPSD\OSD|
➥OSDRandomAdminPassword")
,Dynamic,Provider("RegPropProv")] OSDRandomAdminPassword;
[PropertyContext("Local|HKEY_LOCAL_MACHINE\SOFTWARE\Microsoft\MPSD\OSD|
➥OSDStartTime"),Dynamic,Provider("RegPropProv")] OSDStartTime;
[PropertyContext("Local|HKEY_LOCAL_MACHINE\SOFTWARE\Microsoft\MPSD\OSD|
➥OSDStateSMPRetryCount")
,Dynamic,Provider("RegPropProv")] OSDStateSMPRetryCount;
[PropertyContext("Local|HKEY_LOCAL_MACHINE\SOFTWARE\Microsoft\MPSD\OSD|
➥OSDStateSMPRetryTime")
,Dynamic,Provider("RegPropProv")] OSDStateSMPRetryTime;
[PropertyContext("Local|HKEY_LOCAL_MACHINE\SOFTWARE\Microsoft\MPSD\OSD|
➥OSDTargetDriveCache")
,Dynamic,Provider("RegPropProv")] OSDTargetDriveCache;
[PropertyContext("Local|HKEY_LOCAL_MACHINE\SOFTWARE\Microsoft\MPSD\OSD|
➥OSDTargetSystemDrive")
,Dynamic,Provider("RegPropProv")] OSDTargetSystemDrive;
[PropertyContext("Local|HKEY_LOCAL_MACHINE\SOFTWARE\Microsoft\MPSD\OSD|
➥OSDTargetSystemParition")
,Dynamic,Provider("RegPropProv")] OSDTargetSystemParition;
[PropertyContext("Local|HKEY_LOCAL_MACHINE\SOFTWARE\Microsoft\MPSD\OSD|
➥OSDTargetSystemRoot")
,Dynamic,Provider("RegPropProv")] OSDTargetSystemRoot;
[PropertyContext("Local|HKEY_LOCAL_MACHINE\SOFTWARE\Microsoft\MPSD\OSD|
➥OSDisk")
,Dynamic,Provider("RegPropProv")] OSDisk;
[PropertyContext("Local|HKEY_LOCAL_MACHINE\SOFTWARE\Microsoft\MPSD\OSD|
➥TSVersion")
,Dynamic,Provider("RegPropProv")] TSVersion;
[PropertyContext("Local|HKEY_LOCAL_MACHINE\SOFTWARE\Microsoft\MPSD\OSD|
➥TsApplicationBaseVariable")
,Dynamic,Provider("RegPropProv")] TsApplicationBaseVariable;
};
The Unleashed data class is extended with the following instances:
![]()
Keyname as string and as key value
![]()
InstalledOn as string
![]()
DeploymentType as string
![]()
OSDAdapterCount as string
![]()
OSDAnswerFilePath as string
![]()
OSDAnswerFilePathSysprep as string
![]()
OSDBaseVariableName as string
![]()
OSDComputerName as string
![]()
OSDDiskPart as string
![]()
OSDEnableTCPIPFiltering as string
![]()
OSDEndTime as string
![]()
OSDImageCreator as string
![]()
OSDImagePackageId as string
![]()
OSDImageVersion as string
![]()
OSDInstallType as string
![]()
OSDPartitionActive as string
![]()
OSDPartitionWithDriveLetter as string
![]()
OSDPreserveDriveLetter as string
![]()
OSDRandomAdminPassword as string
![]()
OSDStartTime as string
![]()
OSDStateSMPRetryCount as string
![]()
OSDStateSMPRetryTime as string
![]()
OSDTargetDriveCache as string
![]()
OSDTargetSystemDrive as string
![]()
OSDTargetSystemParition as string
![]()
OSDTargetSystemRoot as string
![]()
OSDisk as string
![]()
TSVersion as string
![]()
TsApplicationBaseVariable as string
After defining the data class and its instances, the next section in the file fills the properties. The Keyname property is filled with the RegKeyToMOF value, and the InstalledOn property is filled with the value of the Installed On Registry key under HKEY_LOCAL_MACHINESOFTWAREMicrosoftMPSDOSD, using the WMI Registry provider. The other properties are filled with other values coming from the Registry.
TIP: DOCUMENTING YOUR EDITS
Document your edits and add them in a well-formatted manner. If you do, when adding or troubleshooting the extensions, things are easily readable in the MOF file.
Verifying the Syntax of the MOF Files
Importing MOF files into ConfigMgr is risky, so take extra precautions to verify that the MOF files you create are working as expected. This section shows how to check the syntax of the files and import them to a test system where you can check the outcome of importing them. Follow these steps:
1. Use Mofcomp.exe with the -check option to check the syntax of the Configuration.mof file (see Figure E.3):

FIGURE E.3 mofcomp -check output.
C:Mof>mofcomp -check configuration.mof
Microsoft (R) MOF Compiler Version 10.0.14393.0
Copyright (c) Microsoft Corp. 1997-2006. All rights reserved.
Parsing MOF file: configuration.mof
MOF file has been successfully parsed
Syntax check complete.
WARNING: File configuration.mof does not contain #PRAGMA AUTORECOVER.
If the WMI repository is rebuilt in the future, the contents of this MOF
➥file will not be included in the new WMI repository.
➥To include this MOF file when the WMI Repository is automatically
➥ reconstructed, place the #PRAGMA AUTORECOVER statement on the first
➥ line of the MOF file.
Done!
2. Now use Mofcomp.exe with the argument configuration.mof to import the contents of Configuration.mof into WMI on the test machine:
C:Mof>mofcomp configuration.mof
Microsoft (R) MOF Compiler Version 10.0.14393.0
Copyright (c) Microsoft Corp. 1997-2006. All rights reserved.
Parsing MOF file: configuration.mof
MOF file has been successfully parsed
Storing data in the repository...
WARNING: File configuration.mof does not contain #PRAGMA AUTORECOVER.
If the WMI repository is rebuilt in the future, the contents of this MOF
➥file will not be included in the new WMI repository.
To include this MOF file when the WMI Repository is automatically
➥reconstructed, place the #PRAGMA AUTORECOVER statement on the first line
➥ of the MOF file.
Done!
3. To use WBEMTest to query WMI to verify that the Unleashed class was created, open WBEMTest.exe and click Connect. In the NameSpace field, type rootcimv2 because that is where you added the Unleashed class. Click Connect. Once connected, click Enum Classes to open the Superclass Info box. Select Recursive and click OK to open the Query Result box. Browse the query result box to see if Unleashed is available; it should be situated below StdRegProv, as shown in Figure E.4.

FIGURE E.4 WBEMTest query result.
As discussed in the previous section, data classes do not necessarily have to reside in rootcimv2; they can reside in other locations within WMI, although rootcimv2 is most commonly used. See Chapter 3 for additional information about WMI and locations where data can reside.
Importing Files into the Configuration Manager Environment
After verifying the correct syntax of the MOF files and importing those files to a test system, you should be confident that they are working as expected. To import the files into the ConfigMgr environment, modify the Configuration.mof file and import another MOF file into the Default Client Settings -> Hardware Inventory section of the ConfigMgr console. Follow these steps:
1. Copy your Configuration.mof over the existing one in the <ConfigMgrInstallPath>inboxesclifiles.srchinv folder.
2. Open dataldr.log in the log files folder under <ConfigMgrInstallPath> using CMTrace or Notepad to determine whether ConfigMgr is accepting the change. You should see the following text:
Configuration.Mof change detected
Compiling MOF files and converting to policy
Confirm that the modification was added successfully by checking for the following:
Running MOFCOMP on F:Program FilesMicrosoft Configuration
Managerinboxesclifiles.srchinvconfiguration.mof
MOF backed up to F:Program FilesMicrosoft Configuration
Managerdatahinvarchiveconfiguration.mof.bak
Successfully updated configuration.mof in the database.
End of cimv2smsinv_config-to-policy conversion; returning 0x0
3. After modifications to Configuration.mof are successfully translated to a policy, verify that the new configuration is being applied to your clients. Ensure that the client has received its new policy by manually initiating a machine policy refresh on the client. To initiate the refresh, open the Configuration Manager Control Panel applet and select Actions. Select the Machine Policy Retrieval & Evaluation Cycle action and click Run Now. On the client, open the PolicyEvaluator.log file in %windir%CMMLogs and confirm that the client has received a new policy.
4. Using WBEMTest, query WMI to ensure that the Unleashed class was created, using the same procedure described in step 3 of the procedure in the “Verifying the Syntax of the MOF Files” section, earlier in this appendix.
5. After verifying that the OSD class is created on the client, select it by modifying the default client settings in the Administration workspace. In the ConfigMgr console, browse to Administration -> Client Settings -> Default Client Settings. Under Default Client Settings, open the Hardware Inventory section and select Set Classes. There are two options in the Hardware Inventory Classes box provides two options:
![]() Import the provided CM12Import.mof file (see Appendix D), provided by the RegKeyToMOF utility.
Import the provided CM12Import.mof file (see Appendix D), provided by the RegKeyToMOF utility.
![]() Browse to the classes on a remote machine using the Add Hardware Inventory Class tool.
Browse to the classes on a remote machine using the Add Hardware Inventory Class tool.
To import the classes using the CM12Import.mof file, click Import in the Hardware Inventory Classes page, browse to the CM12Import.mof from the MOF snippet, and click Open. The Import Summary page appears, providing options to import the hardware inventory classes and settings, or only the settings. Select the option to import only the inventory classes, as you will enable the classes with custom client settings later. If the CM12Import file is accepted, a green check mark appears, and you can click Import to use the MOF file.
Once back in the Hardware Inventory Classes window, verify that the Unleashed class was added to the list. Click OK to close the Hardware Inventory Classes window and the Default Client Settings window.
Listing E.2 shows the contents of the CM12Import.mof file.
LISTING E.2 Contents of the CM12Import.mof File
// RegKeyToMOF by Mark Cochrane (with help from Skissinger, SteveRac, Jonas Hettich,
➥Kent Agerlund & Barker)
// this section tells the inventory agent what to report to the server
// 10/21/2016 12:45:36 PM


#pragma namespace ("\\.\root\cimv2\SMS")
#pragma deleteclass("Unleashed", NOFAIL)
[SMS_Report(FALSE),SMS_Group_Name("Unleashed"),SMS_Class_ID("Unleashed")]
Class Unleashed: SMS_Class_Template
{
[SMS_Report(FALSE),key] string KeyName;
[SMS_Report(FALSE)] String InstalledOn;
[SMS_Report(FALSE)] String DeploymentType;
[SMS_Report(FALSE)] String OSDAdapterCount;
[SMS_Report(FALSE)] String OSDAnswerFilePath;
[SMS_Report(FALSE)] String OSDAnswerFilePathSysprep;
[SMS_Report(FALSE)] String OSDBaseVariableName;
[SMS_Report(FALSE)] String OSDComputerName;
[SMS_Report(FALSE)] String OSDDiskPart;
[SMS_Report(FALSE)] String OSDEnableTCPIPFiltering;
[SMS_Report(FALSE)] String OSDEndTime;
[SMS_Report(FALSE)] String OSDImageCreator;
[SMS_Report(FALSE)] String OSDImagePackageId;
[SMS_Report(FALSE)] String OSDImageVersion;
[SMS_Report(FALSE)] String OSDInstallType;
[SMS_Report(FALSE)] String OSDPartitionActive;
[SMS_Report(FALSE)] String OSDPartitionWithDriveLetter;
[SMS_Report(FALSE)] String OSDPreserveDriveLetter;
[SMS_Report(FALSE)] String OSDRandomAdminPassword;
[SMS_Report(FALSE)] String OSDStartTime;
[SMS_Report(FALSE)] String OSDStateSMPRetryCount;
[SMS_Report(FALSE)] String OSDStateSMPRetryTime;
[SMS_Report(FALSE)] String OSDTargetDriveCache;
[SMS_Report(FALSE)] String OSDTargetSystemDrive;
[SMS_Report(FALSE)] String OSDTargetSystemParition;
[SMS_Report(FALSE)] String OSDTargetSystemRoot;
[SMS_Report(FALSE)] String OSDisk;
[SMS_Report(FALSE)] String TSVersion;
[SMS_Report(FALSE)] String TsApplicationBaseVariable;
};
NOTE: MORE ABOUT HARDWARE INVENTORY
When hardware inventory starts, it checks the rootCIMV2SMS namespace on the local machine for the reporting classes, which contain entries corresponding to the data classes in rootCIMV2.
Note that the data classes and corresponding reporting classes share the same name. The CM12Import.mof file starts with the SMS_Report (FALSE) part, which tells hardware inventory that the block of code containing the Unleashed reporting class should be reported to ConfigMgr. The SMS_Report (FALSE) value is actually the property you can now control using custom client settings, allowing you to specify whether ConfigMgr should report on devices in a certain collection only.
Each field also contains a SMS_Report (FALSE) section, which allows you to specify whether reporting should be enabled for that property field; you can also use custom client settings to specify what fields to enable.
SMS_Group_Name specifies the name of the group displayed in the Resource Explorer; SMS_Class_ID with value Unleashed is the unique identifier for the class, Unleashed, which stands for the class group. The class Unleashed is the declaration, where the name of the class must be identical to the corresponding data class, which you created using an addition to Configuration.mof, or it already existed.
6. You now return to the Add Hardware Inventory Class page. The Inventory classes are loaded, as displayed in Figure E.5. These classes should now include Unleashed if the policy was received and the WMI extensions were added. Ensure that the Unleashed check box is checked. You can select Edit to modify the properties so its value represents a unit that can be Megabytes, Kilobytes, Decimal String, Seconds, Hex String, or Date String; the default is None.
The units are not modified in this example, so click OK. Notice that the Unleashed class is added and selected. Deselect the Unleashed class on the Default Settings level, if enabled, as you will enable these settings with custom client settings later. Click OK to close the Hardware Inventory Classes dialog and click OK to close the Default Settings box.

7. With the Unleashed class imported, enable it using custom client settings that will be applied to one of your collections. Under Administration -> Client Settings, select Create Custom Client Settings from the ribbon bar to open the Create Custom Client Device Settings page. Provide a name to identify the setting and select the Hardware Inventory check box. For more information about default and custom client settings, see Chapter 9, “Client Management.”
Select Hardware Inventory under General on the left side of the page to open the hardware inventory settings and then click Set Classes to open the Hardware Inventory Classes page. Select the Unleashed class and select the settings you want to inventory, as shown in Figure E.6, and click OK to save the custom client settings. With your custom client settings still selected, select Deploy from the ribbon bar and select the collection where you want to deploy your custom client settings. Click OK to finish.

Performing and Verifying Hardware Inventory with the New Settings
After importing the MOF files into ConfigMgr, you can trigger a hardware inventory to check whether the necessary information is inventoried and is in the correct places in the database. You will also want to verify that hardware inventory shows up in the Resource Explorer. Perform the following steps:
1. With the Unleashed class enabled in a custom client setting and that custom client setting deployed to a collection, trigger hardware inventory on a client belonging to that collection:
![]() Initiate Machine Policy Retrieval & Evaluation Cycle from the Configuration Manager Control Panel applet and check the PolicyEvaluator.log file to determine whether the new policy was retrieved from the management point.
Initiate Machine Policy Retrieval & Evaluation Cycle from the Configuration Manager Control Panel applet and check the PolicyEvaluator.log file to determine whether the new policy was retrieved from the management point.
![]() Once the policy is successfully retrieved, initiate a hardware inventory cycle. From the Actions tab in the Control Panel applet, select Hardware Inventory Cycle and click Run Now.
Once the policy is successfully retrieved, initiate a hardware inventory cycle. From the Actions tab in the Control Panel applet, select Hardware Inventory Cycle and click Run Now.
![]() Check the inventoryagent.log file in %windir%CCMLogs to see whether the hardware inventory was successful. Search the file for the Unleashed text to verify that the requested new classes were inventoried and check the lines that follow in the log file to determine if there were problems during inventory. Following is an example:
Check the inventoryagent.log file in %windir%CCMLogs to see whether the hardware inventory was successful. Search the file for the Unleashed text to verify that the requested new classes were inventoried and check the lines that follow in the log file to determine if there were problems during inventory. Following is an example:
Collection: Namespace = \.
ootcimv2; Query = SELECT __CLASS, __PATH,
➥__RELPATH, KeyName, InstalledOn, OSDComputerName, OSDStartTime, TSVersion
➥FROM Unleashed; Timeout = 600 secs.
2. Knowing hardware inventory was successful on the client, determine whether its site server is processing the inventoried data. It may take some time for all the data to be replicated to the CAS if the client is a member of a primary site below the CAS. On the primary site server hosting the site to which the client belongs, open the dataldr.log file and locate the Processing Inventory for Machine: <your machine name> line to determine if the inventoried data has been processed. Following is an example of information after that line:
Processing Inventory for Machine: ALBERT   Version 1.25
➥  Generated: 10/16/2016 05:33:14
$$<SMS_INVENTORY_DATA_LOADER><10-16-2016 05:33:27.041+420><thread=6640 (0x19F0)>
Begin transaction: Machine=ALBERT(GUID:954E5F00-31F9-4716-9CFE-4441E5F3F081)
$$<SMS_INVENTORY_DATA_LOADER><10-16-2016 05:33:27.045+420><thread=6640 (0x19F0)>
~Done with job queueing.  $$<SMS_INVENTORY_DATA_LOADER><10-16-2016
05:33:27.037+420><thread=3944 (0xF68)>
Blocking until completion.  $$<SMS_INVENTORY_DATA_LOADER><10-16-2016
05:33:27.058+420><thread=3944 (0xF68)>
Commit transaction: Machine=ALBERT(GUID:954E5F00-31F9-4716-9CFE-4441E5F3F081)
$$<SMS_INVENTORY_DATA_LOADER><10-16-2016 05:33:27.138+420><thread=6640 (0x19F0)>
Done: Machine=ALBERT(GUID:954E5F00-31F9-4716-9CFE-4441E5F3F081)
➥code=0 (29 stored procs
in XHPED6F6R.MIF)  $$<SMS_INVENTORY_DATA_LOADER><10-16-2016
➥05:33:27.138+420><thread=6640
(0x19F0)>
3. Verify that the necessary database tables were created by opening SQL Server Management Studio. Connect to the server hosting the ConfigMgr site database and open the database. Under Views, you should see a table called dbo.v.GS_Unleashed0. Select this table, right-click, and choose Select Top 1000 rows to query the table. If any information is in the table, it is reflected in the query results, as shown in Figure E.7.
4. Since inventory has occurred, verify that the data is available in the Resource Explorer, initiated from the ConfigMgr console on the client’s primary site server. Open the console and navigate to Assets and Compliance, select the collection you just targeted with your custom client settings, and select the device where you just ran the hardware inventory. Now use Start -> Resource Explorer to open the Resource Explorer for that device. As you can see in Figure E.8, Unleashed has been added to the Resource Explorer.

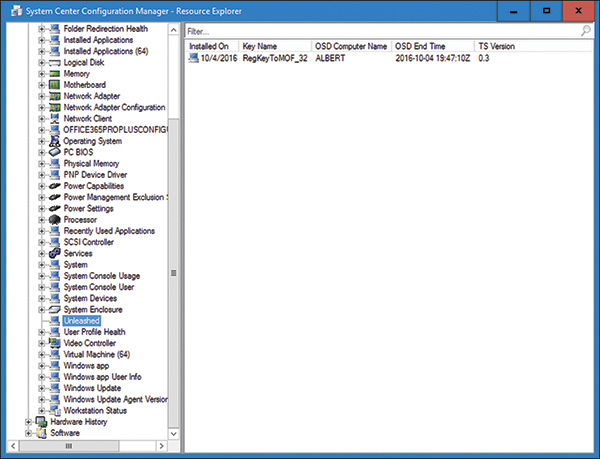
FIGURE E.8 Resource Explorer.
Creating a Device Collection
After verifying that the Unleashed information shows correctly in the Resource Explorer, say that you want to use this information to create a device collection containing all the clients with TSVersion 0.3. To create the device collection, follow these steps:
1. Navigate in the ConfigMgr console to Assets and Compliance -> Device Collections.
2. In the ribbon bar, click Create and then click Create Device Collection to open the Create Device Collection Wizard.
3. Provide the following information on the General page:
![]() Name: TSVersion
Name: TSVersion
![]() Description: Device Collection containing information about TSVersion
Description: Device Collection containing information about TSVersion
![]() Limiting Collection: All Desktop and Server Clients
Limiting Collection: All Desktop and Server Clients
Click Next.
4. On the Membership Rules page, click Add Rule to open the Query Rule Properties dialog and then select Query rule. Provide a name for the query, such as TSVersion, and click Edit Query Statement to open the Query Statement Properties dialog.
5. On the Query Statement Properties dialog, select the Criteria tab and click the starburst icon to open the Criterion Properties dialog. Click Select to open the Select Attribute dialog. Select UNLEASHED from the Attribute Class dropdown list. Select TSVersion from the Attribute dropdown list. Click OK to return to Criterion Properties page.
6. Click Value on the Criterion Properties dialog to select a value from the list; select 0.3 if already inventoried and available in the list or provide 0.3 as a value. Click OK to close this page.
7. Click OK in the Query Statement Properties dialog to return to the Query Rule Properties dialog, shown in Figure E.9.
8. Click OK in the Query Rule Properties dialog to return to the Membership Rules page of the Create Device Collection Wizard. Optionally select if you want to use incremental updates for the collection and specify when a full update of the collection should be scheduled. Click Next to continue.
9. Verify the settings on the Summary page and click Next. Click Close after the wizard successfully creates the device collection.

The device collection is added. You can now create a ConfigMgr application and deploy it to that collection.