
3
Moving into Spring Boot
In the previous chapter, you learned how to set up your development environment for developing your REST APIs using Java and your Angular application. We also installed SDKMAN! to manage multiple versions of Java, a REST client to test APIs without the use of third-party tools, Angular DevTools to debug your Angular application, and Git for code versioning and collaboration.
This chapter will now teach you the concepts of Spring Boot. We will deep-dive into Spring Boot’s fundamentals and the essential things we need to learn to develop our backend application. We will also learn how to create a Spring Boot project using Spring Initializr.
In this chapter, we will cover the following topics:
- Understanding Spring Boot
- Using Spring Initializr
- Dependency injection
- Beans and annotations
Technical requirements
Here is what you need to complete this chapter:
- For building the backend: JetBrains’ IntelliJ IDEA and the Java 17 SDK
- For generating the Java project: Spring Initializr
Note
There will be no directories of repositories for chapters 1 to 4 because most topics here are only theory and feature some sample code. The actual application project will begin in w, Building APIs with Spring.
Understanding Spring Boot
We have already discussed an overview of Spring in Chapter 1, Spring Boot and Angular – The Big Picture. In this section, we will have a deeper understanding of the essential concepts of Spring Boot in building your backend application, but first, let’s recap what Spring Boot is and its significant advantages.
Spring Boot is an open source micro-framework from Pivotal. It is an enterprise-level framework for developers to create standalone applications on Java Virtual Machines (JVMs). Its primary focus is to shorten your code length to make it easier for you to run your application.
The framework extends the Spring Framework, which allows a more opinionated way to configure your applications. In addition, it comes with built-in autoconfiguration capabilities that configure both Spring Framework and third-party packages based on your settings.
Here are the significant advantages of Spring Boot:
- Auto-configuration: When configuring your Spring Boot application, it downloads all the dependencies needed to run your application.
- Opinionated approach: Spring Boot uses a narrow approach to installing dependencies based on your application's needs. Manual configuration is removed as it adds the packages you need for your application.
- Spring starters: We can choose a list of starter dependencies to define your application’s expected needs during the initialization process. One example is Spring Web, which allows us to initialize a Spring-based web application.
Now, we know what Spring Boot is and its advantages. Let’s now discuss the architecture of Sprint Boot.
Spring Boot architecture
Spring Boot consists of different layers and classes to process the data and logic in your backend. The four layers and their use are as follows:
- Presentation/display layer: The presentation layer is responsible for interpreting JSON parameters as objects. This layer is the upper layer that is also responsible for handling authentication and HTTP requests. After accomplishing JSON translation and authentication, we will now move to the business layer.
- Business layer: The business layer, as the name suggests, handles all the business logic in the application. It is composed of service classes that perform authorization and additional validation.
- Persistence layer: The persistence layer is mainly responsible for storage logic that converts objects from and to database rows to insert data.
- Database layer: The database layer performs Create, Read, Update, and Delete (CRUD) operations. The layer can consist of multiple databases.
The Spring Boot architecture depends on the Spring Framework. The framework uses all of its features, such as Spring Model-View-Controller (MVC), Spring Data, and Spring Core. The only difference is that Spring Boot does not require Data Access Object (DAO) and DAOimpl classes.
Now, let’s discuss the Spring Boot Flow architecture, where we will see how data is processed inside an application.
Spring Boot flow architecture
The Spring Boot flow architecture will explain how the HTTP requests are processed and how layers communicate. The flow is composed of controllers, service layers, databases, and models. To have a better understanding, let’s look at the following diagram.

Figure 3.1 – Spring Boot flow architecture
In the Spring Boot flow architecture, the first thing that occurs is the client sends a request (an HTTPS request) to the controller. The controller maps the request and decides what to do with it. Next, it calls the service layer, where all business logic is performed, and gets additional dependencies required for operations from repository classes. The service layer is also responsible for performing logic on the data represented as a model and will be used by JPA to be inserted into the database.
We have learned the flow of the Spring Boot architecture. Now, we will discuss Representational State Transfer (REST) and its concepts.
Understanding REST
Before we start building our backend application, we must first know the concept of REST, as this is the primary architectural approach that we will apply for our backend to be consumable with client applications.
REST is a web service the primary goal of which is to make web services more effective. It allows direct access to applications through a Uniform Resource Identifier (URI) and can provide the resource in the XML or JSON format, making it more flexible.
The URI is where communication happens between two applications. Think of it as a bridge where the backend and frontend communicate. The client (frontend) requests a resource and returns a response represented by the XML or JSON format. Requesting a resource is used with the following HTTP methods:
- GET: This is used to get and read a resource.
- POST: This creates a new resource.
- PUT: This updates an existing resource.
- DELETE: This deletes a resource.
Let’s have a simple real-world example (a blog application) where we use HTTP methods to access a resource with the provided endpoints:
- GET /user/{id}/blogs: This gets the list of blogs of a specific user.
- POST /user/{id}/blog: This creates a blog for a specific user.
- PATCH /user/{id}/blog/{blog_id}: This updates an existing blog for a specific user.
- DELETE /user/{id}/blog/{blog_id}: This deletes an existing blog for a specific user.
In the preceding example, we request a resource using HTTP methods and endpoints. The endpoint returns an object in the form of XML or JSON in the response body. REST also supports the standard status code that will define whether our request is successful or not. The list of commonly used status codes is as follows:
- 200: Success status for the request
- 201: Indicates that an object was successfully created
- 400: Indicates a bad request – usually happens when the request body is invalid
- 401: Unauthorized access to the resource
- 404: Indicates that the resource is not found
- 500: Indicates an internal server error
The status codes are a helpful indication of what the client application will do after the HTTP call, providing an overview of how we can use REST in client and server communication.

Figure 3.2 – Communication between client and server applications
We learned about the concept and architecture of Spring Boot in this section. We also now know the ideas of REST and how it works to provide backend solutions. In the next section, we will generate our new Spring Boot project using Spring Initializr.
Using Spring Initializr
This section will explain what Spring Initializr is and how to configure and start our project. Spring Initializr is a web application that can generate a Spring Boot project on the fly. Spring Initializr will configure the build file with the required dependencies to run our project, focusing only on the code in the application. Spring Initializr makes it easier to set up our project, with the help of the Spring Boot CLI on the side, helping us configure our application. Spring Initializr generates a more traditional Java structure.
There are several ways to use Spring Initializr:
- Via a web-based interface
- Via Intellij IDEA
We will discuss these different ways to generate our Spring Boot application.
Web-based interface
The first way to use Spring Initializr is using a web-based interface. The application can be accessed through https://start.spring.io. You will see the following form once you open the link:

Figure 3.3 – Spring Initializr
The form will ask you for some basic information about your project. The first question is, what is your choice between Maven and Gradle to build your project? The app will also need information such as what language you will use, the artifact name, project name, and package name to be used, and what JDK version will be used when building the application.
Now, on the right side of the interface, you will see the Add Dependencies button. The Add Dependencies feature is one of the most important features of Spring Initializr, as this will allow us to choose the dependencies depending on the needs of our project. For example, we need to have a relational database with JPA access; we should add the Spring Data JPA.
Therefore, we added Lombok, Spring Web, Spring Data JPA, PostgreSQL Driver, and Spring Data Reactive Redis in the following example. We will also discuss each dependency as we go through building our example application.
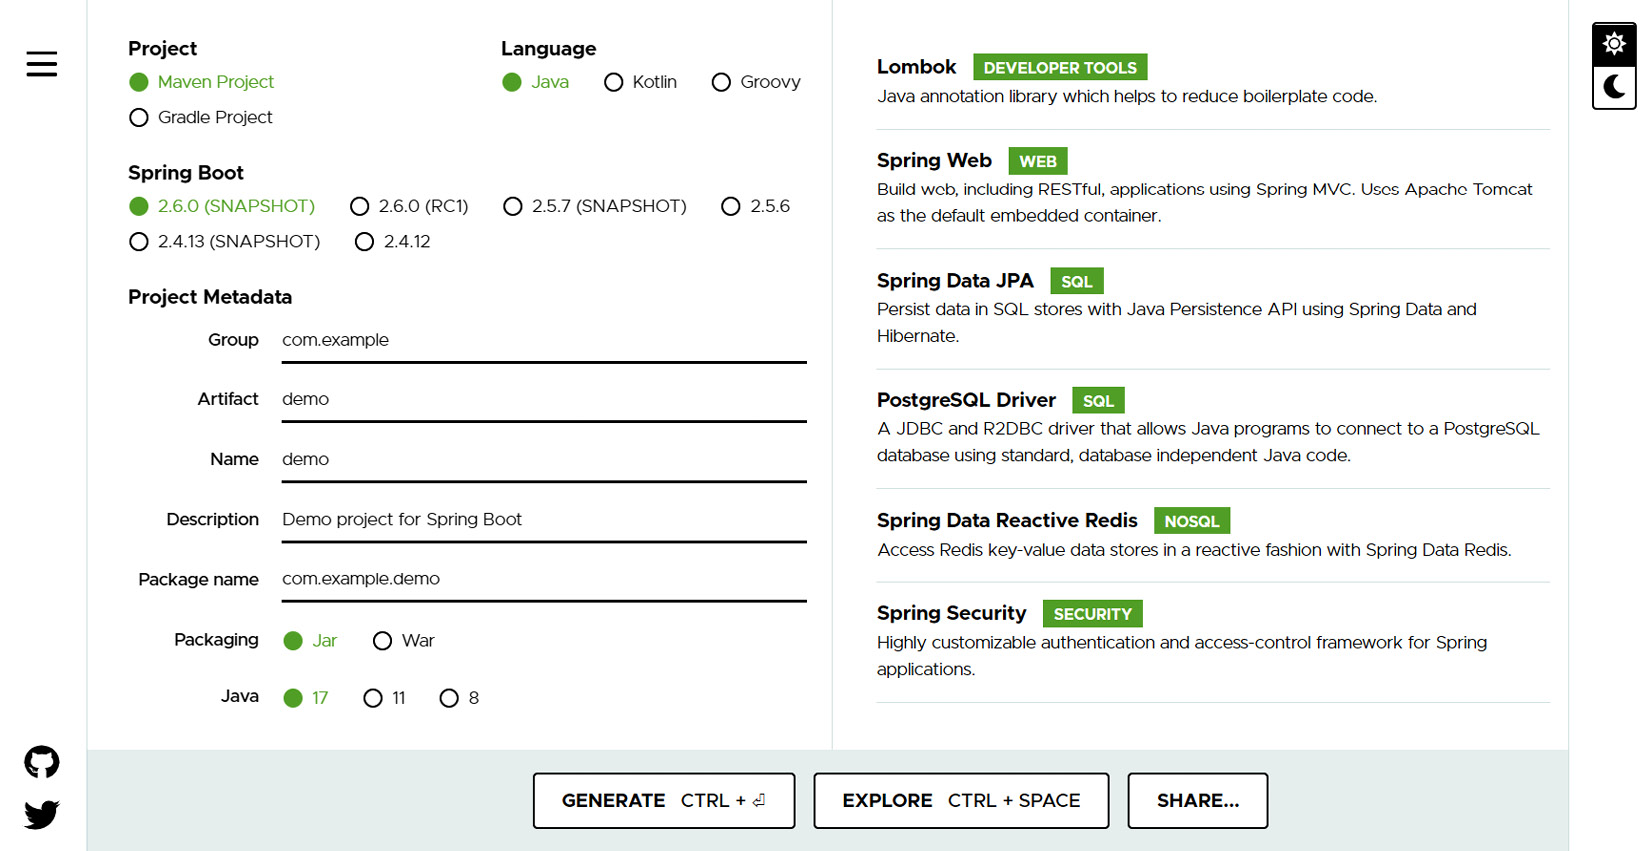
Figure 3.4 – Generating Spring Boot with the dependencies
We can see in the preceding example that we have already added the dependencies we need in our project. The last would be generating our application by clicking the Generate button; this will download a zip file that will contain our application. Before generating our project, we can click the Explore button to check our project structure and verify the configuration.
After successfully downloading the generated Spring Boot application, we will extract the file, and we can now open the Spring Boot project with the IDE of our choice. Finally, we are ready to write our code, but first, let’s check out the project structure generated by Spring Initializr.
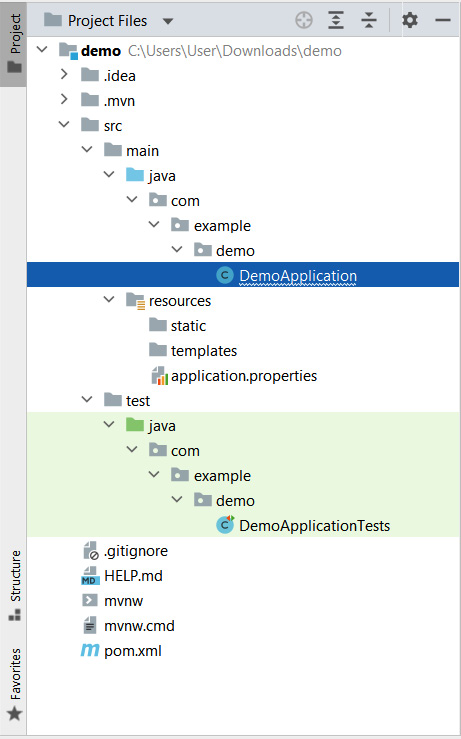
Figure 3.5 – A generated Spring Boot application
We can see from the generated project that there is not much application code included. However, the project consists of the following:
- DemoApplication.java: A class with the main() function for the application bootstrap
- DemoApplicationTests.java: An empty JUnit test class for unit testing
- Pom.xml: A Maven build specification that contains the dependencies needed for the application
- Application.properties: A properties file that is used to add configuration properties
We can see on the generated project that empty directories are included, such as the static folder; this is significant, as this is used for placing static content such as CSS and JavaScript files.
We have successfully generated our Spring Boot project using the web interface. Now, we will use Spring Initializr directly in IntelliJ IDEA.
Via IntelliJ IDEA
Another way of generating our Spring Boot project is by using Spring Initializr directly in IntelliJ IDEA; note that this is only available in the Ultimate edition of IntelliJ. If you are using the Community edition, you can install Spring Assistant at the following link: https://plugins.jetbrains.com/plugin/10229-spring-assistant. This will add a Spring Assistant option to generate your Spring Boot projects.
Execute the following steps:
- Select New Project upon opening IntelliJ IDEA to start generating the project, which will open a new modal.
- Select Spring Initializr, which will open a form with the same web interface as Spring Initializr.
- It will ask for details such as the project name, the language that will be used, the artifact name, and the SDK version that will be used to build the project:

Figure 3.6 – The form for using Spring Initializr with IntelliJ IDEA
We can see in the preceding figure that we have populated all the required details for our project.
- Clicking the Next button will redirect us to the Dependencies selection. We will choose the dependencies we need for the Spring Boot development, which are the same as what we entered in the Sprint Initializr interface.
- After successfully checking the dependencies, click Finish, and our Spring Boot application is configured. Finally, we are ready to write our code.
We have successfully generated our Spring Boot application through the Spring Initializr web interface and built-in IntelliJ IDEA. In the next section, we will learn one of the most important and commonly used concepts in Spring Boot – dependency injection.
Dependency injection
We have successfully generated our own Spring Boot project, and now, we will start learning the concepts of Spring, and one of the most important concepts we need to understand is dependency injection. As we develop our backend using Spring Boot, we will mainly use dependency injection throughout our development, as this makes our Java program modular and enables easier switching of implementations.
Dependency injection is an essential feature of object-oriented programming languages, but first, let’s discuss the concept of inversion of control, which is what dependency injection is trying to achieve.
Inversion of control
Inversion of Control (IoC) is the design pattern used for object-oriented programming languages. IoC is the concept of inverting the flow of your program, and it is used for decoupling the components in your application, making your piece of code reusable and modular. Hence, the IoC design pattern will provide us with a way to inject a custom class into other classes of our application.
The injected class will be instantiated in different parts of our application. Instead of letting our class decide its implementations or making its code fixes, we allow the injection of dependencies to change the class’s flow, performance, and code depending on the case. Thus, IoC mainly offers flexibility and modularity, but it also provides several other advantages in designing your applications:
- Having control of an object’s life cycle, we can define some objects as a singleton, and some objects can have their instance.
- It makes the application more maintainable as your code reduces because of reusable components.
- Testing components is more manageable, as we can isolate components and mock their dependencies, not covering other code that will not be included in unit testing.
We have learned about the IoC pattern and how it is advantageous for developing our application. Now, we will use dependency injection, which allows us to achieve this pattern.
The basics of dependency injection
We have already discussed how IoC works, and it is achieved by allowing an implementation to be decided by giving dependencies to the object. So, this idea is mainly dependency injection. We allow objects or classes to accept other dependencies that can provide implementations of different classes without writing them again, making our code flexible and reusable. Dependency injection can be achieved in different ways, and here are the following implementations.
Constructor-based dependency injection
Constructor-based dependency injection can be achieved by creating an object class with a constructor, with arguments of a specific type representing the dependency we can set.
Let’s have a look at the following code example:
package com.springexample;
/* Class for Student */
public class Student {
   private Grades grades;
   public Student(grades: Grades) {
      this.grades = grades;
   }
   public void retrieveGrades() {
      grades.getGrades();
   }
}
In the preceding example, the Student class has a constructor, public Student() {}, which accepts a parameter of type Grades. The constructor allows us to inject a Grades object in Student, allowing all implementations of the Grades object to be accessible in the Student object. Now, we have accessed the getGrades() method in our Student. To use the Student object, we will execute the following example:
package com.springexample;
import org.springframework.context.ApplicationContext;
import org.springframework.context.support.ClassPathXmlApplicationContext;
public class Main {
   public static void main(String[] args) {
      ApplicationContext context =
        new  ClassPathXmlApplicationContext("Beans.xml");
      Student student =
        (Student) context.getBean("student");
      student.retrieveGrades();
   }
}
We can see in the preceding example that we have instantiated a new student in our main class by getting the bean of our Beans.xml file. The Beans.xml file is our main configuration file for our construction-based injection, which is where we will define our beans together with their dependencies.
Let’s examine the following example of what Beans.xml looks like:
<?xml version = "1.0" encoding = "UTF-8"?>
<beans xmlns =
   "http://www.springframework.org/schema/beans"
   xmlns:xsi = "http://www.w3.org/2001/XMLSchema-instance"
   xsi:schemaLocation =
     "http://www.springframework.org/schema/beans
      http://www.springframework.org/schema/beans/
      spring-beans-3.0.xsd">
   <!-- Definition for student bean -->
   <bean id = "student"
     class = "com.springexample.Student">
     <constructor-arg ref = "grades"/>
   </bean>
   <!-- Definition for grades bean -->
   <bean id = "grades"
     class ="com.springexample.Grades"></bean>
</beans>
In the preceding example, we have defined the Student and Grades object as beans. The only difference is that the Student object has a constructor-arg that references grades; this indicates that we are injecting the Grades object into our Student object.
We have already achieved constructor-based dependency by using the Beans.xml configuration. We can also use annotations directly in our code to configure our beans and their dependencies.
Let’s look at the following example of how to configure beans and dependencies with annotations:
@Configuration
public class AppConfig
{
   @Bean
   public Student student() {
       return new Student(grades());
    }
   @Bean
   public Grades grades() {
      return new Grades();
    }
}
We can see in the preceding example that instead of using XML, we have used annotations to identify our beans and configuration. For example, the @Configuration annotation indicates that the AppConfig class is the source of the bean definitions, and the @Bean annotation defines the bean in our application. We will discuss annotations and beans intensely as we go throughout this chapter.
We have successfully learned how to implement constructor-based dependency injection by using Bean.xml and annotations. Now, let’s move on to the implementation of setter-based dependency injection.
Setter-based dependency injection
The injection of dependencies can be achieved when the container calls the setter methods of our class. So, instead of creating a constructor for the class, we will create a function that will set the object’s dependency.
Let’s look at a basic code example:
package com.springexample;
/* Class for Student */
public class Student {
   private Grades grades;
   public void setGrades(grades: Grades) {
      this.grades = grades;
   }
   public Grades getGrades() {
      return grades;
   }
   public void retrieveGrades() {
      grades.getGrades();
   }
}
In the preceding example, we can see that we have created a setter method named setGrades(), which accepts a Grades object, and its primary function is to set a value for the grades dependency.
Instead of using the constructor with arguments, we use setters to inject our dependencies into our object.
To use the Student object, let’s see the following example:
package com.springexample;
import org.springframework.context.ApplicationContext;
import org.springframework.context.support.ClassPathXmlApplicationContext;
public class Main {
   public static void main(String[] args) {
      ApplicationContext context = new
        ClassPathXmlApplicationContext("Beans.xml");
      Student student =
        (Student) context.getBean("student");
      student.retrieveGrades();
   }
}
We can see in the preceding example that it’s the same as how we used setter-based objects and constructor-based objects. The difference here is how we configure our beans in Bean.xml.
Let’s see the Beans.xml example for setter-based dependency injection:
<?xml version = "1.0" encoding = "UTF-8"?>
<beans xmlns =
   "http://www.springframework.org/schema/beans"
   xmlns:xsi = "http://www.w3.org/2001/XMLSchema-instance"
   xsi:schemaLocation =
     "http://www.springframework.org/schema/beans
      http://www.springframework.org/schema/beans/
      spring-beans-3.0.xsd">
   <!-- Definition for student bean -->
   <bean id = "student"
     class =   "com.springexample.Student">
     <property name="grades" ref = "grades"/>
   </bean>
   <!-- Definition for grades bean -->
   <bean id = "grades"
     class ="com.springexample.Grades"></bean>
</beans>
We configured the beans in our Beans.xml, Student, and the Grades object in the preceding example. The only difference here is when we declare dependencies. We use the property tag instead of constructor-arg to define our dependencies.
We have successfully created our object with setter-based dependency injection, and now, we will discuss field-based dependency injection.
Field-based dependency injection
As the name suggests, field-based dependency injection is a concept where we inject the object’s dependencies directly into the fields. We will not create a constructor or a setter method to inject our dependencies, but we will use the @Autowired annotation for injection.
Let’s see the following example of injecting dependencies into a field:
package com.springexample;
/* Class for Student */
public class Student {
   @Autowired
   private Grades grades;
}
In the preceding example code, we can see that we didn’t create a constructor or a setter method to inject our dependency. Instead, we only used the @Autowired annotation to inject the Grades object.
The field-based injection may be clean at first glance, having only annotations in our code and fewer methods, but many things happen behind our @Autowired dependency. For example, it uses reflection to inject dependencies that are costlier than a constructor and setter-based injection; it also violates the single responsibility principle. We can add more dependencies directly in the fields without warning.
We have learned the basics of dependency injection and the different ways to implement it in our Java application. Now, we will discuss the concept and importance of annotations and beans in Spring.
Annotation and beans
Annotation and beans are essential parts of developing your Spring applications. They are considered the building blocks of Spring and make our code less boilerplate and maintainable.
Spring annotations are used to define the different types of beans. They are simply a form of metadata that marks our code to provide information. Conversely, beans are objects that are instantiated and created and can be injected with other beans. We will discuss more as we go through this section.
Types of annotations
Annotations in Spring are categorized into different types depending on their functionality. The following are annotations grouped into their respective categories.
Core annotations
Core annotations are used to leverage the Spring DI engine in our applications. They can be found in the org.springframework.beans.factory.annotation and org.springframework.context.annotation packages. The following is a list of core annotations:
- @Required: This is applied in the setter methods of a bean and implies that the bean must be injected with the dependency at configuration. Otherwise, it will throw BeanInitializationException. Let’s look at the following example of how to use the @Required annotation:
public class Car
{private String brand;
@Required
public void setBrand(String brand)
{this.brand = brand;
}
public Integer getBrand()
{return brand;
}
}
In the preceding example, we can see that the setBrand() method was annotated with @Required; this indicates that the brand must be populated on initialization.
- @Autowired: We have encountered the @Autowired annotation several times in DI, and this is mainly used to inject dependencies without the use of constructors and setter methods. Let’s look at the following example of how to use the @Autowired annotation:
package com.springexample;
public class Car {@Autowired
private Brand brand;
}
We can see in the preceding example that @Autowired is applied directly in the field. This is because the annotations use reflection to inject dependencies, with more processes involved than constructors and setter methods.
- @ComponentScan: The annotation is a class-level annotation to indicate the packages we want to be scanned for beans. @ComponentScan can accept arguments about what specific packages are to be scanned, and not providing any will allow the current packages and all sub-packages. Let’s look at the following example of how to use @ComponentScan:
@Configuration
@ComponentScan
public class SpringApp
{private static ApplicationContext
applicationContext;
@Bean
public SpringBean springBean()
{return new SpringBean();
}
public static void main(String[] args) {applicationContext = new
AnnotationConfigApplicationContext(
SpringComponentScanApp.class);
}
}
We can see in the preceding example that the @ComponentScan app is applied to the Spring App class, and it is usually implemented together with the @Configuration annotation. Let’s say that SpringApp is found under the com.example.spring.app package; this will scan the package and its sub-packages if there are existing beans.
- @ComponentScan: The annotation is also a class-level annotation to indicate that a class is the source of bean definitions that the Spring container will process at runtime. Let’s look at the following example of how to use the @ComponentScan annotation:
@Configuration
public class SpringApp {@Bean(name="demoBean")
public DemoBean service()
{}
}
We can see in the preceding example that the @Configuration annotation is applied to the SpringApp class, which indicates that SpringApp will be the source of beans.
- @Bean: The annotation is a method-level annotation, and it is used to tell a method to produce a bean. Let’s look at the following example of how to use the @Bean annotation:
@Configuration
public class AppConfig {@Bean
public BeanExample beanExample() {return new BeanExampleImlp();
}
}
In the preceding example, the @Bean annotation is applied to the beanExample method. Once JavaConfig encounters the method, it will be executed and register the return value as a bean in BeanFactory, and the name will be the same as the method name when none is specified.
The @Bean annotation can also be configured in Spring XML, and the equivalent configuration is the following:
<beans>
    <bean name="transferService"
      class="com.acme.TransferServiceImpl"/>
</beans>
Stereotype annotations
Stereotype annotations are mainly used to create Spring beans on the fly in an application context. The following is a list of stereotype annotations:
- @Component: This is the primary stereotype annotation. As with the @Bean annotation, the @Component annotation is used to define a bean or a Spring component. The difference between the two is that @Component is applied at the class level while @Bean is applied at the method level.
The other difference is that the @Component class cannot also be used to create a bean if the class is outside the Spring container, whereas we can create a bean using @Bean even if the class is found outside the Spring container. Let’s look at the following example of how to use the @Component annotation:
@Component
public class Car
{
.......
}
We can see in the preceding example that @Component is applied to the Car class. This means that this will create a car bean at runtime. We also need to remember that @Component cannot be used with the @Configuration annotation.
- @Service: This annotation, used for the service layer, indicates that a class is used to execute business logic, perform calculations, and call external APIs. @Service is a kind of @Component annotation.
- @Repository: This annotation is used for classes that directly access a database. This is an indication of a class that executes the role of a data access object.
- @Controller: The annotations used for Spring controller classes. It is also a type of @Component annotation, used for Spring MVC and the methods annotated with @RequestMapping, which is used for REST.
Spring Boot annotations
These annotations are created explicitly for Spring Boot, and this is mostly the combination of several annotations. The following is a list of Spring Boot annotations:
- @EnableAutoConfiguration: This annotation is used to auto-configure the bean present in the classpath and then to configure it to run the methods. The annotation is now rarely used, as @SpringBootApplication has already been released in Spring 1.2.0.
- @SpringBootApplication: The annotation is the combination of @EnableAutoConfiguration, @ComponentsScan, and @Configuration.
REST annotations
These are specialized annotations used to create endpoints, specify the HTTP requests, and serialize return objects. The following list shows the different REST annotations:
- @RequestMapping: This is used to create endpoints and map web requests. The annotations can be used in a class or a method.
- @GetMapping: This maps the HTTP GET requests and is used for fetching data, and it is the equivalent of @RequestMapping(method = RequestMethod.GET).
- @PostMapping: This maps the HTTP POST requests and is used for creating data, and it is the equivalent of @RequestMapping(method = RequestMethod.POST).
- @PostMapping: This maps the HTTP PUT requests and is used for updating data, and it is the equivalent of @RequestMapping(method = RequestMethod.PUT).
- @DeleteMapping: This maps the HTTP PUT requests and is used for deleting data, and it is the equivalent of @RequestMapping(method = RequestMethod.DELETE).
- @DeleteMapping: This maps the HTTP PATCH requests and is used for partial updates on data, and it is the equivalent of @RequestMapping(method = RequestMethod.PATCH).
- @RequestBody: This is used to bind HTTP requests with an object in a method parameter. The Spring framework binds the HTTP request body of the parameter with the @RequestBody annotation.
- @ResponseBody: This attaches the method's return value to the response body. The annotation indicates that the return object should be serialized into a JSON or XML format.
- @PathVariable: This is used to get the values from the URI. It is allowed to define multiple @PathVariable instances in a method.
- @RequestParam: This is used to get the query parameters from the URL.
- @RequestHeader: This is used to extract the details about the incoming HTTP request headers. We use this annotation in the parameters of a method.
- @RestController: This is a combination of the @Controller and @ResponseBody annotations. The importance of this annotation is that it prevents annotating each method with @ResponseBody.
We have learned about the different types of annotations and their uses in Spring. Now, we will discuss and understand more in the next section the actual definition and importance of beans in Spring applications.
Understanding beans
We have already encountered beans several times in the previous section. We have learned how to create and initialize beans using @Bean and @Component annotations, but the main question is, what is the primary use of a bean in Spring applications?
A bean is the central concept of the Spring Framework we need to understand. It is essential to learn its purpose and functionality to use the Spring Framework effectively.
To define a bean in Spring, it is an object that forms the backbone of your application managed by the Spring IoC container. These are the objects that we mainly use for data and to inject dependencies to create multiple implementations. For better understanding, let’s have some examples of beans.
Let’s assume we have a domain class named Car:
public class Car
{
  private Brand brand;
  public Car (Brand brand)
  {
  this.brand = brand;
  }
}
We can see in the example that the car needs a Brand dependency. The Brand class has the following code:
public class Brand
{
  private String name;
  private int year;
  public Address(String name, int year)
  {
     this.name = name;
     this.year = year;
  }
}
The typical approach is to create a new instance of the Brand class and pass it as a parameter upon creating a new Car class. This approach will work fine, but this can cause issues when we have many classes. So, a better process is that instead of constructing dependencies by themselves, the objects can retrieve their dependencies from an IoC container in the form of beans.
So, what we only need to do is configure the beans and dependencies using annotations or XML to identify the dependencies required for a specific object. Let’s convert the previous example into a bean:
@Component
public class Car
{
 . . . .
}
We will annotate the Car class with the @Component annotation to identify the class as Bean:
@Configuration
@ComponentScan(basePackageClasses = Car.class)
public class Config
{
  @Bean
  public Brand getBrand() {
   return new Brand("Toyota", 2021);
  }
}
The next thing we need to do is create a configuration class. In the preceding example, we have annotated the class with @Configuration and @ComponentScan to identify that this is our configuration class; this will produce a Bean of type Brand, having configured the Brand class as a Bean. We will only need to pull the beans in the application context, and the dependencies are already injected:
ApplicationContext context = new AnnotationConfigApplicationContext(Config.class);
Car car = context.getBean("car", Car.class);
// execute function
car.getName()
car.getYear()
In the preceding example code, we can see that we have extracted the Car bean in the application context. Therefore, we can automatically use the getter methods of the Brand dependency; this means that the IoC container manages the beans and their dependencies.
Summary
With this, we have reached the end of this chapter. Let’s have a recap of the valuable things you have learned. You have learned the fundamentals of Spring Boot, its architecture, and the basics of REST. You have also learned how to use Spring Initializr to create your own Spring Boot project.
Dependency injection allows objects or classes to accept other dependencies that can implement different classes without writing them again. Annotations define the different types of beans; they are simply a form of metadata that marks our code to provide information.
And finally, beans are objects that form the backbone of an application managed by the Spring IoC container.
In the next chapter, we will be learning how to set up a database and use Spring Data JPA.