
6
Documenting APIs with the OpenAPI Specification
In the previous chapter, we learned how to develop our Spring Boot application. First, we configured our application to run on the server using IntelliJ. Then, we developed the different parts of the REST application, such as the models and entities, which serve as the objects; the services, which hold the business logic and call the JPA repository to perform CRUD operations in the database; and the controllers, which define the endpoints. We also learned how to apply Redis, which adds a caching mechanism to improve the performance of our REST APIs.
This chapter will focus on creating the documentation for our Spring Boot project. We will focus on configuring springdoc-openapi and Swagger UI and generating documentation on the fly for the endpoints that we have developed.
In this chapter, we will cover the following topics:
- Setting up springdoc-openapi
- Setting up Swagger UI
Technical requirements
The following link will take you to the finished version of this chapter: https://github.com/PacktPublishing/Spring-Boot-and-Angular/tree/main/Chapter-06/superheroes.
Setting up springdoc-openapi
In this section, we will configure springdoc-openapi in our Spring Boot application. Since we developed our REST APIs in the previous chapter, the next thing we need to do is create documentation for our endpoints. This is an essential part, especially in the development industry, as this will tell the developers what endpoints can be implemented, what the required requests and their formats are, and what response body to expect when calling the endpoint. This also reduces errors and conflicts regarding the API integration as the available endpoints are transparent. However, the major drawback of creating documentation manually is that it is tedious and error-prone. This is where springdoc-openapi comes into the picture.
First, let’s discuss what springdoc-openapi is. springdoc-openapi is a library that automates the generation of API documentation in Spring Boot projects. This automation is possible as the library uses annotations, class structures, and Spring configurations to identify the available APIs.
springdoc-openapi can generate the necessary documentation in JSON/YAML and HTML APIs that can be viewed with a newly generated URL on our application. It also supports several frameworks and protocols, including the following:
- spring-boot
- JSR-303, specifically for @NotNull, @Min, @Max, and @Size
- swagger-ui
- OAuth 2
Now, let’s discuss the properties and plugins of springdoc-openapi.
The properties of springdoc-openapi
We can modify the behavior and settings of .springdoc-openapi based on our preference. It has different properties, as we can set their values under the application.properties file.
Here are some of the commonly used properties in springdoc-openapi:
- springdoc.swagger-ui.path: The default value is /swagger-ui.html. It defines the path to access the HTML documentation.
- springdoc.swagger-UI.enabled: The default value is true. It enables or disables the swagger-UI endpoint.
- springdoc.swagger-ui.configUrl: The default value is /v3/api-docs/swagger-config. It is a URL that retrieves an external configuration document.
- springdoc.swagger-ui.layout: The default value is BaseLayout. It’s the top-level layout used by Swagger UI to display the documentation.
- springdoc.swagger-ui.tryItOutEnabled: The default value is false. It enables or disables the Try it out section, where the user can test the endpoints.
- springdoc.swagger-ui.filter: The default value is false. It enables or disables filtering and adds a textbox to place the filter criteria. It can be a Boolean or a string; this will act as the filter expression.
- springdoc.swagger-ui.operationsSorter: This applies a sort to the operations list of the API. The value can be 'alpha' (sort by paths alphanumerically), 'method' (sort by HTTP method), or a function that will identify the sorting criteria.
- springdoc.swagger-ui.tagsSorter: This applies a sort to the operations list of the API. The value can be 'alpha' (sort by paths alphanumerically) or a function that will identify the sorting criteria.
The plugins of springdoc-openapi
springdoc-openapi also has plugins that we can use to generate the documentation. Let’s take a look.
springdoc-openapi-maven-plugin
springdoc-openapi-maven-plugin generates a JSON and YAML OpenAPI description during build time. The plugin also works in the integration phase. To enable the plugin, we need to add the following declaration to the <plugin> section of the pom.xml file:
<plugin>
    <groupId>org.springframework.boot</groupId>
    <artifactId>spring-boot-maven-plugin</artifactId>
    <version>${spring-boot-maven-plugin.version}</version>
    <configuration>
       <jvmArguments>
         -Dspring.application.admin.enabled=true

       </jvmArguments>
    </configuration>
    <executions>
        <execution>
            <goals>
                <goal>start</goal>
                <goal>stop</goal>
            </goals>
        </execution>
    </executions>
</plugin>
We just added the spring-boot-maven-plugin plugin. Copy the preceding code and paste it into your .pom file.
Now, let’s add version 1.4 of springdoc-openapi-maven-plugin just below the spring-boot-maven-plugin plugin code block:
<plugin>
    <groupId>org.springdoc</groupId>
    <artifactId>springdoc-openapi-maven-plugin</artifactId>
    <version>1.4</version>
    <executions>
        <execution>
            <id>integration-test</id>
            <goals>
                <goal>generate</goal>
            </goals>
        </execution>
    </executions>
</plugin>
We can also customize the behavior of openapi-maven-plugin by specifying the following properties:
- attachArtifact: The default value is false. It deploys the API documentation to the repository.
- apiDocsUrl: The default value is http://localhost:8080/v3/api-docs. This is the local URL to the generated JSON or YAML description.
- outputDir: The default value is project.build.directory. This is where the OpenAPI description is generated.
- outputFileName: The default value is openapi.json. This specifies the filename when the OpenAPI description is generated.
- skip: This skips execution if it is set to true.
- headers: The default value is empty. It specifies the list of headers to send in the request.
The following code example shows how to use these properties:
<plugin>
 <groupId>org.springdoc</groupId>
 <artifactId>springdoc-openapi-maven-plugin</artifactId>
 <version>${version}</version>
 <executions>
  <execution>
   <id>integration-test</id>
   <goals>
    <goal>generate</goal>
   </goals>
  </execution>
 </executions>
 <configuration>
  <apiDocsUrl>
    http://localhost:8080/v3/api-docs</apiDocsUrl>
  <outputFileName>openapi.json</outputFileName>
  <outputDir>/home/springdoc/output-folder</outputDir>
  <skip>false</skip>
  <headers>
    <header1-key>header1-value</header1-key>
  </headers>
 </configuration>
</plugin>
In the preceding example XML code, we have added several properties to apply custom configuration for OpenAPI. We have manually set the output filename, directory, and headers for generating the API documentation.
springdoc-openapi-gradle-plugin
springdoc-openapi-gradle-plugin generates the OpenAPI specification for a Spring Boot application from a Gradle build. To enable the plugin, we must place the following code in our plugins section:
plugins {
      id "org.springframework.boot" version "${version}"
      id "org.springdoc.openapi-gradle-plugin"
          version "${version}"
}
Once the plugins and dependencies have been added, the following tasks will be created:
- generateOpenApiDocs: The job that will be run to generate the OpenAPI documentation. generateOpenApiDocs makes a REST call to the application’s documentation URL to store the OpenAPI docs in JSON format.
- forkedSpringBootRun: The Spring Boot application runs in the background using this task.
We can also customize the behavior of openapi-graven-plugin by specifying the following properties:
- apiDocsUrl: The URL where the Open API documentation can be downloaded
- outputDir: The directory where the documentation is generated
- outputFileName: The name of the generated output file
- waitTimeInSeconds: The time to wait in seconds for the Spring Boot application to start before calling the REST APIs to generate the OpenAPI documentation
- forkProperties: A system property that’s required for running your Spring Boot application
- groupedApiMappings: A set of URLs from where the OpenAPI documentation can be downloaded
To use these properties, we must specify them using generateOpenApiDocs:
openApi {
    apiDocsUrl.set("https://localhost:4000/api/docs")
    outputDir.set(file("$buildDir/docs"))
    outputFileName.set("swagger-test.json")
    waitTimeInSeconds.set310)
    forkProperties.set("-Dspring.profiles.active=special")
    groupedApiMappings.set(
      ["https://localhost:8000/v3/api-docs/group-1" to
       "swagger-group-1.json",
       "https://localhost:8000/v3/api-docs/group-2" to
       "swagger-group-2.json"])
}
With that, we have learned about the properties and plugins that we can use in OpenAPI docs. Now, let’s configure the plugin for our Spring Boot application.
Configuring springdoc-openapi
Now, we will install and configure springdoc-openapi in our Spring Boot application. First, we must add the dependency to the previous project we made. Go to the pom.xml file and add the following XML code:
 <dependency>
      <groupId>org.springdoc</groupId>
 <artifactId>springdoc-openapi-ui</artifactId>         <version>1.6.4</version>
</dependency>
After successfully installing the OpenAPI dependency, we can run our Spring Boot project. Once the server has started, we can go to http://localhost:8080/v3/api-docs/ to access the OpenAPI documentation in JSON format. You will see that all of your endpoints and their associated HTTP requests are displayed as JSON objects. The following is a snippet of the generated JSON documentation for our project:
{
  "servers": [
    {
      "url": "http://localhost:8080/",
      "description": "Generated server url"
    }
  ],
  "paths": {
    "/api/v1/anti-heroes/{id}": {
      "get": {
        "tags": [
          "anti-hero-controller"
        ],
        "operationId": "getAntiHeroById",
        "parameters": [
          {
            "name": "id",
            "in": "path",
            "required": true,
            "schema": {
              "type": "string",
              "format": "uuid"
            }
          }
        ],
        "responses": {
          "200": {
            "description": "OK",
            "content": {
              "*/*": {
                "schema": {
                  "$ref": "#/components/schemas/AntiHeroDto" …… // other created paths UPDATE DELETE and CREATE Inputs
Here, we can see that the generated JSON object displays the available endpoints in our project. It is shown together with the operation ID, which is the default name of the method; it also specifies the parameters with the types required and the possible responses of the endpoint.
We have used the default URL where OpenAPI can be accessed. We can change the URL using the application’s springdoc.api-docs.path property.properties file. For example, we have set it to springdoc.api-docs.path=rest-docs, which means we can now access the JSON document using http://localhost:8080/rest-docs/.
We can also access the YAML version of the documentation by accessing http://localhost:8080/v3/api-docs.yaml.
With that, we have successfully generated the documentation for our endpoints using springdoc-openapi. In the next section, we will learn how to configure, access, and use Swagger UI.
Setting up Swagger UI
Swagger UI is a documentation tool that allows users to call the available APIs in your project directly from a browser. This is a more interactive tool that enables a more detailed and practical use of the APIs. Swagger UI is also open source, enabling more communities to support the tool.
Installing and using Swagger UI
Swagger UI is already included under the springdoc-openapi-ui dependency. We have already included the OpenAPI extension code by adding the following code:
<dependency>
      <groupId>org.springdoc</groupId>
      <artifactId>springdoc-openapi-ui</artifactId>
      <version>1.6.4</version>
</dependency>
The OpenAPI dependency includes the Swagger UI extension; we can access the UI with the following URL: http://localhost:8080/swagger-ui.html. This will open the Swagger UI’s OpenAPI definition page:
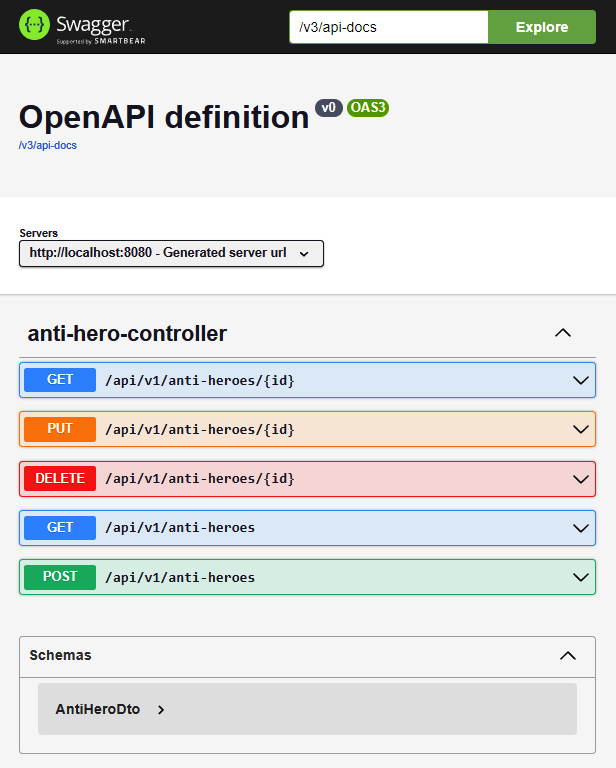
Figure 6.1 – The Swagger UI’s OpenAPI definition page
Here, we can see that our Swagger UI has been accessed successfully. Our created endpoints in the Spring Boot project are also displayed, together with their HTTP methods. Let’s discuss the different parts of the Swagger UI documentation.
The first thing we can see in Swagger UI is that it contains text input, alongside the Explore button. This is where Swagger UI gets the list of endpoints it will render. In the preceding example, we can see that the default value is v3/api-docs. This means that the JSON documentation we have generated using the OpenAPI library is being used by Swagger to get the available endpoints.
We can change this and access the URL that contains the OpenAPI documentation in JSON or YAML format. The next component we will see is the list of available endpoints in our project. In the preceding example, the five endpoints we have developed are listed in Swagger UI. This is not a list as the Swagger UI tool is interactive, allowing us to try the available endpoints.
Let’s have a look at the following example:

Figure 6.2 – POST request for anti-heroes
We can expand the /api/v1/anti-heroes endpoint to create a new Anti-Hero object in our database since this is using the POST HTTP method. The schema of the object we need to pass in our request body is specified. It defines both the names and the types of properties. In this case, the Anti-Hero entity has the following schema:
{
  "id": "3fa85f64-5717-4562-b3fc-2c963f66afa6",
  "firstName": "string",
  "lastName": "string",
  "house": "string",
  "knownAs": "string"
}
The possible responses are also specified in the example endpoint. The possible response has a status of 200, which specifies success. It will also return the newly created entity in the database.
We want to test the endpoint and insert some example data into the database. To do this, we must click the Try it out button, which can be found at the top right, and click the Execute button to call the endpoint. Once the API call is successful, we will see the following output:
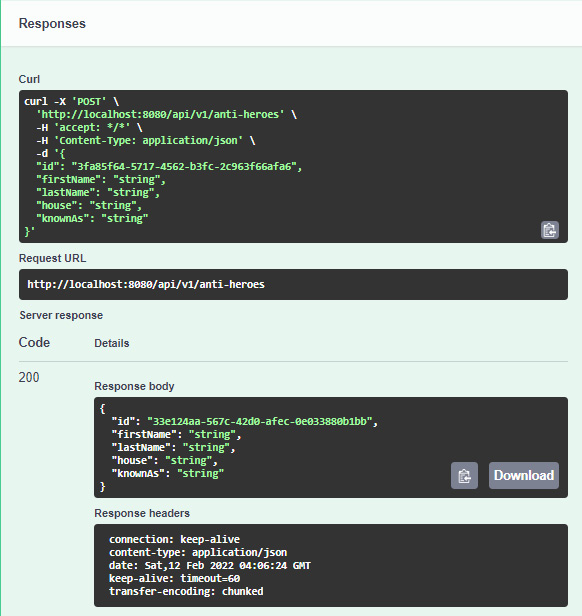
Figure 6.3 – Response from the POST request
Here, we can see that the API returned successfully as it returned a Code of 200 and the newly created entity in the database.
We can check whether our endpoint has successfully inserted the data into our table by accessing pgAdmin, as shown in the following screenshot:
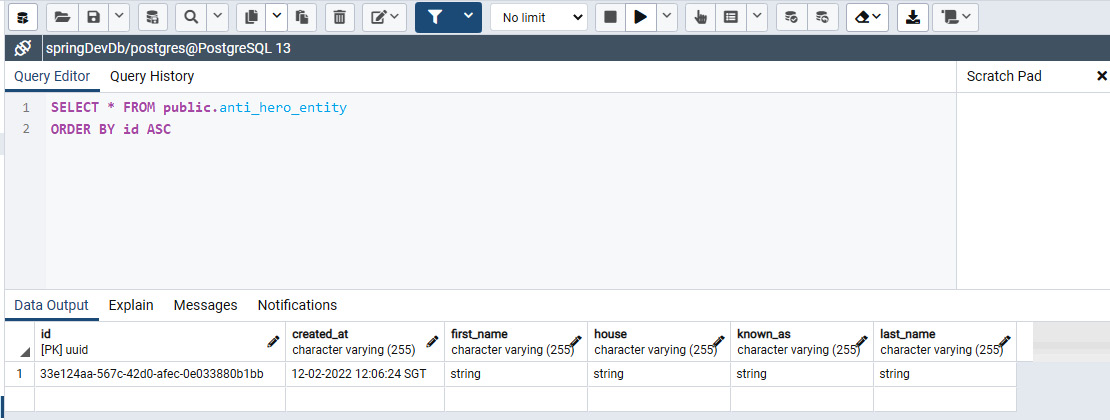
Figure 6.4 – Verifying whether data has been inserted from the POST request
In the preceding example, we can see that our data has been inserted successfully into our table. Now, we can test the other available endpoints by getting, updating, or deleting the data we have created in the database.
We have successfully navigated through the Swagger UI tool and interacted with the available endpoints, but we can also modify Swagger UI based on our preferences and requirements by using properties, similar to what we can do with the OpenAPI documentation. We can also modify the URL to access Swagger UI; for example, we can place springdoc.swagger-ui.path=/{custom-path}.html in the application.properties file.
The other behavior we can also modify is the sorting behavior of our endpoints. We can change how the endpoints are arranged in the list in terms of alpha (arranged alphanumerically) or method (arranged by methods), or we can use a custom function to change the sorting method. For this, we can place springdoc.swagger-ui.operationsSorter=(sort behavior) in the application.properties file.
In this example, we will use springdoc.swagger-ui.operationsSorter=method. We will see the following output:
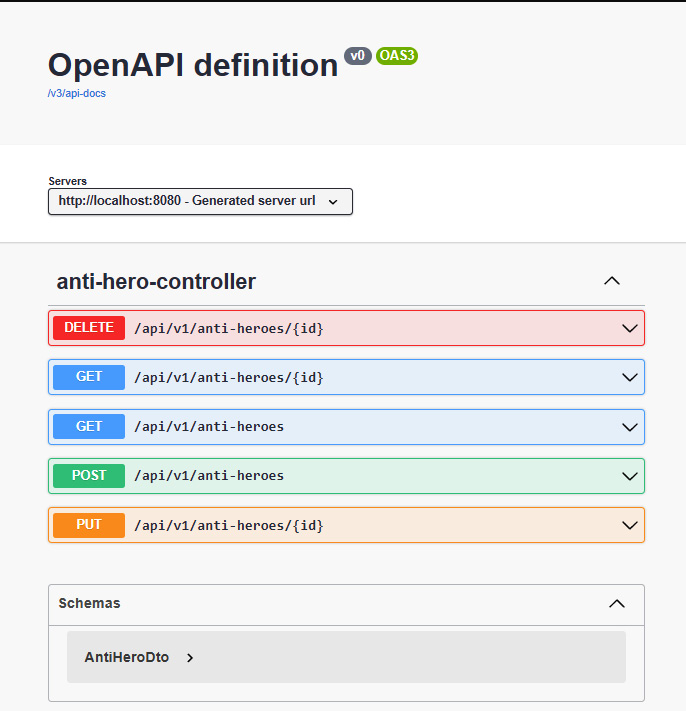
Figure 6.5 – Endpoints arranged by methods
As we can see, our endpoints are now arranged by the HTTP methods.
Displaying pagination information in Swagger UI
Swagger UI can also be integrated with endpoints that use pagination. We can specify the page number, the size of the list on each page, and the sorting expression. For us to integrate the pagination parameters in Swagger UI, we need to add the springdoc-open-data-rest dependency.
To add the library, we must add the following code to our pom.xml file:
<dependency>
   <groupId>org.springdoc</groupId>
   <artifactId>springdoc-openapi-data-rest</artifactId>
     <version>1.6.4</version>
</dependency>
After successfully adding the library, let’s modify our getAntiHeroes method under AntiHeroesController so that we have a working pagination feature:
…. import org.springframework.data.domain.Pageable;
@GetMapping
public List<AntiHeroDto> getAntiHeroes(Pageable pageable) {
    int toSkip = pageable.getPageSize() *
                 pageable.getPageNumber();
    var antiHeroList = StreamSupport
            .stream(service.findAllAntiHeroes().spliterator(), false)
            .skip(toSkip).limit(pageable.getPageSize())
            .collect(Collectors.toList());
    return antiHeroList
            .stream()
            .map(this::convertToDto)
            .collect(Collectors.toList());
}
Now, let’s expand api/v1/anti-heroes, which uses the GET method:
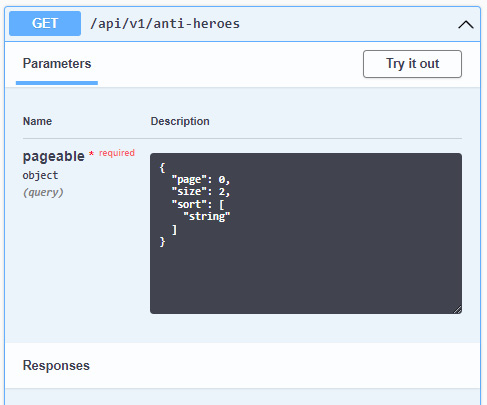
Figure 6.6 – GET method for anti-heroes
Here, we can see that the Parameters section has a pageable property and that we can specify the page we want to retrieve, the size of each page, and the sorting expression. Now, we can execute it to retrieve the data from the database.
Summary
With this, we have reached the end of this chapter. Let’s recap the valuable things you have learned.
First, you learned about the available features and properties of springdoc-openapi and how to configure and use the OpenAPI specification to generate the JSON and YAML documentation for our API calls. You also learned how to access Swagger UI, an interactive documentation tool for calling APIs directly in a browser. We simulated this to send test calls and modify certain behaviors, such as the domain URL and the sorting order. This newly acquired knowledge for generating documentation for APIs is very useful in real-world applications. This knowledge is used by developers to easily identify the available APIs that can be consumed, as well as their parameters and object responses.
In the next chapter, we will learn about the concept of Cross-Origin Resource Sharing (CORS), Spring Security, and JSON Web Tokens (JWTs).