
17
Deploying Spring Boot and the Angular App
In the previous chapter, we learned what frontend-maven-plugin does and what we use it for. Then, we learned what configuration to write to run the Angular application within the Spring Boot application. After that, we learned how to package the two applications as one file. Lastly, we learned how to run the Spring Boot application with Angular.
This chapter will teach you the basics of GitHub Actions, the basics of Heroku, and how to deploy the app using Heroku.
In this chapter, we will cover the following topics:
- Understanding GitHub Actions
- Components of GitHub Actions
- Setting up Heroku
- Creating a CI workflow or pipeline
Technical requirements
The following link will take you to the finished version of this chapter: https://github.com/PacktPublishing/Spring-Boot-and-Angular/tree/main/Chapter-17/superheroes.
Understanding GitHub Actions
Let’s start by defining GitHub Actions. This platform provides workflow automation for developers and operations for continuous integration and continuous delivery (CI/CD). It can run a series of actions using scripts whenever someone creates a pull request, creates an issue, joins as a contributor, merges a pull request, and so on. In short, there are several events in your GitHub workflow that you can use to run a set of specific actions or scripts.
Now, let’s review some of the components of GitHub Actions.
Components of GitHub Actions
Now that we’ve learned what GitHub Actions is, let’s see the components of GitHub Actions that help us do DevOps and run workflows when events get triggered.
Here are the components of GitHub Actions:
- Workflows: This is a configurable YAML file in a repository’s directory, such as .github/workflows, that runs jobs manually, automatically triggers an event, or does so by setting a schedule.
- Events: Events are activities in a repository that cause your workflow to start running. Common events you might see in a workflow file are pull_request, push, and schedule. However, other events can be useful, depending on your needs.
- Jobs: A job is a set or group of steps (script or action) in a workflow. A particular job executes in the same runner throughout the steps.
- Actions: An action performs the task at hand or anything you need, such as checking out your repository, building your application, testing your application, scanning your code for any vulnerabilities, or deploying your application.
- Runners: Runners are just servers. You can choose Ubuntu Linux, Microsoft Windows, or macOS runners in GitHub Actions. However, you are not limited to these three operating systems. You can also have self-hosted runners.
These are the components of GitHub Actions that we will use later in the Creating a CI workflow or pipeline section. But before that, we will set up Heroku, where we will deploy our full-stack application.
Setting up Heroku
In this section, we will use Heroku. It is a Platform-as-a-Service (PaaS) offering that lets us build and run applications in the cloud. Let’s learn how to set up Heroku and our applications.
Creating GitHub and Heroku accounts
In this section, we will create an account for GitHub and then Heroku.
First, we must create a GitHub account by going to https://github.com/. We will use this as the repository for our project.
Then, we must create a Heroku account by going to https://www.heroku.com/. This is where we will deploy our application and create an instance of our database.
Creating a new app in Heroku
After signing in to Heroku, click the New button at the top-right corner of the page and click the Create new app button to create an app without a pipeline:

Figure 17.1 – Create new app
Figure 17.1 is where you create a new app for the full-stack application. Name the app anything you wish and choose a region, but don’t add a pipeline.
Next, we will add a database for our full-stack application.
Adding a Postgres database
Now, let’s add a Postgres database:

Figure 17.2 – Find more add-ons
Figure 17.2 shows where you can find the Find more add-ons button. This is where you can find Heroku add-ons and various tools and services for developing, extending, and operating your application. An example of this can be seen in Figure 17.3:

Figure 17.3 – Heroku Postgres
Figure 17.3 shows the Heroku Postgres add-on, which is a Database-as-a-Service (DaaS) offering based on PostgreSQL. Click it, install it, and then choose the free plan and provision the Heroku Postgres add-on to the full-stack application you created earlier. Then, click the Submit Order Form button.
- Go back to the Resources tab of your app. You should see the Heroku Postgres add-on. Click the Heroku part of Heroku Postgres; a new tab will open.
We have almost finished adding a database. We just need to add a Dataclip, which will let us create SQL queries for our database.
- Go ahead and click the Create Dataclip button. Then, add the following SQL queries:
set transaction read write;
CREATE EXTENSION IF NOT EXISTS "uuid-ossp";
CREATE TABLE user_entity
(
id uuid PRIMARY KEY DEFAULT uuid_generate_v4(),
username VARCHAR(50) UNIQUE NOT NULL,
password VARCHAR(50) NOT NULL,
email VARCHAR(255) UNIQUE NOT NULL
);
CREATE TABLE anti_hero_entity
(
id uuid PRIMARY KEY DEFAULT uuid_generate_v4(),
firstName VARCHAR(50) UNIQUE NOT NULL,
lastName VARCHAR(50) UNIQUE NOT NULL,
house VARCHAR(50) NULL,
knownAs VARCHAR(50) NULL,
createdAt TIMESTAMP NULL
);
- Once you’ve added these SQL queries to the editor, click Save & Run.
With that, the database has been created. Now, let’s create a system.properties file where we can declare the Java runtime version and Maven version.
Adding system properties
In this section, we will create a file that will specify a Java version and a Maven version using system.properties.
Go to the root directory of the Spring Boot application and create a file called system.properties. Then, add the following configurations:
java.runtime.version=17.0.1
maven.version=3.6.2
The preceding two configurations will be used in the deployment part of the full-stack application in Heroku.
In the next section, we will get the domain URL of our app and add it to the config variables.
Adding config variables
In this section, we are going to add config variables in Heroku. In our repository, we will add CLIENT_URL to Heroku’s config vars section and the environment.prod.ts file for the frontend application. Follow these steps:
- The first step is to get the application’s domain name, which can be found by going to the Settings tab:

Figure 17.4 – Application URL
Figure 17.4 shows the application URL where the application will render.
- Copy the URL of your full-stack application and go to the Config Vars area of the Settings tab. Click on the Reveal Config Vars button:

Figure 17.5 – Reveal Config Vars
- Add CLIENT_URL as a Key and add the URL of the application as a Value:

Figure 17.6 – Edit config variable
Figure 17.6 shows the form after adding environment variables or configuration variables.
Don’t forget to add a value to your JWT secret. However, note that your development and production environments should differ.
- Now, open the environment.prod.ts file and add the following code:
export const environment = {production: true,
// your Spring API URL
apiURL: "https://full stack
javaangulartestapp.herokuapp.com/api/v1",
// your heroku URL
authURL: "https://full stack
javaangulartestapp.herokuapp.com"
};
The preceding code will replace the previous localhost:8080 address of apiURL and authURL in the Angular application in production.
Next, we need to publish the full-stack application repository to GitHub since we will deploy the application through GitHub source control.
Manual deployment in Heroku
In this section, we are going to check if the application will run without any problems after we deploy it. Follow these steps:
- To do that, go to the Deploy tab of your application in the Heroku dashboard:

Figure 17.7 – Deploying the application
Figure 17.7 shows where to deploy an application via the Heroku dashboard manually. Use GitHub as the deployment method, then search your repository.
- After choosing the repository of your full-stack application, go to the bottom of the page, where you will find the Manual deploy section. Then, press the Deploy Branch button to start deploying and running the application in Heroku:

Figure 17.8 – Manual deploy
Figure 17.8 shows the Manual deploy section of Heroku.
- To check if everything is working, wait for the deployment to finish and then go to the URL of the application.
- Register a new user and try to sign in. Make sure you open the Network tab of your browser; you will see that the requests are being sent via the application’s URL. Note that the responses from the server have a Status Code of 200 or 201:

Figure 17.9 – The Network tab of Google Chrome
Figure 17.9 shows Google Chrome’s Network tab in developer tools. Here, you can see that the register request returns Status Code 201. The Angular, Spring Boot, and Heroku Postgres database works perfectly.
Now that we’ve finished manually deploying our full-stack application, let’s create an automated deployment using workflow in GitHub Actions.
Creating a CI workflow or pipeline
In this section, we will automate the deployment of our full-stack application by using a workflow in GitHub Actions. Follow these steps:
- Go to the GitHub repository of your project, then click on the Actions tab. Search for Publish Java Package and pick the Maven workflow:

Figure 17.10 – Selecting a workflow
Figure 17.10 shows the basic and ready-made Maven workflow for building Maven projects.
- Change the content of the YAML file in the editor by replacing it with the following YAML configuration:
name: CICD
on:
push:
branches:
- master
jobs:
test:
name: Build and Test
runs-on: ubuntu-latest
steps:
- uses: actions/checkout@v2
- name: Set up JDK 17
uses: actions/setup-java@v2
with:
java-version: '17.0.*'
distribution: 'temurin'
cache: maven
- name: test with Maven
run: mvn test
deploy:
name: Deploy to Heroku
runs-on: ubuntu-latest
needs: test
steps:
- uses: actions/checkout@v2
# This is the action
- uses: akhileshns/[email protected]
with:
heroku_api_key: ${{secrets.HEROKU_API_KEY}}heroku_app_name: "appname" #Must be unique
#in Heroku
heroku_email: "email"
The preceding code is the workflow for our full-stack application’s CI/CD. It’s called CICD because that’s what this workflow is for.
The workflow has one event, push, which will cause the workflow to run if there’s a push in the master branch.
The workflow also has two jobs: test and deploy. The test job’s steps are to check out the code, build the application using Java 17, and run the test. On the other hand, the deploy job’s steps are to check out the code and use the Heroku deploy action, which requires a Heroku API key, the application’s name, and the Heroku account’s email.
- For the Heroku API key, you need to go to the Account settings menu of your profile on your Heroku dashboard:

Figure 17.11 – Account settings
Figure 17.11 shows the Account settings menu under my profile on the Heroku dashboard.
- Click Account settings, then go to API Key and generate an API key:

Figure 17.12 – API Key
Figure 17.12 shows where you can generate a Heroku API key.
Copy the Heroku API key since you will need to create a new Actions secret for GitHub Actions.
- To do so, go to the GitHub repository of your application and open a new browser tab for the Settings tab so that you don’t lose your workflow configuration.
- Then, add the API key in the text area and name it HEROKU_API_KEY. This is the key you will be using in the deploy job of your workflow:

Figure 17.13 – The Actions secrets form
Figure 17.13 shows where you can add a new Actions secret to keep your sensitive values from being copied or read by anyone.
- Once you’ve added a new secret, go back to your browser tab, where you start editing your workflow. Then, commit the file that you are editing:

Figure 17.14 – Committing a workflow
Figure 17.14 shows the Start commit dropdown, where you can commit the new workflow. The new YAML file will be added to your repository, which means you can git pull it later so that it will be on your local machine.
- CICD will kick in after you commit to your workflow. You can look at the progress of your CI/CD workflow by going to the Actions tab:

Figure 17.15 – Workflow status
Figure 17.15 shows the current status of the CI/CD workflow. You can see that it is running the Build and Test job.
- You can also see what’s happening in a particular job by clicking the name of the job via the left sidebar menu:
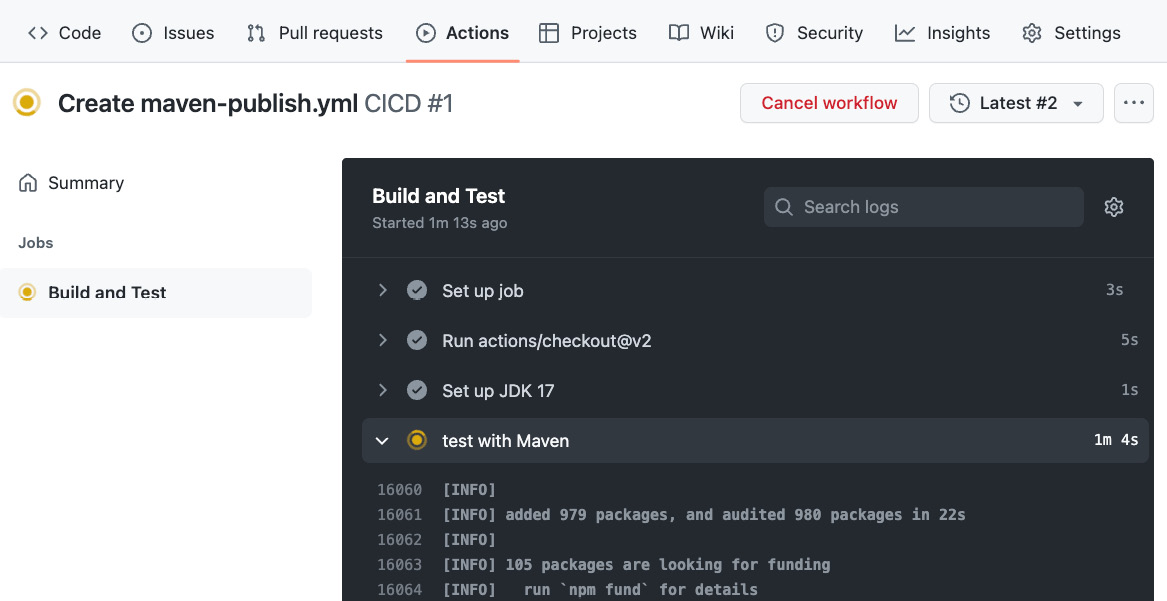
Figure 17.16 – Steps and Actions status
Figure 17.16 shows the output logs from each step in the Build and Test job. You can also use this part of GitHub Actions to debug errors that lead to the jobs and actions failing.
- After running all the jobs in the CI/CD workflow you have created, you will see that the workflow has a green check icon next to it, meaning that the workflow has passed and everything is working:

Figure 17.17 – Steps and Actions status
Figure 17.17 shows a passing GitHub workflow on the Actions tab of your repository.
- Lastly, to check if the deployment automation has deployed our application in the Heroku cloud, we have to go back to the overview dashboard of Heroku and look for the latest activity:

Figure 17.18 – Build succeeded in the Latest activity area of an account in Heroku
Figure 17.18 shows that the build triggered by GitHub Actions succeeded. You can see that the application is running correctly.
With that, we have managed to automate our CI/CD workflow using GitHub Actions. Now, let’s summarize what we have learned in this chapter.
Summary
With that, we have reached the last chapter of this book; let’s recap the valuable things you have learned in this chapter.
First, you learned that GitHub Actions makes it easy to automate all your software workflows and perform CI/CD. You can build, test, and deploy your code right from GitHub. You also learned that Heroku is a PaaS that lets you build, run, and operate applications entirely in the cloud. Heroku Postgres is a managed SQL database service provided directly by Heroku that you can use for your applications.
So, you’ve made it this far. Thank you for finishing the book; I am proud of you and your enthusiasm for learning new tools and things. You can apply what you have learned here to a project, given that the requirements of your project match the problems and solutions you have learned about in this book.
This course has taught you how to build a Spring Boot 2 application and an Angular 13 application as a senior developer, bringing value to your companies, customers, and clients.
As a next step, my recommendation is that you get a new Packt book about standalone Spring Boot 2 or Spring Boot 3, or an Angular book to solidify what you have learned from this book.
On behalf of the Packt team and editors, we wish you all the best in all stages of your career and life.