
4
Setting Up the Database and Spring Data JPA
In the previous chapter, you learned about Spring Boot’s fundamentals to develop our backend application, such as dependency injection, beans, and annotations. In addition, we now know how to create a Spring Boot project using Spring Initializr.
This chapter will teach you how to connect your Spring Boot application to a database by adding a PSQL container and PostgreSQL dependencies and accessing data using the Java Persistence API (JPA).
In this chapter, we will cover the following topics:
- Connecting to database using a PSQL container
- Spring Data JPA
- Adding Spring Data JPA and PostgreSQL dependencies
- Connecting to a database
Technical requirements
Here is what you need to complete this chapter:
- PostgreSQL: https://www.postgresql.org/download/windows/
- pgAdmin: https://www.pgadmin.org/download/
- Docker: https://docs.docker.com/get-docker/
Connecting to a database using a PSQL container
This section will teach us how to set up and configure our PostgreSQL in our terminal by using the conventional method, using the installer, or through a Docker container. But first, let’s discuss what PostgreSQL is and what its advantages are.
PostgreSQL
PostgreSQL is an open source object-relational database system that uses the SQL language to store and handle complicated and large workloads. PostgreSQL also supports both SQL (relational) and JSON (non-relational) querying. It is commonly used as primary data storage for geospatial and analytics applications because of its flexibility and rich features. Its community has improved and continuously backed it for more than 20 years to add more features and reliability to the database system.
PostgreSQL’s flexibility means that it is widely used in developing applications. Here are some of the everyday use cases:
- Scientific data: Research projects can be demanding in storing data, which requires effective and efficient handling. PostgreSQL provides analytical features and a powerful SQL engine that can process a large amount of data.
- Financial industry: PostgreSQL is used in financial companies because of its analytical capabilities and easy integration with mathematical software such as MATLAB and R.
- Web applications: PostgreSQL is also used widely in web applications because apps nowadays require processing thousands of pieces of data. It is compatible with modern web frameworks such as Node.js, Hibernate PHP, and Django.
- Government GIS data: PostgreSQL offers extensions such as PostGIS that provide functions to process geometric data.
The features of PostgreSQL
Here’s a list of some of the features that PostgreSQL offers:
- Compatibility with multiple data types: PostgreSQL is compatible with several data types:
- Supports different features of SQL: It offers the various features of SQL, such as the following:
- Multiple indexing, such as B-tree and expressions
- SQL subselects
- Complex SQL queries
- Multi-Version Concurrency Control (MVCC):
- Table partitioning
- Data integrity compatibility: It also offers data integrity, which includes the following:
- Primary keys
- Foreign keys
- Explicit locks
- Advisory locks
- UNIQUE
- NOT NULL
- Secure database: It adheres to standard security protocols, which includes the following:
- Highly extensible: It offers several features, making it modifiable, such as the following:
Now that we have an overview of the features and use cases of PostgreSQL, let’s move on to installing it on our terminal.
Installing PostgreSQL
There are two ways for us to set up our PostgreSQL in our development terminal. The two approaches are as follows:
- Conventional method: Download the installer directly from the PostgreSQL website.
- PostgreSQL on a Docker container: Connect our application directly to a container.
The conventional method – installation on Windows, macOS, and Linux
PostgreSQL was mainly developed for Unix-like platforms. However, it was created to be portable and can be installed on Windows and macOS platforms.
The first step we need to take is to download the PostgreSQL installer through this URL: https://www.enterprisedb.com/downloads/postgres-postgresql-downloads.
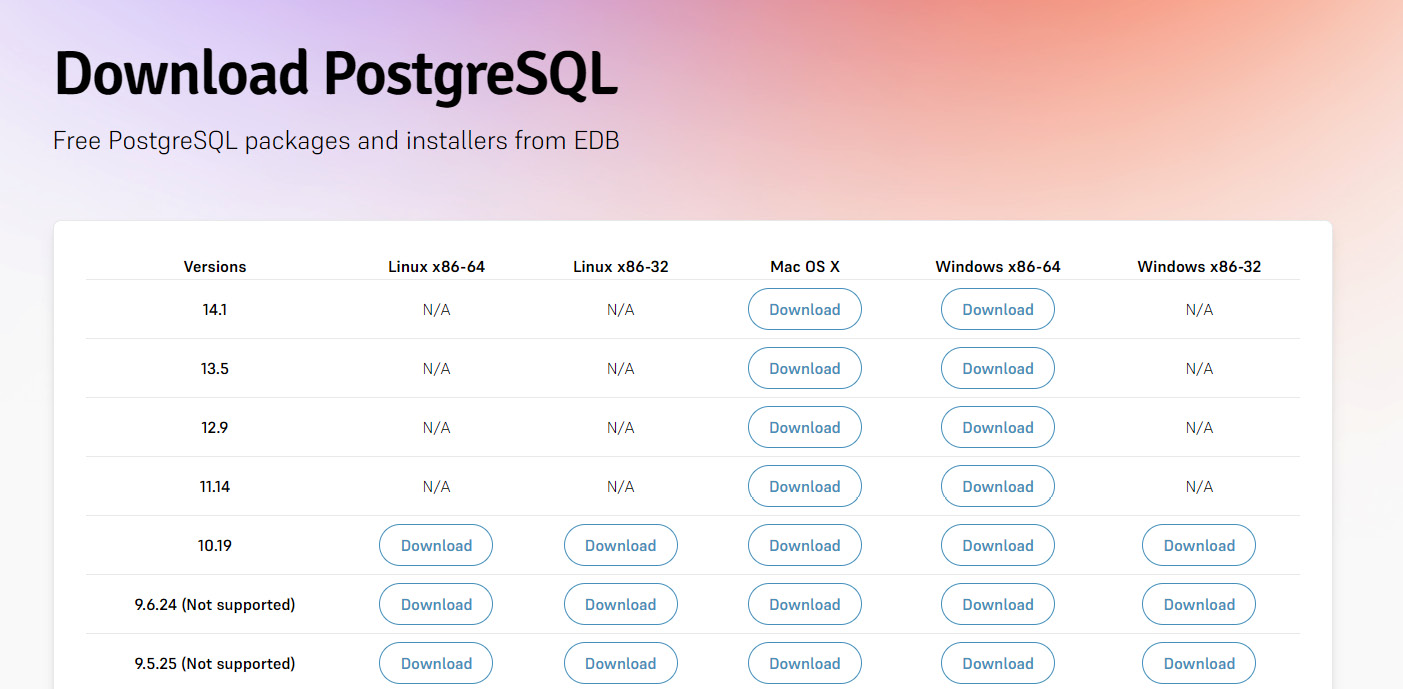
Figure 4.1 – PostgreSQL installation
The steps for the three operating systems are the same, and we only need to configure some settings:
- Click the latest version (14.1) and download the installer, depending on your operating system.
- After a successful download, open the installer, click Next, and specify the path where PostgreSQL will be installed:
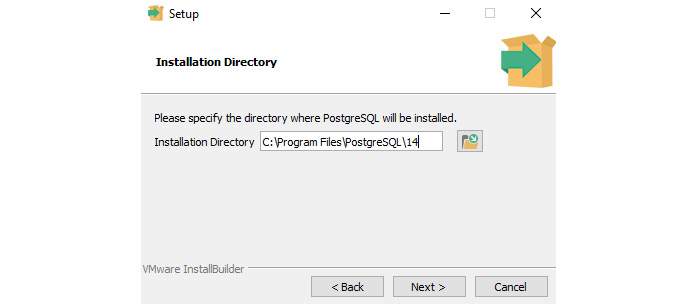
Figure 4.2 – The PostgreSQL installer (specify the path to install)
In the preceding example, we have chosen the default installation path. Click Next again, which will ask us what components we want to install. The components that we select are as follows:
- PostgreSQL Server: Installs the server where our database will run
- pgAdmin 4: A GUI management tool for interacting with the database
- Stack Builder: A GUI that allows us to download and install drivers that are compatible with PostgreSQL
- Command Line Tools: Provides interaction with PostgreSQL using command-line tools:
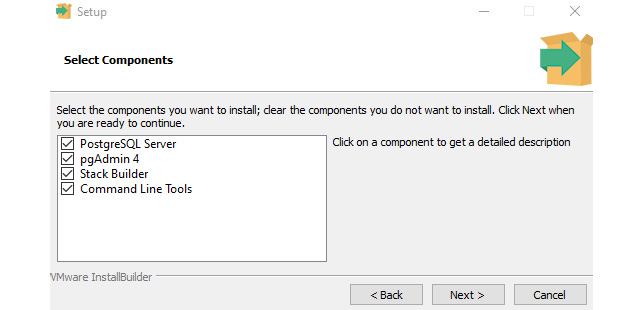
Figure 4.3 – The PostgreSQL installer (select the needed components)
We have checked all the components in the preceding example, as we will need all of them throughout our development.
- Click Next again, and you will be asked to specify the directory to store the data:
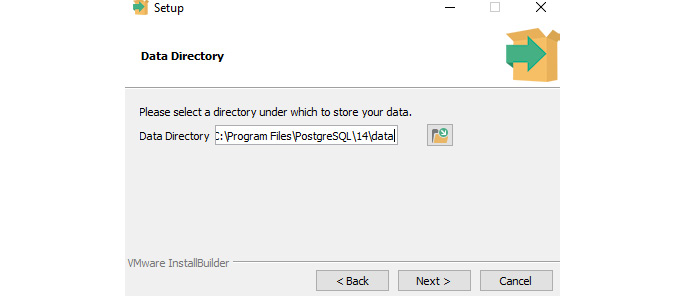
Figure 4.4 – The PostgreSQL installer (select the directory for the data)
In the preceding example, we can see that the default path is the same as where PostgreSQL is installed, and it has created a new folder named data. It is recommended that you use the default path.
- Click Next, which will let you configure the password for the super user (postgres).
- Click Next, which will allow you to set the port to be used for the postgres database.
- Click Next again, and you will now be asked what locale should be used for the database cluster:
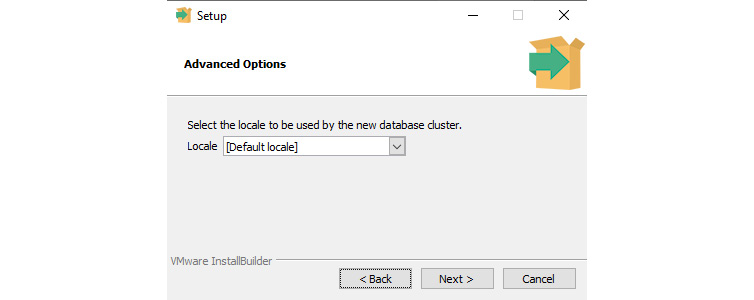
Figure 4.5 – The PostgreSQL installer (select a locale for the database cluster)
In the preceding example, we have selected [Default locale] as our locale for the database.
- Click Next again, which will display all of the settings we have configured; make sure all the details are correct before proceeding.
- After reviewing, click Next, which will now install PostgreSQL in our terminal.
After installation, we can verify whether PostgreSQL is installed successfully by checking the currently installed version.
- To do this, open SQL Shell (psql) and enter the information of our databases, such as Server, Port, Database, Username, and Password.
- Since we have used the default settings, we can press Enter until password confirmation. After successful validation of our password, execute the select version() command to display the currently installed PostgreSQL:
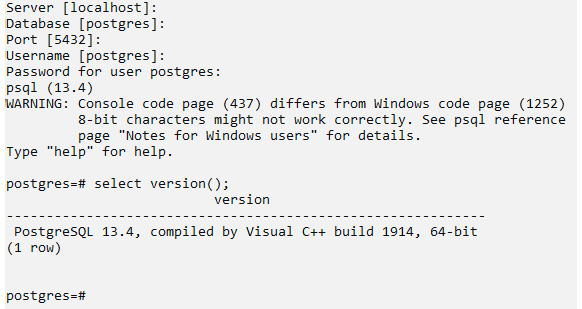
Figure 4.6 – The PostgreSQL installer (displaying the version of PostgreSQL)
In the preceding example, we can see that we have successfully installed PostgreSQL version 13.4 on our terminal.
Now, let’s learn how to install and configure PostgreSQL using Docker.
PostgreSQL on a Docker container
We have installed PostgreSQL on our terminal using the conventional installer; now, we will learn to configure PostgreSQL using Docker. This method will help us skip the complex steps in configuring PostgreSQL for us to start with development and provide a GUI for database management:
- The first step you need to do is install Docker on your terminal. You can install Docker at the following link: https://docs.docker.com/get-docker/. For documentation on the system requirements and installation steps for Docker, you can refer to this link: https://docs.dockerocker.com/desktop/windows/install/.
- After successful installation of Docker, open Docker Desktop and start Docker on your Terminal. Then, open your command line and execute the following command:
Docker run --name postgresql-container -p 5434:5434 -e POSTGRES_PASSWORD=pass -d postgres
The preceding command will pull the PSQL from Docker-hub. The postgresql-container part in the command can be replaced, as this is a container name that we can define. The POSTGRES_PASSWORD parameter is the password for the postgres admin, which we can also configure.
- After executing the command, we can verify the newly created container by executing the Docker ps -a command or viewing Docker Desktop to check the list of containers running:
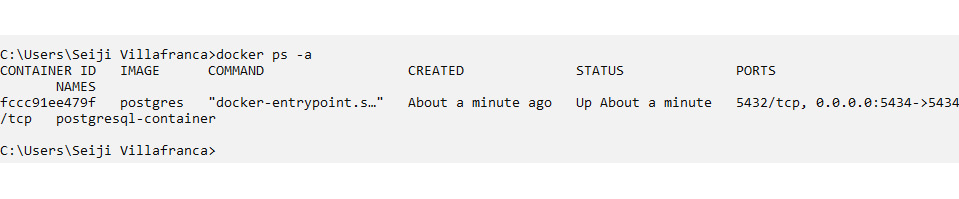
Figure 4.7 – The PostgreSQL installation using Docker
In the preceding example, we have executed the Docker ps -a command, and we can see that our PostgreSQL image has been pulled:
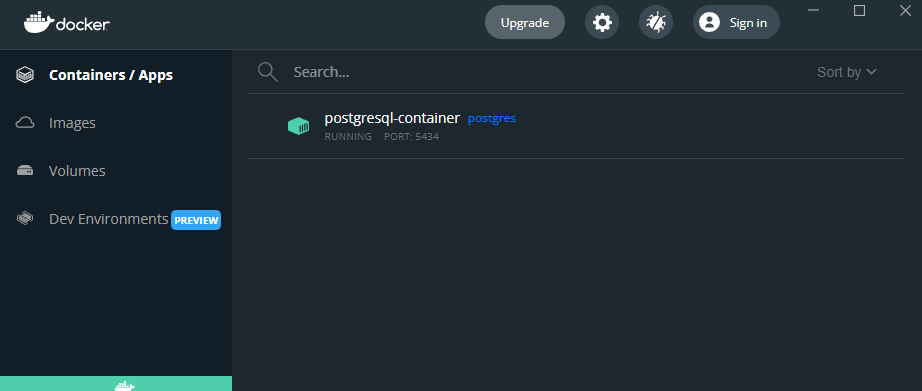
Figure 4.8 – The PostgreSQL installation using Docker (viewing the container in Docker Desktop)
- We can also view the pulled postgresql-container in Docker Desktop and verify its status in our terminal.
We have successfully configured our PostgreSQL with Docker. We can connect this to our pgAdmin by creating a new server with our terminal IP address and port.
We have configured the PostgreSQL database in our terminal. Now, we will learn about Spring Data JPA and its importance in developing Spring applications.
Spring Data JPA
Spring Data JPA (Java Persistence API) is a widely used specification for managing relational data in Java applications. It helps develop Spring, as it reduces boilerplate code by not implementing read and write operations. It also handles the complex process involved in JDBC-based accessing of database and object-relational mappings.
Before discussing Spring Data JPA, let’s discuss its clear advantages and why it is commonly used in Spring development.
The advantages of Spring Data JPA
The following are the advantages of Spring Data JPA:
- No-code repositories: Spring Data JPA promotes no-code repositories, which means that we don’t have to write the repository pattern, which creates a lot of repetitive code. It provides a set of interfaces that we can use to extend our classes to apply data-specific implementations.
For example, we have a BlogRepository class in our application; when we extend it with the CrudRepository<Blog, Long> interface, it will have methods that have the following functionalities:
- Persisting, updating, and deleting one or multiple blog entities
- Finding one or multiple blogs by their primary keys
- Counting all blogs
- Validating whether a single blog exists
Extending the repository with the interface provided by Spring Data JPA includes all data-related methods, which allows us to focus more on business logic.
- Boilerplate reduction: Spring Data JPA offers built-in implementations for methods. As stated in the first advantage, we only need to focus on business logic and no longer need to code read and write operations, as written under the interfaces. This also prevents human errors, as all implementations are already registered for us.
- Generated queries: Spring Data JPA also can create queries based on method names. For example, if we wanted to query a single blog by an author, the only step we need to take is to create a method on our interface with a name that starts with findBy, and Spring will parse the name and create a query:
public interface BlogRepository extends CrudRepository<Blog, Long> {Blog findByAuthor(String author);
}
In the preceding example, we have created a findByAuthor() method, which will allow Spring to generate a query and set the parameters as bind parameter values. It will execute the query once we call the method.
Repositories provided by Spring Data JPA
Spring Data JPA provides repositories that provide different methods for data-related implementations. The repositories are the following:
- CrudRepository: The interface repository, which provides the basic operations to Create, Read, Update, and Delete (CRUD).
- PagingAndSortingRepository: Extends CrudRepostiory and adds a method named findAll, which can sort results and be retrieved in a paginated manner.
- JpaRepository: Adds specific JPA methods and has all the functions of CrudRepository and PagingAndSortingRepository. It also adds methods such as flush(), which flushes the persistence context, and deleteInBatch(), which deletes records in a batch.
We have learned about the different repositories we can use with Spring Data JPA. We will now take a look at Spring Data JPA on Spring Boot.
Spring Data JPA on Spring Boot
For us to implement Spring Data JPA in our application, we need the following components:
- Entity: This is a simple class that defines our model. It will be used as a JPA entity, generated with a primary key.
For example, we will create an entity for Villain by making a plain class and adding @Entity annotations to indicate the Villain class as a JPA entity. The entity will be used as the type for extending our repository:
@Entity
public class Villain {
  @Id
  @GeneratedValue(strategy = GenerationType.AUTO,
                  generator   = "UUID")
  @Column(nullable = false, updatable = false)
  private UUID id;
  @NotNull(message = "First Name is required")
  private String firstName;
  private String lastName;
  private String house;
  private String knownAs;
}
We can see in the preceding example that our Villain class is annotated with @Entity, indicating it as a JPA entity. We have also defined an id field of the UUID type and annotated it with @Id to indicate that this is the primary key, and @GeneratedValue, where we specified that this is automatically generated using strategy = GenerationType.The AUTO and the ID generated should be of the UUID type, using generator = "UUID".
- Repository: This is an interface that we need to extend with JPA repositories for the entities to have built-in operations.
In the previous example, we have a Villain entity. To implement the CRUD operations, we will create a VillainRepository interface and extend it with CrudRepository, with a type of Villain and UUID:
@Repository
public interface VillainRepository extends CrudRepository<Villain, UUID> {
  // custom composite repository here
}- Service: This is where we will use our created repository. We can use the @Autowired annotation to inject the repository and call the JPA and custom-defined methods:
@Service
public class VillainService {private final VillainRepository villainRepository;
@Autowired
public VillainService (VillainRepository villainRepository) {this. villainRepository = villainRepository;
}
public Iterable<Villain> findAllVillains() {return villainRepository.findAll();
}
public Villain findVillainById(UUID id) {return findOrThrow(id);
}
In the preceding example, we can see that we have injected VillainRepository in VillainService using the @Autowired annotation.
Let’s continue with the following methods using the same file:
public void removeVillainById(UUID id) {
    villainRepository.deleteById(id);
  }
  public Villain addVillain(Villain villain) {
    return villainRepository.save(villain);
  }
  public void updateVillain(UUID id, Villain villain) {
    findOrThrow(id);
    villainRepository.save(villain);
  }
  private Villain findOrThrow(final UUID id) {
    return villainRepository
      .findById(id)
      .orElseThrow(
        () -> new NotFoundException("Villain by id " +
          id + " was not found")
      );
  }
}
We have also created methods by using the built-in JPA implementation, such as save(), deleteById(), findAll(), and findById(), which are found in the CrudRepository interface. The service can now be injected into our controllers or other services to use the methods.
We’ve now learned about Spring Data JPA, its advantages, and an overview of implementation on Spring JPA. In the next section, we will learn how to add Spring Data JPA and PostgreSQL dependencies to our Spring Boot application.
Adding Spring Data JPA and PostgreSQL dependencies
This section will add Spring Data JPA, PostgreSQL, and other valuable dependencies to our application. We will add the dependencies with Spring Initializr and an existing Spring Boot project.
Adding with Spring Initializr
Adding dependencies after creating a Spring Boot application using Spring Initializr is simple. We only need to select the dependencies on Initializr before generating our project:
- The first thing to do is to go to https://start.spring.io/ or to your IntelliJ IDEA (for Ultimate users) to open Spring Initializr (for a recap of the Using Spring Initializr section, refer to Chapter 3, Moving into Spring Boot).
- Choose your project if it will use Maven or Gradle and set the required configurations, which are Group, Artifact, Name, Description, Package name, Packaging, and the Java version of the project.
- Next, click Add Dependencies at the top right and select the following dependencies:
- Spring Data JPA: This dependency is for adding Spring Data JPA used for built-in data store-related implementation.
- H2 Database: This is an in-memory database that supports the JDBC API and R2DBC access, which is commonly used for unit testing
- PostgreSQL Driver: This is a JDBC and R2DBC driver that will allow the connection of Java applications to the PostgreSQL database:
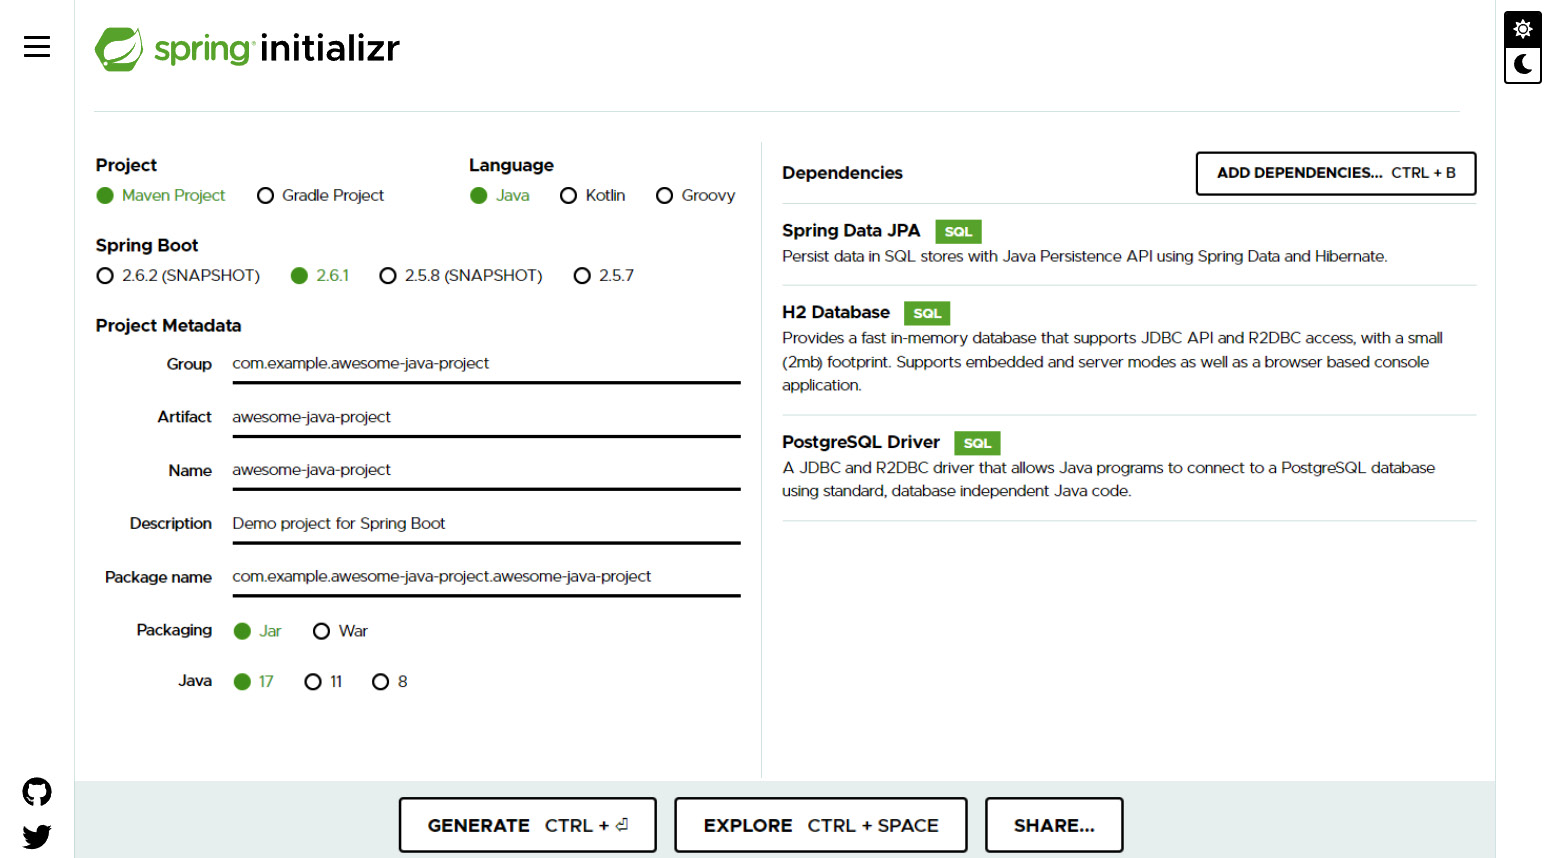
Figure 4.9 – Adding dependencies in Spring Initializr
After successfully adding the dependencies, we can see that our dependencies are already listed.
- Click on GENERATE, which will download our already generated project.
- Extract the ZIP file and open the project on your IDE. If you developed your project using Maven, open pom.xml in the src folder, or if you are using Gradle, open build.gradle, which is also found in the src folder:
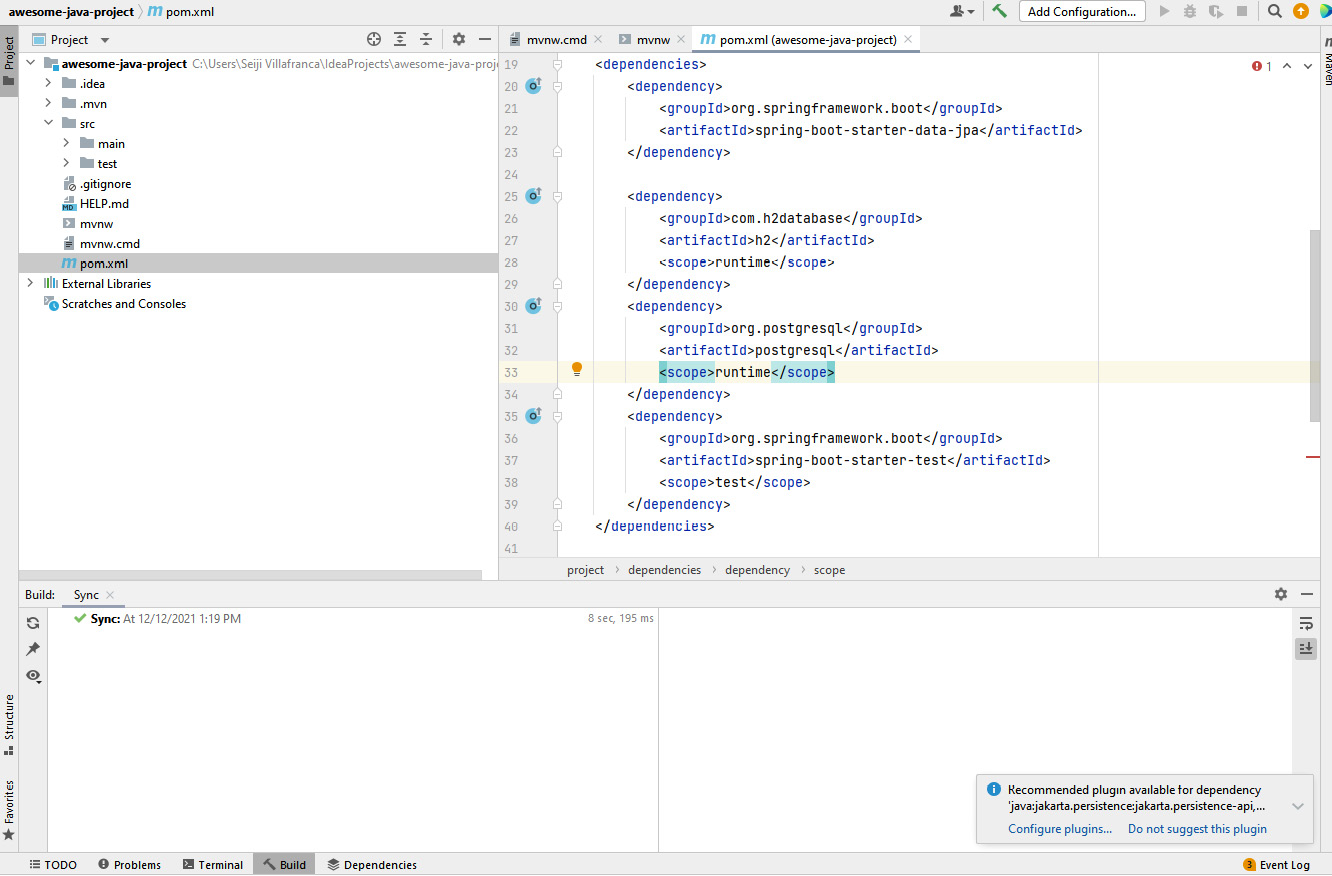
Figure 4.10 – The Spring Boot application (a view of pom.xml)
In the preceding example, we can see that the Spring Boot application is generated with Maven, and we can see that our pom.xml file has included the dependencies we added in Spring Initializr:
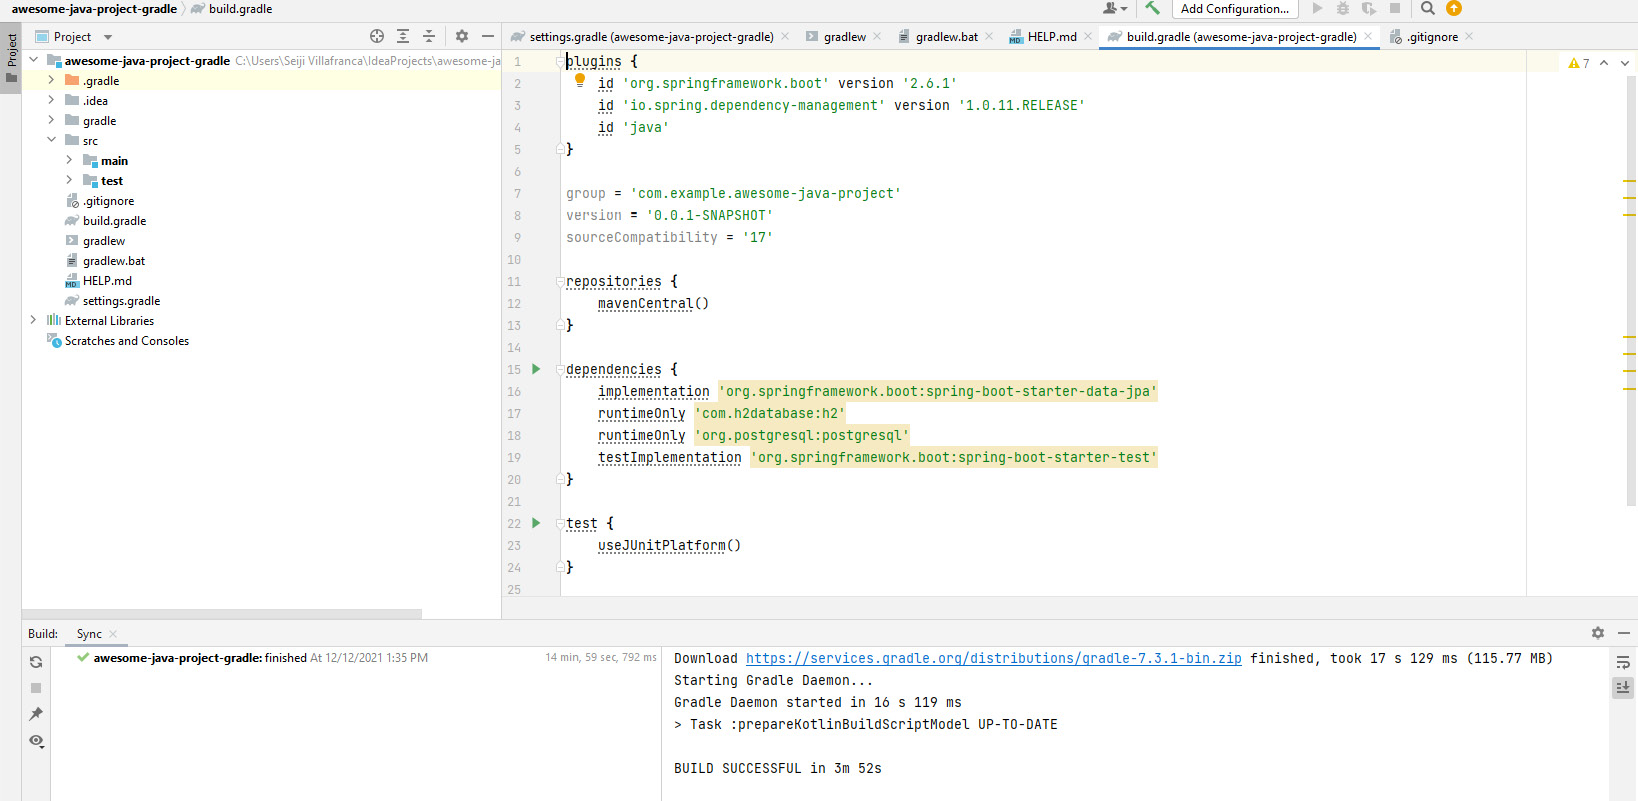
Figure 4.11 – The Spring Boot application (a view of build.gradle)
Now, in the preceding example, where the Spring Boot application is generated with Gradle, we can see the list of dependencies is already added under the build.gradle file.
We will now add the dependencies to an existing Spring Boot application.
Adding an existing project
In the previous example, we added the dependencies to generate our Spring Boot application using Spring Initializr. Now, we will add our dependencies to an existing application. It is simple to add a dependency to an existing Spring app; we only need to modify the pom.xml (Maven) or build.gradle (Gradle) files.
To install Spring Data JPA, the H2 database, and PostgreSQL Driver using Maven, we will add the dependencies in the form of XML, as follows:
<dependencies>
   <dependency>
      <groupId>org.springframework.boot</groupId>
      <artifactId>spring-boot-starter-data-jpa</artifactId>
   </dependency>
   <dependency>
      <groupId>com.h2database</groupId>
      <artifactId>h2</artifactId>
      <scope>runtime</scope>
   </dependency>
   <dependency>
      <groupId>org.postgresql</groupId>
      <artifactId>postgresql</artifactId>
      <scope>runtime</scope>
   </dependency>
   <dependency>
      <groupId>org.springframework.boot</groupId>
      <artifactId>spring-boot-starter-test</artifactId>
      <scope>test</scope>
   </dependency>
</dependencies>
And for a Spring application using Gradle, we will add the dependencies as follows:
dependencies {
   implementation 'org.springframework.boot:spring-boot-
   starter-data-jpa'
   runtimeOnly 'com.h2database:h2'
   runtimeOnly 'org.postgresql:postgresql'
}
IntelliJ will automatically recognize the added dependencies and install them for the project, and we can successfully build and run the Spring Boot application on the fly.
We have learned how to add Spring Data JPA and PostgreSQL Driver to our Spring Boot application. In the next section, we will learn how to connect our Spring Boot application to our PostgreSQL database.
Connecting to a database
We have already configured our PostgreSQL database and initialized our Spring Boot application with the needed dependencies. Now, we will learn how to connect our PostgreSQL to our application. There are two ways we can connect to our database – the first is through Spring JDBC, and the other is Spring Data JPA. Spring Data JPA is the most convenient way to connect to our database, but we will demonstrate both methods in this section.
Configuring the database properties
The first thing we need to do is configure the database properties in our Spring Boot application. We need to specify the server URL of the database, the admin username, and the password by adding the following source code to the application.properties file:
spring.datasource.url=jdbc:postgresql://localhost:5432/springDB
spring.datasource.username=postgres
spring.datasource.password=password
In the preceding example, we can see that we have configured the basic connection settings for our PostgreSQL. springDB on the URL will be the name of the database in PostgreSQL, which should already exist on our server.
Connecting using Spring JDBC
The first method to connect to the database is by using Spring JDBC. We will add an additional dependency to our application for us to use this method.
To add JDBC, we will add the following code to our pom.xml (Maven) or build.gradle (Gradle) files:
<dependency>
    <groupId>org.springframework.boot</groupId>
    <artifactId>spring-boot-starter-jdbc</artifactId>
</dependency>
After successfully adding the JDBC dependency, we can now use JdbcTemplate to execute queries on our application:
import org.springframework.beans.factory.annotation.Autowired;
import org.springframework.boot.SpringApplication;
import org.springframework.boot.autoconfigure.SpringBootApplication;
import org.springframework.jdbc.core.JdbcTemplate;
@SpringBootApplication
public class AwesomeJavaProject  {
    @Autowired
    private JdbcTemplate jdbcTemplate;
    public static void main(String[] args) {
        SpringApplication.run(AwesomeJavaProject .class,
                              args);
    }
    @Override
    public void run(String... args) throws Exception {
        String sql = "INSERT INTO blog (title, author,
          body) VALUES ("+ "'Awesome Java Project',
                        'Seiji Villafranca', 'This is an
                         awesome blog for java')";
        int rows = jdbcTemplate.update(sql);
    }
}
In the preceding example, we can execute database statements such as INSERT in our application and call the update() method to modify data in the database.
Connecting using Spring Data JPA
The second method is by using the Spring Data JPA plugin. The first step we need to take is to add additional details to the application.properties file:
spring.jpa.hibernate.ddl-auto=update
spring.jpa.show-sql=true
spring.jpa.properties.hibernate.dialect=org.hibernate.dialect.PostgreSQLDialect
spring.jpa.properties.hibernate.format_sql=true
After adding the new settings, we can now create Entity and Repository for a specific table in our application – for example, we have a Blog table:
package net.codejava;
import javax.persistence.*;
@Entity
@Table(name = "blog")
public class Blog {
    @Id
    @GeneratedValue(strategy = GenerationType.IDENTITY)
    private Integer id;
    private String title;
    private String body;
    private String author;
}
In the preceding example, we have created a Blog class and annotated it with @Entity and @Table to indicate that this is an object connected to our database table:
package net.codejava;
import org.springframework.data.JPA.repository.JpaRepository;
public interface BlogRepository extends JpaRepository<Blog, Integer> {
}
After creating our entity, we have made the repository for the blog, which can be extended by the repositories provided by JPA. BlogRepository can now be injected into our services or controllers to read, add, modify, or delete data on our database.
Summary
That brings you to the end of this chapter. Let’s have a recap of the valuable things you have learned. You learned how to set up PostgreSQL on your local machine using the installer or Docker container.
You have also learned about the concepts and advantages of Spring Data JPA in Spring Boot and how to add it to your application, which is helpful in creating services with CRUD capabilities with less boilerplate code.
Last but not least, you learned how to connect your Spring Boot application with the PostgreSQL database using JDBC and Spring Data JPA.
In the next chapter, we will be learning how to start our server, how to add controllers, models, and services in our code, and about Redis for caching.