
Joining a Skypecast
Creating Skypecasts from scratch
Spreading your ideas with Skypecasting
Transforming your Skypecasts into podcasts
Town Hall. These two words evoke a home-town scene, a designated place for members of a local community to gather, to speak up, and to raise issues. Holding meetings in a Town Hall is a particularly effective forum for people to come together and exchange ideas. Skype has its own Town Hall. Its designated place is cyberspace, and its home-grown community is made up of skypers. This Skype Town Hall is called Skypecasting.
This chapter shows you the ins and outs of Skypecasting, and you see how Skypecasting offers so much more than a traditional Town Hall.
Skypecasts are a way for people in groups of up to 100 at a time to congregate over Skype. Accommodating 100 people is a pretty nice leap from the Skype conferences of five or ten people that are covered in Chapter 10. The following sections give you just a taste of the full potential of Skypecasting.
As with a conventional Skype conference call, a Skypecast is totally free. Skypecasting works a little differently than a regular Skype conference call. The key differences are the following:
Participants join Skypecasts. The conference host or organizer doesn't choose and call participants; instead, the participants choose a meeting on their own.
Skypecasts are public. Skypecasts are listed on the Web and in a searchable directory within Skype. Anyone with a Skype Name can join a Skypecast.
Skypecasts can accommodate a crowd. Skypecasts can be as small as one or two people and as large as 100.
You can join Skypecasts only on the Internet. You cannot join a meeting by calling in from a regular telephone.
Skypecast hosts have special controls. Participants in a Skypecast can request the microphone so that all the participants can hear what she or he has got to say. The host can individually mute or unmute the microphone of any participant.
Tip
The current cutoff for audience size in Skypecasting is 100 participants. If you want to give people the choice of connecting into a large conference either through Skype or calling from a regular phone, look at High Speed Conferencing (see Chapter 12). With this option, you can convene up to 500 people.
Skypecasts are for anybody. Anybody can join a Skypecast. Anybody can start a Skypecast. In contrast to members of other conferences, Skypecast members don't have to be dues-paying participants. They don't have to join a club. They are free to participate with no restraint except good manners.
The model for a Skypecast doesn't have to be a town hall. Often it is a soapbox. It can be whatever you want it to be. You can
Start a club.
Give a lecture or even a series of lectures.
Create a story circle.
Lead a guided meditation.
Give a music lesson.
Organize an impromptu class. Combine your Skypecast with Webinar (a Web seminar) software to deliver a PowerPoint or any other presentation.
Get on a virtual soapbox and start talking. Anyone can join you. If you are compelling, interesting, or just plain unusual, people will stick around and listen.
The authors of this book set out to Skypecast a discussion on the basic setup and inner workings of Skype. Such a discussion brought together a small community of people with an interest in meeting other skypers, meeting the authors of a book, getting some of their questions answered, and having a soapbox for suggestions. The authors, on the other hand, wanted to meet the community of readers of books on technology, or the community of early adopters of new technologies.
Tip
You can initiate a Skypecast from any location. You can be lounging at home, working at the office, or enjoying your beachfront property (assuming that you have a broadband Internet connection). Skype connections have been made in remote places such as Mount Everest, so if you wanted to climb that mountain and Skypecast the tale of your journey, go right ahead. Most of us, however, have things to share from locations less exotic than Mount Everest.
With so many topics available, you may think that finding the Skypecast you want to join would be difficult. Fortunately, you can find Skypecasts in a few different ways:
Go to the Skypecast Preview Directory. Go to the Skypecast home page (
https://skypecasts.skype.com/skypecasts/home). On this page, you can findFeatured Skypecasts
Skypecasts scheduled over the next four weeks
Skypecasts about to start
Skypecasts already in progress
You don't need to run Skype when you view these listings; they are regular Web pages. You do need to have Skype installed on your computer to join a Skypecast, however.
From your SkypeLive page on your Skype client, view a list of Skypecasts already in progress or that are about to start. If you are using Windows and have Skype 2.6 or later, you have a feature called SkypeLive (see Figure 14-1).
Find out about Skypecasts posted on a blog or Web site. Blogs and Web sites that post links to Skypecasts on specific topics can be kept up-to-date as Skypecasts are added and revised.
Find out about Skypecasts listed on RSS feeds. Web pages commonly have RSS links.

Aside from browsing these lists, you can search for a Skypecast by topic or keyword (sometimes referred to as a tag), by the Skypecast title, or by the Skype Name of the Skypecast organizer. You enter the search term and then click the Search button in Find a Skypecast on the Skypecast Home page (https://skypecasts.skype.com/skypecasts/home).
If this is your first time to join a Skypecast or a similar type of online forum that allows you to speak up and be heard, then you're sure to have fun. The steps involved in joining a Skypecast are easy:
Make sure that you have the most recent version of Skype.
Make sure that you have Skype software (version 2.5 or later for Windows and 1.4 or later for the Mac). New Skypecast features continue to be introduced. For instance, the Skype Live feature, which displays current Skypecasts directly within Skype, can be found on version 2.6 or later for Windows, but version 2.5 does not included the feature. To take better advantage of new Skypecast features, get the latest version of Skype for your platform.
Find a Skypecast at
https://skypecasts.skype.com/skypecasts/home.Note the date and time that the Skypecast is scheduled to start.
When it's time to join the Skypecast, browse the list of Skypecasts posted on the Skypecast home page (see Figure 14-2) and click the Sign in to Join link for the Skypecast of your choice.
When prompted, enter your Skype Name and password.
With Skype 2.5 for Windows and 1.4 for Mac, a separate program is launched to connect to the Skypecast. Later versions of Skype may integrate Skypecasting directly in the Skype program instead of launching a separate program.

Starting your own Skypecast is as easy as going to the Skypecast Web site, finding the link to create a Skypecast, and entering the information for the Skypecast you want to hold.
If you are adventurous, go to follow these steps to set up a Skypecast right now. You don't need a lot of lead time to Skypecast, just log on and speak up!
In your Web browser, enter the address
https://skypecasts.skype.com/skypecasts/home.Note the s in "https"; this means it's a secure site.
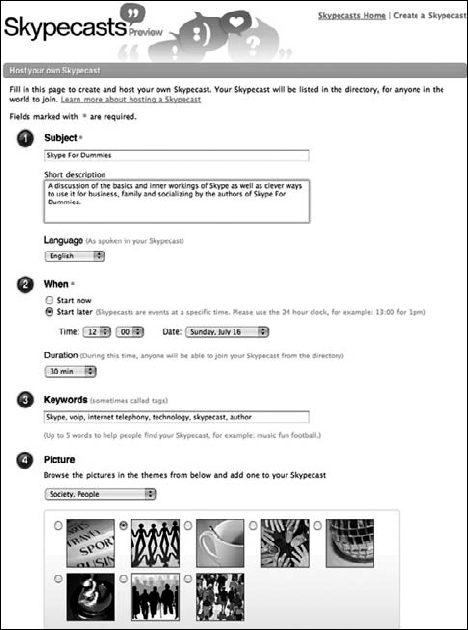
Click the Create a Skypecast link(see Figure 14-3).
Your meeting subject should be a brief one-line description. You must enter a subject to set up a Skypecast. Choose a title that will entice people to join and be easily picked up on searches.
Enter a short one or two paragraph description.
The description is also a required item.
Select the primary language that is to be spoken.
Enter the time and date for your Skypecast.
This item is required. You can have your Skypecast start immediately without any advance scheduling, but most skypers schedule their Skypecasts in advance. You can schedule the Skypecast for any day up to four weeks out into the future. You need to specify the time of day in terms of a 24-hour clock cycle (as opposed to a 12-hour cycle).
Tip
Remember, Skypecasts are global. Pick a time that's not only convenient to your local community but also accommodates a time zone that contains your likely audience. If you have a Skypecast at noon in Boston, you can expect some Californians to join in at 9 a.m., some Londoners to join in at 5 p.m., and a resident of Moscow to join at 9 p.m.
Select the duration.
During this time, anyone will be able to join your Skypecast from the directory. You have a choice setting the duration from 15 minutes up to 5 hours.
Tip
If you don't want late stragglers coming into your Skypecast, select a shorter period of time such as 15 minutes or a half hour. Keep in mind, though, that if a person who joins a Skypecast has a problem with his or her computer, that person may be forced to leave the Skypecast and can't rejoin the Skypecast after the allotted duration expires.
Enter keywords for your Skypecast.
You can enter up to five keywords, or tags. Entering keywords is optional, but we recommend adding them because they help people find your Skypecast more easily and better understand the topic of your Skypecast.
Tip
Try to vary the keywords rather than restrict them to the same topic.
Browse the picture themes to find a picture that quickly communicates your topic. The picture themes are as follows:
Arts, Movies, Music
Business, Meetings, Finance
Flirt, Love, Romance
Gaming
Health, Fitness
Holidays, Vacations, Travel
Internet Chat
Mothers, Parenting, Family
Science, Technology, Ideas
Society, People
Sports
Preview the listing, review and accept the Skypecast Community Guidelines, and click the Agree button.
After you agree, the Skypecast is scheduled.
Tip
Between the time you schedule a Skypecast and the time it runs, you can edit the conference description. For example, you can reschedule and set it to an earlier or later date, or you can revise the Skypecast description. If necessary, you can cancel the Skypecast.
As an added bonus of hosting Skypecasts, you can take the description of a Skypecast you recently organized and reuse its description for additional Skypecasts.
Choosing a subject for your Skypecast is easy. Pick something you are interested in, from collecting baseball cards to baking the ultimate chocolate chip cookies; from brushing up on your Japanese to watching the Super Bowl. If you are an expert in all these areas, feel free to make each one a Skypecast. You can host as many Skypecasts as you want, and it's totally free.
When you create and host a Skypecast:
Choose a title that sells itself. Creating your Skypecast listing is an opportunity to let your prospective audience know what they are in for. A good title explains why someone should join your Skypecast and what you'll be talking about. Some examples of existing Skypecast titles that give you a hint as to the topic and type of discussion:
I'm a Brazilian, Learning English
Poker School Online Training Tournament
Creative Real Estate Investing
Survival Strategies of the Selfish DNA Programs
Think carefully about the keywords. Keywords, or tags, are words or phrases that you add to help users to find your Skypecast by searching the directory. You have an opportunity to add keywords in a special field when you create a Skypecast. You can also add keywords after the Skypecast is posted. Keywords for a Skypecast titled "Financial Markets" are "dollar, euro, actions, stock, finance." These keywords also determine on which syndicated listings your Skypecast appears. Keywords help users find your Skypecast and ensure that your Skypecast gets the best possible promotion.
Promote your Skypecast. Send the Skypecast link to your friends, family, and co-workers in an email. You can also add a simple HTML snippet to your blog or email signature block to remind your fan club (or future fan club).
Don't leave your audience in the lurch. Note the time and day you are to host a Skypecast and be ready and waiting for your audience. A skyper entering an empty Skypecast will turn around and leave.
Decide what kind of host you want to be and what kind of Skypecast you want to run. You may want an open discussion or a one-way broadcast with questions at the end.
Use Skypecast microphone tools strategically. After your Skypecast begins, as a host, you can mute or unmute the microphones of some or all of your participants (be careful; this may become habit forming). Muting participants' microphones actually increases call quality for everyone in the Skypecast, so keep that in mind when voices begin to crackle. Participants can request the microphone by clicking a button available to them. The host assigns a speaker, passes the microphone around, and keeps the quality and flow of the Skypecast high.
Don't hesitate to be a bouncer! If you have an unruly member bent on mayhem, toss that person out! Skypecast controls allow you to remove uncooperative participants.
Your conference is automatically posted in a directory of current and upcoming Skypecasts at https://skypecasts.skype.com/skypecasts/all (see Figure 14-4).

There are several ways for people to learn about your Skypecast:
Scheduled Skypecasts are listed in the Skypecast directory on the Skype Web site. Current and ongoing Skypecasts are also displayed on the Live page of Skype applications starting with version 2.6 for Windows. Both the Web listing and listing in the client are automatic and don't require action on your part.
Listings can be posted to a blog using TypePad.
Listings can be posted on any Web site.
Listings can be posed on RSS Feeds.
Skypecasts are listed in the order they take place. Because accommodating the various time zones complicates listing the time that each Skypecast will start, the directory posts a notice such as Starts in 4 hours and 55 minutes. This way, whatever time zone you are in, you know when to log on and join in.
Another way to get the word out about your Skypecast is to add a Skypecast Widget on a blog. One company, TypePad (www.typepad.com), has partnered with Skype to connect the world of blogging with the world of Skypecasts. As a TypePad blogger, you can create a Skypecast and then add a special Widget to your blog. People reading your daily blog can click the Widget to join your Skypecast directly from inside TypePad. Your community of blog readers is a likely audience for your Skypecast adventure, so embedding a link in your blog is the best way to let them know when you will make your broadcasting debut.
To add a Widget to your TypePad blog:
Log onto
https://skypecasts.skype.com/skypecasts/skypecast/widget.html.Select a radio button for a featured Skypecast, your own Skypecast, or a tagged Skypecast.
Click Install Widget on TypePad.
If you select a tagged Skypecast or your own Skypecast, you will be directed to type your Skype Name in the field provided. Skype searches for the Skypecast you want to promote.
Click the Install Widget on TypePad button.
The TypePad login page appears.
If you have an account, enter your name and password.
Select the blog on which you want the Widget to appear.
Preview your Widget.
Confirm your choice.
Note
After you schedule a Skypecast, you can find its meeting ID number and place a link to it on your Web site. The link takes the form of the following:
https://skypecasts.skype.com/skypecasts/skypecast/detailed.html?id_talk=15783
The only portion of the link that differs from Skypecast to Skypecast is the id_talk number appearing at the end of the link. You can place this on your Web site by inserting the following snippet of HTML code into your Web page.
<a href="https://skypecasts.skype.com/skypecasts/
           skypecast/detailed.html?id_talk=15783"
           target="_blank">My Skypecast Title</a>
The target="_blank" portion tells the browser to open a new Web page when clicking the link.
Tip
To find out the id_talk number of your Skypecast, go to the general Skypecast directory listing and find your Skypecast. Click the link for your Skypecast. When the browser opens to your Skypecast details, look at the URL displayed in your browser. The digits appearing at the end of the URL is your id_talk number.
There are ways to insert into your Web site a listing of all the Skypecasts for a particular kind of search, such as all Skypecasts hosted by a specific Skype ID. This is technical and involves JavaScript. By the time you read this, someone, possibly Skype, may already have an HTML code snippet maker that automatically constructs all this geeky HTML and JavaScript code. Look to our site www.skype4dummies.com for up-to-date information on this. In addition, you can add an RSS feed to your Web site without any complicated coding.
Placing a hardwired link to the Skypecast details on your Web site is easy enough, but if you hold multiple Skypecasts, it would sure be nice to list every Skypecast in which you are the host.
Note
Nowadays, people are starting to use RSS feeds to tap into information that gets regularly updated. You can place an RSS link on your Web site. The RSS link appears as follows:
http://feedsskypecasts.skype.com/skypecasts/webservice/feed.html?user=seasonedskyper
In your link, change the name seasonedskyper to your Skype ID.
If you want to show the listing of all Skypecasts having business as one of the keywords or tags, you can create a link like the following:
http://feedsskypecasts.skype.com/skypecasts/webservice/feed.html?tag=business
If you want to show all currently featured Skypecasts, you can include a link to the following:
http://feedsskypecasts.skype.com/skypecasts/webservice/feed.html?featured=1
The day is here. Your Skypecast is due to start in five minutes. What do you do?
Sign on to join the Skypecast as you would if you were a participant.
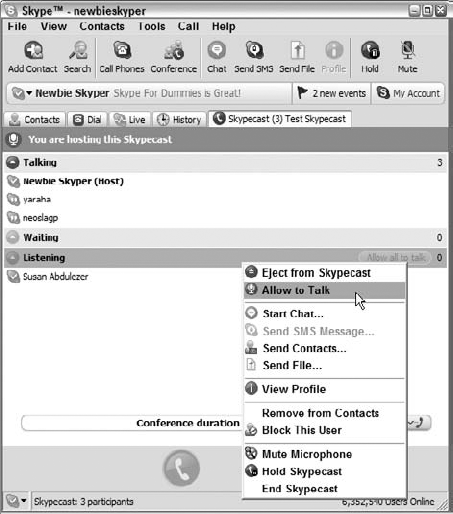
The Skypecast conference window appears. Your name is on the top, listed as the host. As people join in, Skype Names appear in a list. A little timer is ticking away, letting everyone know how long the conference has been on the air.
Introduce yourself and your topic. Start talking!
Invite participants to speak.
As the host, you are in control of the microphone. You can mute everyone and give out the microphone only as members request it, or you can unmute everyone and have a free-for-all (see Figure 14-5). If you are hosting a sing-a-long or cheering a soccer team, you might want to open the mikes up full throttle.
Tip
If anyone gets too rowdy, you always have the power to eject a person from the Skypecast. After all, every community, even a virtual one, needs a few rules.
Your new community is launched. You can follow up with other Skypecasts, start a related forum on an existing Web site, or just maintain contact with some new Skype buddies. Skypecasting will change as new features are added and conferences become more tightly integrated into your regular Skype client. Your Skypecasts may become
Private events
Invitational events
Charity fundraisers
Political caucuses
High school reunions
If you are an astronomer with an active stargazing site, you may soon be able to post a direct link to a Skypecast from your Web site. The addition of video into the Skypecast mix is a logical next step and, if developed, would multiply opportunities for a rich forum available at little or no cost to everyone. It is a remarkable tool for connecting people, and, although the look and feel of the interface may not be the same a month from now, the basic utility of Skypecasts as a community builder will remain the same.
Skypecasts are live events. When they're over, they're over. However, sometimes you want to preserve the event. Some of the ways, and reasons, to save a Skypecast are as follows:
Transcribe your Skypecast:
Extract quotes for an article or research paper.
Generate captions for a video presentation of your Skypecast topic.
Create a transcript for reference. This is a good technique for, say, marketing research, developing a troubleshooting guide for software, and harvesting unique phrases, idioms and terms for a short story.
Save the Skypecast discussion by recording the audio:
Extract audio quotes for a PowerPoint presentation.
Import the audio track into a video-editing program to use as an informational soundtrack.
Create a podcast.
You can save Skypecasts as audio files or text documents by using a variety of software and hardware tools. We've included some specific tool suggestions. This is nowhere near an exhaustive list; but it's a start.
Warning
Depending on the jurisdiction of where you are recording the Skypecast, there may be legal requirements you need to adhere to that require you to inform your participants that the session is being recorded. Please be certain to inform the participants of your Skypecast that you are recording the event. It is both courteous to your guests and it may be legally required!
To save the audio of a Skypecast with hardware tools, do the following:
Plug a USB speakerphone into your computer.
A speakerphone such as the Polycom unit described in Chapter 11 serves the need well.
Set up a traditional tape recorder, a mini-disc recorder, or a flash-based recording unit to capture the audio.
If your recording is digital, you should be able to transfer your audio recording directly to your computer. The way you move the file may differ depending on your recording device and the manufacturer's instructions. If your recording device is not digital, we recommend that you consider acquiring a digital recorder; they are rapidly becoming more affordable.
Tip
Some digital recorders come equipped with a "T-bar" stereo microphone. This type of microphone enables you to position the microphone between yourself and the speakerphone so that a stereo recording of the Skypecast has good sound separation.
If you have a recording on a nondigital (analog) device such as a cassette recorder, you can:
Attach a cable from the audio-out line of your recorder to the audio-in line of your computer.
Select the Record button of your Windows XP Sound Recorder (choose Start
Programs AccessoriesEntertainment on your computer).
Click the Stop button upon reaching the end of the audio playback.
Note that files are saved as WAV files, which are much larger than MP3 files. An hour's recording may consume close to a gigabyte of disk space.
To save the audio of a Skypecast with software tools, use the following:
Pamela or Skylook recording software for PC (see Chapter 9)
Call Recorder for the Mac (see Chapter 11)
So, you're busy recording anyone who will let you capture a conversation, and a folder is filling up with MP3s of interviews, meetings, stories, and plans on every subject. Some of those audio files are a great source of information to have in written form. For example, much of the research done for this book exists as recorded Skype calls preserved as audio files. But, as much as we would like to play our audio recordings for you, we have a few practical requirements. We are limited to paper and ink. That means that we have to convert what we hear to what you read.
Listening to hours of Skype recordings while typing a transcript is a huge job made easier by a wonderful software program, Transcriber (see Figure 14-6), available at no cost from http://trans.sourceforge.net/en/presentation.php. This software is available for download for Windows, Mac, and Linux.
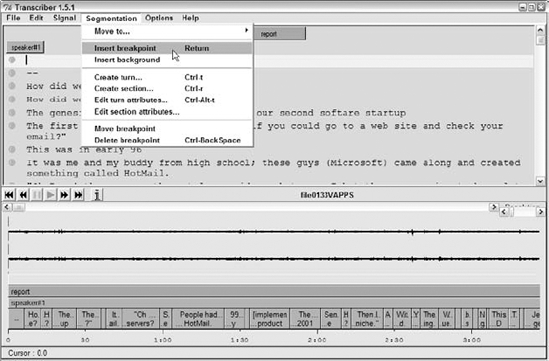
Transcriber's features allow you to
Import MP3 files.
Create labels with the names of individual speakers.
Create new sections when there is a change of topic.
Segment audio portions and sync them with written files.
Zoom and telescope the timeline.
Incorporate the names of speakers in the timeline.
Export transcription files as text or XML (getting not only the text but also the time codes).
Transcriber shaves hours off the task of transcribing long audio sessions, organizing text by topic and speaker, and publishing the transcript in print or on the Web.
Transcriber has many fancy features. But just a straight transcription, in many cases, gets the job done. Here is the two-minute tutorial to get you quickly up to speed:
Launch the software.
You are prompted to locate your digital recording (typically, an MP3 file).
Begin transcribing by pressing the Tab key and typing what you hear. To stop the playback, press the Tab key again.
Repeatedly pressing the Tab key starts and stops the playback. As you get acclimated to transcribing, you will find that you often press the Tab key at the start of a word or phrase, type the word or phrase, and press the Tab key as you are about to resume listening and transcribing. In this manner, you can just about do nonstop typing while slowing the audio track to keep pace with your rate of typing.
Transcriber has a ton of bells and whistles, including the ability to mark your transcript with annotations on background noise, include music, identify different speakers, and even overlap speakers for any segment of your recording. Here are some tips for using the more advanced features of Transcriber:
To rewind the audio playback a few moments, press Alt+←. This feature is useful when you are trying to transcribe something difficult to hear or when the person is talking at 90 miles an hour.
To advance the playback to a later point in the timeline, press Alt+→. There are bound to be moments where there is a pause or natural break. Press the Enter key and continue typing.
Every time you press the Enter key, you insert a new segment in the timeline, and the text window where you are transcribing inserts a new line, starting with a bullet point. Your timeline at the bottom of the window has dividing lines between segments. To move back and forth between segments, press the up arrow or down arrow key. In this manner, you can swiftly move to just about any portion of a long recording and rework the text for a particular segment.
If you want to split a segment into two smaller ones, position your cursor in the text at the place you want to make the split and then press the Tab key to begin the audio playback for the segment. When you get to the moment in the audio playback when the segment should be made, press the Enter key to insert the segment.
To join two segments into one, press Ctrl+backspace. Every now and then, save your file. The file that gets saved has not only a text transcription but also a time coding for each of the segments. This information makes it easy to create captions for audio and video recordings.
If you have a long recording such as an hour in length, want a word-forword transcription, and need to have all this done quickly, make three copies of your audio file and distribute them to three people. Have one person transcribe the first 20 minutes of the recording, another person transcribe the second 20 minutes, and a third person do the remaining portion. The three transcriptions can easily be merged.
As a practical matter, if you need to do a word-for-word transcription and are reasonably comfortable with the software and the typing, plan on spending two-and-a-half to four times the audio recording time for creating the actual transcription.
This software has tons of features. Just following the steps here will get you off to a good start. Happy transcribing!
You can preserve your Skypecasts and promote your ideas by hosting a Skypecast, recording it, and turning it into a podcast. Podcasts make your Skypecast ideas portable. Post your podcast on the Web, and anyone with a portable player can download and play your newly transformed Skypecasts.
The word podcast is a combination of iPod and broadcast. Podcasts are audio and video files published on the Web and downloadable onto iPod players through the Apple iTunes software. Podcasts are becoming a popular way to create personal "radio" programs. You can podcast on a regular basis, create a fan base, and even have listeners subscribe to your show to automatically download to iTunes as soon as you go on the air.
You can turn the MP3s of your Skypecast into a podcast in two ways. One way is to make an RSS feed that points to the MP3 file. This is the quick-and-dirty way. Everything in your unedited MP3 recording gets converted into your podcast, including long stretches of silence, background noise, and people fumbling around with their microphones and saying "Hello, can you hear me now?" You can't create lead-in music, include photos that get displayed on your browser, make your iPod capable of displaying pictures.
Fortunately, taking the leap from the rudimentary transfer of it all to a mini-production system complete with studio-style music lead-ins, sound effects, visual effects, and captioning is easily done and inexpensive. Better yet, the tools for the mini-production studio are intuitive and anything but geeky. The tools we have in mind and recommend are found in the Apple iLife suite of software.
Skypecasts are great sources of content for new podcasts. In broad strokes, to turn a Skypecast into a podcast, you must do the following:
Record the Skypecast: Use Call Recorder for the Mac, Pamela Pro for the PC, or Audio HiJack for either platform to capture the audio.
Edit your audio: Editing programs such as Audacity for Mac or PC, or GarageBand on the Mac, enable you to cut, paste, and arrange your audio files for your "show."
Create an RSS feed: RSS stands for Really Simple Syndication. When you create an RSS feed for your audio file, you are making your podcast available for subscribing and downloading from a Web page. A variety of sources, such as Blogger (
www.blogger.com) and FeedBurner (www.feedburner.com), can create the RSS feeds for you.Add your podcast to your blog or Web site: To publicize your Skypecast-turned-podcast, you can submit the RSS feed page to Apple through iTunes. If the content is acceptable for posting, iTunes puts it into its podcast directory. Your Skypecast is available for downloading.
To use a tool such as FeedBurner, you need to have a blog or Web site set up and available, so you have to flex your geek muscles a bit before using this tool. If you are computing on a Macintosh, you can skip directly to the podcasting with iLife steps later in this chapter. To create an RSS feed with FeedBurner, follow these steps:
Set up an account (you can start with a free account).
Enter a username, password, and email address.
Optionally, you can enter a secret question and answer, which is useful in case you forget your password or require some fundamental change to your account.
Click the Sign In button.
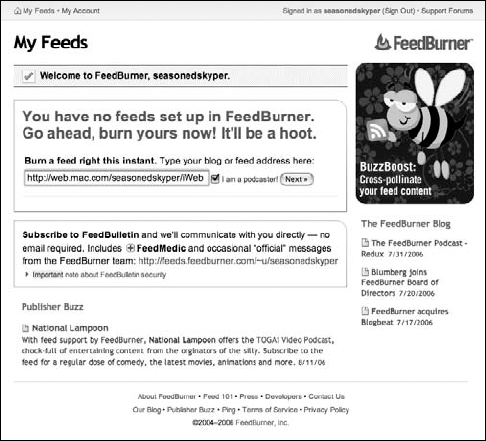
In the screen labeled My Feeds, enter the URL of your blog or feed page.
This URL needs to be the actual page you are using for your podcast (see Figure 14-7).
Also, select the I Am a Podcaster option. This option instructs FeedBurner to use SmartCast, which makes your feed podcast ready.
Click Next.
A Welcome page opens (see Figure 14-8), in which you can enter your feed title and feed address.
Give your feed its title and feedburner.com address.
FeedBurner guesses your feed title from your blog and allows you to set the feed address (see Figure 14-8), which always starts with
http://feeds.feedburner.com/and is followed by an editable word based on your podcast title or podcast theme. An example is Skypecasting to Podcasting for the title andSkypecastingToPodcastingfor the feed address portion. The resulting URL becomeshttp://feeds.feedburner.com/SkypecastingToPodcasting.Click the Activate Feed button.
FeedBurner posts your feed, which is now live for anybody to view and subscribe to as the RSS feed.

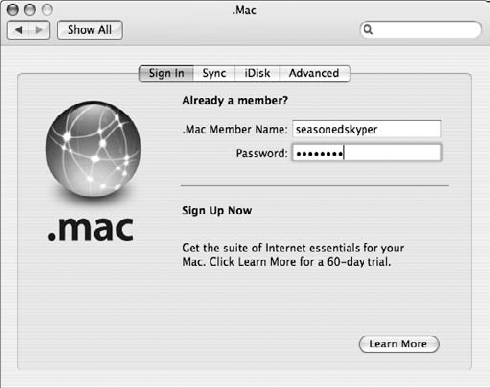
Using Apple's iLife '06 suite of software and the .Mac portal, you can publish the audio file of your Skypecast quickly. These tools work together:
GarageBand. This is the iLife sound editing software. GarageBand has a special track to add chapter markers, bookmarks, and graphics files to an audio file for podcasting.
iTunes. This is the iLife music library. Store your recorded Skypecast files here by simply clicking the MP3 file to open it. The default player is iTunes. After being opened in iTunes, it is stored in the iTunes library, which makes it handy for you to retrieve the Skypecast MP3 file later.
iPhoto. This is the iLife photo and image library. If you want to put any artwork or photos in your podcast, park them in iPhoto by simply dragging the images onto the iPhoto icon. If you are importing photos for your podcast, your digital camera will automatically open iPhoto when attached. Click Import to bring the photos into your library.
iWeb. The iLife Web page editor automates the creation of an RSS feed. This is major. RSS feeds are complicated even if you are a geek!
.Mac Account. The Apple email and Web page services are completely integrated with iLife. Publishing a Web page with a podcast is simply a matter of pressing a few buttons.
Podcasting your recorded Skypecast is fairly straightforward, unless you want to get fancy and add artwork, jingles, and sound effects. Be aware that all your media-sound files, images, and photos must be stored in iLife software so that you can access them easily. The basic steps are as follows:
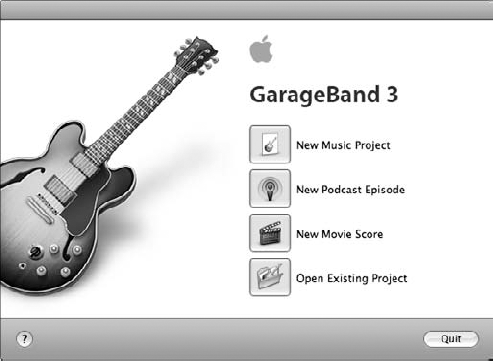
Click the GarageBand guitar icon in your applications dock to launch GarageBand (see Figure 14-9).
Click New Podcast Episode from the list of new project types.
Title your GarageBand podcast and click Save.
It's a good idea to make a separate folder for your podcasts, especially if you plan to do a series and save all the episodes in one place.
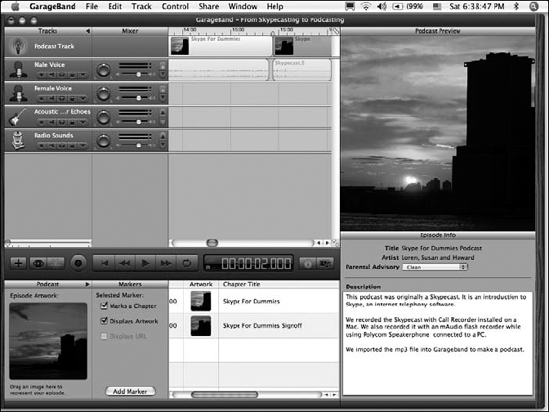
GarageBand opens (see Figure 14-9). Review the three main areas on the screen:
Tracks are located in the upper-left pane.
Podcast artwork and chapters are in the lower-left pane.
The Media Browser is on the right. Along the top of the Media Browser, you see three tabs for Audio, Photos, and Movies.
Click the Audio tab in the media browser and select the MP3 file you want to podcast from the iTunes library displayed within the GarageBand media browser.
Drag the MP3 file into a GarageBand audio track.
You can change the name of any track by selecting the text and entering a new name. You don't have to add audio to every track. GarageBand provides five tracks, labeled as follows:
Podcast Track. This track is exclusively for artwork that is displayed while the podcast is played. The other four tracks are for audio.
Male Voice: Suggested track on which to record a Male voice.
Female Voice: Suggested track on which to record a Female voice.
Jingles: Suggested track on which to record a jingle or tune. You can create jingles and sound loops that are copyright free.
Radio Sounds: Suggested track on which to record radio sounds.
Click the Photos tab in the GarageBand media browser and, from the iPhoto library displayed, drag a photo onto your Podcast track.
Drag the photo onto the blank Episode Artwork window.
Click the information button (it shows a circle with an i inside) to add Episode information (see Figure 14-10).
The available information includes the following:
Title. Add the name of your episode.
Artist. Enter the name of the podcaster.
Description. Write a clear description of your podcast. This is an opportunity to pique a listener's curiosity.
Parental Advisory. GarageBand also provides a Parental Advisory drop-down list. Select None, Clean, or Explicit.
Choose Share
Send Podcast to iWeb.GarageBand converts the file to a podcast. When it's complete, the sign-on screen to your .Mac account automatically opens. Sign on to your .Mac account (see Figure 14-11).
Select a template for your Web page in iWeb.
Choose from among the different themes that appear in a scrolling list with items such as Road Trip or Travel.
Apply your template to Podcast.
You have two template choices, Blog and Podcast. Select Podcast and click the Choose button. iWeb creates a Web page with your podcast. You can make some changes on this screen before you publish your podcast.
Click the title Podcast and change the text to your own title.
You can also select any text in the description and change it in iWeb.
Click Podcast in the iWeb site organizer.
At this point, you can preview the page as it will be seen on the Web. Change the images and text to reflect your podcast.
This puts your Podcast on the Web by uploading the Web page to your .Mac Web site. iWeb includes a Subscribe button on your Podcast site; anyone can click Subscribe and automatically receive newly posted podcasts from your site (see Figure 14-12).
Skypecasts transformed into podcasts can easily be played on iPods, which is the MP3 player of choice for more than 40 million people. Any artwork you include when you create the podcast in GarageBand is displayed on the iPod screen.

Now that you have your podcast on a blog or Web site, the time has come to let the world discover you. The iTunes music store is the podcast directory.
To submit your podcast to iTunes, follow these steps:
Launch iTunes.
iTunes is a free download for Windows or Mac and is available at
www.apple.com/itunes/download.Click the Music Store link.
On the Source panel on the left is a variety of items to pick from, including Library, Podcasts, Videos, Party Shuffle, Radio, and Music Store. To submit your podcast, click the Music Store link.
Click Podcasts in the Inside the Music Store pane.
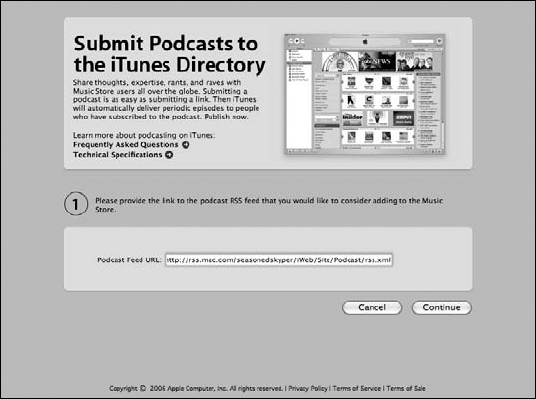
Click either the large Submit a Podcast button or the Submit a Podcast link.
Enter the URL of your podcast's RSS feed.
This URL is likely to have an
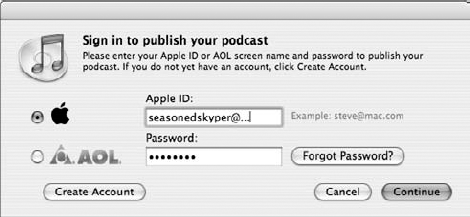
.xmlsuffix. Click the Continue button, and the screen shown in Figure 14-13 appears.Sign in to publish your podcast.
You need an Apple ID or AOL screen name to publish your podcast. If you don't have an account, click the Create Account button (see Figure 14-14).
Creating an account is free, but you must provide credit card information. This allows you to act on impulse and instantly buy something at the Music Store (and get charged on the spot!).
After you create your account, or if you already have an account, click Continue.
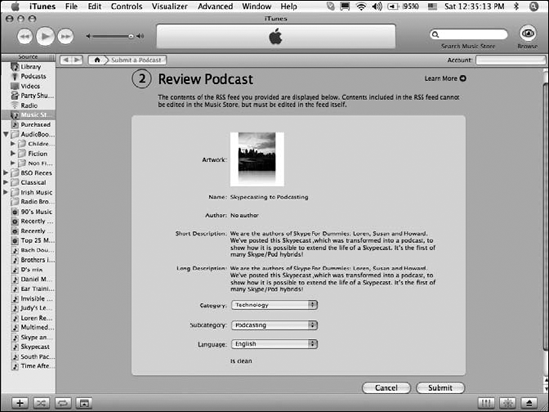
Set the Category, subcategory, and language for your podcast and click the Submit button (see Figure 14-15).
An automated email response is sent to you and informs you that the podcast feed has been received and is under review. Your podcast goes through a review process for suitability and appropriateness, which may take several days. When the review is completed, you are sent a further notification.
All music store customers can search for and subscribe to podcasts, as well as view podcasts on iTunes or download it to their iPod.
Skype is a rich environment for podcast content. Some ambitious skypers are producing programs, which is a step up from casually recording a Skype conversation to help you recall the details of a meeting. You can create podcasts of interviews, poetry readings, performances, news reports, and conferences over Skype. Skypecasts, the large-scale audio conferences posted on the Skype Web site, can be captured, edited, and converted into podcasts as well.
Call Recorder, HotRecorder, Audio Hijack, SAM, Pamela, and Skylook can all be used to provide audio content for a podcast. However, some veterans of the podosphere prefer more rigorous recording equipment, and podcast studios can get pretty geeky. Getting truly clean audio is a tricky business, especially when your environment is virtual. A good book that covers scores of gadgets and techniques for producing podcasts is Podcasting For Dummies. It even has an overview of equipment and editing software to get the best audio production from Skype.