
Getting the most from basic Skype messaging
Doing the math: Skype + Outlook = Skylook
Checking out Pamela; she's not just another pretty voice
Skype can follow you just about anywhere on the planet. Suppose you're flying on a jet with an airline that has Internet access, or perhaps you're hiking up a trail on Mt. Everest and have a wireless connection to the Internet. Even in these far reaches, anyone around the world (anyone appropriately equipped) can reach you. You simply pack a U3 Smart Drive or a Wi-Fi phone and tap into the Internet wherever it's available.
Having this connection on hand doesn't mean that you're available or that you actually want to answer every call, all the time. But having voicemail and even video mail allows other people to connect to you without requiring your physical presence to take every incoming call.
In this chapter, we tell you about various methods for handling the Skype calls that you can't answer in the traditional way. Skype services do include some basic voicemail, call forwarding, and text messaging. You can also add on to or integrate other software with Skype to accept voice messages, record contact-specific personal greetings and conversations, and even schedule Skype calls with your contacts. In particular, we describe how to make Skype collaborate with Microsoft Outlook to organize and store voice messages, as well as how to use Pamela, one of the earliest Skype add-on programs for voice messaging.
Voicemail is nothing new, and Skype comes with basic voicemail capabilities as an optional feature that you can choose to purchase. If you decide to buy the SkypeIn service (see Chapter 8 for information), your voicemail costs change from fee to free! That's because Skype Voicemail is bundled in as a free service when you get a SkypeIn number.
Skype offers two other familiar features for helping you manage your messages: call forwarding and SMS (Short Message System) messaging, which is a standard used for text messaging. You may incur associated fees if you forward calls to a landline or cell phone, and fees for sending text messages depend on the message length and the number of recipients.
But the best part about these three messaging features is that they're easy to use. The next sections show you how.
Skype supports an easy-to-use voicemail system. One convenient benefit of using Skype Voicemail is that your audio messages — both your greeting and the incoming messages people leave you — are not stored on your computer but instead are stored remotely on Skype's central servers. As a result, you don't have to worry about missing calls when you turn off your computer.
Before you can use Skype Voicemail, you have a bit of setup to do. The following steps show you how to start your setup and record the Voicemail greeting that your callers will hear:
Start Skype and choose Tools
Options from the main menu.
The Skype Options dialog box appears.
In the list on the left side of the Options dialog box, click Call Forwarding & Voicemail, as shown in Figure 9-1.
The right portion of the Options dialog box changes to show the settings related to these two services.
In the Voicemail section on the right, select the Send Unanswered Calls to Skype Voicemail check box to activate your voicemail.
Below the Voicemail section of the dialog box, you find the Welcome Message section containing the three buttons you'll use to record and play back your Voicemail greeting.
In the Welcome Message section of the dialog box, click the Record button (the button with the triangle) and speak the Voicemail greeting you want callers to hear (see Figure 9-1).
Note
Your greeting or welcome message may be up to 60 seconds in length. If you have a SkypeIn number, don't forget to use part of that time in your welcome message to tell your callers to leave their phone number.
Click the Stop button (the button with the dot) when you're finished recording.
Click the Replay button (the button with the arrow) to listen to the message you just recorded.
If you don't like what you hear, you can return to Step 4 and re-record your greeting.
When you're satisfied that you recorded the perfect message, click Save.
Tip
Skype Voicemail has an advanced setting that you can use to avoid being interrupted by additional calls if you're already speaking on a call. To select this setting, click the Advanced Settings link in the Voicemail section of the Options dialog box (refer to Figure 9-1) and select the I Am Already in a Call check box in the resulting Advanced Voicemail Settings dialog box (see Figure 9-2).


You also find settings for other situations in which calls are sent to your Voicemail, as follows:
When you don't answer: In the appropriate text box, enter a number (of seconds) that tells Skype how long to wait for you to answer the phone.
When you reject an incoming call: Select the appropriately named check box if you want to send rejected calls to Voicemail.
You can easily sign up for or renew your Voicemail service by going to your Skype account log-in page and clicking the Buy Now button under Skype Voicemail. If you are already using the Skype Voicemail service, you should see an Extend button instead of Buy Now. The URL for reaching your login page is generally https://secure.skype.com/store/myaccount/overview.html.
Skype's call forwarding feature is very simple to set up and operate. It works like this: If someone calls you on Skype and you're not able to answer, the call is routed to the first Skype ID or SkypeOut number in your call-forward list. If the call receives no answer there, it is routed to the next number on your call-forward list.
You can call forward to as many as three Skype IDs or SkypeOut numbers. Skype-to-Skype forwarding is always free. Forwarding to a landline or to a cell phone incurs the regular SkypeOut charges and requires that your account have SkypeOut credit. The account that does the skyping out pays for the call, which makes sense. Suppose you're in the United States and, from your PC, you skype someone located in France. If that person has enabled call forwarding to his or her cell phone, then he or she (and not you) incurs the SkypeOut charges.
For basic call forwarding, follow these steps:
Start Skype and choose Tools
Options from the main menu.The Skype Options dialog box appears.
Click Call Forwarding & Voicemail.
Select (check) the Forward Calls When I Am Not on Skype check box, enter the Skype name you want your calls forwarded to in the Enter Phone Number combo box, and click Save.
For call forwarding to more than one Skype name or SkypeOut number, follow these steps:
Start Skype and choose Tools
Options from the main menu.The Skype Options dialog box appears.
Click Call Forwarding & Voicemail.
Click the Advanced Settings link and select (check) the Forward Calls When I Am Not on Skype check box, and enter the Skype names you want your calls forwarded to in the Enter Phone Number combo box.
Enter the additional Skype names or SkypeOut numbers (see Figure 9-3) as appropriate in the remaining Enter Phone Number combo boxes and click Save.
Tip
If you are uncertain how to enter a SkypeOut number, click the Get Help Entering Phone Numbers link, which takes you to the Web page at
www.skype.com/products/skypeout/rates/dialing.html. This page provides assistance on correctly entering SkypeOut numbers, including looking up the appropriate country codes.Note
You must have Skype credit to forward a call to a SkypeOut number (see Chapter 8 for information about Skype credit).
Interestingly, Skype Voicemail does not record forwarded messages. Systems such as Pamela (described later in the chapter) do, and they add some other very cool features. Skype Voicemail and call forwarding offer basic functionality, but other messaging features in Skype (such as SMS messaging) and add-on products that work with Skype (such as Skylook and Pamela) offer you more.

The blossoming of technologies for communication shows that people crave constant contact with each other. Nowhere is this trend more evident than in the popularity of text messaging, which is a communication method that teenagers use frequently because it's fun, easy, and (perhaps) even addictive.
Many people find that text messaging is practical, even though it has these two drawbacks:
Limited screen size for message viewing: Any text message sent must be viewable from a tiny cell phone screen.
Tedious and time-consuming creation: Typing a message — beyond a short sentence or two — takes more patience and time than most people (especially teenagers) are willing to invest.
To help work around these text messaging limitations, a communications standard — the Short Message System, or SMS messaging — exists for a variety of mobile phones and other devices such as Pocket PCs and GSM (Global System for Mobile Communications) phones. And when you're running Skype, the circle of devices offering SMS text messaging capability even includes your desktop computer.
Sending SMS messages via Skype involves these simple steps:
In your Skype menu, choose Tools
A window pops up, prompting you to select the recipients you want to receive your message. Recipients need not be Skype Names. You can also enter phone numbers.
Add the Skype names or phone numbers of your message recipients and click OK.
An SMS message window appears.
Enter your text message in the Skype SMS window (see Figure 9-4) and click the Send SMS button.
The Skype Names or phone numbers of the recipient(s) appear in the title bar of the Skype SMS window.
That's all there is to sending the text message with Skype, but here are some points to keep in mind about this service:
SMS messaging has a cost attached: When you use SMS messaging, you pay a small fee that's based on two things: the length of your message and the number of recipients getting the message.
Charges apply only to messages delivered within 24 hours: When you send a message, you are charged only if the message reaches the person within 24 hours. If the recipient's GSM phone battery is dead or his or her phone is off, you get a refund.
Warning
Watching your message length is a good idea: The maximum size for any SMS message is 160 characters. So if you send a message with 167 characters, it is split into two SMS messages with 160 characters in the first and 7 in the second. In this situation, you are sending two messages instead of one and you'll be charged accordingly. (It pays to study up on the chat abbreviations presented in Chapter 6!)

Skype is all about connecting with people. And when you use SkypeOut (see Chapter 8), you are only a click away from making that connection. But here's a problem: All the information about the people you want to connect with (your contacts) may live on a separate island known as Outlook.
Wouldn't it be nice if Skype could just take a peek at your Outlook contacts, see their phone numbers, and skype out to them by clicking on their phone numbers from within Skype? Starting with Skype version 2.5 and later, you can make this happen by following two simple steps:
Note
Don't confuse the Outlook program with Outlook Express. Skype and Outlook work together very happily, but you won't get Outlook Express to share information with Skype.
Skype is a communications engine that enables you to talk, write, watch video images, listen, and chat instantly with a variety of contacts. When you use Skype, you can reach skypers, nonskypers, and text messagers, all from one program. Outlook is also a communications engine that helps you manage communications with your contacts as well as information about your activities and your schedule. With Outlook, you compose, receive, and archive emails, make appointments, schedule your time, and share your calendars and folders.
Both Skype and Outlook are amazing programs that offer access to a broad circle of friends, associates, and family. So it stands to reason that both programs work with much of the same information (contact information, that is). Consider the following strengths of each program:
Skype lets you connect with your contacts by exchanging information through the Web and extends that outreach with sound (voice calls), sight (video), live text messaging, and file transfer.
Outlook connects you with your contacts by moving information around through various networks, extends its reach to organizing and scheduling your activities, and even gives you a way to send information to hundreds (or thousands) of people at one time.
Without any integration between the contact information stored in Skype and Outlook, you can quickly get caught up in switching back and forth between the two programs to replicate and update the same information in each one. This inefficient jockeying is the quintessential example of electronic pencil pushing at its worst. So to alleviate the annoying repetition and duplication, Skylook (a software plugin used with Outlook) was born.
You can get the Skylook plugin to use with your Outlook program by doing the following:
Install Skype 1.2 or later, and install Outlook 2000 or later.
Skylook is not an independent program; it is a plugin. You need to have both Skype and Outlook properly installed before downloading and installing Skylook.
Quit Outlook.
Outlook must be closed in order for Skylook to be installed. Skype can remain open.
On the Internet, navigate to
www.skylook.biz.Click Download.
You are prompted to choose a place to save the Skylook installer file. Click Save to place the file in a default folder on your hard drive. You can choose any location, as long as you can locate the file on a program such as the Windows Explorer. Jot down the path to the folder where you save the Skylook installer file.
The basic Skylook account is free. Additional features require a small incremental fee.
Launch the Skylook install wizard by choosing Start
All ProgramsAccessoriesWindows Explorer; then, navigate to the installer file you just saved and double-click the file.To install Skylook, you must accept the terms of the End User License Agreement. Click I Accept the Terms in the License Agreement and then click Next.
Note
Before proceeding with the installation, make sure that you close the Microsoft Outlook application if it is running. The Skylook installer program does some behind-the-scenes hocus pocus so that the next time you open Outlook, Skylook kicks into action and prompts you with a series of setup questions.
When you finish the Skylook installation, launch Outlook.
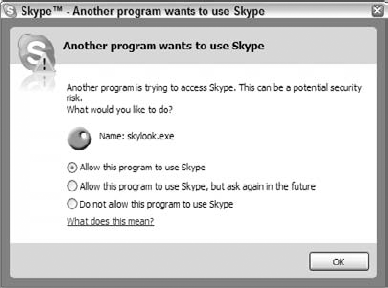
Magically, Skylook is integrated into Outlook, but it still needs some configuration. The Skype security screen (shown in Figure 9-5) appears on your desktop. This same screen appears when any program that wants to use Skype opens. To continue, you must officially introduce the two programs and agree to let Skylook and Skype work together.
If you use Outlook all the time, select the Allow This Program to Use Skype option and click OK.
Tip
Choosing this option eliminates the security reminder every time you launch Outlook, which is a good idea if you're a daily Outlook user.
The Skylook setup wizard opens automatically.
Follow the prompts to configure Skylook and get a feel for how Skylook works at the same time.
You may be asked to answer questions relating to the following:
Whether to synchronize your Outlook contacts with your Skype contacts. We show you how to do so in the next section.
Whether you want Skylook to record your conversation (either one or both sides).
Whether you want Skylook to act as your answering machine. If you do, you can record a personalized greeting, set Skylook to automatically answer when the Skype status is Away, Not Available, or Do Not Disturb, and specify how many seconds to wait before answering.
You have the option to change any of these settings after the program is fully installed.
Tip
To use the call recording feature of Skylook, you need to have Windows Media Player 9 or later installed. Download Media Player at www.microsoft.com/windows/windowsmedia/download/AllDownloads.
Skylook binds Skype and Outlook tightly together. You don't sense that two separate programs are running at the same time. You see one interface, one program to open, and one environment in which to store and send messages. But Skype and Outlook are, in fact, two separate pieces of software. To truly have them work together, you need to give them a little help connecting.
Toolbar too crowded?
If you can't find your orange Skylook icon, you have too many words on your Skylook toolbar. Here's how to get rid of them.
Move your mouse to the far right end of the toolbar where you see a small, triangular notch; click the notch to open your toolbar options.
Choose Tools
Options.A Skylook Options window opens.
Click the Toolbar tab and select the first check box, Hide Captions.
For the Show Contact Presence Buttons in the Toolbar option, set the number to 3 (see the following figure).

Skylook has some slick synchronization tools to pull Skype contacts into Outlook and to roam through Outlook contacts to find Skype users. At times, Skylook walks you through individual connections, as it does when you create a new appointment. Veteran Outlook users make (and have made) hundreds of appointments in Outlook. When you add Skylook to Outlook, the appointment screen takes on a new Skylook toolbar, on which you can conveniently make calls on the spot and then schedule your Outlook appointments all from a single window.
Before you can initiate a Skype call within Outlook, you must synchronize your Outlook contacts with your Skype contacts. Follow these steps to synchronize contacts manually:
Find the small, triangular notch to the right of the orange Skylook Tools icon on the Skylook toolbar.
When you click this "notch," the Skylook Options and Other Functions menu appears.
Select SkySync (Synchronize/Import Contacts) to open the SkySync Wizard.
The SkySync Wizard opens a SkySync Summary window.
Select Review Matches and/or Link Contacts Manually.
You also have the choice to let SkySync search the entire global Skype network to find matches between your Skype contacts and Outlook contacts. It takes a few minutes to perform this search.
SkySync Wizard asks whether you want to update Outlook contact information from Skype profiles. Click Yes; then click Next.
Skype profiles sometimes have extra contact information such as phone numbers that can be added to an Outlook account.
Select an Outlook Contact from the list that the SkySync Wizard generates.
The Review SkySync Recommendations window offers several choices:
Link: Connects a particular Skype contact with the Outlook contact selected.
Unlink: Severs Skype from the selected contact.
View Diffs (differences): Lets you see the profile details of each account.
Update: Updates your Outlook account with the latest profile details.
Don't Update: Leaves each profile unchanged. Sometimes Skype profiles are deliberately different from Outlook profiles. One may be business related; the other may be personal.
Click Link.
When you click the Link button, a window opens and the SkySync Wizard asks you to enter the Skype User ID (Skype refers to this as your Skype Name; Skylook calls it your Skype User ID) of your Outlook contact in the box. If you don't know the ID, Skylook searches for it when you click Next.
Select a name from your list of Skype Contacts generated by SkySync.
If you still don't see your Skype contact, click Next.
A search screen opens. You can add some search details, including:
Full Name
Email Address: Skype Profiles never reveal email addresses, but you can still search for a contact if you already know the email address and it is included in your friend's Skype profile.
Skype User ID: You can enter a portion of the Skype User ID if you don't remember the entire name.
Click Next and select the Skype User ID from the list the SkySync Wizard generates.
Click Finish.
Your Outlook contact is in sync with Skype.
Synchronizing contacts manually through the SkySync Wizard lets you scroll through contacts and decide whether to sync each one individually. However, if you want to synchronize a specific Outlook contact on the fly, here is a little shortcut:
Select a name in your Outlook Contacts list.
The selected name appears in your Skylook toolbar between the Skype Phone Call button and the Help button.
Click the arrow next to the Outlook contact that now appears in the Skylook toolbar and choose Link This Outlook Contact to a Skype Contact from the drop-down menu, as shown in Figure 9-6.
Follow the screen prompts (as in Steps 5–8 in the prior step list) to synchronize the contact with the list of Skype contacts (see Figure 9-7).
Click Finish.
Skylook can expedite contact linking between Skype and Outlook with its SkySync feature. Rather than connect one user at a time, SkySync searches through your Outlook address book and maps it to your Skype contacts list by linking any matches that it finds. You can even use the SkySync Wizard, shown in Figure 9-8, to run a thorough search of the global Skype network.


Tip
Suppose that your company has several thousand active Outlook accounts. Synching up one contact at a time would be out of the question, but using the SkySync Wizard makes this contact mapping possible. SkySync launches automatically during the Skylook setup, but if you want to update your contact links subsequently, choose Tools
SkySync goes through all your Outlook contacts and searches for possible matches on the Skype network. Skylook presents possible matches. For each potential match, Skylook asks you whether you want them linked. Suddenly you see that good old Bob has a Skype account, and SkySync links it to Bob's contact information in your Outlook program.

After your Outlook Contacts link up with Skype, simply select Bob from your contacts in Outlook and skype him via the Skylook plugin. To start a new Skype conversation with Bob, follow these simple steps:
Select your Outlook Contact name.
Click Skype Voice Call in the Skylook toolbar.
Skylook double-checks your intentions and asks whether you really want to call your contact.
If you really want to have a Skype conversation, click OK.
Start talking!
A powerful feature of the Skylook plugin adds the capabilities for voice recording and messaging from within Outlook. These communication methods are not native to Outlook, whose strength is the organization of email, asynchronous messaging, and scheduling.
Note
Including VoIP functionality (offered through Skype) in your Outlook program suddenly catapults messaging to a new level. You can not only email your contacts and invite them to a meeting but also conduct that meeting within the same program. Business collaboration becomes a live event, bringing all the parties together synchronously. When you add Skylook to Outlook, callers can now reach you directly through the messaging system you use most often.
Outlook users tend to keep their Inbox open all the time, expecting little alert beeps when emails come in. A system that is always open like this needs to also handle messages delivered when the intended recipient is away from the desk. Outlook archives and organizes email messages, but it has limited capacity to respond automatically. Usually, the only option is a general automated email reply that answers for you when you're on vacation or at a conference. But because Skype adds voice capabilities to the mix, Skylook adds voicemail through the Skylook Answering Machine.
The Skylook Answering Machine records calls and stores voicemail messages in your Inbox, handling them just like Outlook handles emails. You control when the answering machine responds according to your choice of availability options that you find in your Skype program.
Following are some options you have for controlling the Skylook Answering Machine:
When and how to answer: If you choose, the answering machine activates when your Skype status displays Away, Not Available, or Do not Disturb. You can also choose how long to let the Skype caller ring before the answering machine picks up, even if your Web status shows you are available.
See who's calling before you answer: Sometimes you just don't feel like talking. Of course, because it's a Skype call, you can see who is calling, glance at the caller's profile, do a quick search for archived messages, and then decide whether you want to pick up.
Listen (or not) to messages coming in: If you decide not to pick up a call, you can hear the message as it's being recorded, or you can mute the sound if you don't want to be disturbed.
Work in conjunction with Skype Voicemail: Skylook Answering Machine works even if you have Skype Voicemail service (see the section "Taking messages with Skype Voicemail," earlier in this chapter). The two don't fight each other to answer calls. Whichever picks up first takes the message. Whether a call comes in from Skype Voicemail or through Skylook, all incoming messages are stored in the Outlook Inbox if the program is open. If Skylook is not active, Skype Voicemail takes the messages.
Record a personal greeting for callers to hear: Skylook has a built-in voice recorder, so a simple wizard screen offers the choice to record a personalized greeting.
On the surface, the Skylook voicemail system works just like ordinary voicemail. Someone calls, hears a greeting, and leaves a message. But because these messages are digital and show up in the Outlook Inbox, you can sort, save, and even email them. And voice messages aren't the only kind saved; Skylook will also store missed text chat messages in your Inbox.
Note
Using Outlook with the Skylook plugin gives your clients, friends, and family even more ways to communicate with you. Direct calls, emails, text chats, and voice messages are all available — and you are no longer unreachable.
Another new productivity tool Skylook brings to Outlook is conversation recording and archiving. Suppose that you set up an Outlook appointment to Skype Bob and discuss the details of an upcoming workshop. Rather than take notes during your conversation, you can use Skylook's tools to record, preserve, and store the conversation.
To the right of the orange Skylook Tools icon on the Skylook toolbar is a small triangular "notch" for Skylook Options and Other Functions. Clicking this icon opens a menu. Select Options and click the Recording tab; from there, you can set the recording conversations features with the following choices (see Figure 9-9):
To automatically record all calls. When automatic recording is active, the recording starts as soon as you make or receive a Skype call.
To record only your side or both sides of the conversation. Select either Record My Voice Only or Record All Voices. You can set this option to apply separately to Skype-to-Skype calls or to SkypeIn and SkypeOut calls.
Warning
Recording the voices of other parties may be subject to legal limitations in some jurisdictions. These limitations may require you to notify the other party that the conversation is being recorded. In some cases, recording the other party, even with notice, may not be legal. Please verify the limitations for your jurisdiction. Even though you may be recording a conversation for your own internal use, it is always good to be considerate and courteous and inform the other party that you are recording the conversation.
The Skype Call Monitor is a floating window — shown in Figure 9-10 — that pops up to let you know a call is being recorded. When you expand the Skype Call Monitor, it becomes a larger window that displays real-time information about the recording in progress. The information that is monitored includes the length of the recording (in minutes and seconds) as it happens and the size of the recorded file (in KB) as it grows. If you capture every Skype conversation, you may need a lot more hard drive space (and tons of free time to listen to all those conversations again).


Suppose that you schedule a meeting (that is, a Skype conversation) with your good friend Bob in Outlook. When the meeting is about to start, a screen pops up as a reminder to make your Skype call. Click the reminder icon to open your appointment window. You then select Bob's name in the Contacts box, click the Skype Voice Call button, and you are connected over Skype to good old Bob. If you have call recording enabled, the conversation is automatically recorded and saved as an MP3 file when you log off the call. Skylook then parks the MP3 file in a Skylook Conversations folder.
Note
Voice call recording is a full-productivity-mode feature of Skylook. This feature is available in the business, home, or academic versions of Skylook. Basic Skylook, which is free, does not offer any recording tools.
In addition to recording conversations, this full productivity mode adds contacts to your Skylook Toolbar, saves your voicemail messages to your Outlook Inbox, and creates a Skype Conversations folder to gather and organize Skype conversations.
When you have full-productivity mode enabled, Skylook presents you with choices in the Skylook Recorded the Conversation For You dialog box (see Figure 9-11). For example, you have the option of emailing the MP3 of your just-recorded conversation to Bob. This handy option saves you from rummaging around trying to find the recording. Simply click the Email a Copy To button, and the recording is on its way.

Tip
If you don't want to record a call, just click the Stop button in the Call Monitor toolbar. If you stop a recording during a Skylook call, the entire recording is deleted. If you want a portion of a conversation preserved, hang up and then reconnect to finish the part you don't want recorded. The MP3 file of your recorded portion will be tucked away in the Skylook Conversations folder.
Note
Try using Skylook's recording feature to produce podcasts or online presentations. You can set Skylook options to make sure that you record both sides of the conversation for interviews or conferences. And if you use Skylook calling to coach, mentor, or present to a group, you can choose to record only your lecture so that you avoid capturing any noise from the others on the call.
When you install the Skylook plugin, the program automatically creates a Skylook Conversations folder (see Figure 9-12) that you can access within Outlook. The Skylook Conversations folder functions just like the folders that store your email, but it contains voicemail, chats, and recorded sessions, as well.

Consider these ideas for keeping the contents of your Skylook Conversations folder organized:
Treat the files as though they were emails. Move conversations to another folder, flag them, mark them as unread, or delete them.
Organize your archived conversations by date, category, from, for, size, subject, type, flag, email, importance, and even by conversation.
Review all communication in a particular thread, or with a particular individual, to get a snapshot of an ongoing project. Go through your messages by listening, reading, and printing chats.
Share your messages by forwarding them to friends and colleagues through email or by collecting and putting them in a public folder.
Note
When your messages are properly sorted, you can follow up on each one more easily. You can return a Skype call, send a reply to that chat, or listen once again to a voice message or recorded conversation. You know which contacts are online because the Skype status system (the feature that shows your online Skype availability) works within Skylook. If someone's status is Online, Available, or better yet, in Skype Me mode, by all means, make that call!
Named after the Skype alias of a Skype marketer's girlfriend, Pamela is one of the first add-on programs available for Skype. Not only is Pamela (like her namesake) elegant, she's also well designed and feature rich. Pamela comes in various editions (distinguished by varying levels of functionality) and is a handy tool for managing your Skype messages. (Check out www.pamelasystems.com for how-to information on getting Pamela.) The sidebar "Getting to know Pamela" gives you a peek at Pamela's background, and the features illustrated in this chapter come from the Professional Edition.
Rather than bore you with a list of features that you can find on numerous product data sheets online, we think it is more interesting, revealing, and in keeping with the spirit of playfulness to introduce you to the real personality of Pamela.
So what can we say about Pamela? Well, Pamela is alert; she doesn't forget anything (unless you tell her to). She is very attentive. This gal has real Web savvy and she always knows whom she's talking to. Pamela is appropriately polite and punctual. But of course, she wouldn't be very interesting if she didn't have her moods.
When you work with Skype, you'll discover a tendency to start accumulating Skype contacts. You may also discover a tendency to overlook some of the information that's floating around in your Skype database, but Pamela helps you realize just how much info you have.
For example, we like to experiment and tinker, so we decided to launch Pamela with a reasonable number of Skype contacts just to see how it operates. To our surprise, while Pamela loaded, it reminded us that our friend Hannes' birthday was that day (see Figure 9-13) and prompted us to make contact. We didn't expect this kind of volunteered information, but we certainly welcomed it!
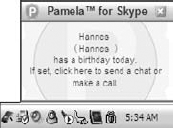
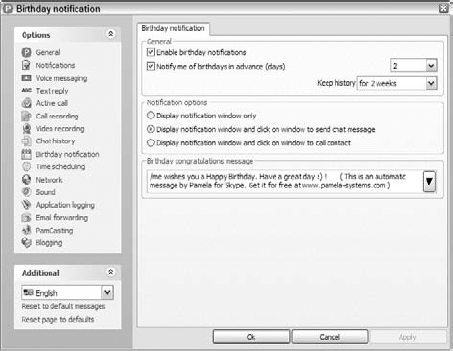
Conveniently, Pamela scours your contacts list to see whose birthday is around the corner. She can also help you send out birthday greetings with the options shown in Figure 9-14.
Pamela records voicemail messages while you are away, and she can also record any conversation as you're making or receiving calls. With the Professional Edition of Pamela, the number of messages you can record is limited only by the amount of available disk space. Pamela is configured to record conversations using uncompressed WAV files.
And although having large amounts of hard disk space at your disposal is getting less expensive these days, you may still feel the need to conserve. If you want to cut down the disk space used by a factor of 12 or so, you can install a couple of special files that make Pamela save sound recordings as MP3 files. You can find the instructions for making this change at www.pamela-systems.com/download/mp3.php.
As download links or URLs listed in this book change, we will post updated links on our Web site www.skype4dummies.com.
A couple of items about Pamela's message recording features are worth pointing out:
Pamela can automatically record all Skype conversations as you have them. Auto recording all conversations, as well as voicemail messages, imposes two burdens on you. First, your hard drive could fill up very quickly, and second, you have to figure out how to manage all those recordings (and then do it!). Alternatively, Pamela can prompt you each time you make or receive a call over Skype and ask you then whether you want it recorded.
Tip
If you ignore the recording prompt for 10 seconds, Pamela assumes that you are not interested (in having the conversation recorded, that is) and closes the prompt.
Pamela can help keep your recordings legal. To help keep you in compliance with legal rules in various countries and geographic regions, Pamela can display an alert to let people know that the conversation is being recorded.
Note
If you want, you can set up Pamela to record calls in stereo. That is, your voice is recorded on the left channel or speaker, and the person or people on the other end of the call are recorded on the right. This type of recording is great for podcasting because editing for clarity becomes easier. For example, you can safely eliminate discernable background noise on an interviewer's side of the call while preserving the sound on the interviewee's side.
Imagine that during the first week of using Pamela, you record a half-dozen conversations — each about a half-hour long — with the same party. Other than by listening through each of the conversations one-by-one, how will you remember the key points and which conversation they belong to? Fear not; Pamela to the rescue!
Pamela's note-taking function (shown in Figure 9-15) allows you to record the date, time, and identity of the person you are speaking to, and to type in whatever notes you want. These notes are appended to the sound recordings so that, at a glance, important details and quick, on-the-spot summaries are at your fingertips. Joe Friday would be pleased with this software. Just the facts, ma'am!
Want something really cool and way over the top? Try making personalized greetings for any Skype contact. That's right! You can record a different greeting message for your husband, your boss, your favorite niece, and that annoying neighbor who feels obligated to gossip about everyone on the local school board. Figure 9-16 shows the Personal Options dialog box with Enable Personalized Voice Mail for This User selected (in this example, the user is Newbieskyper).
If you think that personalization alone is cool, wait until you combine personalization with brains. We discuss call forwarding earlier in this chapter (see the section "Forwarding calls when you can't answer"). So what happens if NewbieSkyper calls SeasonedSkyper, who has call forwarding turned on, and the call is punted over to TheProfessionalSkyper running Pamela? Happily, Pamela is smart enough to know who is actually doing the calling and applies the personalized greeting for NewbieSkyper.


The personalization feature may be cool, but it is also practical. Suppose you are traveling and have access only to email. During your travels, Pamela may have logged plenty of messages on your home base. But also suppose that you're expecting a very important message from one of the people calling. Wouldn't it be nice if recorded audio message files from only that person could be forwarded to your email address? Pamela lets you set up this email notification in either of two ways: without forwarding the audio file, or with the audio file bundled with the notification.
If you can forward email notifications and slip in a sound file, then what's to stop you from creating an alternate Skype ID, calling Pamela, and having the message sent to some Internet server where it can be blogged or podcasted? Rather than code some geeky stuff such as XML or RSS, you can get the same results with Pamela's built-in capabilities.
So don't worry about the geeky stuff. Pamela has specific features that make blogging and PamCasting (Pamela's version of podcasting) easy.
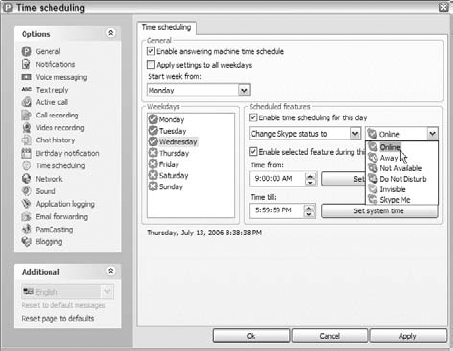
Skype gives your customers, clients, and associates easy access to you from anywhere around the globe. However, anywhere around the globe can mean that people halfway around the world could try to reach you during the middle of their day — while it happens to be 1 a.m. your time. To help manage your presence and interaction with the broader global community, Pamela has the Time Scheduling function shown in Figure 9-17. In this way, Pamela keeps you in touch with others while also making sure that you get your rest.
It often happens: You are away from your computer and someone sends you a chat message. A polite reply to a single chatter is, "I'm away from my computer. My personal assistant, Pam, is responding with this automated message."
This type of response is good for letting single chatters know that you're not currently available. But in a multi-chat situation in which many people may be available to chat, this kind of automated reply can be downright rude. Pamela avoids the potential faux pas by discerning the difference between a single chat and a multi-person chat, and behaving the way you want in each situation.
As your list of Skype contacts grows, you may notice that mood messages for some of the more Skype-savvy contacts change regularly. You might see that some of these say, "I'm busy right now. Call me when I'm off the phone." A few minutes later, the mood message might read, "Okay, I'm available to take your call." Skypers can change their mood messages as they please, but you can have Pamela automatically change mood messages for you as you answer and hang up calls.