
Setting up Skype and getting it working for you is not difficult, and you can do it using the quick steps presented in Chapter 1. Knowing about the process in greater detail, however, will help you get comfortable with Skype more quickly. That's what this chapter is for. Also in this chapter, you find out how to install Skype and create a new account; how to fill in your profile to let the world know who you are; how to find others on Skype; and, best of all, what to do to make a Skype call and start speaking to the rest of the world through your computer.
Note
As mentioned in Chapter 1, the Web pages on www.skype.com are constantly being enhanced. So, they may change from time to time. Don't be surprised if the Web pages you're looking at don't exactly match the screen shots in this book.
Ready to get started? First, pick up the latest version of Skype:
With your Internet browser open, enter
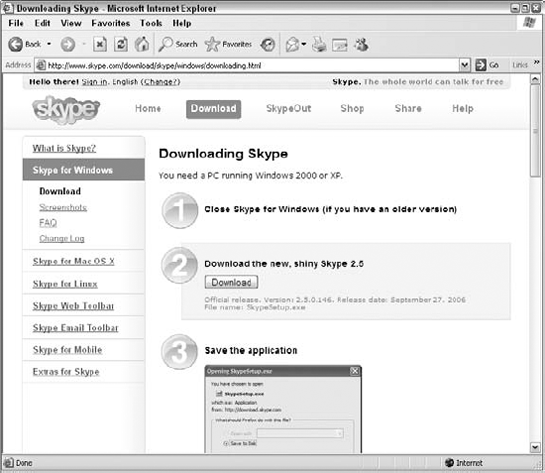
www.skype.comin the address line to open the Home page of the Skype Web site.Click the Download button on the Skype home page to open the Download page.
Click the link for the computer platform that you use to download the software and then click the word Download immediately under the name of the platform you just clicked (see Figure 2-1).
Skype works on Windows, Macintosh, Linux, and Pocket PC. In most of the examples in this book, we use Windows, but we also discuss, where appropriate, differences with other platforms.
Click the Download button (see Figure 2-1) to download Skype to your hard drive.
Note
The appearance of the download page and download button varies by computer platform. On the Mac and Skype for Pocket PC, the button says Download Now. You have to pick the particular variant of Linux you want to download and then save the software to your hard drive.
Note
After you click to download the program, you may be prompted to save or open the program SkypeSetup.exe. Always choose to save the file to your hard drive. Do not open or run the program during the download process.
Tip
Skype often posts two types of downloads, the general public version and the next new beta version. If you are just starting out, it's best to download the general public version because it's more stable. In time, the beta version will become the public version, and you can upgrade.
Choose an easy-to-remember location, such as the Windows Desktop, and click OK. Remember this location so that you can double-click the file after it is saved.
When your download is complete and the program is saved to disk, follow these steps to install the program:
Double-click the SkypeSetup program that you just saved.
If you are on Windows, you will see a little blue-and-white cube that says SkypeSetup.exe. If you are on a Mac, you will see a standard installer icon that looks like a disk drive but is colored blue and white with a big Skype S on top.
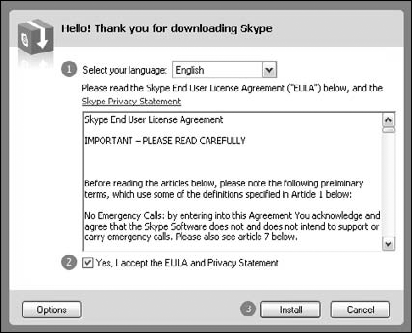
When the installer program launches, it asks you to choose a language; select it from a drop-down list (see Figure 2-2).
The installer program then asks you to read and accept the End User License Agreement. You need to accept this to continue the installation.
Click the Options button (refer to Figure 2-2).
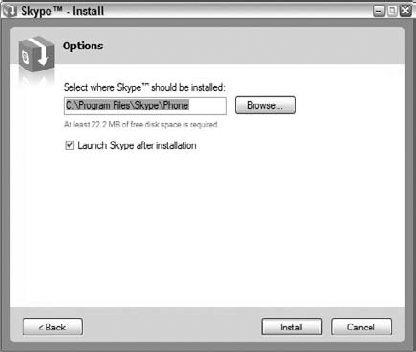
The Options page that results (see Figure 2-3) asks you to select where Skype should be installed. In the field provided, enter the path to the selected location. You can also click Browse to simply select a location to install Skype.
You also have the choice to launch Skype as soon as the installation is complete. This box is already checked. If you don't want Skype to start up right away, deselect the box by clicking it.
Click Install.
Skype is installed and automatically launches (unless you deselected the Launch Skype check box on the Options screen).
Tip
Just in case you want to use Skype in a language other than English, you have a considerable range of options with a growing list of languages, including the following: Arabic, Bulgarian, Chinese Simplified, Chinese Traditional, Czech, Danish, German, Estonian, French, Greek, Hebrew, Hungarian, Italian, Japanese, Korean, Norwegian, Dutch, Polish, Portuguese, Brazilian Portuguese, Romanian, Russian, Spanish, Finnish, Swedish, and Turkish. (Try saying that all in one breath!)
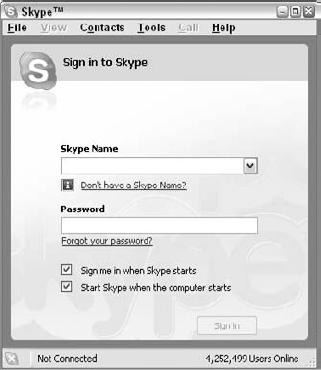
When you launch Skype for the first time, you see the Sign In to Skype window, shown in Figure 2-4.
To use Skype, you must set up a Skype Name and password. A Skype Name is what other people on Skype see when they contact you. You use your Skype Name to log on to Skype in combination with a password. Because you choose your Skype Name, pick one that's unique to you and easy to remember.
To establish your Skype Name and password, follow these steps:
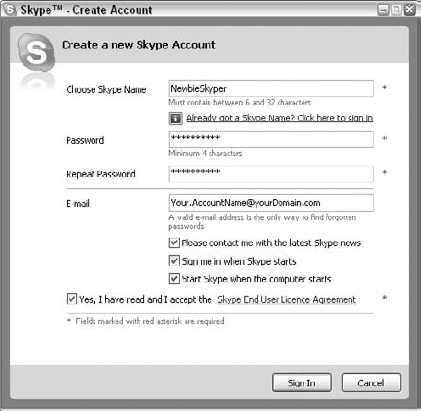
Click the Don't have a Skype Name? link (refer to Figure 2-4).
The Create a New Account page opens.
In the Enter Skype Name box, enter the name that you've decided to use.
One of the first questions that may pop into your mind is, "How will all my friends and family find me on Skype?" If you already have a screen name that you use for your email, try using the same name or something very similar on Skype. However, be aware that Skype Names must start with a letter and not include spaces. Skype Names also must be between 6 and 32 characters long, including letters and numbers. All Skype Names are converted to lowercase letters, even if you use uppercase letters when you create your account.
Tip
What if you have a great idea for your Skype Name but somebody else beat you to it and registered the name on Skype? For that possibility, Skype offers you alternative names to pick from — but also allows you to set one of your own choosing (see Figure 2-5).
Choose a password and enter it in the Password box.
A Skype password must be at least four characters long. All Skype passwords are case sensitive.
You are asked to enter your password again in a second Password box to make sure that you entered it accurately.
Tip
Pick a password that is easy for you to remember but difficult, of course, for others to guess. A good technique is to pick two short but unrelated words and separate them by some nonalphabetical characters — for example,
latte67chair.Select the check box to accept the Skype End User License Agreement and the Skype Privacy Statement.
Although you agree to the License Agreement when you download Skype, you must check it again when you create an account before you can successfully log on to Skype.
Click Next to continue to another Create Your Account Screen; there, enter your email address.
Entering your email address is optional but recommended. Be sure to fill this in. Email is the only way to retrieve a lost Skype password. Also, if you don't have email, you'll have a difficult time making use of features such as SkypeOut and SkypeIn (see Chapter 8).
Enter your country, region, and city.
This information is optional, but it's useful when other skypers search for you.

After you complete the Skype Name information, a page that looks much, if not exactly, the same as that shown in Figure 2-6 appears. Click the Sign In button to launch Skype. Skype is now live and ready to use, and you are greeted with a helpful Getting Started guide. We encourage you to take the time to view this simple tutorial, although you can find out how to perform all these tasks in this book as well. The guide walks you through the general steps for:
Testing your sound settings
Adding a Skype Contact
Making a Skype call
If you want to refer to the Getting Started guide again, you can open it at any time through the Skype menu by choosing Help
Every new Skype member has an opportunity to enter information into a personal profile screen. You don't have to fill in any information; profiles are completely optional. The Skype Profile window clearly states that whatever details are included are "details that only my contacts will see" (see Figure 2-7). So, don't feel obligated to fill in the blanks!
There are some good reasons, however, to populate those empty profile fields. The benefits of adding information are to
Help others find you in a Skype search if they don't have your Skype Name
Give clients easy access to telephone contact numbers that you make public
Show new friends your photo
Post an image of your business logo
Provide contacts with a link to your Web site
Show your local time so that others know when to contact you

Your Skype Name is not part of your profile. A Skype Name is not optional. You need it to log on to Skype and to enable other skypers to contact you. Your profile details give more information about who you are and what you do. You can let the world know whether you are a businessperson, an artist, an author, a fiddler, or just a seasoned skyper looking for a few friends to hang out with online. As more and more people use Skype for business, special interest groups, educational venues, and social gatherings, their location, language, and other personal information may form the basis for a common interest or mutual benefit. Personalizing Skype is more than self-expression; in some cases, it is a courtesy to others reaching out to you.
To open your Skype Profile screen, choose File
Full Name: The first bit of information you can publish to the world in your personal profile window is your full name. Many of us shy away from offering our real names to the virtual world; others find it liberating to invent an identity; and some prefer to be completely anonymous. However, there are advantages to adding your real name to your profile:
Adding your full name makes it easy for others to find you on Skype.
If you use Skype for business, your full name is a vital piece of information for clients to access.
In a conference call or chat, any member of the group can look up your profile to find your name. If many people are conferencing or chatting for the first time, forgetting a name is easy, and it's handy to have it available.
Gender: Potential dates certainly want to know this fact. If your first name is slightly ambiguous (think of all those male Leslies, and Lorens, one of the authors of this book), filling out your gender might just turn out to be the happiest bit of information you share with the world.
Gender is another option that can help you (or others) narrow a search in the Skype directory. If gender is not included in a person's profile, it is not searchable.
Birth Date: Most people are reluctant to reveal this detail. There are, however, some reasons to include your age, such as if
You are open to meeting people your own age.
You are an advocate for a specific age group, such as teens, the elderly, or baby boomers.
Country/Region, State/Province, or City: Skype is international. It's important for callers to have some idea of where they are calling. Knowing where someone lives, and letting others know where you live, can help you both prepare for cultural differences in communication. Whether used for business or social reasons, this is an essential piece of information for smooth customer relationships. In addition,
All locations are searchable in the Skype directory.
Location provides information on local time zones. If this information is not included elsewhere in the profile, at least you'll know when to call (and when not to call).
Language: Choose your language from a drop-down list.
Indicating your native tongue lets callers know whether they share your language. If they don't, they may choose to engage a translator in advance.
Language is a searchable item in the Skype directory.
Home Phone/Office Phone/Mobile Phone: Skype allows you to list three phone numbers, one for home, office, and cell. Some good reasons to add these numbers are the following:
Your Skype profile is available worldwide, so your phone numbers have a global reach. If your phone number is listed in your local phone directory or your business is listed in the Yellow Pages, you would do well to place the equivalent listing in your Skype profile.
You can update your telephone information on Skype instantly. This feature enables you to provide the most current contact information, even if you are in the middle of a major relocation. Updating local directories, or even Web listings, takes much longer.
If someone cannot contact you on Skype, your profile gives that person options in an emergency. People can SkypeOut to you from within the Skype program, or just use a cell or landline. In either case, they have instant access to your phone numbers.
Homepage: It costs nothing to create a Skype account and list a Web page that you want all the world to see. The Homepage box has room for only one Web address, but it can be an effective contact tool for you because:
Web site links are active. A contact can navigate to your Web site directly from your profile.
Posting a Web site in your profile is free advertising for your business, product, service, or just yourself.
About Me: This is your chance to tell your story in 200 characters or fewer (note that it's 200 characters, not words). Plenty can be said in a few words. You can
Describe your business.
Put in a short bio.
List your hobbies, collections, or favorite activities.
Adding a photo or artwork You can add a 96-x-96–pixel graphic to your profile. The format for your graphic must be JPEG or BMP. You can add a picture in two ways:
Click the picture box in the lower-left corner of your profile window. A My Picture screen opens. Click Browse to search for a picture you have prepared in your computer.
Click the Change button to the right of the picture box. Doing so also brings you to the My Picture screen. Click Browse and search for a picture.
Your picture is visible only to your Skype contacts, that is, only people you have in your approved contact list. People who find your Skype profile in a search will not be able to see your picture until you give them permission (see Chapter 4).
You may have hundreds of approved contacts, but you may post only one picture. Pictures make your Skype profile more personal. They can identify you with a business, club, or charity. They can add humor. Some pictures on profile pages include:
A business logo
A recreation picture, such as skiing, surfing, or golfing
A head shot
A cartoon
A favorite landscape
See Chapter 5 for more about including graphics with your profile.
Show My Time: Skype is available 24 hours a day in all time zones. Letting your contacts know your local time or time zone (only your contacts will see your time zone) is important. Your profile page enables you to do indicate your time zone in two ways:
Click in the Show My Time box. This action displays the actual time of day as shown on your watch or wall clock.
Select a GMT (Greenwich Mean Time) zone from the drop-down list provided (see Chapter 10 for more details).
Show How Many Contacts I Have: Unless you tell it to do otherwise, Skype automatically displays how many Skype contacts you have. Although it is nice to share how many contacts you have, you may not want to convey this information. Simply deselect the Show How Many Contacts I Have check box.
Email: You can provide up to three email addresses. These are completely private; no one, not even your contacts, can see these on your profile. Even if no one can see them, there are two reasons to include email addresses, as follows:
If you forget your Skype password, you will need your email address to retrieve it.
People who have your email address can use it to search for your Skype Name, even if the email address does not appear in any Skype directory.
Tip
One great activity is to look up your own last name in the Skype search window and see whether you find distant family members in other countries. Some delightful surprises come out of this activity. In fact, we (Loren and Susan) recently found a cousin from England we'd never met and we spoke for the first time over Skype.
Welcome to the skyper clan
In our example screen shots used throughout this book, we show examples with various Skype Names. In the early chapters, NewbieSkyper appears often in our screen shots and examples. Later chapters contain numerous screen shots of SeasonedSkyper. You'll also see TheProfessionalSkyper and CuriousSkyper.
Note
You have a number of available options for setting the time that will be displayed. Generally, it is easiest and best to set the time to match your local computer. If you are traveling for the week and will be in an entirely different time zone, you can manually set the displayed time to match a specified time zone. For example, if you reside on the east coast of the United States, the local time zone is −5:00 GMT. If you are traveling to San Francisco, which is on the west coast of the United States, you can set your time zone to −8:00 GMT, because it is three hours earlier in San Francisco. When people view your name on the Skype Contacts list, they see the time associated with where you are traveling.
Before you talk to someone, you should test your audio equipment to make sure that you have it properly connected and the volume levels are set appropriately.
To test your connection, follow these steps:
Double-click your Skype icon on the desktop or choose Start
All Programs Skype to launch Skype.
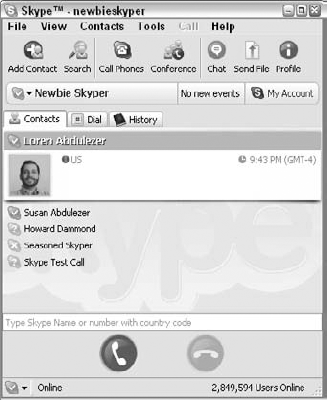
The main Skype window, which simply shows "Skype" followed by your Skype Name across the top, appears and looks similar to the one shown in Figure 2-8. If for some reason the main Skype window is obscured, repeatedly press Alt+Tab on the PC or Option+Tab on the Mac to cycle through all open applications until you navigate to the Skype application.
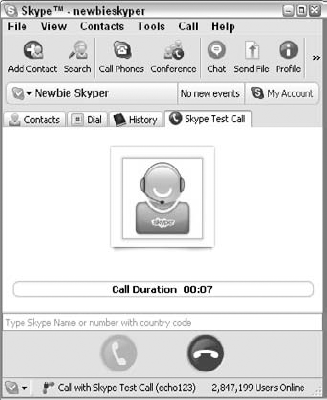
Enter echo123 in the text entry box that contains the text "Type Skype Name or number with country code."
Normally, this box is where you would enter the Skype Name or number of the person you want to call, but entering echo123 connects you to the Skype Call Testing Service.
Click the large, round green icon that appears just below the text entry.
The green call button represents a handset and is the one you click to place a call. (The red hang up button next to it is for hanging up or closing calls.) Clicking the green button connects you to the Skype Call Testing Service (see Figure 2-9). When you're connected, you hear a personable voice calmly guiding you through an audio test.
Leave a short message when prompted, up to ten seconds long, and listen for your message to be repeated.
If you don't hear your message, something's wrong!
The Skype Call Testing service allows you to hear how you sound when you call others. Perhaps your volume is too soft or too loud, or nonexistent. This is a good time to set things right before you attempt your first Skype call. Here are some quick tips and suggestions for troubleshooting your sound problems. The end of this section provides a link to a more comprehensive troubleshooting guide on the Skype Web site.
If you have sound problems when making a Skype call, try the following:
Make sure that your headphone and microphone jacks are plugged into the right audio in and audio out sockets on your computer. Try reversing the order.
Compare your Windows Sound settings with your Skype Sound settings. To locate your Skype Sound settings, choose Tools
If your voice sounds very quiet to others over Skype, first try moving your microphone a little closer to you. If moving your microphone doesn't work, try this: Choose Tools
If no one can hear you, you may have the wrong device selected in your Skype sound settings. If more than one device is listed, make sure that the device selected is the microphone you are using. For example, if you're using a microphone that connects through a USB port, be sure that you've selected a Sound setting that tells your computer to find the mic in that port.
If you can't hear anything, you may have the wrong audio out device selected in your Skype sound settings. If more than one device is listed, make sure that the device selected matches the headset or speakers you are using.
Tip
You can find advanced help in setting up your sound devices at www.skype.com/help/guides/soundsetup.html.
Tip
You can hear the same call-testing service in Chinese if you skype echo-chinese (include the hyphen) instead of echo123. Another one is soundtestjapanese for Japanese.
You may encounter some feedback problems when using Skype, but these have simple solutions, as the next sections explain.
Even if you are prepared with the appropriate headgear for Skype calls — meaning that your headset/microphone unit is plugged into your computer — the person you are calling may not be as prepared. If you skype someone who is using his or her built-in microphone and no headset, you will hear feedback. That is, you will hear yourself a couple of seconds after you speak because your voice is coming back through the other person's built-in microphone. Your Skype partner will think all is okay because he or she doesn't have the same feedback problem (you have eliminated echoes by virtue of using a headset). So, encourage people to use Skype with the proper equipment. Trying to talk through a feedback loop is no fun!
Tip
If you don't have a regular microphone, you can actually substitute it with any available set of headphones. Just plug the headphone into the microphone jack and speak into the earpiece. Of course, you need an extra headset to use as a, well, headset! Go ahead and try it. We did, and it actually works. We heard the giggles loud and clear.
Sometimes the person on the other end does not have a microphone handy or can't talk out loud because he or she is in a meeting, for example. In such a case, you may be the only one talking while your Skype partner is using the chat window. (See Chapter 6 for details of how to conduct a talk/chat simultaneously.) This mode of communicating actually works more smoothly than you might think. Other uses for this alternative to voice chat is for skyping in a noisy office or with people with hearing difficulties. How many times have you wished that you could hold up a sign to a person on the other end of the telephone because the person couldn't make out what you were saying? The chat window is like having a built-in captioning service.
Congratulations! Assuming that you've installed Skype, created a Skype Name, and tested your connections, you're ready to start skyping. The question is, Whom can you call?
You can get started by searching for fellow skypers. To do that, follow these steps:
Locate the Windows Start button on the lower-left corner of your desktop and choose Start
Skype to launch Skype.The Sign In to Skype window opens.
Enter your Skype username (that is, your Skype Name) in the Skype Name box.
Enter your Password in the Password box.
Click Sign In.
The Skype program window opens. The menu across the top contains File, View, Contacts, Tools, Call, and Help. (Check out Chapter 3 for details about each of these menu items.)
From the Skype menu, choose Contacts
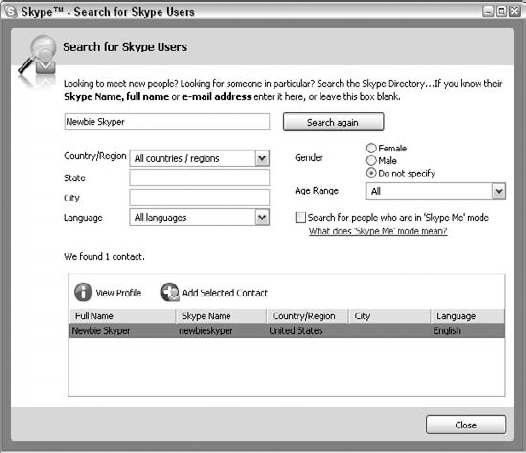
Search for Skype Users.Alternatively, you can click the Search icon to bring up the Search window, shown in Figure 2-10.
Enter the person's name in the uppermost text box.
In our example, the name Newbie Skyper appears in that box (refer to Figure 2-10).
You can start your search by entering a full name. If your friend has not added his or her name to a profile, you may not be able to find the person this way. (The last section in this chapter provides some additional information about searching.)
Click Search.
Skype searches through its directory to find the name you entered. When found, this name appears in the lower half of the Search window under "We found 1 contact."
Now that you've located someone you want to call, you're just one click away from a Skype conversation. To make a call from your Search window, follow these steps:
Double-click the contact's Skype Name to bring up your contact's profile window.
Click the green call button.
This button appears as a green circle with a white telephone handset inside. When you click it, you hear the sound of a ringing telephone, and a call window appears. The call window contains:
The Skype Name of the person you are calling.
A photo, if posted, in his or her profile.
A red hang up button.
When your contact answers the call, just talk!
Sometimes your call is not accepted because you are not an authorized contact for that person. Receiving authorization and adding names to your Contacts list is an important part of communicating on Skype. This topic is covered at length in Chapter 4.
The ability to search Skype is a powerful feature. Although you can search for a Skype Name, full name, or email address, you can narrow your search based on a set of filters. An example of narrowing a search this way is shown in Figure 2-11. Although this search example is contrived, the search results are filtered using a specific age group and gender.
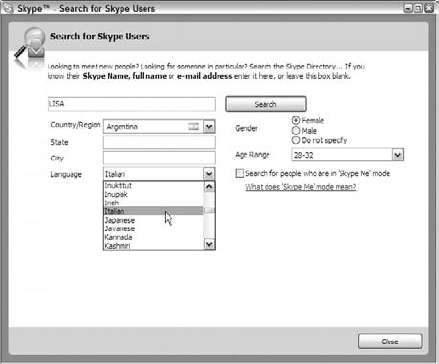
The Skype search directory gives you a number of ways to look for fellow skypers. Sometimes it is difficult to find the person you are looking for because he or she has not entered much information in a Skype profile. But you can still perform a successful search because you have several search options. If your Search window is not open, click the Search icon (looks like a spyglass) or, in the Skype menu, choose Contacts
Use the Search for Skype User box to:
Enter a full name.
Enter an email address. This information is not revealed in a profile, but if you know someone's email address, you can use it to find that contact if the person put it in his or her profile.
Enter a Skype Name. Sometimes you have a Skype Name but no other information. You can search and then open a profile to find a time zone, full name, or Web site for further contact.
Search by location. If you don't have a name or an email address, you can always try searching by location. If only a few Skype Names show up in an area, you might be able to find an individual. Looking by location also gives you an opportunity to meet skypers close by. To search this way:
Select a country or region from a drop-down list.
Enter a city, state, or both by entering the names into the boxes provided.
Search by language. Select your language from a drop-down list. Language searches work best in combination with other parameters unless you are looking for something very specific, such as people who speak Vighur, Volapuk, or Shona living in Manhattan, Kansas.
Search by gender or age range.
Search people in Skype Me mode. Skype lets you display your online status (see Chapter 3), and Skype Me mode is an online status that lets the world know you are eager to receive calls and chats from anyone. When you search for skypers, you may want to select the Search People in Skype Me Mode box. Selecting this box guarantees that the people you find are people who want to talk.
You can mix and match all the search parameters. When you have everything entered in the Search window:
Click Search to find skypers matching your search terms. Scroll through the results of your inquiry.
Click Search again after changing the search parameters if you did not see the skypers you want to contact.
Tip
You can sort the order of the search results by clicking the appropriate header bar of the search results.
If you use multiple Skype accounts and have just one email account for all of them, all the accounts will turn up in a search.
Note
Other than the email addresses you place into your profile, all the information you place into your profile is visible. People can find you by searching Skype using your email address only if they already know it.
Although you can opt to leave much of your profile blank, you will find that populating your profile with information such as language and country is helpful because this information is displayed in the search results. As the number of users in the global Skype community grows, people trying to find you have an easier time doing so with this extra information.