
In This Chapter
Understanding Skype as a many-platformed thing
Adding flexibility with a Skype phone
Bolstering privacy and clarity with accessories
Going wireless with Bluetooth
Getting add-ons that listen, record, transcribe, animate, talk to you, and on and on
Skype comes in four flavors: Windows, Macintosh, Linux, and Mobile. After you choose a flavor (or two), you can serve up Skype in any number of ways. Instead of a cup or a cone, you use devices such as laptops, desktops, wireless phones, mobile computers, or memory sticks to hold your chosen flavor(s). Then you can go for the toppings! Why not try adding microphones, webcams, wired or wireless headsets, or Bluetooth transmitters to your Skype sundae? You can also add software programs that record conversations, follow you with video as you move, or transform your image into a talking dinosaur.
With so many flavors and toppings (that is, platforms and add-ons) to choose from, we suggest matching your selections with how you use Skype for work or play. Here are some ideas:
For the frequent traveler: If you need to take Skype with you wherever you go, try Skype on a laptop (or other mobile device) with a headset.
For the collaborator: Suppose you need to keep track of ideas shared on Skype conference calls; try using audio recording software and transcribing software to capture every idea perfectly.
For the integrator: If you find it handy to connect calls from other people's computers, try loading Skype — with your call list, chat history, bookmarks, and so on — onto a USB drive.
For the too-busy-to-sit-down entrepreneur: If you find it difficult to stay tethered to a computer, try a Bluetooth headset and speech commands to manage your Skype communication.
For the frequent business caller: Suppose you could make all your landline calls and Skype calls from the same device by just pressing a button. You might want to plug in a dual-duty phone that handles both kinds of calls seamlessly.
No matter which devices, operating systems, add-ons, or software packages you use, one element remains the same: How you bring all these tools together can help you connect with others, work more productively, save money, and just have fun.
Your desktop or laptop computer isn't the only platform you can use to run Skype. You have other fun options — for example, Skype-enabled phones and PDAs — that free you to take Skype wherever you go. One of these mobile platforms, plus an Internet connection, is all you need to hook up with your Skype contacts.
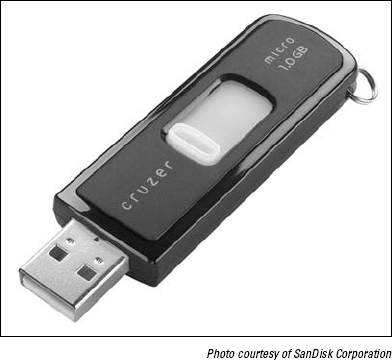
The notion of tucking away an entire communication and productivity center on a stick is pretty outrageous. But it's also true. Devices such as the U3 Smart Drive from SanDisk (shown in Figure 11-1) let you take your data and your programs with you. You can explore the current variety of U3-compliant software at the U3 Software Download Center (http://software.u3.com), which features device-ready programs for download and purchase. In what seems to be the blink of an eye, computing environments have moved from desktops to laptops to palmtops, and now we're into thumbtops. We can't help imagining that using such devices gives us access to one big information network where — like the Borg of "Star Trek" — we tap into the global mind (without the sinister overtones, of course).
We tried the U3 Smart Drive, which comes preloaded with Skype. This small device, in addition to backing up files, allows you to run programs directly from the smart drive without having to touch files from the computer's hard disk. With Skype preloaded, all you do is plug the drive into a USB port on an Internet-connected computer, start Skype, and log on to your account.
Running Skype from a U3 Smart Drive or other removable drive offers you portability as well as the following:
An increased level of privacy: All your Skype-related information — chat history, bookmarks, notifications, and SkypeOut/SkypeIn numbers — remains on your portable drive. When you remove your portable drive, you remove your information from the host computer.
Freedom from downloading and installing Skype: You aren't in the uncomfortable position of asking to download software onto someone else's computer in order to run Skype. A technology has got to be good when it makes you a better guest!
Added portability: Pocket your data along with your programs in one tiny space. Everything is ready for transmission over Skype, just when you need it.
Generate confidence: Knowing that your programs and data are accessible in another complete package and location — that is, tucked away on your smart drive — reduces the techno-jitters before a presentation.
Backup your peace of mind: Even if you bring a fully configured laptop along, having a smart drive waiting in the wings as a perfectly rehearsed understudy reduces the worry that your show won't go on.
Note
The programs loaded onto a U3 Smart Drive have to be prepared to retain all the information that accompanies the software. If you feel squeezed for space and decide to upgrade your drive from a 1GB to a 2GB or 4GB unit, you can just drag the contents onto the new drive.
When you use Skype on a Pocket PC device, you can call, chat, look up a profile, change your Web presence, make SkypeOut calls, receive Voicemail messages, and participate in a conference. During an active call, you can even see the photos or images that skypers uploaded to their profiles.
But here are a few things you can't do (well, not yet, anyway). You can't:
Send or receive a file through Skype
Hold a videoconference
Initiate a voice conference call
If you don't have Skype on your Pocket PC, you can get it from www.skype.com/download/skype/mobile. The creators of Skype recommend that you download Activesync software to connect your mobile unit and laptop/desktop PC first, and then download and install Skype for Pocket PC.
Tip
If you have an older version of Skype for Pocket PC on your mobile unit, uninstalling it before putting on a new version is a good idea. To remove software from your Pocket PC, choose Start
The HP iPAQ hw6900 (shown in Figure 11-2) is a personal digital assistant, a Quad band radio, a GPS receiver, a camera, an MP3 player, a computer running Windows Mobile, a number cruncher, a streaming video player, an Internet radio, and a smart phone. But wait, there's more! It's also Skype ready, right out of the box.
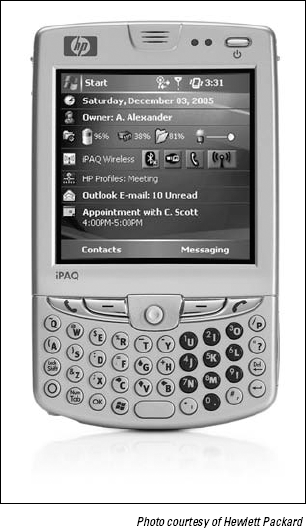
Skype is already installed on the hw6900, so you won't have to figure out how to download a program as the first mobile thing you do. (You can save that tutorial for a Skype upgrade later.) However, a little fiddling is needed to connect to a Wi-Fi network. (Wi-Fi is the popular name describing the underlying technology of wireless local area networks [WLANs] based on the IEEE 802.11 specifications.) If you use a wireless computing device, you need a wireless network that's set up to access the Skype peer-to-peer network.
The iPAQ hw6900 rides on top of the Wi-Fi signal to provide Skype service. Your mobile unit will search for a signal; when you see your network name among the choices, press the network name with your stylus for one or two seconds until a context menu pops up, and then select Connect. If you don't see the Wi-Fi search screen, tap on Start
Note
Before you can make the iPAQ hw6900 into a working cell phone, you must activate an account with a service provider and sign up for a fee-based plan. Then with Skype and Wi-Fi, you can make SkypeOut calls.
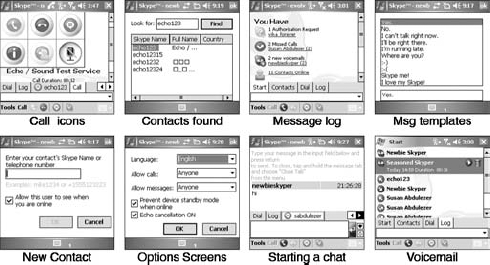
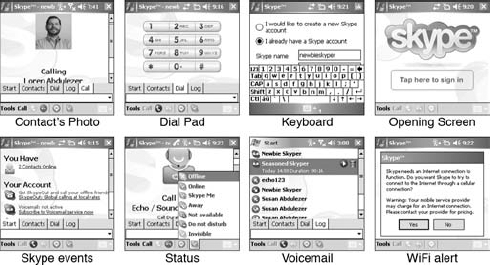
Skype looks almost the same (just smaller) on a mobile device as on a laptop. Figures 11-3 and 11-4 show various Skype screens on a Pocket PC platform. When you get to the program, you'll recognize all the icons. And you'll be skyping around town in no time if you follow these steps:
Charge your iPAQ hw6900 (or other Pocket PC unit) and press the power button to turn it on.
The Today Screen — the little mobile desktop screen for those of us not in the Windows mobile universe — appears.
Choose Start
Programs Skype.
Tap the Tap Here to Sign In button on the Opening Screen (as shown at the top right in Figure 11-4) and choose an option on the sign-in screen, as follows:
Create a new Skype account.
Log on to your own account.
Enter your Skype ID (your Skype Name) and password where prompted and click OK.
Skype looks for a signal and logs in to your account (if you have a wireless network available). After you're connected, look through your Contacts list and check the Web status buttons that indicate your contacts' presence online. See Chapter 3 for information on verifying that a contact is on the Web.
Select a contact from your list, tap the call or chat button, and skype away.
Tip
Tap twice on the screen for skyping options during an active call. Large call function icons appear on the screen and let you check a profile, mute your voice, add the caller to your contacts, start a chat, or hang up.
Tip
If you use the on-screen keyboard, it obscures the password field, so you may want to use the standard built-in QWERTY-style keyboard.
The iPAQ hw6900 comes with a clear cover that swivels up to reveal the touchscreen display. One of the authors (we won't say which one) spent an embarrassing amount of time trying to troubleshoot the unit, which wouldn't open any programs until we pointed out that the clear plastic cover was down, so that lovely touchscreen was not actually being touched. No amount of stylus tapping would start that puppy. After we figured out the lift-up-the-clear-cover hack — similar to the take-off-the-lens-cap hack — everything worked like a charm.
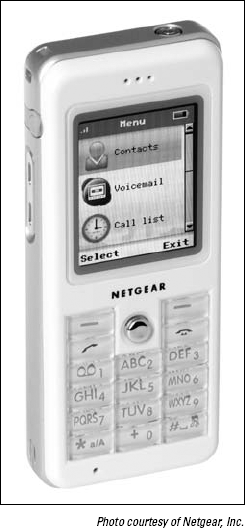
Those of you craving a truly portable Skype phone (but who don't need the turbocharged iPAQ) may want to look at the Netgear SPH101, shown in Figure 11-5. Weighing in at just a few ounces, this phone is extremely portable and fits comfortably inside your shirt pocket. Separately available is a cradle to keep the unit perpetually charged. Because of the phone's small size, the LCD panel is also small, but it is extremely crisp and the colors are bright, which makes the screen easy to read.
This nifty device taps into wireless networks and allows you to send and receive calls over Skype. Just imagine having no calling plans and no monthly fees. You simply find a public wireless network or connect into your own private wireless network and begin calling.
Tip
If you get a Wi-Fi phone, also get a SkypeIn number (with free Voicemail). This way, anyone can call you from a regular landline or cell phone as easily as people reach you on Skype from a PC.
We've come full circle. Telephones started out bulky and wired; then they trimmed down and became wireless. Now we make calls over the Internet on computers, which are even bulkier and have more wires. Not to worry! More and more companies are producing Internet telephony devices that are smaller, wireless, and look just like ... telephones!
The Linksys CIT200 Internet Telephony Kit is a Skype phone for PCs (see Figure 11-6). The device consists of a handset with a dial pad and a color display that works just like a telephone. After you've synchronized your Skype information with the phone, you can scroll through your Contacts list on the display and press the button with the green telephone icon to dial out. There are no major lessons to learn, but there are major advantages to gain, as follows:
Finding available Skype contacts is quick and easy. To the left of each contact name is a status icon that tells you who is online and who doesn't want to be disturbed. Push the toggle button up or down to scroll through your contacts. If you have a really long list, you can jump to a section quickly. Find the first letter of your contact's name on the dial pad. If you are looking for Loren, press the JKL button. Hold that key down for about two seconds, and the first namethat starts with J is highlighted. Hold the key down again to jumpto K names, and hold it a third time for L names.
Contacts' profiles are at your fingertips. You can see some of a contact's profile information (other than a photo) if that contact has made it available. Pressing the button under the word DETAILS on your display shows a contact's language, age, and gender. Press the button under MORE to find telephone, fax, mobile phone, and home phone information. If your contact has not put this information into his or her profile, you won't see it in your Skype phone.
The Skype phone offers familiar phone operations. To make a call, just select a contact and push the button with the green telephone on it. Push the red telephone button to end a call. You can put your caller on hold by pressing the green call button (you'll hear a dial tone). Press the Skype button at the bottom of the phone to see your contacts list. Choose a contact and press the button below the word DETAILS. Then, when the phone number information appears on the screen, press the same button (this time it will be below the word DIAL) and start another call. However, it won't be a conference call. If you're invited to a conference call, you can participate, but you can't start one.
Letting others know that you're online and available to call is a snap. You can indicate your status to your Skype contacts through the Linksys handset by choosing Menu
Note
Setting up the Linksys Skype phone is easy. But watch for the one hold-up: You can't plug it in right out of the box because it needs an overnight charge before the first use. After that, if the phone needs a charge, it will emit a little beep to let you know to put it back in its cradle.
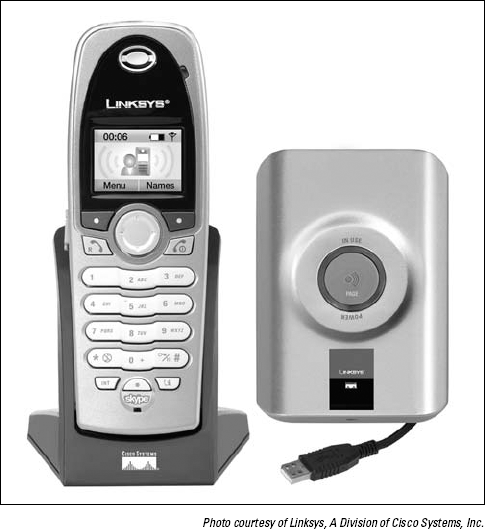
The Linksys CIT200 phone piggybacks on your computer's Internet connection and Skype program. A base station acts as the go-between. So, you need to install some software drivers to get all the pieces communicating. Linksys provides an install CD, so you don't have to search for the drivers over the Internet. However, you must install Skype and activate a Skype account prior to hooking up the Linksys phone. With that done, the installation process is simple:
Plug the phone's base station into a USB port on your PC.
Put the Linksys phone in its charger cradle (after putting the two NiMH AAA batteries in the charger).
Make sure that you charge the unit for 14 hours before its first use.
Insert the installation CD and run the setup.exe installer file (which should begin automatically).
Press the button on the base station (there is only one) to make sure that the base sees the phone handset.
If all is well, the handset will play a little music to let you know it's connected.
Log on to your Skype account on your computer.
When the Skype API Security Screen appears, click the button that allows the Linksys CIT200 program to use Skype.
Your phone is now skypified and ready for the acid test. Press the Skype button at the bottom of the phone, and if all goes well, your contacts will appear in the display.
The Linksys CIT200 phone is for Skype voice calling. You can't chat, start a conference, or send a file, but you can retrieve your Skype Voicemail if you have an account. This device has mute and speakerphone features, as well as a headset jack for earphones. You can connect up to four handsets to one base station, and if you have multiple computers in different rooms, you can connect one handset to four base stations. Choose a base station to connect to, and the Skype ID for that computer comes up on your phone. To connect to a base station:
Select Menu (push the button below the word Menu in the LCD display).
Press the circular navigation button left or right to navigate to the SYSTEM menu.
Press the button under the word OK.
Press the circular navigation button up or down to select BASE SELECT. Click OK.
Navigate through the list of bases.
By default, they are named BASE 1, BASE 2, and so on. Click OK. Your phone displays the word SUCCESSFUL if you've made contact. You now have access to the Contacts list on that computer's Skype program.
Press and hold 0 to get a + sign in your phone number: When skyping out, your number, a plus sign (+), and the country code precedes the telephone number.
Keeping your Skype phone in range of your base station: If you wander beyond the range of the Linksys Skype phone, it beeps in complaint. Simply move closer to the base station to pick up a signal.
Managing your audio devices: The Linksys phone becomes the default audio device when you plug in the base station. Because your other audio does not play through the phone, you won't be able to hear any audio (other than a Skype call) unless you unplug it.
Note
These phones are small enough to hide themselves under pillows and beneath papers. Ours buried itself under a mounting pile of chapter drafts. So we just pressed the magic pager button on the base station, and our Linksys Skype phone started singing up a storm. We followed the music right to the unit. (If only everything else we lose would do the same thing, we'd probably have a lot more free time.)
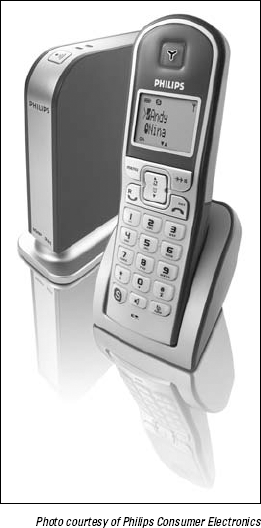
The Philips VoIP321 Skype phone for Windows 2000 or XP actually does double duty. It is an Internet phone and a regular phone in the same handset (see Figure 11-7). A base station connects to both a phone jack and a USB port at the same time. You can switch back and forth between services by pressing a button: specifically, a Skype button for making Skype calls and a Call button to get a dial tone. Calling couldn't be more convenient.
The Philips VoIP321 has all the standard features of a wireless telephone, including a mute feature, speakerphone, and headset jack. When you use the Skype features, you can make voice calls, but you can't see video or pictures and you can't chat, transfer files, or send SMS (text) messages. Although the phone's display is not in color, the backlighting and large, clear letters make for easy reading. And you won't need a magnifying glass to read this phone panel. So whether you're using a landline or a Skype line, this phone gives you the same solid experience.
Tip
Installation for the Philips VoIP321 is a snap. The Setup Wizard does all the work and puts a shortcut icon on your desktop after installation. Here's just one hint: When the installer asks you to press HERE to set the audio preference, it literally means the word HERE on the installer screen, and not the Next button. The audio preference is set to recognize the phone by default.
After installation, follow these instructions to activate the phone and make a call:
Click the shortcut icon (which looks like a white handset on a blue background, with the words Philips USB along the edge) to activate the VoIP321, if it isn't already started.
A small icon appears on your desktop tray when VoIP321 is active, so you'll know whether you need to launch it.
Start your Skype program.
The Skype Security API makes its appearance and asks whether it's okay to let the Philips Phone work with the Skype software.
Select the radio button next to Allow This Program to Use Skype. Click OK if you plan to use the phone all the time.
Otherwise, you can decide every time you power up Skype by choosing the Allow This Application to Use Skype, But Ask Again in the Future option.
To make a Skype call, press the easy-to-see red S button on the handset.
You see your contacts displayed along with their online status.
Press the scroll key up or down to a contact's name and press the Call button (the one with the little green telephone on it) or the red Skype button; either one will connect you to your buddy.
You can make a SkypeOut call as well, but you still have to put in the country code by pressing and holding 0 (zero) on the dial pad to get the plus sign (+) before the country code. Then press the red Skype button to call.
To make a telephone call the old-fashioned way, dial the number, press the Call button (the button with a green handset on it), and talk.
On this phone, you can also press the Call button, and then dial, and then talk. You're not penalized for getting the steps mixed up.
Basic calling seems pretty straightforward, but the following operations make using this phone system a bit more interesting:
Call waiting: Suppose you are on a Skype call and someone tries to reach you on your regular line. Not a problem. A special call-waiting tone is played. When you hear it, you can end the Skype call and still take the landline call.
Conference calling: You can use your VoIP321 with your Skype service to conference with two other skypers. Dialing one skyper, press the Call button (which becomes a Hold button when you have a Skype call in progress), dial the other skyper, and then press the Conference button to join the three callers. This experience is more of a traditional telephone conference, but within the Skype service.
Multiple handsets: Because the Philips VoIP321 works with up to four handsets, you can have multiple Skype calls going at the same time on different handsets. But you can't have multiple handsets making different calls on the same landline simultaneously. The handsets are treated as extensions by the landline and as separate phones by Skype.
You can operate Skype just fine from your desktop computer with its built-in speakers and microphone. But you may want to improve on the sound quality, ensure privacy, or otherwise free yourself from the basic setup's limitations. Headsets (both wired and wireless) can help you keep the noise down and bolster privacy, whereas adding a speakerphone can produce a clearer voice transmission on both ends.
And don't worry that adding extra gadgets will tie you down to your computer. Fortunately, you don't have to give up the habit of wandering from desk to refrigerator and back again while on a Skype call. You can simply clip on a wireless Bluetooth headset, voice activate your calls, or plug in a noise cancellation speaker phone while you're getting yet another piece of that coconut cream pie necessary to fuel all those Skype conversations.
Warning
Okay, we've made the process of adding accessories to your Skype operation seem effortless, and in many ways, it is. But some USB (Universal Serial Bus) devices should not be connected during installation until the software install program directs you to plug them into the computer. Make sure that you check installation instructions before you begin. The device you're hooking up may not work properly if you don't complete the steps in the correct order.
Tip
We'd also like to point out the following helpful tips for avoiding potential problems when hooking up headsets or other accessories:
Install device drivers before plugging in the USB device: After device drivers are installed, plug in your USB headset first, before you launch Skype. Otherwise, your audio input and output may not come through the headphones properly.
On Apple Macintosh, use a USB headset/microphone: Apple computers have mini-plug headphone jacks, but external audio input is either digital or USB based, so the USB headset/microphone combinations work best. All Macintosh computers have built-in microphones, so you can get away with using the computer mic and your iPod earplugs in a pinch.
Headsets help keep your conversation private because only the headset wearer (you) can hear what the caller is saying. And having a headset with a mute button adds an additional measure of privacy because you can push it to speak freely with someone in the same room without your Skype partner hearing what you say.
Voice echoing is another potential problem that can occur if one party doesn't use a headset while on Skype. Echoes happen when the computer's built-in microphone picks up the voice coming out of the computer's speaker. The caller hears his or her own voice projected back into the computer microphone. It's hard to talk when you keep hearing yourself repeating something a second later. Headsets and microphones help eliminate this feedback loop by putting a little barrier between the microphone and speaker.
Some headsets to consider adding to your Skype setup include the following:
The Premium Headset 350 from Logitech (see Figure 11-8): This headset connects to your computer through a USB port. Besides volume and mute controls, the headset features noise cancellation and a microphone that pivots out of the way if you just want to listen to music or play a computer game.
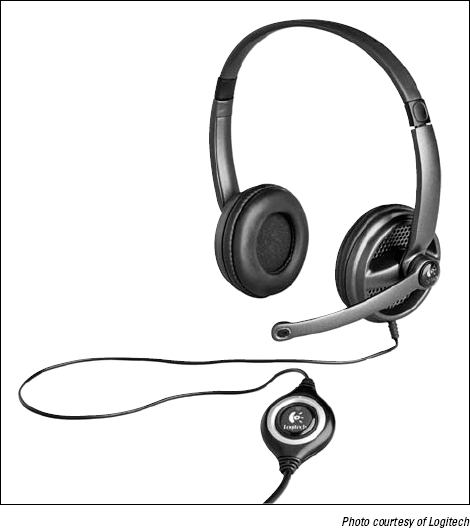
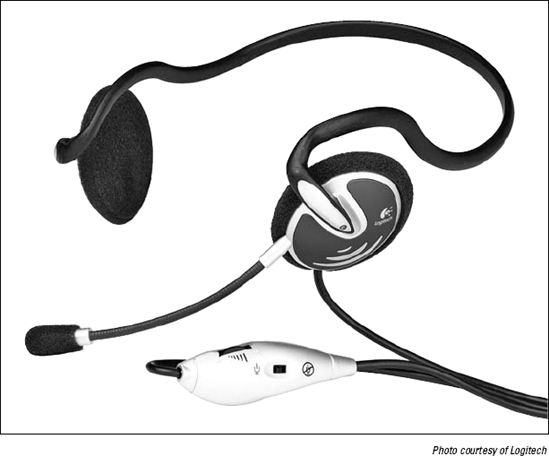
The Internet Chat Headset (see Figure 11-9): Also from Logitech, the Internet Chat Headset is among the variety of headsets that use mini-plug input into the microphone and headphone jacks in the computer. Some of these models also have volume control.
The Lightweight Computer Headset Model 33-1187 from RadioShack (see Figure 11-10): This headset doesn't have any bells and whistles. It uses mini-plugs and is an inexpensive but dependable choice.

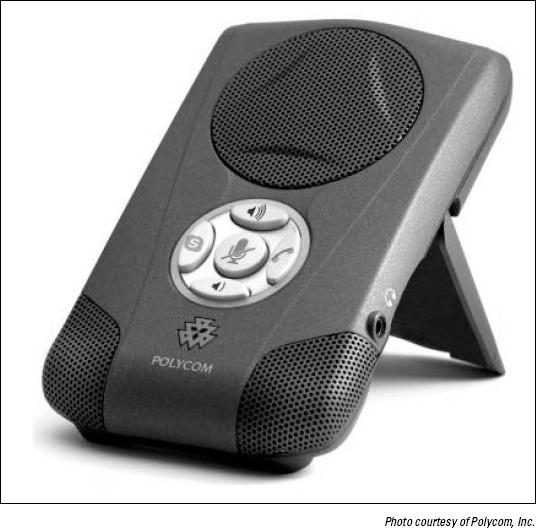
If you're on the go, wedded to your laptop, and wedded to Skype, then you're bound to get hooked on the Polycom Communicator C100S speakerphone for Skype, as shown in Figure 11-11. The most common first comments we hear from people who use this device is "If I closed my eyes, I would swear you're in the room standing next to me."
Note
This is a speakerphone that you don't have to hover over, and you don't have to worry about a hiss or crackle during the conversation. You can carry on a Skype conversation easily from across the living room. The person you are speaking to would admit that the volume drops a little but that he or she still can hear you very clearly.
Many of us have endured speakerphones that handle noise cancellation by silencing the person who is not doing the talking and thereby eliminating the echo feedback looping from the speakers to the microphone. This noise cancellation method prevents two people from talking at the same time, which can prove frustrating to a caller trying to get a word in edgewise when the other person launches into motor-mouth mode.
The Polycom speakerphone handles echo cancellation flawlessly and lets both parties talk at the same time without being cancelled out.
The C100S is simple to operate. After the initial software installation, just plug it into the USB port. The Communicator should automatically become the default audio device (mic and speaker) for your system and it works with just five buttons:
The Pick-up/Hang-up button: Pressing the Pick-up/Hang-up button (on the right) lets you answer an incoming Skype call or hang-up a call in progress. Additionally, you can use this button to launch a call with whichever Skype Buddy you have highlighted on your list.
The large center microphone mute button: This appears as a microphone with a slash running through it; see Figure 11-11. Pressing this button lights up a bright-red LED to let you (and anyone glancing at the unit) know that you can speak privately.
The two volume buttons at the top and bottom: Look for buttons with speaker icons in loud and soft mode; see Figure 11-11). These buttons on the speakerphone panel allow you to adjust the speaker volume up or down while keeping the microphone volume constant.
The blue Skype button (the S on the left): This button enables you to launch Skype with just a push when the phone is plugged into a computer running Windows XP. If Skype is already running, pushing the button brings the Skype window to the foreground.
Note
At the time of this writing, no software is available for the Mac OS X (although Polycom plans to add Mac driver support in the very near future).
Absent Mac OS X drivers, if you plug the device in without loading any software or drivers, the Mac operating system does recognize the speakerphone as a standard USB audio device (mics and speaker). Therefore, the volume controls are functional, as are the mute button and the red LED indicator light. If you have an Intel-Mac with Boot Camp (which allows you to run Windows XP) installed, the speakerphone behaves exactly as it does on any Windows-based PC.
The unit has built-in left and right microphones. Whether the family is gathering on Sunday to sing "Happy Birthday" to your grandfather a thousand miles away, or you're joined by half a dozen business associates spread around a conference table, no one will feel alienated from the conversation.
Everything about the Polycom speakerphone is well thought out, and here are some features worth noting:
The phone has a 3.5mm mini-plug jack: This lets you carry on a private conversation using the ear buds from your iPod or any other stereo headphone without disturbing your associates in the office cubicles next to yours.
The speakerphone comes with a diagnostic software application: This allows you to verify the operation of all buttons (plus the green and red LED lights), test the sound input from each of the left and right microphones, and generate a set of test sounds from the speaker.
The USB cable tucks neatly under the flip-open back panel used to angle the speakerphone: A little opening in the side of the panel enables you to close the panel and lay the unit flat on a table top, without pinching the USB cable as it is connected to your computer.
You may love the privacy and clarity that headsets provide, but you may also hate that feeling of confinement you get from their wired connection. One way to cut the cord from the computer to your ear is to use a Bluetooth-enabled headset. Bluetooth is a specification (IEEE 802.15.1) for wireless personal area networks using an unlicensed radio frequency. (See the sidebar "What is Bluetooth and how did it get that odd name?" for just a little more info on this technology.) Bluetooth-enabled headsets look something like the odd implement jutting out of Lieutenant Uhura's ear on the original "Star Trek" series. In fact, the name Uhura means freedom in Swahili, so it's clear that she took her wireless communication seriously!
Bluetooth allows devices to communicate over a short range (usually easily covering the important desk-to-refrigerator distance) of about 30 feet. Some computers have Bluetooth built in, but you can add this feature externally if your computer doesn't. When you add it externally, you go through some software setup and a little bit of configuring to get the Bluetooth gadgets to link together. But after they do, it's wire-free sailing.
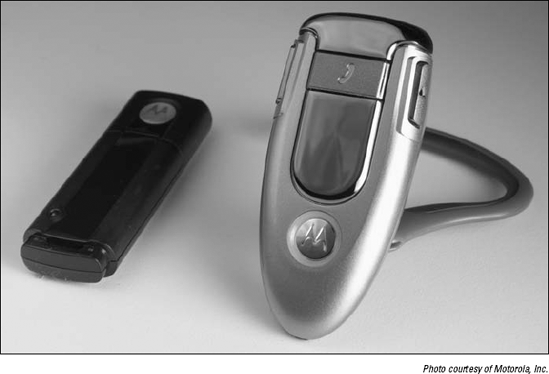
Motorola produces a number of wireless devices built into glasses, hats, jackets, helmets, and headsets. The device Motorola manufactures to use with Skype is the Wireless Internet Calling Kit Headset and Bluetooth USB PC Adapter, shown in Figure 11-12. The headset is a little over-the-ear clip-on unit for use with a PC. The clip part swivels out so that you can easily put it on and tuck the speaker part in close against your ear canal. The more complicated part is installing and syncing the Bluetooth USB Adapter.
Note
To assist you with loading drivers for Bluetooth communication, Motorola provides one of those mini-CDs with its tiny headset (seems to be a theme here). If you're afraid to load this little CD in your computer, you can make a duplicate on a full-sized CD, and it works perfectly. We tend to do this (make a full-sized duplicate) when we're loading software onto an Intel-based Mac running Windows. We're afraid we'll lose the little disks into the slot-loading CD player.
When you install the drivers from the Motorola CD, the Initial Bluetooth Configuration Wizard walks you through the process, but you still have to make some entries and choices:
When prompted, select Headset from the list of devices you want to connect wirelessly to your computer and click Next.
If you use your wireless headset continuously, make sure that you check the box to start it automatically. Otherwise, you'll have to go through a synchronization procedure.
In the same dialog box, choose to have a secure connection and click OK.
The Bluetooth activates and searches for a connected device. If you are using the Motorola headset, an icon with the model number appears in a list of connectable devices.
Choose your headset from the list of devices and click Next.
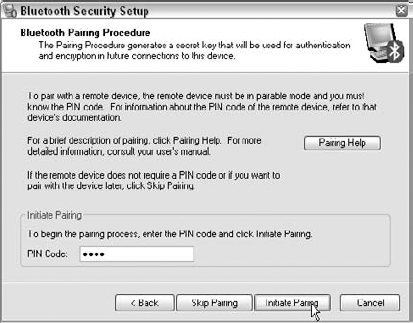
When prompted, enter the code that comes with your device in the PIN Code text box to pair up the computer and headset (as shown in Figure 11-13) and click Initiate Pairing.
This is a crucial step to activate the headset-to-computer connection.
After you complete the installation of the Motorola H500, you need to press a button on the unit and hold for a few seconds to have it connect to the Bluetooth Adapter. A lovely circular blue light on the headset shines continuously after the computer discovers the device and the two shake hands.
While the connection is active, the Bluetooth earpiece enables you to hear any sounds coming from your computer: all the alerts, any music you play, and, of course, your Skype conversations. A teensy, but effective, microphone picks up your voice and minimal background noise, which is a very nice feature if your office, like ours, is in the pathway of four hospital emergency rooms, a police academy, a fire station, and rush-hour traffic.
If you want a wireless, over-the-ear headset that is fit for double duty — good for both Macintosh computers and cellular phones — you might try the Plantronics Explorer 320 Bluetooth Headset. This unit is designed for use with cellular phones equipped with Bluetooth, but it is surprisingly easy to connect to a Macintosh if you want to make hands-free Skype calls. Of course, your Macintosh must come with Bluetooth installed because this wireless device does not come with a USB transmitter (and doesn't need one). Bluetooth is a fairly standard feature on current Macintosh models, so if you have recently made a purchase, you should be good to go!
To connect the Plantronics Explorer 320 to a Mac, follow these steps:
Click the blue apple in the upper-left corner of your desktop.
Choose System Preferences from the drop-down list.
Double-click the Bluetooth icon.
The icon is blue and has a white, geometric "B" figure. If you don't know what the Bluetooth icon looks like, look at the geometric icon appearing near the top-right corner of Figure 11-13.
Take your well-charged Plantronics 320 and press the power button for six to ten seconds (there is only one button).
The headset will start flashing red and blue.
Choose 320 Plantronics from the list of devices; then, click the Set Up New Device Button.
The Bluetooth Setup Assistant opens.
Click Continue.
From the list provided, select the radio button next to the word Headset and click Continue (again).
The Setup Assistant will search for your Headset.
When the device name appears in the window, click Continue (yes, again).
On the next screen, the computer makes contact and gathers information about your headset.
When the computer finishes, the Continue button becomes active; click Continue.
Enter a passkey to pair with your headset as prompted and click Continue.
The passkey information comes with each headset's documentation. The computer contacts your headset, and you are ready to make your wireless calls.
Click Quit to close the Bluetooth Setup Assistant.
Skype comes with many options, but you can greatly expand its native functions by using additional software. You may already have some software that you can use in conjunction with Skype. For example, Macintosh computers come with speech recognition software that you can train to work with Skype commands. And some programs that record audio for podcasting can also record your Skype conversations and voice messages.
Macintosh computers have built-in speech-recognition software installed on every machine. Speech recognition is yet another liberating technology that frees you from your keyboard by replacing keystrokes with vocal commands. When you turn on this feature, you have access to a long list of speakable items (words that your computer recognizes as input), including commands that let you open and quit applications, request the date and time information, switch applications, and shut down your machine. You can make some commands application specific, and you can make others work no matter what program you're running.
You can pair the Macintosh speech recognition feature with Skype by downloading and installing a set of commands (Speakables for Skype) that are scripted just for Skype. But before you install Speakables for Skype, or any other speech-recognition scripts, you must activate the speech-recognition feature on your Mac. To do so, follow these steps:
Select the blue apple icon in the upperleft corner of your screen. From the drop-down list, choose System Preferences.
The System Preferences window appears. This window displays all the system preferences as icons. Notice the microphone icon labeled Speech.
Click the Speech icon (the microphone).
The Speech dialog box pops up.
Select On to activate Speakable Items, as shown in Figure 11-14.
With your microphone of choice showing in the Microphone drop-down menu, click the Calibrate button.
Calibrate your voice by speaking the provided phrases into the chosen microphone when prompted.
Each phrase, when recognized, will flicker in acknowledgment. You can adjust a volume slider if the computer is not recognizing your speech.
Select an option next to Listening Method.
Tip
You can activate speech recognition continuously or when a key is pressed. Letting the computer listen to everything — especially in a noisy environment — is probably not a good idea. You never know what sound will trigger a command, so we recommend that you keep the default setting where the computer listens only while the Esc key is pressed.

After speech recognition is up and running, you can test it. Press the Esc key and say one of the built-in commands out loud, for example, try "What time is it?", "Tell me a joke," or "Open iTunes." If you're not sure of what commands are available, you can:
Click the arrow at the bottom of the floating microphone icon that appears when you activate speech recognition: The floating icon is round and displays a microphone image, the name of the key you have to push to activate Speakable Items, and an arrow for additional speech commands.
Find more commands: Open the Speech preferences, choose Commands, and then click the Open Speakable Items Folder button.
Find all existing items the computer should recognize: If speech recognition is working properly, just press the Esc key and say, "Show me what to say." This command brings up the window with all the existing items that the computer should recognize, and you don't have to hunt for the right folder with the right commands.
Try some of the listed items: After you've found the Speakable Items list in the Speech folder, try some of the listed items.
Note
Sometimes you need to say items a couple of times to get the recognition started, but after it works, using voice commands can be addictive. Watching someone tell a computer what to do is rather baffling to casual observers, but if you're used to walking down a crowded street speaking into an ear-mounted cell phone, those strange looks shouldn't bother you a bit.
With speech recognition active, tested, and working, you are ready to download and install Speakables for Skype scripts. These scripts are available at www.speakables.com/. Follow the directions on this Web site to download and then follow these steps to make the connection to Skype:
Click the Speakables for Skype shortcut icon installed on your desktop.
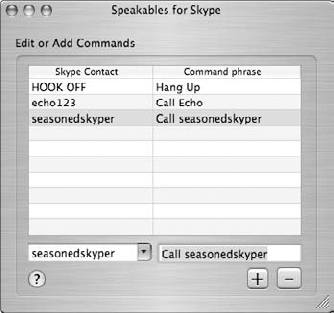
A Speakables for Skype dialog box containing a table for adding contacts and commands opens, as shown in Figure 11-15, and Skype launches.
Click OK in the security screen that pops up to tell you that another application wants to use Skype.
In the Speakables for Skype main menu, choose File
Refresh Contacts and then click Save to save your changes.All your contacts are now imported into a drop-down list in the Speakables for Skype program.
Select a contact and type a voice command.
In the Speakables for Skype window, note that you have two columns: Skype Contact on the left and Commands on the right. Select a contact from the Skype Contact list on the left and, under Command Phrase on the right, enter the voice command you want to say when you make a Skype call (see Figure 11-15).
Your calling command can be anything from the mundane "Call Vincent" to the edgier "Yo! Vinnie."
Press Enter when your command is finished; then, start telling Skype what to do.
After all, it's nice to know someone is listening to you.
Tip
You can make any phrase a speakable item in a snap. Activate speech recognition on your Mac by pressing the Esc key (after turning on speech recognition in your System Preferences). Then, select a file or document name, or even a URL, and say, "Make this speakable." A dialog box appears, inviting you to add a command.
Try this:
Highlight the URL
www.skype.com.Press the Esc key and say, "Make this item speakable."
A dialog box appears, saying, "Go to "
www.skype.com"When I say(fill in the speech prompt in the text field).Enter the word or phrase you want to say to go to this Web site in the text box provided.
For example, enter the word skype.
Press the Esc key to activate voice recognition.
Hold down the Esc key and say "skype."
Your browser opens up to that Web site.
Congratulations, you've just added another voice command!
Tip
Bluetooth headsets do not work with speakable items on the Macintosh. The alternative wireless solution is a Plantronics CS50-USB headset, which uses a different wireless technology and has a range of up to 200 feet.
Note
Speakables for Skype has recently released a version of its software for Windows. Instructions and a free demo are available at www.speakables.com/Skype_Windows.htm.
You never know when you may replay a conversation in your mind — trying to remember all the details you forgot to write down, all the jokes you wish you could repeat, and all the family stories from your grandmother you want to capture. Instead of relying solely on your memory, you can find a number of ways to record Skype conversations using software, hardware, and a combination of both. We've included a small sampling of the possibilities here, but the Web is filled with tempting demos that are worth exploring.
For example, we suggest checking out the following Web sites for starters:
www.hotrecorder.com
www.podproducer.net/en/index.html
www.applian.com/freecorder/index.php
www.scodor.com
To get the latest scoop on recording applications, Skype has its own section for current programs (both tried and untried) at:
http://share.skype.com/directory/messaging/
Warning
If you're lucky enough to have a robust Skype Contacts list filled with fascinating, informative, clever, and scintillating conversationalists, you may want to install voice-recording software to preserve the witty repartee. Of course, remember that you should record conversations only with permission from your contacts. Recording conversations without all parties knowing may be illegal and is certainly impolite.
The following list outlines a few voice-recording products:
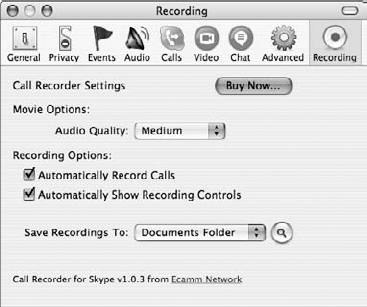
Call Recorder: This product — an inexpensive add-on you can download from Ecamm Network at
www.ecamm.com/mac/callrecorder— is designed for the Macintosh platform and makes your Skype calls into QuickTime movies. After you install Call Recorder, a Recording dialog box (shown in Figure 11-16) shows up right in the Skype application, so you don't have to open a second program. Call Recorder is simple to operate and gives you handy options:You can choose to record automatically, which is nice if you tend to forget to activate the record button, or you can start the session manually. You can have the recording controls visible all the time so that capturing important conversations on the fly is easy. Also, the quality of the recording can be set at high, medium, or low.
Call Recorder creates QuickTime files and records separate audio tracks for incoming and outgoing voices. If you want to work with this file in an audio-editing program, you have a little more control than with one-track recording solutions. If you have the QuickTime Pro software, you can quickly get each track individually from the movie file using the extract button in the movie properties window. You can also use QuickTime Pro to export the file to another format.
HotRecorder for VoIP: This recording software for Windows computers works with Skype as well as other applications to capture audio. You can find and purchase this program at
www.hotrecorder.com. The files created by this program are.eplfiles, which is a proprietary format used only with HotRecorder. In order to replay those files in other programs, you must convert them. HotRecorder provides a utility that you can use to save these audio files as MP3s, OGG, or WAV files.SAM (short for Skype Answering Machine): This is a Skype recording plugin for the Windows platform available at
http://kishkish.com/sam. SAM not only records conversations but also stores and organizes the recordings by time or participant. You can configure SAM as a regular answering machine that greets your Skype callers in the same way that a landline answering machine does.With SAM, all your messages are stored digitally with names, date, time, and length of call for each contact. You can respond to these messages with Skype's callback feature right from the Message pane. This program offers a cost-effective way to build in a simple message center for a small business.
Tip
For larger businesses in need of recording, tracking, voicemail, and conference calling and Skypecast recording, the two major programs of choice are Pamela and Skylook, both of which we cover in Chapter 9.
Skype is a rich environment for producing podcast content. As a step up from casually recording a Skype conversation (to help recall meeting details), some ambitious skypers are producing programs for broadcast (for step-by-step instructions, see Chapter 14). You can create podcasts of interviews, poetry readings, performances, news reports, and conferences over Skype. Skypecasts, the large-scale audio conferences posted on the Skype Web site, can be captured, edited, and converted into podcasts as well (see Chapter 14 for much more about Skypecasts).
Software programs such as Call Recorder, HotRecorder, Audio Hijack, SAM, Pamela, and Skylook are all capable of providing audio content for a podcast. However, some veterans of the podosphere prefer more rigorous recording equipment, and podcast studios can get pretty geeky. Getting truly clean audio is a tricky business, especially when your environment is virtual.
Tip
Podcasting For Dummies (also from Wiley Publishing) is a good resource for information about scores of gadgets and techniques for producing podcasts. This book even has an overview of equipment and editing software that's useful for getting the best audio production from Skype.
So, you're busy recording anyone who will let you capture a conversation and you're filling up folders with MP3s of interviews, meetings, stories, and plans on every subject. Some of those audio files may be a great source of information to have in written form. For example, much of the research we did while writing this book exists as audio files of recorded Skype calls. As much as we would like to play our audio recordings for you, the practical requirement is that these recordings become paper and ink. To make this transformation, we had to convert what we recorded to what you're reading.
Listening to hours of Skype recordings while typing out a transcript was a huge job made easier by the wonderful software program Transcriber, shown in Figure 11-17 and available at no cost from http://trans.sourceforge.net/en/presentation.php.
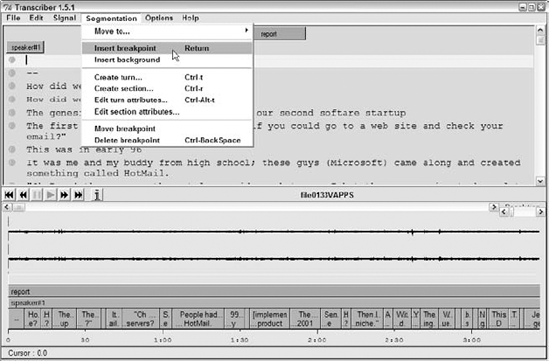
This program's transcription features allow you to:
Import MP3 files: Think about all those Skype conversations you've been recording. You can export your transcriptions to files as text or HTML.
Create labels: Labels can be based on the names of individual speakers. These names are incorporated into the timeline.
Create new sections: You can segment audio portions and sync them with written files.
Zoom and telescope the timeline: This feature enables you to jump to any part of a long recording very quickly and easily.
Transcriber shaves hours off the task of transcribing long audio sessions, organizing text by topic and speaker, and publishing the transcript in print or on the Web (for more information, see Chapter 14).
Third-party developers are tapping into Skype videoconferencing and forever changing the way we look at ourselves. Literally. Avatar animation products — for example, Talking Headz, Festoon, and Logitech's Quickcam Fusion — walk us through the process of becoming dinosaurs, pumped-up soccer players, femme fatales, emotional emoticons, and, our favorite, a hairy eyeball with an attitude. Each of these software packages helps you create your cartoon soul mate and show your silly side to the world.
Avatars are Web-based animated characters; virtual stand-ins for you, me, or anyone who wants to create an online personality ready to mix it up with other available avatars (see Chapter 5 for more about avatars). The idea behind using avatars with Skype is to play with video conversations, add character to instant messages, and just have fun in a new way on a new playground. These software packages work closely with Skype video messaging and launch at the same time you start up Skype.
The avatar animations are cleverly developed. When you speak or record a message, the avatar mouths your words quite convincingly. Some avatars respond to mouse tracking, with their eyes and heads following the cursor as it moves. Some have added personality routines, sighs, sneezes, and rolling eyes designed to elicit a response from a viewer. The following three avatar animation programs have unique offerings, so we recommend investigating each one:
Gizmoz Talking Headz (
www.gizmoz.com): Encourages you to build your avatar image from scratch and makes no pretense about keeping it serious. The characters, gags, jokes, sounds, and animations are indescribable, so visit this avatar farm and see for yourself.Festoon (
www.festooninc.com): Provides for video conferencing with up to five people (a very practical side of this product) each transmitting from their own webcam. Festoon also provides video cutouts called Eye Candy, which are still pictures with gaps where the faces should be so that you can insert your own image.Logitech QuickCam Fusion's Video Effects software (
www.logitech.com): Maps a still picture of your face to your chosen avatar to coordinate speech, or if you want, you can become a talking shark. As does Festoon, QuickCam Fusion sometimes uses webcams.
Just because you can talk to the whole world for free doesn't mean that you want to answer every Skype call. Sometimes you just don't want to talk to your lovable but endlessly chatty friend. So, a little call screening is in order. Of course, Skype has a built-in caller ID. You can see the user name and picture (if one is posted), of each caller. But our eyes are not always on the computer screen, and it seems a little retro to have to run across the room to answer a Skype call just as we do for landlines (remember those?). Luckily, for every problem, no matter how small, there is an enterprising and fun solution.
You can customize caller announcements with a software product plugin for Skype running on Windows called Wizztones (www.wizztones.com). With Wizztones, each contact can have a different ringtone (see Figure 11-18). You can keep any of the Skype ringtones, record your own, pick from a list, or even have a custom ringtone messages synthesized. To synthesize a custom ringtone, you upload a message (in text) and Wizztones will digitize it and add it to your messages list instantly, without leaving the Wizztones software interface! Wizztones also provides standard phrases (in addition to ringtones) to announce each caller — just in case you can't come up with a snappy phrase to announce that Uncle Ralph is calling!
If you want to use Wizztones to change a ringtone, follow these steps:
Click the Wizztones icon (which looks like a blue planet with two big white Z's inside) in your Windows task menu bar.
The Wizztones options window opens (see Figure 11-18).
Select a contact in the Skype contacts list.
Select the Other Available Ringtones option from the ringtones window.
Select the ringtone you want to associate with your chosen contact.
If the contact is your mom, you can select Your Mom Is Calling from the ringtone list. Of course, you can also choose The Boss Is Calling as her ringtone. (But beware, ringtones can be very revealing.)
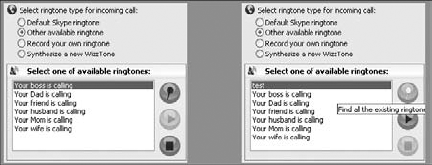
If you want to create your own ringtone phrases, you can do that, too. Select the Synthesize a New Wizztone option, enter the text to be synthesized in the text field when prompted, and click the little recording button to change the text to speech. Just sync the phrase with your contact, and when Mom calls, Skype announces, "Uh-oh, this is a call I can't refuse," or whatever phrase you choose to let you know what you're in for.
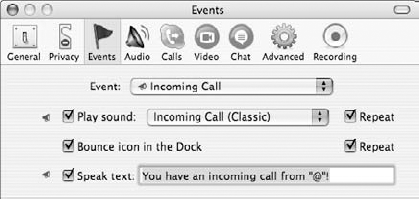
Skyping on a Macintosh computer gives you a few cool built-in features for customizing sound input and output. One that works beautifully with Skype pulls in your contact user name information and transforms text to speech, with no typing on your part. Just accessing Skype preferences taps into this Mac utility, and you can use it to create personalized caller announcements (see Figure 11-19).
Getting Skype to announce a caller with a unique phrase of your choosing is simple. All you need to do is follow these steps:
Launch Skype.
In the Skype menu, choose Skype
PreferencesNotifications.From the Events pop-up list, choose Incoming Call.
Click to activate the Speak Text field.
The default phrase "You have an incoming call from "@"!" appears in the window. There is no need to enter a name. When you get a call from the chosen contact, somehow, magically, the "@" symbol is replaced with your contact's name.
If you want, type over the text in the Speak Text field (just be careful not to type over or replace the "@"! portion of the text).
So, instead of hearing only "You have an incoming call from Loren," you can add to it, making it "You have an incoming call from Loren. That's the best news I've had all day!"
Note
When you edit this incoming caller message text, the announcement changes for all your contacts, so it's wise not to be too specific when crafting the perfect announcement.
You can add this feature to all your contacts at the same time. In a busy office, or when you are facing a deadline, you may want to be notified immediately if your client is available, is calling, or is sending you a file. The basic ringtone only gives you the information that someone wants your attention. When you hear a name, you have a heads-up on what to say. These kinds of personalized announcements can skyrocket your productivity.
The following announcements are among those that can be customized in Macintosh events:
Your contact "@" is available.
You have an incoming call from "@"!
Message from "@".
You have an instant message from "@"!
You have received an authorization request from "@"!
You have received a list of contacts from "@"!
You have received a file from "@"!
File transfer with "@" is completed.
File transfer with "@" has failed.
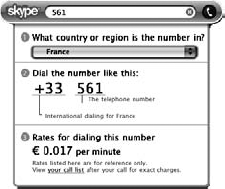
Widgets are handy Macintosh computer shortcuts to scores of applications. Click on the widget icon and a widget dashboard appears. You can add, move, rearrange, and download widgets of all sorts. Calendar widgets, stock market widgets, webcam widgets, newsfeed widgets — there's a widget for every inclination, personality, and taste. So, appropriately for a Skype book, there is a Skype Widget, as shown in Figure 11-20.
The Skype Widget has a field to put in a SkypeOut number. If you are not sure of how to dial a long-distance number, the widget is very helpful. Say that you want to call Brazil. You know the main number but not the country code. The Skype Widget lets you pick a country from a list and then provides the right symbol and code for that call. After you put in the country, the calling rate appears to let you know how much this call costs. Click the phone to dial the number and activate Skype. Your Skype software opens and places the call.
Combing the Internet for gadgets is an awful lot of fun. But if you want an efficient way to deck out your personal Skype Center, you can log on to Skype.com and click the Shop button. An online catalogue features phones, webcams, headsets, speakerphones, and other Skype accessories. Skype tests the products listed on the Web site and certifies that they work properly with Skype. Those products that are officially approved have a Skype Certified seal of approval.
Skype also posts a developers forum, http://share.skype.com/directory, where you can find loads of accessories, software, services, video and animation add-ons, enterprise software, messaging solutions, plugins, and even an entire section on everything for Skype from Japan. Many of the software and plugin offerings are free downloads, and each product is followed by a lively forum of product reviews.
You'll find a wonderful sense of playfulness within this section of the Skype site. Most of the products are not officially Skype Certified, so you're on your own here, but these products extend Skype in some of the most unusual, adventurous, and productive ways. It's worth combing through the descriptions and reviews, and even to take a chance and download some plugins. There are some very cool surprises here.
We are on the constant lookout for new and interesting gadgets, doodads, plug-ins, and services you may want to explore. Have a look at our updates on our Web site at www.skype4dummies.com.