
Setting up basic Skype behavior
Protecting your privacy
Receiving notifications
Setting your sounds
Customizing hotkeys
Dealing with specialized connectivity settings
Setting advanced options
When you've started to get used to Skype, you may want to fine-tune some of the details regarding how it works in your digital world. The more you know about making your Skype settings suit your daily needs, the better Skype will serve you.
These pages guide you through choosing your general settings, privacy options, notifications and alerts, sound effects and sound devices, hotkeys, connection options, and advanced features. We cover these option groups in the same sequence as they appear in the menu pane of the General options menu. (We skip the call forwarding, voicemail, and video categories here, however, because those topics are covered in detail in Chapters 7, 9, and 10.)
Use this chapter to help you define how you interact with the Skype community and what you will (and won't) let the software do.
To get started, choose Tools

General options are grouped into three categories:
Telling Skype to start a chat or start a call when you double-click a contact
Emoticon behavior
Online status timeouts
Maybe you're a little shy when you first meet someone, or you just don't feel like talking sometimes. You can tell Skype that you always want to start in chat mode (which really means writing mode) rather than audio mode whenever you double-click the name of a person in your Contacts list (see Chapter 2 for more about contacts). To have Skype start in chat mode, click the Start a Chat button under the When I Double-Click on Contact or Use the Address Field option. In chat mode, you can exchange written messages with another user, send files from your hard drive, and paste links of Internet addresses from any Web browser.
The alternative is to set Skype to start in audio mode by clicking the Start a Call button (refer to Figure 4-1). In this mode, when you double-click the name of a contact, you hear a ringing tone just as you do when you dial a person on a regular telephone. Assuming that your recipient is available, you are in a direct conversation with the person you called.
Regardless of whether you set your General options to start a chat or start an audio call when you double-click a contact, you are always free to directly call the selected contact and click the green call button. You are also free to start a chat with that selected contact.
Emoticons, an array of symbols that express emotions play an important role in a Skype chat (see Figure 4-2). Meeting a new person over Skype by using the chat mode means that you see only the written words, not the person's facial expressions. You can't hear the eagerness, sincerity, kindness, or humor in his or her voice. Sometimes a chat mode is an introductory meeting, which, if all goes well, leads to a conversation, a file transfer, or other privileges we extend to people we trust. The addition of an emoticon can break the ice between new Skype contacts.
Although Skype emoticons are generally animated, such as a "(dance)" emoticon that displays an icon-sized person dancing, you can change the behavior of your emoticons to be static images in your chat windows. To do so, deselect the Show Animated Emoticons option in your General options. If you want to eliminate the graphic representation of emoticons altogether and instead show text that represents the emoticon, deselect the Show Emoticons option. The dancing person emoticon appears as "(dance)," with the parentheses, in your chat window.

Tip
In addition to placing emoticons by clicking icons in the pop-up panel shown in Figure 4-2, you can enter the text representation in your text chat window. For example, to show the image of the emoticon with sunglasses, you enter (cool).
Some undocumented emoticons that you might enjoy are also available. One of our favorites, especially after laborious hours of writing and editing, is the "(headbang)" emoticon. When you see this animation, you will know that emoticons can be very expressive. (Try finding some you like at http://share.skype.com/sites/en/2006/05/new_emoticons_in_skype_25.html.)
Tip
In your chat window, you can display emoticons representing the flags for various countries. To display a flag for the United States, enter (flag:us); for Canada, enter (flag:ca). The choice of country flags is extensive and is based on the two-letter designation set by the International Standards Organization standard ISO-3166. You can find the full list of two-letter country abbreviations at
www.iso.org/iso/en/prods-services/iso3166ma/02iso-3166-code-lists/index.html
The other choices on the General options relate to automatic changes to your online status — your visibility to others on the Skype network. Click the box next to Show Me As 'Away' When I Am Inactive For to set how long you want Skype to wait before automatically signifying that you've stepped away from the computer. When your mouse movement halts, Skype senses this mouse inactivity after the amount of time you set and automatically displays an Away icon next to your contact name. You control how long Skype waits to trigger a change in status; you may choose to have an Away sign posted after five minutes, and a Not Available sign posted after 20 minutes. To change these settings, choose Tools
Skype gives you two mechanisms for protecting your privacy:
Your Skype profile: Information about yourself that you allow anyone on Skype to see. It can be jam-packed with information or contain barely anything.
Your Privacy setting: This setting enables you to set who can directly call or chat with you.
In real life, anyone can find out where you live. All anyone needs to do is to look you up in a phone book, buy a mailing list, or find you through some publicly available information source. The fact that people happen to know you means that they can show up at your doorstep whenever they please.
But if you live in a building with a doorman, visitors have to be announced, and you can give instructions to the doorman as to who is allowed to visit and who isn't. Skype, through its profile and privacy settings, parallels this latter arrangement closely. The next two sections show how you can make it easy or difficult for people to find you based on your Skype profile, and how to assert control over who can start a call or chat with you based on your privacy settings.
Your Skype profile contains three kinds of information:
Information that all Skype users can see: Includes information such as
Your full name.
Your vital statistics: Gender and date of birth.
Geographic location: You can specify the Country/Region, State/Province, and City.
Your preferred language.
Your telephone numbers: Can include home, office, and mobile.
Your Home page: You may have a Web site that you want the world to visit.
A description about yourself: If you want to tell your life's story, you must do it in 200 characters or fewer.
Information that only your Skype contacts can see: Only your Skype buddies get the exclusive and revealing picture of you, as well as some limited information about your Skype account.
Your Skype picture.
Your time: It can be your computer's local time or a Greenwich Mean Time (GMT).
The number of Skype contacts you have: You can choose not to reveal this information to anyone.
Information known only to you:
Your email address: You can list more than one email address.
The information in the public portion of your profile is available literally to any Skype user. The semi-private information is reserved for your Skype contacts, and no one gets to directly view your email address.
From a privacy perspective, a few points are worth mentioning:
Even if you don't want to reveal much information, you'll probably find that listing your preferred language and country is useful. Adding identifying information such as a country can be helpful to someone who searches for your name and finds several people with the same first and last name as yours. Additional information can help to narrow the list.
Many people are unaware that the number of Skype contacts a person has is listed unless they deselect this option. You may not want the world to know that you have only three contacts, especially if you portray yourself as being experienced in VoIP and Skype.
You can choose to fill in all the items in your profile, or none of them. You should have your email address in your profile so that you can take advantage of features such as SkypeOut, SkypeIn, and Voicemail. Also, if you ever forget your password, you'll need your email account to reset your password.
Although your password is never directly displayed, a Skype user who generally knows your email address can find you by searching Skype.
The last item may prove to be very helpful. You can use, for example, a [email protected] or [email protected] email address for your company. People can then easily search for and find the right party, such as sales or support, if your company has many Skype user accounts.
Privacy options let you allow or deny calls and chats. You can also put some callers in the virtual doghouse by blocking contact altogether. Be aware that privacy is something you must choose. Skype's default setting allows anyone to initiate a call or chat with you. Skype calls this process "Authorization," meaning that when someone requests your Contact Details, you have authorized him or her to know both your full Skype identity particulars (except your email address) and your online status in real time. Authorization is usually what you want to choose in order to keep connected to your new circle of friends. This setting is probably not your first choice, however, when it comes to the world at large.
The Skype community is large and growing daily. This means that possibly thousands of people, organizations, or interest groups might want to contact you — or you them. Although this is a welcome opportunity, you need to be aware that you may be sharing a bit more than "hello" when you share contact details or accept a call or chat.
When a person contacts you for the first time, a Skype window pops up on your screen (see Figure 4-3). You might be tempted to hastily click OK so that you can get back to what you were doing. Wait! Before you prematurely act to share or not share all your information, you can click the Show Options button and look over your other choices (see Figure 4-4), as follows:
Send Your Contact Details with This Person: Choosing this option allows the person to freely communicate with you whenever he or she wants.
Do Not Share Your Contact Details with This Person: Choosing this option ignores the person's request. That person can't tell whether you simply didn't respond or actually declined his or her request.
Block This Person from Contacting You in the Future: This option means that you will always appear as Offline anytime that person views you in his or her Contacts list.
By deselecting the Add This Person to My Contacts option, you can share your contact details with a person without adding that person to your own list of Skype contacts.
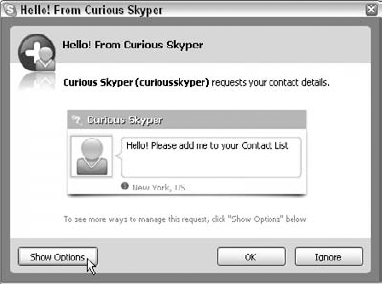
Figure 4.3. When requests pop up, your options are not immediately displayed! Click Show Options before you share your information.

Note
Even if you set your privacy settings so that only authorized people can contact you or see when you are online, you can still receive "Hello from" requests from new visitors.
Skype provides a number of notifications that alert you, by on-screen messages or through sound effects, when someone on your Skype Contacts list comes online or does the following:
Calls you
Starts a chat with you
Sends you a file
Requests your contact details
Sends you contacts
Leaves you a Voicemail message
To choose what notifications you want Skype to provide you with, click Notifications in the Options window to display the Notifications panel, shown in Figure 4-5. Depending on how you like to work, any or all of these notifications can serve you well or be an annoyance. You might want to start by enabling all the notifications (do so by clicking the box next to each option) and then see how they work out for a while. You can go back and alter your settings anytime.
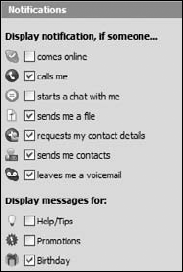
Another type of notification setting, which appears at the bottom of the Notifications menu, is Display Messages for Help/Tips. Enable this setting if you want Skype to alert you to various kinds of supplementary services available from Skype such as SkypeOut, SkypeIn, or sending SMS messages, which are fee-based services. In case you are wondering what an SMS message is, look at Chapter 9.
Tip
Skype can notify you when any of your Skype contacts come online. If you start accumulating a lot of contacts, you may find this feature distracting and sometimes even downright annoying. If you happen to use a wireless network and your connection cuts in and out, then after the connection resumes, you can get alerts displaying the contacts that appear to come online all at one time (see Figure 4-6). Sometimes, too much of a good thing may not be so good! For this reason, many skypers choose to keep the setting for Someone Comes Online disabled.

As you become familiar with Skype and don't require all the helpful hints and suggestions, you may want to turn off Help/Tips because it, too, is distracting by constantly suggesting and displaying links to services that have nothing to do with what you are doing at the moment, such as SkypeOut, SkypeIn, or sending SMS text messages.
Remember the uproar around Classic Coke? The Coca-Cola Company changed the formula, introduced a new beverage, and suddenly everyone became nostalgic for the old taste. Well, the designers of Skype wisely kept its classic, familiar ringtones when they added a snazzy new group of modern sounds for the following:
Skype allows you to customize your ringtones by importing WAV files purchased on the Internet or even by importing your own digital recordings. Skype further lets you manage its behavior by controlling the sound devices on your computer. The following sections explain how to customize Skype in this regard.
A virtual cacophony of sounds awaits your selection, depending on your mood and how much idle time you have to fool around and experiment with what suits your fancy. You can choose from a variety of dial tones, busy signals, connecting buzzes, on-hold tones, and many others from the sounds panel list (see Figure 4-7).
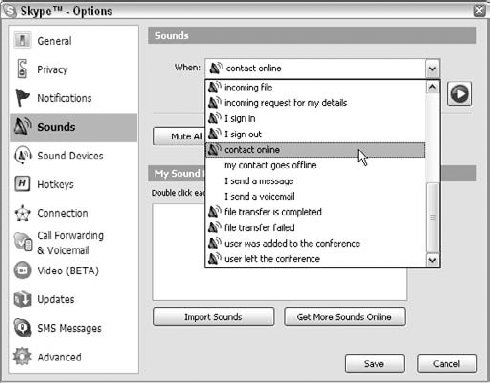
After you pick a sound type, you can choose the modern or classic variety. If you wish, you can import sound files directly from your hard drive or even purchase and download sound files from the Skype Web site. Choosing Tools

This site allows you to try different ringtones before you choose to buy them (see Figure 4-9).

Skype can play WAV sound files. If you have an MP3 file, you can convert it to a WAV-formatted file by using programs such as Audacity and QuickTime Pro. Plenty of other programs make this conversion as well. Catch the latest posts about this and other topics on our Web site for this book, www.skype4dummies.com.
Sound Devices settings pertain to Audio In, Audio Out, and Ringing. Choices here relate to Windows Default Sound Device and any custom Sound Cards installed on your computer (see Figure 4-10). Unless you have some special requirement, you should leave these options alone. If you're not sure whether your system has a special requirement, it probably doesn't.

One situation in which sound device settings may need to be adjusted is when you wish to use a USB phone and speakers for a new HiFi system at the same time. In such a situation, you can do the following:
Choose Start
Settings Control PanelSounds and Audio Devices.
The Sounds and Audio Devices Properties window appears.
(Depending on your operating system and how you have it configured, you may have to navigate to the Windows Sounds and Audio Devices control panel differently from the way described in this step.)
Click the Audio tab of the Sounds and Audio Devices Properties window and then select your sound card as the Sound playback default device.
Click the Voice tab and select your sound card as the Sound playback default device.
Click the OK button to save and close your Sounds and Audio Devices Properties window.
In your Skype application, choose Tools
OptionsSound Devices.The options to choose here are for Audio In and Audio Out. Choose your USB device for each.
Tip
If your voice sounds very faint to your callers, deselect the box next to Let Skype Adjust My Sound Device Settings; then, set your sound settings at the Windows Sound control panel.
Keyboard jockeys are in for a treat. You can easily create your own hotkey settings to juggle your Skype tasks such as answering calls, putting someone on hold, hanging up, and more, all at the touch of a keystroke.
The following example makes clear how to create your own hotkey.
Suppose that you want to make the Skype window appear instantly at a keystroke. Here's what you can do:
Click the Hotkeys menu appearing in the left panel of the Options window.
The items and buttons appearing under the Enable Global Hotkeys check box are all grayed out.
Click the Enable Global Hotkeys check box to activate the hotkeys.
Click Focus Skype and then click the Change Hotkey button.
The window shown on the right side of Figure 4-11 pops up.
Enter the letter A or any letter of your choosing in the text box and click OK.
This step enables the Focus Skype action.
Save your Hotkey settings.

Now you can instantly jump to Skype from any program in Windows whenever you press WinKey+A. If Skype is already running, the Skype client window comes to the foreground. If Skype is not running when you press WinKey+A, the Skype application launches as it normally does when you start Skype. If you don't have Skype configured for automatic logon, you need to sign in as you regularly do.
Connection settings relate to ports and proxy connections. Skype works over the same connections that you use when you surf the Internet with your browser. If you can connect to the Internet with your browser, and your Skype contacts can, too, you should be able to carry on a conversation.
Some companies require you to apply special settings to connect your Web browser to the Internet. Generally, your Skype Connection settings should closely match those of your browser.
Note
Most of the time you won't have to tweak your settings because Skype usually works without any fiddling.
If you require a custom connection, perform the following steps:
Choose Tools
OptionsConnection from the Skype application menu.The Connection panel appears.
Set your mode for proxy detection and fill in host and port information.
A drop-down list provides for Automatic proxy detection, HTTPS, or SOCKS. Your System or Network Administrator should be able to tell you whether your connection is going through HTTPS or SOCK, and he or she should be able to give you the hostname (it may be an IP address) of your proxy server and a port number. Fill in this information.
Enable proxy authentication.
You may need to select the box for Enable Proxy Authentication and provide a username and password.
Your Skype proxy and connection setting should more or less parallel your Web browser connection setting.
Remarkably, Skype works in many corporate environments without any customized setup even when your organization's firewall would stop other software programs from connecting to the Internet. For the most part, if your company's firewall allows you to connect to the public Internet through your Web browser, you should be able to use Skype without difficulty.
Here are some troubleshooting steps you can try if your firewall is stopping incoming or outgoing Skype traffic:
Run your Skype incoming connections through ports 80 and 443: If you are having difficulty connecting to the Internet over Skype after establishing your proxy settings, look to see that a check mark appears next to Use Port 80 and 443 as Alternatives for Incoming Connections. You can find this setting by choosing Tools
Open your external firewall: If your company is running an external firewall, ask your network or security administrator to configure the firewall to allow for Skype traffic.
Open your internal firewall: If you are running your own personal firewall and have administrative rights on your computer, here are some steps you can take:
Run your personal firewall software.
Check to see whether there is currently a rule that specifically prohibits Skype traffic. The first time you ran Skype, your personal firewall server may have prompted you when it detected Skype traffic and suggested that it be blocked. If you gave the OK to block the traffic, Skype cannot communicate with the outside world. Your solution is to find the offending rule and remove it.
If you can't find the rule that blocks Skype, the following may work: Uninstall Skype and re-install it. The next time Skype runs, your personal firewall may prompt you about what to do. This time, you can tell it to allow the Skype traffic.
Your personal firewall software may not have any rules about Skype and may need to be explicitly told that network traffic associated with Skype should be allowed. You must add Skype to your firewall's list of allowed programs.
Find further information on the Skype Web site: Go to
www.skype.com/help/guides/firewall.htmlto find information about specific Skype firewall setups including Windows XP SP2 Firewall, Norton Personal Firewall, Zone Alarm Pro, and McAfee Firewall Pro.
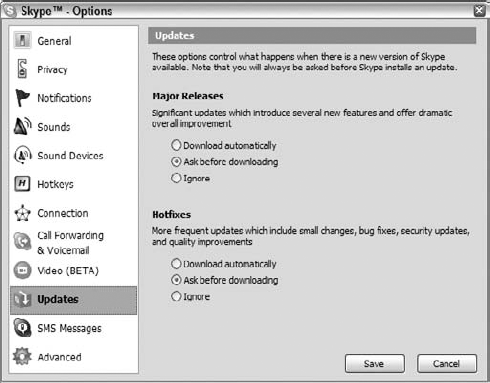
Some people like having their application software always up-to-date. Others want to be told when a new version of their software is available, whereas others blissfully chug along without annoying reminders. Which kind of person are you? Whatever your preference, Skype lets you set it (see Figure 4-12).
Skype lets you set your preferences for both major updates by choosing Options
Download Automatically: This option automatically checks to see whether a new version of Skype is available whenever Skype starts up; of one is, Skype automatically downloads it.
Ask before Downloading: This option is similar to the automatic download, but it politely asks you for permission before downloading.
Ignore: In choosing this option, you are instructing Skype to take no action to download new versions of Skype unless you manually choose to download Skype.
Between major releases, Skype may introduce minor releases or hotfixes. You have the same set of options available to you for downloading hotfixes as you do for downloading major releases of Skype. On the same screen where you set your preference for major Skype releases, you can set your preference for hotfixes and select Download Automatically, Ask before Downloading, or Ignore.
Advanced options are not absolutely essential to using Skype, but they can make things smoother. The options are as follows:
Startup: If you anticipate using Skype frequently, you may want to have Skype start up automatically whenever you power on your computer.
Automatically Answer Incoming Calls: Unless you have a special need to automatically connect to whomever calls you at the very first ring, you should leave this option disabled. There are special circumstances when you would want to automatically answer incoming calls, however. One of them (setting up a "NannyCam") is covered in Chapter 7.
Enable Contacts List and History Quickfiltering: Choosing this option tells Skype to quickly locate any contact in either your Contacts list or history of chats by simply typing in any portion of a name. Only those items that match appear. As your list of Skype contacts and chats grow, Quickfiltering becomes an indispensable tool.
Automatically Pause Winamp: Winamp is a freeware player that enables you to play music and video content. Winamp has many plugins (see
www.winamp.com/plugins) that enable you to use it in conjunction with other programs. The advanced settings in Skype (see Figure 4-13) let you automatically pause Winamp during an incoming call.Suppose you're working at your desktop and enjoying some peaceful music on your computer's CD player. Suddenly you're interrupted by a Skype caller. You answer the call, but the music hasn't stopped playing! You're hearing both the music and your Skype buddy at the same time. Your buddy isn't hearing any of your music and doesn't know why you sound so confused as you frantically scramble to stop the music.
Wouldn't it be nice if the music automatically shut off when you answered your Skype call? If your computer uses Winamp to play music, as many computers do, you can enable the Automatically Pause Winamp During Calls feature.

Figure 4.13. The Advanced Options settings are another means of customizing Skype to suit your style.
Note
See Chapter 6 for Advanced Options settings pertaining to chats.