
Setting up video with Skype (it's easier than you think)
Shopping for a webcam
Installing your video software
Making a Skype video call
In the opening scene of the movie 2001: A Space Odyssey (produced in 1968), Dave Bowman is talking with his wife and children over a video phone. As the movie title indicates, the story takes place in 2001. Back in 1968, we waited with bated breath for the advent of video phones. We waited a long time: the year 2001 came and went with hardly a trace of video phones becoming a reality. Finally, history is about to catch up with science fiction, thanks to Skype.
This chapter walks you through choosing the right equipment and environment for setting up Skype with video. We also take you through a webcam selection, connection, detection, and even a section about video protection. Okay, we know when to stop, or, to quote the sportscaster Warner Wolf, "Let's go to the videotape" (in this case, let's get started with Skype video).
The addition of video to a call may make the difference between touching base and enjoying a true visit, describing an item for sale and clinching the deal, or worrying whether someone is doing okay and seeing for yourself. Coming together in agreement, truly communicating intentions, and clearly describing objects are all circumstances that benefit from the ability to see eye to eye, literally. Videoconferencing can have some unexpected bonuses:
Webcams enable group participation: By setting up a webcam, a family can join in on a Skype conversation without having to pass headsets around from person to person.
Webcams eliminate wired microphones: Good webcams have built-in microphones, so you don't need to use the computer's internal microphone or to add an external microphone.
Webcams may eliminate echoes: Webcams with noise cancellation features eliminate the voice echo your Skype partner may hear if you don't have a headset. This noise cancellation feature lets you speak, unfettered, while using Skype video.
Webcams eliminate wired headsets: A surprising advantage of connecting a webcam to communicate is that a good webcam takes the place of tethered headsets. Sound is routed through the webcam speakers instead.
Note
If you don't have a webcam, you can still receive a video call. Skype software lets you see video transmitted from another user even if you don't reciprocate.
Before you use Skype video, you have to beg, borrow, or buy a webcam. Picking a webcam can make the difference between a great videoconference and a frustrating one. First, determine how, where, and why you are using videoconferencing. Then pick a unit that best matches those needs. If you make video calls at a desktop in your office, you can get a unit that is larger and can be moved around, placed on a shelf, or mounted on an office wall. If you are on the move and need to be totally portable, choosing a small unit that attaches to your laptop is a better choice.
Newer computer models are beginning to include built-in webcams, such as the Apple iMacs and MacBook Pro laptops. A built-in webcam is the most compact way to include video. But if you don't have that option, you'll have to do a little research and make a few good choices. The following section should help you with you webcam buying spree.
The standalone webcam rests on a platform or a boom (a small pole that supports the webcam), or it nests in a stand. Standalone cams are usually larger and some may have more features than those smaller units that clip onto a laptop or flat screen, although high-end clip-ons are almost indistinguishable in performance from high-end standalones. If you have a dedicated videoconferencing area, have multiple people at your conferencing station, or want to include a fair amount of items in your video viewing screen, then standalone webcams are for you.
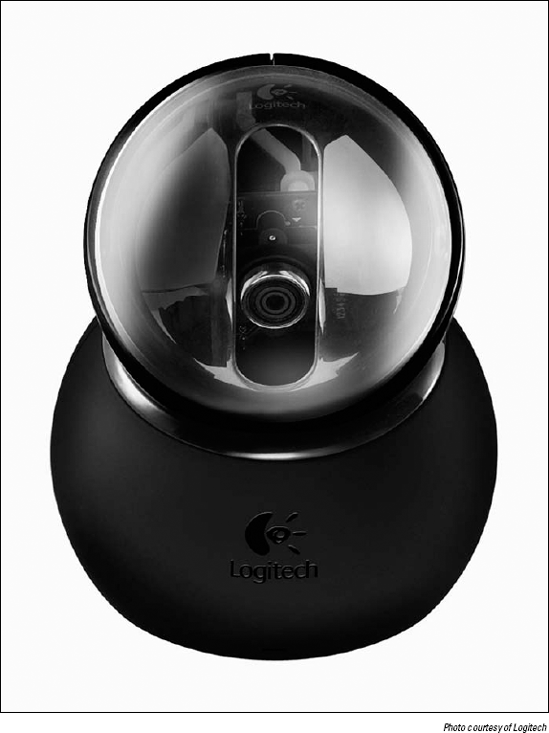
Logitech's Quickcam Orbit MP (see Figure 7-1) is an example of a feature-rich standalone webcam. The camera is a shiny orb with a wide-angle lens that perches on a variable-height post or small stand. Its ultra-wide-angle lens takes in a large area around you. You may have the corner of a room, or a curved conference display set filled with your latest widgets on floor-to-ceiling shelves. The camera can include your widgets along with you and your sales partner in the mix. This webcam also follows you around your work area using a capability called Face Tracking. The Face Tracking webcam has some cool advantages:
Face Tracking allows the camera to fix its lens on the dominant face in the picture (or the most active one).
With Face Tracking, as you move, so will the camera: Logitech's Quickcam Orbit MP webcam actually has a motorized lens that physically moves as it tracks you.
Face Tracking accommodates both pan and tilt motion as you move across and up and down: Some webcams move within a 189-degree field of view and a 109-degree tilt up and down.
Face Tracking adjusts the webcam focus as you move closer or farther away. If you move closer, the image is tight, framing your face. If you move back, the webcam adjusts its zoom to reveal more of the room. As you move, the webcam changes focus dynamically. Having a camera that makes its own zoom and pan decisions is, well, actually a little spooky!
See the section "Follow this face, or that face, or those faces!" later in this chapter for more about Face Tracking.
The clip-on webcam perches on the top of a flat screen and is perfect for a portable videoconferencing setup. One of the big advantages of a clip-on webcam is that it overcomes the common drawback of the casual videoconferencer. That is, most people stare at their screen, at the video image of the person they are talking with, rather than look into the camera. Unfortunately, most cameras are placed in an awkward position, so it doesn't make sense to look into the lens. It makes much more sense to watch the person on the screen. But then you have two people not quite making eye contact in a medium that's supposed to connect people face to face!
Although anchoring a clip-on at the top of a screen helps aim the lens, some clip-on webcams pivot to allow some subtle adjustment of the lens. You pivot and aim the webcam at your face while you test the software settings for your clip-on. After it's set, you don't have to worry about the awkward stare into the computer.
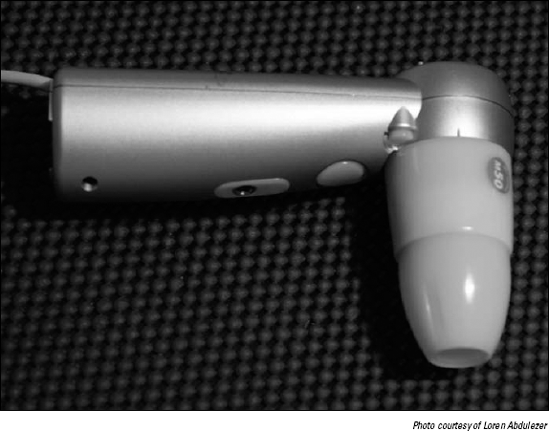
Some clip-on webcams, such as the Logitech QuickCam for Notebooks Pro (see Figure 7-2), have a digital Face Tracking feature (rather than a motorized lens tracker, as described previously) that keeps you in focus as you move toward or away from the lens. The camera doesn't move, but the software detects faces and makes adjustments to keep them front and center. If you are talking and suddenly lean back in your chair, the image zooms out to show you and the room around you. When you lean forward, the software tries to keep you in the viewing area by zooming in and eliminating the background.

Tip
If you don't want to use a wired headset and microphone, you can take advantage of your webcam's microphone and noise cancellation feature without having the webcam active (heaven forbid you have a bad hair day). In this mode, the webcam's microphone can continue to work even if the webcam settings in Skype are not enabled.
The most common use for a webcam is to see the person you are calling. But there are other webcams that have more specialized missions. Our favorite is the ProScope USB microscope (see Figure 7-3), available for both PC and Mac platforms. After you download and install the proper drivers that come with this device, it works just like a webcam, with a little twist. The microscope can, of course, take extreme close-ups of objects and materials. Some microscopes come with a variety of lenses to increase the power of the "macro" photographic image. There is even a high-res version of the scope (find out more at www.proscopehr.com/index.html).
Why would you want to use a USB microscope? Perhaps you are a coin collector (see Figure 7-4) and would like to make some trades, purchases, or sales within your Skype coin club. Connect the microscope, turn on videoconferencing, and put your wares on display. The same can be done for other collections; obsidian arrowheads, cameo jewelry, scrimshaw art, and postage stamps are just a sample of collectibles you can show in detail over Skype using a USB microscope.
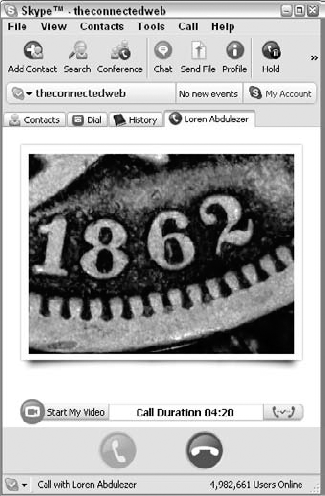
Figure 7.4. A USB microscope can transmit close-up images of coins and jewelry, for example, over Skype.
Another use for a USB microscope is the transmission of live video streaming in field research. If you are a biology teacher, equip your students with a laptop, a USB microscope, and an assignment to capture images of moss samples from a local park. The USB microscope has a built-in light source that will illuminate a bit of moss on a rock or tree bark. Students in other schools anywhere in the world can receive the video of local flora and add it to a database of moss samples for research projects.
Transmitting live video from the field is not only inspiring for students and teachers alike but also arms the students of today with tools for thinking about how to design the laboratories of tomorrow. Skype videoconferencing combined with USB microscopy makes it possible to routinely use field microscopes in disciplines such as forensics, and teams of people spread over thousands of miles can collaboratively engage in problem solving in real time.
Image size, automatic and manual pan and tilt control, and autofocus are all important features of good webcam. To help you decide which webcam to use, here are some things to consider.
The images rendered by most inexpensive webcams have a classic security camera look — jumpy black-and-white images that have more in common with Charlie Chaplin movies than Paramount Pictures. However, the newest webcams have made tremendous improvements in transmission, color rendering, and image resolution. Some give you a choice of image quality or size. If you pick one with a better quality image, though, you may run into some transmission problems. Better pictures contain more information that must be pushed through those Internet cables to reach your Skype buddy. The general rule is to pick a size and resolution that's not too large and not too small, but just right. Experiment with your equipment to figure out which size works best. If transmission is choppy, reduce the picture size in your webcam software preferences. To change your video image size, open the software installed with your specific webcam. You cannot change the image size within Skype software. It is important to explore your webcam software before you make a video call on Skype so that you can be prepared to troubleshoot if there is a problem.
Tip
If you are on a Skype video call and you don't see yourself in your video window, reduce the pixel resolution of your webcam software in the video settings preferences. Chances are, you'll reappear!
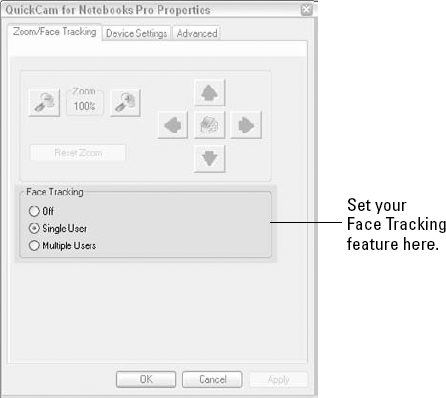
Motorized and "intelligent" Face Tracking is a feature that frees you from endlessly adjusting your webcam to keep your face in the viewfinder. The digital or motorized face tracker enables you choose to track one person or detect several people at a time (see Figure 7-5). When a group is in the picture, the motorized face tracker adjusts to try to try to keep everyone in the frame, even if everyone is moving in different directions. Logitech's Quickcam for Notebooks Pro software lets you choose Face Tracking for a single user or multiple users to follow an individual or a group.
Face Tracking doesn't just make webcams easier to use with Skype. Software that tracks facial features has the potential to perform other kinds of functions as well; for example, you may be able to have the software recognize a face, remember a face from a former videoconference, or look up and match a face from a library or photo album. Facial recognition is a handy feature for those of you who never forget a face but never remember a name. You may also be able to analyze the facial expressions and head motions of individuals in different cultures (great for businessmen and diplomats), follow an individual's eye movements, or even have the software read lips. All these high-tech features are in the works and will eventually add power to our Skype video communication.
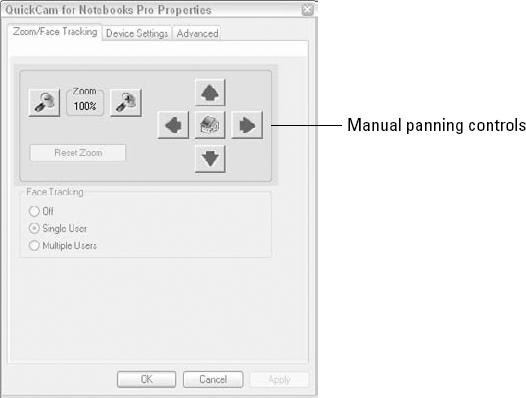
If you are a little hesitant to let your camera follow you around, you can always activate the manual pan and zoom option. To do so, follow these steps:
From the Skype menu, choose Tools
Options VideoTest WebcamWebcam Settings.
Select the Off radio button to stop Face Tracking.
Click the arrows in the Webcam Settings window that appear above the Face Tracking radio button choices to move the camera lens in any of four directions as well as to zoom in and zoom out (see Figure 7-6). Disabling Face Tracking in the Webcam Setting window is preferable when you want the camera to stay focused on an object that you are describing, or if you want to control who is displayed in the video as you speak. If your mom were sitting beside you in front of a webcam as you spoke to your niece, you would probably want the camera on your mom's reaction when she finds out that a great-grandchild is on the way. Use the manual pan toggle to make sure that the camera is exactly where you want it ... on your mom's broad smile!
While you're webcam shopping, it's a good idea to review the list of features published for each webcam you're considering. Compare that list with the following items to get the most flexibility out of videoconferencing with Skype:
Wide field of view
Microphone included with camera
Microphone contains noise cancellation capability
Minimum lens distortion
Low light boost
Manual pan and zoom control
Face Tracking software
Avatar creation software included
USB 2 enabled for fast transmission
Wide-angle lens
The less you have to fiddle with your webcam, the smoother your video conversation will be. A webcam with a fixed focus nails you to the chair. You can't move out of range, reach for a book, or lean back in your chair without slipping out of camera range. A webcam with a wide field of view that tracks your movement, keeps your features on-screen even in dim light, and doesn't distort your features makes video chats a more natural activity.
Webcams with built-in microphones, especially noise cancellation microphones, give you a definite advantage. Microphone webcams eliminate an extra piece of hardware with extra wires that take up precious USB ports on your computer. If making a video call forces you to plug in a webcam, a microphone, and headphones as well as deal with the tangle of wires, plugs, and devices, you may just decide to forego the whole experience. One good webcam combines all these devices, simplifying the setup and letting you concentrate on what you want to say, not what you need to plug in to say it.
Tip
Often, you can take advantage of your webcam's noise cancellation microphone even if you don't enable video. You can choose your webcam as the sound input device in your computer's sound control panel and not even have to set up a separate microphone! To do so, follow these steps:
Choose Start
My ComputerControl PanelsSounds and Audio DevicesAudio.In the Sound Recording section of the Audio window, click the drop-down list and select your webcam.
Now it's time to roll up your sleeves and plug in that camera. You need to install some software and then configure it before you launch your on-screen debut.
Your webcam should come with its own installation software. Although each brand is different, all involve some common steps to install the software drivers. Following are some tips to consider.
Tip
Turn off your anti-virus and anti-adware software before installing new video drivers. You can turn them back on after the video installation.
Tip
The webcam you may be using may not have the most up-to-date video driver for your computer and operating system. Check for updates from the manufacturer on its Web site. (Hint: Look at the support and download pages for updated drivers.)
Warning
Don't plug in your webcam before you install the video driver. In almost every webcam installation, you need to wait until the software prompts you to plug in your device (see Figure 7-7).

If you are encountering technical difficulties with your video, go to Appendix B of this book; you may find some help there. If the installation did not work, simply uninstall the video software and start over with the proper sequence.
To configure your Skype video options, choose Tools
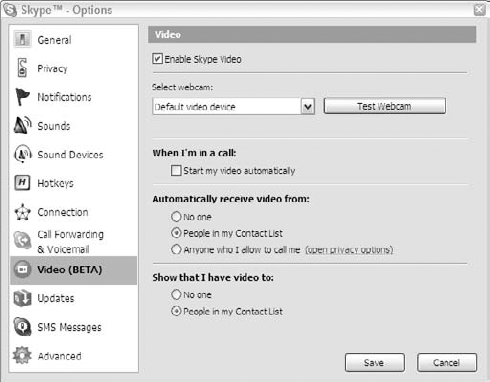
Video options require that you have a video device, either a webcam or software such as CrazyTalk (which animates a character's mouth and mimics your lip movements as you speak). To use video, you have to select Enable Skype Video before continuing. You should deselect the When I'm in a Call: Start My Video Automatically option. You probably should also set the Automatically Receive Video From option to People in My Contact List. Here's a list of Skype options you may want to set:
Category | Option |
|---|---|
Privacy | Allow Calls from My Contacts |
Video | Enable Skype Video |
Video | When I'm in a Call: Automatically Start My Video |
Video | Show That I Have Video to People in My Contact List |
Advanced | Automatically Answer Incoming Calls |
Note
Skype video is very stable. However, Skype is constantly improving its software and therefore continues to label its video feature in Beta mode, as you can see in Figure 7-8.
You'll want to make sure that you're actually piping in sound through your webcam and that the volume level is adequate. Many webcams have visual sound meters that light up as you speak so that you get feedback concerning your volume. One reason to check your webcam's sound is that you may have more than one sound input device attached to your computer. If you're unsure of which one is active, just tap the microphone — you'll find out soon enough!
To adjust your volume:
Choose Start
SettingsControl PanelsSounds and Audio Devices.The Sounds and Audio Devices window appears.
Click the Audio tab to open the Sound Recording window; there, click the Volume button.
In the window that appears, you see a virtual sound mixer with four volume sliders. Among the sliders are two choices for audio input, Line In and Microphone. Select the check box beneath the volume slider labeled Microphone
Using your mouse, move the slider up or down to raise or lower the volume.
Now you'd better comb your hair because you're ready (we hope) to become a video star. Glance in the mirror to check your smile, clear your throat, adjust the camera, and take a deep breath; you're about to go live on Skype!
To make a video call on your PC, follow these steps:
Select a contact from your list in the main Skype window.
Click the green call button.
When your contact answers, click the little video icon located at the bottom of the Skype call window.
That's all there is to it! You're on the air in your very own show with your very own fans (even if those are just Mom, your kids, or Dennis from the office).
Note
It's a good idea to test your webcam before you start your video call. From your Skype menu, choose Tools
Some Macintosh computer models, such as the iMacs, have cameras built in, so there is no need to install a separate webcam and special drivers. Macintosh laptops and towers can accept firewire webcams (webcams that connect with a special firewire cable for fast video data transmission), such as the iSight camera, also without any additional software installation. Skype works seamlessly with the Macintosh video drivers to detect iSight as well as built-in cameras.
Warning
Not all webcams work with Macintosh or PC computers. Make sure that you read the system requirements on the webcam package before you buy it for your Skype video setup.
Setting up Skype video on the Macintosh is simple. The following steps use iSight as an example, but the steps should be similar for others.
Choose Skype
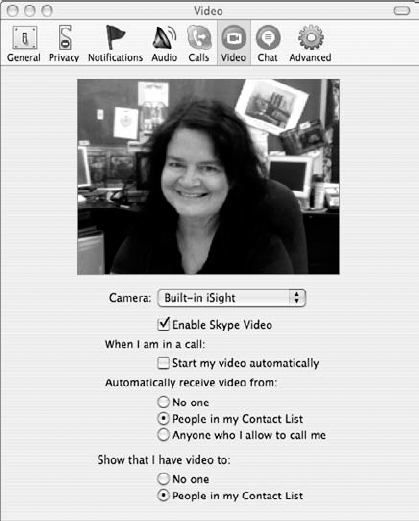
PreferencesVideo.The video configuration window opens (see Figure 7-9). If you don't have a built-in camera, plug your iSight webcam into a firewire port and turn it on by opening the lens.
From the Camera drop-down list, select your camera if it is not already detected.
Select the Enable Skype Video check box.
Choose your video options by selecting the check boxes or radio buttons (as the case may be) next to each choice, as follows:
When I Am in a Call: It's best not to check the option to start your video automatically. Give yourself a chance to compose yourself before appearing on camera.
Automatically Receive Video From: You can be super cautious and choose no one, or you can allow video only from people on your Contacts list.
Show That I Have Video To: You can choose to keep your video capability a secret and choose no one, or reveal it only to people on your Contacts list.
Click the red gel radio button on the far-left corner of the window title bar to close your Preferences window.
There you have it! You're all set to make a video call using your Macintosh, and you can communicate both with other Macintosh and PC users with this video capability. To make a video call on your Macintosh:
Select a contact from your Contacts list in the main Skype window.
Click the green call button next to your contact's name.
When your contact answers, click the little video icon (see Figure 7-10) located at the bottom of the Skype call window.
Your video will be transmitted to your contact. When video is live, your video icon turns an aqua blue.
Note
Skype doesn't automatically broadcast your image, even if you enable video in your options. The default setting in Skype is protective: Nobody has to see you in your pajamas when you're making or receiving a Skype call. To make yourself visible, you have to click the blue video icon when a call comes in (see Figure 7-10).

It's a good idea to pick a place, a "movie set," for your videoconference. Although your hair might not cooperate for your on-screen debut, you can at least get the backdrop right. Here are some ways to get "set" for video:
Select an all-purpose background: The simplest set is a solid-colored background. Quiet backdrops such as curtains or undecorated walls actually make transmitting video a little easier because there is less visual information to send. However, with high-speed lines and more efficient webcam software, you can add more interesting backgrounds without degrading the video signal too much.
Create a mood: A good backdrop for your video setting might be a library wall. Another is your collection of photos or artwork on display. On the other hand, if you're teaching online and need to demonstrate a lesson — perhaps you are teaching a Sign Language class, for example — then a simple, blank backdrop will prevent distractions for your viewers.
Lighting your set: Having a well-lighted area keeps you from being lost in the shadows. Lighting brings out color and detail of objects and individuals. Sensitive webcams can boost low light, but they need to have at least some light to boost.
You can move a lamp stand close to your "broadcast station" if you don't have enough natural light. Arrange your light source to illuminate your face. Fluorescent lights, usually mounted on the ceiling, cast a greenish glow (not very flattering), whereas tungsten lights, such as the ones usually used in table lamps, warm your skin tones.
Although natural light is best, it's available only during the day, of course. If you do have a source of natural light, take advantage of it, because you still need a little more light than whatever your computer screen provides.
During the day, you can set up a laptop and portable webcam near a window, but be careful not to aim the camera at the window unless you want to appear in silhouette. Shift your chair, or move the angle of your laptop or desktop to take advantage of a light source such as a window behind a desk.
Control background sound: Another consideration for an effective video set is background sound. If you live near a road or highway, you might want to move away from the window to eliminate all that motor noise. If you are near a construction site, calling in the evening, after workers go home, is a better choice.
Choose a set outside your home: With wireless Internet access in public parks, cafes, or even libraries, you can have a video chat from your favorite hangout. Keep the location consistent, though. Every time you pick a new place to set up your webcam, you need to find a wireless connection, adjust your position to take advantage of the light, and accommodate background noise. Showing up at the same place at the same time shortens setup time. If you pick a venue with a lively, noisy background, dedicated headsets are required so that you can hear and be heard.
A picture is worth a thousand words, but you need to hear the words as well as see the picture; otherwise, videoconferencing isn't much fun. Visual "noise" can be as disruptive as any other brand of noise. On the other hand, all that background activity may be just what you want your caller to see. There's no rule that videoconferencing needs to be just face to face. Determining the view your webcam shows makes you a director, of sorts, so be creative as you express yourself. Take advantage of the capability. A few preparations can make a big difference in your experience.
Note
Your videoconferencing environment is a balanced combination of backdrop, light availability, and camera model. Some more expensive webcams are much more sensitive to low light and transmit significantly better at night.
One fun aspect of using Skype video is that it doesn't have to be an isolated tool. Combining Skype video with other Skype features opens even more possibilities.
You might think that having a chat window open during a video session would be redundant. After all, you can see and talk — why would you want to write, too? Here are several great reasons:
Exchange paragraphs of text: If you are collaborating on a presentation and you want to extract a paragraph from an existing document, you can copy and paste your work into the chat window as you are talking with your partner; this way, you can share the information.
Pass a Web link: You can give someone a Web link by just pasting the URL into the chat. Sometimes there's no substitute for connecting straight into a site. Doing so clarifies the conversation because showing a Web site, image, or paragraph is easier than describing it.
Assist in conversations with multiple languages: If you are conferencing with someone who speaks a different language, the chat window can serve as an instant caption to clarify, translate, or define confusing phrases.
You can find out much more about using Skype chat features in Chapter 6.
Video lets you see your fellow skyper, so it's natural for both of you to want to see what you are both talking about. Unfortunately, holding up an article, letter, or any printed text in front of a webcam is likely to produce a slightly shaky, slightly fuzzy image that is more than slightly illegible. Instead of holding up a paper, transfer that file (see Chapter 6) if you have it in digital form. If you don't have a digital file, you can scan the article in advance of your video call and then transfer it. You don't have to open your email to send the file, nor does your recipient have to open his or her email to download an attachment containing the file. We've found that transferring a file while we are connected through Skype video does not slow down the transfer rate. Mention it, send it, and share it. It's almost like being in the same room!
After your get your video gear ready, you can find many ways to use it beyond a cozy video chat with Grandma. Following are a few video scenarios to consider.
With Skype, you can set up a "NannyCam" to make sure that your kids at home are fast asleep by 8:00 p.m. Here are some quick and easy ways to set up a surveillance camera at home:
Create a special Skype Name for your NannyCam: Be sure to set to set your Skype Sign In settings to Sign Me in When Skype Starts and Start Skype When the Computer Starts. This way, if your computer reboots, your NannyCam starts up automatically.
If you are already logged in to Skype, you can change these settings by choosing File
After you sign in with your NannyCam Skype Name, add your regular Skype Name to your Contacts list: The Contacts list for the NannyCam consists of only one person, namely, you. Of course, you may want to include your spouse's Skype Name alongside yours. Whatever the case, the list is very short.
In your NannyCam's privacy options, be sure to set the Allow Calls From option to Only People from My Contacts: Setting this option ensures that only you and your spouse can connect to the NannyCam.
Enable video and set it to start automatically: In your Skype Video Options window, select Enable Video and then select the check box next to Start My Video Automatically. In the Advanced Options, set the Call option to Automatically Answer Incoming Calls.
Test your NannyCam by connecting to it over Skype from one of the other computers in your home, or even from work.
Be sure to adjust your webcam to point to the specific area of the room you're watching, and make sure that the lighting level is adequate. Remember, most webcams give some visual signal that they are transmitting, such as an LED that lights up. You can adjust the audio volume levels for the computer speakers next to the NannyCam so that you have a little PA system, or you can turn off sound altogether.
This kind of setup can give you some peace of mind when you are traveling and want to make sure that everything at home is safe and sound. Best of all, this is a simple and very affordable home security solution for homeowners. Get yourself an inexpensive webcam and dust off that out-of-date computer taking up space in your closet. You won't have to worry about whether it has enough power; the webcam and Skype are the only applications you need it to run.
Video with Skype does not always have to entail having two people who are visually connected, one on each end of a live conversation. A USB microscope attached to your portable laptop and Skype on a Wi-Fi network can give you a close-up view of the world. There are plenty of practical uses of Skype and video that aren't limited to headshots of people talking to one another. Read on for a few ideas.
Field reporting using a laptop that connects to the Internet from one of the phone company's PCMCIA cards, equipped with Skype and a small video camera, can be a powerful tool for journalists. Whether a reporter writes for a newspaper, magazine, e-zine, podcast, or blog, the combination of laptops, webcams, and Skype is the equivalent of a TV studio on a shoestring budget. Transmitting live pictures, sound, and text from the middle of an event eliminates any time lapse between what happens in the world and how quickly people hear about it. Television has long been able to bring immediate news to a broadcast medium. Skype video, audio, chat, and file transfer put this same power into the hands of individuals. An enterprising Skype reporter can take his or her live feed and make it into a podcast, or even a "vodcast" (a video podcast) for large-scale distribution. Reporters can even connect to a newsroom with a live Skype video call and have their transmission broadcast on television.
Researchers can use Skype video to deploy a group of biologists (or budding student biologists) to collect data, information, and images in the field. Connect a USB microscope to each field laptop and transmit pictures of soil, water, moss, and lichen samples over Skype video. The research group can coordinate field research efforts to their best advantage and send images to remote laboratories, schools, and colleges.
Any field-based research benefits from video transmission tools. You can be digging for arrowheads, pottery shards, or other archeological artifacts with a live webcam or USB microscope serving as a research tool. You can enable a remote expert on the receiving end of the video stream to perform an instant analysis. The scientific tasks can be distributed among field, lab, and academic sites. More researchers can be involved, with less disruption to their own schedules. The research efforts can even be multinational.
Skype is currently limited to two video partners at a time, but with some third-party software programs (check out Festoon at www.festooninc.com), video conferencing among more than two people at a time is possible, which multiplies the collaboration efforts of any field-based projects.
Use Skype video to sell your wares, collaborate on developing a product, or inspect a custom-made prototype before shipping it out to the manufacturer. In business relationships, seeing the person you're doing business with is helpful, but seeing a product is crucial. Skype video is a quick way to make business communications more efficient and speed the workflow and production environment.
On a small scale, you can set up a jewelry cam to transmit pictures of items, such as rings and earrings, to potential customers. Use a USB microscope to take a closer look at the engraved markings on various items as you talk about each piece. A static picture is helpful to a buyer, but video is dynamic. You can respond to a request to focus on a stone or a setting, thereby satisfying a buyer's curiosity and overcoming any reluctance on the part of your customer to make a purchase.