
Hour 10. Dynamically Accessing and Manipulating Web Pages
What You’ll Learn in This Hour:
![]() Tracking the mouse position and other information
Tracking the mouse position and other information
![]() Manipulating the size and other attributes of page elements
Manipulating the size and other attributes of page elements
![]() How to show and hide elements dynamically
How to show and hide elements dynamically
![]() Layering page elements
Layering page elements
![]() Dynamically creating DOM elements and adding them to web pages
Dynamically creating DOM elements and adding them to web pages
![]() Adding and removing classes in jQuery
Adding and removing classes in jQuery
![]() Modifying the layout of the web page
Modifying the layout of the web page
This hour is a big one. So far you have been given most of the tools that you will need to implement highly dynamic and interactive web pages. In this hour, you take the next step and learn how to use those tools and some new ones to access information about web page elements. Then you use that information to manipulate and arrange them.
After you are able to access and modify the properties and values of the different page elements, you will be able to change basic web pages into true web applications. The following sections will take you on that ride, so hang on.
Accessing Browser and Page Element Values
One of the core fundamentals of both jQuery and JavaScript are access to the DOM objects that represent the elements on the web page. This section guides you through accessing property values, position, size, and other attributes of the elements, as well as showing you how to modify many of them.
Getting Mouse Position
Mouse movement is one of the most common web interactions that you will be dealing with. Often, you will need to make adjustments to elements on the page based on the position of the mouse.
The mouse position is accessible from the event object when a mouse event is triggered. Keep in mind that there are three mouse coordinates specified by the event. Table 10.1 describes each of these.

The following code shows an example of getting the mouse coordinates from an event object named e and applying them to a string variable:
var screenPosition = e.screenX + ", " + e.screenY;
var pagePosition = e.pageX + ", " + e.pageY;
var browserPosition = e.clientX + ", " + e.clientY;
Getting and Setting Values
Several HTML elements, especially input elements, have values that are associated with them. It is a simple matter in both jQuery and JavaScript to access the values of elements.
In JavaScript, the value can be accessed directly by accessing the value attribute of the object; for example:
domObject.value = 5;
var value = domObject.value;
jQuery, on the other hand, provides the .val() method to retrieve and set the value. For example, the following code will set and then get the value of a jQuery object representing the HTML <input> element with id="textInput":
$("#textInput").val(5);
var value = $("#textInput ").val();
Getting and Setting Attributes and Properties in jQuery
DOM objects provide direct access to the DOM object attributes and the DOM element properties of the HTML elements they represent. This is not reasonable in jQuery, because jQuery objects often represent multiple elements with varying attributes. For that reason, jQuery provides the .attr() and .prop() methods to get and set the attributes and properties of these elements.
The .attr(attribute, [value]) method allows you to specify an attribute name only to get the current value, as well as an optional value to set the current value. For example, the following code gets the src value for a specific image element with id="bannerImg":
var state = $("#bannerImg").attr("src");
Then the following statement sets the src attribute value for all <img> elements:
$("img").attr("src","images/default.jpg");
The .prop(property, [value]) method allows you to specify the property to get the current value and an optional value to set the current value. For example, the following code gets the checked state for a specific element with id="firstCheckbox":
var state = $("#firstCheckbox").prop("checked");
And the following statement will set the checked value of all <input> elements to true:
$("input").prop("checked", true);
Note
The only difference between a property and attribute as far as jQuery goes is that attributes are values that define the HTML structure and properties are values that affect the dynamic state of the object. For example, in an <input> element, "type" is an attribute because it defines the structure, whereas "checked" is a property because it affects only the state.
Getting and Setting CSS Properties
Another important aspect of dynamic web programming is the dynamic manipulation of CSS.
JavaScript enables you to access the CSS properties via the style attribute of the DOM object. For example, you can get the color and background-color CSS properties of an element from a DOM object using the following code. Notice that you need to use style["background-color"] syntax because style.background-color is not valid in JavaScript:
var domObj = document.getElementById("banner");
var color = domObj.style.color;
var color = domObj.style.["background-color"];
Another example is that you can set position, top, and left CSS properties for an element using the following code:
domObj.style.position = "absolute";
domObj.style.top = "100px";
domObj.style.left = "100px";
jQuery also makes it extremely easy to get and set CSS values using the .css(property, [value]) method. For example, the following code retrieves the cursor CSS property value of an element:
$("#buttonA").css("cursor");
Then the following sets the border-radius value:
$("#buttonA").css("border-radius", "10px 15px");
The .css() method also allows you to pass a map object with properties and values. This enables you to set several settings at once. For example, the following code uses .css() to set the margin, padding, float, and font-weight attributes at the same time:
$("span").css({margin:0, padding:2, float:"left", "font-weight":"bold"});
Notice that the property names can either be enclosed in quotes or not. You need to use quotes if the property name contains a – or other character that is not valid in a JavaScript object name. The values can be numbers or strings. The numerical values represent distance, which can be expressed in px, cm, or %; the default is px, so if you want to specify pixels, you only need to enter the number. If you want to specify cm, %, or some other value type, you need to use a string—for example, "100%".
Getting and Setting Element Size
Another important aspect when dynamically working with HTML elements is the capability to get the element’s size. jQuery makes this very simple. Table 10.2 shows the methods provided in the jQuery object that enable you to get the height and width of an element.
The height and width methods return only the size of the first element in the jQuery objects’ set. For single object sets, that is not a problem. Just keep in mind that other objects in the set may have different sizes.
Getting and Setting Element Position
In addition to the size of HTML elements, you often need to get their position. When you’re working with HTML elements, there are two types of positions. The first is the position relative to the full document. The second is the position relative to the HTML element that acts as an offset parent. Which element is the offset parent depends on the position settings in CSS.
jQuery provides the .position([position]) method to get the position relative to the offset parent. The .offset([position]) method provides the position relative to the document. Both of these methods can be called with no argument. They return a simple object with a left and right attribute that represent the number of pixels from the left and top of the document when using .position() or offset parent when using .offset(). They can also be called with a simple position attribute, which is an object that has left and right attributes. When called with a position parameter, they will set the position of the element.
For example, the following code will get the number of pixels from the top and the left of the document and the offset parent to an element with id="myElement". Notice that to get the statements on one line, you reference the top and left attributes directly after the call:
var pixelsFromPageTop = $("#myElement").offset().top;
var pixelsFromPageLeft = $("#myElement").offset().left;
var pixelsFromParentTop = $("#myElement").position().top;
var pixelsFromParentLeft = $("#myElement").position().left;
To set the distance of that element exactly 10 pixels down and 10 pixels to the right of the top-left corner of the document, use the following statement that defines a simple object with left and top values and passes it to the .offset() method:
$("#myElement").offset({"top":10,"left":10);
Accessing the Class
The simplest way to get the classes associated with an HTML element is to look at the className attribute of the DOM object. The className attribute is a string containing the names of the class(es) attached to the element. Keep in mind that an element may have more than one class name attached to it. In those cases, the names will be separated by a space.
The following example shows how to get the className attribute of an element with id="mainList" from jQuery:
var class = $("#mainList").get().className;
Getting Browser and Screen Size and Color Information
An important part of dynamically manipulating web pages is the capability to access information about the screen and browser. This section focuses on the size and color capability.
Getting the screen or browser window size allows you to adjust the size of HTML elements based on the available area on the screen or browser window.
You can access the screen size using the Screen object in JavaScript. The Screen object provides the width and height attributes that are the screen resolution dimensions. For example, the following code stores the screen width and height in variable:
var sWidth = screen.width;
var sHeight = screen.height;
To get the supported colors by the screen and thus the web browser, use the colorDepth attribute of the Screen object. This returns a value of the number of bits supported—for example, 8, 16, 24. Following is an example of getting the color depth supported by the screen:
var colorBits = screen.colorDepth;
Even if the screen is large, the browser window may not be taking up the full screen amount. Although the browser window provides scrollbars for web pages that exceed the size of the window, it often looks better to resize elements on the page or adjust the layout as the browser size changes.
The browser dimensions can be accessed from the innerWidth, outerWidth, innerHeight, and outerHeight attributes of the window object available in JavaScript. The innerHeight and innerWidth values refer to the actual area available for the web page. The outerWidth and outerHeight refer to the total area, including the browser menu, borders, and bars. The following is an example of getting the web page display area dimensions:
var pageWidth = window.innerWidth;
var pageHeight = window.innerHeight;
Try it Yourself: Getting Screen, Browser, Mouse, and Element Info Using jQuery and JavaScript
1. In Aptana, create the hour10, hour10/js, hour10/css, and hour10/images folders.
2. Create the hour10/hour1001.html, hour10/js/hour1001.js, and hour10/css/hour1001.css files.
3. Add the code shown in Listing 10.1-html to the HTML file. You should recognize the HTML components. There are two main sections: The first part defines several types of elements for you to interact with, and the second part, the really long <div>, provides a place to display information about the mouse, screen, browser, and elements.
4. Add the CSS from Listing 10.1-css to the CSS file. You should also recognize the CSS statements by now. Some of the lines in the CSS are combined to make it fit better in the book.
5. Open the hour1001.js file and the following ready() function that adds event handlers for the mousemove, mouseover, change, keypress, and resize events. You will create these event handlers in later steps. The mousemove event handler is attached to the document to catch the mouse movements at the document level. The resize handler is attached to the window so that you can display info when the browser is resized.
01 $(document).ready(function(){
02 $(document).mousemove(mousePosition);
03 $("*").mouseover(elementInfo);
04 $("*").change(elementInfo);
05 $("*").keypress(elementInfo);
06 $(window).resize(windowResize);
07 });
6. Add the following handler that will be called on mouse movement. Notice that propagation is stopped so that you try to display the information only once. The Screen object is used to get and display the screen dimensions and color bits. The event object e is used to get and display the various mouse position coordinates.
08 function mousePosition(e){
09 e.stopPropagation();
10 $("#screenSize").html(screen.width + "x" + screen.height);
11 $("#colors").html(screen.colorDepth+"bit");
12 $("#browserSize").html(window.innerWidth + "x" + window.innerHeight);
13 $("#mousePosition").html("X:" + e.screenX + " Y:" + e.screenY);
14 $("#pagePosition").html("X:" + e.pageX + " Y:" + e.pageY);
15 $("#scrollPosition").html("X:" + e.clientX + " Y:" + e.clientY);
16 }
7. Create the following functions that will display all the element information. Propagation is stopped. The contents of the .infoContainer <span> elements are removed by line 19. Using the event object, the domObj variable is assigned the target DOM object that the event occurred on, and jObj is set to the jQuery version of the target object:
17 function elementInfo(e){
18 e.stopPropagation();
19 $(".infoContainer span").html("");
20 var domObj = e.target;
21 var jObj = $(domObj);
...
33 }
8. Add the following statements that use the DOM and jQuery objects to display the id, tag, and class attributes:
22 $("#elementId").html(domObj.id);
23 $("#elementType").html(jObj.prop('tagName'));
24 $("#elementClass").html(domObj.className);
9. Add the following statements that display the element’s size and position:
25 $("#elementSize").html(jObj.width() + "x" + jObj.height());
26 $("#elementPosition").html(jObj.offset().top + ", " + jObj.offset().left);
10. Add the following miscellaneous statements. Line 27 uses the .css() method to get the CSS color attribute, line 28 uses .val() to get the value of the element if there is one, line 30 gets the checked state of the element if available, and line 32 gets the src attribute of <img> elements.
27 $("#elementColor").html(jObj.css("color"));
28 $("#elementValue").html(jObj.val());
29 try{
30 $("#elementChecked").html(jObj.prop('checked').toString());
31 } catch (e) {}
32 $("#elementSource").html(jObj.attr('src'));
11. Add the following handler that sets the browser window size each time you resize the browser:
34 function windowResize(e){
35 $("#browserSize").html(window.innerWidth + "x" + window.innerHeight);
36 }
12. Save all three files and then open the HTML document in a web browser. Play around with the HTML elements and see the information change, as shown in Figure 10.1. Mouse coordinates, screen, and browser size, as well as element info, are displayed as available. Don’t forget to try resizing the browser and scrolling.

FIGURE 10.1 A web page that displays the screen, browser, mouse, and element info as you play around with the web page.
LISTING 10.1-html HTML File That Provides Several Elements to Play with, as Well as an Independent <div> That Displays Info
01 <!DOCTYPE html>
02 <html>
03 <head>
04 <title>Hour 10-1</title>
05 <meta charset="utf-8" />
06 <script type="text/javascript" src="../js/jquery.min.js"></script>
07 <script type="text/javascript" src="js/hour1001.js"></script>
08 <link rel="stylesheet" type="text/css" href="css/hour1001.css">
09 </head>
10 <body>
11 <div>
12 <div id="banner" class="header">Teach Yourself jQuery & JavaScript</div>
13 <div id="menu" class="menu">
14 <span class="menuItem">Hours</span>
15 <span class="menuItem">Docs</span>
16 <span class="menuItem">Code</span>
17 </div>
18 <div id="content">
19 <p class="imageArea"><img id="sunset" src="images/sunset.jpg" width="200px"/>Sunset</p>
20 <select>
21 <option value=1>Hour 1</option>
22 <option value=2>Hour 2</option>
23 <option value=3>Hour 3</option>
24 <input type=text />
25 </select>
26 <input type="checkbox" />
27 </div>
28 </div>
29
30 <div class=infoContainer>
31 <p>Screen & Browser Info</p>
32 <div>Screen Size: <span id="screenSize"></span></div>
33 <div>Color Level: <span id="colors"></span></div>
34 <div>Browser Size: <span id="browserSize"></span></div>
35 <p>Mouse Position</p>
36 <div>Absolute Mouse: <span id="mousePosition"></span></div>
37 <div>Page Mouse: <span id="pagePosition"></span></div>
38 <div>Relative Mouse: <span id="scrollPosition"></span></div>
39 <p>Element Info</p>
40 <div>Element ID: <span id="elementId"></span></div>
41 <div>Element Type: <span id="elementType"></span></div>
42 <div>Element Class: <span id="elementClass"></span></div>
43 <div>Element Size: <span id="elementSize"></span></div>
44 <div>Element Position: <span id="elementPosition"></span></div>
45 <div>Element Value: <span id="elementValue"></span></div>
46 <div>Element Checked: <span id="elementChecked"></span></div>
47 <div>Image Source: <span id="elementSource"></span></div>
48 <div>Element Color: <span id="elementColor"></span></div>
49 </div>
50 </body>
51 </html>
LISTING 10.1-js jQuery and JavaScript Code That Retrieves and Displays Information About the Screen, Browser, Mouse, and HTML Elements
01 $(document).ready(function(){
02 $(document).mousemove(mousePosition);
03 $("*").mouseover(elementInfo);
04 $("*").change(elementInfo);
05 $("*").keypress(elementInfo);
06 $(window).resize(windowResize);
07 });
08 function mousePosition(e){
09 e.stopPropagation();
10 $("#screenSize").html(screen.width + "x" + screen.height);
11 $("#colors").html(screen.colorDepth+"bit");
12 $("#browserSize").html(window.innerWidth + "x" + window.innerHeight);
13 $("#mousePosition").html("X:" + e.screenX + " Y:" + e.screenY);
14 $("#pagePosition").html("X:" + e.pageX + " Y:" + e.pageY);
15 $("#scrollPosition").html("X:" + e.clientX + " Y:" + e.clientY);
16 }
17 function elementInfo(e){
18 e.stopPropagation();
19 $(".infoContainer span").html("");
20 var domObj = e.target;
21 var jObj = $(domObj);
22 $("#elementId").html(domObj.id);
23 $("#elementType").html(jObj.prop('tagName'));
24 $("#elementClass").html(domObj.className);
25 $("#elementSize").html(jObj.width() + "x" + jObj.height());
26 $("#elementPosition").html(jObj.offset().top + ", " + jObj.offset().left);
27 $("#elementColor").html(jObj.css("color"));
28 $("#elementValue").html(jObj.val());
29 try{
30 $("#elementChecked").html(jObj.prop('checked').toString());
31 } catch (e) {}
32 $("#elementSource").html(jObj.attr('src'));
33 }
34 function windowResize(e){
35 $("#browserSize").html(window.innerWidth + "x" + window.innerHeight);
36 }
LISTING 10.1-css CSS Code That Styles the <div> and Other Elements
01 .infoContainer{
02 border:3px ridge;
03 padding:3px;
04 position:fixed; display:inline-block;
05 top:50px; right:50px;
06 background-color:#C0C0C0;
07 width:200px; height:280px;
08 font:12px arial;
09 }
10 .infoContainer div{ margin-left:5px; }
11 .infoContainer div span{
12 color:blue;
13 float:right; }
14 .infoContainer p{
15 margin:0px; padding:0px;
16 font-size:14px; font-weight:bold;
17 }
18 #banner{
19 height:100;
20 color:white; background-color:blue;
21 font-size:40px; text-align:center;
22 }
23 #menu{ background-color:gray; padding:5px; }
24 .menuItem{
25 padding:3px; margin-left:3px;
26 background-image: -moz-linear-gradient(top, #0022ff 0%, #AACCFF 85%, #0022ff 100%);
27 font:20px bold;
28 color:white;
29 }
30 .imageArea{color:red;}
Dynamically Manipulating Page Elements
In the previous section, you not only learned how to access the components, but also how to change values, attributes, properties, and CSS settings. This section extends those concepts by discussing some additional ways to dynamically manipulate the web page by adding and removing elements, changing classes, and toggling visibility.
Adding Page Elements Dynamically
Often, you will not know all the elements that belong on a web page until a user logs in, or you receive addition information from a web service, or some other interaction. In those cases, you must be able to add elements on-the-fly in your jQuery and JavaScript code.
Adding Page Elements in JavaScript
There are several ways to add HTML elements dynamically. The most basic is to set the innerHTML attribute of a container object to an HTML string. For example, the following code sets the contents of an existing object to a new <p> element:
domObj.innerHTML = "<p>Paragraph 1 goes here</p>";
domObj.innerHTML += "<p>Paragraph 2 goes here</p>";
The problem with this method is that it lends itself to really ugly string statements that will likely become a major headache later. So JavaScript provides a way to create the DOM objects and then append them to the parent object.
The document.createElement(tag) method allows you to create an element object, and the document.createTextNode(text) allows you to create the text node that is part of the element. Then the appendChild(object) method can be called on the DOM objects to append the newly created elements and nodes.
To illustrate this, check out the following code that adds a couple of paragraphs to an existing object named domObj:
var newP = createElement("p");
var newT = createTextNode("Paragraph 1 goes here");
newP.appendChild(newT);
domObj.appendChild(newP);
It takes a bit more code, but the flow is much safer. Plus, the upside of creating objects is that you have an actual DOM object that you can add additional values to the element. For example, the following code allows you to add an <img> element and set the src and height attributes before appending it to the existing object:
var newImg = createElement("img");
newImg.src = "images/sunset.jpg";
newImg.height = 200;
domObj.appendChild(newImg);
Adding Page Elements in jQuery
Now you can look at how to add new elements in jQuery. You can apply the same innerHTML shortcut in jQuery as in JavaScript by using the .html() method, which will get or set the innerHTML string. For example:
$("#myDiv").html("<p>Paragraph 1 goes here</p>");
This method, however, has the same limitations and should be used sparingly. The better method is to create a new jQuery object and append it. The following code takes you through that process. The first step is to create the object by passing the tag name or HTML string to the jQuery object $. For example, the following statement creates a new jQuery object with one <p> element in the set:
var newP = $("<p></p>");
You can then add text to the paragraph using the following:
newP.html("Paragraph 1 goes here");
Then you can append an element to one or more existing elements using .append(jQueryObject). For example, the following code adds the paragraph to all <div> elements:
$("div").append(newP);
To illustrate this, the following code creates a new jQuery object with an <img> element in the set and adds it to all <li> elements:
var newImg = $("<img></img>");
newImg.attr("src", "images/sunset.jpg");
newImg.height(30);
$("li").append(newImg);
jQuery also provides the .appendTo(target) method, which allows you to append an object to another object. This works the same way as .append() but in reverse. The method is called from the child object and not the new parent. For example, the newImg object from the example above could be appended by the following statement instead:
newImg.appendTo("li");
Removing Page Elements
Page elements can be removed in a couple of ways. The most basic way is to get the parent object and then set domObj.innerHTML = "" for DOM objects or call jObj.html("") for jQuery objects. This erases all content inside the parent element and thus removes any child elements.
Try to design your html components so that you can remove elements using the .html("") method because it keeps the cleanup code so simple. Another advantage is that adding new elements to the container is easier because you don’t have to deal with existing elements.
In JavaScript, you can also call the .removeElement(child) on the parent element. For example, the following code gets an element with id="container" and then removes a child with id="paragraphA":
var parent=document.getElementById("container");
var child=document.getElementById("paragraphA");
child.parentNode.removeChild(child);
jQuery provides two methods to remove elements. The first is .empty(), which is equivalent to .html(""). With .empty(), all child elements and text will be removed. The second method is .remove([selector]), which removes elements based only on the original query and an optional selector.
If no selector is specified, the elements from the original query are removed. For example, to remove all <div> elements, use the following statement:
$("div").remove()
If a selector is specified, child elements from the original query that match the selector will be removed. For example, to remove the <p> elements inside <div> elements, use the following:
$("div").remove("p");
jQuery provides one additional method that is useful when removing elements: the .detach([selector]) method. The detach method works the same way as the .remove([selector]) method, with one important difference. The actual element DOM data is not deleted, even though the elements are removed from the parents. You still have the elements in the existing jQuery object and can insert them back into the DOM at another location.
For example, the following code detaches all paragraphs from one element and appends them to another:
var ps = $("#div1").detach("p");
ps.appendTo("#div2");
Replacing Elements in jQuery
As you have seen in the previous sections, you can easily add and remove elements via jQuery. You also need to be aware of the capability to replace existing sets of elements with other sets of elements. This is required in jQuery because after you remove the elements, you will no longer be able to perform the same queries because the elements will be gone.
You can use three methods to replace elements in jQuery. The simplest is to use .html(). The .html() method in jQuery is extremely useful for replacing the contents of an existing element with completely different content. The .html() method accepts a string or an object and replaces the content of the set of elements in the jQuery with the object or string. For example, the following statement replaces the contents of all <div> elements with a new paragraph:
$("div").html($("<p>New Paragraph</p>"));
Another method of replacing a set of elements in the document with new content is the .replaceAll(target) method. This method replaces the set of elements that match the target selector with those of the current set. For example, to replace all <div> elements in a parentB with <span> elements from parentA, you could use the following:
$("#parentA span").replaceAll("#parentB div");
The final method is to use .replaceWith(newContent), which does the opposite of .replaceAll(). The .replaceWith() function replaces the elements in the current set with the content specified. For example, to replace all <div> elements with a single new blank <div>, you could use the following:
$("div").replaceWith($("<div></div>"));
Inserting Elements in jQuery
Another important feature of jQuery is the capability to easily insert elements into existing content. You have already seen how to append items to the end; however, what if you want to put content into the middle? That is where the .before() and .after() methods come in handy.
The .after(content [,content]) method allows you to specify an element that should be inserted after each element in the current jQuery object’s set. For example, to insert a new paragraph after the third <p> element in the document, you would use the following:
$("p:eq(2)").after($("<p>New Fourth Paragraph</p>"));
The .before(content [,content]) method allows you to specify an element that should be inserted before each element in the current jQuery object’s set. For example, to insert a new paragraph before the third <p> element in the document, you would use the following:
$("p:eq(2)").before($("<p>New Third Paragraph</p>"));
Note
Both the .after() and .before() methods allow you to pass in multiple objects to insert, separated by a comma. This enables you to prepare sets of objects and then insert them all together in the correct spot.
Changing Classes
A very important part of rich interactive web pages is good CSS design. JavaScript and jQuery can enhance the CSS design by dynamically adding and removing classes from elements.
jQuery makes it extremely simple to add, remove, and toggle classes on and off. If you design your CSS code well, it is very simple to apply some nice effects very easily.
Classes are added using the .addClass(className) method. For example, to add a class named active to all <span> elements, you could use the following statement:
$("span").addClass("active");
Classes are removed using the .removeClass([className]) method. For example, to remove the active class from the <span> elements, you would call
$("span").removeClass("active");
You can also use remove with no className, which removes all classes from the elements. For example, the following statement removes all classes from <p> elements:
$("p").removeClass();
You can also toggle classes on and off using the .toggleClass(className [, switch) method. In addition to the className, you can specify a true or false for the optional switch parameter indicating to turn the class on or off.
For example, to turn the active class and the inactive class off for all <span> elements, the code would be the following:
$("span").toggleClass("active", true);
$("span").toggleClass("inactive", false);
Toggling Visibility
A simple way of changing the look and feel of web pages is to toggle the visibility of elements. You can do this from JavaScript by setting the style.display property to "none" or to ""; however, jQuery provides much more elegant and extensible solutions.
To display an element using jQuery, simply call the .show() method on that object. Then to hide the element, use the .hide() method. It’s as simple as that. For example, to hide an object named jObj, use the following statement:
jObj.hide();
To display it again, use
jObj.show();
One problem with .hide() is that once it is applied, the element will no longer take up any page space. This may be the way that you want it, or in some instances you may only want the element to be invisible, but still take up space. To make an element invisible, set the opacity CSS property to 0. For example:
jObj.css("opacity", "0");
To make the element visible again, set the opacity back to 1:
jObj.css("opacity", "1");
Tip
Setting the opacity lower but not to 0 can be a great way to show that elements are not currently active while still showing them. For example, you can set menu and button elements that are not yet implemented and active to .5 opacity so that they still show up but are obviously not clickable.
Try it Yourself: Dynamically Manipulating Web Page Elements

FIGURE 10.2 A web page that dynamically builds the elements displayed in the left pane and then changes the content based on user selections.
1. In Aptana, create the hour10/hour1002.html, hour10/js/hour1002.js, and hour10/css/hour1002.css files.
2. Add the code shown in Listing 10.2-html to the HTML file. You should recognize the HTML components. There is a set of <span> elements that will be buttons, a content <div> where you will dynamically place new elements, and a free-floating menu that provides buttons with links to jQuery docs.
3. Add the CSS from Listing 10.2-css to the CSS file. There is quite a bit of CSS code to style the different elements. However, all of it should be familiar to you by now.
4. Open the hour1002.js file and add the following ready() function. Line 2 hides the docMenu div, which will be shown only when the user clicks on the Docs button. The rest of the lines add click handlers for the buttons.
01 $(document).ready(function(){
02 $("docMenu").hide();
03 $("#hours").click(setHourNav);
04 $("#docs").click(setDocNav);
05 $("#fade").click(fade);
06 });
5. Add the code shown in lines 7 through 22. This is two functions. The setHourNav() function is called when the user clicks the Hours button. This function goes through the process of creating a new <select> element and adding 24 <option> elements to it. On line 16, a change event handler is added to the <select> element to catch when the hour changes. The second function sets the content paragraph element to match the hour selected.
24 $("#content").append(select).append("<br><p></p>");
6. Add the following function that will be called when a user clicks the Docs button. This function shows the doc menu, removes the active class from all <span> elements, and then adds it to the Docs button to show it is active.
27 function setDocNav(){
28 $("docMenu").show();
29 $("span").removeClass("active");
30 $("#docs").addClass("active");
31 }
7. Add the following handler for when the user clicks one of the options in the doc menu. This function creates a new <iframe> element that points to the selected doc and then replaces the contents of the #content <div> with that new element.
32 function setDoc(doc){
33 var frame = $("<iframe></iframe>");
34 frame.attr("src", doc);
35 $("#content").html(frame);
36 }
8. Add the following handler for when the user clicks the Fade button. This checks the current opacity CSS property and increases it or decreases it to cause the content to fade in and out.
37 function fade(){
38 var opacity = $("#content").css("opacity");
39 if (opacity < 1){ $("#content").css("opacity", 1);}
40 else { $("#content").css("opacity", .5); }
41 }
9. Save all three files and then open the HTML document in a web browser. Play around with the Hours and Docs buttons to see the elements dynamically displayed. Try the Fade button to fade the content in and out.
LISTING 10.2-html HTML File Basic Web Page Used in the Example
01 <!DOCTYPE html>
02 <html>
03 <head>
04 <title>Hour 10-2</title>
05 <meta charset="utf-8" />
06 <script type="text/javascript" src="../js/jquery.min.js"></script>
07 <script type="text/javascript" src="js/hour1002.js"></script>
08 <link rel="stylesheet" type="text/css" href="css/hour1002.css">
09 </head>
10 <body>
11 <div id="container">
12 <div id="menu" class="menu">
13 <span id="hours" class="menuItem">Hours</span>
14 <span id="docs" class="menuItem">Docs</span>
15 <span id="fade" class="menuItem">Fade</span>
16 </div>
17 <div id="content"></div>
18 </div>
19 <div id="docMenu">
20 <span onclick="setDoc('http://api.jquery.com/')">jQuery</span>
21 <span onclick="setDoc('http://api.jqueryui.com/')">jQueryUI</span>
22 <span onclick="setDoc('http://jquerymobile.com/demos/1.2.0/')">jQueryMobile</span>
23 </div>
24 </body>
25 </html>
LISTING 10.2-js jQuery and JavaScript Code That Dynamically Builds the Left Navigation Items Based on the Button Clicked in the Top Menu
01 $(document).ready(function(){
02 $("#docMenu").hide();
03 $("#hours").click(setHourNav);
04 $("#docs").click(setDocNav);
05 $("#fade").click(fade);
06 });
07 function setHour(e){
08 var hour = $("#hourSelect").val();
09 $("#content p").html("Hour "+ hour);
10 }
11 function setHourNav(){
12 $("#docMenu").hide();
13 $("span").removeClass("active");
14 $("#hours").addClass("active");
15 var select = $('<select id="hourSelect"></select>'),
16 select.change(setHour);
17 for(var x=1; x<25; x++){
18 var option = $("<option></option");
19 option.val(x);
20 option.html("Hour "+x);
21 select.append(option);
22 }
23 $("#content").html("");
24 $("#content").append(select).append("<br><p></p>");
25 setHour();
26 }
27 function setDocNav(){
28 $("#docMenu").show();
29 $("span").removeClass("active");
30 $("#docs").addClass("active");
31 }
32 function setDoc(doc){
33 var frame = $("<iframe></iframe>");
34 frame.attr("src", doc);
35 $("#content").html(frame);
36 }
37 function fade(){
38 var opacity = $("#content").css("opacity");
39 if (opacity < 1){ $("#content").css("opacity", 1);}
40 else { $("#content").css("opacity", .5); }
41 }
LISTING 10.2-css CSS Code That Styles the Banner, Buttons, and Other Elements
01 #banner{
02 height:100px;
03 color:white; background-color:blue;
04 font-size:40px; text-align:center;
05 }
06 #menu, #docMenu{
07 background-color:black;
08 padding:6px 4px 9px 4px;
09 }
10 .menuItem, #docMenu span{
11 padding:2px;
12 background-image: -moz-linear-gradient(top, #2244ff 0%, #AACCFF 85%, #0022ff 100%);
13 font:20px bold;
14 cursor:pointer;
15 }
16 .active{
17 border:5px groove;
18 }
19 #docMenu span{
20 display:block;
21 margin-top:1px;
22 }
23 #content, iframe{
24 display:inline-block;
25 width:700px; height:500px;
26 }
27 #container{ width:800px; background-color:#C0C0C0}
28 #docMenu{
29 position:fixed; right:60px; top:60px;
30 }
Dynamically Rearranging Elements on the Web Page
One of the coolest interactions that you can make with web pages is to rearrange elements based on user interaction. For instance, you can make elements bigger or smaller, or change the position. These were already covered as part of getting and setting element attributes in the first section of this hour. This section builds further on those concepts by discussing a final way to position page elements using the z-index; then you step through an example that shows the different methods of rearranging the elements.
Adjusting the z-index
The z-index is a CSS property that specifies the position of an HTML element with respect to other elements, not vertically or horizontally but projected out toward the user, as if it were papers stacked on top of one another on the screen. The element with the highest z-index is displayed on top of other elements when the page is rendered by the browser.
To get and set the z-index in jQuery, use the .css() method. For example, to get the z-index for an item, use the following:
var zIndex = $("#item").css("z-index");
To set the z-index for an item to read 10, use the following statement:
$("#item").css("z-index", "10");
Try it Yourself: Dynamically Rearranging Page Elements
1. In Aptana, create the hour10/hour1003.html, hour10/js/hour1003.js, and hour10/css/hour1003.css files.
2. Add the code shown in Listing 10.3-html to the HTML file. You should recognize the HTML components. The HTML code contains several <span> elements that will be styled as buttons and three images that will be rearranged as the user clicks the buttons.
3. Add the CSS from Listing 10.3-css to the CSS file. This code styles the buttons and puts a frame around the images.
4. Open the hour1003.js file and the following global definitions, which will be used later to keep track of the starting coordinates when tiling and stacking images, as well as the current image with the top z-index and max image index:
01 var startX = startY = 60;
02 var topIndex, maxIndex;
5. Add the following ready() function. Lines 3 and 4 set the current top index and the max index to the number of files minus 1 to make it zero-based. Then lines 6–12 add click handlers for each of the buttons.
03 $(document).ready(function(){
04 topIndex = $(".photo").length-1;
05 maxIndex = topIndex;
06 $("#right").click(function(e){move(e, "right");});
07 $("#left").click(function(e){move(e, "left");});
08 $("#bigger").click(function(e){resize(e, "bigger");});
09 $("#smaller").click(function(e){resize(e, "smaller");});
10 $("#stack").click(stack);
11 $("#tile").click(tile);
12 $("#flip").click(flip);
13 stack();
14 });
6. Add the following resize handler that accepts a direction and uses the value to either enlarge or shrink the image by adjusting the width using the width() method. Notice that the topIndex variable is used to determine which image to adjust:
15 function resize(e, direction){
16 var img = $("img:eq(" + topIndex + ")");
17 if (direction == "bigger"){ img.width(img.width()+20); }
18 else { img.width(img.width()-20); }
19 }
7. Add the following move handler that adjusts the offset() of the image to the left or right based on the direction argument. Also startX and startY are adjusted to the new position.
20 function move(e, direction){
21 var img = $("img:eq(" + topIndex + ")");
22 var pos = img.offset();
23 if (direction == "right"){ pos.left += 10;}
24 else {pos.left -= 10;}
25 img.offset(pos);
26 startX = pos.left;
27 startY = pos.top;
28 }
8. Add the following stack() function that iterates through all the .photo elements and stacks them by adjusting the top and left offset values each iteration:
29 function stack(){
30 var x = startX, y = startY;
31 $(".photo").each(function(indx){
32 $(this).offset({ top:y, left:x });
33 x += 20;
34 y += 20;
35 });
36 }
9. Add the following tile() function that also iterates through all the .photo elements and places them next to each other, rotating to the next line if the current set has surpassed 400 pixels. Notice that I use several variables through each iteration to keep track of the max height and current x and y coordinates.
37 function tile(){
38 var x = startX, y = currTop = startY;
39 var maxH = 0;
40 $(".photo").each(function(indx){
41 maxH = Math.max(maxH, $(this).outerHeight());
42 $(this).offset({ top:y, left:x });
43 x += $(this).outerWidth();
44 if (x > 400){
45 y = currTop + maxH;
46 x = startX;
47 maxH = 0;
48 }
49 });
50 }
10. Add the flip() function that will adjust the z-index so that when images overlap each other, you can change which is on top:
51 function flip(){
52 if (topIndex >= $(".photo").length-1){ topIndex=0; }
53 else { topIndex++; }
54 var lastObj = null;
55 $(".photo").each(function(indx){
56 if (indx>topIndex){ z = indx-topIndex; }
57 else { var z = indx + maxIndex - topIndex; }
58 $(this).css("z-index", z);
59 lastObj = $(this);
60 });
61 lastObj.css("z-Index", 0);
62 }
11. Save all three files and then open the HTML document in a web browser, as shown in Figure 10.3. Play around with the buttons and notice how the interactions of the images matches the rearrangements made by the click handler functions.
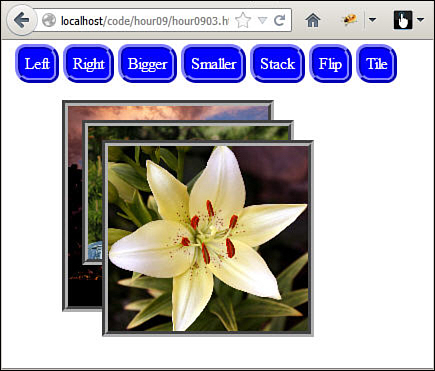
FIGURE 10.3 Using the width(), offset(), and css("z-index") methods on image objects, you can easily rearrange them on the web page.
LISTING 10.3-html HTML File Basic Web Page Used in the Example That Defines Several <span> Elements Used for Buttons and <img> Elements
01 <!DOCTYPE html>
02 <html>
03 <head>
04 <title>Hour 10-3</title>
05 <meta charset="utf-8" />
06 <script type="text/javascript" src="../js/jquery.min.js"></script>
07 <script type="text/javascript" src="js/hour1003.js"></script>
08 <link rel="stylesheet" type="text/css" href="css/hour1003.css">
09 </head>
10 <body>
11 <div id="container">
12 <span id="left">Left</span>
13 <span id="right">Right</span>
14 <span id="bigger">Bigger</span>
15 <span id="smaller">Smaller</span>
16 <span id="stack">Stack</span>
17 <span id="flip">Flip</span>
18 <span id="tile">Tile</span>
19 <div id="photos">
20 <img class="photo" src="images/sunset.jpg" />
21 <img class="photo" src="images/boy.jpg" />
22 <img class="photo" src="images/flower.jpg" />
23 </div>
24 </div>
25 </body>
26 </html>
LISTING 10.3-js jQuery and JavaScript Code That Dynamically Moves, Resizes, and Adjusts the z-index of Several <img> Elements
01 var startX = startY = 60;
02 var topIndex, maxIndex;
03 $(document).ready(function(){
04 topIndex = $(".photo").length-1;
05 maxIndex = topIndex;
06 $("#right").click(function(e){move(e, "right");});
07 $("#left").click(function(e){move(e, "left");});
08 $("#bigger").click(function(e){resize(e, "bigger");});
09 $("#smaller").click(function(e){resize(e, "smaller");});
10 $("#stack").click(stack);
11 $("#tile").click(tile);
12 $("#flip").click(flip);
13 stack();
14 });
15 function resize(e, direction){
16 var img = $("img:eq(" + topIndex + ")");
17 if (direction == "bigger"){ img.width(img.width()+20); }
18 else { img.width(img.width()-20); }
19 }
20 function move(e, direction){
21 var img = $("img:eq(" + topIndex + ")");
22 var pos = img.offset();
23 if (direction == "right"){ pos.left += 10;}
24 else {pos.left -= 10;}
25 img.offset(pos);
26 startX = pos.left;
27 startY = pos.top;
28 }
29 function stack(){
30 var x = startX, y = startY;
31 $(".photo").each(function(indx){
32 $(this).offset({ top:y, left:x });
33 x += 20;
34 y += 20;
35 });
36 }
37 function tile(){
38 var x = startX, y = currTop = startY;
39 var maxH = 0;
40 $(".photo").each(function(indx){
41 maxH = Math.max(maxH, $(this).outerHeight());
42 $(this).offset({ top:y, left:x });
43 x += $(this).outerWidth();
44 if (x > 400){
45 y = currTop + maxH;
46 x = startX;
47 maxH = 0;
48 }
49 });
50 }
51 function flip(){
52 if (topIndex >= $(".photo").length-1){ topIndex=0; }
53 else { topIndex++; }
54 var lastObj = null;
55 $(".photo").each(function(indx){
56 if (indx>topIndex){ z = indx-topIndex; }
57 else { var z = indx + maxIndex - topIndex; }
58 $(this).css("z-index", z);
59 lastObj = $(this);
60 });
61 lastObj.css("z-Index", 0);
62 }
LISTING 10.3-css CSS Code That Styles the Buttons and Images
01 .photo{
02 border:6px groove;
03 width:200px;
04 position:absolute; top:40px; left:20px;
05 }
06 span{
07 padding:5px;
08 background-color:blue; color:white;
09 border-radius:10px 15px; border:5px ridge blue;
10 cursor:pointer;
11 }
12 #container{ padding:5px; }
Summary
This hour has covered a lot of ground. You already had the tools to understand the JavaScript code, CSS styling, and the various objects involved in jQuery and JavaScript. In this hour, you learned how to access the attributes, properties, methods, and other parts of those objects and them modify them to apply interactivity and dynamics to web pages.
You also learned how to create HTML objects dynamically and add them to web pages, and how to remove and modify existing elements based on user interaction.
Q&A
Q. You showed how to add and remove classes in jQuery; is there a way to do the same in JavaScript?
A. Yes, but you probably shouldn’t use it. The className attribute of the DOM object contains a space-separated list of classes. You can add a class by appending the new class name to that attribute—for example obj.className += " " + newClass;. Removing the className is more difficult. You need to either use a regex statement or split the string, remove the class, and then rebuild it. These methods are a lot more risky than jQuery because you can end up mangling the string and then none of the classes will work.
Q. Is there a way to rotate an image element?
A. Yes, in some browsers. You can use the transform CSS property for Firefox and Chrome and the filter property for Internet Explorer. The following code illustrates rotating an image 90 degrees using jQuery in Firefox, IE, and Chrome:
$("img").css({
"-webkit-transform": "rotate(90deg)",
"-moz-transform": "rotate(90deg)",
"filter": "progid:DXImageTransform.Microsoft.BasicImage(rotation=1)"
});
Workshop
The workshop consists of a set of questions and answers designed to solidify your understanding of the material covered in this hour. Try to answer the questions before looking at the answers.
Quiz
1. How do you make an element disappear and yet keep taking up space in the web browser?
2. What CSS property allows you to specify which HTML element is displayed on top when two elements overlap?
3. What is the difference between screenX, pageX, and clientX properties of a mouse event?
4. What jQuery would you use to remove all <p> elements from an element with id="container"?
5. True or False: An HTML element can have only one class assigned to it at a time.
Quiz Answers
1. By setting the opacity CSS property to 0.
2. z-index
3. screenX is relative to the left edge of the screen, pageX is relative to the left edge of the document, and clientX is relative to the left edge of the browser window.
4. $("#container p").remove();
5. False. Elements can have many classes assigned to them.
Exercises
1. Open the code in Listing 10.1 and add a link with a target and href value. Then modify the JavaScript to also display those values in the info portion of the web page so that you can hover over the link and see them.
2. Open the code in Listing 10.3 and add four new buttons. Add two buttons to move the image up and down. Then add two buttons that change the opacity of the image up .1 or down .1. You will need to make certain that the opacity stops at 0 and 1.