
Hour 9. Applying Events for Richly Interactive Web Pages
What You’ll Learn in This Hour:
![]() Ways that events can be triggered by the user and browser
Ways that events can be triggered by the user and browser
![]() What properties are accessible on event objects
What properties are accessible on event objects
![]() How to add handlers that are able to dynamically respond to events
How to add handlers that are able to dynamically respond to events
![]() Ways to pass extra data to event handlers
Ways to pass extra data to event handlers
![]() Methods to manually trigger events
Methods to manually trigger events
![]() Ways to create your own custom events
Ways to create your own custom events
![]() How to implement and fire off callback functions in your code
How to implement and fire off callback functions in your code
One of the major goals of jQuery and JavaScript is to provide developers with the capability to create incredibly sophisticated and richly active web pages. At the heart of interactive web pages are events. An event is basically any time anything happens in the browser environment, from a page loading, to a mouse movement or click, to keyboard input, to resizing the window.
Understanding events, the objects that represent them, and how to apply them in your web pages will enable to you to create some spectacular user interaction. In this hour, you learn the concepts required to understand events and how to utilize them in building rich, interactive web pages. You will be using the concepts in this hour throughout the rest of the book.
Understanding Events
You have already been using events in several of the examples used so far in this book. However, to get the most out of them, you need to understand what is happening in the entire process from the physical interaction to the jQuery and JavaScript interactions that will modify screen elements and data. The following sections describe the event process, as well the components involved, and how to implement events in web pages.
Understanding the Event Process
The event-handling concept is pretty easy to catch at a high level; you click a button on the web page and things happen. This section delves a little bit deeper so you can understand what is going on. The following list describes the important things that happen when a user interacts with the web page or browser window.
1. A physical event happens—A physical event occurs; for example, a user clicks or moves the mouse or presses a key.
2. Events are triggered in the browser—The user interaction results in events being triggered by the web browser—often, multiple events at the same time. For example, when a user types a key on the keyboard, three events are triggered: the keypressed, keydown, and keyup events.
3. The browser creates an object for the event—The web browser creates a separate object for each event that is triggered. The objects contain information about the event that can be used by handlers.
4. User event handlers are called—User-defined event handlers are called. You have the capability to create handlers in JavaScript that will interact with the event objects and/or page elements to provide interactivity with HTML elements. There are three phases that the event handlers can be acting in. The following describes the three phases shown in Figure 9.1:
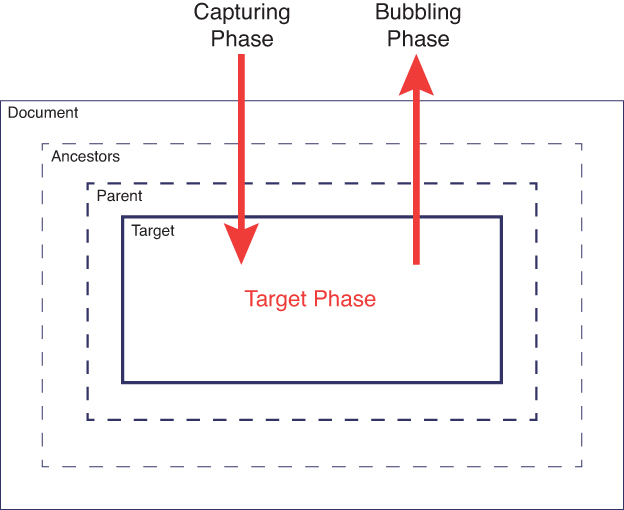
FIGURE 9.1 Events are handled first in the capturing phase from the document down to the target, then in the target phase, and finally, the bubbling phase from the target up through the document.
![]() Capturing—The capturing phase is on the way down to the target HTML element from the document directly through each of the parent elements. By default, behavior for event handlers for the capturing phase is disabled.
Capturing—The capturing phase is on the way down to the target HTML element from the document directly through each of the parent elements. By default, behavior for event handlers for the capturing phase is disabled.
![]() Targeting—The target phase occurs when the event is in the HTML element where it was initially triggered.
Targeting—The target phase occurs when the event is in the HTML element where it was initially triggered.
![]() Bubbling—The bubbling phase is on the way up through each of the parents of the target HTML element all the way back to the document. By default, the bubbling phase is enabled for events.
Bubbling—The bubbling phase is on the way up through each of the parents of the target HTML element all the way back to the document. By default, the bubbling phase is enabled for events.
5. Browser handlers are called—In addition to user event handlers, the browser has default handlers that do different things based on the event that was triggered. For example, when the user clicks a link, the browser has an event handler that gets called and navigates to the href location specified in the link.
Looking at Event Objects
Event objects get created by the browser when it detects that an event has occurred. If the event handler was defined by jQuery, the event object is converted to a jQuery event object that has a few more attributes and methods. Therefore, you need to be aware of which event object type you are working with.
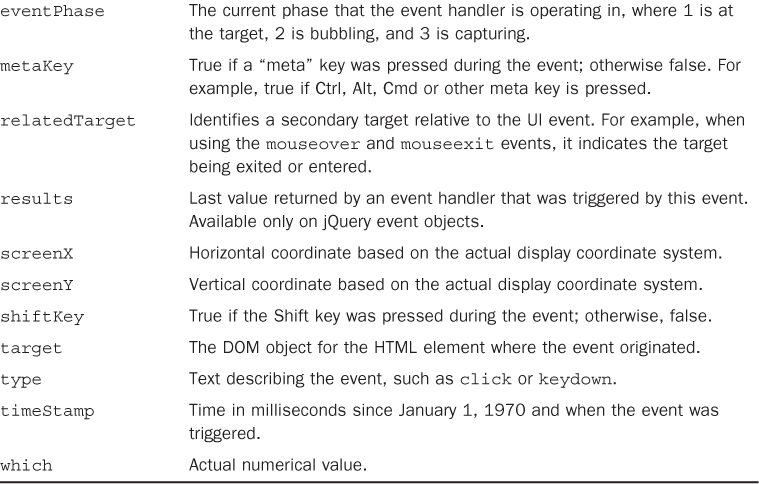
The event object provides you with additional information about the event, such as what type the event was—for instance, a click or keypress—which key(s) were pressed, the position of the mouse, what HTML element the event occurred on, and so on. Table 9.1 describes the most commonly used event attributes that you will be working with.

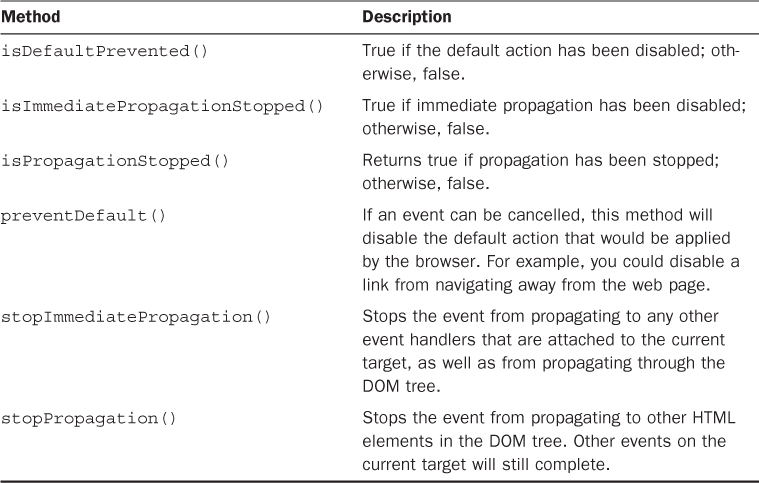
Events also provide a few methods that allow you some control into the behavior of the event—for example, stopping propagation and default web behavior. Table 9.2 describes the important methods on event methods.
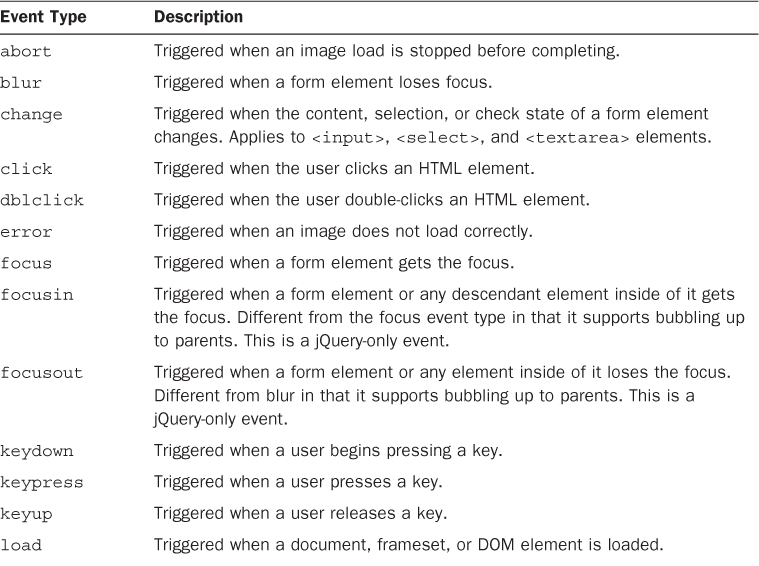
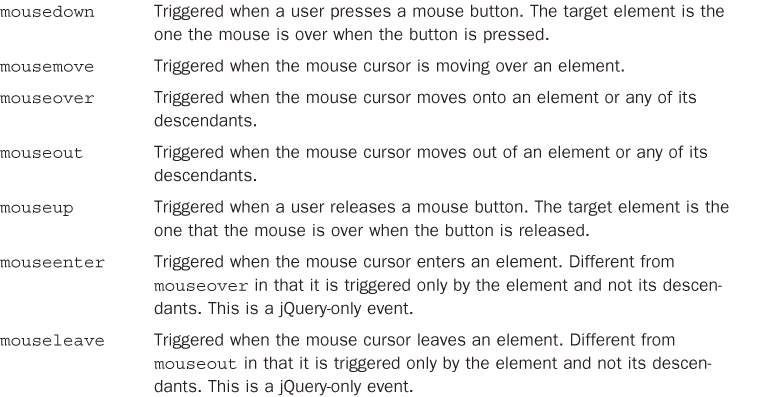
Reviewing Event Types
An event type is a keyword that is used by JavaScript and jQuery to identify the physical event that took place. These keywords are used to attach handlers to specify types of events. Also, as you will see later, the keywords are used in the names of methods that can be used to attach event handlers or trigger events manually.
JavaScript provides several event types that correspond to the different events that occur during dynamic page interaction. jQuery event handling supports all the JavaScript and also adds a few of its own events. Table 9.3 lists the different event types supported by JavaScript and jQuery.

Using the Page Load Events for Initialization
When the HTML document loads, the JavaScript code specified in the <script> tags will be loaded and executed. Typically, the JavaScript and jQuery logic will be inside functions that will be executed later. However, there will be some code that does initialization work, such as attaching event handlers to page elements or even adding additional elements to existing ones.
The problem is that the HTML element objects may not have been built by the browser at the point when the JavaScript code is loaded. An exception will be thrown if you try to reference the HTML object before it is created, so you need to wait until the page has fully loaded.
That is where the load event comes in extremely handy. Placing your initialization code inside an event handler that gets triggered when the page is loaded allows you to be sure all HTML objects have been created and the DOM is fully ready.
Using the JavaScript onload Event
To add initialization code that runs when pages are loaded in JavaScript, create a function in JavaScript that performs the initialization. For example, consider the following JavaScript code that shows a simple skeleton initialization function:
function onloadHandler(){
(initialization code here...)
}
Now you have two options to cause the onloadHandler() to trigger when the page is fully loaded. The first is to attach your initialization code to the onload attribute of the <body> element in the HTML. For example:
<body onload="onloadHandler()>
The second method is to assign it directly to the window object in your JavaScript code. For example:
window.onload = onloadHandler;
Adding Initialization Code in jQuery
In jQuery, initialization code can be triggered and executed at two different times: when the DOM is ready and when the document and its resources have fully loaded. Which of these options you use will depend on what needs to happen in your initialization code.
Using the .ready() jQuery method will trigger the initialization code to run when the DOM is fully ready. All of the DOM objects will have been created and the page will be displayed to users. All page resources, such as images, may not have fully downloaded at this point, however. This is the option that enables you to add interactions and functionality as soon as possible. The following shows an example of using .ready() to attach a simple initialization function:
$(document).ready(function(){
(initialization code here...)
}
Using the .load() jQuery method will trigger the initialization code to run after all page resources have loaded and are rendered to the user. On occasion you might use this option if you need resource information, such as image dimensions, when you are applying the initialization code. The following shows an example of using load() to attach a simple initialization function:
$(document).load(function(){
(initialization code here...)
}
Caution
The .ready() and .load() methods are not compatible with using the onload="..." attribute in the <body> tag. If you are using jQuery, use .ready() or .load(); if not, use the onload attribute.
Adding and Removing Event Handlers to DOM Elements
To provide interaction to events that occur in a web page, an event handler must be added for each specific event type you want to interact with. An event handler is just a JavaScript function that adds, removes, or alters DOM elements, or whatever else is necessary to complete the interaction. For example, the following code is an example of an event handler that changes the text displayed in the <p> elements to "clicked":
function clickHandler(){
$("p").html("clicked");
}
Several methods enable you to add event handlers to DOM elements. The following section describes each of these methods along with their advantages and disadvantages.
Assigning Event Handlers in HTML
The most basic methods of adding an event handler to a DOM element is directly in the HTML code. The advantage of this method is that it is simple and easy to see what event handler gets assigned to a particular DOM object.
Event handlers are added to DOM objects in HTML by setting the value of the handler attribute in the tag statement. For each event that the element supports, there is an attribute that starts with “on” followed by the name of the event. For example, the click event attribute is onclick and the load event attribute is onload. To see a list of the events, see Table 9.1.
The following example shows just how easy it is to add a click event handler to DOM element in the HTML code:
<div onclick="clickHandler()">Click Here</div>
This would call the following function when the <div> element is clicked:
function clickHandler(){
$("div").html("clicked");
}
You can also include the DOM event object as a parameter to the event handler using the event keyword. This allows you to access the event information in event handler; for example:
<div onclick="clickHandler(event)">Click Here</div>
This would call the following function when the <div> element is clicked and change the text to display the x coordinate of the mouse cursor by reading e.screenX:
function clickHandler(e){
$("div").html("clicked at X postion: " + e.screenX);
}
You can also define that specific arguments are passed to an event, allowing you to distinguish specific functionality. The parameters can be numbers or strings surrounded by single quotes or even the id value of DOM objects, in which case the DOM element will be passed. For example, the following code adds event handlers that pass the event object, as well as the DOM object for the <h1> element with id="heading" along with a number and string:
<h1 id="heading"></h1>
<div onclick="clickHandler(event,heading,1,"Yes")">Click Here</div>
<div onclick="clickHandler(event,heading,2,"No")">Or Here</div>
When clicked, the elements would call the following function and use the DOM objects’ innerHTML property to change the text to display the number, message, and x coordinate of the mouse cursor:
function clickHandler(e,obj,num,msg){
obj.innerHTML = "DIV " + num + " says " + msg +" at X postion: " + e.screenX;
}
There are a couple of major disadvantages to this method, though. The first is that the DOM element has to be defined in the HTML and never removed and read dynamically. The second is that if you want the same event handler assigned to several DOM elements, you have to add code to the tag to every one of them in the HTML.
Typically, you use the HTML method of assigning event handlers only for basic examples with very little JavaScript.
Adding Event Handlers in JavaScript
You can also add and remove event handlers dynamically to DOM objects inside of JavaScript code. This method provides the advantage that you can dynamically add event handlers at any point in time, not just when the page is loaded. Thus, it enables you to add event listeners to elements created after the page load.
To add an event handler in JavaScript, simply call addEventListener() on the DOM object. The addEventListener() function takes three parameters: the first is the event type (event types are defined in Table 9.1), the second is the function to call, and the third is a Boolean that specifies true if the handler should be called during the capturing phase and the bubbling phase, or false if the handler should be called only during the bubbling phase.
The trick with using addEventListener() is how to pass custom data into the handler call. One method is to wrap the actual function handler inside of a simple wrapper function that passes the arguments to the event handler. The following code illustrates this:
function clickHandler(e,objId,num,msg){
var obj = document.getElementById(objId);
obj.innerHTML = "DIV " + num + " says " + msg +" at X postion: " + e.screenX;
}
...
document.getElementById("div1").addEventListener('click',
function(e){
clickHandler (e, "heading", 1, "yes");
},false);
So here is what is going on in the addEventListener() calls in the preceding code. The event type 'click' is specified, and then a new anonymous function with no name is defined that accepts the event object as the only parameter represented by e. Inside the wrapper function, the actual event handler is called with the custom parameters, including the e variable to pass the event object along. In the example, false is used to indicate that the handler should be called only during the bubbling phase.
You can also remove event handlers from the event using the removeEventListener() function on the DOM object. You will need to specify the event type and the name of the event handler to remove. For example, the following code adds an event handler and then removes it:
var obj = document.getElementById("div1");
obj.addEventListener('click', clickHandler);
obj.removeEventListener('click', clickHandler);
Tip
You can also set the access event handler on the DOM object itself using the handler attribute. The handler attribute will be “on” plus the event type. For example, for the click event, the attribute is obj.onclick. You can call the event handler using obj.onclick() or assign it directly using obj.onclick= function handler(){ ...};
Try it Yourself: Adding Event Handlers to DOM Objects via JavaScript
1. In Aptana, create the hour09, hour09/js, and hour09/css folders.
2. Create the hour09/hour0901.html, hour09/js/hou0901.js, and hou09/cs/hour0901.css files.
3. Add the code shown in Listing 9.1-html to the HTML file. You should recognize almost everything in this file. Notice the onload event handler for the <body> tag is set to onloadHandler().
4. Add the CSS from Listing 9.1-css to the CSS file. You should also recognize the CSS statements by now.
5. Open the hour0901.js file and the following function that will be used to handle click events. Notice that it takes several arguments. The first argument is the DOM event object, which is used to get the x position via e.screenX. It also accepts an object ID that is used to get the object that should be written to. The rest of the arguments are used to write out the message the innerHTML of the object specified by objId.
01 function clickHandler(e,objId,num,msg){
02 var obj = document.getElementById(objId);
03 obj.innerHTML = "DIV " + num + " says " + msg +" at X postion: " + e.screenX;
04 }
6. Create the following wrapper functions that will be used to pass arguments to the actual event handler. The wrapper functions only accept the event object as argument e. Then they call the clickHandler() function with the appropriate values. In this example, the event handler is then removed from the target object by calling removeEventListener(). It is not typical to remove event handlers; this is just to provide an example.
05 function yesWrapper(e){
06 clickHandler(e, "heading", 1, "yes");
07 e.target.removeEventListener('click', yesWrapper);
08 }
09 function noWrapper(e){
10 clickHandler(e, "heading", 1, "no");
11 e.target.removeEventListener('click', noWrapper);
12 }
7. Add the following onloadHandler() function that calls addEventListener() to add a click event handler to each of the <div> elements:
13 function onloadHandler(){
14 document.getElementById("div1").addEventListener('click', yesWrapper, false);
15 document.getElementById("div2").addEventListener('click', noWrapper, false);
16 }
8. Save all three files and then open the HTML document in a web browser and play around with the Say Yes and Say No buttons shown in Figure 9.2. Notice that the buttons work only once because the event handler was removed. If we had not removed the event handler, the buttons would continue to handle the event and change the <h1> element text.

FIGURE 9.2 A simple JavaScript web page that dynamically adds event handlers to <div> elements and responds to mouse clicks.
LISTING 9.1-html HTML File That Loads jQuery and JavaScript, Attaches Event Handler Elements to Provide User Interaction, and Then Defines the <div> and <h1> Elements Used in the Example
01 <!DOCTYPE html>
02 <html>
03 <head>
04 <title>Hour 9-1</title>
05 <meta charset="utf-8" />
06 <script type="text/javascript" src="../js/jquery.min.js"></script>
07 <script type="text/javascript" src="js/hour0901.js"></script>
08 <link rel="stylesheet" type="text/css" href="css/hour0901.css">
09 </head>
10 <body onload="onloadHandler()">
11 <div id="div1")">Say Yes</div>
12 <div id="div2")">Say No</div>
13 <h1 id="heading"></h1>
14 </body>
15 </html>
LISTING 9.1-js JavaScript Code That Defines an Event Handler and Dynamically Attaches It to the <div> Elements
01 function clickHandler(e,objId,num,msg){
02 var obj = document.getElementById(objId);
03 obj.innerHTML = "DIV " + num + " says " + msg +" at X postion: " + e.screenX;
04 }
05 function yesWrapper(e){
06 clickHandler(e, "heading", 1, "yes");
07 e.target.removeEventListener('click', yesWrapper);
08 }
09 function noWrapper(e){
10 clickHandler(e, "heading", 2, "no");
11 e.target.removeEventListener('click', noWrapper);
12 }
13 function onloadHandler(){
14 document.getElementById("div1").addEventListener('click', yesWrapper, false);
15 document.getElementById("div2").addEventListener('click', noWrapper, false);
16 }
LISTING 9.1-css CSS Code That Styles the <div> Elements
1 div{
2 border-radius:5px;
3 margin:3px;
4 padding:5px;
5 background-color:lightgrey;
6 font-weight:bold;
7 display:inline-block;
8 cursor:pointer;
9 }
Applying Event Handlers in jQuery
The best method of attaching event handlers to DOM elements is using jQuery. Using jQuery objects makes it simple to select different sets of objects and apply the same event handler to all of them at the same time.
In the past, jQuery has had a couple of different ways to add and remove event handlers, including bind()/unbind() and delegate()/undelegate(). The bind() method mimicked the behavior of addEventListener(), and delegate() made it possible to add an event to a jQuery object and then, as additional child elements were added to the event handler, would automatically be delegated to those as well.
As of jQuery 1.7, these methods have all been replaced by a simple pair, on() and off(). Event handlers are attached to jQuery objects using the on() method. The on() method can be called in one of the two following formats:
on(events [, selector] [, data], handler(eventObject))
on(events-map [, selector][, data])
The following list describes the purpose of each of the arguments that can be added to the on() method when adding event handlers to jQuery objects:
![]()
events—One or more space-separated event types and optional namespaces denoted by dot syntax; for example, "click", "mouseenter mouseleave", or "keydown.myPlugin". The list of event types can be found in Table 9.1.
![]()
events-map—A mapping object in which the string keys specify one or more space-separated event types, and then the values specify handler functions that will be called when the event is triggered; for example, {'click':myhandler} or {'click':function myHandler(e){return true;}}.
![]()
selector—Optional. Selector string that specifies which descendants should also call the event handler when the event is triggered. This replaces the functionality of the delegate() method. If you add the event handler to a set of parent objects that will always exist in the page, any of their descendants that match the selector will also call the handler when the event is triggered, even if they get added after the event is attached.
![]()
data—Optional. This can be a number, a string, or an object that will get passed to the handler as the data part of the event as event.data when an event is triggered.
![]()
handler(eventObject)—If you are not using an events-map, you will need to specify the handler function that will be executed when the event is triggered.
To remove an event handler from elements using jQuery, call the off() method on the jQuery object. The syntax for the off method is one of the following:
off(events [, selector] [, handler(eventObject]))
off(events-map [, selector])
If no handler is specified, the off() function removes all event handlers for the events specified. The following example shows a basic example of adding an event handler to all <div> elements using on() and then removing it using off():
$("div").on("click",clickHandler);
$("div").off("click",clickHandler);
Note
The on() and off() methods work for all jQuery event types, including your own custom events. jQuery also provides some simple helper functions that are discussed later in the hour to make it easier to attach handlers for certain events.
Tip
Often you will want an event handler to run only once, the first time the event occurs. jQuery provides the very helpful one() method that will add an event, then automatically remove it after it triggers for the first time. The one() method uses the same syntax as the on() method.
Try it Yourself: Adding Event Handlers Using jQuery
1. In Aptana, create the hour09/hour0902.html, hour09/js/hou0902.js, and hou09/cs/hour0902.css files.
2. Add the code shown in Listing 9.2-html to the HTML file. You should recognize almost everything in this file.
3. Add the CSS from Listing 9.2-css to the CSS file.
4. Open the hour0902.js file and the following function that will be used to handle click events. The event takes only the event object as argument e. It relies on the data portion of the event object to provide the objId of the element that text should be added to. It also uses the e.target.id, e.screenX, and e.data.answer values as part of the message written to the <h1> element.
01 function clickHandler(e){
02 $("#"+e.data.objId).html(e.target.id + " says " + e.data.answer +
03 " at X postion: " + e.screenX);
04 }
5. Create the following ready() function that will automatically be called when the document has been loaded and is ready:
05 $(document).ready(function(){
...
12 });
6. Add the following jQuery code that finds the #div1 element and then uses on() to add an event handler. In this example, an events-map object is passed specifying clickHandler() for the click event type. In addition, an object is passed in that will add the heading and answer attributes to the event object data. This is where the values came from that we used in step 4.
06 $("#div1").on({"click":clickHandler},
07 {"objId":"heading", "answer":"yes"});
7. Add the following jQuery code that gets the document object and then adds the event handler to the #div2 element. The difference between this method and the one in step 6 is that we use a selector. By using a selector, you can delete and re-add the #div2 element, and it will still call the event handler. Also notice that, rather than an event-map, you use the events method and add the handler as the final argument.
08 $(document).on("click",
09 "#div2",
10 {"objId":"heading", "answer":"no"},
11 clickHandler);
8. Save all three files and then open the HTML document in a web browser and play around with the Say Yes and Say No buttons shown in Figure 9.3.
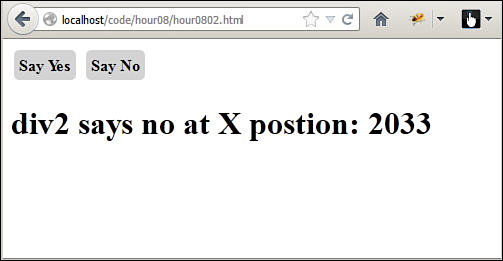
FIGURE 9.3 A simple JavaScript web page that uses jQuery to dynamically add event handlers to <div> elements and responds to mouse clicks.
LISTING 9.2-html HTML File That Loads jQuery and JavaScript, Attaches Event Handler Elements to Provide User Interaction, and Then Defines the <div> and <h1> Elements Used in the Example
01 <!DOCTYPE html>
02 <html>
03 <head>
04 <title>Hour 9-2</title>
05 <meta charset="utf-8" />
06 <script type="text/javascript" src="../js/jquery.min.js"></script>
07 <script type="text/javascript" src="js/hour0902.js"></script>
08 <link rel="stylesheet" type="text/css" href="css/hour0902.css">
09 </head>
10 <body>
11 <div id="div1">Say Yes</div>
12 <div id="div2">Say No</div>
13 <h1 id="heading"></h1>
14 </body>
15 </html>
LISTING 9.2-js jQuery and JavaScript Code That Defines an Event Handler and Dynamically Attaches It to the <div> Elements
01 function clickHandler(e){
02 $("#"+e.data.objId).html(e.target.id + " says " + e.data.answer +
03 " at X postion: " + e.screenX);
04 }
05 $(document).ready(function(){
06 $("#div1").on({"click":clickHandler},
07 {"objId":"heading", "answer":"yes"});
08 $(document).on("click",
09 "#div2",
10 {"objId":"heading", "answer":"no"},
11 clickHandler);
12 });
LISTING 9.2-css CSS Code That Styles the <div> Elements
1 div{
2 border-radius:5px;
3 margin:3px;
4 padding:5px;
5 background-color:lightgrey;
6 font-weight:bold;
7 display:inline-block;
8 cursor:pointer;
9 }
Using jQuery Event Helper Function to Assign Event Handlers
In addition to using the addEventListener() method to add event handlers, jQuery also provides helper functions that enable you to set the event handler. These helper functions are named after the event, so it helps your code look a bit cleaner.
The helper functions use the following syntax similar to addEventListener() but without the need to specify the event type:
.<event type>( [eventData], handler(eventObject))
The eventData argument is optional and, as with addEventListener(), will set the data value for the event object. The handler argument is required and specifies the function to call. Replace <event type> with the event name listed in Table 9.3. For example, the following two jQuery statements are equivalent ways to assign a handler to the click event:
obj.click( dataObj, function myHandler(e){...});
obj.addEventListener("click", dataObj, function myHandler(e){...});
In addition to the helper functions based on the event type name, jQuery also provides one additional helper function that is useful for mouse hovering events. The hover() helper function allows you to set the handlers for the mouseenter and mouseleave events at the same time. For example:
obj.hover(function enterHandler(e){...}, function leaveHandler(e){...});
obj.addEventListener("mouseenter", function enterHandler(e){...});
obj.addEventListener("mouseenter", function leaveHandler(e){...});
You can also set the same handler for both the mouseenter and mouseleave by specifying only one handler. For example:
obj.hover(function hoverHandler(e){...});
Triggering Events Manually
JavaScript and jQuery allow you to trigger events manually. This provides advantages such as simulating user interactions, tying page element interactions together, or interactions with your own custom events.
The following sections describe how to trigger events in both JavaScript and jQuery.
Triggering Events in JavaScript
The simplest way to trigger an event in JavaScript is to use the event method attached to the DOM object if there is one. Simple events such as click, select, blur, and focus have corresponding methods attached to DOM objects that support them. For example, you can trigger the click event on most DOM objects using the following syntax:
obj.click();
The more advanced method of triggering events in JavaScript is to create an event object and then use the document.dispatchEvent() call to trigger the event mechanism. This method provides much more control over event information and is the only way to trigger many of the events. The dispatchEvent() method involves a three-step process.
The first step is to create an event object using the document.createEvent() method. The createEvent() method requires that you specify the event type for the object that is being created. Table 9.4 lists some of the common event types accepted by createEvent(). For example, to create a mouse click event object, you would use the following statement:
var clickEvent = document.createEvent("MouseEvents");
The next step is to initialize the event object with values by calling the events’ initialization function. Table 9.4 lists the corresponding initialization function for the event types along with the parameters supported.
For example, to initialize the click event object, you would use the following statement. The type is specified as "click" and bubbling and cancelable attributes are both true. Here, window is used as the view element. The coordinates don’t really matter, so they remain at 0, and the additional keyboard keys don’t matter, so those are set to false. The button argument is set to 0 for the left-click, and no related target is specified:
clickEvent.initMouseEvent("click", true, true, window, 0, 0, 0, 0, 0, 0,
false, false, false, false, 0, null);
For the most part, the parameters to the initialization functions should be self-explanatory. However, you will likely need to check on some of the specific arguments. You can find the definitions for the event objects and methods at
www.w3.org/TR/DOM-Level-2-Events/events.html
The final step is to call dispatchEvent() on the HTML object that you want to trigger the event for. For example, the following code looks up an object and then triggers the click event:
var obj = document.getElementById("someId");
obj.dispatchEvent(clickEvent);
Prior to IE9, IE used a different set of methods to create and trigger an event. Instead of createEvent(), you need to use createEventObject() and instead of dispatchEvent(), you would need to use fireEvent(). If you need to trigger events and support earlier IE browsers, then you should review the documentation at MSDN on using fireEvent().
Try it Yourself: Triggering Events Manually in JavaScript
1. In Aptana, create the hour09/hour0903.html, hour09/js/hou0803.js, and hour09/cs/hour0903.css files.
2. Add the code shown in Listing 9.3-html to the HTML file. This is just a basic HTML file that loads additional JavaScript and CSS files. There are two check boxes and two <span> elements added to the web page.
3. Add the CSS from Listing 9.3-css to the CSS file. This code stylizes the <span> element to look like a button.
4. Open the hour0903.js file and the following onloadHandler() initialization function that attaches an event listener to both of the <span> elements:
01 function onloadHandler(){
02 var employee = document.getElementById("Employee");
03 employee.addEventListener('click', simpleClick, false);
04 var registered = document.getElementById("Registered");
05 registered.addEventListener('click', eventClick, false);
06 }
5. Create the simpleClick() handler function added to the first button. The code uses the target.id from the event to find the corresponding check box element. Then the click() function is called on the check box object, which triggers the click event just as if the mouse had clicked it.
07 function simpleClick(e){
08 var cb = document.getElementById("check"+e.target.id);
09 cb.click();
10 }
6. Add the following eventClick() handler function to the second button. This code first creates a "MouseEvents" object and then initializes it to a "click" type with the appropriate parameters. This code also uses the target.id from the event to find the corresponding check box element, then calls dispatchEvent() on the check box element’s object, triggering a mouse click event.
11 function eventClick(e){
12 var event = document.createEvent("MouseEvents");
13 event.initMouseEvent("click", true, true, window,
14 0, 0, 0, 0, 0, false, false,
15 false, false, 0, null);
16 var cb = document.getElementById("check"+e.target.id);
17 cb.dispatchEvent(event);
18 }
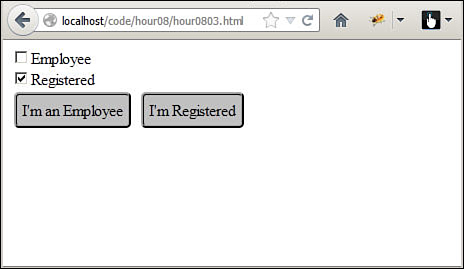
7. Save all three files and then open the HTML document in a web browser, as shown in Figure 9.4. Play around with the check boxes and buttons. Notice that the buttons provide the same interaction with the check box as directly clicking the check box.
LISTING 9.3-html HTML File That Loads CSS and JavaScript and Defines the Check Boxes and <span> Elements
01 <!DOCTYPE html>
02 <html>
03 <head>
04 <title>Hour 9-3</title>
05 <meta charset="utf-8" />
06 <script type="text/javascript" src="js/hour0903.js"></script>
07 <link rel="stylesheet" type="text/css" href="css/hour0903.css">
08 </head>
09 <body onload="onloadHandler()">
10 <input id="checkEmployee" type="checkbox" /><label>Employee</label><br>
11 <input id="checkRegistered" type="checkbox" /><label>Registered</label><br>
12 <span id="Employee">I'm an Employee</span>
13 <span id="Registered">I'm Registered</span>
14 </body>
15 </html>
LISTING 9.3-js JavaScript Code Manually Triggers the Click Event for the Check Box Elements from the <span> Elements
01 function onloadHandler(){
02 var employee = document.getElementById("Employee");
03 employee.addEventListener('click', simpleClick, false);
04 var registered = document.getElementById("Registered");
05 registered.addEventListener('click', eventClick, false);
06 }
07 function simpleClick(e){
08 var cb = document.getElementById("check"+e.target.id);
09 cb.click();
10 }
11 function eventClick(e){
12 var event = document.createEvent("MouseEvents");
13 event.initMouseEvent("click", true, true, window,
14 0, 0, 0, 0, 0, false, false,
15 false, false, 0, null);
16 var cb = document.getElementById("check"+e.target.id);
17 cb.dispatchEvent(event);
18 }
LISTING 9.3-css CSS Code That Styles the <span> Elements
1 span{
2 border-radius:5px;
3 margin:3px;
4 padding:5px;
5 background-color:#C0C0C0;
6 border:3px ridge;
7 display:inline-block;
8 cursor:pointer;
9 }
Using jQuery to Trigger Events Manually
Now that you’ve had a chance to trigger events from JavaScript, you are ready to find out just how much easier jQuery will make your life if you are able to use it. jQuery also supports two methods to trigger events manually.
As with JavaScript, jQuery objects also have methods that correspond to many of the event types that you can call directly. For example, most elements have click() and dblclick() methods. Form elements add additional methods such as blur(), focus(), keypress(), keydown(), and keyup() that can be called to trigger specific events. For example, the following statement will trigger the click event for all <span> elements:
$("span").click();
jQuery also provides a way to trigger events while specifying the values of the event object using the trigger() method. There are two different syntaxes for the trigger() method, as listed next:
trigger(eventType [, extraParameters])
trigger( eventObject)
Following is an example of using the first method to trigger the click event for all elements with class="checkbox":
$(".checkbox").trigger("click");
The following is an example of using the second method on all input items with class="bigText". This method actually passes in a simple event object for the keypress event, then sets the charCode attribute of the event object to 13 or the return key.
$("input.bigText").trigger({'type':'keypress', 'charCode':13});
Notice that this is much simpler than the JavaScript method because trigger() accepts a simple object with the appropriate attribute names to set whatever values in the event object you might want to pass in. Occasionally, you might end up having to use the JavaScript method, but you should use jQuery as often as possible.
Try it Yourself: Triggering Events Manually in jQuery
1. In Aptana, create the hour09/hour0904.html, hour09/js/hou0904.js, and hou09/cs/hour0904.css files.
2. Add the code shown in Listing 9.4-html to the HTML file. This is a basic HTML file that loads additional jQuery, JavaScript, and CSS files. There is a <p> element, an <input> element, and a series of <span> elements that will act as buttons.
3. Add the CSS from Listing 9.4-css to the CSS file. This code stylizes the <span> element to look like a button and the <p> element to provide nice formatting.
4. Open the hour0904.js file and add the following ready() initialization function that attaches a keypress event handler to the <input> element as well as a click handler to all the <span> elements:
09 $(document).ready(function(){
10 $("input").keypress(function (e){inputHandler(e)});
11 $("span").click(function (e){spanHandler(e)});
12 });
5. Create the inputHandler() handler function that gets the charCode from the event object and appends the string form to the <p> element. At this point as you type in the text <input>, it will be displayed in the <p> element as well.
01 function inputHandler(e){
02 var chr = String.fromCharCode(e.charCode);
03 $("p").append(chr);
04 }
6. Add the following spanHandler() handler function that gets the innerHTML of the <span> element and converts the first character to a code. Line 7 then triggers a keypress event on the <input> element passing in the character code for the button as the charCode value. This allows the user to click a button and apply the currency symbol using the event handler for the text <inputs>.
05 function spanHandler(e){
06 var chrCode = e.target.innerHTML.charCodeAt(0);
07 $("input").trigger({'type':'keypress', 'charCode':chrCode});
08 }
7. Save all three files and then open the HTML document in a web browser, as shown in Figure 9.5. Type some text into the input and also click the <span> elements and notice that the result is the same.

FIGURE 9.5 A simple web page that triggers the keypress event for the <input> element from the <span> elements’ event handler.
LISTING 9.4-html HTML File That Loads CSS and JavaScript and Defines the <p>, Text <input>, and <span> Elements
01 <!DOCTYPE html>
02 <html>
03 <head>
04 <title>Hour 9-4</title>
05 <meta charset="utf-8" />
06 <script type="text/javascript" src="../js/jquery.min.js"></script>
07 <script type="text/javascript" src="js/hour0904.js"></script>
08 <link rel="stylesheet" type="text/css" href="css/hour0904.css">
09 </head>
10 <body>
11 <p>Price: </p>
12 <input type="text" />
13 <span>$</span>
14 <span>£</span>
15 <span>¥</span>
16 <span>€</span>
17 </body>
18 </html>
LISTING 9.4-js JavaScript Code That Triggers the keypress Event for the <input> Element from the <span> Elements’ Event Handler
01 function inputHandler(e){
02 var chr = String.fromCharCode(e.charCode);
03 $("p").append(chr);
04 }
05 function spanHandler(e){
06 var chrCode = e.target.innerHTML.charCodeAt(0);
07 $("input").trigger({'type':'keypress', 'charCode':chrCode});
08 }
09 $(document).ready(function(){
10 $("input").keypress(function (e){inputHandler(e)});
11 $("span").click(function (e){spanHandler(e)});
12 });
LISTING 9.4-css CSS Code That Styles the <span> and <p> Elements
01 span{
02 border-radius:5px;
03 margin:3px;padding:5px;
04 background-color:#C0C0C0;
05 border:3px ridge;
06 display:inline-block;
07 cursor:pointer;
08 }
09 p{
10 border:4px outset blue;
11 padding:3px;
12 color:white;background-color:blue;
13 font-size:30px;font-weight:bold;
14 }
Creating Custom Events
An extremely powerful aspect of the JavaScript and jQuery event-handling mechanism is the capability to add custom events. This solves the problem that the built-in events are all tied to DOM elements and specific behaviors supported by the browser. What if you want an event for every time the number of items in an array is greater than 100?
Custom events enable you to extend the events that can be added to elements. Custom events do not directly correspond to the physical interaction with the user, but rather to events that happen in your code based on the interactions that the user is performing.
The advantage of creating custom events is that you can use the already in-place event-handling system that allows you to add/remove events, bubble them up, and trigger them.
The following sections describe the different methods you can use in JavaScript and jQuery to add your own custom events.
Adding Custom Events Using JavaScript
Adding a custom event in JavaScript is similar to triggering an event in that you create a custom event object and then initialize it. The following code shows an example of creating a basic custom event:
var myEvent = document.createEvent("CustomEvent");
myEvent .initCustomEvent(
"worldEnds",
true,
false,
{
'fire': false,
'ice': false,
'time': new Date()
}
);
The first parameter defines the type name, the second sets the bubbles property to true, the third sets cancelable to false, and the fourth defines the details of the event. The values of fire, ice, and time will be available via the details attribute of the event object.
After the event has been created, you can trigger the event by calling the dispatchEvent() method on a DOM object. For example:
var obj = document.getElementById("#notify");
obj.dispatchEvent(myEvent);
Event handlers for the event can be added to DOM elements in the normal way using the addEventListener() method. For example:
document.addEventListener("worldEnds ", endOfWorldHandler, false);
Adding Custom Events Using jQuery
Adding custom events in jQuery is a very simple process. It is a simple matter of calling $.event.trigger() and passing in the new event object. You must specify a type attribute for the event object, but after that, you can define whatever default values for the event object that you would like. For example, the following code will define a new event:
var custEvent = $.Event("worldEnds", {
fire: false,
ice: false,
time: new Date()
});
The next line of code will trigger the event in the event system:
$.event.trigger(custEvent);
After the event has been added to the system, you can attach event handlers for it. For example:
$(document).on("worldEnds", endOfWorldHandler);
Implementing Callbacks
Although they are not really events, callbacks have some similarities. A callback is a function that can be registered in jQuery and then fired off at specific times from your code. When a callback list is fired, each of the functions are executed in order.
An example where callbacks are useful is if you want users to have the option to specify that they want a notification when a background process, such as downloading data via AJAX, completes. If a user selects the option to enable the notification, a callback can be added. Then, anytime a download completes, the callback function will execute and display a notification to the user.
Understanding the Callback Mechanism
The callback mechanism is used by calling $.Callbacks(flags) to create a callbacks object. The purpose of the flags attribute is to provide the capability to specify the behavior that should occur when different callback functions are executed. The possible values for flags are as follows:
![]()
once—Functions added are fired only once.
![]()
memory—As new functions are added, they are fired right away with the same values as the last time callbacks were fired.
![]()
unique—Allows the callback functions to be added only once.
![]()
stopOnFalse—Stops firing other callback functions if one of the functions fired returns a false.
The callbacks object supports adding functions using the add(functionName) method and removing functions using the remove(functionName) method. To fire the callback list, call the fire() method. You can also disable the list using the disable() method.
The simplest way to understand implementing callbacks is to look at some examples. The following code defines a list of callbacks that must have unique function names and that also stop if one of the functions returns false:
function functionA(){return true;}
function functionB(){return true;}
function functionC(){return true;}
var callbacks = $Callbacks("unique stopOnFalse");
callbacks.add(functionA);
callbacks.add(functionB);
callbacks.fire()
callbacks.remove(functionB);
callbacks.add(functionC);
callbacks.fire();
callbacks.disable();
callbacks.fire();
The first time that callbacks is fired, functionA and functionB are executed. The second time, functionA and functionC are executed because functionB was removed. The third time, no functions are executed because the list has been disabled.
Using Deferred Objects
jQuery provides an intriguing option to implement callbacks in a different way, the deferred object. A deferred object is an object that contains a set of functions that can be run at a later time. The actual arguments passed to the function are not added until the deferred object is resolved and the functions are executed.
This allows you to apply a set of functions to a single object that can be applied at any time.
The following code illustrates creating a simple deferred object with multiple functions and then executing those functions:
var resultString = "";
function function1(n1, n2, p3) { resultString += "Problem: "; }
function function2(n1, n2) { resultString += n1 + " + "; }
function function3(n1, n2) { resultString += n2 + " = "; }
var deferredObj = $.Deferred();
deferredObj.done( [function1, function2], function3).done(function(n1, n2) {
resultString += n1 + n2;
$("div").append(resultString);
});
deferredObj.resolve(5,6);
So this is what is happening in the preceding code. The three defined functions all add to the resultString variable. A new deferred object named deferredObj is created. The .done(functions [, functions]) method is called to add the functions to the deferred object. All three ways were used to add functions. The first argument is a list of functions to execute, the second is a single function, and the third is an anonymous function.
The functions are not executed until .resolve(args) is called. Notice that the arguments of .resolve() match those required by the functions. Each function is executed in order. The result is that the following string is appended to the <div> element:
Problem: 5 + 6 = 11
Summary
This hour focused on the different ways to implement event handling in web pages. Event handling is at the heart of interactive web pages. JavaScript and jQuery differ in how you create and add events to DOM elements. You learned the methods used to add event handlers in both.
You also learned how to access the event object and pass your own custom objects into event handlers, and you learned how to create and trigger your own custom events.
Q&A
Q. When is it better to use JavaScript to create and trigger custom functions rather than jQuery?
A. Never. Okay, not necessarily. jQuery has a lot more cross-browser support right now for events. Also, it is much easier to create the objects necessary. For those reasons, you should almost always use jQuery. If jQuery isn’t an option for your environment because of backward compatibility or the like, then use JavaScript.
Q. Can’t you do everything with custom events that you can do with callbacks?
A. Not very easily. Remember that you can create as many callback lists as you want with different flags and only fire off the functions tied to a specific list. Trying to manage all of that in event handlers would get out of hand pretty quickly
Workshop
The workshop consists of a set of questions and answers designed to solidify your understanding of the material covered in this hour. Try to answer the questions before looking at the answers.
Quiz
1. What HTML attribute of the <body> tag can be used to call JavaScript code when the page has finished loading?
2. True or False: An event will trigger the handler function only for the target element in which it occurs.
3. When would you use the .ready() method rather than the .load() method?
4. True or False: Mouse events can be triggered only by mouse movement or mouse clicks.
Quiz Answers
1. onload.
2. False. Most events will bubble up through ancestor objects all the way through the document object.
3. .ready() is used when you need only the DOM to be loaded. .load() is used if you also require other resources, such as images, to be finished loading as well.
4. False. Mouse events can be manually triggered in both jQuery and JavaScript.
Exercises
1. Extend the example in Listing 9.4 to add additional buttons for other nonstandard characters. You will need to get the Unicode character codes from the web.
2. Extend the example in Listing 9.4 to include a third button that will trigger the events for both check boxes.