
Hour 12. Enhancing User Interaction Through Animation and Other Special Effects
What You’ll Learn in This Hour:
![]() Understanding animation fundamentals
Understanding animation fundamentals
![]() Creating sliding elements
Creating sliding elements
![]() Creating image galleries using simple resize and transparency animations
Creating image galleries using simple resize and transparency animations
![]() Implementing expandable and collapsible elements
Implementing expandable and collapsible elements
![]() How to delay animations for better effects
How to delay animations for better effects
![]() How to animate element movement for dynamic web apps
How to animate element movement for dynamic web apps
One of the most important features of jQuery is the capability to add animations to changes you are making to elements. This provides the user with the feel of a slick, well-developed application rather than a clunky, traditional web page.
This is especially true if you are moving, resizing, or dynamically adding elements to the web page. It is very frustrating as a user to all of a sudden have a bunch of new things appear or disappear. Using transitions, it gives users a chance to see where things are leaving or coming from and adjust their mindset to accept the changes.
This hour focuses on helping you understand the fundamentals of animation. Then you will get a chance to apply those new skills in a series of practical examples.
Understanding jQuery Animation
jQuery animation is the process of modifying a property of an HTML element from one value to another in an incremental fashion visible to the user. This section describes that process and how to implement animations on CSS attributes.
Animating CSS Settings
Most animation in jQuery is done via the .animate() method. The .animate() jQuery method allows you to implement animations on one or more CSS properties. Keep in mind that the .animate() method acts on all elements in the jQuery object set at the same time. Often you will want to act on only a single element so you will need to filter the set down to one.
The .animate() method accepts a CSS property object mapping as the first argument. You can specify more than one property in the object to animate multiple properties at the same time. For example, the following code animates the height and width properties for <img> elements:
$("img").animate({height:100, width:100});
Note
The .animate() method can animate only properties that have a numerical value. For example, you will not be able to animate border styles, but you can animate border size.
There are a couple of different ways to call the animate method. The following shows the syntax of both:
.animate(properties [, duration] [, easing] [, complete])
.animate(properties, options)
The first method allows you to specify the duration, easing, and complete functions as optional arguments. The second method allows you to specify the options as a single option map object. For example, the following calls .animate() with a duration and easing object map:
$("img").animate({height:100, width:100}, {duration:1000, easing:"linear"});
Tip
You cannot animate color changes using the color names; however, you can animate color changes using the hex values, such as #ff0000.
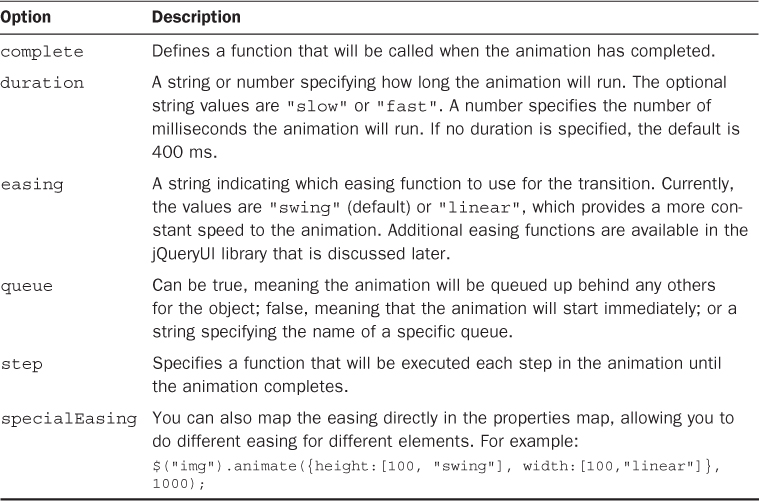
Table 12.1 describes the different options available for the .animate() method. These options are also available on some of the other animation methods that are discussed later in this hour.
Understanding Animation Queues
Animations happen asynchronously with code executing, meaning that the code continues to execute while the animation is happening. What happens if you specify another animation for an object before the first one completes? The answer is that jQuery queues the animations and then executes them in order, one after another, until all are competed. That is, unless you specify queue:false in the animation options.
You must understand the animation queue because if you allow user interactions to queue too many animations by moving the mouse or clicking, the animations will be sluggish and behind the users’ actions.
Caution
You must pay attention to where you trigger your animations from. Remember that events will bubble up. If you execute the same animation from all levels during the bubble up phase, you could have some seriously undesired results. To prevent this, you can use the stopPropagation() and stopImmediatePropagation() methods.
Stopping Animation
jQuery enables you to stop the current animations currently executing on elements contained in the jQuery object set. The .stop([clearQueue] [, jumpToEnd]) method allows you to stop animations in a few ways.
Calling .stop() with no parameters pauses the animations that are in the queue. The next animation that starts will begin executing, then animations in the queue again. For example, the following code pauses all animations:
$("*").stop();
Calling .stop(true), with the clearQueue option set to true, stops animations at the current point and removes all animations from the queue. For example, the following stops all animations on images and removes the animations from the queue:
$("img").stop(true);
Calling .stop(true, true), with the jumpToEnd option set to true, causes the currently executing animation to jump to the end value immediately, clear the queue, and then stop all animations. For example, the following stops all animations on images but finishes the adjustment made by the current animation and then removes the animations from the queue:
$("img").stop(true, true);
The .stop() method returns the jQuery object, so you can chain additional methods onto the end. For example, the following code stops all animations on images and then starts a new one to set the opacity to .5:
$("img").stop(true, true).animate({opacity:.5}, 1000);
Delaying Animation
A great option when implementing animations is adding a delay before the animation is added to the queue. This can be used to provide animations in a more advanced way because you delay the execution of the animation queue, allowing the user a better visual experience.
The .delay(duration, [, queueName]) method enables you to specify the delay duration in milliseconds, as well as an optional queueName that specifies what queue to apply the delay to. For example, the following code adds a size animation to images; then after the size is complete, there will be a delay of 2 seconds and the opacity will animate up to 1:
$("img").animate({width:500}, 1000).delay(2000).animate({opacity:1} 1000);
Note
The .delay() method is great for delaying between queued jQuery effects; however, it is not a replacement for the JavaScript setTimeout() function, which may be more appropriate for certain use cases—especially those cases that you require to have the capability to cancel the delay.
Applying .promise() to Animations
The .promise([type], [, target]) method allows you to apply functionality after all actions bound to the jQuery object’s set are completed. It does this by returning a new object that will observe the actions and not execute any attached methods until the actions have completed.
The .promise() returns an object similar to a deferred object. It has a .done() method that enables you to pass in a function that will be run after the .promise() functionality has been executed.
For example, the following code waits for animations to complete, then changes the text to "complete":
$("span").animate({opacity:0}, 30000).promise().done(function(){
$("p").html("complete");
});
The .promise() method accepts two optional arguments. The first is type, which specifies the type of action. The default type is fx, which applies to animations; so for animations, you do not need to specify the type. The second parameter is target, which specifies an optional target jQuery object to return rather than a newly created one.
Animating Show and Hide
You have already seen the .show() and .hide() methods in action in Hour 9, “Applying Events for Richly Interactive Web Pages.” It is common practice to animate this functionality, so jQuery has nicely provided animation options for these methods to make your life easier.
Animating hide()
The .hide( [duration] [, easing] [, callback]) method provides the optional duration, easing, and callback options allowing you to animate the hide effect, making less of a jump when the element disappears.
For example, the following code applies an animation of 1 second with linear easing and executes a simple callback function when hiding an element:
$("#box").hide(1000, "linear", function() { $("#label").html("Hidden!") });
Animating show()
The .show( [duration] [, easing] [, callback]) method provides the optional duration, easing, and callback options allowing you to animate the show effect, making a more easy transition as an element appears.
For example, the following code applies an animation of 1 second with linear easing and executes a simple callback function when showing an element:
$("#box").show(1000, "linear", function() { $("#label").html("Shown!") });
Animating toggle()
The .toggle( [duration] [, easing] [, callback]) method provides the optional duration, easing, and callback options allowing you to animate the toggle between the show or hide effect when toggling between them.
For example, the following code applies an animation of 1 second with linear easing and executes a simple callback function when toggling an element between hidden or shown:
$("#switch").toggle(1000, "linear", function() { $("#label").html("Switch Toggled!") });
Try it Yourself: Using Show and Hide Animations to Create an Expand/Collapse Element
1. In Aptana, create the hour12, hour12/js, hour12/css, and hour12/images folders, and then add the hour12/hour1201.html, hour12/js/hour1201.js, and hou12/css/hour1201.css files. You also need to copy the images from the website at code/hour12/images to the hour12/images folder in Aptana.
2. Add the code shown in Listing 12.1-html and Listing 12.1-css to the HTML and CSS files. It’s just basic stuff—a <div> with <span> used for a handle, an <img>, and a footer <div>.
3. Open the hour1201.js file and add the following ready() function that adds a click handler to the #handle element:
01 $(document).ready(function(){
02 $("#handle").click(toggleImage);
03 });
4. Add the following handler to toggle the visibility of the image. The if statement checks the text in #handle and then either calls show() to display the image or hide() to hide it. Notice that on show(), there is a complete function that displays the footer, letting the user know that the image is ready. On hide, the footer is hidden:
04 function toggleImage(){
05 if ($("#handle").html() == '+'){
06 $("#photo").show(1000, function(){$("#footer").show();});
07 $("#handle").html('-'),
08 } else {
09 $("#footer").hide();
10 $("#photo").hide(1000);
11 $("#handle").html('+'),
12 }
13 }
5. Save all three files and then open the HTML document in a web browser, as shown in Figure 12.1. You should be able to expand the image and collapse it and see the footer displayed at the appropriate time.

LISTING 12.1-html HTML File Basic Web Used to Display the Collapsible Image Element
01 <!DOCTYPE html>
02 <html>
03 <head>
04 <title>Hour 12-1</title>
05 <meta charset="utf-8" />
06 <script type="text/javascript" src="../js/jquery.min.js"></script>
07 <script type="text/javascript" src="js/hour1201.js"></script>
08 <link rel="stylesheet" type="text/css" href="css/hour1201.css">
09 </head>
10 <body>
11 <div>
12 <div id="title"><span id="handle">-</span>Image</div>
13 <img id="photo" src="images/img7.jpg" width="200px"/>
14 <div id="footer">Image Ready</div>
15 </div>
16 </body>
17 </html>
LISTING 12.1-js jQuery and JavaScript Code That Implements the Collapsible Image
01 $(document).ready(function(){
02 $("#handle").click(toggleImage);
03 });
04 function toggleImage(){
05 if ($("#handle").html() == '+'){
06 $("#photo").show(1000, function(){$("#footer").show();});
07 $("#handle").html('-'),
08 } else {
09 $("#footer").hide();
10 $("#photo").hide(1000);
11 $("#handle").html('+'),
12 }
13 }
LISTING 12.1-css CSS Code That Styles the Collapsible Image Element
01 div{ width:200px; text-align:center; }
02 #title, #handle, #footer{
03 background-color:blue; color:white;
04 font-weight:bold;
05 }
06 #handle{
07 display:inline-block; width:15px; float:left;
08 background-color:black; cursor:pointer;
09 }
10 #footer{
11 font-size:10px; background-color:black;
12 margin-top:-5px
13 }
Animating Visibility
jQuery also provides animation capability in fade methods attached to the jQuery objects. In the end, the fade methods are equivalent to using .animate() on the opacity property.
The following sections describe applying animation to the various fading methods.
fadeIn()
The .fadeIn( [duration] [, easing] [, callback]) method provides the optional duration, easing, and callback options allowing you to animate fading the opacity of an element from its current value to 1.
For example, the following code applies an animation of 1 second with swing easing to all image elements:
$("img").fadeIn(1000, "swing");
fadeOut()
The .fadeOut( [duration] [, easing] [, callback]) method provides the optional duration, easing, and callback options allowing you to animate fading the opacity of an element from its current value to 0.
For example, the following code applies an animation of 1 second with swing easing to all image elements and then, when completed, fades them back in again:
$("img").fadeOut(1000, "swing", function() { $(this).fadeIn(1000);});
fadeToggle()
The .fadeToggle( [duration] [, easing] [, callback]) method provides the optional duration, easing, and callback options allowing you to animate fading the opacity of an element from its current value to 0 or 1, depending on its current value.
For example, the following code applies an animation of 3 seconds with swing easing to all image elements. Images that are currently visible are faded out, and images that are currently transparent are faded in:
$("img").fadeToggle(3000, "swing");
fadeTo()
The .fadeTo( duration, opacity [, easing] [, callback]) method provides the duration and opacity options that specify a specific opacity to end at and how long to animate the transition. It also provides optional easing and callback arguments.
For example, the following code applies an animation of 2 seconds for all images to transition from the current opacity to .5:
$("img").fadeTo(2000, .5);
Try it Yourself: Using Fade Animation to Implement an Image Selection Effect
1. In Aptana, create the hour12/hour1202.html, hour12/js/hour1202.js, and hour12/css/hour1202.css files.
2. Add the code shown in Listing 12.2-html and Listing 12.2-css to the HTML and CSS files—just a basic <div> with five <img> elements.
3. Open the hour1202.js file and add the following ready() function that adds a mouseover and mouseout handler to all the <img> elements. The mouseover handler fades the image to an opacity of 1, which makes it fully opaque; the mouse out fades it back to .3 so that it will be transparent when the mouse is not over it.
1 $(document).ready(function(){
2 $("img").mouseover(function(){$(this).fadeTo(1000, 1);});
3 $("img").mouseout(function(){$(this).fadeTo(1000, .3);});
4 });
4. Save all three files and then open the HTML document in a web browser, as shown in Figure 12.2. You should be able to move the mouse over the images and see the transparency change.

LISTING 12.2-html HTML File Basic Web Used to Display the Images
01 <!DOCTYPE html>
02 <html>
03 <head>
04 <title>Hour 12-2</title>
05 <meta charset="utf-8" />
06 <script type="text/javascript" src="../js/jquery.min.js"></script>
07 <script type="text/javascript" src="js/hour1202.js"></script>
08 <link rel="stylesheet" type="text/css" href="css/hour1202.css">
09 </head>
10 <body>
11 <div>
12 <div id="photos">
13 <img src="images/img1.jpg"/>
14 <img src="images/img2.jpg"/>
15 <img src="images/img3.jpg"/>
16 <img src="images/img4.jpg"/>
17 <img src="images/img5.jpg"/>
18 </div>
19 </body>
20 </html>
LISTING 12.2-js jQuery and JavaScript Code That Implements Image Selection Fades
1 $(document).ready(function(){
2 $("img").mouseover(function(){$(this).fadeTo(1000, 1);});
3 $("img").mouseout(function(){$(this).fadeTo(1000, .3);});
4 });
LISTING 12.2-css CSS Code That Styles the Collapsible Image Element
1 div{padding:0px;}
2 img{
3 float:left;
4 opacity:.3;
5 width:100px;
6 }
Sliding Elements
A common animation is the sliding effect. A sliding effect transitions an element from taking no space to taking space from a starting edge to the finish edge. Using sliding animations gives the user a richer experience because menus, images, and other elements can be “tucked” away until the user moves the mouse over them or clicks them.
You can use a couple of different ways to create a sliding element. One way is to use the built-in jQuery slide methods. The second is to animate the height and width properties. The following sections describe each of these methods.
Animating slideUp(), slideDown(), and slideToggle()
The .fadeTo( duration, opacity [, easing] [, callback]), .fadeTo( duration, opacity [, easing] [, callback]), and .fadeTo( duration, opacity [, easing] [, callback]) methods provide the duration, easing, and callback arguments allowing you to animate sliding effects in the vertical direction.
For example, the following code applies an animation of 1 second to slide an element down, and then applies a delay of 3 seconds and slides the element back up:
$("#menu").slideDown(1000).delay(3000).slideUp(1000);
You can also animate the .slideToggle() method in a similar fashion. For example, the following code animates visibility of a <div> element using a slide animation:
$("div").slideToggle(1000);
Sliding Using Width and Height
I also like to use the width and height properties to create a sliding element. You can create a vertical slide animation by animating the height and create a horizontal slide animation by animating the width.
There are a couple of tricks. You need to provide both a width and a height value for the element if you want to have the full slide effect and not just a resize effect. Also, if you want the element to maintain space on the page, you cannot animate the value all the way down to 0. However, you can animate down to .1 and the other dimension will retain its space.
The following example shows an animation that animates sliding down by changing the height to 100 and then back up by changing the height to .1:
$("img").animate({height:100}, 1000);
$("img").animate({height:.1}, 1000);
Try it Yourself: Using Sliding Animation to Implement a Dynamic Menu
1. In Aptana, create the hour12/hour1203.html, hour12/js/hour1203.js, and hour12/css/hour1203.css files.
2. Add the code shown in Listing 12.3-html and Listing 12.3-css to the HTML and CSS files—just basic stuff: a <div> with a <p> for a title bar, and an inner <div> containing the <span> used for menus and <img> elements.
3. Open the hour1203.js file and a basic ready() function. Inside the ready() function, add the following line that will hide the inner <div>:
02 $("div div").hide();
4. Add the following statements to add mouseover and mouseout handlers to the <span> elements. On mouseover, you get the index of the <span> and then use it to find the corresponding <img> element and animate setting the height to 100, thus sliding down the image. On mouseout you do the opposite, setting the height to .1 to slide it up:
03 $("span").mouseover(function(){
04 var i = $(this).index("span");
05 $("img").eq(i).animate({height:100}, 1000);
06 });
07 $("span").mouseout(function(){
08 var i = $(this).index("span");
09 $("img").eq(i).animate({height:.1}, 1000);
10 });
5. Add the following statements to add mouseenter and mouseleave handlers to the #container element. On mouseenter, you first stop propagation so that you apply the slide toggle only once during bubbling. Then you stop all animation on the #images element and use slideToggle() to animate sliding the entire menu. The same occurs on mouseleave. The result is that when the mouse is over the #container element, it slides down and slides back up when the mouse leaves:
11 $("#container").mouseenter(function(e){
12 e.stopPropagation();
13 $("#images").stop(true).slideToggle(1000);
14 });
15 $("#container").mouseleave(function(e){
16 e.stopPropagation();
17 $("#images").stop(true).slideToggle(1000);
18 });
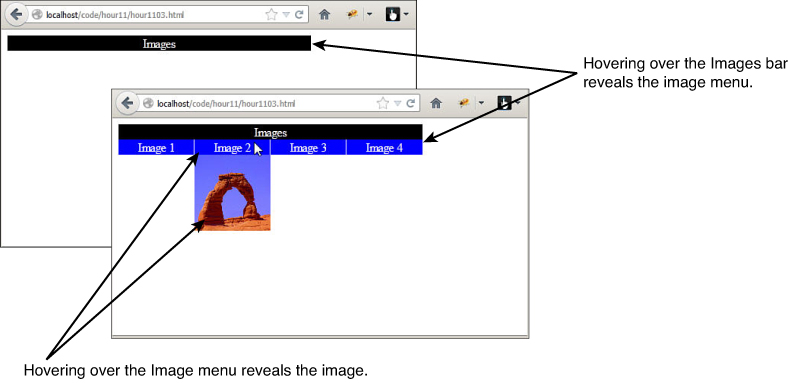
6. Save all three files and then open the HTML document in a web browser, as shown in Figure 12.3. You should be able to expand the menu, and as you hover over each menu item, the image should slide down and back up when you leave.
LISTING 12.3-html HTML File Basic Web Used to Display the Sliding Menu Element
01 <!DOCTYPE html>
02 <html>
03 <head>
04 <title>Hour 12-3</title>
05 <meta charset="utf-8" />
06 <script type="text/javascript" src="../js/jquery.min.js"></script>
07 <script type="text/javascript" src="js/hour1203.js"></script>
08 <link rel="stylesheet" type="text/css" href="css/hour1203.css">
09 </head>
10 <body>
11 <div id="container">
12 <p>Images</p>
13 <div id="images">
14 <span>Image 1</span><span>Image 2</span><span>Image 3</span><span> Image 4</span><br>
15 <img src="images/img1.jpg" />
16 <img src="images/img2.jpg" />
17 <img src="images/img3.jpg" />
18 <img src="images/img4.jpg" />
19 </div>
20 </div>
21 </body>
22 </html>
LISTING 12.3-js jQuery and JavaScript Code That Implements the Sliding Image Menu
01 $(document).ready(function(){
02 $("div div").hide();
03 $("span").mouseover(function(){
04 var i = $(this).index("span");
05 $("img").eq(i).animate({height:100}, 1000);
06 });
07 $("span").mouseout(function(){
08 var i = $(this).index("span");
09 $("img").eq(i).animate({height:.1}, 1000);
10 });
11 $("#container").mouseenter(function(e){
12 e.stopPropagation();
13 $("#images").stop(true).slideToggle(1000);
14 });
15 $("#container").mouseleave(function(e){
16 e.stopPropagation();
17 $("#images").stop(true).slideToggle(1000);
18 });
19 });
LISTING 12.3-css CSS Code That Styles the Sliding Menu
01 img{
02 display:inline-block; width:100px; height:.1px;
03 margin:0px; padding:0px; float:left;
04 }
05 p, span {
06 display:inline-block; width:400px;
07 background-color:black; color:white;
08 margin:0px; padding:0px; text-align:center;
09 }
10 span {
11 width:100px; margin:-1px;
12 border:1px solid; background-color:blue; float:left;
13 }
Creating Resize Animations
Similar to using the height and width to create a sliding effect, you can also use them to create a resize animation. The difference between a slide and a resize is that the aspect ratio of the image is maintained on a resize, giving the overall appearance that the element is growing or shrinking rather than being unfolded or untucked.
The trick to creating a resize animation is that you either need to specify both height and width in the .animate() statement, or one of them has to be auto in the CSS settings, and you animate only the one that has a value.
For example, the following code shows a resize animation of an image up to 500 pixels over 1 second, and then slowly over 5 seconds back down to 400 pixels:
$("img").animate({height:500, width:500}, 1000).animate({height:500, width:500}, 5000);
Try it Yourself: Using a Resize Animation to Create a Simple Image Gallery View
1. In Aptana, create the hour12/hour1204.html, hour12/js/hour1204.js, and hour12/css/hour1204.css files.
2. Add the code shown in Listing 12.4-html and Listing 12.4-css to the HTML and CSS files—just a basic <div> with <img> elements. In the CSS file, the <img> elements are styled to a width of 100px, but no height is set. That way we can animate the size without using the height property.
3. Now open the hour1204.js file and a basic ready() function that adds mouseover and mouseout handlers to the <img> elements. On mouseover, you get the animation by increasing the width and opacity, and do the opposite on mouseout.
1 $(document).ready(function(){
2 $("img").mouseover(function(){
3 $(this).animate({width:"200px", opacity:1}, 1000);
4 });
5 $("img").mouseout(function(){
6 $(this).animate({width:"100px", opacity:.3}, 1000);
7 });
8 });
4. Save all three files and then open the HTML document in a web browser, as shown in Figure 12.4. You should be able to hover over the images and see the resize animation.

LISTING 12.4-html HTML File Basic Web Used to Display the Images
01 <!DOCTYPE html>
02 <html>
03 <head>
04 <title>Hour 12-4</title>
05 <meta charset="utf-8" />
06 <script type="text/javascript" src="../js/jquery.min.js"></script>
07 <script type="text/javascript" src="js/hour1204.js"></script>
08 <link rel="stylesheet" type="text/css" href="css/hour1204.css">
09 </head>
10 <body>
11 <div>
12 <div id="photos">
13 <img src="images/img1.jpg"/>
14 <img src="images/img2.jpg"/>
15 <img src="images/img3.jpg"/>
16 <img src="images/img4.jpg"/>
17 <img src="images/img5.jpg"/>
18 </div>
19 </body>
20 </html>
LISTING 12.4-js jQuery and JavaScript Code That Implements the Resize Effect
1 $(document).ready(function(){
2 $("img").mouseover(function(){
3 $(this).animate({width:"200px", opacity:1}, 1000);
4 });
5 $("img").mouseout(function(){
6 $(this).animate({width:"100px", opacity:.3}, 1000);
7 });
8 });
LISTING 12.4-css CSS Code That Styles the Images
1 div{padding:0px;}
2 img{
3 opacity:.3;
4 width:100px;
5 float:left;
6 }
Implementing Moving Elements
Another dynamic that is good to animate is repositioning of elements—specifically, moving an element from one location to another. Users hate it when they do something and page elements are all of a sudden in a different location. Animating the move enables them to see where things go and make the necessary adjustments in their thinking.
The following sections describe methods of animating the repositioning of elements. You also get a chance to implement some code that should solidify the concepts for you.
Animating Element Position Changes on Static Elements
You cannot directly alter the position of static page elements, because they simply flow with the items around them. However, you can animate the margin and padding properties. For example, the following code animates a move of all <p> elements to the right by animating the margin-left property:
$("p").animate({"margin-left":30}, 1000);
Animating Element Position Changes on Nonstatic Elements
Most of the move animation you do will be on nonstatic elements, and usually it will be on fixed elements, simply because it is much easier and safer to move those without needing to worry about other element positions.
Either way, it doesn’t matter if it is a fixed, absolute, or relative positioned element—you will still be animating the same two values, top and left. To animate movement vertically, you use top, and to animate horizontally, you will use left. For example, the following statements animate moving an element to the right 10 pixels and then down 10 pixels:
var position = $("#element").offset();
$("#element").animate({top:position.top+10}, 1000);
$("#element").animate({top:position.left+10}, 1000);
You can also animate in a diagonal direction by animating both top and left at the same time. For example, the following code animates movement down 10 pixels and to the right 100 pixels in the same animation:
var position = $("#element").offset();
$("#element").animate({top:position.top+10, top:position.left+100}, 1000);
Try it Yourself: Creating a Simple Paper Airplane App with jQuery Animation
1. In Aptana, create the hour12/hour1205.html, hour12/js/hou1205.js, and hour12/css/hour1205.css files.
2. Add the code shown in Listing 12.5-html and Listing 12.5-css to the HTML and CSS files. The HTML code displays a set of images for the controls. You can use a couple of <span> elements as spacers for the controls. The rest of the images are the plane and the cones. Each cone has its own ID so that it can be positioned in CSS.
3. Open the hour1205.js file and the following global variables and basic ready() function. The variables store the height and width of the browser pane so that you can use that to know when to stop the animation. It is also used in line 4 to position the plane image in the middle of the web page:
01 var rightEdge = window.innerWidth;
02 var bottomEdge = window.innerHeight;
03 $(document).ready(function(){
04 $("#plane").offset({top:bottomEdge/2, left:rightEdge/2});
...
22 });
4. Add the following handlers for the control buttons. Notice that each handler first changes the image src for the plane, stops the current animation, and then animates the left or top properties to move the plane. The #stop handler stops all animation and clears the animation queue:
05 $("#up").click(function(){
06 $("#plane").attr("src","images/planeUp.png");
07 $("#plane").stop(true).animate({top:0}, 5000);
08 });
09 $("#left").click(function(){
10 $("#plane").attr("src","images/planeLeft.png");
11 $("#plane").stop(true).animate({left:0}, 5000);
12 });
13 $("#right").click(function(){
14 $("#plane").attr("src","images/planeRight.png");
15 $("#plane").stop(true).animate({left:rightEdge}, 5000);
16 });
17 $("#down").click(function(){
18 $("#plane").attr("src","images/planeDown.png");
19 $("#plane").stop(true).animate({top:bottomEdge}, 5000);
20 });
21 $("#stop").click(function(){ $("#plane").stop(true) });
5. Save all three files and then open the HTML document in a web browser, as shown in Figure 12.5. You should be able to fly the plane around using the control buttons. It’s a very basic example, but a good way to help you understand movement animation.

LISTING 12.5-html HTML File Basic Web Used to Display the Controls, Cones, and Plane
01 <!DOCTYPE html>
02 <html>
03 <head>
04 <title>Hour 12-5</title>
05 <meta charset="utf-8" />
06 <script type="text/javascript" src="../js/jquery.min.js"></script>
07 <script type="text/javascript" src="js/hour1205.js"></script>
08 <link rel="stylesheet" type="text/css" href="css/hour1205.css">
09 </head>
10 <body>
11 <div>
12 <span></span>
13 <img id="up" src="images/up.png" /></br>
14 <img id="left" src="images/left.png" />
15 <img id="stop" src="images/stop.png" />
16 <img id="right" src="images/right.png" /><br>
17 <span></span>
18 <img id="down" src="images/down.png" />
19 <img id="plane" src="images/planeRight.png" />
20 <img id="cone1" src="images/cone.png" />
21 <img id="cone2" src="images/cone.png" />
22 <img id="cone3" src="images/cone.png" />
23 </div>
24 </body>
25 </html>
LISTING 12.5-js jQuery and JavaScript Code That Implements the Plane Movement Animation Using Click Handlers
01 var rightEdge = window.innerWidth;
02 var bottomEdge = window.innerHeight;
03 $(document).ready(function(){
04 $("#plane").offset({top:bottomEdge/2, left:rightEdge/2});
05 $("#up").click(function(){
06 $("#plane").attr("src","images/planeUp.png");
07 $("#plane").stop(true).animate({top:0}, 5000);
08 });
09 $("#left").click(function(){
10 $("#plane").attr("src","images/planeLeft.png");
11 $("#plane").stop(true).animate({left:0}, 5000);
12 });
13 $("#right").click(function(){
14 $("#plane").attr("src","images/planeRight.png");
15 $("#plane").stop(true).animate({left:rightEdge}, 5000);
16 });
17 $("#down").click(function(){
18 $("#plane").attr("src","images/planeDown.png");
19 $("#plane").stop(true).animate({top:bottomEdge}, 5000);
20 });
21 $("#stop").click(function(){ $("#plane").stop() });
22 });
LISTING 12.5-css CSS Code That Styles the Controls, Cones, and Plane
1 img{ width:40px;}
2 span{ width:40px; display:inline-block; }
3 #plane{ position:fixed; width:100px;}
4 #cone1{ position:fixed; top:100px; left: 500px; width:50px;}
5 #cone2{ position:fixed; top:200px; left: 100px; width:50px;}
6 #cone3{ position:fixed; top:300px; left: 300px; width:50px;}
Summary
In this chapter, you learned the basics of web animations and how to apply them to changes you make to elements. Most animations can be done using the .animate() method that is available on jQuery objects. You learned about the animation queue, how to stop animations and clear the queue, as well as delay the animations.
jQuery also provides several helper functions, such as fadeIn()/fadeOut() and show()/hide(), that simplify some of the more common animation tasks. You got a chance to create some practical page elements as well as a simple app to waste time flying paper airplanes.
Q&A
Q. Is there a way to globally disable all animations?
A. Yes. You can set jQuery.fx.off to set all animations to the final state and disable animations. This is a useful feature if you want to disable animations for testing or if you want to allow users to disable the animations on slower devices. Setting the value to false enables animations again.
Q. Is there a way to control the number of steps required to compete the animation?
A. Sort of. You can set the jQuery.fx.interval value to the number of milliseconds between steps. This controls the frames per second at which the animations run. You should be careful with this setting, though; lowering the number will make the transitions smoother but will also take up more system resources.
Workshop
The workshop consists of a set of questions and answers designed to solidify your understanding of the material covered in this hour. Try to answer the questions before looking at the answers.
Quiz
1. Is it possible to control when an animation occurs?
2. How do you animate color changes?
3. True or False: Animating the width property only will always keep the image aspect ratio.
4. True or False: You cannot animate movement in static elements.
5. Is there a way to execute a function after all animations have completed?
Quiz Answers
1. Yes, partially. Using the .delay() method or setTimeout(), you can delay an animation for a period of time.
2. You must use the hex color values, such as #ffffff.
3. False. If height is auto, then that is correct; however, if height is a specific value, the aspect ratio will be ignored.
4. False. You can animate margins and padding to provide some movement animations.
5. Yes, using the .promise() method.
Exercises
1. Open up the code in Listing 12.1. Add a second <span> to the #title <div> to place the “Image” text in. Then hide and expand that <span> as well as the image.
2. Open the code in Listing 12.4. Modify the code by adding a click handler for the images. In the click handler, stop all animation without completing the current animation. Then turn off the mouseover and mouseout event handler using $(this).off("mouseover"); and so on.
3. Open the code for Listing 12.5. Modify the code to add four new buttons for diagonal movement. You will need to find your own images. You will also need to add handlers for those buttons that apply the movement animation by setting the top and left properties in the same animation.