
Chapter 18. Getting and staying connected—or not
It seems that I spend quite a bit of my time answering questions—from family, friends and neighbors—who want to know how to resurrect their computers, or from developers who need to figure out how to get around some seemingly impossibly complex problem. Thankfully, not all of their problems are that complex. I expect that many of you are confronted by many of the same queries from those that look up to you as a technical resource—like the doctor who lives up the street who listens patiently while you describe that pain in your right knee.
A couple of the most common questions I get on the public Network News Transfer Protocol (NNTP) newsgroups (such as Microsoft.public.dotnetframework.adonet and ..sqlserver.connect[1]), are “How do I get connected?” and “Should I stay connected?” This chapter attempts to explain how the SQL Server connection mechanism works and how to create an application that not only can connect to SQL Server in its various manifestations but stays connected when it needs to. I don’t have room here to provide all of the nuances, but I hope I can give you enough information to solve some of the most common connection problems and, more importantly, help you design your applications with best-practice connection management built in.
1 No, I don’t hang out on the MSDN forums—they’re just too slow.
What is SQL Server?
Before I get started, let’s define a few terms to make sure we’re all on the same page. When I refer to SQL Server, I mean all versions of Microsoft SQL Server except SQL Server Compact edition. The connection techniques I discuss here apply to virtually all versions of SQL Server, starting with SQL Server 2000 and extending beyond SQL Server 2008. If I need to discuss a version-specific issue, I’ll indicate the specific version to which the issue applies. Getting connected to SQL Compact is done differently—you provide a path to the .SDF file and a few arguments in the connection string to configure the connection. SQL Server Compact Edition is discussed in two other chapters so I suggest looking there for details.
Instances of SQL Server run as a service, either on the same system as the client (the program that’s asking for the connection) or on another system (often referred to as a server). The service communicates with the outside world via the interactive Tabular Data Stream (TDS) protocol that’s documented online (http://msdn.microsoft.com/en-us/library/cc448435.aspx). But it’s unwise to code directly to TDS, as it’s subject to change without notice, and, frankly, that’s what the SqlClient .NET and DB-Library data access interfaces are for.
SQL Server has several entry points:
- A specifically enabled TCP/IP port
- A named pipe
- The VIA protocol
- The shared memory provider
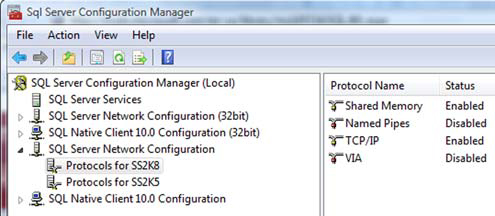
Depending on the SQL Server version, some or all of these protocols (except shared memory) are disabled by default. This hides any installed SQL Server instances from the network and prevents clients from connecting. To enable or disable one or more of these protocols, I recommend the SQL Server Configuration Manager (SSCM) as shown in figure 1. The SQL Server Surface Area Configuration Utility has been dropped from SQL Server 2008 but you can also use sp_configure to make protocol changes.
Figure 1. The SQL Server Configuration Manager
If you expect to share SQL Server databases over a network, the client data access interfaces must address them through VIA, an IP port, or a named pipe. If the client is running on the same system as the SQL Server instance, your code should connect through the (far faster) shared memory provider. I’ll show you how to do that a bit later (see “Establishing a connection” later in this chapter).
Understanding the SQL Server Browser service
In SQL Server 2005 and later, Microsoft uses the SQL Server Browser service to decouple IP assignment and port broadcasting functionality from the SQL Server instance, in order to improve functionality and security. By default, the SQL Server Browser service is disabled on some stock-keeping units (SKUs), so it needs to be enabled if you need to expose SQL Server instances to network clients. The SQL Server Configuration Manager can also set the startup state of this or any SQL Server–related service.
On startup, the SQL Server Browser service claims UDP port 1434, reads the registry to identify all SQL Server instances on the computer, and notes the ports and named pipes that they use. When a server has two or more network cards, SQL Server Browser will return all ports enabled for SQL Server.
When SQL Server clients request SQL Server resources, the client network library sends a UDP message to the server using port 1434, requesting access to a specific named or default instance. SQL Server Browser responds with the TCP/IP port or named pipe of the requested instance. The network library on the client application then completes the connection by sending a request to the server using the information returned by the service.
When your application accesses SQL Server across a network and you stop or disable the SQL Server Browser service, you must hard-set a specific port number to each SQL Server instance and code your client application to always use that port number. Typically, you use the SQL Server Configuration Manager to do this. Keep in mind that another service or application on the server might use the port you choose for each instance, causing the SQL Server instance to be unavailable. If you plan to expose your instance via TCP/IP address and penetrate a firewall, this is the only approach you can choose.
Diagnosing a connectivity problem
Getting connected to SQL Server can be troublesome as there are so many layers of security and physical infrastructure to navigate. The following sections walk you through the layers and explain how to test to see if each layer is working, disabled, or protected, thus making the connection attempt fail. These steps include the following:
- Testing the network (if necessary). Can you see the network? Is the host server visible and responding?
- Testing the SQL Server instance service state. Is the instance running?
- Connecting to the instance and initial catalog (default database) given the appropriate credentials.
Testing for network availability
When troubleshooting a connection issue, it’s best for your application to use your own diagnostics to test for network and service availability, as the human running the application is often unable to return reliable information about the state of the network, SQL Server services, or the weather. For this reason, I encourage developers to add a few lines of code to test for the presence of the network and test the state of the selected SQL Server instance. As shown in listing 1, in Visual Basic.NET (or C#) it’s easy to use the .NET Framework Devices.Network class.
Note
All of the code examples in this chapter are in Visual Basic.NET.
Listing 1. Testing for network availability in Visual Basic.NET
Dim WithEvents myNet As New Devices.Network
    Function TestServerAvailability( _
      ByVal uriServiceName As System.Uri) As Boolean
        If myNet.IsAvailable Then
            ' Continue
        End If
    End Function

    Private Sub myNet_NetworkAvailabilityChanged( _
        ByVal sender As Object, _
        ByVal e As Microsoft.VisualBasic.Devices.NetworkAvailableEventArgs) _
        Handles myNet.NetworkAvailabilityChanged
        ' Report network has changed state.
        If e.IsNetworkAvailable = False Then
            ' Report network is down...
        End If
    End Sub
After you determine that the network is available, and you can ping a known server within the domain hosting the SQL Server, you know that the connection problem is likely on the server hosting the SQL Server instance. If the network is down, there might well be other issues such as an improperly configured Network Interface Card (NIC) or Wi-Fi interface, a disconnected cable, a bad router, or improperly configured firewall that make testing the SQL Server instance irrelevant and unnecessary.
Managing the SQL Server instance state
Because SQL Server is a service, it must be running before it can accept connections. Although this might seem obvious, for some implementations—as when using SQL Server Express Edition—the server instance might not be needed by other applications and might be consuming resources between uses. In this case the service might be shut down after the application quits. There are any number of architectural, administrative, and performance considerations to resolve when taking this approach, but given the expanding number of SQL Server Express implementations it’s wise to understand how to configure the server so the instance is running when needed and not in the way when SQL Server is not required. I usually suggest another approach: install the SQL Server Express instance on a spare system and leave it running at all times. This makes connection, administration, and countless other issues less complex.
Again, the SSCM can be used to set the startup state of any of the SQL Server–related services, including SQL Server Reporting Services and BS Analysis Services. You can also use Services.msc or command-line scripts to start or stop selected services as shown in listing 2—assuming you have admin rights (run the script as Administrator). I do this on my demo laptop to bring up SQL Server, Reporting Services, and other services on demand before a session. Note that the service name (for example, mssql) is followed by the instance name (ss2k8) separated by a $ even for SQL Server 2008. You can also use NET START in a similar way but it does not return as much detailed information about the status of the service as it starts (or doesn’t). In any case, you can include a script like this in a batch file that you execute before (or after) you run a job that requires SQL Server.
Listing 2. Starting SQL Server and supporting services in a command batch
cls
echo on
rem sc start w3svc
sc start  mssql$ss2k8
sc start  reportserver$ss2k8
sc start sqlagent$ss2k8
sc start sqlbrowser
sc start mssql$sqlexpress
start msdtsServer
start sqlwriter
pause
It’s also possible to start SQL Server (or any service) using .NET factory classes, and I’ll show you how to do that a bit later (in listing 4).
Finding visible SQL Server instances
Okay, so the network is available (at least as far as your application can tell) and the server hosting your SQL Server instance is visible on the network. Next, you can query the .NET Framework to see what SQL Server instances are visible. This is a two-step process that’s simplified somewhat because we’re interested only in SQL Server instances (and not other services like Reporting Services or Exchange). In summary, the code shown in listing 3 performs the following steps:
- First, use the ADO.NET (2.0) System.Data.Common.DbProviderFactories object’s GetFactoryClasses method to harvest the .NET data providers installed on the system. This method returns a DataTable.
- Pick out the SqlClient data provider row and pass it to the DbProviderFactories.GetFactory method. In this case you get a DbDataSourceEnumerator object that can be inspected via the GetDataSources method to find the visible SQL Server instances.
This is the same technique used by the Data Connection dialog box in Visual Studio and SSMS (you know, the dialog box that takes 10 seconds or so to enumerate the visible servers). This means you need to expect a similar delay before the GetFactory method completes. A code segment to perform these operations is shown in listing 3.
Listing 3. Capturing the list of visible SQL Server instances
Private Sub ShowInstance(ByVal drProvider As DataRow)
        Try
            Me.Cursor = Cursors.WaitCursor
            Dim factory As DbProviderFactory = _
                DbProviderFactories.GetFactory(drProvider)
            Dim dsE As DbDataSourceEnumerator = _
                factory.CreateDataSourceEnumerator()
            If dsE Is Nothing Then
                DataGridView1.DataSource = Nothing
                MsgBox("No instances visible for this provider(" _
                        & drProvider(0).ToString & ")")
            Else
                DataGridView1.DataSource = dsE.GetDataSources()
            End If
        Catch exNS As NotSupportedException
            MsgBox("This provider does not support data source enumeration...")
        Catch exCE As System.Configuration.ConfigurationException
            MsgBox("The " & drProvider(0).ToString & " could not be loaded.")
        Finally
            Me.Cursor = Cursors.Default
        End Try

    End Sub
Note
This method exposes only those instances that can be referenced by the SqlClient .NET data provider. This means that only SQL Server instances are shown; Reporting Services, Analysis Services, and other related services are not included.
If everything has gone well, you can see the target SQL Server instance—so you know the service is being exposed by the SQL Browser. Remember that the code shown previously searches the registry for installed instances, but you still don’t know if the SQL Server instance has been started or if, perhaps, a DBA has paused the instance. The code to determine the instance state is quicker and simpler than searching for visible server instances. In this case, your code calls the System.ServiceProcess.ServicesController class to test the current service status. This same class can also be used to set the service status. This means you’ll be able to start, stop, or pause a specific SQL Server instance (if you have sufficient rights).
The trick here is to pass the correct arguments to the ServicesController class to properly identify the SQL Server instance. When the industry transitioned from SQL Server 2000 (version 8.0) to SQL Server 2005 (version 9.0), the method of referencing instances changed. SQL Server 2000 uses the service name of MSSQLSERVER. From SQL Server 2005 on, the service name changed to MSSQL followed by the instance name (separated with a $). For example, on my web site I have an instance of SQL Server 2005 named SS2K8, which shows up in services.msc as SQL Server (SS2K8) with a service name of MSSQL$SS2K8. Unfortunately, the .NET factory classes require you to pass in the same string that appears in services.msc when asked for the service name. It can be a bit confusing. Perhaps the example in listing 4 will make this easier.
For purposes of this exercise, let’s assume we’re working with SQL Server 2005 or later. Listing 4 illustrates a routine that starts a selected SQL Server instance on a specified network server. In the example, we pass in the server’s name (in this case BetaV1, which is the name of the server hosting the desired SQL Server instance) and the Service Name which is composed of SQL Server concatenated with the instance name in parenthesis. For example, when I choose BetaV1 and the SS2K8 SQL Server instance on that server, the arguments passed to the ServiceController class would be SQL Server (SS2K8) and BETAV1. After you have instantiated a ServiceController object for the given SQL Server instance (or any service for that matter), you can determine its running state by examining the Status property. Likewise, you can use a controller method to do the following (and much more):
- Start, stop, or pause the service.
- Determine if the service can be paused and continued.
- Determine if the service can be stopped or shut down.
- Determine if the service has dependent services.
This assumes that the service can be started—and you can use the ServiceController class to test for this state as well. I tuned this code up a bit to leverage the WaitFor-Status method as it seemed a bit more elegant than polling the state. Note that the Controller.Start method is asynchronous, so it returns immediately—usually before the service has had a chance to start.
Listing 4. Starting a selected service
Private Sub btnStart_Click(ByVal sender As System.Object, _
     ByVal e As System.EventArgs) Handles btnStart.Click
    Dim Controller As New System.ServiceProcess.ServiceController( _
        txtServiceName.Text, txtServerName.Text)
    lblControllerStatus.Text = Controller.Status.ToString
    If Controller.Status = ServiceControllerStatus.Running Then
    Else
        Timer1.Enabled = True
        Controller.Start()
        Do Until intTimeout > 20 _
        Or Controller.Status = ServiceControllerStatus.Running
            Controller.Refresh()
            lblControllerStatus.Text = Controller.Status.ToString
            lblControllerStatus.Refresh()
        Loop
    End If
    Timer1.Enabled = False
End Sub
What is a connection?
Now that you know the network is up and the SQL Server instance being targeted is visible and running, you’re ready to try to open a connection. Too many applications assume these facts and expect the exception messages returned from the various layers between the application and the server are useful—unfortunately, they aren’t (at least in most cases).
Note
Make sure your code includes complete and robust connection exception handling. Consider that the user trying to connect with your application is the person least likely to be able to diagnose what’s wrong.
A connection to a SQL Server instance is a logical link between an application and a specific SQL Server instance. Once established, it’s the only means of communicating with the instance. When you execute the SqlClient Open method on a SqlConnection object, the .NET data access interface establishes a bi-directional link to accept SQL commands and return the result sets containing the rows or other information back from the server—including exceptions and messages.
When it comes time to establish a connection to SQL Server, developers have faced a dizzying array of data access interfaces that are designed to make, use, and break connections, as well as manage pools of connections as the need arises. Data access interfaces, including ODBC, OLE DB, RDO, COM-based ADO, and ADO.NET, all use TDS behind the scenes to establish a link between the client application and a specific instance of SQL Server, so they all share a common purpose—to expose TDS to one programming interface or another that can be easier to use. Connections can be established over a network (WAN or LAN), or established directly by using a shared memory data access provider if the client and SQL Server service are running on the same system. As you add logical or physical layers between the client and SQL Server, more issues are exposed—issues that make connecting more and more difficult. This means you should try to use the Shared Memory provider whenever possible. No, this does not mean you should avoid multi-tiered systems or service-oriented architectures which centralize access to the SQL Server instance, but it does mean that when building an object layer or service that’s hosted on a system that’s also hosting the SQL Server instance, it makes abundant sense to bypass the network layer and use the shared memory provider.
A SQL Server 2008 instance can support up to 32,767 connections, which is an order of magnitude more than you’ll ever need. In reality, the upper limit of connections is limited by available resources like RAM, available CPU cycles, the version of SQL Server installed, and how the DBA has configured the system. Even SQL Server Express edition can support hundreds (or even thousands) of connections, but because of further version-specific constraints applied to RAM and processor utilization, it’s not likely that you’ll be able to maintain more than a few hundred viable connections.
Contrary to popular myth, connections are not expensive. Unlike other DBMS systems that create full-duplex heavyweight connections or perform burdensome DDL queries when connecting, a SQL Server connection has a fairly small impact on the server (and client). SQL Server’s connections are half-duplex. This means that a connection can handle only one operation at a time—a connection is either in talk mode or listen mode.
Tip
Think of a connection like a CB radio conversation in which only one person can talk at a time. This is why radio operators use established protocols to end a packet of conversation by saying “Over” when they’ve finished talking. 10–4?
To connect or not to connect...
Although establishing a connection is fairly cheap, it’s not free, so when designing highly scalable applications it makes sense to minimize the total number of times an application opens and closes connections, thereby getting the most out of each open/close cycle. This is especially true for ASP or Web Service applications that have to service dozens to thousands of connections a minute.
Because an ASP/ASP.NET/Web Service application cannot (or should not) attempt to maintain a globally referenced Connection object, applications are designed around a just-in-time connection strategy. This usually means acquiring a connection just before it’s needed and releasing the connection back to the connection pool right after the results are captured by the client. I discuss the connection pool a little later (see “Connection management” later in this chapter). I think this makes sense to an extent. If you know that your application plans to make several queries in quick succession, some might suggest a broader-scope connection paradigm that holds the connection until all of these operations are complete. This approach comes with an element of risk. One of the more common failure modes for ASP-type applications is leaking connections—that is, when connections are acquired (by the Connection.Open method) but not released (with the Connection.Close method). Because the .NET Framework’s garbage collector (GC) does not run that often,[2] orphaned connection objects (that have not been released) might languish in the object garbage heap for minutes to hours. Because of this, any connection strategy must ensure that any connection that’s acquired (opened) is release (closed).
2 The garbage collector runs when memory resources demand it—so perhaps not for some time.
To facilitate ASP-type application connection churn, the data access providers have implemented a mechanism to cache connections—it’s called the connection pool. I’ll devote some time to this mechanism a bit later when I discuss properties, methods, and events that the data access interfaces expose to help manage connections.
Note
ADO.NET 2.0 and later supports the option to use Multiple Active Resultsets (MARS) connections. Although these permit developers to reuse connections that have pending results, there are so many restrictions and evil side effects, that there are few real scenarios in which this approach provides any benefit over opening another connection.
Another myth that I hope to bust is that all applications should always use a connect-query-disconnect connection strategy. I can see how this myth got started, as this is a best practice for ASP, ASP.NET, and Web Service applications. If you’re building a Microsoft Windows Presentation Foundation (WPF), Windows Forms, or other client-side executable, it does not always (or even usually) make sense. Instead, I often recommend connecting to the server when connectivity is first required and maintaining the connection for the life of the application. The benefits to this approach are compelling. First, your application need not spend resources opening (and closing) connections. But the most significant benefit is the ability to manage connection-scoped server state. For example, you can create
- Temporary tables (in tempdb) that can be indexed to hold intermediate query results based on the current client. These can be used to dramatically improve query performance.
- Connection-specific connection settings that need be applied only once and stick with the connection scope.
- Server-side cursors against live data, although this is not often done.
Consider that when you open a connection, SQL Server has to launch an agent to manage your requests, allocate memory, and prepare for your work. When you close a connection, the server has to clean up the mess you left behind like the maid who comes into your hotel room after that all-nighter. Any connection-owned resources, such as temporary tables or server-side cursors, have to be freed, and the agent has to be shut down. These operations can be postponed by using connection pooling, as I’ll discuss later (see “Managing the connection pool” later in this chapter).
Connection management
So, when you discover that you cannot perform another operation on the existing connection, what should you do? Simply open another connection? I suggest you rethink your application strategy. Consider the following scenario. Your application has opened a connection and executed a query, which returns a rowset as a DataReader. In an attempt to save time and resources, you’ve decided not to create and populate a memory-resident DataTable (or DataSet). To implement your decision, you execute a query and ADO.NET supplies a SqlDataReader, which is a pipe to the rowset. While processing the DataReader row by row, you determine that some changes are needed in the database based on a row’s data values. At this point you discover that you can’t reuse the DataReader object’s connection to make the change, so you’re tempted to open another connection or somehow figure out how MARS works.
Can you see the problem here? Because you’re using SQL Server (and not some toy database), it makes a lot more sense to perform this type of operation on the server. After all, SQL Server is a service designed to manage database operations. In this case, I would recommend that you write a stored procedure to make these changes in place. And no, I’m not suggesting that you build a cursor in a stored procedure to walk through and edit the rows. In many cases row-by-row operations can be performed by a simple (and sometimes not-so-simple) UPDATE statement with far better performance. Why don’t developers do this in the first place? Well, some are uncomfortable with more than basic T-SQL operations. My suggestion in this case is to get familiar with T-SQL and stored procedures and learn how to leverage the server-side power of SQL Server.
Consider that any number of scenarios resemble the one I described previously. That said, some situations require multiple connections, but before your application charges off to open a second connection (or even consider MARS) I suggest you reconsider what the application is trying to accomplish. It usually makes a lot of sense to complete rowset population as quickly as possible to free up server-side resources being consumed by your connection. This means leveraging the TableAdapter Fill or DataTable Load methods to construct or load a memory-resident DataTable with the selected rowset(s).
Note
Rowset population is the process of bringing the entire selected rowset to the client. Doing so frees any pending locks on the data rows, pages, and extents on the server. It can also free your connection for additional operations by your application (or others) needing SQL Server resources your application might be holding.
Connection strategies
Although you have little control over some parts of SQL Server query processing, there are other aspects of application implementation where you can manage to improve performance. These include limiting the number of demands your application makes on the server as well as the quality or intelligence of these requests. Most data access developers agree that it’s not only the number of server requests, but the intelligence of them that makes a difference between an application that can support 100 users and one that can support thousands.
Each time you execute a query or perform a data definition language (DDL) operation, the client-side data access provider (typically implemented by ADO.NET’s SqlClient namespace) must build a set of TDS packets, hook up the connection, pass the query to the server, and process the result sets as they are made available by SQL Server. This process is called a round trip. Generally, anything you can do in your application to make each round trip more efficient can help improve performance—it’s like avoiding a trip down the mountain for an egg when you know you’ll need another tomorrow or in an hour. This means if you can bundle several queries or other operations together in a batch instead of sending the commands individually, you can improve performance by reducing round trips. It also means executing queries that return enough rows to satisfy the user’s immediate requirements and perhaps a few more to permit the user to browse or filter the returned rowsets.
But consider this scenario: you want your application to start quickly but your design requires execution of a number of time-consuming queries against one or more SQL Server (or other DBMS) databases to populate pick lists and fetch current status. Does it make sense to open more than one connection to perform parallel (possibly asynchronous) operations to improve performance? Sure, in some cases I can see this as a viable approach—especially if the extra connections are closed after use. But another approach that I’ve been recommending lately uses the new Visual Studio 2008 Local Data Cache classes that leverage SQL Server Compact edition to persist lookup table data on the client system. Although this does not make sense for ASP.NET applications, for applications that are permitted to use the client systems’ resources, I think letting the replication connection (that works independently of your own SQL Server connection) handle these independent operations has appeal.
Another solution to application initialization, where you need to summarize server data for the user, is to not perform the summary on the client and not open a connection at all. I’ve found that it’s often far more efficient and easier to code when I use the MicrosoftReportViewer control to launch and render a SQL Server Reporting Services server-generated report to summarize (even complex) data. This eliminates the need to open and manage a SqlClient connection or worry about unwanted server load caused by clients performing duplicate operations. Consider that reports generated from the same data can be cached (as a report Snapshot) on the Reporting Services server and regenerated only when the data changes. This way, your application does not need to include the code to generate the summary, process the summary data, manage the presentation UI, or tie up a connection to do so.
Establishing a connection
You’ve determined that you need a connection. If you haven’t skipped down to this section, you’re aware that it’s not always necessary to open a connection (or another connection). Let’s step through the process of configuring a SqlClient.SqlConnection object.
Note
You can connect to SQL Server in other ways, including using one of the older one-size-fits-all data access interfaces (DAI) like ODBC or OLE DB, or one of the more recent DAIs like COM-based ADO that uses ODBC or OLE DB behind the scenes. You can also use the OleDb namespace to connect to SQL Server, but because of its COM legacy and inefficiency, you’ll be hobbled by a lack of features that are supported only in the managed SqlClient namespace. If you’re still working with OLE DB and non-.NET applications, I suggest using the SQL Server Native Client (SNAC) provider as it’s the most efficient and includes support for SQL Server 2008.
Many of these steps are performed automatically when you create a Visual Studio Data Connection in the Server Explorer, after you provide the essential ingredients and perhaps a few values.
You can specify a host of options when defining a SqlConnection object—all of which are configured in the ConnectionString property or passed in the SqlConnection. All of these options are specified by key and value pairs. Note that if you don’t spell the key correctly or pass a value that’s not within the acceptable range of values, ADO.NET throws an exception. This is different than the behavior you might have seen with OLE DB or ODBC connection strings. Note also that the keys are not case sensitive and whitespace is ignored. If you repeat a key, only the last value is used. Some might suggest using the ConnectionStringBuilder to construct the ConnectionString but unless you’re charging by the line, this seems like going to the emergency room to take out a splinter. Consider that Visual Studio exposes application settings that can also be used to construct the ConnectionString and persist it in your project, so it can be easily referenced in code. This paradigm provides an interactive dialog box to create and test a connection string at design time.
The essential keys and values in the ConnectionString include the following:
- Server or Data Source—The name of the server and instance name of the targeted SQL Server.
- Integrated Security—The security mode to use. This setting determines whether ADO.NET uses trusted (SSPI) Windows authentication or untrusted SQL Server authentication. In the latter case, this includes a specific Login Name and matching password. The default is False. See the section “Trusted or untrusted security?” later in this chapter.
- User ID and Password (or PWD)—Only specified when not including the Integrated Security key or when integrated security is not set to True or SSPI. Specifies the SQL Server Login account name and matching password that has rights to access the Initial Catalog. These keys are ignored if you’ve requested Integrated Security.
- Initial Catalog—Specifies the SQL Server database to use for all operations (if not specifically overridden in the query or after opening the connection). Although Initial Catalog is not required, it’s essential that your connection avoid depending on the default database set by the DBA for the login account. If the DBA-set default database is changed, your application will break. Leave it off at your own peril.
Note
Some of these keys have (several) alternate names. I’m showing the most common.
Some of the more interesting (and commonly used) options include the following:
- Application Name—This key identifies the connection so it can be identified when you’re using SQL Profiler filters.
- Async—Used to determine if the connection should permit asynchronous operations.
- AttachDBFilename—Used with detached SQL Server database files. This approach has a number of side effects that I discuss later.
- ConnectTimeout or Connection Timeout—How long should the client application wait for the connection to be established? The default is 15 seconds—an eon in SQL Server terms. A typical Windows Forms connection should open in about a second; in an ASP.NET application using connection pooling, even less time—unless the pool is full or the server is too busy. See the section “Connection pooling” later in this chapter for more information.
- Enlist—When set to True, the connection pooler automatically enlists the connection in the current transaction context.
- Encrypt—When True, SSL encryption is used for all data sent between the client and SQL Server—but only if the server has an SSL certificate installed.
- TrustServerCertificate—When set to True, SSL is used to encrypt the channel when walking the certificate chain to validate trust. If TrustServerCertificate is set to True, and Encrypt is set to False, the channel is not encrypted. A setting of True has no effect if the server is not configured to accept SSL connections.
- User Instance—Used with SQL Server Express to create a user-specific instance of SQL Server in the user’s process space. Microsoft plans to deprecate this approach in a future version of SQL Server. (See “Accessing user instances” later in this chapter for more information.)
Note
Key values that accept true/false settings also accept yes or no and in some parts of Minnesota, you betcha is also acceptable—well, it should be.
Notice anything missing here? Well, the Connection Reset key has been removed in ADO.NET 3.5. This key gave developers the option to leave the connection state in place between uses. Each application sharing the pool could leverage work done by other instances of the application (even if it was the same application). For some reason, Microsoft has seen fit to remove this feature.
Before we move on, let’s revisit the essential connection string keys to pick up a few more details. I discuss the keys associated with the connection pool a bit later (see “Connection pooling” later in this chapter).
The server key
The server key in the connection string names the server (system) and instance of the target server. If you plan to address the SQL Server default (unnamed) instance, leave off the <instance name> portion of the key value. Remember, specifying a server by name requires the Windows Directory Name Service (DNS) to locate the named server, so if there is something wrong with the DNS service or it can’t be reached, attempts to connect by name can fail.
Tip
Using “.” or “(local)” indicates that the SQL Server service instance specified is on the same system as the client application and enables the shared memory data provider.
I rarely hard-code a server name in my applications. Instead, I either reference a connection string kept in a separate file (appconfig or webconfig) or better yet, I use an alias. Using the SSCM you can create a named alias to dereference the server/instance to a specific name used in the connection string. This way, when you’re ready to move the application into production, you change the alias and run the application.
If you want to simplify your connection strategy, bypassing needless overhead can usually help. If your client application is connecting to a SQL Server instance that’s running on the client’s system—as when using SQL Server Express, or a SQL Server Workgroup instance running on the same system as your ASP.NET application—it makes a lot of sense to use the shared memory provider (SMP). That’s because this provider does not need to navigate through ports, protocols, or the network stack to get to SQL Server and SQL Server does not need to wade through these layers to return your result sets.
To activate the SMP, all you need to do is specify “.” or “(local)” for the Server or Data Source key. You still need to specify the SQL Server instance being addressed unless you’re connecting to the default instance. That’s done by tacking on the instance name to the “.” or “(local)” in the connection string. Although it makes a lot of sense to use the local connection whenever possible, there might be drawbacks to this approach if the SQL Server has to compete with other resource-hungry applications on the same system, such as Reporting Services, Office, or Age of Empires. In a production environment, even when using SQL Express, I prefer to build a dedicated system whose sole purpose is to host an instance of SQL Server.
Table 1 shows a number of example server key settings.
Table 1. Typical server key settings
|
The server key syntax SERVER= |
SMP? |
Addresses |
|---|---|---|
|
<server name>; as in MyServer |
No |
Default instance on <server name> server |
|
.; or (local); |
Yes |
Default instance on the local server |
|
.<MyInstance>; as in .SS2K8; |
Yes |
<MyInstance> named instance on the local server |
|
<domain><server><instance>; |
No |
Named instance on named server on named domain |
|
<IP>,<Port>; as in 209.20.233.22,1433; |
No |
The specified server by IP address and port |
I don’t recommend addressing any SQL Server instance via IP address and port. Why? Well, it’s tough to do, given the number of firewalls most (serious) organizations put up to prevent direct-port operations. It also assumes you’ve gone to the trouble of disabling the dynamic IP port assignment scheme used by SQL Server 2005 and later. Accessing a SQL Server instance over the Internet? IMHO: madness.
Trusted or untrusted security?
One of the critical components you need to include in your connection string is your application’s or your user’s credentials. You have two choices:
- Request a trusted connection. This approach captures the Windows user or IIS credentials and passes them to SQL Server for authentication.
- Supply a user ID and password that are passed to SQL Server for authentication.
In either case you must create a login for the specified user or for the domain group that includes the user’s Windows login ID—unless you’re connecting as the SQL Server system administrator or a member of the administrator’s group.
Warning
Connecting any production application that’s accessible to users using the SA Login ID and password is a fundamental mistake. Although there are rare exceptions, developers should never build or test applications using SA credentials.
Let’s visit each of these approaches in a bit more detail.
Using trusted or integrated security
Microsoft seems to support the trusted approach for most production applications. I also endorse it, but with a few caveats. You enable the trusted security option by including Integrated Security=SSPI; or Trusted_Connection=True; in the connection string. After you do, keep in mind that the connection inherits the rights granted to the user. The user might be a human with domain or system login rights or a service (like the ASP.NET service running under IIS). In the case of IIS services you need to determine the version of IIS you’re using to host the application making the connection and the username IIS is using to log into SQL Server. I discuss this in the next section.
If the user has limited rights in the database, the application might not be able to access all of the data objects (like stored procedures, tables, views, or functions) that it needs to function properly. In addition, if the user has super rights, the application might have access to more data objects than necessary. The reason I mention this is that trusted security may open your database to Trojan attacks, where a block of SQL is embedded surreptitiously that can be executed only when a user with sufficient rights runs the program.
When you use this approach, consider that each time your code opens a connection, the user credentials are verified. This also applies to pooled connections (as discussed in “Connection pooling” later in this chapter). Trusted connections are enabled by default when you install SQL Server, and cannot be disabled.
ASP.NET considerations
When connecting from an ASP.NET application hosted by Internet Information Services (IIS), it’s IIS that usually acts as a proxy user. The real users (the humans) accessing your web page are usually not members of your domain, so Active Domain authentication credentials won’t help get them connected. Over the years the default user account name used by IIS has changed. Today’s defaults are as follows:
- In IIS 6.0, the system uses <machinename>ASPNET.
- In IIS 7.0, the system uses <NT Authority><network service>.
It’s also possible, and probably a good idea in some cases, to have your ASP.NET applications log on with application-specific SQL Server authentication credentials instead of these defaults, which are used when you specify Integrated Security = SSPI. This gives you more control over the rights this particular application is granted.
As these accounts may not have been assigned rights to your database or to the objects they contain, you’ll have to make some changes using SQL Server Management Studio to grant these rights. If you don’t, you won’t be able to connect, or you’ll get a rights exception as the connection attempts to access the initial catalog.
A considerable number of articles discuss techniques to protect the credentials used by applications that choose to use SQL Server authentication (untrusted) connections. Some advise creating an entry in the Web.Config file, although others say this is a mistake. In my opinion, if you create a login account on SQL Server and grant rights to only those specific objects that the application needs and no other, the surface area of exposure is reduced dramatically. So what if the credentials are leaked? All the hacker can do is run the permitted stored procedures or extract data using the read-only views.
Warning
Trusted security can make your application vulnerable to Trojan attacks. Remember that 80 percent of all hacking comes from within the corporate firewall.
I don’t have the space here to discuss much more on security. Suffice it to say, that you need to make sure to deny access to all objects in the database and carefully consider which server logins, database users, schemas, or roles should have rights.
Using SQL Server authentication
I’m of the opinion that SQL Server authentication eliminates the opportunity for a high-privilege user to access more data than the application is intended to expose. With this approach I recommend setting up a SQL Server Login ID for the specific application or for the group of related applications that need identical rights. Not everyone agrees with this approach, but in my experience many customers find it far easier to let the DBA, not the developer, control access to the database and its contents.
To use SQL Server untrusted authentication, you must first enable that option during SQL Server installation (setup) or via SQL Server Management Studio by setting the Security Server Authentication option to permit SQL Server and Windows Authentication Mode, as shown in figure 2.
Figure 2. Setting SQL Server and Windows Authentication mode in SSMS

Next, you need to include the UID=<Login ID>; and Password=<password>; keys and values. I don’t build a SQL Server account for each individual in the company; this avoids the problem of creating a login account for the payroll clerk Betty who is replaced by Bob while she’s on maternity leave (giving Bob a complex). Instead, I created a PayRollClerk15 login account or role that’s used by the application (or Betty and Bob). Note that this strategy (of individual or even role-based) accounts is not a good idea for ASP.NET applications.
Warning
As a general rule of thumb, you should never expose the SA password nor create applications that use it. Do not permit developers to build applications using the SA account. Doing so masks any number of complex issues that will have to be addressed at some time in the future—hopefully before your data is compromised.
Accepting user login credentials—or not
I often drone on and on about why it’s important to avoid login dialog box strategies that capture a user ID and password. I don’t use them to capture SQL Server authentication credentials but I sometimes use them to determine the user rights level. The application (protected by HTTPS or Windows ACL rights protections) logs on with its own unique credentials. If I expose a user login, it’s to restrict user access to only those portions of the data to which they have permission to see and (perhaps) change.
If you must expose a user login dialog box, make sure that you don’t permit the user to guess indefinitely until they get the right combination of username and password. Make sure you insist on strong passwords and introduce a delay that hobbles hackers with keystroke generators. I also cripple the login dialog box for some long period of time after N number of login attempts.
Accessing user instances
About the time that SQL Server Express was born, Microsoft felt a need to replace the Access/JET database with a suitably equivalent engine. Because of this, the developers at Microsoft decided to implement the (expletive deleted) user instance option. As a result, the Visual Studio data access code generators were adapted to use this feature, so it’s likely that there are any number of applications that implement it. I don’t want to spend a lot of time on this approach as I don’t endorse it—and neither does Microsoft at this point in time. It’s on the chopping block for deprecation in a later version. Although I would advise avoiding it and moving on, I’ll give you an idea of what it does to your user’s system.
When you include the key User Instance = True; in the connection string, the first time the database connection opens, the following series of operations is started (or at least attempted):
- ADO.NET’s SqlClient data provider looks for an installed instance of SQL Express. This option works only against SQL Server Express.
- If found, the SQL Server Express master and msdb databases are copied to the user’s directory.
- The database file (.mdb) as specified in the AttachDBFilename key is also copied to the user directory.
- A user-owned instance of SQL Server is started as a process owned by the user—not as a service, so it does not appear in Services.msc.
- At this point, tempdb, model, trace, and the transaction log files are created.
- The instance name is generated and appears as a number; for example: 69651E0A-5550-46.
- A named pipe connection is established to the user instance and passed back to ADO.NET.
As you can see, the first time a user instance connection is made, it can take a considerable amount of work to get the connection established. For this reason, it makes sense to bump up the ConnectTimeout key value. The next time the User Instance key is used, the process is far simpler. Because the master and other system databases are already in place, the SQL Server instance belonging to the user is restarted. The AttachDBFilename key-specified database is not reinstalled.
Warning
When accessing a user instance, the connection is given full SA rights when using the Trusted Connection option. You can see how this might impact the security of the database—especially when the database’s contents do not belong to the user but are the value-added provided by a vendor.
After the database connection is closed, the SQL Server instance owned by the user remains running for 60 minutes, by default. This can be reduced by executing sp_configure 'user instance timeout', <minutes>. An acceptable value is anything between 5 and 65,535, so even after the user application ends, SQL Server hangs around waiting for another connection for at least 5 minutes.
Typically, it takes less than a second to get connected to SQL Server from a Windows Forms application, but the connection operation can be delayed by a clogged network, a busy server, or a yellow cable dangling from the router. In an ASP.NET application, consider that the website might be under considerable load (due to the success of your Super Bowl ad or the inefficiency of your code). If your code does not complete its data operation quickly enough, the server might be unable to keep up. If the provider cannot get connected immediately, it continues to wait (and retry) for the number of seconds specified by the ConnectTimeout key. After the time expires, it throws an exception.
Tip
When ADO.NET attempts to connect to SQL Server, the ConnectTimeout counter begins. After SqlClient finds the server, the counter stops—even though you might not yet be able to use the connection.
Connection pooling
Again, quite a bit has been written about connection pooling. This is one of the most common areas of concern, especially for ASP.NET applications, and I’ve written my share of articles and blog entries. When you understand how the mechanism works, you’ll understand how to keep it working. These are the basic functions:
- When the SqlConnection.Open method passes a connection string to SqlClient, the provider looks for a matching connection pool. Each pool is uniquely identified by its connection string.
- Each AppDomain or Process gets its own pool. This means other ASP.NET applications get their own pool(s).
- Each transaction scope gets its own pool.
- An application can have as many pools as necessary—just change the connection string.
- Since ADO.NET 2.0, developers have been able to clear a specific pool or all pools owned by the AppDomain or Process.
- When the SqlConnection.Open method is called, either a new pool is created, or an existing pool is reused.
- If the pool exists, the provider attempts to find and use a dormant (unused) connection in the pool. Otherwise, a new connection to SQL Server is established and its handle is placed in the pool.
- If a dormant connection is found, the connection state is cleared (by default) so the new owner inherits a clean connection state—identical to the state when it was first opened.
- As more requests for connections are passed to the provider, the process is repeated until the number of pooled connections reaches an upper limit. The default is 100 connections.
- When the Connection.Close method is called, the connection is marked as dormant and reusable. The connection is then placed in the pool, ready for reuse. No attempt is made to clean out the connection state until the connection is reused.
- If a connected application fails in a way that forces the connection to be closed, the pooled connection is dropped. In some cases, all connections in the pool are dropped when an error occurs.
- If the server cannot be accessed for whatever reason or the AppDomain or Process ends, the pool is flushed and dropped.
- If a pooled connection is not reused after 4 to 8 minutes, it is closed and dropped from the pool until there are Min Pool Size connections left.
Note
Connection pools are created on the client, not on the server.
Tip
When debugging applications with Visual Studio, you’ll notice that Visual Studio owns the connection pools. This means connections might be held for some time if the application under development does not properly close the connection (as often happens). Eventually, you’ll overflow the pool or exhaust the number of connections permitted by the SQL Server configuration.
As you can see, managing the connection pool can be somewhat complex—at least behind the scenes. Typically an active ASP.NET site uses about a dozen connections per pool—even those sites that support thousands of users. If you need to adjust the connection pooling mechanism, you can do so using the specific connection string keys, as shown in table 2.
Table 2. Connection pooling connection string keywords
|
Default |
Purpose |
|
|---|---|---|
|
Connection Lifetime |
0 |
Has no effect on lifetime of dormant pools except for clustered servers. |
|
Load Balance Timeout |
0 |
Has no effect on lifetime of dormant pools except for clustered servers. |
|
Max Pool Size |
100 |
Specifies the maximum number of connections to be pooled. (If you have to increase this, you’re doing something wrong.) |
|
Min Pool Size |
0 |
Sets the number of connections kept in the pool regardless of age. |
|
Pooling |
True |
Enables or disables connection pooling. |
Despite what the documentation says, you can’t change the length of time a connection is left in the pool after it’s closed. The Connection Lifetime and Load Balance Timeout keys are used only in clustered servers. After a connection is closed by the Connection.Close method, the dormant connection remains aging in the pool (holding its server-side state) for 4 to 8 minutes (the time is chosen randomly). The only way to force the connections to close is to flush the pool or stop the process or AppDomain that owns it.
Closing the connection
Before closing out this chapter, I’d like to include a few tips about closing a connection. As discussed earlier, when connection pooling is enabled and the Connection.Close method is executed, the Connection is released back to the pool but the server-side state is not touched—not for 4 to 8 minutes. When the connection is reused, the first TDS packet sent to the server instructs the agent to reset the connection. You can’t alter this behavior now that the Connection Reset key has been removed. This means that if the server is holding resources for the connection, they remain held until the connection is reused or the application ends. Microsoft suggests that developers disable connection pooling to immediately release these resources. I suggested to Microsoft that it give developers the option of resetting the connection on Close.
Summary
Based on the feedback I get at conferences and from my customers, readers, and the developers I support online, connecting to SQL Server continues to be one of the most trouble-prone areas for both novice and expert developers. Sadly, it seems that there are as many opinions about how, when, and if to connect as there are health-card lobbyists in Washington. For instance, Microsoft wants developers to use SSPI authentication. I do too, but I also urge caution. Some suggest that accessing SQL Server directly via ports is OK but I beg to disagree as I’m concerned with hard-coding ports and network snooping.
Building any connection strategy is all about what works for your application architecture and security infrastructure. In some cases the just-in-time connection strategy makes sense, but in others it incurs needless overhead. Sometimes the connection pool helps improve performance, but at other times it just gets in the way.
Sometimes we as writers, consultants, and pundits make things a lot more complicated than they have to be by overloading our readers and clients with a lot of unnecessary detail. Considering that most SQL Server implementations are SQL Server Express, those that mold opinions need to remember to keep things simple whenever possible without compromising security or performance. For the most part, the developers I work with want solutions, not options. I hope this chapter has provided some of these solutions.
About the author

William (Bill) Vaughn is an industry-recognized author, mentor, and subject-matter expert on Visual Studio, SQL Server, Reporting Services, and data access technologies. He’s worked in the computer industry for over 37 years. In 2000, after 14 years at Microsoft, Bill stepped away to work on his books, consulting, mentoring, and independent training seminars. He’s written over a dozen books, including Hitchhiker’s Guide to Visual Studio and SQL Server (7th Edition) and Hitchhiker’s Guide to SQL Server Compact Edition. He and Peter Blackburn also wrote the critically acclaimed Hitchhiker’s Guide to SQL Server 2000 Reporting Services.