2
Comparing Adobe Character Animator to Other Animation Apps
Adobe Character Animator is unique and comes equipped with features that are accessible to newcomers to animation. But Character Animator isn’t the only animation app out there. In fact, if you’re accessing Character Animator through Adobe Creative Cloud, you also have access to Adobe Animate and After Effects. There are also apps from other companies that offer unique features.
If all of this software can create animation, why choose Character Animator? Can you use more than one piece of software? To help make this easier to understand, this chapter will cover the following:
- What is Adobe Animate?
- What is After Effects?
- Other popular animation apps
The focus of this book is on Character Animator, and so we will only cover topics necessary for working in the app. If you don’t have access to Animate or After Effects, don’t worry. Any files we create with these apps in the book will be exported and made import-ready for Character Animator. With that said, let’s get going!
What is Adobe Animate?
Adobe Animate is one of the most well-known animation apps. You may know of it under a different name, but it cemented its popularity in the 1990s. In this section, we will cover the following:
- A brief history of Adobe Animate
- The strengths of Animate
- Using Animate with our Character Animator productions
With that said, let’s take a quick trip back in time.
Brief history of Adobe Animate
Adobe Animate is one of the longest-running 2D animation apps to exist, at least for the average consumer. While we won’t spend much time on its history, it’s always good to have a bit of context.
Created in 1996 under the name FutureSplash Animator, the app has undergone name changes and ownership changes from FutureWave Software, to Macromedia, and finally, to Adobe. The most popular name for this app was Flash.

Figure 2.1: Trial splash screen for the original FutureSplash Animator
The app saw a golden age of sorts under Macromedia in the late 1990s and early 2000s with its lightweight .swf file format. These interactive browser-based animations and games lead to a wealth of content, even helping to create the likes of Newgrounds, a popular animation community that has existed for over two decades.

Figure 2.2: Newgrounds is responsible for the popularity of Flash in the early 2000s
Many today refer to animations created in any consumer software as Flash animations. While perfect for older browsers and slower internet speeds, Flash, or rather Flash-based browser media, eventually fell out of vogue when faster and more secure content streaming went mainstream.
Figure 2.3: An early Flash cartoon created in 2002 by the author
It’s primarily used now as a traditional animation app, which is why Adobe changed the name to Animate a few years ago. Steady updates have added new tools and features, making it more in line with other popular animation apps.
The strengths of Adobe Animate
There are a few things Animate can do to help with modern animations. Here, we will be covering the following strengths of the app:
- Frame-by-frame animation
- Symbols
- Drawing tools
Arguably, there are more strengths to the app than listed here. But these are some of the main features.
Frame-by-frame animation
Because of the way you can add keyframes and use the draw tools, Animate is one of the best apps out there for frame-by-frame animation. This is the art of literally going frame by frame, using onion skins (or references from previous frames) to draw and design your animation.

Figure 2.4: An example of onion skinning in Animate
This is a traditional way of working. It’s time-consuming, but the payoff is worth it if your patience and skills are up to the task. A great example of this type of animation is the work of Harry Partridge, a prolific YouTube animator. Check out his work here: https://www.youtube.com/user/HarryPartridge.
Symbols
Symbols allow the user to create reusable looping animations and dictate when an animation should jump to a certain frame, stop playing, and other helpful tasks.

Figure 2.5: An example of an Animate project’s library
The Library also allows for the easy transfer of assets between Animate projects. These libraries can be used across multiple episodes in a series, as an example.
Drawing tools
Animate has some nice freehand-based drawing tools. The vectors you create can be shaped and molded through beziers and points.

Figure 2.6: Vectors allow for smooth lines and moldable shapes
The app is also compatible with most popular tablets, allowing for pressure sensitivity.
Using Animate with Character Animator productions
So, that leads us to the important topic for this section: why should we consider adding Animate to our toolset when using Character Animator? Here are a few of the things that Animator can help you with:
- Designing characters and assets
- Creating animations and effects
- Bringing character animator assets into animate
Animate can intake rendered Character Animator files as well, allowing for two workflows.
Designing characters and assets
As discussed previously, Adobe Animate has a strong lineup of drawing tools, allowing for both freehand and shape-based art. With the ability to export images, vectors, and PNG sequences, we can bring both animated and still art into our Character Animator productions.

Figure 2.7: An example of a more complicated character design in Animate
Alternatively, we can export our Character Animator animations and bring them into Animate. This is once again done by exporting the Character Animator content as a PNG sequence.
Importing Animate art into Character Animator
If you have a copy of Animate installed, you can access the Blob_fla_example.fla file inside of the book’s example files. This is a really simple file as we just need some context before importing it into Character Animator. If you don’t have a copy of Animate installed, don’t worry! We have the exported file needed to import into Character Animator available in the exercise files.
This is a simple vector-based creation using Animate’s draw tools. We have two groups housing eye and mouth phases. Here, is how we can get this creation over to Character Animator:
- Go to File > Publish Settings.
- Under OTHER FORMATS on the left side of the panel, click on the text SVG Image.
- New options will appear on the right. Be sure to check Optimize for Character Animator.

Figure 2.8: The Publish Settings panel
- Press the Publish button.
- Open Character Animator.
- Make sure the Rig tab is open. The previous project we worked on will automatically open, which is fine.

Figure 2.9: The rig workspace in Character Animator
- Double-click inside the upper left Project panel, or use Ctrl + I or ⌘ + I to import a file.
- Locate the .svg file you just exported from Animate and double-click to bring into Character Animator. Alternatively, you can look under the book’s files and open blob_fla_example.svg.
Once imported, note how the Animate layers transfer over. This is useful, although it is lacking the groups in the original Animate file. While disappointing, we can still organize groups and other functions to properly set up the rig in Character Animator.

Figure 2.10: Our vector-based character imported into Character Animator
If we look at the Puppet panel, we will see the four poses that were brought over with the import. These will appear as layers.
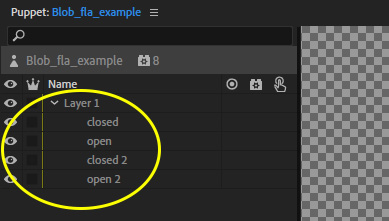
Figure 2.11: The .svg file will transfer layers over when properly exported – minus folders
We will learn more about the importance of layers in the next chapter.
Creating animations and effects
While Animate has some nice drawing tools, its primary function is to animate. It’s easy to import these animated creations into Character Animator, adding even more life and detail to your productions.
Character Animator is for animating characters and building sequences. It doesn’t offer much in terms of effects or particles, which is why we sometimes need to use other apps.
Once again, we will briefly look at Animate and if you don’t have a copy, don’t worry. The exported content is available in the book files.
Exporting and importing Animate content for Character Animator
If you open Animated_smoke.fla in the book files, you will see a simple puff of smoke animate across 20 frames. We are going to add this animated smoke to Character Animator.

Figure 2.12: The animated puff of smoke in Animate
For importing animated content into Character Animator, image sequences will need to be exported. An image sequence is an exported sequence of frames, with each frame represented in an image. Lots of animation and video software, including Character Animator, recognize these sequences and put them together so they animate like a video clip when imported.
To export a PNG sequence of the smoke in Animate, you need to do the following:
- Go to File > Export > Export Movie (Ctrl + Alt + Shift + S or ⌘ + ⌥ + Shift + S).
- Here you can choose a name and where to save the sequence. It’s recommended you create a new folder to place the images in to keep everything contained and organized.
- Before saving, make sure Save as type, which is located at the bottom of the save panel, is set to PNG Sequence (*.png). PNGs are preferable for quality, as well as their ability to use transparent backgrounds.

Figure 2.13: Choosing PNG Sequence (*.png) as the type
- Once ready, press Save and Animate will export each frame of animation as a PNG.
How do we import this sequence into Character Animator? Unlike puppets, we can’t use the traditional import method as doing so will just bring in a single image. To import a PNG sequence, you need to do the following:
- Open Character Animator.
- Go to File > Import Cycle.
- A new file browser window will appear. Locate the first image of the sequence and click on it. To ensure it’s the first frame, organize the files by name and select Animate_smoke0001.png.

Figure 2.14: Selecting the first image is the best way to ensure all files are accounted for
- After processing, the sequence will appear in your project browser.
- Click the Record tab on the top.
- Click and drag the sequence from the project panel to the bottom of the screen (this is where the timeline is located).
- With the sequence on the timeline, you should be able to hit the Play button and see the smoke animate out. Make sure you’re at the beginning of the timeline before hitting play to see the result.
This not only works with smoke effects but also with anything else you may choose to animate. As long as the file result ends up as an image sequence, Character Animator can decipher the cycle.

Figure 2.15: The smoke PNG sequence on the Character Animator timeline
To sum up this part, Adobe Animate is a great app and can create amazing content all on its own. But it can also be a great companion app for Character Animator. Keep this in mind if one of your productions needs outside content.
What is Adobe After Effects?
After Effects has lots of applications. Many people don’t use it only for animation, but rely on its powerful video editing tools to create stellar pieces of media. In terms of functionality, it shares some similarities with Animate. But with After Effects’ wide range of uses, there are more tools and menus to rummage through. We’re just going to touch on some basics in terms of how these additional tools and menus can bolster Character Animator productions. In this section, we will cover the following:
- A brief history of Adobe After Effects
- The strengths of After Effects
- Using After Effects with our Character Animator productions
A brief history of Adobe After Effects
Like Animate, After Effects started its life in the early 1990s, under the Company of Science and Art. Originally, the application gained attention for its use of layers, masks, and keyframes, with very humble beginnings compared to how big it grew.
Figure 2.16: The After Effects app logo
As the app continued to develop and undergo changes in ownership, After Effects built up its reputation as a high-tier consumer video compositing application with a suite of animation tools.
The strengths of After Effects
After Effects has a lot of uses and like Animate, it can be a bit overwhelming to get a handle on. Breaking it down, After Effects is effective in the following areas:
Compositing and grading media
After Effects allows for limitless creative control with masking, coloring, and adding special effects to video or animation. If you have a copy of After Effects installed, you can open the included file, blob_ae_example.aep. As you can see in the following figure, our blob character got an upgrade: a blur, glow, and gradient were added.

Figure 2.17: Left – No effects. Right – glow, blur, and gradient effects
That’s not even scratching the surface of what we could do. You can target individual layers, create compositions, use keyframe animation for custom dynamic effects, and so much more.
Motion graphics
After Effects is great for creating animated titles or moving shapes. With the ability to work in 3D space and a camera, plus dozens of helpful tools, creating eye-catching animated shapes and text is a pretty simple process. If you wish to view an example, check out hello_3D_text.aep.

Figure 2.18: After Effects allows for rudimentary 3D, light, and camera effects
Drawing meshes allows for morph effects and rudimentary character rigging. Add functionality with Cinema4D, a 3D modeling app, and you have a lot to dig into, if you wish.
Expanding toolset and capability
After Effects has hundreds of free and paid plugins, you can use to expand the app’s capabilities. This includes the ability to create frame-by-frame animations (similar to Animate), add bone tools for true character control, and add custom or expanded effects.
Using After Effects with our Character Animator productions
Ultimately, what can After Effects do for our Character Animator productions? Here are a few basic examples:
- Grading a scene you animated in Character Animator
- Adding visual effects (such as a glow) to characters or props
- Creating animations for import into Character Animator
- Importing Character Animator animations to After Effects
- Camera movements in 3D space
Another nice thing about After Effects, is it can read Character Animator files and import them in. This means you can import animations for Character Animator directly into After Effects with no need for rendering beforehand. We will look at a few of these examples once we finish recording an animation in Character Animator.
Other popular animation apps
There are many animation apps from other developers with various strengths. The downside to these is they are not in Adobe Creative Cloud. However, some of these apps are free or offer trials, which is nice.
As you continue to learn animation, you may find it beneficial to check out some of these other apps to see if they can help with your productions:
- Moho (https://moho.lostmarble.com)
- Toon Boom (https://www.toonboom.com)
- Blender (https://www.blender.org)
- Cinema 4D (https://www.maxon.net/en/cinema-4d)
- OpenToonz (https://opentoonz.github.io/e/)
- TVPaint Animation (https://www.tvpaint.com)
Again, these are completely optional and something to keep in the back of your mind.
Summary
Remember, we require none of the previously covered apps to animate cartoons with Character Animator. They can enhance your production and with Animate and After Effects being available on Creative Cloud, it doesn’t hurt to have some extra knowledge. Just remember the following:
- Animate is great for traditional animation, such as frame-by-frame
- After Effects allows us to add effects and polish to our productions
- You can use the previously covered apps with Character Animator, or vice versa
- Other applications have their own strengths and may be useful if the Adobe apps aren’t a good fit
In the next chapter, we are going to begin our Character Animator production by preparing a PSD-based character for rigging!