
11
Rearranging, Polishing, and Enhancing Our Sequence
In the previous chapter, we laid down animation for both of our fully rigged characters. Now, we are going to arrange the actions to create a linear scene, as well as looking at any other areas that could use some improvement. This will set us up to export the scene as a video so we can do some editing in After Effects and Premiere, which will come in the next chapter.
But for now, we will cover the following:
- Using PNG sequences for external animations
- Adding more character actions
- Arranging character actions in sequence
- Correcting flaws and enhancing animations
By the time we are done, you will have a coherent sequence you can view in Character Animator and export out for further editing or sharing. This will also give you an opportunity to further understand how the timeline works. So, with that said, let’s get going!
Technical requirements
In this chapter, we will reference Version 8 in the Chat_With_Chaz Character Animator project file. We will also reference the AudienceAnimation.png sequence, which comprises 60 images in a folder. We will combine these images to take advantage of the Cycle Layers behavior.
Using PNG sequences for external animations
While Character Animator is great for quick character animation, there may be some tasks best left to other apps. In these cases, we have choices of how to implement external animations. These PNG sequences can be implemented during editing once you export them from Character Animator, or you can import sequences to Character Animator and integrate them into the set. In this chapter, we will do the latter.
Importing PNGs for the sequence
Like importing PSDs or other files, we will import the sequence of images onto our Project panel. This animation comprises 60 individual images and we can link behavior to allow a cycle effect.
To import the image sequence, take the following steps:
- Make sure you’re on the Rig tab.
- Double-click a blank area on the Project panel to bring up the import prompt.
- Browse to the AudienceAnimation folder, which is in the book project files.

Figure 11.1: You will find 60 images inside the AudienceAnimation folder
- Inside the folder will be 60 images. Select these (Ctrl +A or ⌘ + A) and select import.
- Once the images are on the Project panel, create a new folder labeled audience animation and drag the images into it to keep the panel organized.

Figure 11.2: The audience images on the Project panel
- Right-click on AudienceAnimation_00001 and rename the layer to Audience Animation Main.
- Double-click the newly renamed Audience Animation Main to jump into the Puppet panel.
- Select AudienceAnimation_00002 to AudienceAnimation_00060 on the Project panel and drag them into the Puppet panel.

Figure 11.3: You will find 60 images inside the AudienceAnimation folder. You can see the first nine in this image
Right now, this will not do much other than overlap 60 images over one another. We will need to add behavior to tell Character Animator to cycle through the images.
Adding Cycle Layers behavior
We will add a behavior to this sequence just like we added behaviors to our Chaz rig:
- While in the Puppet panel, locate the Behaviors button for Audience Animation Main.
- Click the Behaviors button and choose Cycle Layers from the list.
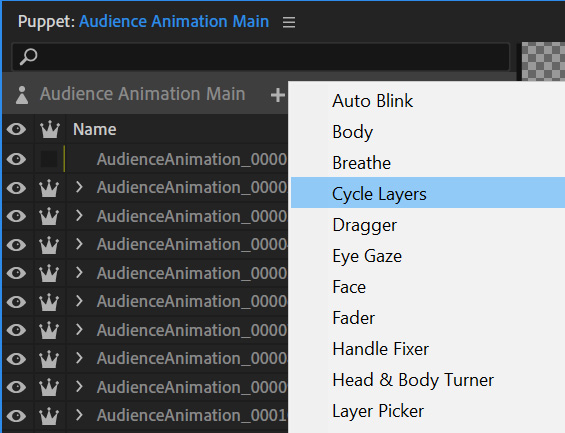
Figure 11.4: Clicking the + icon next to Audience Animation Main will allow you to add behaviors
- Once you set this behavior, a new panel will appear with Cycle options. There are a few ways you can control the sequence. For our purposes, we want the animation to play once when we hit the Play or Record button.
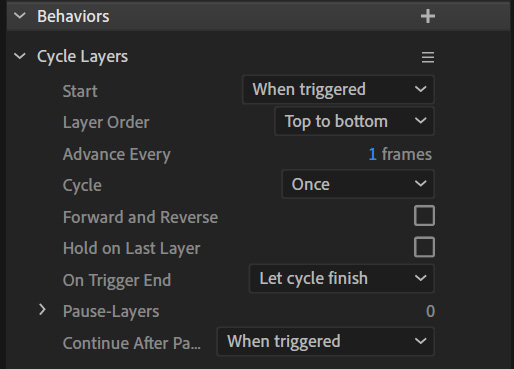
Figure 11.5: The Cycle Layers behavior provides many options for your .png images
By default, you will see the animation won’t start unless enabled by a trigger. But what about the other options? Here is a quick rundown of them:
- Start: Choose to start the cycle automatically or by trigger.
- Layer Order: This will dictate the animation order. Since we have our images labeled 1–60, with 1 being at the top, Top to bottom is the option we want to choose here.
- Advance Every: Dictates the speed of the animation. If set to 1, the cycle will play on every frame based on Project’s established frames per second. If set to a higher value, the animation will play slower based on the framerate.
- Cycle: You can choose whether you want the animation to play once or loop continuously.
- Forward and Reverse: Choose to reverse the animation as it’s currently displayed.
- Hold on Last Layer: When enabled, will freeze on the last image in your sequence once the cycle is complete.
- On Trigger End: If you have a trigger set to stop the animation in this cycle, you can choose whether you want the animation to play all its frames before stopping or stop right when the user presses the trigger.
- Pause-Layers: Choose layers you’d like to pause on during the animation.
- Continue After Pause: Choose whether to continue right when the key is pressed down or when it’s released.
- With a better understanding of how we can work with cycling layers, let’s begin by changing Start to Immediately, so that way the audience will animate with no intervention on our end.

Figure 11.6: You have three options for how you want to trigger the animation
- Let’s also make sure the animation is set to play once and hold on to the last layer. This will let the audience cheer for 3 seconds and then freeze on the last frame.

Figure 11.7: Hold on Last Layer will prevent the .png sequence from disappearing on completion
Now we can move on to placing the audience appropriately in the scene.
Adjusting the audience in the scene
We will need to add the audience animation to the scene and make the adjustments. To do this, take the following steps:
- Make sure you’re on the Record tab.
- Drag Audience Animation Main above STUDIO LIGHT.

Figure 11.8: The audience will overlay all other layers
- The audience will appear offset. Go to the Transform panel with the audience still selected and set Position Y to 544%. This should place the audience properly within the set.
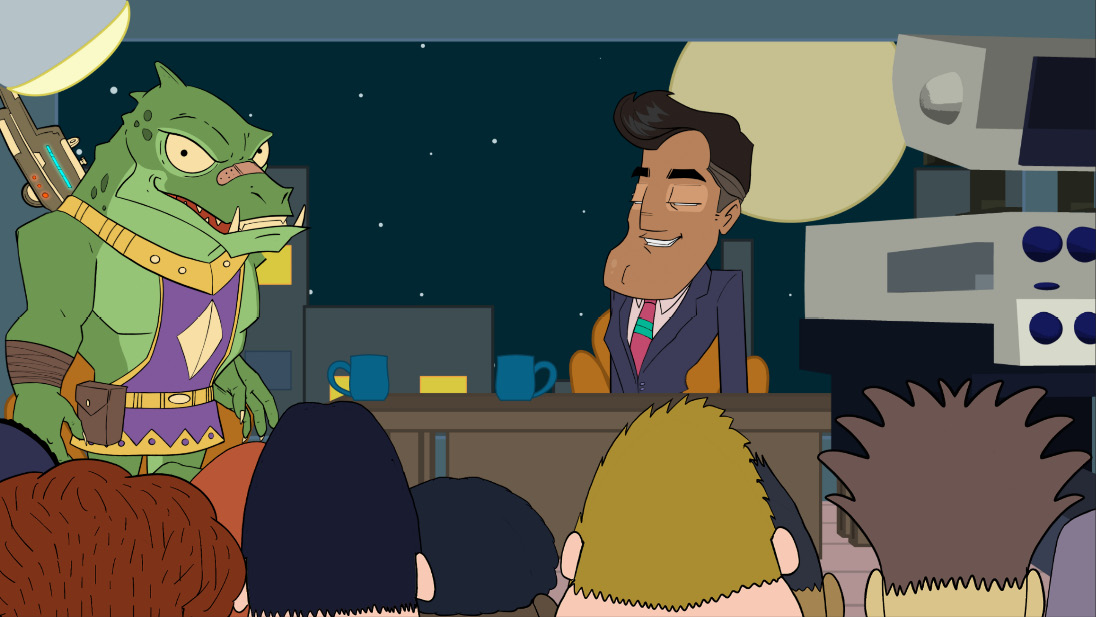
Figure 11.9: You will find 60 images inside the AudienceAnimation folder
With the audience now on set, we have all major sequences ready to be polished and reordered. Up next, we will focus on arranging the layers so that everything runs in a nice linear and logical fashion. Luckily, we can edit our keys on the timeline. Let’s rearrange, tweak, and even add some more actions through triggers.
Adding more character actions
While we added some basic face and head animations to Chaz using the webcam, the alien is only currently being lip-synced. With the alien’s gaze, emotion, and body language being static, the animation is less engaging. Luckily, we can go back in and add some actions, breathing more life into the conversation.
Adjusting the alien’s gaze
Setting the alien’s pupils to look at Chaz will give the character and the scene a bit more depth:
- Go back to the Rig tab and double-click Alien_Guest_v2 in the Project panel.
- Click once on the 3-4th Head layer.
- Using the + icon on the bottom right, add a new Eye Gaze behavior.

Figure 11.10: You have many options with Eye Gaze
- Now, go to the Record tab.
- Click Alien_Guest_v2.
- Locate Eye Gaze [3-4th Head] and expand it to reveal its options.
- Ensure only Keyboard Input is set to record. This will allow us to control the pupils using our arrow keys. Here, pressing left will move the pupils right and vice versa due to us mirroring the rig on the set.
- Set Keyboard Strength to 70% to keep the eyes from drifting too far.

Figure 11.11: Set Keyboard Strength to 70%
- Set the play head back to 00:00:00.
- We are going to record the new eye gaze action. To do this, hold down the left key and then press the Record button. Hold the left arrow key until around the beginning of the alien’s dialogue. This will allow him to glance at Chaz and then look at the audience as he talks.

Figure 11.12: If everything works correctly, the alien will appear to be looking at Chaz
As we do this, keyframes for Eye Gaze will start to record on the timeline.
![Figure 11.13: You should see keyframes for Eye Gaze [3-4th Head]](https://imgdetail.ebookreading.net/2023/10/9781803246949/9781803246949__9781803246949__files__image__Figure_11.13_B18354.jpg)
Figure 11.13: You should see keyframes for Eye Gaze [3-4th Head]
With the gaze set, let’s add a bit more life to the eyes. Luckily, there’s a built-in behavior that makes this easy.
Setting automatic blinks for the alien
While we could set the blinks to record and use our camera to capture our own blinks, like we did when we recorded Chaz’s base actions, we’re going to use a special behavior to give you the chance to explore more tools. Here’s what we need to do:
- Go to the Rig tab.
- Click 3-4th Head.
- On the bottom right of the Behaviors panel, click the + icon and then Auto Blink.
Figure 11.14: Auto Blink is the first behavior on the list
- Once added, you can adjust three parameters, choosing how many blinks per minute to set, how long a blink lasts, and how random the blink occurrence is. We will leave these at the default settings, but experiment if you wish.

Figure 11.15: These are the default settings, but if you want to adjust the blink animation, feel free
- Go to the Record panel and see the blinks taking hold. Locate Auto Blink [3-4th Head] and set it to record. That way, it’ll be functioning for preview and exporting purposes.
Preview the scene to see how the blinks add to the conversation and character interactions. Now, we can add a little body movement to the alien to help add even more life to the sequence.
Adding arm movement to the alien
While we have set down keyframes to allow the alien to sit, we can make the sequence more interesting by adding body movements, such as arm gestures. This can be as subtle or extreme as you like. Since we already added Dragger keys, let’s add a new dragger and isolate it to the left or front arm.
For this purpose, we are going to have the alien raise his arm as he talks:
- Go to the Rig tab and click on Alien_Guest_v2.
- Click on the Front Arm group layer.
- At the bottom right, click the + button next to Behaviors and choose Dragger.
- Go to the Record tab. Among the behaviors, locate the new dragger for the left arm. Set this to Record, leaving all other behaviors unarmed.
![Figure 11.16: Make sure only Dragger [Left Arm] is set for record](https://imgdetail.ebookreading.net/2023/10/9781803246949/9781803246949__9781803246949__files__image__Figure_11.16_B18354.jpg)
Figure 11.16: Make sure only Dragger [Left Arm] is set for record
- Click the Record button on the timeline. Let the animation play out until the alien speaks. Grab the front wrist and raise it as he talks.

Figure 11.17: Raising the arm as the alien speaks will breathe more life into the conversation
- Near the end of his line, lower the arm.
- Once you’re finished, press Stop and replay the scene. The alien should remain sitting while the arm animates independently from what we previously established.
By now, you should understand how we can build movements using multiple behaviors. But what about Chaz? While we recorded his actions, there may be some issues that cropped up. Luckily, we can edit these actions after the fact to make the animation more pleasing.
Note
The alien’s tags will be flipped (left arm and leg being on the right and vice versa). This is due to changing the Scale X to –100 in the previous chapter. We can counter this by flipping the character before setting up and tagging the rig.
Arranging character actions in sequence
When we recorded our character actions in the previous chapter, we didn’t pay attention to proper ordering. That’s fine, as we were only focusing on getting the audio and basic keys laid down.
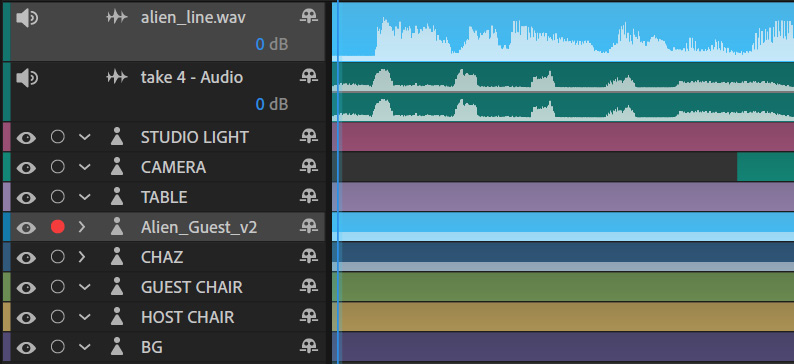
Figure 11.18: As it stands right now, the timeline is a mess
But right now, if we play the animation, it will appear as a jumbled mess. The first thing we should do to work through this is pull up our script or outline from the previous chapter that lays out the scene. We can use this as a blueprint for timeline ordering:
We will start with a zoom-in on the stage as the audience cheers.
Chaz laughs and welcomes the audience back from the commercial break:
“Welcome back to Chatting with Chaz! I am, of course, your adoring host, Chaz, and today we have a special guest!”
Cut to show alien.
“An alien from outer space! How are you doing, sir?”
The alien replies: “Oh, you know, just sort of hanging out, planning to take over Earth, that sort of thing.”
“Well, that’s great, I... wait, what?”
Suddenly, three more aliens transport onto the set!
The first line suggests we have a moment for the audience to react before Chaz speaks. This means we should push any of Chaz’s and the alien’s actions forward on the timeline to create space for the audience’s reaction. Let’s push everything up by 1 second except for the audience. To do this, take the following steps:
- While on Record, starting with alien_line.wav and take 4 - Audio at the top of the timeline, click and drag each of those layers 1 second to the right.
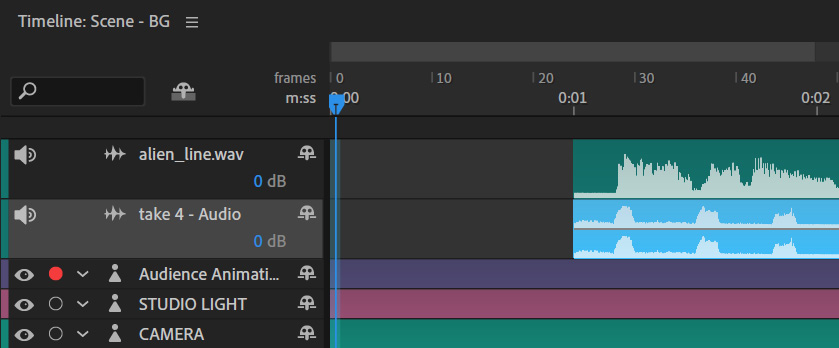
Figure 11.19: Both audio files should start at 0:01
- We will need to move Chaz and the alien’s actions forward as well to match. Starting with CHAZ, click the drop-down arrow to reveal all the keyframes.

Figure 11.20: Expand the CHAZ layer to access the recorded behavior
- We want to move most of these actions to the 1-second mark so we can match the audio. The exception here is Dragger. We used Dragger to set the character at his desk. We want to keep him there at the start of the animation. So, move Eye Gaze, Face, Lip Sync, and Head & Body Turner over to the 1-second mark.

Figure 11.21: Move Chaz’s actions up by 1 second to match his audio file
Finally, we need to properly sequence the alien’s interaction with Chaz. While giving the scene a second to establish itself is good, having both characters talk at the same time makes no sense. We will also need to create some space for the alien’s line to play out before Chaz answers him. Here’s how to make the adjustments:
- Starting with the audio, select take 4 - Audio.
- Use ⌘ or Ctrl + D to duplicate the layer.

Figure 11.22: We will be duplicating the audio file to split the lines up
- Trim the top audio file to remove the dialogue “Well, that’s great, I... wait, what?”.
- For the bottom take 4 - Audio layer, trim from the beginning, and remove everything except for “Well, that’s great, I... wait, what?”. This will create a space to add the alien’s reaction.

Figure 11.23: Trimming the audio files provides us with more freedom when arranging actions
- Now, arrange the lines so that the alien_line.wav layer sits in between the two take 4 - Audio files.

Figure 11.24: We need to place the alien’s line between Chaz’s split audio file
This will offset the character actions with the audio. Therefore, we need to rearrange the recorded actions for both characters so they match the new audio locations on the timeline. Let’s relocate the alien’s actions first:
- Expand Alien_Guest_2 and locate Lip Sync.
- Select the Lip Sync and Visemes keys.
- Drag them over to the left to match the audio for the alien. The start frame should be at around 00:17:03.

Figure 11.25: Drag the Lip Sync and Visemes keys up to 00:17:03
We also need to account for the Dragger behavior we added to the alien arm. As it stands right now, he will speak and then raise his arm. We want the alien to raise his arm as he speaks:
- Locate Dragger [Left Arm] [Alien_v2] and drag it to the left.
- Move it a little at a time and test the animation until the arm is raising with his dialogue.

Figure 11.26: Moving the keys will change when the animation starts
Once that is set, we need to account for Chaz’s last line. This means we need to arrange his mouth and body actions as well:
- Collapse the Alien_Guest_v2 layer for easier viewing.
- Expand the CHAZ layer to see the recorded actions.
- Starting with Lip Sync, click and drag the sequence so that it matches the end of the last audio file on the timeline.

Figure 11.27: By extending the Lip Sync behavior, we can add the visemes closer to the end of where the line now is
- Then, grab the visemes starting at 00:18:03 and move them over to match the audio file at the start of 00:22:20.
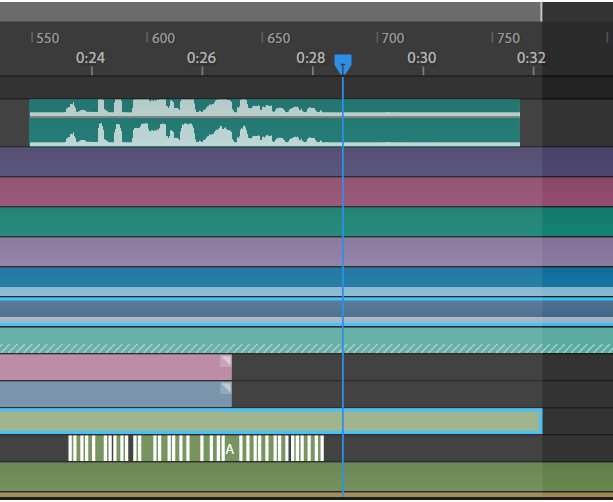
Figure 11.28: Move the visemes up to match the start of the audio file
With these changes, playing the animation back should now reveal a scene in the correct order, with no overlapping dialogue, and proper lip-syncing. Now, we can add a bit more life to the character actions.
Correcting flaws and enhancing animations
While using the camera is a great way to lie down animation quickly, you may find some anomalies pop up. In our case, the character’s head is turning but the actions are random in duration and appearance. Don’t worry, this is where the script comes in. By using it as a guide, we can plan out when to turn the head and for how long.
So, to add refined head turns to Chaz’s actions:
- Go to the Record tab.
- Expand the CHAZ layer.
- Click on the take 4 - Camera Input sequence for Head & Body Turner.

Figure 11.29: Locate the Head & Body Turner behavior for CHAZ
- Remove it by pressing the Delete key on your keyboard.
We are now going to re-apply the head-turn animation. We can do this using the webcam or with triggers. But we’re only going to focus on turning the head. To do this, let’s break down Chaz’s dialogue and plan out when we should turn his head:
“Welcome back to Chatting with Chaz! I am, of course, your adoring host, Chaz, and today we have a special guest!... An alien from outer space!”
During these lines, we will want to have our character face the audience.
“How are you doing, sir?... Well, that’s great, I... wait, what?”
With these lines, Chaz should face the alien guest. Once those lines end, we can have Chaz go back to the 3/4th view.
With that in mind, here’s what you need to do:
- Turn your webcam on if it’s not already.
- Ensure CHAZ is still selected.
- Make sure Head & Body Turner [Heads] is the only behavior set for recording.
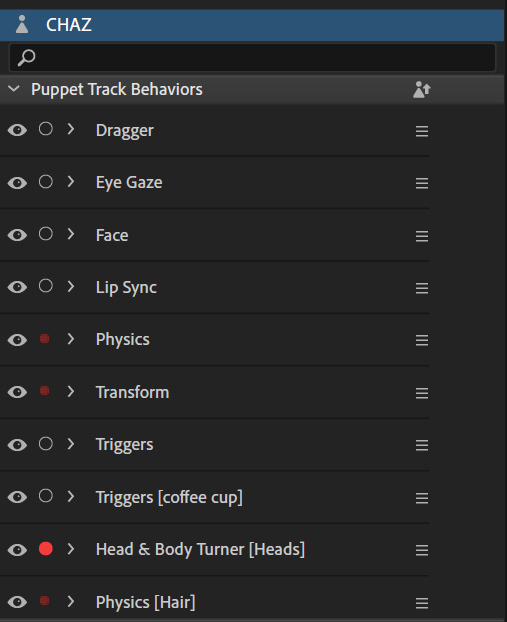
Figure 11.30: We’re only focusing on the head turns for this part
- Bring the play head back to 00:00:00.
- Press Record.
- After the countdown, turn your head to the right to have the character face the audience.

Figure 11.31: Since the default position for our head is the 3/4th view when looking directly at the camera, turning right will activate the front view
As you make your movements, the puppet will react accordingly:

Figure 11.32: Chaz should react according to your head movement. In this case, he’s facing the camera

Figure 11.33: Looking left will also activate the left-head phase
The puppet should match the left-facing head:

Figure 11.34: Chaz faces left, just like what you see in the webcam preview window

Figure 11.35: Looking forward will activate the default 3/4th view
Facing forward will activate the default view, which in our case is the 3/4th shot:

Figure 11.36: Chaz’s default head view
- Once the recording is complete, press Stop or the spacebar and replay the recording to see whether the head actions line up. If needed, you can delete the keys and try again until you get it right.
From here, look at the gaze and make sure it’s lining up. If the eyes are drifting, you can choose to re-record the action. The same goes for anything else you’ve recorded. Remember, you can apply manual controls if you need even more refinement.
Summary
While Character Animator allows you to press a record button and create an animation, the results may sometimes not transfer the way you intended. You can add, change, and remove actions. Being able to isolate specific actions to fine-tune them is very helpful. Even if you can’t record an animation in sequence, the timeline is powerful enough to allow for isolating actions and rearranging them to create a cohesive narrative. Finally, don’t forget you can add outside animations using the PNG sequence behavior built into the app. The more you try out these behaviors, the more possibilities you’ll find.
So, what’s next? There are several ways we can edit and enhance our production. In the next chapter, we will be exporting our work to be shared, visually enhanced through After Effects, and tightened up in Premiere.