
Chapter 1. Workspace
Come on in! Let us show you around. We’ll be your tour guides to the world of InDesign. We’re here to tell you what’s what, what’s where, and how it fits together. This chapter is all about InDesign’s user interface—the myriad windows, panels, menus, and other gadgets InDesign displays on your screen. It tells you what they all are, and what we call them. This is important, because not everything in InDesign is clearly labeled—as you read through the techniques in this book, you need to know that we mean this button over here, and not that button over there.
This chapter also contains lots of tips and tricks for working with InDesign’s user interface. These are the “little things” that make all the difference between enjoying and hating the time you spend working with InDesign (or any other program, for that matter). The point is to get you up to speed with all of these new tools so that you can get on with your work.
If you have used earlier versions of InDesign, you’re no doubt wondering: does Adobe have to change the user interface with each new version? We don’t know. Probably.
Ready? Let’s start the tour.
A Note About Keyboard Shortcuts: Throughout this book, we will refer to keyboard shortcuts using the format: Mac OS/Windows, as in “Command-Z/Ctrl-Z” (this is not necessarily in our order of platform preference, but it is in alphabetical order).
Another Note About Keyboard Shortcuts: Since you can redefine most of the keyboard shortcuts in InDesign, we can’t guarantee that your keyboard shortcuts will match ours. And we can’t follow every keyboard shortcut in the text with the disclaimer, “…or the shortcut you’ve defined for this action.” As you read this, bear in mind that we’re using the shortcuts from the default keyboard shortcut set.
Yet Another Note About Keyboard Shortcuts: A few of InDesign’s default keyboard shortcuts—especially those for selecting tools—do not use a modifier key (by “modifier key,” we mean Command, Control, Option, Ctrl, Alt, Shift, and so on). If you’re editing text, you can’t use these keyboard shortcuts without deselecting the text, or you’ll end up entering characters in the text.
The keyboard shortcut to switch to the Pen tool, for example, is “P.” If you press the shortcut while the cursor is in text, you’ll enter the character “P.” If you use InDesign to set type (as most of us do), you’ll almost certainly want to add a modifier key to the unmodified keyboard shortcuts you use most often.
Layout and Story Windows
When you open or create an InDesign document, you view and work on the publication using one or more windows (see Figure 1-1). InDesign windows come in two flavors: layout windows give you a view of a page or spread; story windows show a section of text in a document. You can have multiple windows of either type open at once. We’ll cover story windows in more detail in “The Story Editor,” in Chapter 3, “Text.”
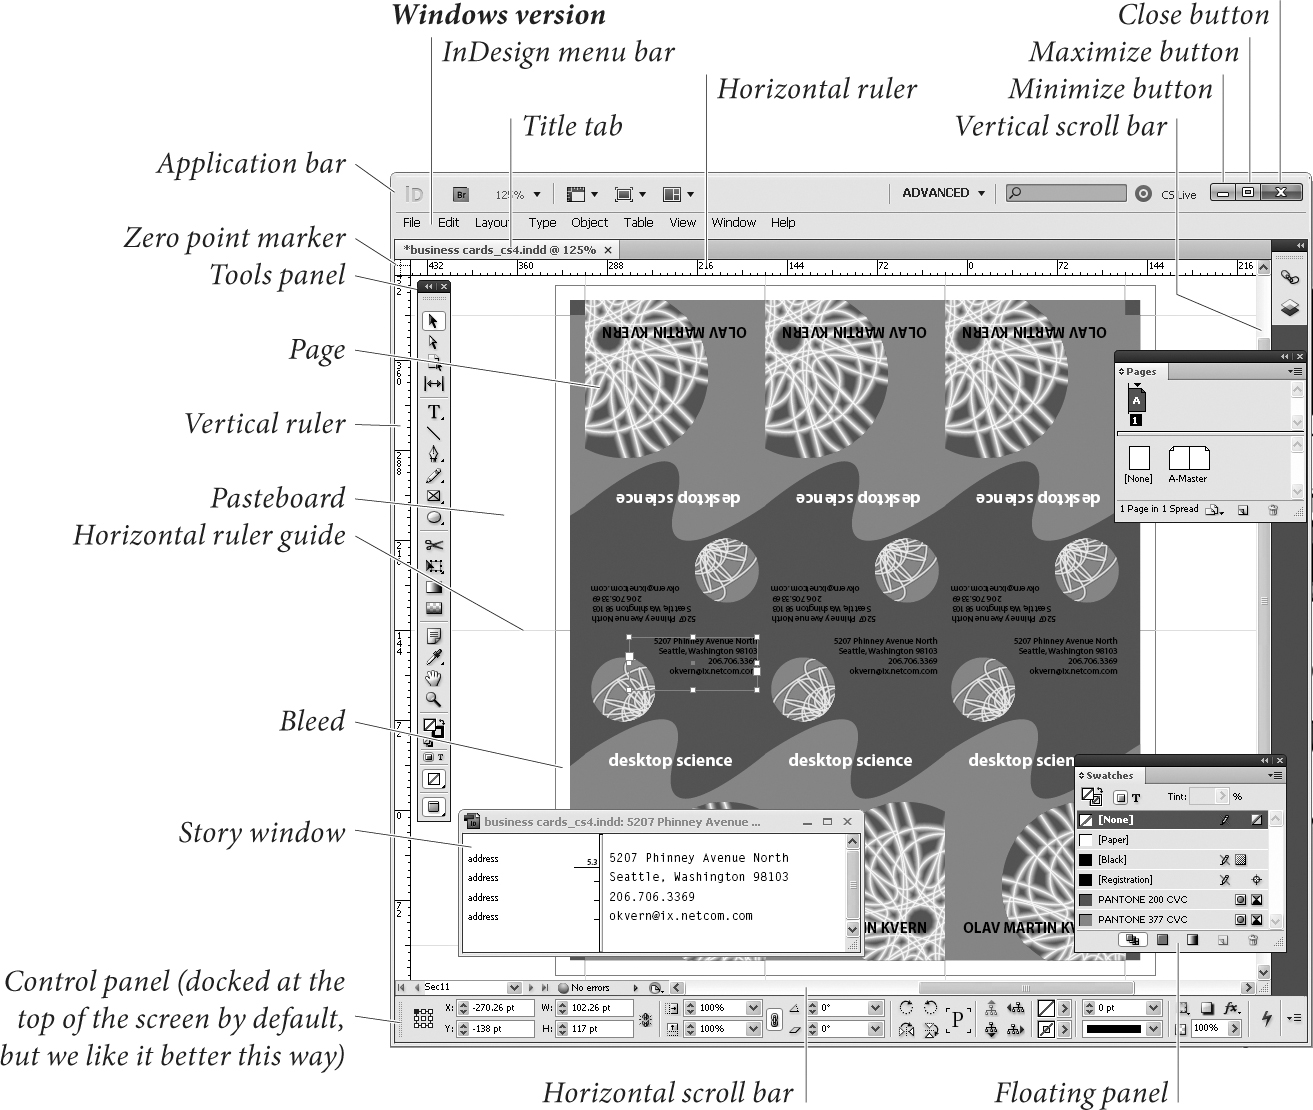

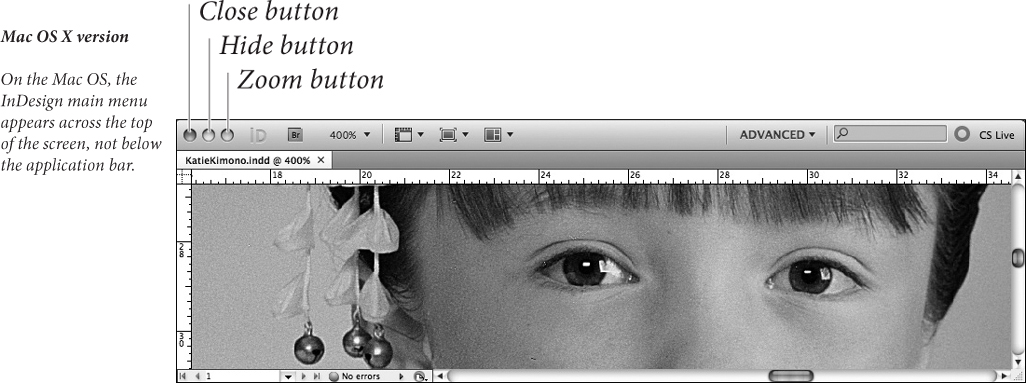
Figure 1-1. InDesign Windows
The view of the document you see in a layout window can be magnified or reduced, and each layout window can be set to a different magnification. Since magnification is primarily a way of moving around in your publication, we’ll cover it later in this chapter, in “Publication Navigation.”
Application Frame
On the Mac OS, you can choose to have InDesign keep its windows inside a single frame or to treat each window as a separate item. Turn on the Application Frame option from the Window menu to do the former; turn it off if you prefer to accidentally switch out of InDesign by clicking on the desktop or a window belonging to some other application. If you turn this option off, the close/minimize/maximize buttons will disappear from the Application Bar and appear on each window.
Application Bar
At the top of the screen, you’ll usually see the Application Bar (see Figure 1-2), which contains controls for changing the workspace and window arrangement, changing window magnification, launching Adobe Bridge, and searching Adobe’s online InDesign help.

Figure 1-2. Application Bar
The appearance of the Application Bar differs slightly between the Windows and Mac OS versions of InDesign. In Windows, you’ll see the control menu, close/minimize/maximize buttons, and you might see the main menu (if the window is maximized). The main menu on the Mac OS appears at the top of the screen, and is not associated with the window.
On the Mac OS, you can turn the Application Bar on or off—it’s an option on the Window menu (when Application Frame is off).
Title Bar
At the top of a document window you’ll see the title bar or title tab, which contains the name of the document. If the document has not been saved, an asterisk (*) appears next to the name.
To close a window, press Command-W/Ctrl-W (or Ctrl-F4 in Windows). To close all windows, press Command-Option-Shift-W/Ctrl-Alt-Shift-W. If you have unsaved changes in any of the documents you’re closing, InDesign will ask if you want to save them.
Pasteboard
Like most other page layout programs, InDesign is built around the metaphor of the traditional layout table. In the days before this desktop publishing fad came along, we would lay out our pages on a table, drafting board, or desk. As we did our layout, we’d place our waxed galleys of type and artwork on the pasteboard, an area off the page. We would then move the items onto our layout as they were needed. The pasteboard is the same in InDesign—an area off the page on which you can place elements for future use (see Figure 1-3).

Figure 1-3. Pasteboard
The pasteboard is not a fixed size, as it was in PageMaker, and it’s not shared between spreads—each spread has its own pasteboard (as in QuarkXPress). You can use areas of the pasteboard for temporary storage of the elements you’re working with—just drag the elements off the page, and they’ll stay on the pasteboard until you need them (again, this is just like an old-fashioned layout board).
By the way, you can also make the height of the pasteboard larger (providing more space above and below the page); we cover that in “Guides and Pasteboard Preferences,” later in this chapter.
Scroll Bars
The most obvious, least convenient, and slowest way to change your view of your publication is to use a scroll bar (that is, to click in a scroll bar, drag a scroll handle, or click the scroll arrows). For more on better ways to get around, see “Publication Navigation,” later in this chapter.
Page Field and Page Buttons
The Page field/pop-up menu and its attached navigation buttons give you a way to get from one page to another. Click the Previous Page button to move to the previous page in your publication, or click the Next Page button to move to the next page. Alternatively, you can click the First Page button to go to the first page in the publication, or the Last Page button to go to the last one.
If you know exactly which page you want to go to, choose the page number from the Page pop-up menu or enter the page number in the Page field. You can jump directly to the Go To Page dialog box by pressing Command-J/Ctrl-J.
Zoom Level
Enter a magnification percentage in this field in the Application Bar, or choose one from the attached pop-up menu, and InDesign magnifies or reduces the view of the document you see in the window. There are better ways to do this, as we show in “Publication Navigation,” later in this chapter.
Preflight
The Preflight area (the icon and related pop-up menu) in the lower-left of window shows you the preflight status of the document. For more on the Preflight feature, refer to Chapter 11, “Printing.”
Status Pop-Up Menu
The Status pop-up menu lets you display the document in its folder, in Bridge, or in Mini Bridge. Choose Reveal in Finder (Mac OS) or Reveal in Explorer (Windows) to open the folder containing the document. Choose Reveal in Bridge to display the folder in Bridge. Choose Reveal in Mini Bridge to display the folder in Mini Bridge.
Rulers
Pressing Command-R/Ctrl-R displays or hides InDesign’s rulers—handy measuring tools that appear along the top and left sides of a publication window (see Figure 1-4). The rulers are marked off in the units of measurement specified in the Units & Increments Preferences dialog box. The increments shown on the rulers vary with the current magnification; in general, you’ll see finer increments and more ruler tick marks at 800% size than you’ll see at 12% size.

Figure 1-4. Rulers
As you move the cursor, lines in the rulers (we call them “shadow cursors”) display the cursor’s position on the rulers (see Figure 1-5).

Figure 1-5. Shadow Cursors
To change the units of measurement used by a ruler, Control-click/Right-click the ruler to display the Context menu. Choose a new measurement system from the menu, or choose Custom to enter a custom measurement increment (if you do this, InDesign displays the Custom Measurement Unit dialog box, where you can enter the measurement unit you want to use).
Zero Point
The intersection of the zero measurement on both rulers is called the zero point. To change the location of the zero point, drag the zero point marker (see Figure 1-6).

Figure 1-6. Moving the Zero Point
As you drag, intersecting dotted lines show you the position of the zero point. Stop dragging, and the rulers will mark off their increments based on the new position of the zero point marker. To reset the zero point to the default location, double-click the zero point marker.
To lock the position of the zero point, use the Context menu. Point at the zero point, then hold down Control and click (Macintosh) or click the right mouse button (Windows). Choose Lock Zero Point from the Context menu (see Figure 1-7). To unlock the zero point, display the Context menu and turn off Lock Zero Point.
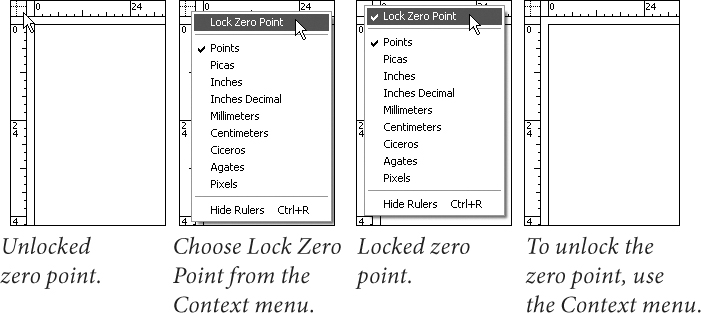
Figure 1-7. Locking the Zero Point
Managing Multiple Windows
To open more than one window on a document, choose “New Window” from the Arrange submenu of the Window menu. Now that you have two windows open, you can arrange them by choosing either Tile Windows Horizontally or Tile Windows Vertically from the Arrange submenu of the Window menu (see Figure 1-8). Choose Cascade from the Arrange submenu of the Window menu to stack the open document windows on top of each other. You can other arrangement options from the Arrange Documents pop-up menu on the Application bar.
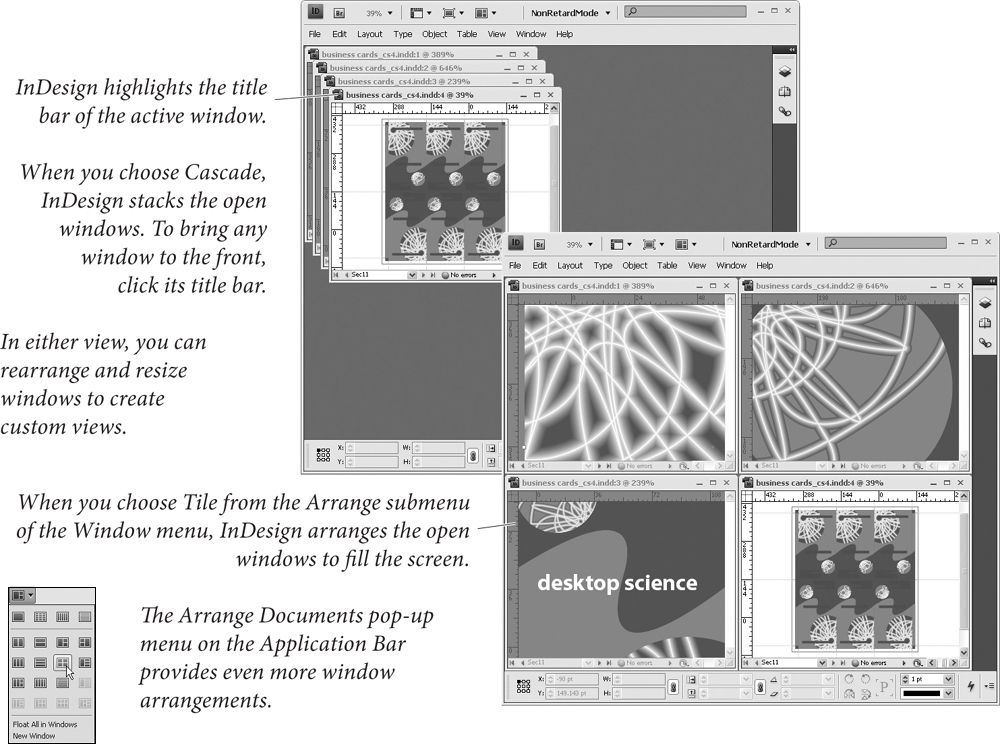
Figure 1-8. Window Views
To switch from an active document window to an inactive document window, click any part of the inactive window or choose a window name from the bottom of the Window menu. Or, press Command-`/Ctrl-` (accent grave) to between open windows.
Click the split layout view icon in the lower right corner to split the currently document (see Figure 1-9). Sometimes it’s easier to display pages in multiple windows than it is to scroll or zoom from page to page. Think about using multiple windows on a single document in the following situations:
• When you find yourself jumping back and forth between two or more locations in a publication, such as a master page and a layout page.
• When you need to copy an object or objects from one page to another page that’s several pages away.
• When you’re trying to fit copy into a story that spans several pages. Make one window focus on the end of the story, and you can view the end of the story as you edit text.
• When you’re working with alternate layouts in the same document.

Figure 1-9. Split Layout View
There’s no trick to removing a view—simply close the window, and it disappears from your Windows menu.
You can also have as many different documents (files) open as you like. You switch from one publication to another by choosing a window name from Window menu, or by clicking on their windows.
To close all open windows, hold down Option as you click the Close box (Macintosh) or hold down Alt as you click the Close button (Windows). Or press Command-Option-Shift-W/Ctrl-Alt-Shift-W.
InDesign’s Panels
The best way to work with InDesign’s panels is to have the minimum number of them open at once, to combine panels into functional groups and workspaces, and to learn and master the keyboard shortcuts for working with and navigating through panels. That’s what this part of the book is about.
InDesign’s panels work two ways—they display information about the document or the selected object, and they provide controls for changing the publication and the objects in it.
All About Focus
When a particular window, field, or control is active, we say it has “focus”—it’s receiving any keystrokes you might press. If you’re pressing keys, and yet no text is appearing in the selected text frame, it’s because something else—another window or field—has focus.
When you choose a menu option or click a button in a panel, InDesign applies the change and returns focus to your page layout. When you press Tab to move ahead one field (or Shift-Tab to move back one field), InDesign applies any change you made and shifts focus to the next (or previous) panel field. InDesign offers a number of keyboard shortcuts for controlling keyboard focus:
• Press Enter/Return to apply a value you’ve entered in a panel field and return focus to your page.
• Press Shift-Return/Shift-Enter to apply the value you’ve entered in a panel field and keep that panel field in focus.
• Return to the last-used panel field by pressing Command-Option-~/Ctrl-Alt-~ (tilde; that’s the key in the upper-left corner of the keyboard). The panel must be visible for this to work. To change this, look for “Activate last used field in panel” in the Views and Navigation product area of the Keyboard Shortcuts dialog box (see “Keyboard Shortcuts,” later in this chapter).
• In any of the “list” panels (the Swatches panel, for example), press Command-Option/Ctrl-Alt and click in the list. This transfers focus to the list. Press the up and down arrows, or type the name of an item to select that item from the list.
• Double-clicking the name of an item in many of the panels (the Layers panel, for example), you can edit the name of the item.
Displaying and Hiding Panels
Use keyboard shortcuts to show and hide panels and save yourself extra mouse movement (see Table 1-1). If a panel is open but hiding behind other panels in a group, pressing the keyboard shortcut brings the panel to the front. To close a panel, press the shortcut again, click the panel tab, or click the Close button on the panel’s title bar (the “X”).
Table 1-1. Panel Keyboard Shortcuts

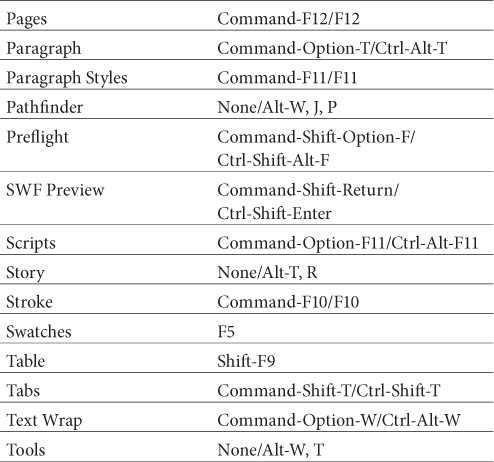
Zipping and Unzipping Panels. It’s easy to run out of room on your screen to see anything but the panels. You can shrink a panel down to just its tab and title bar by clicking the area at the top of the panel, away from the title tab (see Figure 1-10). When you want to display the entire panel, click the area at the top of the panel again.
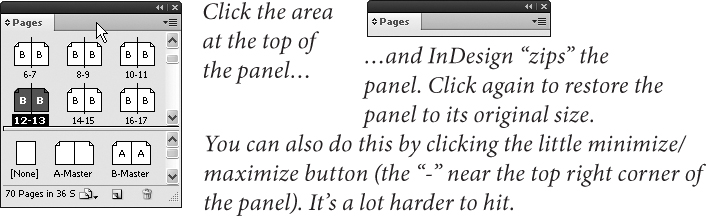
Figure 1-10. Zipping and Unzipping Panels
Hiding All Panels. Press Tab to hide all displayed panels; press it again to display them. Press Shift+Tab to hide panels without hiding the Tools panel. These shortcuts don’t work with an active text cursor.
Reducing a panel to an icon. Zipping a panel makes it smaller, but to make it smaller still, you can reduce the panel to an icon. To do this, double-click the bar at the very top of the panel or click the very tiny Collapse to Icons button (see Figure 1-11).

Figure 1-11. Reducing a Panel to an Icon
Displaying options. Many of InDesign’s panels can be set to display all of the available options for a particular feature, or a subset of those options. To expand the panel to show all its features, select Show Options from the panel menu, or click the little arrow icon to the left of the panel name (see Figure 1-12).

Figure 1-12. Showing/Hiding Panel Options
Resizing panels. To resize a panel, drag the Resize box at the panel’s lower-right corner (see Figure 1-13). If a panel doesn’t have a Resize box, you can’t resize it. You can drag the sides of some of the panels.
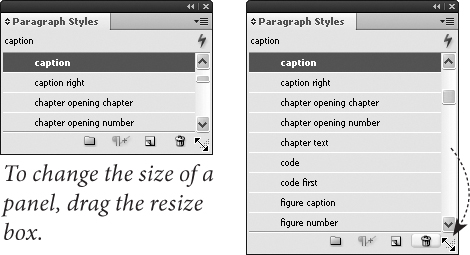
Figure 1-13. Resizing Panels
Snapping panels into position. When you drag a panel near the edge of another panel, InDesign snaps the edge of the panel you’re moving to the closest edge of the other panel. This makes it easy to arrange and resize panels in relation to other panels.
Grouping and separating panels. When you first launch InDesign, you’ll notice that some panels are combined. For example, Paragraph Styles and Character styles are grouped together. You can rearrange any of these panels, pull panels groups apart, or combine the panels any way you want (see Figure 1-14). We all have different work habits, and tabbed panels give us a way of customizing InDesign to fit our particular habits and needs.
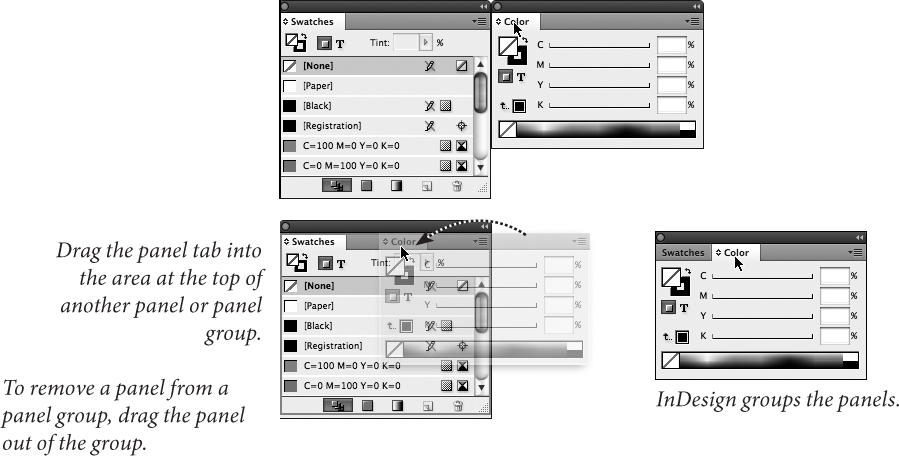
Figure 1-14. Grouping Panels
To combine panels, drag the tab of one panel into the area at the top of another panel (Adobe calls this a “drop zone”). When you combine two or more panels, you are creating a “panel group.” A panel group behaves as if it is a single panel—the panels move, resize, and zip/unzip as a unit.
In any panel group, only one panel can be “on top” at a time; only the tabs of the other panels in the group are visible. To display another panel in the group, click the panel’s tab or press the keyboard shortcut for the panel.
Stacking panels. Another way to customize the layout of InDesign’s panels is to “stack” one panel on another. When you do this, both panels remain visible (in contrast to grouped panels, where only the uppermost panel is visible), and move, hide, display, or resize as a single panel.
To do this, drag the tab of a panel into the area at the bottom of another panel. InDesign highlights the bottom of the target panel. Stop dragging and InDesign stacks the panels (see Figure 1-15).

Figure 1-15. Stacking Panels
Docking panels. Another way to show and hide panels is to use InDesign’s “dock” feature. When you drag a panel tab within a few pixels of the left or right edge of the screen or the application frame, InDesign adds the panel to a dock, a special area at either side of the screen. Panels in the dock are shown as icons, either with or without the name of the panel, depending on the width of the dock (see Figure 1-16).

Figure 1-16. Docking Panels
To expand a docked panel, click the panel’s icon or press the panel’s keyboard shortcut. To collapse the panel again, click its tab (or press the keyboard shortcut again).
To dock all of the panels in a panel group, drag the top of the panel group into the dock or hold down Option/Alt as you drag the panel tab into the dock area.
You can’t move the Control panel or the Tabs panel into the dock areas at the sides of the workspace. You can, however, dock the Control panel to the top or bottom. When you do this, the Control panel isn’t reduced to an icon.
To turn a docked panel back into a floating panel, drag the panel’s icon out of the dock. Hold down Option/Alt and drag a panel group to convert the entire group to a floating panel group.
Small Panel Rows. To reduce the height of each item in any of the “list” panels (such as the Paragraph Styles and Layers panels), choose Small Panel Rows from the panel’s pop-up menu (see Figure 1-17).
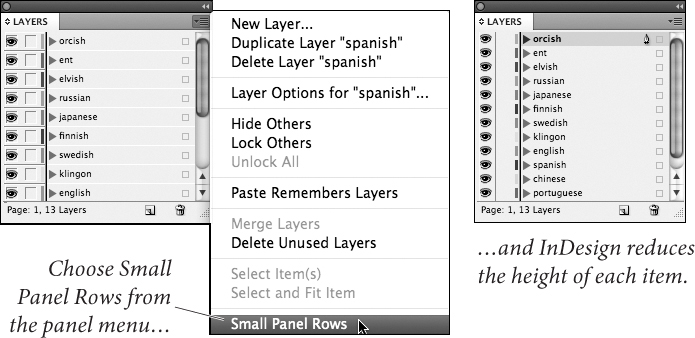
Figure 1-17. Small Panel Rows
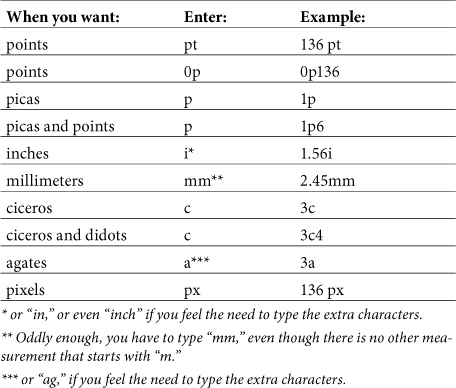
Overriding Units of Measurement. Being able to switch from one measurement system to another is great, but what do you do when you want to enter a value in a measurement system other than the one currently selected? Do you have to go to the Units & Increments Preferences dialog box and switch to another measurement system? No—all you need to do add a “measurement override” when you enter the value. Want to enter 115.3 points in a field that’s currently showing decimal inches? It’s easy: enter “115.3 pt,” or even “0p115.3” in the field, and InDesign will take care of the conversion for you. You can use these shortcuts in any numeric field in any InDesign panel or dialog box. Table 1-2 shows you how to enter measurement overrides.
Table 1-2. Measurement Overrides
You can also cycle through measurement units by pressing Command-Option-Shift-U/Ctrl-Alt-Shift-U when any measurement field has focus (note, though, that this changes the measurement system in all fields and rulers).
Doing Arithmetic in Fields. You can add, subtract, multiply, or divide in any numeric field in any InDesign panel or dialog box. Want an object to be half its current width? Type “/2” after the value in the W (width) field in the Transform panel and press Enter. Want an object to move two picas to the right? Enter “+2p” (yes, all of the measurement unit overrides shown above work with these operations) after the value shown in the X field in the Transform panel. Enter “*” to multiply, or “-” to subtract. You get the idea.
You can also enter percentages as part of any arithmetic operation. For example, if you replace a value with “25%” and press Enter, InDesign enters one quarter of the value for you.
Starting with InDesign CS6, you can string together multiple calculations, such as “2p+3i-1p6”—especially handy during tax season.
Using the Tools Panel
If the publication window is the layout board where you collect the galleys of type, and illustrations you want to use in your publication, the Tools panel is where you keep your waxer, X-Acto knife, T-square, and bandages. (Note to youngsters: there were tools used in the early days of page layout. You don’t have to understand how they work to use the corresponding tools in InDesign. But it helps.)
Some of the following descriptions aren’t going to make any sense until you understand how InDesign’s points and paths work, and that discussion falls in Chapter 5, “Drawing.” You can flip ahead and read that section, or you can plow through this section and figure it out as you go. It’s your choice, and either method works.
You can break InDesign’s Tools panel (as shown in Figure 1-18) into conceptual sections.
• Selection tools (the Selection, Direct Selection, Page, Gap, Content Collector and Content Placer tools) select objects, pages, or space between objects. You can do different things with the objects depending on the selection tool you’ve used.
• Tools for drawing basic shapes (the Rectangle, Polygon, Ellipse, and Line tools) and their equivalent frames (Rectangle Frame, Polygon Frame, and Ellipse Frame tools) draw complete paths containing specific numbers of points in specific positions on the path.
• Path-drawing and editing tools (the Pen, Add Point, Delete Point, Convert Point, Pencil, Eraser, Smooth, and Scissors tools) draw paths point by point (or, in the case of the Scissors tool, delete points or split paths).
• Transformation tools (the Rotate, Shear, Scale, and Free Transform tools) change the rotation angle, size, and skewing angle of objects on your pages.
• Text editing tools (the Type tool and Path Type tool) give you a way to enter and edit text (the latter along a path). The Note tool adds non-printing notes to text.
• Navigation tools (the Zoom and Hand tools) help you move around in your publication.
• Object formatting tools (the Fill and Stroke selectors, the Gradient tool, and the Gradient Feather tool) provide ways to apply formatting to objects.
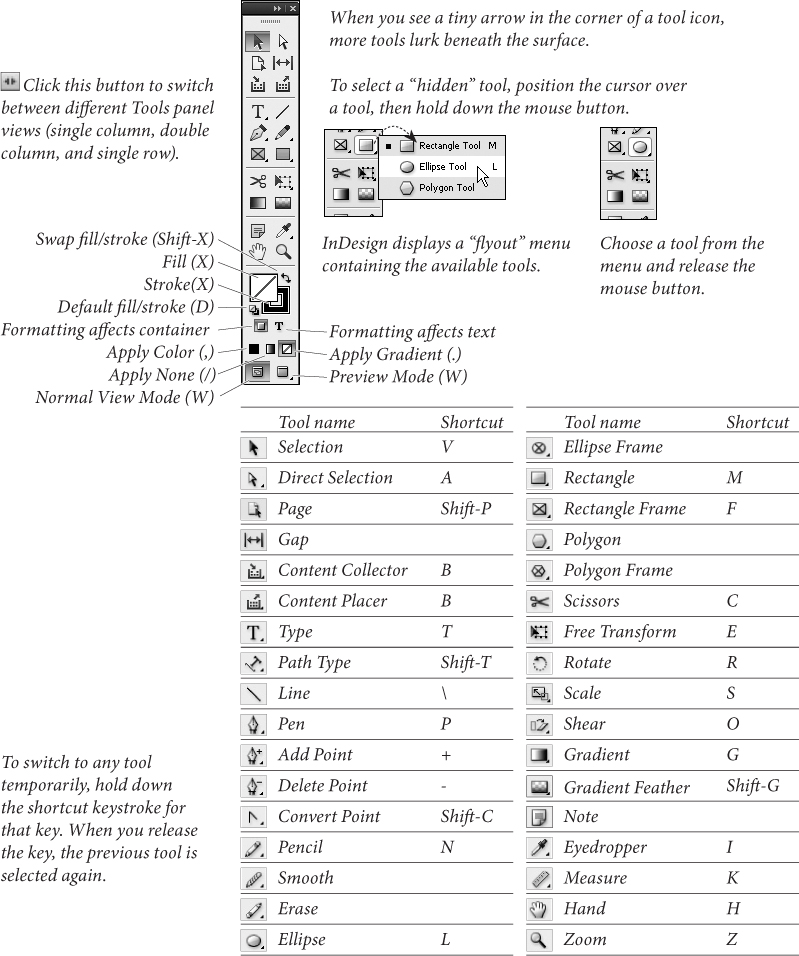
Figure 1-18. The Tools Panel
The tool descriptions below are brief and are only intended to give you a feeling for what the different tools are and what they do. To learn more about entering text with the Type tool, see Chapter 3, “Text.” For more on drawing objects with the drawing tools, see Chapter 5, “Drawing.” For more on working with the Transformation tools, see Chapter 9, “Transforming.”
Tool Hints. The Tool Hints panel not only shows which shortcut activates each tool, but also which modifier keys work with the tool. Choose Utilities from the Window menu, and then choose Tool Hints to open the Tool Hints panel. Then select a tool to see how to use it.
Spring-loaded tools. Here’s an Illustrator feature that finally made its way into InDesign. While you’re using one tool, you can temporarily switch to another tool. While one tool is selected, press the tool shortcut—and keep holding it down—perform your action, and when you release the shortcut key, the original tool is still active. We love it for quickly using the Direct Selection tool (A) when we’re drawing with the Pen tool, or switching temporarily to the Selection tool (V) to nudge an object when we’re using the new Gap tool. Try it.
Changing the Tools Panel View. You can display the Tools panel in three different arrangements: single column, double column, and single row (horizontal). You can toggle between these views by clicking the tiny double-arrow icon at the top of the panel.
Tools Panel Keyboard Shortcuts. You can choose most of the tools in the Tools panel using keyboard shortcuts such as “F” for the Frame tool (no Command/Ctrl or other modifier key necessary). This is usually faster than going back across the screen to the panel. Note, however, that you can’t press these while you’re editing text. That’s why we like to add additional keyboard shortcuts (see “Keyboard Shortcuts,” later in this chapter) to the tools we use most often; for example, on David’s system, Command-Shift-1/Ctrl-Shift-1 switches to the Selection tool when he’s editing text.
Selection Tool
The Selection tool is the swiss-army knife of the Tools panel. Use it to select, resize, scale, and rotate objects. You can even manipulate content within frames by dragging that thing that looks like a donut (it’s actually called the Content Grabber). Press V to select the Selection tool (when the cursor is not in text). The Selection tool’s versatility is why the InDesign team dumped the Position tool and buried the Rotate tool under the Free Transform tool.
When you double-click a text frame with the Selection tool, you’ll switch to the Type tool. When you double-click the contents of an object with the Selection tool, you’ll switch back and forth between selecting the contents and selecting the frame.
We’ll go into more detail on using the Selection tool. See “Selecting and Deselecting,” in Chapter 2, “Page Layout,” for more about making selections.
Direct Selection Tool
The Direct Selection tool (press A) is for selecting objects that are inside other objects, such as the following.
• Individual points on paths. For more on editing the shape of a path, see Chapter 5, “Drawing.”
• Component paths of compound paths. For more on working with compound paths, see Chapter 5, “Drawing.”
• Objects inside groups. For more on selecting objects inside groups, see Chapter 2, “Page Layout.”
• Objects pasted inside other objects. For more on working with path contents, see Chapter 9, “Transforming.”
Page Tool
Use the Page tool for creating different page sizes within a document. To create a different page size, press Shift+P to select the Page tool, and click the page in the layout to select it. Then use the options in the Control page to change the page layout.
For more on working with the Page tool, see Chapter 2, “Layout.”
Gap Tool
Use the Gap tool to adjust the spacing between objects. If you select the Gap tool and try to use it without knowing what it does, you’ll probably get frustrated because it utterly refuses to select objects.
Press U to select the Gap tool, place the pointer between objects, and drag to change the gap between aligned objects. Shift-drag to move the gap between only the two nearest objects; Ctrl-drag/Command-drag to resize the gap instead of moving it; Alt-drag/Option-drag to move the gap and objects in the same direction. Ctrl+Alt-drag/Command+Option-drag to resize the gap and move the objects. Adding the Shift key to any combination affects only the two nearest objects.
For more on working with the Gap tool, see Chapter 9, “Transforming.”
Content Collector Tool
When you select the Content Collector tool, click objects or stories to add them to the Content Conveyor at the bottom of the screen. You can then use the Content Placer Tool to copy and link these objects from the Content Conveyer into another layout or document. Press B to switch between the Content Collector and Content Placer tools.
Type Tool
You enter and edit text using the Type tool. To create a text frame, select the Type tool and drag the tool in the publication window. For more on entering, editing, and formatting text, see Chapter 3, “Text.” To select the Type tool, press T. When you have the Selection or Direct Select tool chosen in the Tool panel, you can switch to the Type tool automatically by double-clicking any text frame. InDesign places the text cursor as close as possible to where you double-clicked.
Path Type Tool
Use the Path Type tool to enter and edit text on a path (Adobe calls this the “Type on a Path” tool). To add text to a path, select the Path Type tool and click the tool on a path. A flashing text insertion point (or text cursor) appears on the path. At this point, text you enter will flow along the path. See Chapter 6, “Where Text Meets Graphics.” To select the Path Type tool, press Shift-T.
Note Tool
You use the Note tool to add non-printing notes to text. Click the Note tool in text, and InDesign will display a window you can use to enter the text of the note, or to jump to the next or previous notes in the document. We’ll talk more about notes in Chapter 3, “Text.”
Pen Tool
You use the Pen tool to draw paths containing both straight and curved line segments (that is, paths containing both curve and corner points). Click the Pen tool to create a corner point; drag to create a curve point. Press P to select the Pen tool.
Under the Pen tool, you’ll find the Add Point tool, the Delete Point tool, and the Convert Point tool.
For more (much more) on working with the Pen tool (and its variants) to draw and edit paths, see Chapter 5, “Drawing.”
Pencil Tool
If you’re one of the millions of computer users who find the Pen tool—and the whole process of drawing by manipulating points, line segments, and control handles—confusing, give the Pencil tool a try. With the Pencil tool (press N), you can sketch free form paths. As you drag, InDesign creates a path that follows the cursor, automatically placing points and adjusting control handles as it does so.
If you don’t like something about a path you’ve drawn using the Pencil tool, you can adjust it using any of InDesign’s other drawing tools (including that scary Pen tool). You might want to start with the other tools that share the same space in the Tools panel: the Smooth tool and the Eraser tool (see below).
Smooth Tool
Select a path—any path—and drag the Smooth tool over it. It’ll get smoother. Not smooth enough yet? Drag again. As you drag the Smooth tool, InDesign adjusts the points and control handles that define the path to create a smoother transition from one line segment to another. InDesign often removes points during this process. If you continue to repeat the smoothing process, we think you’ll eventually end up with a simple curve between two points.
Eraser Tool
The Eraser tool erases line segments and points. To use the Eraser tool, select a path, then drag the eraser tool over part of the path. InDesign splits the path and removes the line segments and points where you dragged the Eraser tool.
Line Tool
Use the Line tool to draw straight lines—paths containing two corner points. If you hold down Shift as you drag the Line tool, the lines you draw will be constrained to 0-, 45-, and 90-degree angles. Press (backslash) to select the Line tool.
Ellipse Tool
Use the Ellipse tool to draw ellipses and circles. Hold down Shift as you drag the Ellipse tool, and InDesign draws circles. Press L to select the Ellipse tool.
Rectangle Tool
Use the Rectangle tool to draw rectangles. If you hold down Shift as you drag, you draw squares. Press M to select the Rectangle tool.
If you need a rectangle with rounded corners, draw the rectangle using the Rectangle tool, then choose Corner Options from the Object menu to display the Corner Options dialog box (you can also get to this dialog box via the context menu). The Corner Options dialog box can provide a variety of other corner shapes, as discussed in Chapter 5, “Drawing.”
Polygon Tool
The Polygon tool makes it easy to draw equilateral polygons, such as pentagons, hexagons, and dodecagons. (Polygons are closed geometric objects that have at least three sides; they’re equilateral if all sides are the same length.) You can also use the Polygon tool to draw stars.
To change which polygon the Polygon tool draws, double-click the tool in the Tools panel. InDesign displays the Polygon Settings dialog box (see Figure 1-19). Enter the number of sides you want in the Number of Sides field. If you want the polygon to be a star polygon, enter a percentage (from 0 to 99 percent) in the Star Inset field. If you don’t want the polygon to be a star polygon, enter 100 percent in the Star Inset field.

Figure 1-19. Polygon Settings
Want to impress your friends? Select the Polygon tool and start dragging a shape. Press the left and up arrow keys several times to create a grid of polygons. While still dragging, press the Spacebar, and press the left and up arrow keys again. Because you pressed the Spacebar, the arrow keys adjust the star inset and number of polygon sides. Press the Spacebar again to switch back to grid mode.
Rotate Tool
To rotate the selected object (or objects), select the Rotate tool from the toolbox (press R) and then drag the tool on your page. When you select the Rotate tool, InDesign displays the transformation center point icon on or around the selected object. The center point icon sets the center of rotation (the point you’ll be rotating around), and corresponds to the selected point on the Proxy in the Transform and Control panels. Drag the transformation center point icon to a new location (or click one of the points in the Proxy) to change the point.
Hold down Shift as you drag the Rotate tool to constrain rotation to 45-degree increments (as you drag the Rotate tool, InDesign snaps the selection to 0, 45, 90, 135, 180, 225, 270, and 315 degree angles).
Scale Tool
To scale (or resize) an object, select the object, select the Scale tool, and then drag the tool in the publication window. When you select the Scale tool, InDesign displays the transformation center point icon on or around the selected object. The location of the center point icon sets the center of the scaling, and corresponds to the selected point on the Proxy in the Transform and Control panel. Drag the transformation center point icon to a new location (or click one of the points in the Proxy) to change the point you’re scaling around.
Hold down Shift as you drag a corner handle to retain the object’s proportions as you scale it. When you scale an object that has a stroke and Adjust Stroke Weight When Scaling is turned on in the Transform panel, the stroke may appear disproportional (thicker in some places and thinner in others) and the stroke weight in the Strokes and Control panels appears incorrect. You can fix both of these problems by choosing Redefine Scaling as 100% from either the Transform or Control panel menus.
Shear Tool
Shearing, or skewing, an object alters the angle of the vertical or horizontal axes of the object. This makes it appear that the plane containing the object has been slanted relative to the plane of the publication window. To shear an object, drag the Shear tool (press O) in the publication window. As you drag, InDesign shears the object.
When you shear an object, InDesign distorts the stroke weights of the paths in the selection. The Redefine Scaling as 100% feature mentioned above will fix this distortion, too.
Free Transform Tool
The Free Transform (press E) tool is a combination of the Scale, Rotate, and Selection tools, all bundled into a single tool. What the tool does depends on the position of the cursor. For more on working with the Free Transform tool, see Chapter 9, “Transforming.”
• When the cursor is above one of an object’s selection handles, the Free Transform tool acts as the Scale tool. Drag the Free Transform tool, and you scale the object around its center point.
• When the cursor is just outside one of the selection handles, the Free Transform tool behaves as if it were the Rotate tool. Drag the tool to rotate the object.
• When the Free Transform tool is inside the bounds of the selection, it acts as a “move” tool—drag the tool to move the object.
Eyedropper Tool
The Eyedropper tool (press I) can pick up formatting attributes (from the fill and stroke of a path to the character and paragraph formatting of text) and apply them to objects, or sample a color in an imported graphic and add it to your Swatches panel.
To “load” the Eyedropper tool, click the tool on an object (the object doesn’t have to be selected). If you have an item selected when you click, InDesign applies the attributes of the item under the cursor to the selected item. Then click the “loaded” Eyedropper tool on an object to apply the formatting (see Figure 1-20).

Figure 1-20. Eyedropper Tool Options
Double-click the Eyedropper tool to display the Eyedropper Options dialog box. Use this dialog box to define the attributes sampled and affected by the Eyedropper tool (see Figure 1-21).

Figure 1-21. Eyedropper Tool
Measure Tool
The Measure tool—which is usually under the Eyedropper tool—gives you a way to measure distances and angles (see Figure 1-22).
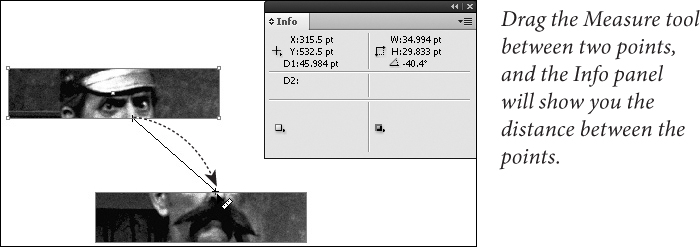
Figure 1-22. Measure Tool
To measure the distance between two points, select the Measure tool (press K) and drag it from one point to the other. When you drag the Measure tool, InDesign displays the Info panel. The D field in the Info panel shows the distance between the two points.
To measure an angle, select the Measure tool and drag it between two points—this creates one side of the angle. Next, hold down Option/Alt and drag from one of the end points of the line created by the Measure tool. This creates the other side of the angle. The Info panel displays the angle in the Angle field (it also displays the length of the two sides of the angle in the D1 and D2 fields).
Gradient Tool and Gradient Feather Tool
Use these tools to apply gradients or gradient feather fills, or to adjust fills you’ve applied. When you drag the tool, you’re setting the location of the beginning and ending points of the gradient. We discuss gradients and blends in Chapter 5, “Drawing.”
Scissors Tool
The Scissors tool cuts paths or points. Select a path, choose the Scissors tool (or press C), and then click the path. InDesign splits the path at the point at which you clicked.
Hand Tool
The Hand tool lets you scroll around your page; we explore how best to use it in “Publication Navigation,” later in this chapter. Double-click the Hand tool to set the view to Fit Spread in Window.
Zoom Tool
Use the Zoom tool to change the magnification in a publication window. To switch to the Zoom tool, press Z. To switch to the Zoom tool temporarily, hold down Command-Spacebar/Ctrl-Spacebar (when you’re done using the tool, InDesign will select the tool you were using before you switched to the Zoom tool).
Once you’ve switched to the Zoom tool, click the tool on the area you want to magnify, or drag a selection rectangle around it. To zoom out, hold down Option/Alt—you’ll see that the plus (“+”) inside the Zoom tool changes to minus (“-”)—and then click or drag to zoom out.
For more on using the Zoom tool, see “Publication Navigation,” later in this chapter. Double-clicking on the Zoom tool jumps to 100-percent View, but pressing Command-1 is easier and faster.
Fill and Stroke
The Fill and Stroke buttons, or “selectors,” near the bottom of the Tools panel control what part (the fill or the stroke) of the selected path or text is affected when you apply a color. To make a selector active, click it. Here are two very useful shortcuts:
• Swap colors—apply the color assigned to the fill to the stroke, or vice versa—click the swap fill and stroke icon (or press Shift-X).
• Press X (when you’re not editing text) to switch between the Fill selector and the Stroke selector.
Beneath the Fill and Stroke buttons, you’ll see two very small buttons—the Formatting Affects Container button and the Formatting Affects Text button. Click the former button to apply the fill or stroke to the text frame; click the latter to apply it to the text.
As your eye proceeds down the Tools panel, you’ll find three more buttons—they’re shortcuts for applying colors or gradients, or for removing a fill or stroke from an object. Click the Apply Color button to apply the current color (in the Color panel or Swatches panel) to the fill or stroke of the selected object. The state of the Fill and Stroke selector determines which part of the object is affected. Click the Apply Gradient button to apply the current gradient (in the Swatches panel or the Gradient panel), and click the Apply None button to remove the fill or stroke from the selected object.
As you’d expect, InDesign has shortcuts for these buttons, too.
• To apply the most recently used color to the current fill or stroke (which attribute is affected depends on which selector is active), press, (comma—again, this won’t work when text is selected).
• Press . (period) to apply the current gradient.
• Press / (slash) to remove the fill or stroke from the selected object or objects.
For more on applying colors, see Chapter 10, “Color.”
Other Panels
Most of InDesign’s other panels are discussed in the other chapters of this book. But there were a few (pesky) panels that didn’t really fit in the other chapters, so we’ll talk about them in this section.
Background Tasks Panel
If you’re exporting a large file to PDF or IDML format, you can keep working in InDesign during the export. The Background Tasks panel shows the process’s status. Choose Utilities from the Window menu, and then choose Background Tasks.
Info Panel
The Info panel displays information about the selected object, or, if no objects are selected, about the current location of the cursor (see Figure 1-23).
• When you select a character, it shows you the Unicode value of the character. Select text, and, the panel displays a count of characters, words, lines, and paragraphs in the selection.
• When you select a frame or line, the Info panel displays the stroke and fill colors.
• Select a graphic, and the panel shows the file type (EPS, TIFF, PSD), resolution, and color space (RGB, CMYK, or Grayscale). InDesign can’t extract the resolution from EPS and PDF.
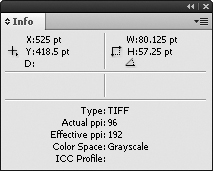
Figure 1-23. Info Panel
Library Panel
Use the Library panel (or panels, as you can have multiple libraries open at once) to store and retrieve commonly used items (see Figure 1-24). Does your company or client have a logo they like to plaster all over every publication you lay out? Put it in a library. Open library files just as you open InDesign documents or book files—using the Open and New options on the File menu.
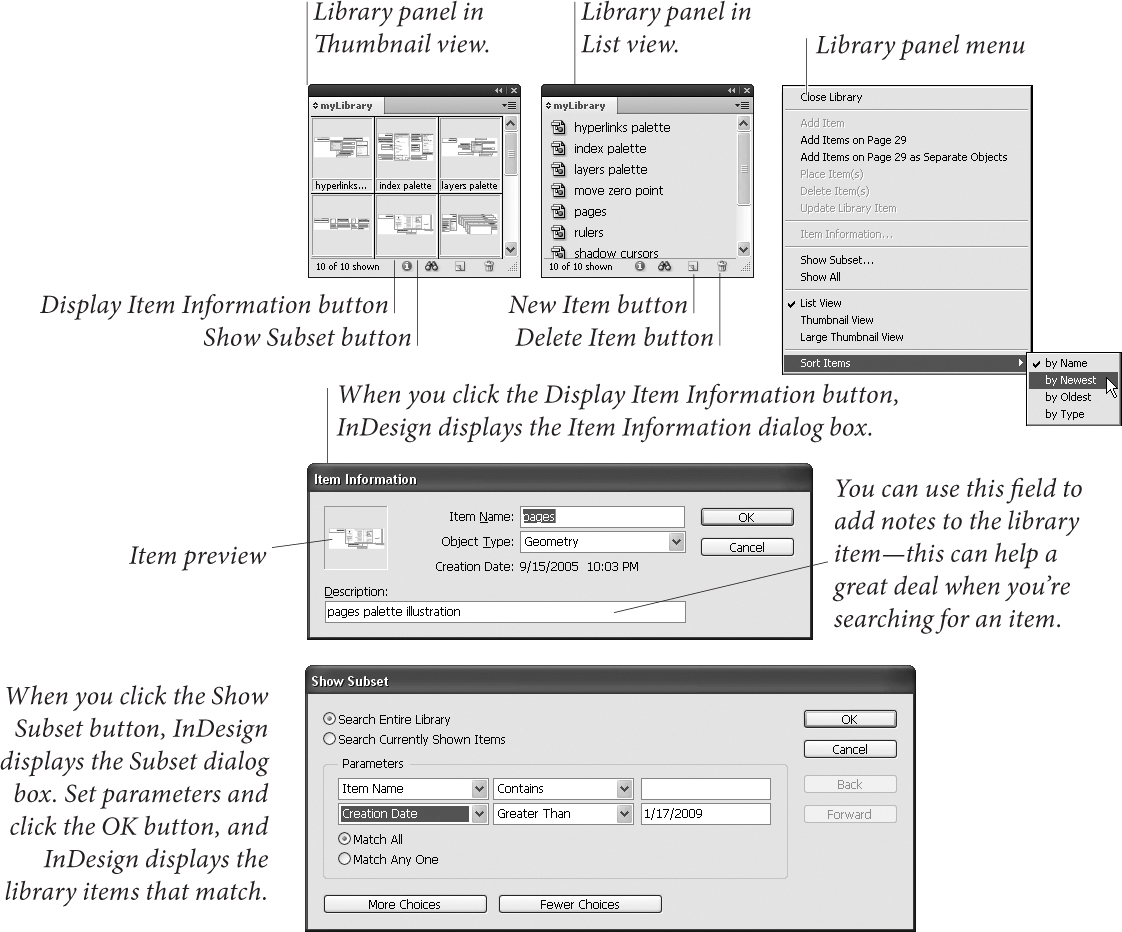
Figure 1-24. Library Panel
Context Menus
Context menus are menus that pop up at the location of the cursor, and change according to the location of the cursor and the object you have selected (see Figure 1-25). On the Macintosh, you summon a context menu by holding down Control as you click the mouse button. In Windows, click the right mouse button.
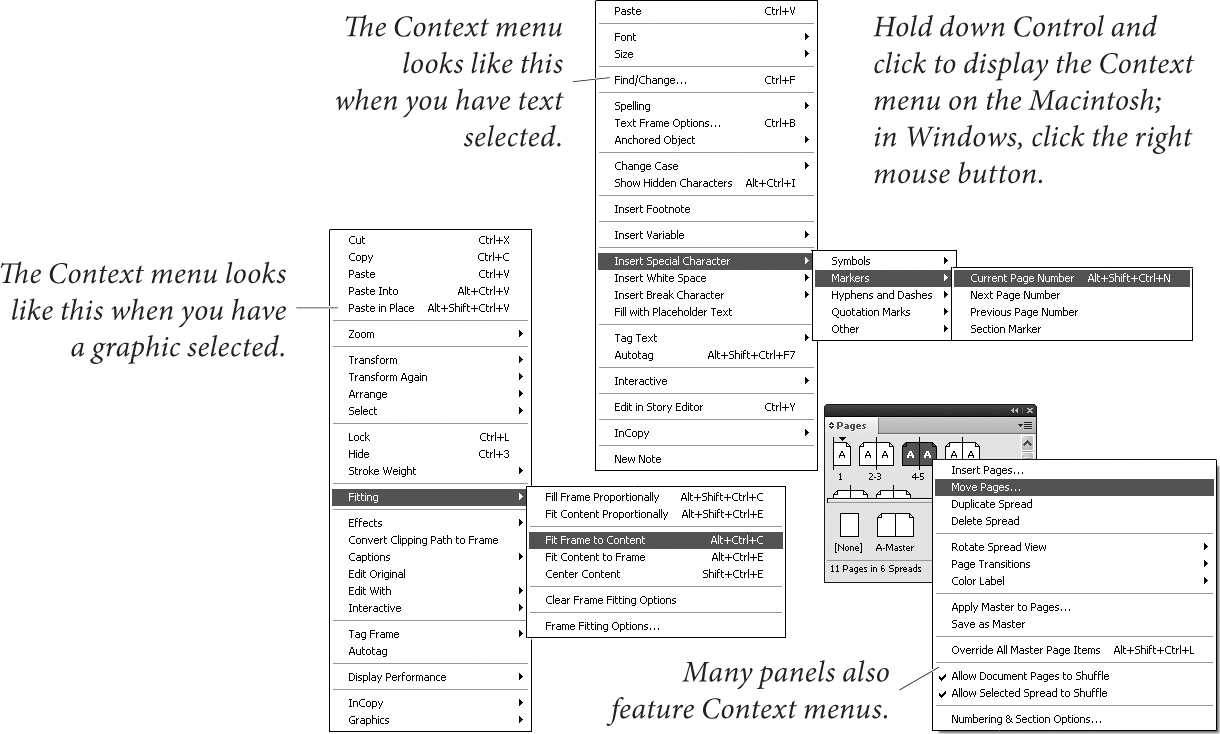
Figure 1-25. Context Menus
Context menus give you a great way to do a lot of things—from changing the formatting of the selected objects to changing your magnification. Let’s face it—your attention is where the cursor is, and there’s a limited amount of it. Dragging the cursor across the screen to reach a menu or button is distracting and time-consuming.
Many of InDesign’s panels (such as the Pages, Paragraph Styles, and Links panels) feature Context menus of their own. These menus, for the most part, replicate the options on the panel menu, but save you a trip across the panel to get at the menu.
Context menus also show the shortcut keys for the commands on the menu—a handy reminder.
Keyboard Shortcuts
We hate it when software manufacturers change the keyboard shortcuts we know and love. Especially when they change an easy-to-reach, frequently used shortcut to one that’s difficult to use. InDesign gives us something we’d like to see in every application—editable keyboard shortcuts. This means that we can make the program’s keyboard shortcuts work the way we think they ought to.
You can redefine those that correspond to menu commands—you can’t redefine some of the keyboard shortcuts that modify mouse actions. To define or redefine a keyboard shortcut, follow these steps (and take a look at Figure 1-26).
1. Choose Keyboard Shortcuts from the Edit menu. InDesign displays the Keyboard Shortcuts dialog box.
2. To create a new shortcut set, click the New Set button. To use an existing set, choose the set’s name from the Set pop-up menu (if that’s all you want to do, you can skip to Step 7). To delete a set, choose the set’s name and click the Delete Set button.
3. Choose an option from the Product Area pop-up menu. InDesign fills the Commands list with the available commands for the corresponding area of the program.
4. Select a command from the list. InDesign displays the current shortcut (or shortcuts) assigned to the command.
5. To remove a selected shortcut, click the Remove button. To assign a shortcut to a command, or to replace an existing shortcut, move the cursor to the New Shortcut field and press the keys you want to use for the shortcut.
6. Click the Assign button to assign a shortcut to the command, or (if you had a shortcut selected) click the Replace button to replace the selected shortcut. Note that a single command can have multiple shortcuts assigned to it. If you want, you can save your changes without closing the dialog box by pressing the Save button.
7. Once you’ve changed all of the shortcuts you want to change, click the OK button to close the dialog box and save the set.

Figure 1-26. Editing Keyboard Shortcuts
Keyboard shortcut sets are saved in the Presets > InDesign Shortcut Sets folder in your InDesign folder. Want to take your keyboard shortcuts with you to another machine? Take the shortcuts file from your machine and copy it into the InDesign Shortcut Sets folder of the copy of InDesign you’ll be using. Open the Keyboard Shortcuts dialog box and choose your shortcut set from the Sets pop-up menu.
To return to InDesign’s default keyboard shortcuts, all you need to do is choose the Default set from the Set pop-up menu.
To view all of the shortcuts in a set, select the set from the Set pop-up menu, then click the Show Set button. InDesign displays a list of the shortcuts in the set using the default text editor on your system (TextEdit on the Macintosh; Notepad in Windows). You can print or save this file for your reference.
Setting the context. You can have a keyboard shortcut do different things. You might want Command-T/Ctrl-T to open the Text Frame Options dialog box when you’re editing text and open the Table Options when your cursor is in a table. To do this, select a context from the Context pop-up menu before you click the Assign button.
A few thoughts on making up your own shortcuts. There are two approaches to making up your own keyboard shortcuts. The first is assign shortcuts using a key that has something to do with the name of the command—like “P” for “Print.” Usually, these shortcuts are easy to remember. Another, and, in our opinion, better, approach is to analyze the way you work with commands, and then take the commands you use most often and assign them shortcuts that are easy to reach with one hand (usually the left hand, given that the shortcuts for copy, cut, and paste are all on the left side of the keyboard).
What’s the most frequently used keyboard shortcut? For us, it’s got to be Fit Page In Window, because we navigate by zooming in with the Zoom tool, then zooming out to the Fit Page In Window view, and then zooming in on another part of the spread. The default shortcut for the Fit Page In Window view, Command-0/Ctrl-0 doesn’t work for us. It’s a long reach for the left hand, and 0 (zero) is a difficult key to hit without looking at the keyboard. Consider using Command-Shift-W/Ctrl-Shift-W—it’s an easy, one-handed reach.
Customizing Menus
In addition to being able to customize keyboard shortcuts, you can also change InDesign’s menus. That said, you can’t change them much. You can hide menu items, and you can change their color, but you can’t add them (except via scripting).
To edit InDesign’s menus, follow these steps (see Figure 1-27).
1. Choose Menus from the Edit menu. InDesign displays the Menu Customization dialog box.
2. Select a menu set from the Set pop-up menu, if necessary.
3. Select a menu type (Application Menus or Context and Panel Menus) from the Category pop-up menu.
4. Select the menu you want to edit. It can sometimes take guesswork to find the right menu, but keep at it—they’re all there.
5. Once you’ve found the menu item you want, you can hide it by clicking the “eye” icon (or show it by clicking the box in the Visibility column). To change the menu item’s color, click the text in the Color column—InDesign displays a pop-up menu you can use to select another color.
6. To save the menu set, click the Save button, or click Save As to save a new menu set.
7. Click the OK button to close the dialog box.
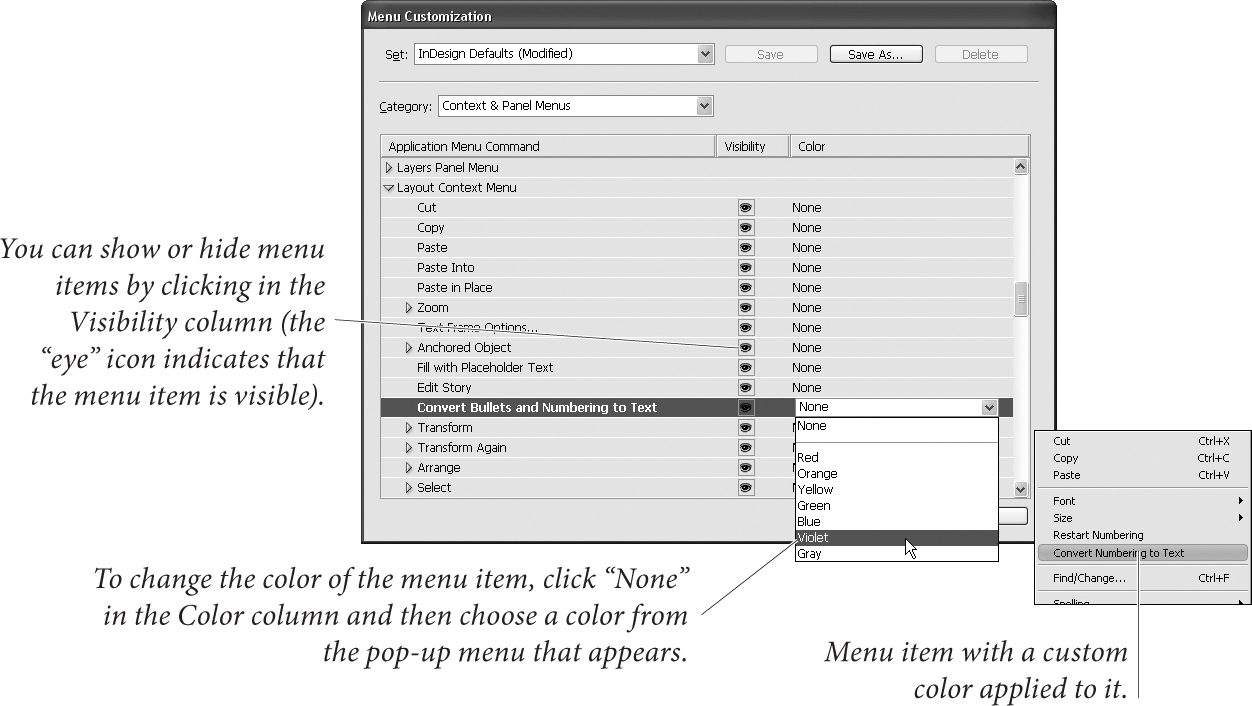
Figure 1-27. Customizing Menus
To return to InDesign’s menu defaults, choose Reset Menus from the Workspace submenu of the Window menu. Or you can display the Menu Customization dialog box and select the InDesign Defaults menu set from the Set pop-up menu.
To display hidden menu items, hold down Command/Ctrl as you display the menu, or choose Show All Menu Items.
Menu sets are saved as XML and are given the file extension “.inms”. If you need to find one, search for the name of the menu set. Only the differences between the default set and the custom set are saved in the file. Ole has (once again) spent way too much time rooting through the menu customization files.
Customizing the Control Panel
The Control panel can take the place of a number of other panels, and thereby save you a great deal of space on your screen. But it’s even better than that—you can change the controls that appear in the Control panel. If, for example, you’re like Ole and do not care about object effects and text wrap, you can do away with them and save the space for more worthy interface items. Doth the text skewing control offend thee? Pluck it out!
You can turn controls in the Control panel off or on to make it more to your liking. To do this, choose Customize from the Control panel menu. InDesign displays the Customize Control Panel dialog box (see Figure 1-28). You can’t change the order in which the controls appear, and you can’t add different controls.

Figure 1-28. Customizing the Control Panel
Saving and Loading Workspaces
Once you’ve gotten your panels and menus set up just the way you want them, you can save them—their locations and states—to a workspace. You can load that workspace to return to that arrangement.
You can set up special configurations for specific tasks—you might want to have one set of panels for working with paths; another for entering text and typesetting, and still another for creating bookmarks and hyperlinks. With InDesign’s workspace management, you can dramatically reduce the number of panels you have on your screen.
To save a workspace, choose Save Workspace from the Workspace submenu of the Window menu. InDesign displays the Save Workspace dialog box. Enter a name for the workspace and press the OK button to save the workspace. InDesign adds the workspace name to the list of available workspaces (see Figure 1-29).
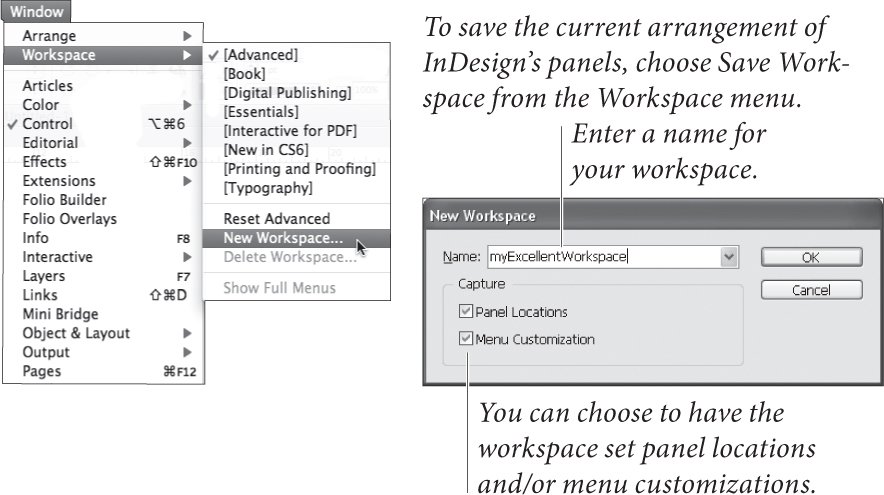
Figure 1-29. Saving a Workspace
To apply a workspace, choose the workspace name from the Workspace submenu of the Window menu. After a (relatively) brief pause, InDesign resets your panels to the configuration saved in the workspace. You can assign keyboard shortcuts to the workspaces in the Window Menu area of the Edit Keyboard Shortcuts dialog box (see “Keyboard Shortcuts,” earlier in this chapter).
Once you have your workspaces set up the way you like them, it’s a good idea to back up the file containing them. It’s called “Active-Workspace.xml” and you can find it by searching your hard drive.
Setting Preferences
Why do applications have Preferences dialog boxes? It’s simple: there’s often more than one “right” way to do something. Rather than dictatorially decide to limit users, InDesign gives you a choice. Preferences are one way you can control the appearance and behavior of the program. They’re a place where you can customize the program to better fit your work habits and personality.
To display InDesign’s Preferences dialog box, choose General from the Preferences submenu (under the InDesign menu on the Macintosh, or the File menu in Windows), or press Command-K/Ctrl-K. The Preferences dialog box contains a number of panels—each listed along the left side for you to click on.
Have you ever been frustrated when a preference option doesn’t stick? You change a preference, and end up with the old setting when you open a new document. That’s because some preference settings affect only the current document, while other settings affect all documents. If you want a preference option to affect all new documents you create, close all documents before changing the settings.
General Preferences
The General pane of the Preferences dialog box (see Figure 1-30) is the “kitchen sink” of the Preferences dialog box universe—it contains the things that didn’t fit anywhere else. All options in the General pane are application-specific.
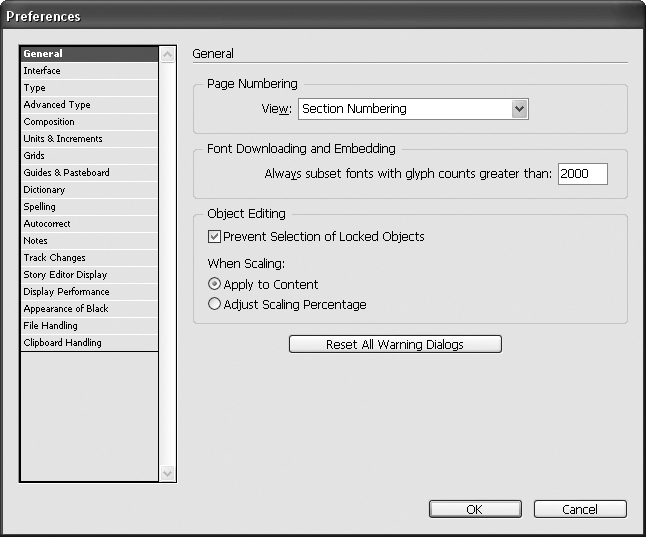
Figure 1-30. General Preferences
Page Numbering. The options on the View pop-up menu change the way InDesign displays page numbers in the Pages panel. When you choose Absolute Numbering, InDesign numbers the pages sequentially, starting with page one, and pays no attention to the page numbering options of any of the sections in the publication. Choose Section Numbering to have InDesign display page numbers based on the page numbering options you’ve set up in the Section Options dialog box for each section. For more on setting up sections and numbering pages, see Chapter 2, “Page Layout.”
Always Subset Fonts with Glyph Counts Greater than 2000. Whew. This one takes a bit of rapid-fire explaining. When InDesign sends a font to a printer (or into an exported file), you can choose to include all of the characters in the font, or to include only those characters of the font that are used in the document. The latter option is called a font “subset” (see Chapter 7, “Importing and Exporting”).
While we generally think that you should include all of the characters in a font (you never know when you might need them, and disk space/network bandwidth are both cheap these days), we have to say that some fonts are huge. Some OpenType fonts actually include tens of thousands of character glyphs. Turning this option on lets us download complete character sets of standard Western fonts without forcing us to download all of Kozuka Gothic Pro just because Ole felt the need to spell out “furi kuri” in Katakana.
Prevent Selection of Locked Objects. In previous versions of InDesign, you could select locked objects. People complained, so Adobe decided to make a change. In InDesign CS5 and later, you can’t select locked objects—unless you uncheck this option.
When Scaling Options. When you scale an object, how should it be reflected in the interface? For example, if you double the scale of a text frame with 12-pt text, what should appear in the Control panel? If Apply to Content option is on, “24 pt” appears for Font Size and the Scale values are reset to 100%. If Adjust Scaling Percentage is on, “12 pt(24)” is displayed for Font Size, and the Scale values are 200%. There is one benefit to turning Adjust Scaling Percentage on: You can always reset the text frame to 100 percent size in the Control panel or Transform panel, returning the text to its original, pre-scaled size. When you turn on Apply to Content, it can be hard to get back to the original size. See Chapter 9, “Transforming.”
Reset All Warning Dialogs. Many of InDesign’s warning dialog boxes include a “never ask me this question again” option. If you have checked this option, and, for whatever reason, want to see the dialog box again, click the Reset All Warning Dialogs button.
Interface Preferences
The Interface pane of the Preferences dialog box (see Figure 1-31) gives you a way to customize a variety of user interface behaviors. These settings affect the application, not individual documents.

Figure 1-31. Interface Preferences
Tool Tips. To view the names of control in InDesign’s panels or their associated keyboard shortcuts, choose Fast or Normal from the Tool Tips pop-up menu. When you do, InDesign displays a small window containing a tool’s name when your cursor passes over the tool. Tool tips do not work for every tool or control in every panel. Once you’re familiar with InDesign, turn this option off—showing tool tips does slow down the application.
Show Thumbnails on Place. When you place a file, you can have the cursor display a tiny preview of the incoming content. To do this, turn the Show Thumbnails on Place option on. To show an icon instead (which is what we strongly prefer), turn this option off.
Show Transformation Values. When creating or moving an object, notice those numbers in the grey box that show the X, Y coordinates? Those are transformation values (or “smart cursors”), and you can turn them off.
Enable Multi-Touch Gestures. If you’re running InDesign on a Mac or Windows Vista or later, you can take advantage of multi-touch gestures when using your mouse. For example, the rotate gesture rotates the spread, and the swipe gesture scrolls up and down.
Highlight Object Under Selection Tool. In Preview mode, moving the cursor over objects highlights the objects. If you don’t like the resulting flashing effect, turn off this option.
Floating Tools Panel. You can choose to display the Tools panel in one of three arrangements: Single Row, Double Column, or Single Column. Choose the option you like best.
Auto-Collapse Icon Panels. When you add panels to the dock, you can display the panels as icons. When you turn this option on, InDesign will automatically close docked panels after you use them.
Auto-Show Hidden Panels. When you press Tab or Shift-Tab to hide panels, mousing over the side of the document window shows the panels temporarily.
Open Documents as Tabs. Turn this option off to have documents appear as floating windows; turn it on to have documents appear in tabbed panels.
Enable Floating Document Window Docking. When this option is on, you can dock floating document windows (just as you would dock panels).
Hand Tool. Determine the balance between performance and visual quality when you scroll through a document, which causes text and images to be greeked.
Live Screen Drawing. Do you want the image to redraw when you move an image? If Immediate is in, the image redraws while you drag. If Never is on, dragging an image moves only the frame, and then image is moved when you release the mouse button. If Delayed is on, the image redraws only if you pause before dragging.
Greek Vector Graphics on Drag. Select this option if you’re experiencing performance issues while dragging large vector graphics.
Tip: If you’re looking to turn off things like the Content Grabber and Live Corners, check the Extras submenu on the View menu.
Type Preferences
The Type pane of the Preferences dialog box (see Figure 1-32) affects the way that InDesign formats and displays text in your publications.

Figure 1-32. Type Preferences
Use Typographer’s Quotes. Using “typewriter” quotation marks and apostrophes (” and ’) instead of their typographic equivalents (“, ”, ‘, and ’) is one of the hallmarks of amateur desktop publishing design. Fortunately, you don’t need to remember obscure shortcuts because when you turn on the Use Typographer’s Quotes option, InDesign enters the correct quotation marks for you as you type normal straight quotes. This option is document specific.
Type Tool Converts Frames to Text Frames. When this option is turned on, clicking a frame with the Type tool will convert it to a text frame, even if the content type is set to Unassigned or Graphic. To prevent the Type tool from converting frames to text frames, turn this option off. This option is application specific.
Automatically Use Correct Optical Size. This setting only comes into play when you’re working with multiple master fonts—and then only with those fonts that have a defined optical size axis (not all multiple master fonts do). If your font fits this description, feel pleased that you’re among a tiny handful of people on the planet, and that turning on Automatically Use Correct Optical Size forces the font to use an optical size axis that matches the point size of the text, regardless of the optical size axis setting of the instance of the font. When this option is off, InDesign uses the optical size axis setting of the font instance. This option is document specific.
Triple Click to Select a Line. When the Triple Click to Select a Line checkbox is on, triple-clicking the Type tool in text selects the line you’re clicking on and quadruple-clicking selects the paragraph; when this option is off, triple-click to select a paragraph and quadruple-click to select the entire story. Since we can’t agree on the “correct” setting for this option, we leave it up to you. This option is application specific.
Apply Leading to Entire Paragraphs. While you might, in rare instances, want to vary the leading of lines in a paragraph, you’d probably prefer to use a single leading value for all lines in a paragraph (if you’re coming to InDesign from QuarkXPress, FrameMaker, or Microsoft Word this is the behavior you expect).
By default, InDesign applies leading at the character level, which means that you might accidentally create uneven leading between lines of a paragraph. To force InDesign to use a single leading value for an entire paragraph, turn on the Apply Leading to Entire Paragraphs option. When you do this, the largest leading value in the paragraph sets the leading of the paragraph. Note that this doesn’t affect any leading that you set while this preference was turned off—only leading you apply from here on out. That means you can get the best of both worlds: Leave it turned on most of the time and turn it off on the rare occasions that you want to adjust leading on a line-by-line basis. This option is document specific (see Chapter 4, “Type”).
Adjust Spacing Automatically when Cutting and Pasting Words. What should InDesign do when you paste a word into text? Should it add space before and after the word, if necessary? If you think it should, turn this option on. Note that InDesign will not insert space before sentence-ending punctuation, regardless of the state of this option. This option also controls whether InDesign removes extra spaces when you press Delete. This option is application specific.
Font Preview Size. This option turns the font preview in the various font menus (in the Control panel, Type menu, and Character menu) on or off, and controls the size of the text used in the menus. Turning this option off dramatically speeds up the font menu display. Select typefaces based on printed examples, not from a screen.
You can also specify the number of recently used fonts to display, and you can indicate whether the list of recent fonts is sorted by alphabet or by recent use. These options are application specific.
Drag and Drop Text Editing. Turn on the Enable in Layout View option to enable drag and drop text editing in layout view; turn on Enable in Story Editor to make it work in the story editor. These options are application specific. For more on drag and drop text editing, see Chapter 3, “Text.”
Smart Text Reflow. The options in this section define the way that InDesign adds pages when you create overset text by editing a story. The Add Pages To pop-up menu defines where you want to add pages: at the end of the story, the end of the section, or at the end of the document.
Turn on Limit to Primary Text Frames to force InDesign to add the text to text frames defined on the master pages. Leave this option off to add new text frames based on the area within the margins of the new pages.
The Preserve Facing-Page Spreads option does just what it says it does—if your editing would cause a single page to be added in the middle of the document, InDesign will add a spread to maintain the pagination of the pages following the added page.
Turn this option on to allow InDesign to delete pages when your editing empties the text frames on the page. This option only comes into play when the emptied text frame(s) are the only objects on the page. These options are document specific.
Advanced Type Preferences
The options in the Advanced Type pane provide additional control over text formatting. For more on superscripts, subscripts, and small caps, see Chapter 4, “Type.”
Character Settings. When you apply Superscript or Subscript to text, InDesign scales the selected characters and shifts their baseline position. (This doesn’t apply to OpenType formatting.) How can you control the amount of scaling and baseline shift? That’s where the options in this section come in. The Size fields are percentages of the size of the selected characters (you can enter from 1 to 200 percent); the Position fields are percentages of the leading (you can enter from –500 to 500 percent). When you apply Small Caps formatting to text, InDesign scales the selected characters by the percentage you enter in the Small Cap Size field (from one to 200 percent).
Note that these settings affect all superscript, subscript, and small caps formatting you’ve applied throughout your current document. (This is the way that QuarkXPress handles these formatting attributes, but it’s unlike PageMaker, where superscript, subscript, and small caps formatting options are set at the character level.) These options are document specific. For more on superscript, subscript, and small caps, see Chapter 4, “Type.”
Use Inline Input for Non-Latin Text. When you’re entering characters that are outside the range of the Western character set (like Japanese, Chinese, or Korean), you can use one of (at least) two methods to get the characters into the text frame. You can use the Input Method Editor (or IME) that comes with your operating system (usually typing characters in a separate floating window), or you can use the inline text entry method (where you type right in the text frame). We think it’s much easier to type “inline,” along with all the other text. This option is application specific.
Composition Preferences
Composition is the process of making type fit in the columns and pages in your publication. The options in the Composition Preferences pane of the Preferences dialog box relate to various aspects of InDesign’s text composition features. Composition preference settings are application specific. To really understand how composition works, see Chapter 4, “Type.”
Highlight. The options in the Highlight section help you spot composition problems before they become printed mistakes. All three options work the same way: when they spot a composition problem (a place where InDesign has had to break your rules to lay out a publication, or where InDesign lacks the font to properly compose a piece of text), they “highlight” the text by drawing a colored bar behind it.
• Keep Violations. In the Keep Options dialog box (choose Keep Options from the Paragraph panel’s menu), you’ll see a variety of settings that determine the way a paragraph deals with column and page breaks. These settings, collectively, are called “keeps.” InDesign will sometimes have to disobey your keeps settings. Keeps violations are rare, but you can easily spot them when you turn this option on.
• H&J Violations. When InDesign composes text, it tries to follow the guidelines you set in the Justification dialog box, but, sometimes, it can’t. In those cases, InDesign applies word spacing that’s looser or tighter than the minimum or maximum you specified. This is known as an “H&J violation.” When you turn this option, InDesign highlights the problem lines by displaying a yellow bar behind the text. The intensity of the tint used to draw the bar gives you a rough indication of the severity of the “violation”—the more saturated the yellow, the greater the variation from your settings. See Figure 1-33.
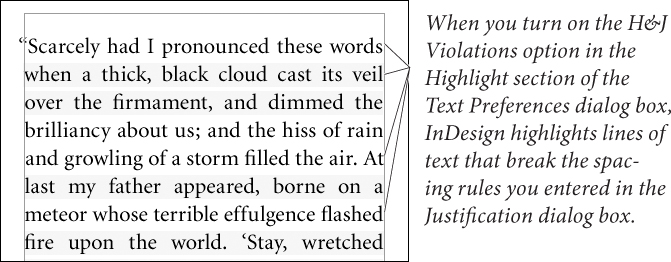
Figure 1-33. Highlighting Composition Problems
• Substituted Fonts. When you turn on this option, InDesign highlights text that uses fonts that aren’t currently have loaded. The highlight color is pink. See Figure 1-34.

Figure 1-34. Highlighting Font Substitution
• Substituted Glyphs. InDesign has various features that replace characters in your text with other characters, such as ligatures, swashes, ordinals, and so on (most of these options are on the Character panel menu). To see the places where InDesign has applied these special characters, turn on the Substituted Glyphs option. The highlight color is purple. See Figure 1-35.
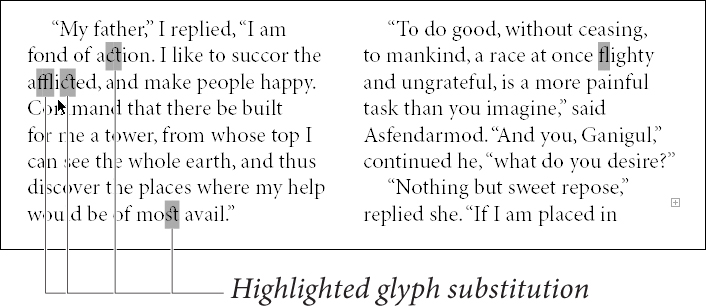
Figure 1-35. Highlighting Glyph Substitution
• Custom Tracking/Kerning. To see the places in your text that have had custom kerning or tracking applied to them, turn on this option. When you do this, InDesign highlights any text containing manual kerning (i.e., kerning that was not applied by one of the automatic kerning methods), or tracking values other than zero with a blue-green tint. See Figure 1-36.

Figure 1-36. Highlighting Custom Tracking and Kerning
Justify Text Next to an Object. When an object bearing a text wrap appears in the middle of a column of text, should InDesign justify the text around the wrapped object? If so, turn on Justify Text Next to an Object. Note that this option has no effect on text wraps that do not split a line into two or more parts. The authors suggest that you never create a design that would cause you to care about this option one way or the other. See Figure 1-37.

Figure 1-37. Justifying Text Next to an Object
Skip by Leading. When a text wrap breaks a text column, and the text in the text column is aligned to a baseline grid, should the text continue to align to the baseline grid, or should it get as close to the text wrap boundary as possible? We like to turn Skip by Leading on to make sure the text aligns to the baseline grid. For more on this topic, see Chapter 6, “Where Text Meets Graphics.”
Text Wrap Only Affects Text Beneath. Many QuarkXPress users get confused when using text wrap (runaround) in InDesign because text can wrap even when the wrapping-object is underneath the text frame (in the page’s stacking order or layer order). If you don’t like this behavior, you can turn on the Text Wrap Only Affects Text Beneath checkbox. There are pros and cons to both methods. For more on this topic, see Chapter 6, “Where Text Meets Graphics.”
Units & Increments Preferences
We’ve all got favorite units of measure—Ole is partial to furlongs and stone, while David prefers cubits—so we should be able to choose the measurement system we use to lay out our pages. That’s what the Units & Increments pane is for (see Figure 1-38). Units & Increments preferences are document specific.

Figure 1-38. Units & Increments Preferences
Ruler Units. The Origin pop-up menu sets the default location of the ruler zero point. Choose Spread to have InDesign position the zero point at the upper-left corner of the spread. Choose Page, and InDesign locates the zero point at the upper-left corner of the page. If you have three or more pages in a spread, you might want to choose Spine to place the ruler zero point at the binding spine.
Use the Horizontal and Vertical pop-up menus to select the measurement units (inches, inches decimal, picas, points, millimeters, agates, ciceros, and pixels) you want to use for the rulers. In addition to the measurement systems, you can use custom increments for either or both rulers. When you choose Custom, you can enter a value in the field (see “Rulers,” earlier in this chapter).
As you set up a publication’s measurement units, there are two things you should keep in mind:
• You can use the Context menu to change ruler units—Control-click (Macintosh) or right-click on the ruler in the document window, and InDesign displays a Context menu containing the same options as you see in the Units & Increments Preferences dialog box.
• You can always override units of measurement in any field in any panel or dialog box in InDesign. For more on entering measurement unit overrides, see “Overriding Units of Measurement,” earlier in this chapter.
Stroke. Change the Stroke values to Points, Millimeters, or Pixels to affect the Weight value in the Stroke panel and any other place where you can change the stroke width. This options is especially useful for web documents.
The Text Size unit of measurement is no longer available. Text is always displayed in points.
Point/Pica Size. This option changes the definition of the size of a point (and, therefore, the size of a pica). The modern (i.e., post-desktop publishing) standard for the size of a point is 72 points per inch.
If using your old Compugraphic E-scale is more important to you than anything else in life, feel free to set this option to something other than PostScript (72 pts/inch). Just don’t tell us about it, or insist that we should do the same.
Keyboard Increments. What happens when you push an arrow key? That depends on the settings you’ve entered in the following fields.
• Cursor Key. When you have an object selected using the Selection or Direct Select tool, you can move it by pressing the arrow keys. How far do you want it to move with each key press? Enter that value in this field.
• Size/Leading. When you have text selected, you can increase or decrease the size and/or leading of the text by pressing keyboard shortcuts (by default, you press Command-Shift->/Ctrl-Shift-> to increase the size of the text; Command-Shift-</Ctrl-Shift-< to decrease the size; Option-Up arrow/Alt-Up arrow to increase the leading; or Option-Down arrow to decrease the leading). How much larger or smaller should the point size or leading get with each key press? Enter the amount you want in this field.
• Baseline Shift. When you have selected text using the Type tool, you can increase baseline shift by pressing (by default) Option-Shift-Up Arrow/Alt-Shift-Up Arrow, or decrease baseline shift by pressing Option-Shift-Down Arrow/Alt-Shift-Down Arrow. How much baseline shift should each key press apply? Enter the amount you want in this field.
• Kerning. When the text cursor is between two characters, you can apply kerning by pressing Option-Left Arrow/Alt-Left Arrow or Option-Right Arrow/Alt-Right Arrow. When a range of text is selected with the text tool, pressing this shortcut applies tracking. Enter the kerning amount you want to apply (in thousandths of an em) in this field.
Grids Preferences
InDesign can display two different types of grid: baseline and document. You control various aspects of their appearance using the options in this pane (see Figure 1-39). Both grids are very similar to the guides (ruler guides, margin guides, and column guides), and have a similar effect on items on your pages. Grid preferences are document specific.

Figure 1-39. Grids Preferences
Baseline Grid. The baseline grid is an array of horizontal guides that mark off the page in units equal to a specified leading amount (note that the baseline grid isn’t really a “grid,” as it has no vertical lines).
• Color. Choose a color for the baseline grid using the Color pop-up menu.
• Start. Enter a value in the Start field to set the distance from the top of the page at which you want the baseline grid to begin.
• Increment Every. Enter a distance—in general, the leading value of your publication’s body text—in the Increment Every field.
• View Threshold. Set the magnification at which the grid becomes visible in the View Threshold field.
Document Grid. The document grid is a network of horizontal and vertical guidelines—something like graph paper.
• Color. Choose a color for the grid using the Color pop-up menu.
• Gridline Every. Enter the distance you want between grid lines in this field.
• Subdivisions. Just as the document grid divides the page, subdivisions divide the grid into smaller sections. The number you enter in this field sets the number of subdivisions between each grid line. If you don’t want to subdivide the document grid, enter 1 in this field. InDesign displays the grid subdivision lines using a tint of the color you specified for the document grid.
Grids in Back. Turn on the Grids in Back option to make both grids appear at the bottom of the stacking order rather than on top of your page objects.
Guides and Pasteboard Preferences
Use the Guides and Pasteboard pane of the Preferences dialog box (see Figure 1-40) to set the color for displaying margin, column, bleed, and slug guides, as well as the preview color of the pasteboard. Why isn’t there an option for setting the color of ruler guides? Because you don’t have to use the same color for all of your ruler guides—you specify the color using the Ruler Guides dialog box. The color preferences are application specific.
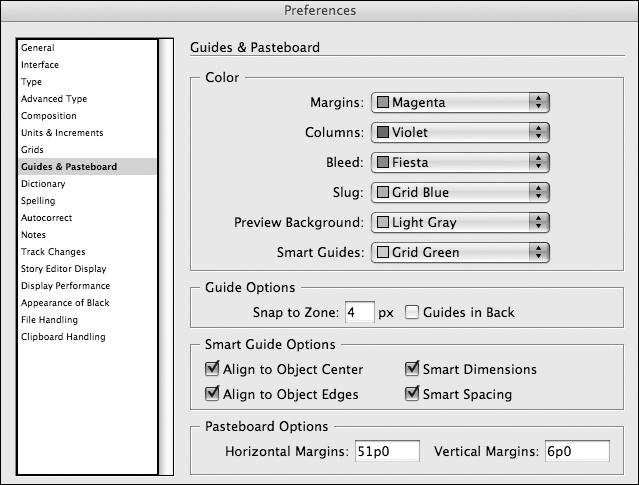
Figure 1-40. Guides & Pasteboard Preferences
(Tip: Changing your pasteboard color to black before showing a client boosts the apparent contrast and looks cool. You could also change the preview color for each stage of a job—first draft could be pink, second draft green, and so on. But remember that any color other than neutral gray may make your page or images look like they have a slight color cast on screen; that’s just the way the human eye works.)
Snap to Zone. Use the Snap to Zone option to set the distance, in screen pixels, at which guides begin to exert their mysterious pull on objects you’re drawing or dragging. This option is document specific.
Guides in Back. Turn on Guides in Back to position the guides at the bottom of the stacking order of the layer they’re on. We’ve never figured out a good reason to turn this feature off. This option is document specific.
Smart Guide Options. InDesign’s Smart Guides feature displays information about objects as you move, resize, or create them, and gives you a way to snap to other object locations on the page (see Figure 1-41). This is a terrific feature, but bear in mind that it can interfere with snapping to the grid or guides. These options are application specific.
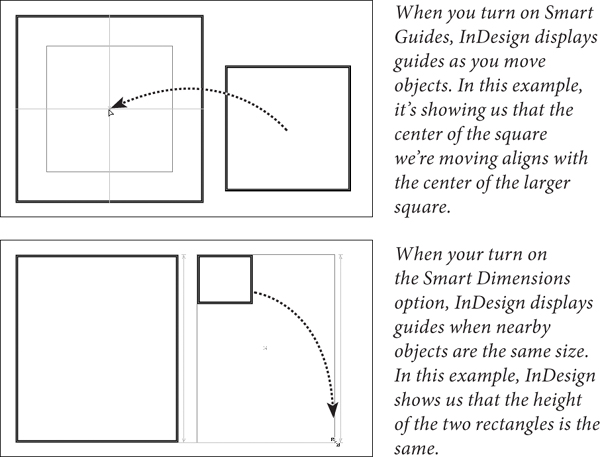
Figure 1-41. Smart Guides
Pasteboard Options. The Vertical Margins field sets the distance from the top or bottom of the page to the outside edge of the pasteboard. To make your pasteboard taller, increase this value; to make it shorter, decrease the value. This option was called Minimum Vertical Offset in InDesign CS4 and is the equivalent of the old Pasteboard XTension for QuarkXPress (but without the associated bugs and troubles). The Horizontal Margins field sets the width of the pasteboard on both sides of the spread. These options are document specific.
Dictionary Preferences
The Dictionary pane of the Preferences dialog box controls the spelling and hyphenation dictionaries used in the document (see Figure 1-42). This looks like it would set the default dictionary for a document, but it does not. It’s very rare that you would need to change these, unless you were using a third-party plug-in offering different hyphenation and spelling dictionaries. Choose a dictionary from the Language pop-up menu to choose the vendor of your choice from the Hyphenation and Spelling pop-up menus. The default changed from Proximity to Hunspell. Hunspell offers open source support for custom dictionaries, which is especially useful for less common languages such as Hungarian.

Figure 1-42. Dictionary Preferences
You can add additional dictionaries for each language by clicking the New User Dictionary or Add User Dictionary buttons. The Language setting is application specific; all other Dictionary preferences are document specific
Double Quotes. Enter the pair of characters you want to use for double quotes, or select them from the pop-up menu.
Single Quotes. Enter the pair of characters you want to use for single quotes, or select them from the pop-up menu.
Compose Using. When you add a word to your user dictionary (including changes you make to hyphenation points), InDesign adds the word to the user dictionary’s exceptions list. Choose User Dictionary to use the exceptions list in the current user dictionary; choose Document to use the hyphenation exceptions stored in the document; or choose User Dictionary and Document to use both exception lists.
User Dictionary Options. Choose Merge User Dictionary into Document to copy the hyphenation and spelling exceptions list from the user dictionary into each document you open. Clearly, this isn’t an option you want to turn on if you frequently open documents created by other people.
Choose Recompose All Stories When Modified to recompose all stories in a document when the user dictionary changes (or when you change the setting of the Compose Using pop-up menu). Recomposing all stories in a document can be a time-consuming process; most of the time, we think you should leave this option turned off.
Spelling Preferences
The options in the Spelling pane of the Preferences dialog box give you control over InDesign’s spelling checker and dynamic spelling feature (see Figure 1-43). Spelling preferences are application specific.

Figure 1-43. Spelling Preferences
Spelling. There’s not much to the options in the Spelling section. Turn on Misspelled Words to check for spelling errors. Turn on Repeated Words to check for “the the” and other repetitions. Turn on Uncapitalized Words to check for common capitalization errors, and turn on Uncapitalized Sentences to find sentences that do not start with a capital letter.
Dynamic Spelling. Turn on the Enable Dynamic Spelling option to have InDesign mark possible spelling errors in text (this feature is very similar to the dynamic spelling features in Word or other word processors). You can specify the colors InDesign uses to mark misspelled words, repeated words, uncapitalized words, and uncapitalized sentences using the pop-up menu associated with each type of spelling error. For more on dynamic spelling, see Chapter 3, “Text.”
Autocorrect Preferences
InDesign’s Autocorrect feature can fix misspelled words as you type. To turn the Autocorrect feature on or off, and to add or remove words from the list of misspellings and their corresponding corrections (see Figure 1-44). Autocorrect preferences are application specific. For more on using the Autocorrect feature, see Chapter 3, “Text.”
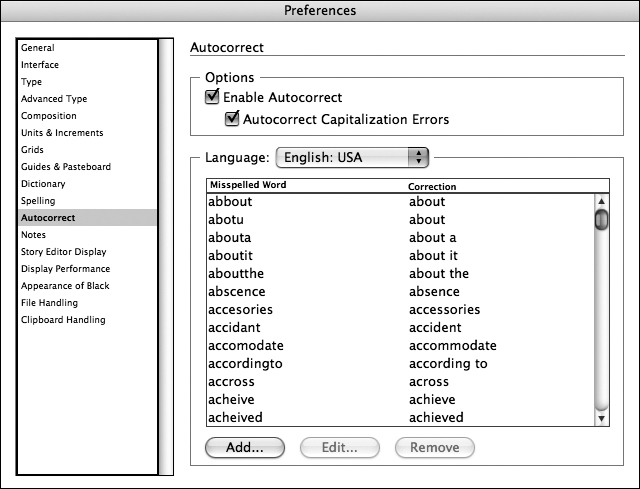
Figure 1-44. Autocorrect Preferences
Notes Preferences
The option in the Notes pane of the Preferences dialog box control the appearance of notes in your documents. Notes preferences are application specific. For more on using the Autocorrect feature, see Chapter 3, “Text.”
Note Color. Choose the color you want to use for notes. You can select either a fixed color or the User Color (which you can define by choosing User from the File menu).
Show Note Tool Tips. When this option is on, you can position the cursor over a note and see a tool tip that includes user information and a short excerpt of the note. With this option turned off, you’ll have to open the note in the Notes panel to see this text.
Include Note Content When Checking Spelling. Do you want to check the spelling of the text in notes? If so, turn this option on.
Include Note Content in Find/Change Operations. Do you want to include notes when you find and change text? If you do, turn this option on.
Inline Background Color. Sets the background color for the notes displayed in the Story Editor.
Track Changes Preferences
The options in the Track Changes pane of the Preferences dialog box control the appearance of edited text in the Story Editor (see Figure 1-45). The idea of tracking changes is to see which changes were made by another person so that you can accept or reject them. Or, if you’re the other person who jumps into someone else’s file, you can turn on Change Tracking to let the author know what you’ve done to the precious publication. Keep in mind that the change tracking shows up only in the Story Editor, not in the layout. Track Changes preferences are application specific. We’ll have more to say about tracking changes in Chapter 3, “Text.”
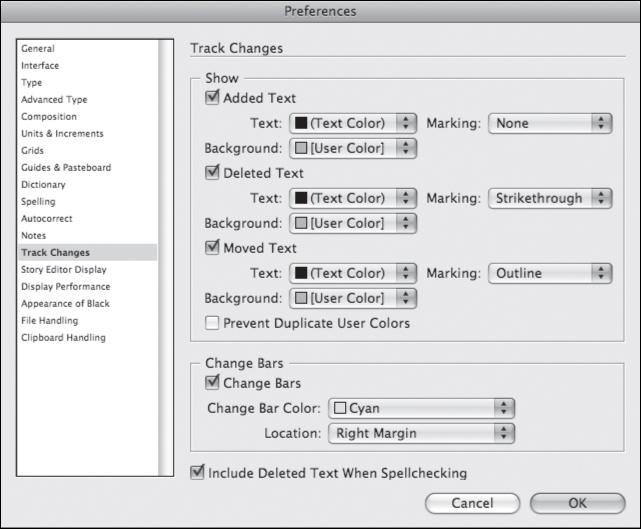
Figure 1-45. Track Changes Preferences
Show. You can change the appearance of Story Editor text that’s been added, deleted, or moved when Track Changes is turned on. Turn off Added Text, Deleted Text, or Moved Text if you don’t want any of these types of changes to be tracked. For example, if you care only about new text, turn off Deleted Text and Moved Text.
For each option, set the display appearance. By default, all changes have the same Text settings as the Story Editor text—that’s what the parentheses in (Text Color) mean. All changes are also highlighted with your user color. (Choose User from the File menu to change the user color.) If Prevent Duplicate User Colors is selected, you may be assigned a color that differs from the one you select in the User dialog box.
By default, Marking is set to None. Unless you have an excellent reason for doing so, don’t change the Marking setting for any of the options.
Change Bars. Change bars appear in the margin of the story editor next to any text that is added, deleted, or moved. If the Story Editor looks too busy visually, turn off Change Bars. You can change the color of change bars, and decide whether you want them on the left or right side.
Include Deleted Text When Spellchecking. Depending on your workflow, it can be annoying to include deleted text when you’re checking spelling, or it can be annoying not to include deleted text. You decide.
Story Editor Display Preferences
The options in the Story Editor Display pane of the Preferences dialog box control the appearance of Story windows in the document (see Figure 1-46). The idea of the Story Editor is to make text editing easier on your eyes, but it’s up to you to decide what that means. They’re your eyes, after all. Story Editor preferences are application specific. We have more to say about the Story Editor and story windows, as you’ll see in Chapter 3, “Text.”
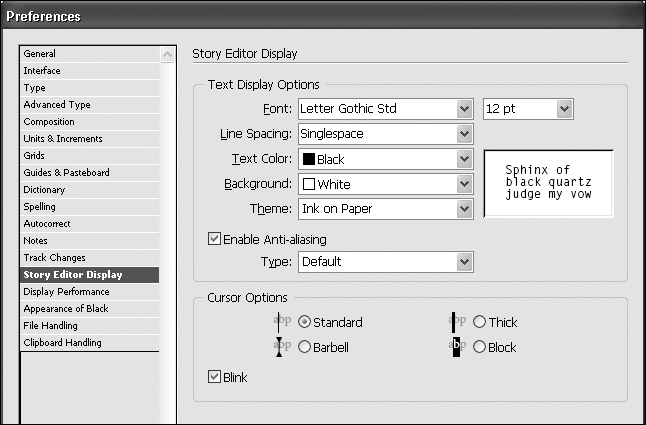
Figure 1-46. Story Editor Display Preferences Dialog Box
Text Display Options. The options in the Text Display Options section set the font, font size, spacing, and background and foreground colors displayed in story windows. The Theme pop-up menu contains several preset color combinations. The Enable Anti-Aliasing option smooths the edges of text in story windows.
Cursor Options. The options in the Cursor Options section control the appearance of the cursor as it moves through text in a story window. Turn the Blink option on to make the cursor blink, or turn it off to prevent the cursor from blinking. We had actually finally expunged the memory of the 1980s Block cursor from our minds when Story Editor brought it all back for us.
Display Performance Preferences
The options in the Display Performance pane of the Preferences dialog box control the way that InDesign draws text and graphics on your screen. The choices you make in this pane can dramatically speed up—or slow down—drawing and redrawing the screen (see Figure 1-47). Display Performance preferences are application specific, and have no effect on printing to PostScript/PDF printers.

Figure 1-47. Display Performance Preferences
Default View Settings. Choose an option on the Default View pop-up menu to set the default view setting for the document. Perhaps we’re just middle-of-the-road guys, but we like to choose Typical.
Preserve Object-Level View Settings. The Preserve Object-Level View Settings option tells InDesign to save any display settings you’ve applied to images when you save the document and then reopen it. When it’s turned off, InDesign forgets all the display settings. While it seems like a good idea to turn this on, it can increase the time it takes to open your documents, so we usually leave it off.
Adjust View Settings. You can apply one of three display settings—which are named “Optimized,” “Typical,” and “High Quality”—to any InDesign window or object, and you can define the parameters of each setting. Note that the names of these settings do not necessarily apply to the quality of the display; “High Quality” can be redefined to produce a lower quality display than “Optimized.”
To edit the parameters of a view setting, choose the setting and then adjust the values of the options.
• Raster Images. This slider defines the method InDesign uses to draw imported bitmap images (TIFF, JPEG, GIF). Note that images saved in the EPS (including DCS) and PDF formats are considered “vector graphics.” See Figure 1-48.
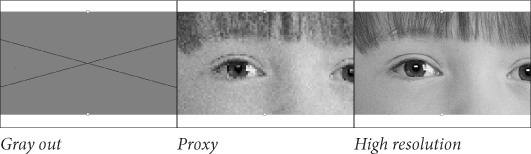
Figure 1-48. Raster Images View Settings
Choose Gray Out to draw every image as a gray box. Choose Proxy to have InDesign construct a low-resolution screen version of the imported graphic and use that image for display at all magnification levels. When you choose High Resolution from the Raster Images slider, InDesign gets its information about how to render an image from the original file that’s linked to your publication, which means that InDesign renders the best possible display of the image for the current magnification.
This setting has no effect on the way the images print.
• Vector Graphics. Choose an option from the slider to define the method InDesign uses to display vector graphics (EPS and PDF). See Figure 1-49.
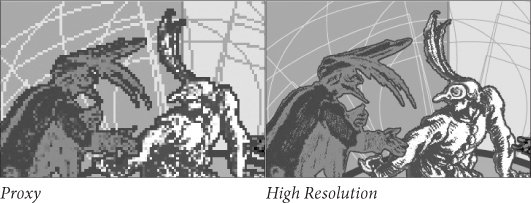
Figure 1-49. Vector Graphics View Settings
Choose Gray Out to draw every graphic as a gray box. Choose Proxy to have InDesign construct a low-resolution screen version of the imported graphic and use that image for display at all magnification levels. When you choose High Resolution from the Vector Graphics slider, InDesign gets its information about how to render the graphic by reinterpreting PostScript/PDF instructions in the graphic file. InDesign then renders the best possible view of the graphic for the current screen resolution. Note, however that this process can be very time consuming.
• Transparency. The Transparency slider controls the appearance of transparency on your screen—it has nothing to do with the way that transparency prints. Choose Off to omit previews for transparency altogether, or choose Low Quality, Medium Quality, or High Quality to control the accuracy of the preview. See Figure 1-50.

Figure 1-50. Transparency View Settings
• Enable Anti-Aliasing. Anti-aliasing smooths the edges of InDesign objects by adding pixels around the edges of the object. See Figure 1-51.

Figure 1-51. Anti-Aliasing
• Greek Type Below. It takes time to draw text characters, and, frankly, it’s not always worth doing. You might have noticed that when you zoom out to the 12.5% page view, InDesign doggedly attempts to give the best preview it can of the (now very tiny) text on your pages. To tell InDesign not to bother, and to speed up your screen redraw, use greeking.
When you enter a value in the Greek Type Below field that’s greater than zero, InDesign displays text characters that are equal to or smaller than that value as a gray bar (see Figure 1-52).
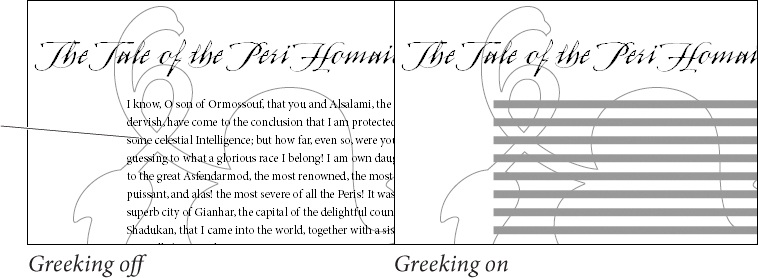
Figure 1-52. Greeking
The value shown in the field is in points, but it doesn’t refer to the point size of the text. Instead, it refers to the size of the text as it appears on your screen at the current magnification. The advantage of using this option is that the gray bar draws much faster than the actual characters. Greeking has no effect on text composition.
• Use Defaults. Click this button to return the options for the selected display setting to their default value.
Appearance of Black Preferences
What is the color “black” in your documents? Is it always 100 percent black ink (or “100K black”)? Or is it sometimes a “rich black,” a color made up of large percentages of other inks? The options in the Appearance of Black pane of the Preferences dialog box control the on-screen, exported, and printed appearance of both 100K black and rich black colors. The best way to understand what the settings in the Appearance of Black panel of the Preferences dialog box (see Figure 1-53) is to look at the example graphics in the dialog box. These preferences are application specific.

Figure 1-53. Appearance of Black Preferences
On Screen. When you choose Display All Blacks Accurately, InDesign will display 100K black as a dark gray and rich black(s) as RGB black (the darkest color your monitor can represent). When you choose Display All Blacks As Rich Black, both 100K black and rich black(s) will appear as RGB black.
Printing/Exporting. When you choose Output All Blacks Accurately and print to a non-Postscript printer or export to an RGB file format, InDesign will print (or save) 100K black as gray and rich black(s) as RGB black. Choose Output All Blacks As Rich Black, and InDesign will print (or save) both 100K black and rich black(s) as RGB black.
Overprint [Black] Swatch at 100%. If you always want objects colored with the [Black] swatch to overprint, turn this option on. This setting overrides any changes you might make in the Print dialog box. Note that this setting only affects that swatch; it has no effect on any other black swatch (even solid black!), which will print solid black and still knock out whatever is behind it even if this option is on (see Chapter 10, “Color”).
File Handling Preferences
The File Handling pane contains options for importing files and setting the location of InDesign’s temporary files. All but one File Handling preferences are application specific; the option for creating links applies only to the document.
Document Recovery Data. As you work with InDesign, the program saves information about your preference settings and keeps a record of changes you make to your document. While this makes for a lot of disk-writing activity, it also gives you InDesign’s multiple undo and document recovery features.
To change the folder InDesign uses to store its temporary files, click the Choose button. InDesign displays a dialog box. Locate and select the folder you want to use and click the OK button.
Why would you want to change the location? InDesign’s temporary files—in particular the file recovery information, can get quite large. You might want to move them to a larger drive to free disk space on your system drive, or to a faster drive to improve performance.
Number of Recent Items to Display. Enter the number of recent files you want to display on the Open Recent submenu of the File menu.
Always Save Preview Images with Documents. Turn this option on to save a preview image of the document with the document file. You can also choose how many pages have preview thumbnails. The preview slightly increases the file size. We leave this turned off.
Snippet Import Options. When you import an InDesign snippet (see Chapter 7, “Importing and Exporting”), you can choose to have the snippet appear at its original location (that is, the position it occupied in its document of origin), or at the current cursor location. To do the former, turn on Position at Original Location; to do the latter, turn on Position at Cursor Location.
Check Links Before Opening Document. Turn this option on to have InDesign check the link status of the imported files in the document as you open the document; turn it off to manage links yourself using the Links panel (see Chapter 7, “Importing and Exporting”).
Find Missing Links Before Opening Document. If you have turned on the Check Links Before Opening Document option, you can also choose to have InDesign look for missing links as it opens the document.
Create Links When Placing Text and Spreadsheet Files. When you imported text or Excel files into InDesign 1.x and 2, InDesign always maintained a link to the original file on disk (unless you manually unlinked it in the Links panel). This caused all sorts of confusion, so Adobe made it a preference. Now, by default, imported non-picture files are not linked. If you want them to be linked, then turn on the Create Links When Placing Text and Spreadsheet Files option. We discuss this in more depth in Chapter 3, “Text.”
Preserves Image Dimensions When Relinking. When you use the Links panel to update or relink a the linked graphic, should the new or updated graphic be scaled to match the dimensions of the existing graphic, or should it take on the same scaling as the existing graphic? To do the former, which can result in the replacement graphic being distorted, turn this option on.
Clipboard Preferences
When you copy data out of an application and switch out of that application, the program writes data to the system Clipboard so that it can be pasted into other applications. Applications often post multiple data formats to the Clipboard in the hope that at least one of them will be readable by the application you want to paste the data into. In InDesign, you use the Clipboard Handling pane of the Preferences dialog box to control the way that InDesign works with the Clipboard. Clipboard preferences are application specific.
Prefer PDF When Pasting. Some applications (notably Illustrator) can put PDF format data on the system Clipboard. InDesign can paste this data as an imported PDF graphic. Whether this is a good thing is debatable—personally, if we want an Illustrator PDF file in InDesign, we’d much rather save it to disk and import it using Place (see Chapter 7, “Importing and Exporting”). However, sometimes we want to paste Illustrator paths into InDesign as editable objects (rather than as a non-editable graphic). If you want to paste paths from Illustrator, turn off the Prefer PDF When Pasting option.
Copy PDF to Clipboard/Preserve PDF Data At Quit. InDesign can put PDF data on the Clipboard, too. This lets you copy something out of InDesign and paste it elsewhere, such as Illustrator (which can convert the PDF into editable objects). If you want InDesign to put PDF data on the Clipboard, turn on the Copy PDF to Clipboard option. Turn on Preserve PDF Data at Quit to prevent InDesign from clearing the Clipboard when you quit.
When Pasting Text and Tables from Other Applications. When you switch from one application to another, copied text typically appears on the Clipboard as both RTF and plain text. RTF carries formatting with it; plain text doesn’t. If you want to retain the RTF formatting when you paste text into InDesign from Microsoft Word or some other program, turn on the All Information (Index Markers, Swatches, Styles, etc.) option. To have pasted text take on the attributes of the text you’re pasting it into, turn on the Text Only option.
Setting Defaults
“Defaults” are the settings you begin with when you start InDesign. InDesign’s defaults control page size, fill stroke color, available styles, type settings, and other details. InDesign has two kinds of defaults—application defaults and document defaults. Application defaults determine the appearance and behavior of all new publications; document defaults control the specifications of objects you create in a particular publication.
Neither document defaults nor application defaults change any existing objects or publications—you can change the defaults at any time without harming publications you’ve already laid out.
When you create a new InDesign publication, do you immediately add a set of colors to the Colors panel, display the rulers, and add styles to the Style panel? Wouldn’t it be great if you could tell InDesign to create new documents using those settings?
You can. To set InDesign’s application defaults, close all publications (without closing InDesign), then, with no publication open (what we like to call the “no pub state,” or, as our good friend Steve Broback would say, “Utah”), add or remove styles and colors, set type options, and otherwise make the changes you’ve been making in each new publication. The next time you create a new InDesign publication, it’ll appear with the settings you specified.
Some document properties cannot be set as application defaults—you cannot, for example, create a new layer or add master pages.
Reverting to InDesign’s Original Defaults
You may occasionally want to delete your preferences and start from scratch. To do this, hold down Command-Option-Shift-Control (on the Mac OS) or Ctrl-Alt-Shift (in Windows) as you start InDesign.
Publication Navigation
InDesign offers three ways to change your view of the publication: zooming, scrolling, and moving from page to page. Zooming changes the magnification of the area inside the window. Scrolling changes the view in the window without changing the magnification.
Zooming
When you zoom in and out on a page, you are using an electronic magnifying glass, first enlarging a particular area of a page and then reducing your screen view so that you are seeing the entire page or pages at once. InDesign lets you magnify or reduce your screen view from 5 percent to 4,000 percent.
Zooming with the View menu. The View menu offers InDesign’s “standard” magnifications, or views, and provides keyboard shortcuts for most of them (see Table 1-3). In fact, some of the keyboard shortcuts in the table should probably just be committed to memory, as they don’t appear in the View menu—such as Command-2/Ctrl-2 to zoom to 200-percent view, and Command-Option-2/Ctrl-Alt-2 to zoom back to the last magnification you used.

All of these commands except Fit Page in Window and Fit Spread in Window center the selected object in the window. If you don’t have an object selected, these shortcuts zoom in or out based on the center of the current view. Fit Page In Window centers the current page in a publication window. This makes Fit Page In Window the perfect “zoom-out” shortcut.
Zooming to actual size (100%) in InDesign CS6 is more accurate than in previous versions. InDesign does calculations based on the monitor’s resolution. If you don’t believe us, get out a ruler and check.
Zooming with the Zoom tool. Another method: choose the Zoom tool, point at an area in your publication, and click. InDesign zooms to the next larger view size (based on your current view—from 100% to 200%, for example), centering the area you clicked on. Hold down Option/Alt and the plus (“+”) in the Zoom tool changes to a minus (“-”). Click the Zoom tool to zoom out.
Fit Selection In Window. Another view command we use all of the time is Fit Selection In Window. Don’t bother looking for it on the View menu—it’s not there. Instead, it appears on the context menu when you have an object selected. It does just what it says—zooms (in or out) on the current selection and centers it in the publication window (see Figure 1-54). Press Command-Option-=/Ctrl-Alt-= to zoom to the Fit Selection In Window view. When text is selected, this shortcut fits the text frame containing the text in the window.

Figure 1-54. Fit Selection in Window
Switching to the Zoom Tool. Press Command-Spacebar/Ctrl-Spacebar to temporarily switch from any tool to the Zoom tool to zoom in; or hold down Command-Option-Spacebar/Ctrl-Alt-Spacebar to zoom out.
Zooming with “Power Zoom.” We’re not kidding—that’s what it’s called. To use this feature, switch to the Hand tool, then hold down the (left) mouse button. After a second, InDesign displays a red frame in the window. You can move the mouse to change the area selected, and you can make the frame larger or smaller using the mouse scroll wheel. When you release the mouse button, InDesign zooms in or out to fit the area in the window (see Figure 1-55).
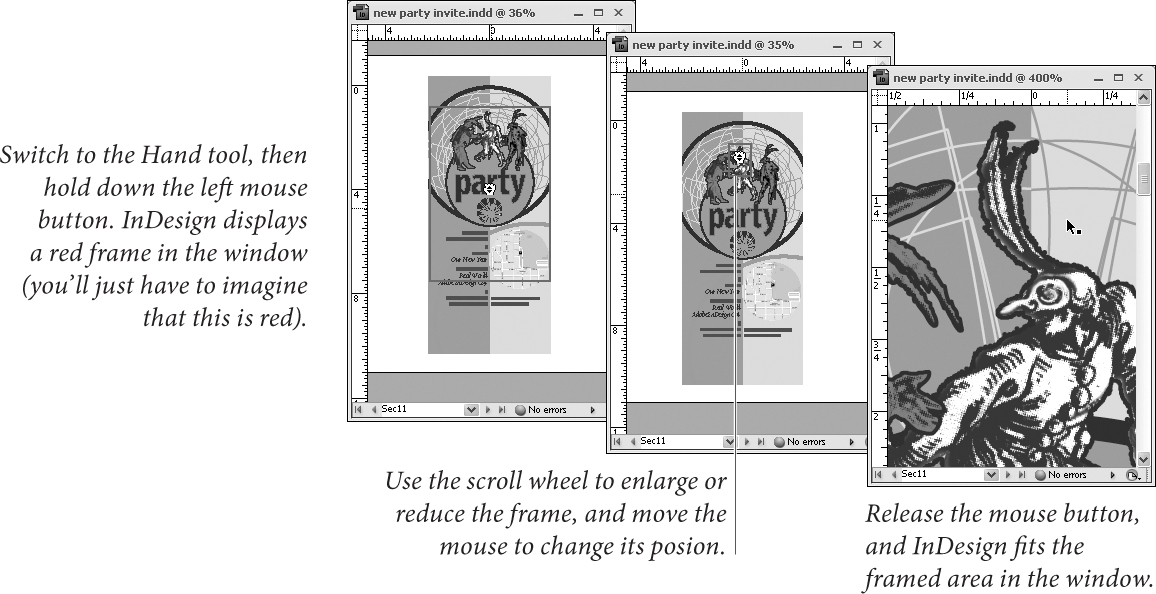
Figure 1-55. Power Zoom
The Best Way to Zoom. To zoom in, press Command/Ctrl and hold down Spacebar to turn the current tool (whatever it is) into the Zoom tool, then drag the Zoom tool in the publication window. As you drag, a rectangle (like a selection rectangle) appears. Drag the rectangle around the area you want to zoom in on, and release the mouse button. InDesign zooms in on the area, magnifying it to the magnification that fits in the publication window (see Figure 1-56).
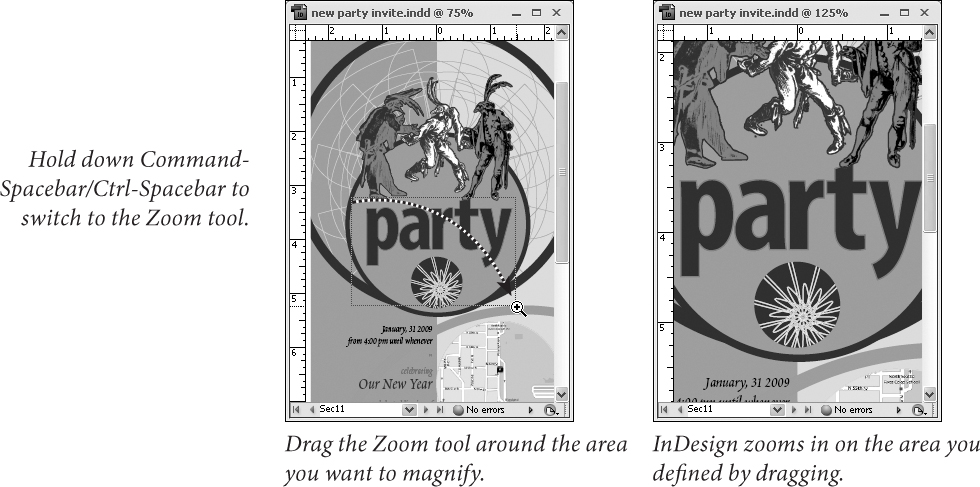
Figure 1-56. Drag Magnification
To zoom out, use one of the keyboard shortcuts—Command-0/Ctrl-0 (for Fit Page In Window) is especially handy. It’s even better if you redefine the shortcut to make it easier to reach with one hand—why take your hand off of the mouse if you don’t need to?
Entering a magnification percentage. To zoom to a specific magnification percentage, enter the percentage in the Magnification field and press Return/Enter. InDesign zooms to the percentage you specified (centering the selection, if any, as it does so).
Scrolling
As we mentioned earlier in this chapter, we rarely use the scroll bars to scroll. So how do we change our view of our publications? We use the Hand tool (also known as the “Grabber Hand”).
Scrolling with the Hand tool. So how do you use the Hand tool? Sure, you can always click on the Hand tool in the Tools panel, or press H to switch to the Hand tool. But it’s better to use the keyboard shortcut that always works, no matter what tool you have selected: Option/Alt-spacebar (see Figure 1-57). This shortcut is temporary—release it, and you’ll go back to whatever tool you had selected.

Figure 1-57. Using the Hand Tool
The Hand tool even works inside the Pages panel (though you don’t need to hold anything down or choose a tool to use it there).
Scrolling as you drag objects. Don’t forget that you can change your view by dragging objects off the screen. If you know an object should be moved to some point outside your current view, select the object and do one of the following things:
• To scroll down, drag the cursor into the scroll bar at the bottom of the publication window. Don’t drag the cursor off the bottom of the screen—InDesign won’t scroll if you do this.
• To scroll to the right, move the cursor into the vertical scroll bar, or drag the cursor off of the left edge of the screen.
• To scroll to a point above your current view, drag the cursor into the horizontal ruler.
• To scroll to the left, drag the cursor into the vertical ruler (or off the screen, if the ruler is not visible).
The window scrolls as long as the mouse button is down. Sometimes it’s the best way to get something into position.
InDesign won’t let you drag objects to an area in the publication window that is behind a panel. If you drag the cursor into any panel other than the Library panel, InDesign displays the “prohibited” symbol. When you drop objects you’re dragging into an area covered by a panel, InDesign bounces the objects back to their original locations. You can’t hide panels while you’re dragging objects, so you might want to hide the panels before you begin dragging.
Scrolling with a Scroll Wheel. If your mouse has a scroll wheel, InDesign probably supports it (no promises—there are lots of different mice). Move the scroll wheel to scroll the window up and down, or hold down Option/Alt as you move the scroll wheel zoom.
The scroll wheel even works inside panels—this is especially useful in the Pages panel, but it also comes in handy when you need to scroll through long lists of styles in the Paragraph Styles panel.
If you have a fancy mouse and you’re running InDesign in Windows Vista, Windows 7, or on a Mac, turn on Enable Multi-Touch Gestures in Interface preferences to do things like rotating the spread using the rotate gesture.
Jump to Page
One of the best navigation shortcuts doesn’t appear in the menu: Command-J/Ctrl-J, for Go To Page (it displays the Go to Page dialog box—where you can enter the page you want to jump to).
Two of the most useful page-navigation features in the Layout menu have odd names (Go Back and Go Forward) and are set apart in the menu. How do these work? Let’s say you’re working on page 9 when you jump to page 25 to make a quick change and then jump to page 81 to see how the change affected the end of the story. Now you can press Command-Up Arrow/Ctrl-Up Arrow (Go Back) to jump back to page 25, and press it again to return to page 9. Want to return to page 25? Press Command-Down Arrow (Go Forward).
Managing InDesign’s Plug-Ins
Everything you see in InDesign is provided by a plug-in. The “application” itself is little more than a plug-in manager. The functions we traditionally think of as being central to a page layout application—things like text composition, text editing, or basic drawing tools—they’re all plug-ins. We’re not kidding.
This means that you can turn plug-ins on and off to customize InDesign to the way that you work and the publications you work with. Specifically, you can turn off the plug-ins you don’t use. You can also add third-party plug-ins to add custom features to InDesign.
To define the plug-ins InDesign will load the next time you start the program, choose Manage Extensions from the InDesign menu (on the Macintosh), or from the Help menu (in Windows). The Adobe Extension Manager opens. This command used to be called Configure Plug-ins in previous versions. You can create and manage sets of plug-ins.
Why would you want to turn plug-ins off? Simple—to reduce the amount of memory taken up by InDesign and to increase the speed of the application (slightly).
Some plug-ins are required by InDesign—they’re the ones with the little padlock next to them. But all of the other plug-ins are fair game. Never use the Info panel? Turn it off!
Place Icons
When you place (that is, import) a file or take another action that loads text or a graphic, InDesign changes the cursor into an icon called a “place icon,” or “place gun” (see Figure 1-58). Click the place icon to specify the position of the upper-left corner of the incoming file, or drag the place icon to define the width and height of the file.
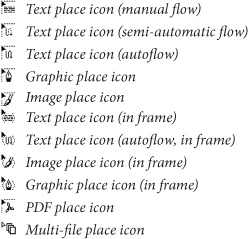
Figure 1-58. Place Icons
We’ll talk more about place icons in the next chapter, and again in Chapter 3, “Text” and Chapter 7, “Importing and Exporting.”
On with the Tour
At this point in the InDesign tour, we’ve seen most of the sights. Don’t worry if you’re a little confused—it’s hard to take it all in at once. In the following chapters, we’ll help you put the tools in context—so far, we’ve just talked about what the tools are. In the rest of the book, we’ll talk about what you can do with them.