
Bonus Appendix: More Scripting
In the printed version of Real World Adobe InDesign CS6, we cut a few sections from the Scripting chapter due to space constraints. If you’re interested in scripting—and we hope you are—you’ll want to check out this additional material.
While the printed book includes only JavaScript examples, we provide the AppleScript and VBScript examples here.
You can also learn about using the ExtendScript Toolkit and play around with more samples in the “Even More Fun with Scripting” section.
Enjoy!
Additional Scripting Examples
The chapter in the printed book provides a script example only in JavaScript. In this bonus chapter, we provide the example in AppleScript and VBScript examples as well.
A Short, But Useful, Example
When you want to get an object or series of objects out of a frame you’ve pasted them into, you end up doing a lot of selecting, cutting, and pasting. A script that could remove all of the objects from a frame (while maintaining the positions they occupied in the frame) would save you time and trouble. Right? Let’s go!
This script assumes you have an object selected, and that the object contains at least one other object. The script will not ungroup a group as it processes the objects.
AppleScript. To create the script, follow these steps.
1. Start the AppleScript Script Editor and InDesign.
2. Enter the following text or download the script from David’s web site (see “Where to Get the Scripts in this Chapter,” above). Note that ¬ indicates a long line—do not enter a line break in the Script Editor.
--CutContents.applescript
--An InDesign CS6 AppleScript.
set done to false
tell application “Adobe InDesign CS6”
activate
set mySelection to selection
if (count mySelection) = 1 then
set myPageItem to item 1 of mySelection
repeat while done is false
if class of myPageItem is not group and
(count page items of myPageItem) is greater than 0 then
set myItem to page item 1 of myPageItem
copy geometric bounds of myItem to myBounds
set myX to item 2 of myBounds
set myY to item 1 of myBounds
select myItem
cut
paste
set myPageItem to item 1 of selection
tell myPageItem to move to {myX, myY}
else
set done to true
end if
end repeat
end if
end tell
3. Save the script in the Scripts Panel folder inside the Scripts folder in your InDesign folder. If you choose to save the file as an uncompiled AppleScript (a text file), give it the file extension “.applescript”.
JavaScript. To create the script, follow these steps.
1. Start the ExtendScript Toolkit and target InDesign. If InDesign is not already running, you’ll be prompted to start it.
2. Enter the following text or download the script from David’s web site (see “Where to Get the Scripts in this Chapter,” earlier in this chapter). Don’t worry about the indents; they’re just here to make it easier for you to follow—JavaScript doesn’t need them.
//CutContents.jsx
//An InDesign CS6 JavaScript
//Cuts the contents of the selected page items and places
//them in the proper page position and stacking order.
var myObjectList = new Array;
if(app.documents.length != 0){
if(app.selection.length != 0){
for(var myCounter = 0; myCounter < app.selection.length;
myCounter ++){
switch(app.selection[myCounter].constructor.name){
case “Rectangle”:
case “Oval”:
case “Polygon”:
case “GraphicLine”:
//If the item contains a page item,
//add the item to the list.
if(app.selection[myCounter].pageItems.length != 0){
myObjectList.push(app.selection[myCounter]);
}
break;
}
}
//If there were qualifying items in the selection, pass them
//on to the myCutContents routine for processing.
if(myObjectList.length != 0){
myCutContents(myObjectList);
}
}
}
function myCutContents(myObjectList){
var myPageItem;
var myGeometricBounds;
for(var myCounter = 0; myCounter < myObjectList.length;
myCounter ++){
var myDone = false;
myPageItem = myObjectList[myCounter];
do{
if((myPageItem.constructor.name != “Group”)&&
(myPageItem.pageItems.length != 0)){
myPageItem = myPageItem.pageItems.item(0);
app.select(myPageItem, SelectionOptions.replaceWith);
app.cut();
app.pasteInPlace();
myPageItem = app.selection[0];
}
else{
myDone = true;
}
} while(myDone == false);
}
}
3. Save the script as a plain text file with the file extension “.jsx” to the Scripts Panel folder inside the Scripts folder in your InDesign folder.
VBScript. To create the script, follow these steps.
1. Start InDesign and a text editor.
2. Enter the following text or download the script from David’s web site (see “Where to Get the Scripts in this Chapter,” earlier in this chapter). Lines that end with an underscore (“_”) are long lines that had to be broken to fit the layout (the underscore is the continuation character in VBScript).
Rem CutContents.vbs
Rem An InDesign CS6 VBScript
Rem Cuts the contents of the selected page items and places
Rem them in the proper page position and stacking order.
ReDim myObjectList(0)
Set myInDesign = CreateObject(“InDesign.Application.CS6”)
If myInDesign.Documents.Count <> 0 Then
If myInDesign.Selection.Count <> 0 Then
For myCounter = 1 To myInDesign.Selection.Count
Select Case TypeName(myInDesign.Selection.Item(myCounter))
Case “Rectangle”, “Oval”, “Polygon”, “Graphic Line”
If Not (IsEmpty(myObjectList(0))) Then
ReDim Preserve myObjectList(UBound(myObjectList) + 1)
End If
Set myObjectList(UBound(myObjectList)) = myInDesign. _
Selection.Item(myCounter)
End Select
Next
If Not (IsEmpty(myObjectList(0))) Then
myCutContents myInDesign, myObjectList
End If
End If
End If
Function myCutContents(myInDesign, myObjectList)
For myCounter = 0 To UBound(myObjectList)
myDone = False
Set myPageItem = myObjectList(myCounter)
Do While (myDone = False)
If ((TypeName(myPageItem) <> “Group”) And _
(myPageItem.PageItems.Count <> 0)) Then
Set myPageItem = myPageItem.PageItems.Item(1)
myInDesign.Select myPageItem, _
idSelectionOptions.idReplaceWith
myInDesign.Cut
myInDesign.PasteInPlace
Set myPageItem = myInDesign.Selection.Item(1)
Else
myDone = True
End If
Loop
Next
End Function
3. Save the script as a text file with the file extension “.vbs” to the Scripts Panel folder in the Scripts folder in your InDesign folder.
Testing the CutContents Script
Now that you’ve saved the script, switch to InDesign. Select a path that contains one or more objects. Double-click the script name in the Scripts panel (or, if you’re using AppleScript, you can also run the script from the Script Editor). InDesign will remove each nested object inside the frame and paste it into the same position as it occupied while inside the frame (see Figure 12-1).

Figure 12-1 CutContents Script
Developing VBScripts with Visual Basic for Applications
If you’ve chosen VBScript as your InDesign scripting language, you need to have some way to debug (that is, step through) your scripts. VBScript, by itself, does not have this capability. Visual Basic for Applications (VBA), however, features an excellent debugging and development environment. You can use VBA to develop your scripts, then deploy them as VBScripts. The following steps show you how to get started (this process is shown in more detail in the Adobe InDesign CS6 Scripting Tutorial).
1. Start InDesign and a Microsoft Office application that contains VBA We’ll use Excel, but other applications.
2. In Excel, choose Visual Basic Editor from the Macro submenu of the Tools menu. Excel displays the Visual Basic editor.
3. Choose References from the Tools menu. Visual Basic displays the References dialog box. Turn on the Adobe InDesign CS6 Type Library option (in the Available References list), then click the OK button to add this reference to your project.
4. Create a new form by choosing User Form from the Insert menu.
5. Add a button to the form. To do this, drag a Command Button from the Toolbox panel and drop the button in the form.
6. Double-click the button to display the Code window.
Now you’re ready to add a VBScript for debugging. Paste or enter the main part of the script between the lines beginning with “Private Sub” and ending with “End Sub” lines. If you want to debug the example script, you would paste the lines from the start of the script to the line beginning with “Function” in this area. You would then enter (or paste) any functions (such as the “myCutContents” function) following “End Sub.”
Now you can debug the script. To set a breakpoint on a specific line, you click in the column to the left of the line—a red circle will appear there. Click the Run button, then click the Command button you created earlier. Visual Basic runs the script up to the breakpoint and stops. At that point, you can display the Locals window (choose Locals Window from the View menu) to view the contents of the variables you’ve defined in the script (see Figure 12-2). Our example script shouldn’t have any problems in it, but you’ll need to use debugging when you’re writing scripts of your own.
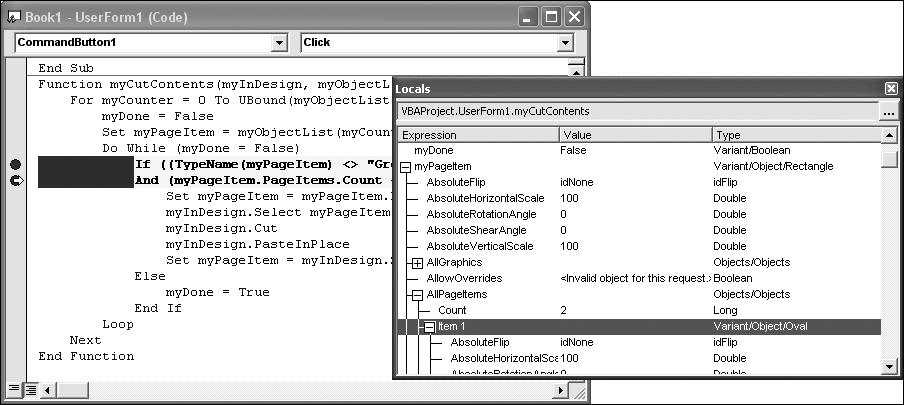
Figure 12-2 Debugging Scripts with VBA
Once you’ve got your script working the way you want it to, copy the contents of the Code window to a text file, delete the lines beginning with “Private Sub” and “End Sub”, and then save the file as a text file with the file extension “.vbs”.
Using the ExtendScript Toolkit
InDesign comes with an excellent JavaScript development tool, the ExtendScript Toolkit (ESTK). Scripters working in AppleScript or VBScript have always been able to use excellent script development environments—but, before the ESTK came along, InDesign scripters working with JavaScript had to edit the scripts using a text editor and then run and debug our scripts inside InDesign. We could debug a script using a built-in debugger, we couldn’t edit text there; and, back in our text editor, we couldn’t debug. It made for a very frustrating development process.
But a good IDE gives a scripter more than just a way to enter and debug a script—it should also provide editing features such as syntax coloring and file management. When you’re debugging, an IDE should provide a way to view the values of variables in your script, a way to step through the lines of the script, and an easy way to interact with the scripting environment through a “console.” The ESTK provides all of these features.
Editing and Running Scripts in the ESTK
The best way to learn about a new piece of software, of course, is to use it for something, and, to do that, you’ve got to start it. While you can start the ESTK as you would start any other application, the quick way to do it is to select a JavaScript in the Scripts panel, then choose Edit Script from the Context menu. This starts the ESTK and opens the script for editing. The ESTK might not become the active application—if it doesn’t, you can Command-Tab (Mac OS) or AltTab (Windows) to it to bring it to the front.
At this point, you can create a new script, edit a script, run a script, or debug a script. Make certain that InDesign is selected as the target application—even experienced scripters often forget this step (see Figure 12-3).
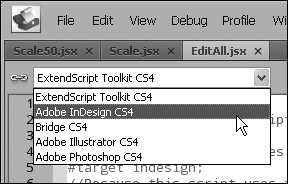
Figure 12-3 Setting the Target Application
As you run or debug InDesign scripts in the ESTK, InDesign’s screen display is turned off. This makes your scripts run faster. To examine the state of a document while debugging a script, turn on the Enable Redraw option in the Scripts panel menu.
The ESTK is a full-featured text editor, with keyboard navigation, drag and drop text editing, and standard find/change capabilities. Just as text editors can check the spelling and grammar of your text, the ESTK has a way to check the syntax of your script. This is a great way to find mismatched parentheses or brackets, missing quotation marks, and other little annoyances that gremlins have inserted into or removed from your code. Choose Check Syntax from the Edit menu to perform this check—if the ESTK finds a syntax error, it’ll highlight it and display an error message.
We won’t cover using the ESTK in great detail here—that’s discussed in the Adobe JavaScript Tools Guide (choose JavaScript Tools Guide from the Help menu to open this PDF). We will, however, mention a few of our favorite things.
Writing to the Console
As you’re debugging your script, it can sometimes help a great deal to write log entries to the console window. In the ESTK, you can display information in the console using the $.write() method. If you need see a the value of a number of variables at once, you’ll probably use $.write() extensively during debugging.
Using the Data Browser
Another way to view the values assigned to variables in your script as you debug is the ESTK Data Browser tab. To view the properties of an object, click the arrow to the left of the object name to expand the object. For each property, the ESTK will display the property’s value.
Object Model Viewer
The ESTK provides a great way of looking at the objects, properties, and methods that comprise InDesign’s scripting object model: the Object Model Viewer.
To use the object model viewer, choose Object Model Viewer from the ESTK Help menu. The ESTK displays the Object Model Viewer. Choose Adobe InDesign CS6 (7.0) Object Model (the other listings for InDesign display previous versions of the scripting object model) to view the InDesign CS6 object model (see Figure 12-4).

Figure 12-4 The ESTK Object Model Viewer
Even More Fun with Scripting
Here are a few bonus examples that we didn’t print in the book.
Overriding All Overrides
We admit that we feel a thrill of pride when we look at our neatly ordered lists of paragraph styles in the Paragraph Styles panel. We don’t get out enough. But a “+” (plus sign, indicating a local formatting override) after a style name drives us crazy. What’s that doing there? Evil, local formatting is interfering with our dream of formatting and organizational goodness!
It doesn’t matter how the local formatting crept into the document (be it something in a Word file or an errant co-worker)—it’s easy to get rid of, as long as you use the following script. It’s very short, but it can save you hours of work.
AppleScript. Follow the steps shown earlier in this chapter for creating an AppleScript, then enter the following code (or download the script from David’s web site—see “Where to Get the Scripts in this Chapter,” earlier in this chapter).
tell application “Adobe InDesign CS6”
tell stories of document 1 to clear overrides
end tell
JavaScript. Follow the steps shown earlier in this chapter for creating a JavaScript, then enter the following text or download the script from David’s web site (see “Where to Get the Scripts in this Chapter,” earlier in this chapter).
app.documents.item(0).stories.everyItem().clearOverrides();
VBScript. Follow the steps shown earlier in this chapter for creating a VBScript, then enter the following text or download the script from David’s web site (see “Where to Get the Scripts in this Chapter,” earlier in this chapter).
Set myInDesign = CreateObject(“InDesign.Application.CS6”)
Set myDocument = myInDesign.Documents.Item(1)
For myCounter = 1 myDocument.Stories.Count
myInDesign.Documents.Item(1).Stories.Item(myCounter).ClearOverrides
Next
Automatically Creating Style-to-Tag Mappings
If you’ve looked through Chapter 14, “XML,” you probably noticed the section on mapping paragraph styles to XML tags. It’s a very powerful method of converting your existing InDesign documents to an XML workflow.
If your documents contain a large number of styles, and if those styles contain spaces, you probably groaned aloud thinking about the amount of work you’d have to put in to map all of your paragraph styles to tags.
Automating this process is exactly the sort of thing that scripting is very good at. The following are two example scripts (one for each platform). The script creates tags that match each paragraph style in the document, replacing invalid characters in the style names as it does so. The script then associates each paragraph style with the corresponding tag.
AppleScript. Follow the steps shown earlier in this chapter for creating an AppleScript, then enter the following code (or download the script from David’s web site—see “Where to Get the Scripts in this Chapter,” earlier in this chapter). Note that ¬ indicates a long line in this layout—do not enter a line break in the Script Editor.
--MapStylesToTags.as
tell application “Adobe InDesign CS6”
if (count documents) > 0 then
if (count paragraph styles of active document) > 1 then
my myMapStylesToTags(active document)
end if
end if
end tell
on myMapStylesToTags(myDocument)
tell application “Adobe InDesign CS6”
tell myDocument
repeat with myCounter from 1 to (count paragraph styles)
set myParagraphStyle to paragraph style myCounter
set myStyleName to name of myParagraphStyle
if myStyleName is not “[No paragraph style]” then
--Replace spaces. Search for other characters if necessary.
set myStyleName to my myReplaceCharacters(myStyleName, ¬
“ “, “_”)
set myTag to make XML tag with properties ¬
{name:myStyleName}
--Map styles to tags
set myMap to make XML export map with properties ¬
{markup tag:myTag, mapped style:myParagraphStyle}
--To map tags to styles, remove the comment from the
--following line and comment out the line above.
--set myMap to make XML import map with properties ¬
--{markup tag:myTag, mapped style:myParagraphStyle}
end if
end repeat
--Apply the mapping specified above.
auto tag
end tell
end tell
end myMapStylesToTags
on myReplaceCharacters(myString, mySearchString, myReplaceString)
set AppleScript’s text item delimiters to the mySearchString
set the myList to every text item of myString
set AppleScript’s text item delimiters to the myReplaceString
set myString to the myList as string
set AppleScript’s text item delimiters to ““
return myString
end myReplaceCharacters
JavaScript. Follow the steps shown earlier in this chapter for creating a JavaScript, and enter the code shown here.
//MapStylesToTags.jsx
if (app.documents.length != 0){
if (app.activeDocument.paragraphStyles.length > 1){
myMapStylesToTags();
}
}
function myMapStylesToTags(){
var myDocument = app.activeDocument;
for(var myCounter = 0; myCounter < myDocument.paragraphStyles.
length; myCounter ++){
var myParagraphStyle = myDocument.paragraphStyles.
item(myCounter);
var myStyleName = myParagraphStyle.name;
if (myStyleName != “[No paragraph style]”){
//Replace all spaces with underscore characters.
var myRegEx = new RegExp (‘ ‘, ‘gi’) ;
myStyleName = myStyleName.replace(myRegEx, ‘_’);
var myXMLTag = myDocument.xmlTags.add(myStyleName)
var myMap = myDocument.xmlExportMaps.add(myParagraphStyle,
myXMLTag)
//To map XML tags to styles, comment the line above
//and uncomment the following line.
//Set myMap = myDocument.xmlImportMaps.add(myxmlTag,
//myParagraphStyle)
}
}
myDocument.autoTag();
}
VBScript. Follow the steps shown earlier in this chapter for creating a VBScript, then enter the following code (or download the script from David’s web site—see “Where to Get the Scripts in this Chapter,” earlier in this chapter).
Rem MapStylesToTags.vbs
Set myInDesign = CreateObject(“InDesign.Application.CS6”)
If myInDesign.Documents.Count <> 0 Then
If myInDesign.ActiveDocument.ParagraphStyles.Count > 1 Then
myMapStylesToTags (myInDesign.ActiveDocument)
End If
End If
Function myMapStylesToTags(myDocument)
For myStyleCounter = 1 To myDocument.ParagraphStyles.Count
Set myParagraphStyle = myDocument.ParagraphStyles.
Item(myStyleCounter)
myStyleName = myParagraphStyle.Name
If myStyleName <> “[No paragraph style]” Then
myStyleName = Replace(myStyleName, “ “, “_”)
Set myXMLTag = myDocument.XMLTags.Add(myStyleName)
Set myMap = myDocument.XMLExportMaps.Add(myParagraphStyle, _
myXMLTag)
Rem To map XML tags to styles, comment the line above
Rem and uncomment the following line.
Rem Set myMap = myDocument.XMLImportMaps.Add(myXMLTag, _
Rem myParagraphStyle)
End If
Next myDocument.AutoTag
End Function
Drawing NINAs
Have you ever played with a Spirograph? Or been fascinated by one of the geometric patterns created by M. C. Escher? Both authors admit a fondness (well, more like an obsession) for geometric art. While writing this book, we stumbled across a very interesting web site: http://www.washington.edu/bibsys/mattf/nina/. Matt Freedman, at the University of Washington, invented (or is it “discovered”?) a very nifty new algorithm for drawing shapes he’s named NINAs (NINA being an acronym for “Nina Is Not An Acronym”). NINAs are fascinating shapes, and we had to see if we could write InDesign scripts that make use of the NINA algorithm (with Mr. Freedman’s permission). Figure 12-5 shows some of the NINAs drawn by our script.

Figure 12-5 Various NINAs
Note: This script involves a small amount of trigonometry—so we’ve had to add some handlers (subroutines) to the AppleScript section, because AppleScript has no built-in trigonometric functions.
In addition, you should note that the Visual Basic functions return values in radians, rather than degrees, and that InDesign’s vertical axis is upside down relative to traditional geometric plotting.
AppleScript
The following script fragment shows the heart of our NINA drawing script—for the complete script, go to David’s web site (see “Where to Get the Scripts in this Chapter,” earlier in this chapter). Note that ¬ indicates a long line in this layout—do not enter a line break in the Script Editor. Note, too, that this AppleScript can be very slow. If you have an AppleScript extension that supports sine and cosine functions, you could use those functions to improve script performance. Once you’ve downloaded the script, you can experiment with fairly low values for the myNumberOfLines variable.
on myDrawNina(myNumberOfLines, a_pulse, b_pulse, myLength, ¬
myClosedPath)
set myList to {}
repeat with myCounter from 0 to (myNumberOfLines * 2)
--Note: the “*(180/pi)” part converts radians to degrees,
--as the sine/cosine handlers expect degrees as their input.
set myAValue to ((-2 * pi * a_pulse * myCounter) / ¬
myNumberOfLines) * (180 / pi)
set myBValue to ((-2 * pi * b_pulse * myCounter) / ¬
myNumberOfLines) * (180 / pi)
set myASine to my sine_of(myAValue)
set myACosine to my cosine_of(myAValue)
set myBSine to my sine_of(myBValue)
set myBCosine to my cosine_of(myBValue)
set myX to (myACosine + myBCosine) * myLength
set myY to (myASine + myBSine) * myLength
copy {myX, myY} to end of myList
end repeat
tell application “Adobe InDesign CS6”
tell active page of active window
set myGraphicLine to make graphic line
set entire path of path 1 of myGraphicLine to myList
if myClosedPath is true then
set path type of path 1 of myGraphicLine to closed path
else
set path type of path 1 of myGraphicLine to open path
end if
end tell
end tell
end myDrawNina
JavaScript
The following script fragment shows the heart of our NINA drawing script—for the complete script, go to David’s web site (see “Where to Get the Scripts in this Chapter,” earlier in this chapter).
function myDrawNina(myNumberOfLines, a_pulse, b_pulse, myLength,
myClosedPath){
var cur_x, cur_y;
var myAnchor = new Array(2);
var myArray = new Array;
//Rather than draw the entire path point-by-point,
//we’ll fill an array and then use it to fill in all of the point
//locations at once using the entirePath property.
for (var myCounter = 0; myCounter < myNumberOfLines; myCounter++){
cur_x = (Math.cos((-2 * Math.PI * a_pulse * myCounter) /
myNumberOfLines) + Math.cos((-2 * Math.PI * b_pulse * myCounter)
/ myNumberOfLines)) * myLength;
cur_y = (Math.sin((-2 * Math.PI * a_pulse * myCounter) /
myNumberOfLines) + Math.sin((-2 * Math.PI * b_pulse * myCounter)
/ myNumberOfLines)) * myLength;
myAnchor = [cur_x, cur_y];
myArray.push(myAnchor);
}
app.activeDocument.viewPreferences.horizontalMeasurementUnits =
MeasurementUnits.points;
app.activeDocument.viewPreferences.verticalMeasurementUnits =
MeasurementUnits.points;
var myPage = app.activeWindow.activePage;
var myGraphicLine = myPage.graphicLines.add();
myGraphicLine.move(undefined, [“1p”,”1p”]);
var myPath = myGraphicLine.paths.item(0);
//Now set the entire path to the contents of the array.
myPath.entirePath = myArray;
if(myClosedPath == true){
myPath.pathType = PathType.closedPath;
}
else{
myPath.pathType = PathType.openPath;
}
//Label the graphic line with the parameters used to create it.
myGraphicLine.label = “number_of_lines = “ + myNumberOfLines + “,
a_pulse = “ + a_pulse + “, b_pulse = “ + b_pulse;
}
Visual Basic
The following script fragment shows the heart of our NINA drawing script—for the complete script, go to David’s web site (see “Where to Get the Scripts in this Chapter,” earlier in this chapter). As usual, “_” indicates a line break in this layout; do not break the line or type the character).
Function myDrawNina(myInDesign, myNumberOfLines, a_pulse, b_pulse, _
myLength, myClosedPath)
pi = 3.14159265358979
Set myDocument = myInDesign.ActiveDocument
Set myPage = myInDesign.ActiveWindow.ActivePage
ReDim myArray(myNumberOfLines)
Rem Fill in an array with point locations.
For myCounter = 0 To (myNumberOfLines)
cur_x = (Cos((-2 * pi * a_pulse * myCounter) / myNumberOfLines) _
+ Cos((-2 * pi * b_pulse * myCounter) / myNumberOfLines)) * _
myLength
cur_y = (Sin((-2 * pi * a_pulse * myCounter) / myNumberOfLines) _
+ Sin((-2 * pi * b_pulse * myCounter) / myNumberOfLines)) * _
myLength
myArray(myCounter) = Array(cur_x, cur_y)
Next
Set myGraphicLine = myPage.GraphicLines.Add
Rem Move the graphic line a bit to clear up
Rem page “ownership” issues.
myGraphicLine.Move , Array(“1p”, “1p”)
Rem Set the points on the path to the array generated by the loop.
myGraphicLine.Paths.Item(1).EntirePath = myArray
Rem Label the NINA with settings.
myGraphicLine.Label = “number_of_lines = “ CStr(myNumberOfLines)_
& “, a_pulse = “ & CStr(a_pulse) & “, b_pulse = “ & CStr(b_pulse)
If myClosedPath = True Then
myGraphicLine.Paths.Item(1).PathType = idPathType.idClosedPath
Else
myGraphicLine.Paths.Item(1).PathType = idPathType.idOpenPath
End If
End Function
Testing the NINA Drawing Script
To test the NINA drawing script, move InDesign’s ruler zero point to the point at which you want to locate the center of the shape, then run the script (we recommend setting the publication’s measurement system to points before running the script). If all goes well, InDesign will draw a NINA. We urge you to experiment with the settings in the script—the number of different types of shapes you can draw is truly endless. Even very slight changes to the settings can produce wildly differing results.
Adding a User Interface
InDesign scripts can create their own dialog boxes, and can populate those dialog boxes with static text labels, check box controls, pop-up menus, text entry fields, and a variety of number entry fields (measurement units, integers, percentages, and real numbers). Previously, adding a user interface to a script meant you had to rely on additional user interface building software, such as FaceSpan, Real Basic, or AppleScript Studio on the Mac OS, or the full version of Visual Basic in Windows. Having to rely on these add-on products made your scripts larger, and complicated sharing scripts with others.
There’s good news and bad news about InDesign script dialog boxes. The good news is that InDesign takes care of all spacing and sizing issues. The bad news? InDesign takes care of all spacing and sizing issues. This means that you don’t have to worry about setting pixel coordinates for every control, but it also means that you have very little control over the appearance of your dialog boxes. At the same time, it’s relatively easy to create a good-looking dialog box.
The NINA drawing script a good one to add a user interface to—all you need is a dialog box containing four text fields (to set the myNumberOf Lines, a_pulse, b_pulse, and myLength variables) and OK/Cancel buttons.
We’ve provided a version of the NINA drawing script with a user interface—you can download it from David’s web site (see “Where to Get the Scripts in this Chapter,” earlier in this chapter). When you run the script, InDesign will display a dialog box (see Figure 12-6). Use the version with the user interface, and you won’t have to edit the script to draw different NINAs.

Figure 12-6 NINA User Interface
Mystic Rose
Another interesting geometric figure is the “Mystic Rose”—a polygon where every point connects to every other point. Ole thought it would be fun to have a script that would draw these, so he wrote one (see Figure 12-7). We’ve included this script with the other scripts in the Zip archive you can download from David’s web site (see “Where to Get the Scripts in this Chapter,” earlier in this chapter).

Figure 12-7 Mystic Rose
Monitoring Events
“Events” are things that happen in InDesign. Opening a file, printing a file, importing a graphic, and moving an object are all examples of events. InDesign can watch for a certain set of events, and can run scripts when those events occur. The set of events that InDesign can respond to is, at present, rather limited. You can monitor the following events (the event names are shown in parentheses).
• Opening a document (beforeOpen, afterOpen)
• Creating a new document (beforeNew, afterNew)
• Saving a document (beforeSave, afterSave, beforeSaveACopy, afterSaveACopy, beforeSaveAs, afterSaveAs)
• Closing a document (beforeClose, afterClose)
• Exporting (beforeExport, afterExport)
• Displaying a menu (beforeDisplay, afterDisplay, beforeInvoke, afterInvoke, onInvoke)
• Printing a document (beforePrint, afterPrint)
• Placing a file (beforeImport, afterImport)
• Reverting a document (beforeRevert, afterRevert)
While this list is limited, there are a number of great places here to have scripts run automatically. You can use the beforePrint event, for example, to trigger a custom preflight script. A script attached to the afterNew event add XMP metadata (“file info”) to the document.
One important thing to note about event scripting: JavaScripts can process the events using functions inside the event handling script, but AppleScript and VBScript event scripts must call external scripts. That’s why the AppleScript and VBScript sample script folders include a folder containing three additional scripts (relative to the JavaScript version)—they make the LabelGraphicMenu script work.
Take a look at the “Events” chapter in the Adobe InDesign CS6 Scripting Guide for more on attaching scripts to events.
Menu Scripting
InDesign scripting can run any menu item, and can associate scripts with new menu items. Thanks to the events mentioned in the previous section, scripts associated with menu items (most notably the Context menus) can check the selection to see whether they should display themselves or not. A script can check to see that a graphic is selected, for example, before it displays a menu items for working with a graphic.
Because the process of attaching a script to a menu item is fairly complicated, we’re not going to show an example here. We thought, however, that we’d mention it as something you should keep in mind. If you’re curious about what it takes to add a script to a menu item, take a look at the “Menus” chapter in the Adobe InDesign CS6 Scripting Guide for your preferred scripting language.
Startup Scripts
If you have a script you really like, and want to have the script run whenever you start InDesign, you can. There’s no real trick to it: just put the script inside a folder named “Startup Scripts” anywhere in the Scripts folder in your InDesign folder. When you do this, the script will run whenever you launch InDesign.
At the same time, some scripts will need modification to be run as startup scripts. Take, for example, the very useful sample script LabelGraphicMenu that comes with InDesign. This script installs a new menu item on the Context menu when you have a graphic selected. Choose the menu item, and you can easily add a caption to the graphic (see Figure 12-18).
The only trouble with this script is that it asks (politely) if it can do what it does whenever you run it. You don’t want to have to respond to this question every time you start InDesign, so you’d better make a change to the script before you put it in the Startup Scripts folder. If you’re using AppleScript or VBScript, you’ll also have to move a folder containing three “helper” scripts to the same folder as the script itself.
AppleScript
To convert the sample script LabelGraphicsMenu.applescript to a startup script, follow these steps.
1. Open the script with your script editor.
2. Locate the line:
set myResult to display dialog myString buttons{“Yes”, “No”, default button: “Yes”}
3. Enter “--” before the start of the line to make it a comment.
4. Locate the line:
if button returned of myResult is “Yes” then
And change it to:
if true then
5. Save the script.
6. Put the edited version of the script and the LabelGraphic Support folder inside a folder named “Startup Scripts” in the Scripts folder inside your InDesign folder. Create the folder if it does not already exist.
JavaScript
To convert the sample script LabelGraphicMenu.jsx to a startup script, follow these steps.
1. Open the script with the ExtendScript Toolkit.
2. Locate the line:
var myResult = confirm(“This script installs a new menu item
‘Label Graphic’
on the context menu that appears when you
select one or more graphics.
Click the Yes button to add the
menu item.”);
And change it to:
var myResult = true;
3. Save the script.
4. Put the edited version of the script inside a folder named “Startup Scripts” in the Scripts folder inside your InDesign folder. Create the folder if it does not already exist.
VBScript
To convert the sample script LabelGraphicMenu.vbs to a startup script, follow these steps.
1. Open the script with your script editor.
2. Locate the line:
myResult = MsgBox(myString, vbOKCancel, “Install Label Graphic
menu item?”)
myResult = vbOK
3. Save the script.
4. Put the edited version of the script and the LabelGraphic Support folder inside a folder named “Startup Scripts” in the Scripts folder inside your InDesign folder. Create the folder if it does not already exist.
End Script
Scripting is all about empowerment. Don’t just sit around telling yourself that the reason you’re working late is that InDesign can’t do something you’d like it to do. Sure, there are things in every program we’d like the manufacturer to fix, but, with InDesign’s scripting features, we’ve finally got the tools we need to fix them ourselves.
By urging you to take up scripting, we’re urging you to take control of InDesign, your publications, your work, and your life. We know you can do it!