
Chapter 9. Transforming
In the previous chapters, we’ve covered the process of getting text and graphics into your InDesign publication. This chapter is all about what you can do with those elements once you’ve wrestled them onto your pages. The process of moving, rotating, scaling, reflecting, or shearing an object is called transformation.
Many of the topics in this chapter have been touched on in the preceding chapters—mainly because everything you can do in InDesign is interconnected. In the old days, software was entirely linear and modal: one had to proceed from this screen to that screen following a particular sequence of steps. These days, software is extremely nonlinear and non-modal (that is, you can do things many different ways in many different orders), and, therefore, much harder to write about. It’s enough to drive one mad! Your purchase of this book will make our time at the Looney Farm that much more pleasant. Thank you.
Transformation Basics
There are many ways to transform an object in InDesign:
• Select the object using the Selection tool, then drag a selection handle to scale the object (but not necessarily the contents).
• Select a transformation tool from the Tools panel, set the center of transformation (if necessary), and drag the tool.
• Display the Transform panel or Control panel and enter values in the panel field corresponding to the transformation you want to apply.
• Choose one of the “preset” rotation or reflection options from the Transform panel menu or Control panel menu. See “Transformation Presets,” later in this chapter.
• Double-click one of the transformation tools in the Toolbox to display the corresponding transform dialog box (double-click the Rotate tool, for example, to display the Rotation dialog box).
• Select the Free Transform tool, and drag the tool around the object. See “Using the Free Transform Tool,” later in this chapter.
• Press keyboard shortcuts. See “Scaling with Keyboard Shortcuts,” later in this chapter.
There’s no “right” or “best” way to do transformations—you can experiment with the different methods and see which you like best. We change methods depending on the situation (and our mood).
Setting the Center of Transformation
When you select an object and then choose one of the transformation tools from the Tools panel, InDesign displays the center of transformation icon (it looks something like a small registration mark) on or around the object (see Figure 9-1). The initial position of the icon is determined by the point selected in the Proxy in the Transform panel or Control panel (by default, it’s in the center).

Figure 9-1. Center of Transformation
When you scale, rotate, or shear an object, InDesign transforms the object around the center of transformation. To reposition the center of transformation icon, either drag it to a new position (with whatever transformation tool you have selected) or click a point on the Proxy in the Transform panel or Control panel.
Transforming Line Segments and Points
To transform a point or line segment on a path, select the path or point using the Direct Selection tool, then transform it as you would any other object (drag it, or enter values in the X and Y fields of the Transform panel or Control panel, or press the arrow keys, or display the Move dialog box, or use any of the other transformation techniques). This can produce interesting effects (see Figure 9-2).

Figure 9-2. Transforming Points, Not Paths
You can also select the points and/or line segments of a path and then copy as you transform the object by holding down the Option/Alt key after you start dragging or clicking the Copy button in the any of the transformation tool’s dialog boxes. In this case, InDesign splits the path at the unselected points on the path. This takes a little getting used to, but might come in handy. If you want to transform line segments or points of a copy of a path, copy the path first, then apply the transformation.
Transforming Path Contents
When you transform a shape that contains other objects (an image frame with a picture in it, for example), you can control whether the content is transformed. By default, dragging the handles of a frame does not scale the content, but using any of the transformation tools or using the scaling fields in the Transform panel or Control panel to alter a frame does scale the content. The Width and Height fields in the panels, by contrast, scale the frame without scaling the content.
To transform a frame without transforming its content, select the frame with the Direct Selection tool—this way, the frame is selected but the content is not. At this point, you can transform the object as you normally would—the content will not be transformed (see Figure 9-3).

Figure 9-3. Transforming Path Contents (or Not)
If you’re familiar with earlier versions of InDesign, you might be asking, “What happened to the Transform Content option?” Don’t ask us—we’d like to have it back.
Apply to Content or Adjust Scaling Percentage
Transforming text frames in earlier versions of InDesign was frustrating because the program would scale the frame and the text in it, but the Control, Character, and Paragraph panels would still stubbornly display the original point size. If you used the Scale tool to double the size of a text frame containing 12-point text with a two-pica indent, for example, the Point Size field in the Character panel would still show “12 pt”, the Left Indent field in the Paragraph panel would show “2p”, and the Transform panel would show “200%”.
The same problem haunted the process of transforming groups, or transforming frames with objects in them (such as frames containing imported graphics).
Fortunately, Adobe changed this behavior in later releases. Turn on the Apply to Content option in the General panel of the Preferences dialog box, and InDesign will apply the scaling amount to the content (text, group items, or frame contents) as you scale.
With this option turned on, scaling a text frame immediately applies the transformation to the text, and the Control panel scaling fields revert to 100%. In the example above, the text size would show “24 pt” and the indent would appear as “4p”.
If you like, you can go back to the old system by turning on the Adjust Scaling Percentage option in the General panel of the Preferences dialog box. See Figure 9-4 to get what we’re talking about.
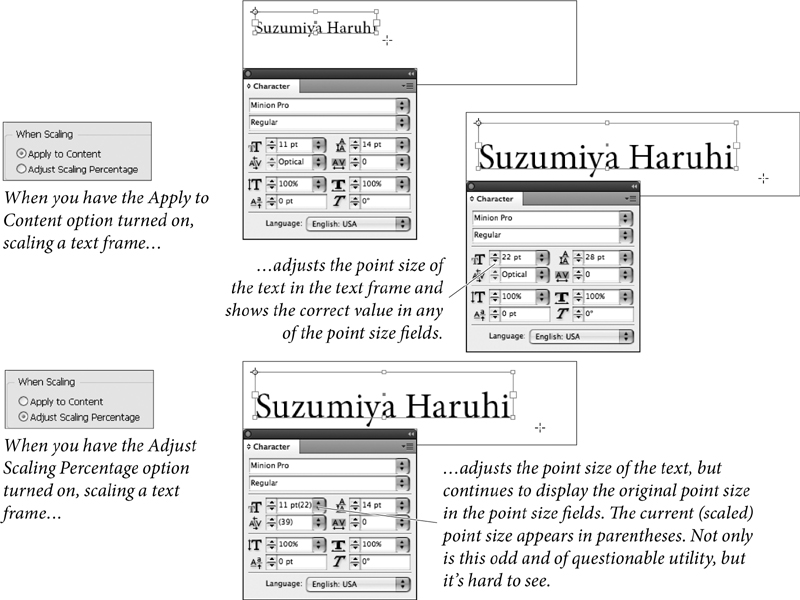
Figure 9-4. Applying to Content vs. Adjust Scaling Percentage
In spite of the wording of these options, the scaling is always applied to the content. The only difference lies in the values (point sizes or scaling percentages) shown in the relevant panel fields.
Transforming Multiple Selected Contents
You can resize, scale, or rotate multiple objects with the Selection tool, and you don’t even need to group them first. Simply select the items you want to transform, and you see a transformation bounding box around the selected items. Dragging a handle resizes the selected elements; holding down Shift resizes them proportionally. Holding down Command/Ctrl scales them. Holding down Command/Ctrl+Shift scales them proportionally. Including the Option/Alt key performs the transformations from the center of the selected objects.
To rotate the selected items, position the mouse outside one of the corner handles of the selection box, and drag to rotate.
Numbers Are Your Friends
If numbers scare you, you’re going to be scared by the Transform panel and Control panel. Don’t give in to math anxiety—these panels are simply too useful to avoid. The first step to taming them is to understand the controls are called, and what they can do for you (see Figure 9-5). To display the Transform panel, choose Transform from the Object and Layout submenu of the Window menu; to display the Control panel, press Command-Option-6/Ctrl-Alt-6.

Figure 9-5. Friendly Numbers
The Proxy
A “proxy” is something that stands in for something (or someone) else. The Proxy in the Transform and Control panels stands in for the object or objects you’ve selected (see Figure 9-6). The points on the Proxy icon correspond to the selection handles InDesign displays around an object when you select it with the Selection tool (not the Direct Selection tool).
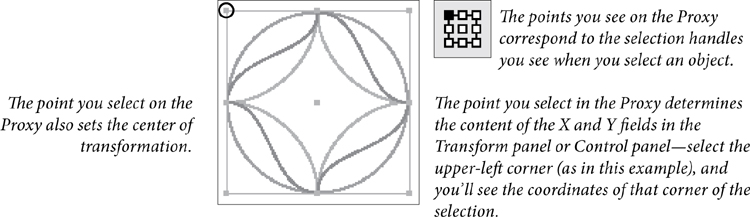
Figure 9-6. The Proxy
When you select a point on the Proxy, you’re telling InDesign that changes you make in the panel affect that point (the X and Y fields), or are centered around that point (the Width, Height, Horizontal Scaling, Vertical Scaling, Rotation Angle, and Shear Angle fields).
Understanding Page Coordinates
An InDesign page is a two-dimensional surface; a plane. You can define the position of any point on a plane using a pair of coordinates: the horizontal location (“X”) and the vertical location (“Y”). The numbers you see in the X and Y fields of InDesign’s Transform and Control panels represent the horizontal and vertical distance of the selected point on the Proxy from the zero point on the rulers.
As you move farther to the right, the value in the X field increases; move the object to the left, and the value decreases. Horizontal locations to the left of the zero point are represented by negative numbers. As you move farther down on the page, the value in the Y field increases. Vertical locations above the zero point are represented by negative numbers. Note that this means that InDesign’s vertical coordinate system is upside down relative to the two-dimensional coordinate system you learned in geometry class (see Figure 9-7).
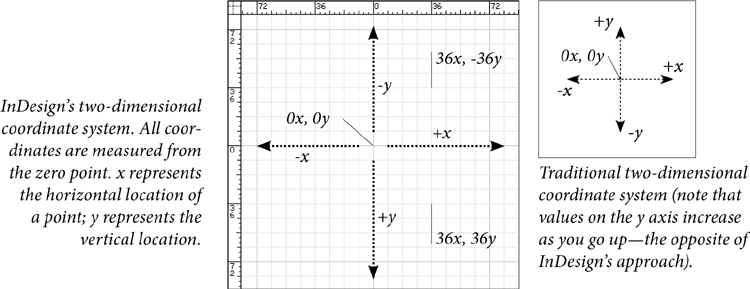
Figure 9-7. Page Coordinates
Duplicating As You Transform
Hold down Option/Alt as you press Return/Enter to apply a change you’ve made to any of the Transform or Control panel fields, and InDesign copies the object and then applies the transformation to the duplicate (see Figure 9-8).

Figure 9-8. Duplicating As You Transform
Panel Menu Options
The options in the Transform panel and Control panel control the way that transformations affect objects and their contents.
Redefine Scaling as 100%. If you had Adjust Scaling Percentage enabled in Preferences when you scaled an object, you can make the panel fields display “properly” by choosing this option.
Transformation Presets. Some transformations are so common that Adobe added the following presets to the Transform and Control panels: Rotate 180 degrees, Rotate 90 degrees clockwise, Rotate 90 degrees counter-clockwise, Flip Vertical, Flip Horizontal, Flip Both. These options are buttons in the Control panel (see Figure 9-9), or menu options in the Transform panel.

Figure 9-9. Transformation Preset Buttons
Dimensions Include Stroke Weight. What defines the dimensions of a path? Is it the geometric representation of the path itself? Or should it include the stroke weight applied to the path? We prefer to work with the geometric bounds of a path, so we turn off the Dimensions Include Stroke Weight option, which is turned on by default.
Transformations Are Totals. When you select an object that’s contained by a frame, should the panel fields reflect the state of the selected object relative to the pasteboard, or relative to the frame containing the object? That’s the question you answer by turning the Transformations are Totals option on the Transform panel or Control panel menus on or off (it’s on by default). When it’s on, InDesign displays the rotation, scaling percentages, and shear angle of the selection relative to the pasteboard. Turn this option off to display the information relative to the containing frame (see Figure 9-10).

Figure 9-10. Transformations Are Totals
Show Content Offset. If you nest one object inside another, and then select that nested item with the Direct Selection tool, what should appear in the X and Y fields of the Transform panel and Control panel? By default, the Show Content Offset option is turned on in either panel menu, so the X and Y fields display the offset of the nested object from the “parent” frame.
Moving Objects
There are many ways to move objects in InDesign—select the object and then try any of the methods shown here. (To move the content of a frame without moving the frame itself, select the Direct Selection tool and click inside the frame.)
Moving Objects by Dragging
To move an object, select the object with the Selection tool or the Direct Selection tool and drag—make sure not to drag the Content Grabber or you’ll move only the frame contents. Hold down Option/Alt as you drag to duplicate the object.
The Live Screen Drawing option in Interface preferences determines what happens when you move an object. If Immediate is selected, the object moves when you drag. If Delayed is selected when you start dragging, you’ll see only a box representing an object; however, holding down the mouse button for a moment before dragging causes the object to move as you drag it.
Moving Objects with the Transform Panel or Control Panel
When we need precision, we always move objects by entering numbers in the X and Y fields of the Transform or Control panel (see Figure 9-11). And it’s not just because we’re closet rocket scientists; it’s because we don’t trust the screen display.
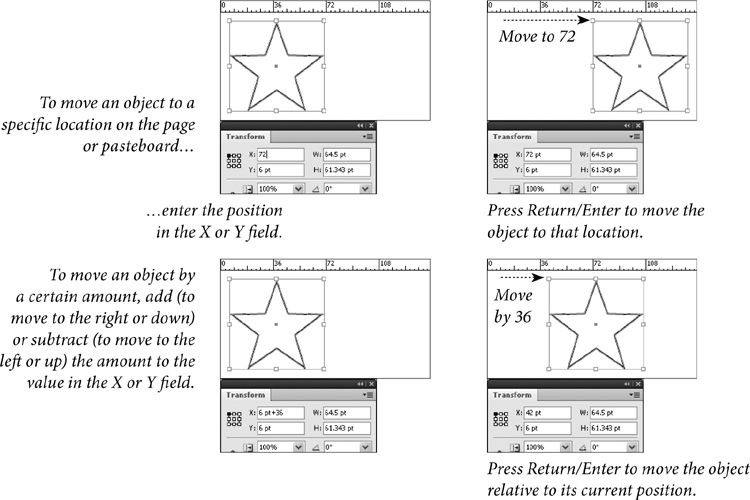
Figure 9-11. Moving Objects Using the X and Y Fields
Select the object you want to move. In the Control panel, enter values in the X field to move the object horizontally and the Y field to move the object vertically. If you want to move the object to an absolute position, enter a new value in the field; to move the object some distance relative to its current location, add or subtract that distance from the value in the panel field. Press Return/Enter.
Moving Objects Using Other Methods
To use the Free Transform tool to move objects, position the tool over any part of the object other than the selection handles, and the Free Transform tool works just like the Selection tool. Drag the center point, and InDesign snaps it to any active grids or guides. Hold down Option/Alt as you drag to duplicate the object as you move it.
You can also move objects using the Move dialog box. With the object selected, double-click the Selection tool, and specify options.
As if dragging by eye and specifying coordinates weren’t enough (in terms of movement options), InDesign also sports “nudge” keys. Select an object and press one of the arrow keys, and the element moves in that direction, using the increments you set in the Cursor Key field in the Units & Increments Preferences dialog box.
To move the selected object by ten times the distance you entered in the Cursor Key field, hold down Shift as you press the arrow key. To duplicate the selection as you move it, hold down Option/Alt as you press the arrow key.
Duplicating and Moving Objects with Step and Repeat
When you want to duplicate an object and move the duplicate to a new location, or create a series of duplicates, turn to InDesign’s Step and Repeat feature. Select an object, then choose Step and Repeat from the Edit menu. In the Step and Repeat dialog box, enter the number of duplicates you want in the Repeat Count field, then enter the horizontal and vertical offsets for each duplicate. Or, select the “Create as a grid” option, and specify the number of rows and columns in the grid. Click OK. See Figure 9-12.

Figure 9-12. Step and Repeat
InDesign’s Duplicate command remembers the settings from the Step and Repeat dialog box. The next time you choose Duplicate, the duplicate will be offset from the original by the same distance.
Scaling
As is the case with other transformations, you can use a number of different methods to change the size of an object. For basic scaling, use the Scale tool or Selection tool. For more precise scaling, use the fields in the Transform or Control panel or the Scale dialog box.
Scaling with the Scale Tool
When you want to scale an object until it “looks right,” use the Scale tool (see Figure 9-13).
1. Select the object you want to scale.
2. Select the Scale tool from the Tools panel (or press S).
3. Change the location of the center of transformation icon, if necessary. To do this, either drag the icon to a new location or click one of the points in the Proxy in the Transform panel.
4. Drag the Scale tool horizontally to scale the object’s width or vertically to scale the object’s height. Dragging diagonally sizes the object’s width and height. Hold down Shift as you drag to scale the object proportionally. Hold down Option/Alt as you drag to duplicate the object and scale the duplicate.

Figure 9-13. Scaling an Object with the Scale Tool
As you drag the Scale tool, InDesign displays the scaling percentages in the Horizontal Scaling and Vertical Scaling fields in the Control panel and Transform panel. If you’re scaling a page item (a rectangle, ellipse, polygon, line, or frame), these fields return to 100 percent when you stop dragging. If you’ve selected an imported graphic with the Direct Selection tool before scaling it, the fields reflect the scaling applied to the object.
Scaling Using Other Methods
Let’s look at a few other ways to scale.
• If you use the Selection tool to drag an image or text frame, you resize it. But if you hold down Command/Ctrl while dragging, you scale the frame and its content. Hold down Shift as you drag to resize the object proportionally.
• To scale a selected object using the Free Transform tool, select the Free Transform tool from the Tools panel. Position the tool above a selection handle, then drag. Hold down Option/Alt to scale the object proportionally around its center point, or hold down Shift to scale proportionally.
• When you know you want to make an object larger or smaller by an exact percentage, or to scale the object to a specific width or height, use the Transform panel or Control panel (see Figure 9-14).
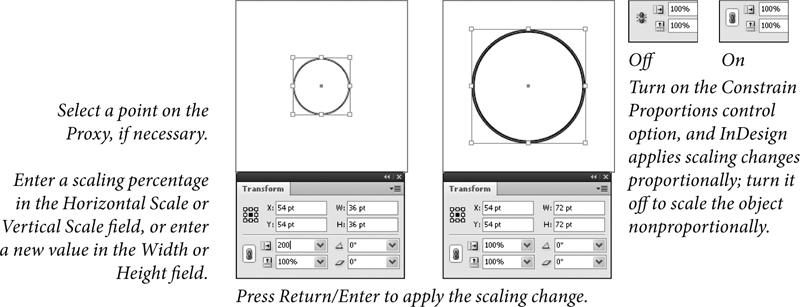
Figure 9-14. Scaling an Object Using the Transform Panel
Note that the Horizontal and Vertical Scale fields operate differently than the Width and Height fields. When you enter a value in the Horizontal Scale field or Vertical Scale field, and have selected the object using the Selection tool, the scaling is applied to the content of the object (if any). When you use the Width or Height field, the scaling is not applied to the object. Bonus tip: You can enter percentages in the Width and Height fields, and you can enter measurements in the Horizontal Scale and Vertical Scale fields. Try it!
• To scale using the Scale dialog box, select one or more objects and double-click the Scale tool. You can also choose Scale from the Transform submenu of the Object menu. In the Scale dialog box, set scaling options. To scale the object proportionally, turn on the Uniform option and enter a scaling percentage in the Scale field. To scale the contents of a path, turn on the Scale Content option.
• Press a keyboard shortcut. OK, this one needs its own section.
Scaling with Keyboard Shortcuts
You can also scale the selected object by pressing keyboard shortcuts. Note, however, that these changes don’t appear in the scaling percentages of the Transform panel when you are scaling page items (rectangles, ellipses, polygons, lines, and text frames).
• Press Command-. (period)/Ctrl-. to increase the scale of the object by one percent.
• Press Command-, (comma)/Ctrl-, to decrease the scale by one percent.
• Press Command-Option-. (period)/Ctrl-Alt-. to increase the scale by five percent.
• Press Command-Option-, (comma)/Ctrl-Alt-, to decrease the scale by five percent.
Note that these shortcuts do exactly what they say: they scale the object relative to its current size, not its original size. They are the same as entering scaling percentages in the Horizontal Scale and Vertical Scale fields in the Control panel.
If you’d rather have your scaling keyboard shortcuts change the size of the object rather than the scaling percentage (as if you were entering values in the Width and Height fields of the Control panel), those shortcuts are available in the Keyboard Shortcuts dialog box.
Scaling Strokes
We often want to scale a page item without scaling its stroke. This is especially true when we’re scaling frames containing images. To do this, turn off the Adjust Stroke Weight When Scaling option on the Transform Panel or Control panel menu before you scale the frame.
This option is not available when the Adjust Scaling Percentage option is turned on (in the General panel of the Preferences dialog box). Oddly, it’s grayed out in the Transform panel menu, but disappears from the Control panel menu altogether.
Rotating Objects
InDesign can rotate any object on a page, in .001-degree increments. The rotation angle shown is relative to the pasteboard (where 0 degrees is horizontal) or to the frame containing the rotated object. If you rotate an object by 30 degrees, entering that value again will not change the rotation of the object. To do that, you’d need to enter “+30” following the value shown in the Rotation Angle field.
Rotating with the Rotate Tool
One advantage of using the Rotate tool is that you can manually move the center of transformation icon. Select the Rotate tools from the Tools panel (or press R). Drag the center of transformation to the point you want to rotate around, and then start dragging (see Figure 9-15).
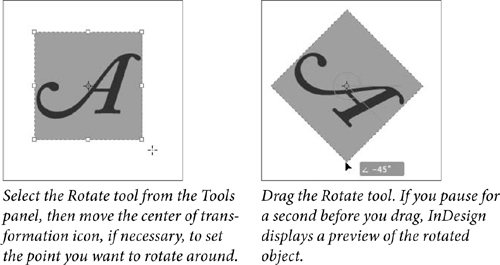
Figure 9-15. Rotating an Object Using the Rotate Tool
Rotating with the Selection Tool
Follow these steps to rotate an object using the Selection tool (see Figure 9-16).
1. Select the Selection tool from the Tools panel (or press V).
2. Select the object you want to rotate. Click the Content Grabber if you want to rotate the image within the frame. Click the frame edge if you want to rotate the frame and its contents.
3. Position the tool anywhere outside the object’s selection handles, then drag. InDesign rotates the object around its center point, regardless of the Proxy setting. Hold down Shift as you drag to constrain rotation to 45-degree increments.
Using the Free Transform tool to rotate an object is basically the same as using the Selection tool. Position the tool anywhere outside the object’s selection handles, then drag (positioning the tool near the selection handles scales the object, so move a bit farther away). InDesign rotates the object around its center point. Hold down Shift as you drag to constrain rotation to 45-degree increments.
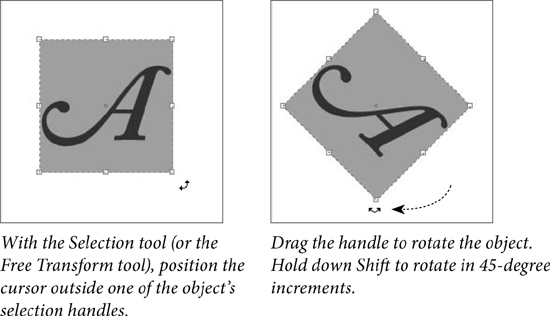
Figure 9-16. Rotating an Object with the Selection Tool
Rotating Objects Numerically
To rotate an object using the Transform panel or Control panel, follow these steps (see Figure 9-17).
1. Select the object or objects you want to rotate.
2. Click a point on the Proxy to set the point you want to rotate around, if necessary.
3. Enter a new value in the Rotation Angle field. To rotate the object to a specific angle, enter that angle in the field. To rotate the object relative to its current rotation angle, add to or subtract from the value in the Rotation angle field.
You can enter positive numbers (such as “45”) or negative numbers (such as “-270”) between −360 and 360 degrees. Positive rotation angles rotate the selected object counterclockwise; negative values rotate the object clockwise. You enter rotation angles in .001-degree increments.
4. Press Return/Enter to rotate the object, or Option-Return/Alt-Enter to rotate a copy of the object.

Figure 9-17. Rotating an Object Using the Transform Panel or Control Panel
You can also rotate an object by entering numbers in the Rotate dialog box. Double-click the Rotate tool, and enter a rotation angle. Turn on Preview so you can see what’s going on.
Rotating Multiple Selected Objects
When you rotate more than one object (we’re counting groups as single objects), the objects rotate around a single point. This point can be their joint geometric center, or around any other point you’ve specified. They don’t all rotate around their individual center points.
Reflecting Objects
Reflecting—or mirroring—objects in InDesign is very simple, and you can reflect, or “flip” an object over its vertical axis, its horizontal axis, or both its vertical and horizontal axes at once. That’s it. There’s no reflection tool, no need to enter a reflection angle anywhere.
To reflect an object, follow these steps (see Figure 9-18).
1. Select the object you want to reflect.
2. Choose Flip Vertical, Flip Horizontal, or Flip Both from the Transform panel menu. InDesign reflects the selected object.

Figure 9-18. Reflecting an Object
Shearing Objects
Shearing (or skewing) an object makes it appear that the plane the object’s resting on has been rotated away from the plane of the page. It’s good for creating perspective effects—but it’s not a replacement for a serious 3D rotation program (see Figure 9-19).
No amount of shearing applied to objects on an InDesign page will produce wool.

Figure 9-19. Shearing an Object
To shear an object using the Shear tool, select the object and choose the Shear tool from the Tools panel. Change the location of the center of transformation icon. Drag the Shear tool. As you drag the cursor, the skewing angles display in the Shearing Angle field of the Transform panel. The panel shows that vertical shearing is actually done by horizontal shearing (skewing) and rotating the object.
You can also shear an object using the Control panel by entering an angle in the Shear X Angle field. Typing a value in the Shear X Angle field only lets you skew (horizontal shear) the object. To create a vertical shear, type the same angle into the Rotation angle field.
If you Option/Alt-click the Shear X Angle icon, you can use the Shear dialog box to shear an object.
Repeating Transformations
The options on the Transform Again submenu of the Object menu give you a way to repeat transformations you’ve recently applied (see Figure 9-20). You can repeat individual transformations, or you can repeat a series of transformations. InDesign will remember a transformation until you apply a different transformation, and will keep track of any uninterrupted sequence of transformations.

Figure 9-20. Transform Again
How it works: select an object and apply a transformation, then select another object and choose one of the options from the Transform Again submenu of the Object menu or use the associated keyboard shortcut.
There are four ways to use Transform Again:
• Transform Again. Applies the most recent transformation to the selected object or objects.
• Transform Again Individually. Applies the most recent transformation to each object in the selection (see Figure 9-21).
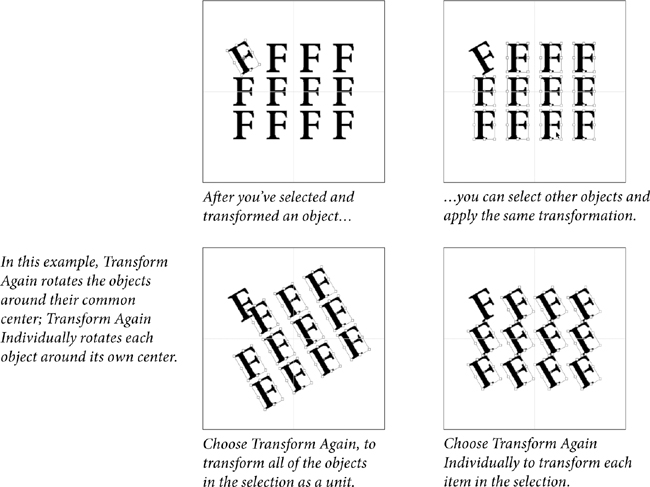
Figure 9-21. Transform Again vs. Transform Again Individually
• Transform Sequence Again. Applies the most recent series of transformations to the selected objects (see Figure 9-22).

Figure 9-22. Transform Sequence Again
• Transform Sequence Again Individually. Applies the most recent series of transformations to each object in the selection.
Want to make a series of objects the same size? Select one of the objects, then change its width and height. Select the other objects, and choose Transform Again Individually (see Figure 9-23). Fitting options that you apply to a frame can also be repeated using Transform again (see Figure 9-24).
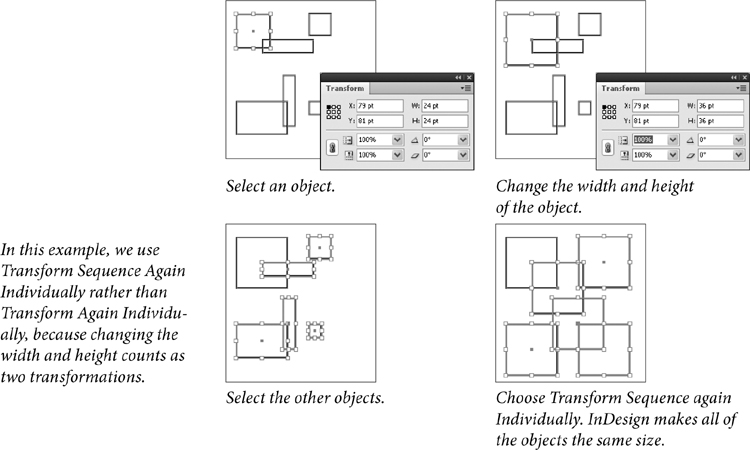
Figure 9-23. Making Objects the Same Size

Figure 9-24. Fitting and Transform Again
Grid Mode
When you’re dragging an object, you can press the arrow keys to duplicate the object into a grid. The InDesign team calls this “Grid Mode.” You can use Grid Mode to create a grid of objects when you’re placing multiple images, when you’re creating objects, or when you’re duplicating objects
In Grid Mode, use the arrow keys to change the number of rows and columns; use Command/Ctrl plus arrow keys to change the gutter space between either rows or columns; use Page Up and Page Down to change the gutter space between both rows and columns.
Placing multiple graphics into a grid. Select multiple files in the Place dialog box and click Open. Start dragging, and use the arrow keys to change the number of columns and rows of the placed images.
Drawing a grid of shapes or text frames. Select a tool that lets you draw a frame. Begin dragging. While still dragging, press the right arrow key to increase the number of columns and the up arrow key to increase the number of rows (see Figure 9-25).

Figure 9-25. Grid Mode
When using the Polygon tool, press the Spacebar while dragging to turn on and off Grid Mode. When Grid Mode is off, pressing the arrow keys changes the star inset and number of sides.
Duplicating objects into a grid. Use the Selection tool to select an object. Hold down Option/Alt and begin dragging. While still dragging, release the Alt or Option key, and press the right arrow and up arrow keys to increase the number of columns and rows. Drag a rectangle to specify the size of the grid, and release the mouse button.
Here’s a nifty trick. If multiple column guides appear on the current spread, InDesign automatically uses the gutter width as the amount of space between each frame in the grid. That makes it easy to place a grid of images neatly within the columns. And if you’re drawing text frames, the frames are threaded automatically.
Aligning and Distributing Objects
InDesign features both object alignment and object distribution. InDesign aligns objects based on the object’s bounding box, and bases the alignment on the option you’ve selected in the Align To pop-up menu in the Align panel. You can align objects to the selection, to one of the objects, to the page, to the margins, or to the spread by choosing the correspondingly named menu options.
When you distribute objects you’re telling InDesign to evenly arrange the selected objects.
Aligning Objects
When you’ve selected the objects you want to align, press Shift-F7 to display the Align panel. Click one of the alignment buttons to align the selected objects (see Figure 9-26).
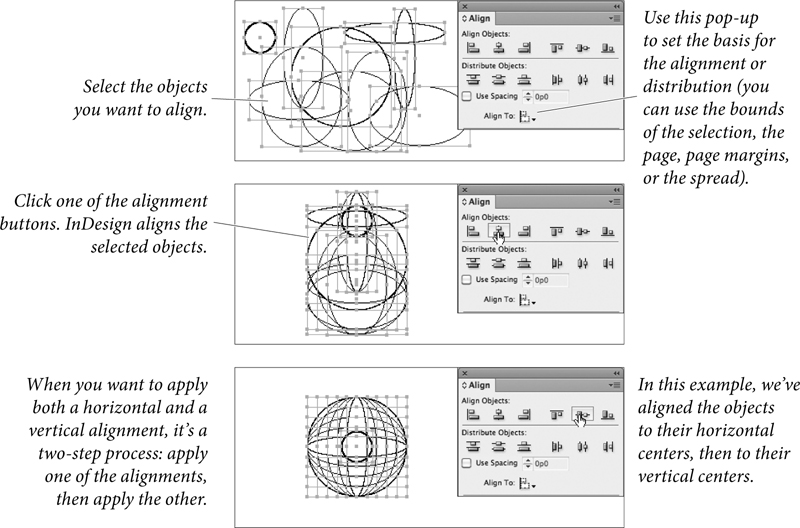
Figure 9-26. Aligning Objects
If you’ve locked an object in the selection, InDesign doesn’t move that object when you apply an alignment. If an object doesn’t seem to be following the herd, unlock it by clicking the object’s lock icon.
While none of the alignment or distribution options are assigned a keyboard shortcut by default, you can use the Keyboard Shortcuts dialog box to add this feature to your copy of InDesign (you’ll find them in the Object Editing section).
With InDesign CS6, you can align objects to a selected object. Select objects using any method, and then click one of the selected objects to make it the key object. When you do so, Key Object is selected for Align To in the Align panel. You can click to select a different key object. Click an alignment option to align the objects to the key object. Cancel by selecting a different Align To option.
Distributing Objects
Have you ever wanted to space a bunch of objects at even distances from each other (from each other’s centers, at any rate) across a particular horizontal measurement? If you have, InDesign’s Distribute feature should make your day. To distribute the selected objects inside the rectangle defined by the objects’ bounding box, click one of the distribute buttons in the Align panel. InDesign distributes the objects as you’ve specified (see Figure 9-27).

Figure 9-27. Distributing Objects
To distribute (or space) the objects by a specified distance, use the Use Spacing option in either the Distribute Objects section of the Align panel or the Distribute Spacing section (see Figure 9-28).
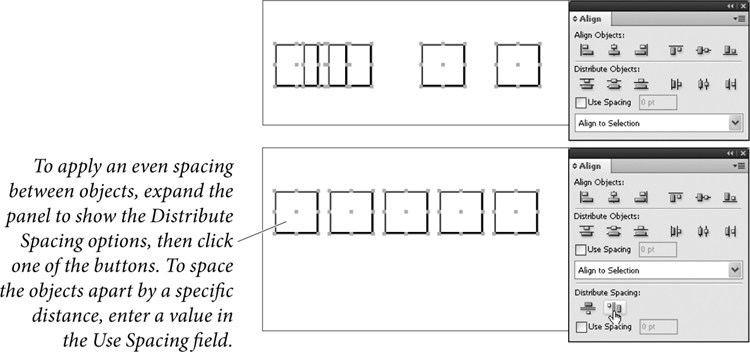
Figure 9-28. Distributing Space Between Objects
When you click one of the buttons in the Distribute Objects section, the value you enter in the Use Spacing field sets the distance between the object sides (top, bottom, right, and left) or object centers (vertical or horizontal). If you enter 12 points, for example, and then click the Horizontal Distribute Lefts button, InDesign spaces the left edges of the objects in the selection 12 points apart.
When you use the Use Spacing option in the Distribute Spacing section, InDesign spaces the objects apart by the distance you enter in the Use Spacing field. Click the Vertical Distribute Space button to distribute the objects vertically, or click the Horizontal Distribute Space button to distribute the objects horizontally. The objects do not need to be the same shape or size.
Live Distribute
When you select several objects, you can resize the space between the objects proportionally instead of resizing the actual objects. Simply start dragging a selection handle and then hold down the Spacebar while still dragging.
Using the Gap Tool
The Gap tool lets you adjust the gap size between objects (see Figure 9-29). The Gap tool is oddly counter-intuitive when you first start using it, because you’re not used to working on the space between objects. Once you get used to it, you’ll find it’s an easy way to adjust your layout.

Figure 9-29. Gap Tool
You can also use the Gap to resize several objects that have commonly aligned edges simultaneously, while keeping the gaps between them fixed.
The Gap tool ignores locked objects and master page items.
Select the Gap tool from the Tools panel (or press U), and then move the pointer between two objects. Again, you’re working on the space between objects, not the objects themselves. Use modifier keys to determine how the gap is resized and which objects are affected (see Table 9-1).

Here’s a tip that might help—the Gap tool doesn’t have to be between objects. You can use it to change the space between objects and the edge of the page.
When some people first start using the Gap tool, they can’t figure out how to “push” a row of objects away from other objects. The trick is to move the Gap tool to the other side of the objects and “pull.” It’ll make sense once you start using the tool.
Locking Objects
In InDesign, you can lock an object’s position—which means that you can’t transform it. You can determine whether locked objects can be selected. If the Prevent Selection of Locked Objects option is turned on in General preferences, you cannot select a locked object. If it’s turned off, you can select the object and copy it or change its appearance; you just can’t transform it.
To lock an object, select it and press Command-L/Ctrl-L (or choose Lock from the Object menu). To unlock an object, click its lock icon (or choose Unlock All on Spread from the Object menu). You can also lock or unlock an object in the Layers panel.
Of course, another good way to lock an object is to place it on a layer and then lock the layer. An object on a locked layer is totally locked; you can’t even select it.
Hiding Objects
You can hide an object if you don’t want it to be printed, exported, or selected. To hide objects, choose Hide from the Object menu or use the Layers panel. Choose Show All On Spread from the Object menu to view all hidden objects
Transform Your Life!
Fuzzy caterpillars turn into moths. Clark Kent jumps into a phone booth and emerges as Superman. Werewolves stalk the moors under the full moon. Bewildered authors turn into parents. These transformations are all everyday, natural phenomena.
Make InDesign’s transformation tools an integral part of how you work with the program, and you’ll have their powerful, almost magical forces on your side.