
Chapter 13. Integrating Version Cue into Your Workflow
As a creative professional, your time is best spent creating — not wasting time chasing down files or managing them for your design team. Whether you’re a designer, photographer, service provider, web or print publisher, or simply a colleague working remotely, Version Cue can manage your file versions to make you more productive and save time. Version Cue lets you easily create, manage, and find different versions of your project files by giving you simple, unified access to all versions of your files. If you collaborate with others, you and your team members can share project files in a multi-user environment that protects content from being accidentally overwritten.
Almost anyone who has collaborated on a project with others knows what can go wrong when you don’t use a file manager: You open the wrong version of a file by mistake, thinking it’s the current one. Or you open the latest version of a file, make edits, and save them before changing the version number. A colleague goes off to lunch with a file left open from the server, making it unavailable to anyone else.
Here’s how Version Cue can help you maintain file integrity and team sanity. Built into Creative Suite, this file-management feature for individuals and small work groups lets you do any of the following:
• Create and manage versions of your files as you work on a project.
• Visually browse through your files with Adobe Bridge and your CS2 applications.
• View information about the files you’re working on (called metadata) to help you find files more easily, without having to open up the files.
• Create alternates to keep alternate versions of a file active.
• Share projects with others in your workgroup more easily and safely, without losing data.
• Control file security on your project.
• Review PDF files collaboratively through a browser or web page.
This chapter shows how Version Cue can make you and your workgroup more productive, and discusses its pros and cons. We introduce you to the Version Cue workflow by describing a sample collaboration of three designers. Then we show how to set up Version Cue appropriately for your environment and workflow, and create and manage projects for individuals and small groups. We’ll also discuss strategies for collaborating successfully in a workgroup, and how to create a more controlled environment for larger groups using the Administration utility.
About Version Cue
How many times did you wish for a tool that could manage your files easily and consistently, without interrupting your workflow and jeopardizing the integrity of your work, so that you could keep on working and creating? Version Cue in Adobe Creative Suite 2 is that tool.
Most people don’t use special tools to manage their graphic files. They rely on their operating system, trusting themselves to rename or renumber files as they create new file versions. Sandee and Steve used such a convention when they started this book in Microsoft Word (which doesn’t understand Version Cue); for example, Steve named the third version of this chapter 13_VersionCue_3sw.doc. Without having a tool like Version Cue to manage our versioning, we or one of our editors sometimes worked on the wrong version of a file!
What Version Cue Can Do
Version Cue can solve many problems that occur when you’re using Adobe Creative Suite and relying on a traditional operating system-based workflow. It helps you share assets (the collection of files included in a project) with others and offers some advantages over using more complex file-management systems. Here’s how your workflow can benefit from using Version Cue:
• It’s easier to track files using Version Cue.
A traditional system relies almost exclusively on filenaming to identify a file. But many files may have similar or even the same names. Typically, you must spend precious minutes, or even hours, opening files to find the correct ones. Version Cue supplements names with thumbnails of the common file types used in Creative Suite — InDesign, Illustrator, PDF, and images files — and with additional metadata about the file. The metadata can include information saved automatically with the file (for instance, file creation date and font and color information in an InDesign file) and also comments you make when you save versions. This information can be searched within a Version Cue project.
• You can manage files better without relying on unwieldy filenaming conventions.
Filenaming conventions are difficult to use and error-prone. In a typical workflow, it’s common to begin saving changes to a file before remembering to save it under a different name, overwriting your own or someone else’s work. Or maybe a particular artist who worked on the project before handing it off created unique filenames, and then other team members on the project had to search in frustration for the right version. Version Cue tracks all versions of a file automatically; you don’t have to rely on filenaming conventions to handle versioning. When an artist opens a file from a Version Cue workspace, it will be the latest version. As team members work, they can easily save new versions back to the workspace, and Version Cue automatically takes care of tracking those versions.
• Version Cue provides valuable status information about files.
Sometimes you may need access to a file to print a proof or to place an image, but the file is in use by someone else and unavailable because it is locked by the operating system. Version Cue visually shows the status of all files in a project, including whether another team member is using a particular file. It even allows you to open a copy of the file — for example, to print a proof — but warns of the consequences of having more than one person editing the same file.
• Tools help you manage files flexibly and transparently.
Version Cue is tightly integrated with Adobe Bridge and all the CS2 applications. You use it from within the applications you’re already using. You don’t have to explicitly check files in and out of a database (as is required by some file-management systems). In contrast, other file-management systems rely on third-party tools that can impose a very structured workflow, be hard to learn and follow, or require users to switch out of their graphics applications to check files in and out.
• Version Cue requires no special maintenance or support.
Unlike some expensive file-management systems that can require a lot of maintenance and support, Version Cue can be used just as it’s installed with Adobe Creative Suite, with no extra setup or maintenance. However, for larger workgroups, Version Cue can be installed on a server. It provides administrative tools that can be used to back up and restore projects, create archives, establish file security, and so on. Groups of as many as 10 or more (Adobe has tested Version Cue with groups as large as 30) can benefit from working collaboratively using Version Cue.
When Version Cue Might Not Be the Right Fit
But Version Cue can’t be all things to all people. There are times when it might not work for you.
• Version Cue isn’t a media-asset manager. It can’t search for or manage files archived on CDs or DVDs as can some software designed for working with images.
• Version Cue is intended either for individuals or small workgroups, so it might not be appropriate for a very large workgroup with all members needing access to the same set of files. (However, even in large companies, most workgroups consist of fewer than 20 people.)
Anatomy of a Version Cue Project
Here’s an example of a typical Version Cue project and one possible scenario of a workflow within a group of designers. Even if you’re a single user, working on your own, you can follow this workflow.
Imagine that a team of designers — Mary, Bob, and Carol — is working on a product flyer describing the features of Adobe Creative Suite (Figure 13-1). Mary is designing this flyer in InDesign CS2 with three language editions — English, French, and Spanish. Bob is creating a layered Photoshop CS2 file that displays the Adobe Creative Suite logo on a 3D box, with layers and layer comps for each language edition. Bob also created the screen captures for each language edition. Carol is working in Illustrator CS2 on a graphic for the flyer that lists the different Creative Suite components, with layers for each language. Each designer has a copy of Adobe Creative Suite installed on his or her own computer. Mary will host the collaborative Creative Suite flyer project on her workstation.
Figure 13-1. A product flyer put together by a team of designers using Version Cue.

Create the Project
Mary starts by opening Adobe Bridge. She clicks Version Cue on the Favorites panel. She double-clicks the Workspaces icon, and then double-clicks the icon with her computer name (labeled My Computer) to open her workspace (Figure 13-2, left). The opened workspace is empty. Then she chooses Tools > Version Cue > New Project (Figure 13-2, right). In the New Project dialog box, she chooses her computer from the Location menu as the project location, names the project, and enters a short description to provide information to her collaborators and so the information can be included in a search. She checks Share This Project With Others so that Bob and Carol will see it when they navigate to her workspace.
Figure 13-2. Clicking Version Cue on the Adobe Bridge Favorites panel reveals icons for Version Cue workspaces on your computer and on other computers on the local network (left). When creating a new project, there is an option to share it (right).

Import and Create Assets
Mary starts to import project assets that are ready. She chooses File > New Window to duplicate the existing Bridge window. Then she uses the Bridge Folders panel to navigate to the folder on her Desktop where she has stored screen captures from Bob and an Illustrator PDF from Carol. Mary selects the files she wants and simply drags them into the project (Figure 13-3). Copying all the assets associated with the project into the Version Cue workspace makes the files available to everyone working on the project. (Alternatively, she could drag the files directly from the Desktop into her Bridge window showing the project.)
Figure 13-3. Adding existing assets to a project by dragging them from another Adobe Bridge window.

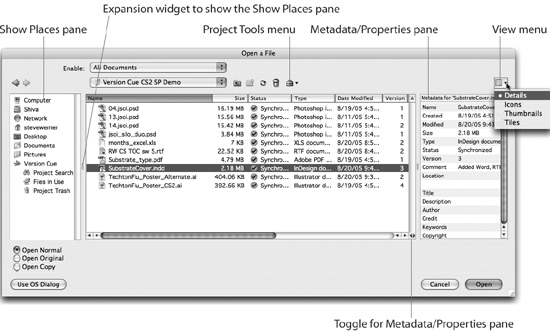
With some of the graphics completed, and Bob still working on his layered Photoshop file, Mary is ready to begin her page layout in InDesign. She begins creating elements common to the different language editions. After working a bit, she saves her file into the Version Cue project she’s already created by choosing File > Save As. She clicks the Use Adobe Dialog button in the Save As dialog box to navigate to the Version Cue workspace (described in detail in the sidebar “The Adobe Dialog Box” later in the chapter). In the Adobe dialog box, she clicks the Version Cue icon in the Show Places pane on the left. It reveals the Workspaces icon and a new alias to the project she’s created. Whenever Mary or her co-workers create or access a project, an alias is automatically created to make it easier to get into the project later. Double-clicking the alias to the project displays the graphics already in the project (Figure 13-4).
Figure 13-4. When using the Adobe dialog box to save a file, adding a comment saves metadata that can be searched later.

Mary names her layout, enters a comment in the Version Comments field to add information for the file version she’ll create, and clicks Save. The saved file is added into the Version Cue project, and a second working copy is saved to her hard drive. (Version Cue always saves two copies of your files; see “Using Working Copies” later in this chapter.) The File Status field at the bottom of the InDesign window read Synchronized; Open, because the copies in the Version Cue workspace and the working copy match.
Create File Versions
Mary continues to build her layout, adding a new layer for the English text. She chooses File > Save to save the layout changes to her working copy, but not yet as a newer version in the Version Cue project for others to access. (As we explain next, you can save versions to your hard drive until you reach a milestone — a new version you wish to make available to others to access from the Version Cue project.) The File Status field in InDesign reads In Use By Me; Open. If Carol or Bob were to view the Version Cue project in Adobe Bridge or the Adobe dialog box at this time, they would know that Mary is editing the file by the status In Use By Mary.
Save a Version Milestone
Mary places the Illustrator file that Carol has created by choosing File > Place and using the Adobe dialog box to select the graphic.
Because this is a milestone for the file, Mary saves a new version of the file and adds a comment — much as mountain climbers scaling a tall mountain would set up a base camp they could return to. Mary chooses File > Save A Version. In the Save A Version dialog box, she adds a comment that indicates the new milestone, “Added English layer,” and clicks Save. Version Cue updates Mary’s own working copy and then adds it to the master project for others to access from the Version Cue workspace, synchronizing the file (Figure 13-5).
Figure 13-5. Saving a new version of the InDesign file for the milestone of adding a new layer.

In a similar manner, Mary adds layers for the French and Spanish versions, and chooses the Save A Version command to save a version of each of these steps, which are also milestones in the creation of the file.
View, Delete, and Promote Versions
Saving versions of a file with Version Cue is easy because each is saved without having to specify a different file name for each version. At any time, you can view the versions you’ve created. (Viewing versions has some similarity to viewing Photoshop’s History palette because you can use it to return to a previous file state, but Version Cue versions are stored in the file, while Photoshop’s history is discarded when a file is closed.)
If Mary wants to view the versions she has created, she clicks the pop-up menu to the right of the File Status field at the bottom of the window, and chooses Versions.
The Versions dialog box displays thumbnails for each version, comments she has made, her name (as the creator of the version), and the date and time (Figure 13-6). When she selects a version, she can click View Version to view the version, or click Delete to delete it. If Mary later wants to work with one of the earlier versions because, for example, she wants to recover from a destructive change, she can bring any previous version forward by selecting that version and clicking Promote To Current Version.
Figure 13-6. Using Versions dialog box to view other file versions, delete them, or promote them to current version.

View the Project from the Bridge
Bob has now completed the Photoshop image of the 3D product box, and he’s ready to save it to the project so that Mary can place the image in the layout.
Bob uses Adobe Bridge to view the Adobe Creative Suite Flyer project in Mary’s Version Cue workspace, and sees all files that have been added so far. In Bridge Thumbnails view, he can pause over each file and display a tool tip that shows the person who created it, the version number, and other status information (Figure 13-7). An icon next to each file also indicates its current status. (See Table 13-3 for the meaning of status icons.)
Figure 13-7. Viewing a project in Adobe Bridge.

All files in the project are currently labeled No Working Copy, because Bob hasn’t opened any file, nor synchronized the project. (He could create working copies of all project files by opening them, or by selecting the project and choosing Tools > Version Cue > Synchronize.)
He’s ready to save his Photoshop file into the project. In Photoshop CS2, he chooses File > Save As, clicks the Use Adobe Dialog button, and navigates to the Version Cue workspace on Mary’s computer, where he sees the files Mary has been working on. Bob saves the 3D box file into the project for the first time, saving a version of the Photoshop file and including a comment with the version (Figure 13-8).
Figure 13-8. Using the Adobe dialog box to navigate to the Version Cue project and save a version of the Photoshop file.

From Adobe Bridge, Mary sees that Bob’s file is now in the project, marked with a No Working Copy icon. She synchronizes the file to create a working copy by selecting the file and choosing Tools > Version Cue > Synchronize; the icon changes to Synchronized. In her InDesign layout, she places the file on each layer, choosing the layer comp appropriate for each language layer. She saves another version of the InDesign file.
The layout is now complete, and Mary creates a PDF proof of the file to send off for approval. She can create a browser-based review of the PDF file using the Version Cue Administration utility, as we describe in the “Using a Browser-Based Review (Version Cue)” section of Chapter 14, “Creating and Using PDF Files.”
Setting Up, Turning On, and Enabling Version Cue
Version Cue CS2 files are installed on your computer as part of the default installation of Adobe Creative Suite 2 — you don’t have to set them up. But before you can begin working with Version Cue, first you need to set up a Version Cue workspace, turn on Version Cue in Acrobat if you’re using that application in your projects, and enable preferences. Then you’re ready to go to work. This section describes these steps, and how to view a Version Cue workspace.
Setting up Version Cue
Installing Version Cue automatically creates a Version Cue workspace — a file storage area that contains all versions and XMP metadata for all files in a project and that maintains the relationships between the files.
A Version Cue workspace can contain many projects (Figure 13-9).
Figure 13-9. Version Cue workspace with current projects.

By default, Version Cue is turned on and requires no special setup. However, if you’re part of a workgroup, you (or your administrator) might set up a configuration different from the default — for example, installing Version Cue on a server instead.
Version Cue supports three common workflow scenarios: a single user on a personal workstation, a small group of users with files on individual computers, and a larger group of users using a server as a local area network.
Whether you’re an individual user or a member of a workgroup with the proper permissions, you can define whether a project is private (for your use only) or shared with others, and who has privileges to access a shared project. (A project is a top-level folder in a Version Cue workspace that contains related files, grouped as you wish and following any kind of file/folder hierarchy.) If you’re an individual user, you can also define whether an entire Version Cue workspace is public or private.
If you intend to collaborate with other Creative Suite users, make sure that the Version Cue workspace is available on a computer that everyone can access on a network and that the collaborative projects are kept in that workspace. (See “Collaborating on a Project” later in this chapter.)
Single User Workflow
Individual users of Adobe Creative Suite 2 are ready to go after installing Creative Suite 2, and can immediately begin setting up Version Cue projects. Individuals can access projects from a computer other than their own that’s on a local network on which Creative Suite is installed.
Workgroup with Files on Computers Workflow
In a small workgroup, installing Adobe Creative Suite on each workstation in the group also installs a Version Cue workspace on each workstation. Each member of the workgroup can set up a Version Cue project on his or her hard drive, share the project on that hard drive over the local network, and decide which projects are private and which can be shared.
Workgroup with Files on Server Workflow
For a more structured workgroup, installing Version Cue on a server accessible to the members of a workgroup may make more sense. When a Version Cue workspace is on the server, typically it will almost always be available. (On an individual workstation, the Version Cue workspace is unavailable when the computer is put to sleep or shut down.)
Installing Version Cue on a server, as opposed to on an individual computer, has other advantages. On a server, Version Cue typically has a larger file capacity due to the server’s large-capacity drives; backup normally is automatic and scheduled; and performance is usually not an issue. In comparison, when Version Cue is installed on an individual computer, file capacity is limited to the computer’s hard drive, and backup depends on when a user backs up projects.
To install Version Cue on a server, install from the Creative Suite 2 CD directly to the server’s hard drive. Your license for a single copy of the Adobe Creative Suite allows you to install Version Cue on a server, even if other CS2 components are installed on a different workstation. Once installed, the Version Cue workspace on the server broadcasts its presence on the local network; thus, generally, it’s unnecessary to configure the server in a special way. By default, Version Cue is turned on when the computer starts, which is necessary in case the server must be rebooted.
Tip: Restart Version Cue Once a Week
It’s a good practice to restart Version Cue periodically — Adobe recommends once a week. When Version Cue is restarted, it performs an integrity check and makes necessary repairs to its internal structure if required (a very rare event).
Getting Access to Version Cue Projects
If you have license to only one component of Creative Suite 2, you will not have your own Version Cue workspace.
If you have created a Version Cue project and set it to be shared (which you can do only if you have installed the full Creative Suite), it will be accessible to anyone on your local area network who has installed Adobe Creative Suite 2, as well as to anyone who has a copy of individual CS2 applications — InDesign, Illustrator, Photoshop, GoLive, or Acrobat 7.0 Professional — and who has permission to access the project. Participation in a shared project gives you access to the full Version Cue feature set. The user of an individual Creative Suite component like InDesign can use the same Bridge and Adobe dialog box interface as someone who is licensed to use Creative Suite (see the sidebar “The Adobe dialog box”). They can even create a project in someone else’s Version Cue workspace if they have access to it.
You can also view and open the files remotely if you have access to a Version Cue workspace. When you need to access a project on a different subnet (a computer outside your local area network), you can use the IP (Internet Protocol) address of the computer to access the Version Cue workspace. See “Collaborating on a Project” later in this chapter.
Turning off Version Cue in CS2 Applications
Version Cue is turned on in the Creative Suite 2 applications by default (with the exception of Acrobat 7.0 Professional, which requires that you turn on Enable Version Cue workgroup file management in General Preferences).
Even if you’re not using Version Cue, it’s a good idea to leave it turned on; doing so gives you access to the Adobe dialog box. However, if you think you’ll never use Version Cue, you can turn it off in CS2 applications by deselecting the Enable Version Cue Workgroup File Management option. (This option is in the File Handling preferences in Photoshop and InDesign, and in the File Handling & Clipboard preferences in Illustrator.) Then, in Version Cue CS2 preferences, turn off Version Cue and reboot your computer. As a last step, deselect Version Cue in the Favorites Items section in the Adobe Bridge preferences. Version Cue can’t be removed from the Folders pane or the Version Cue submenu of the Bridge Tools menu.
Enabling Version Cue Preference Settings
When you set up Version Cue for the first time, it is set up for an individual working with both print and web projects. The default memory setting is 128 MB of RAM for the workspace (in addition to the 196 MB of RAM required to run any single CS2 application). You can adjust these settings in Version Cue preferences for your particular needs.
To adjust the Version Cue preferences, on the Macintosh, click the Version Cue icon on the menu bar and choose Version Cue CS2 Preferences. In Windows, double-click the Version Cue icon on the system tray at the bottom right of the screen. Adobe Version Cue CS2 Preferences appears (Figure 13-10).
Figure 13-10. Version Cue CS2 Preferences

Depending on the number of users and the kinds of projects you work on, you may want to change a few preferences:
• If the workspace installed on this workstation is going to be shared, select This Workspace Is Visible To Others. Choosing This Workspace Is Private keeps the workspace hidden from others on the network. (If you share your workspace, you can still set individual projects within it to be shared or private.)
• If you plan to use Version Cue a lot, set the Memory Usage to 256 MB for better performance. Setting the memory higher is probably necessary only if you envision copying or moving thousands of files in a single operation at some point when working with a project, even in large workgroups.
• In the Workgroup Size menu, set the size to Single User, Small Group (2-4 people), Medium (5-10 people) or Large (more than 10 people).
• In the Optimize For menu, select Print Media, Web Media, or Mixed Media, depending on the intended projects.
Viewing Version Cue Workspaces
It’s easiest to view a Version Cue workspace in Adobe Bridge. Clicking Version Cue in the Favorites panel of Bridge initially displays an icon labeled Workspaces in the content area (Figure 13-11, left). (Later, as you start to work on projects, aliases or shortcuts of those projects will also appear at this level of your file hierarchy.) Double-clicking the Workspaces icon displays the Version Cue workspace on your own workstation, marked with the name of the workstation and My Computer. If your local network has other Version Cue workspaces, icons will also appear with the name of the workstation and Adjacent Computer (Figure 13-11, right).
Figure 13-11. Click Version Cue on the Adobe Bridge Favorites panel to display Version Cue workspaces (left); Version Cue workspaces visible on a local network (right).

When you view Version Cue workspaces in Adobe Bridge, icons indicate the workspace status, as shown in Table 13-1.
Table 13-1. Version Cue Workspace Icons and Their Meanings

Tip: If You Don’t See Version Cue...
If Version Cue doesn’t appear in Adobe Bridge, you may have turned off the display of Version Cue in the Favorites panel. Go to Bridge General Preferences and check Version Cue in the Favorites Items section.
Version Cue workspaces also appear in the Adobe dialog box when choosing the Open, Save, Save As, Place, Import, and Export commands of InDesign, Illustrator, and Photoshop (see the sidebar “The Adobe Dialog Box.”) However, Version Cue workspaces aren’t easily accessible when browsing in your operating system’s file hierarchy or when using your operating system’s Open or Save dialog box.
Working with Version Cue
Once Version Cue is set up, you’re ready to create a project and organize related files. You can add files to the Version Cue project various ways, create file versions, review versions of files, and locate files by searching embedded metadata.
Version Cue CS2 makes it easy to create workspaces and projects. Passwords are not required, and user accounts don’t have to be created manually to share Version Cue workspaces and projects. After a user accesses the Version Cue workspace without an assigned user name, the user name for the user’s own computer is automatically added to the list of users in the workspace and the password is left blank. (Information about user names and passwords for a workspace or a project is visible in the Version Cue CS2 Administration utility. See “Administering Version Cue” later in the chapter.)
Here we describe techniques for creating projects, opening and saving files, placing files, working with versions and alternates, and so on. Most of the time, you’ll be working in Adobe Bridge or the Adobe dialog box. We suggest that you familiarize yourself with the techniques in “Browsing Through Your CS2 Files” and “Making Bridge Your File Manager” in Chapter 3, “View from the Bridge,” because they’ll help you work with Version Cue projects.
Working with Projects
A project is a top-level folder in a Version Cue workspace that contains related files, grouped as you wish. You can create any kind of file hierarchy within a project. (Projects and workspaces can be backed up and restored. We explain how in the “Backing Up and Restoring Projects and Workspaces” section later in the chapter.)
To create projects, you use either Adobe Bridge or the Adobe dialog box. To get an overview of the files in your project, or to move or copy files between folders within a project, use Adobe Bridge. To open, save, or place files within InDesign, Illustrator, and Photoshop, use the Adobe dialog box. You can also do some file-management operations in the Adobe Version Cue CS2 Administration utility (which we’ll cover in the section “Administering Version Cue”).
As you work with projects in Adobe Bridge, icons indicate whether or not a project is shared, and whether or not it’s available (see Table 13-2).
Table 13-2. Version Cue Project Icons and Their Meanings

Creating a New Project
Choose one of these methods to create a new project:
• In Adobe Bridge, choose Tools > Version Cue > New Project, or in the Adobe dialog box, choose Project Tools > New Project. In the New Project dialog box, select the workspace, name the project, add a description, select the shared status, and save the new project to your workspace.
• In the Adobe Version Cue CS2 Administration utility, click Create A Project, and then click Blank Project.
• In the Version Cue Administration utility, click Import From Folder to import an existing project on your hard drive.
Adding Files and Folders to a Project
There are two preferred methods to add existing files and folders to a project. Both begin by navigating to the project in Bridge.
• Choose File > New Window; in the new window, navigate to the files you want to add to the project. Drag the files into the project window.
• Drag files and folders from the Macintosh Finder or Windows Explorer into the Bridge window.
Tip: Dragging to the Working Copy Folder
You can drag new files and folders into a project in the Working Copy folder. Just be sure to synchronize the project to update the copies in the Version Cue workspace; see “Synchronizing Files, Folders, or Projects” for more information. However, you cannot create a new project using this method.
You can change the sort order when viewing a project by choosing View > Sort In Adobe Bridge. (See “Collaborating on a Project” later in this chapter for a discussion of how you might structure your projects.)
Opening and Saving Files
Opening a file in a Version Cue project is the same as opening any other file. However, if you open a file that’s in use by another user or that has previously been edited and saved as a new version, you’ll be prompted to edit the most recent version if you have worked with the file previously. Also, you’ll be asked whether you want to risk edit conflicts if the file is in use by another user.
To save a file that hasn’t been part of a project into a Version Cue workspace, use the Adobe dialog box; navigate to the project and save the file. It’s also good idea to save a version comment.
To include non-Adobe files (for example, a Microsoft Word document) in a project, you must manually move these files into a Version Cue project in Adobe Bridge (see the sidebar “Creating Versions of Non-Adobe Files,” later in this chapter).
Copying and Moving Files and Folders
To copy files and folders between projects, just drag the files between Bridge windows. To move files and folders, copy and then delete them (see the upcoming section “Deleting Files, Folders, and Projects”). Only the most recent version of the file will be copied.
To move files and folders from a Version Cue project to a Desktop folder, drag from the project folder to the folder. As when you copy between projects, only the most recent version of the file will be copied.
Placing Files from a Project
You can use the File > Place command in InDesign and Illustrator with project files as you normally would. (We describe working with linked graphics in “Linking Files in InDesign and Illustrator” in Chapter 9, “Smart Objects and Intelligent Layouts.”) The Links palettes in InDesign and Illustrator display additional information about linked graphics when they are part of a Version Cue project. Figure 13-13 shows icons indicating when a linked file is being edited, by whom, when a file is a member of a group of alternates, and when it’s the primary alternate.
Figure 13-13. Links palette with file-status icons.

Tip: Linking Adds a Working Copy
Placing a file from a Version Cue project also makes a copy in your working copy folder. That copy is available to you even when the Version Cue workspace is unavailable.
Searching for Files in a Project
Working on files in a Version Cue project automatically appends metadata (for example, comments and versions) to the files. You can search for files based on these and other kinds of metadata. You cannot search across multiple projects.
• In Adobe Bridge, choose Edit > Find. For more information on how to search the metadata, see “Searching for Files and Metadata” in Chapter 3, “View from the Bridge.”
• In the Adobe dialog box, open the folder you want to search. (You cannot search across projects, and must therefore select which project you want to search in first.) Click Project Search in the Show Places pane on the left. Use the Search Criteria pop-up menu to choose All, File Name, File Info, Keywords, or Comments. Type in the Search field, and click Search. (Note that you can search for some metadata in Bridge that you can’t search for here.)
Tip: When You Find Old Versions
Searching a project will also locate past versions. To use an old version, use Bridge to view the older version, which opens it in its native application. Then choose File > Save As to make it a new file.
Synchronizing Files, Folders, or Projects
As you work in Version Cue, sometimes a Version Cue workspace isn’t available (for example, when the network isn’t available, or you’re using a laptop when flying), and you need to edit the copy of a file that is in your working copy folder. When the workspace becomes available again, you need to synchronize a file, folder, or an entire project. Synchronizing updates the file, folder, or project in both your working copy folder and the Version Cue workspace with the most recent versions. You might also synchronize a project to add copies of its files to your working copy folder. Use either Adobe Bridge or the Adobe dialog box to synchronize a project, or individual files or folders:
• In Adobe Bridge, select a project’s icon or alias, Control/right-click, and choose Synchronize (or choose Tools > Version Cue > Synchronize). To synchronize a file or folder, select its icon and use the same command.
• In the Adobe dialog box, select a project’s icon or alias, Control/right-click, and choose Synchronize (or choose Project Tools > Synchronize). To synchronize a file or folder, select its icon and use the same command.
Deleting Files, Folders, or Projects
To prevent accidental deletions, deleting a file or folder in a Version Cue workspace is a two-step process. The first step is to select the file or folder and delete it in one of two ways:
• In Adobe Bridge, select the file or folder and click the Delete Item button in the toolbar, or Control/right-click and select Delete from the context menu.
• In the Adobe dialog box, select the file or folder and click the Delete icon, or Control/right-click and select Delete.
This deletion hides the file or folder from normal view but does not erase it. To see it in Adobe Bridge, you must select View > Show Hidden And Deleted Files.
The second step is to delete the file or folder permanently. Choose one of these options:
• Control/right-click the file or folder and select Delete Permanent (Figure 13-14).
Figure 13-14. When a file has been deleted but not erased, you must first make it visible, and then choose the Delete Permanent command.

• In the Adobe dialog box, choose Project Tools > Show Deleted Items; then select the file or folder you want to permanently delete, and choose Project Tools > Delete Permanent.
To delete an entire project, select its icon or alias in Adobe Bridge or the Adobe dialog box. In Bridge, Control/right-click and choose Delete Project. In the Adobe dialog box, choose Project Tools > Delete; then confirm the deletion. Deleting a project permanently erases its files and folder from the Version Cue workspace and from your working copy folder.
Tip: Disconnect to Delete Extra Copies
Deleting a project does not automatically erase copies on other workstations on your network. To delete these copies from another workstation, use the Disconnect command from that workstation.
Disconnecting from a Project
You may want to disconnect from a project, for example, to free up file space on your hard drive. Disconnecting removes the project files from your working copy folder, and removes the alias to the project from Adobe Bridge and the Adobe dialog box. However, the files in the Version Cue workspace are not changed.
You can disconnect from a project in two ways:
• In Adobe Bridge, select the project icon or its alias, Control/right-click, and choose Disconnect from the context menu.
• In the Adobe dialog box, choose Project Tools > Disconnect.
Viewing Project Status
As you work in Bridge and the Adobe dialog box, Version Cue displays icons that indicate the status of files in a Version Cue project. In Thumbnails view in Bridge, only the icon appears. Switching to Details view displays a description of the status. Table 13-3 lists the file-status icons and their meanings.
Table 13-3. Version Cue File-status Icons and Their Meanings

Using Working Copies
A working copy of a file is created when you open a file within a Version Cue project, whether the file resides on your computer, on another computer, or on your network server. Version Cue always saves two copies of your file, even when you’re working only on a private project on your own computer. By using working copies to edit files, Version Cue protects the master project versions from unintended and unwanted changes.
Working copies also provide performance benefits by allowing you to update your work without having to constantly upload changes to the Version Cue workspace. This helps it perform better for large workgroups.
As you begin work on a file opened within a Version Cue project, the File Status field at the bottom of your window in InDesign, Illustrator, or Photoshop states In Use By Me (Figure 13-15, left). After you change the file, choose File > Save to save the file to your hard drive and save any changes in the file’s working copy. When you achieve a milestone that you’d like to save as an official version, choose File > Save A Version in your application to save the updated version both to the working copy of the file and to the Version Cue workspace; the File Status field changes to Synchronized, meaning that the working copy and the project version are now the same (Figure 13-15, right). The same file-status information appears in Adobe Bridge and in the Adobe dialog box so that other users of a shared project can see when you’re working on a file.
Figure 13-15. When you begin to make changes in a file in a Version Cue project, the status reads In Use By Me (left); when you save a new version, the status reads Synchronized (right).
![]()
Working copies are located by default in your Documents folder (Mac) or My Documents folder (Windows) in the Version Cue folder.
Working with Versions and Alternates
Version Cue introduces two new concepts: Versions and Alternates. As you work on a file, it may go through many version changes. In Version Cue, versions are historical iterations of a file that are saved with the file in a Version Cue workspace. The versions are not stored as separate files as they are in a traditional workflow.
Then again, sometimes you may need to keep active more than one variation of a particular file based on editorial decisions. In Version Cue, you can make these variants alternates. An alternate could be used, for example, when you need different images for different editions of a publication, or when a client is deciding between graphics at particular locations in a project. Files can be designated as alternates of each other even if they don’t reside in the same physical location. The Alternates feature provides special tracking of the “primary” alternate that’s especially useful for layout work when there is a decision-making process that’s part of the workflow.
Viewing and Comparing Versions
You can view the versions of a file in Adobe Bridge or in the Versions dialog box, using one of several methods:
• In Adobe Bridge, open the project and click the Versions And Alternates View icon. Then click the Versions View button in the upper right corner of the window. Each file in a project has thumbnails of each version, with a version number and modification date (Figure 13-16). Control/right-click a thumbnail and choose View, Promote To Current Version, or Delete from the context menu.
Figure 13-16. Versions View with an overview of versions for all project files.

Tip: View Comments Without Opening Files
When in Bridge Versions View, you can pause over each version thumbnail and view in a tool tip the comments saved with that version.
• In the Adobe dialog box, select a file icon and choose Project Tools > Versions to display the Versions dialog box, where you can view versions of the file (see Figure 13-6 — please note 6, not 16). From this dialog box, select a version and choose commands to View Version, Promote To Current Version, or Delete Version.
See the following two sections for information on promoting and deleting versions.
• In InDesign, Illustrator, or Photoshop, click the File Status field pop-up menu at the bottom of the window and select Versions to display the Versions dialog box (Figure 13-6).
• In the InDesign or Illustrator Links palette, select a linked file that has versions. Choose Versions from the Links palette menu to display the Versions dialog box.
Working with Previous Versions
Choosing to view a previous version of a file opens the previous version in a separate window. The version number appears in the title bar to remind you that this is not the current version. The File Status field at the bottom of the document window reads Never Saved.
Tip: Saving as a New File or an Alternate
You can edit and save a previous version as a new file, or as an alternate to the original file. To save a previous version as an alternate, choose File > Save As. In the Save As dialog box, check Save As Alternate of [Filename].
Choosing to promote a previous version to the current version (as described in the previous section) prompts you to save the file as a new version, incrementing the version number. It’s helpful to add a version comment to any document that you chose to roll back to a previous version. The previously displayed version will close and the newly promoted version will display as the current version.
Deleting Versions
You can use the Versions dialog box or Versions And Alternates view to delete versions of a file, as described in the earlier section “Viewing and Comparing Versions.” To select multiple versions to delete, Shift-click or Command/Ctrl-click, and then click Delete.
However, a more efficient way to delete old versions is with the Version Cue CS2 Administration utility. On the Administration Home page, click Remove Old Versions. On the Remove Old Versions page, choose to delete all versions older than a specified date and to specify the number of most recent versions to keep (Figure 13-17).
Figure 13-17. Version Cue CS2 Administration utility with options to remove old versions of a file or keep a specified number of versions.

Creating an Alternates Group
Alternates are variations of a file. Version Cue maintains the relationship among alternates by creating an alternates group, which you can view in the Alternates dialog box or in Adobe Bridge. The alternates may be in different folders, but all must be in the same project. The preferred alternate is designated the primary alternate and is given a special icon (Table 13-4).
Table 13-4. Alternate Icons and Their Meanings

To select multiple files for alternates, either Shift-click for a contiguous selection or Command/Ctrl-click for a noncontiguous selection. To create alternates, choose one of these options:
• In Bridge, navigate to the project that contains files you want to make alternates. Select the files to be included in the alternates group, and choose Tools > Version Cue > Make Alternates (or Control/right-click to use the context menu).
• In Bridge, to make alternates from files in multiple folders, click the Versions And Alternates View icon at the lower right corner of the window, and then click the Alternates View button at the upper right corner of the window. In your Version Cue project, select the file for which you want to create alternates. Choose File > New Window and navigate to a different folder in the same project. Select the files to be made alternates and drag them to the right of the larger thumbnail in the first Bridge window (Figure 13-18).
Figure 13-18. In Alternates view, two graphics were dragged from Folder 1 to Folder 2 and dropped to the right of the thumbnail of Southwest.psd. This made the three graphics into an alternates group, even though the files are in different folders of the same project.

• In the Adobe dialog box, navigate to the project where you want to make alternates. Select the files you want to make alternates. Control/right-click one of the files, and choose Make Alternates from the context menu.
Viewing and Removing Alternates
Choose from these options to get to places where you can view and remove alternates:
• In Bridge, click the Versions And Alternates View icon at the lower right corner of the window, and then click the Alternates View button at the upper right corner of the window.
• In the Adobe dialog box, select a file in a project, and choose Project Tools > Alternates (Figure 13-19).
Figure 13-19. Alternates dialog box with options to open an alternate, make it the primary alternate, or remove an alternate.

• In InDesign, Illustrator, and Photoshop, click the File Status field pop-up menu and choose Alternates.
• In the Links palette in InDesign or Illustrator, select the linked graphic for which you want to view the alternates, and choose Alternates from the palette menu.
To remove an alternate from an alternates group, in Bridge, select the alternate in Alternates view, Control/right-click, and choose Remove From Alternate Group; in the Alternates dialog box, select the alternate and choose Remove, and then click Done. When there are no longer two members of an alternates group, the group automatically ceases to exist.
Changing Primary Alternates and Relinking Alternates
To make a different alternate the primary, or preferred, alternate, use Adobe Bridge or the Adobe dialog box. In Bridge Alternates view, Control/right-click an alternate, and choose Make Primary Alternate from the context menu. In the Alternates dialog box, select an alternate, click Make Primary Alternate, and then click Done.
To relink to a different alternate, use the Links palette in InDesign or Illustrator. Choose Alternates from the palette menu. In the Alternates dialog box, select an alternate. Choose Relink, and then click Done. (The Relink command is added to the Alternates dialog box in the Links palette.)
Tip: Moving an Alternate to Another Group
A file cannot be in more than one alternates group. To move it to a different group, first remove the file from its original group (see the preceding section, “Viewing and Removing Alternates”). Then add the file to the new alternates group.
Collaborating on a Project
Up to now, we’ve focused on how to use Version Cue to streamline file management — the process of creating file versions, maintaining a file history, and locating and managing files. Additional issues can arise when you want to share a project with others and collaborate on files.
This section will focus on those issues. You need to plan how your projects will be structured and shared. You should know how to access and work on someone else’s project. You must understand what happens when more than one person wants to access a file at the same time. And you need to know how to access remote projects, for example, if you’re collaborating with a long-distance client.
Planning How to Structure and Share Your Projects
When you create a project that will be shared with co-workers, there are several things you should consider:
• How do you want to structure your projects? Consider making each job for a client its own project, to help keep projects smaller and more manageable. However, if you want to search for a file, you can search only one project at a time. You might also consider creating client-based projects, putting all your jobs for a particular client within a single project folder, and making each job a folder within the client project. Remember that you can structure the folders within a project any way you like.
• Who should have access to your project? When you create a new project in Adobe Bridge or the Adobe dialog box, you can choose to Share This Project With Others. However, if you use the Version Cue CS2 Administration utility described in the “Administering Version Cue” section that follows, you can restrict project access to specified users by requiring users to log into a project (Figure 13-20). You can also use the utility to create user names and assign them to a specific project; this will give you the most control over a project. (Later, you can “unshare” a project by selecting it in Bridge or the Adobe dialog box and choosing Unshare Project, or by choosing that command in the Version Cue CS2 Administration utility.)
Figure 13-20. When you select a project in the Version Cue CS2 Administration utility, you can require a password for a project, or enable lock protection to control who can save versions.

• Do you want to assign lock protection to the project? By default, when you create a project, more than one user can open the same file and save versions of that file. You can use the Version Cue CS2 Administration utility to assign lock protection to a project, restricting who can save a new version (Figure 13-20). If lock protection is enabled, only the first person who opens a file can save a new version (see “Viewing and Setting Project Information” that follows). Anyone else can still open the file, but must either save it as a new file or as an alternate.
Working on Someone Else’s Project
Normally, if you are on the same local network with the person who is hosting a project and has set the project to be shared, you will be able to open the project on your computer. You can access that project in one of two ways:
• In Adobe Bridge, click Version Cue in the Favorites panel, and then double-click the Workspaces icon. You can open any workspaces and projects that are shared and to which you have access privileges.
• In the Adobe dialog box, click Version Cue in the Show Places pane on the left. Double-click the Workspaces icon.
The workspace icon will indicate whether the workspace is available (see Table 13-1). Sometimes a workspace is marked Not Available, and its projects are marked Offline. If you have opened or synchronized the files from these projects before, you’ll have copies of them in your working copy folder, and you can open the files anyway. You’ll need to remember to use the Synchronize command to update the copies in the Version Cue workspace (see the earlier section “Synchronizing Files, Folders, or Projects”).
Sharing Access to Files
Version Cue features a series of alerts and locks to enable users to share the same file while maintaining its integrity.
Marking a File as In Use
When you’re collaborating on a project, you can choose to mark a file as In Use. This indicates that you’re intending to edit the file, and you want to notify others in your workgroup of the new file status. Using this command also copies this file (or updates it) to your working copy folder. This is helpful when you want to work on a file when you know you won’t have access to the Version Cue workspace. In Bridge, choose Tools > Version Cue > Mark In Use. In the Adobe dialog box, Control/right-click a file and choose Mark In Use from the context menu.
Opening a File In Use
Version Cue allows more than one user to open a file, but updates users on any file conflicts. You may open a file that’s already in use, for example, if the person who first opened the file didn’t synchronize it with the Version Cue workspace before leaving the computer, and that person is no longer available; or you may just want to print out the file.
When you open a file already opened by another user, you will receive an alert indicating that the file is in use (Figure 13-21, left); you can close the file or save a new version.
Figure 13-21. Alerts appear when opening a file in use (left), and saving a file in use (right).

If you keep the file open and change it, Version Cue issues a second alert about creating a conflicting copy (Figure 13-21, right). You can choose to do either of the following:
• Discard Changes to display the most recent version of the file and discard any changes you’ve made.
• Continue Editing to keep editing the working copy without overwriting changes in the other user’s working copy of the same file. (Each user is prompted to save a new version of the file.)
If lock protection is not turned on for this project, you can save a new version of your edits. If you do, you’ll receive a third alert warning, saying that conflicting edits will occur if you continue. You may cancel or choose Save Version Anyway. Saving anyway updates the copy in the Version Cue workspace with the new version, and alerts the other user that you have created a new version. You and the other user will have to resolve the different versions of the file.
Changing the Lock Status of a Project
Occasionally, when you’re working on a shared project, the In Use status of a file cannot be changed. Here are some ways to remove the lock status:
• If you can open the file on the workstation that Version Cue alerts indicate is using the file, choose File > Save A Version to release the lock.
• On the workstation that Version Cue says is using the file, select the file in Bridge, Control/right-click, and choose Reveal In Finder (Mac) or Reveal In Explorer (Windows). This displays the working copy that Version Cue indicates is in use. You can delete the working copy of the file, but you’ll lose any changes that had been made in that version.
• In the Version Cue CS2 Administration utility, click the Advanced tab, and then choose Maintenance > Reset Locks. In the Reset Locks window, choose a project name or a user name, and click Reset Locks.
Connecting Remotely
When you need to work on a Version Cue project that is located remotely (a computer outside your local area network), you can use the computer’s IP (Internet Protocol) address to access its Version Cue workspace. You might remotely access a workspace, for example, if you sometimes work in an office not on your local network and need to access your usual workspace, or if you need to share your workspace with someone working at a location outside your company. As usual, there is more than one way to do this:
• In Adobe Bridge, choose Tools > Version Cue > Connect To.
• In the Adobe dialog box, choose Connect To from the Project Tools menu.
In the Connect To dialog box, enter the Version Cue Client URL — the Version Cue IP or DNS (Domain Name System) address — followed by a colon, and the port number (3703), for example, http://153.32.235.230:3703. Then click OK. After you connect to the remote workspace, the dialog box displays all the Version Cue projects in that workspace. An alias is automatically created to that workspace and will be shown the next time you view your available workspaces.
How can you find the Client URL for a computer? Open the Version Cue CS2 Administration utility (described in the next section) to view the Version Cue Client URL listed at the bottom of the Home page.
Administering Version Cue
You can set up a more controlled project environment, in which users have to log in before accessing your project. You may also need to back up individual projects and the entire workspace, restore projects, and export them for archiving, as well as modify preferences to match the needs of the workgroup and perform more advanced managerial tasks. These administrative tasks are performed using the Version Cue CS2 Administration utility.
The interface for the Administration utility is very different from the rest of Adobe Creative Suite. If you’re a “power user” or a system administrator, you can work with the utility in your default web browser, and you can access its advanced features by navigating through web pages and choosing commands. Some of the features of the Administration utility (for example, creating, managing, and deleting projects) duplicate those of Adobe Bridge or the Adobe Dialog box. The system administrator in a larger workgroup might prefer to create and manage certain projects from Bridge or the Adobe dialog box. Table 13-5 shows you different tasks you can undertake in Version Cue, and which application or interface you can use to accomplish them.
Table 13-5. Version Cue Tasks and Where You Can Accomplish Them

For more information on the more technical features of the Administration utility, we recommend that you refer to Version Cue CS2 Help by choosing this command from the Version Cue icon on the Macintosh menu bar, or the Windows system tray.
Accessing and Logging into the Administration Utility
You can access the Administration utility in several ways:
• From the Version Cue icon on the Macintosh menu bar or the Windows system tray at the bottom right of the screen, choose Advanced Administration.
• From Version Cue CS2 Preferences, click the Advanced Administration button.
• From the Adobe dialog box, select a workspace icon. Choose Project Tools > Edit Properties. Click the Advanced Administration button.
The Adobe Version Cue CS2 Administration web page appears (Figure 13-22). Installing Version Cue on a workstation automatically creates a permanent user ID and password with administrator privileges, which enables access to the Administration utility.
Figure 13-22. Version Cue CS2 Administration utility login page with preset login and password.

The default login and password are both “system.” Use your best judgment when setting the login and password for the Administration utility. If you are working by yourself or with a trusted small group, it may be unnecessary to set a new login and password. In a more complex environment, or when you’re working with a project that requires security, you should change these defaults.
An administrator may sometimes need to access the Administration utility remotely (from a different workstation). To do that they need to enter the URL (or IP address) of the Version Cue workspace explicitly in the web browser (along with “:3703” appended). However, such a remote workspace can only be administered if the password for the default account is changed from “system” to something else. This is a basic security protection that prevents otherwise-unwanted remote access, since the “system” password and login is published and known to all.
Tip: Did You Forget Your Login and Password?
If you create a login and password for your workspace, and then lose the information, Adobe cannot retrieve it for you. However, you can work around the problem without affecting your projects using the following procedure. Use the Uninstall Version Cue utility located in the folder on the computer where the Version Cue workspace is installed. At the uninstaller prompt, choose the option to Remove Only Version Cue Software (Mac) or Keep My Preferences (Windows). This option saves the existing data and backup folders on your hard drive. When uninstalling is complete, move these folders temporarily outside the Version Cue CS2 application folder. Reinstall Version Cue. Manually turn off the Version Cue workspace in Version Cue preferences, and then replace the data and backup folders you moved in the Version Cue CS2 application folder, to overwrite the newly created ones. Restart the Version Cue workspace to restore the default login and password. Your projects will be preserved.
After logging in successfully, you’ll be taken to the Administration utility Home page (Figure 13-23). From the page, click links to perform various tasks — Add A User, Edit Users, Remove Old Versions, Create A Project, Perform Advanced Tasks — or click the Users, Projects, or Advanced tabs at the top of the window.
Figure 13-23. Home page of the Version Cue CS2 Administration utility.

Setting User Logins and Privileges
In a complex shared environment, it can be useful to control the process of creating user names and privileges. A user with administrative access can edit a project’s existing user IDs, create new user IDs, and assign them to specific projects.
To add a new user, including setting passwords and privileges, start on the Administration utility Home page and click Add A User. To edit the existing list of users, start on the Home page and click Edit Users. On the Users page, click the link for an existing user to go to a new page to set individual passwords and privileges. Alternatively, select the check boxes beside user names and click buttons to create a new user, duplicate or delete a user name, or export a list of users.
We don’t have room here to cover other important information about setting privileges. For more information, see the topics in the “Working with Users and Privileges” section in Adobe Creative Suite 2 Help in the Adobe Help Center.
Backing Up and Restoring Projects and Workspaces
The Version Cue CS2 Administration utility lets you back up all information in a Version Cue project, either as needed or as scheduled, as well as back up the entire Version Cue workspace, for example, to move a complete workspace from one computer to another. You can easily restore a backup copy of a project from a particular date. You can also save a backup configuration and use it with a project.
Backups are stored in the backups folder; to view the current location of this folder, use the Locations tab of the Version Cue Preferences.
Tip: Changing Data and Backup Locations
You can change the location of your Version Cue data and backups folders. Turn off the Version Cue workspace in the Adobe Version Cue CS2 Preferences. On the Version Cue Preferences Locations tab, click the Choose button to navigate to a destination location. This location must be on a hard drive (not a removable drive) that is permanently accessible to your workstation.
Backing Up Projects
To back up a project, start on the Administration utility Home page, and click the Projects tab. Select the check box next to a project’s name, and click the Back Up button. Accept or change the backup name (which includes the time of the backup), and select which information is to be included — Files, Project File Versions, Project Metadata, and Users/User Assignments (Figure 13-24). Then click Back Up. When backup is complete, a status page appears.
Figure 13-24. Administration utility Backup Project page with options to back up a project, including all versions and metadata, at a particular time.

To create a default backup configuration for a project, from the Administration utility Home page, click the Projects tab. Click the name of a project, and create a backup configuration on the Edit Properties page for the project. Choose to schedule the backup daily, weekly, or monthly.
Backing Up Workspaces
To back up the entire Version Cue workspace, start at the Administration utility Home page, and click the Advanced tab. Click Backup Version Cue Data. Add comments if you wish, and click Save. When completed, a list of workspace backups appears.
Restoring Projects and Workspaces
When restoring earlier backups of projects or workspaces, take care not to overwrite them. Restoring a copy of a workspace backup overwrites all current data in the workspace, including all projects, files, and versions; so use this option carefully!
To restore an earlier backup without overwriting the project, start at the Administration utility Home page, and click the Projects tab. Click the Project Backups link to display a list of previous backups. Click the name of the backup you’d like to restore. In the New Project Name field, enter a name different from other project names (the default is Recovery of [Backup Name]), and click the Restore button. The restored backup will be added to your projects.
Tip: Moving a Project to Another Workspace
You can use this backup and restore method to move a project, with all of the versions of files within the project, to a different workspace.
To replace current projects with a previous backup, first restore the backup (which will automatically turn off the Version Cue workspace): From the Administration utility Home page, click the Advanced tab. Click Maintenance > Administer Backups. Click the name of the backup you want to restore. Click Restore. The Version Cue workspace will turn off (indicated by a red “X” across the Version Cue icon in the Macintosh menu bar or the Windows system tray). Use the icon menu to turn on Version Cue CS2 again.
Viewing and Setting Project Information
To view and set information about projects in a Version Cue workspace, use the Projects page in the Administration utility. Begin on the Administration utility Home page, and click the Projects tab at the top of the page. The Projects page displays projects currently in the Version Cue workspace, including their disk usage; sharing, login and lock-protection status; and date created. Clicking a project’s name displays the Edit Properties page, where you can change project properties and set up backup configurations (see the preceding section, “Backing up and Restoring Projects and Workspaces”).
Exporting Projects
Version Cue lets you export the most recent version of all project files from a workspace, or all workspace data, including older versions.
To export the most recent version of project files — for example, to move them from one workstation to another, package them for output, or archive the final versions — use the Administration utility. From its Home page, click the Projects tab. Select the check box next to the project you want to export, and click the Export button. On the Export Project page (Figure 13-25), select a project from the Project Name menu, and then choose File from the Protocol menu. Click Choose File (Mac) or Browse (Windows), and navigate to the folder to which you want to export the project. Select any file in the folder and click Choose (Mac) or Open (Windows).
Figure 13-25. Use the Administration utility Export Project page to export current versions of a project to a location you define.

Tip: Selecting a Folder to Export
Because of the web interface, the scheme for exporting is a bit weird. To select a folder to export, you must select a file within it. If the folder is empty, you must manually enter the path in the field provided.
To export all workspace data, not just the latest versions, first use Version Cue preferences to turn off the Version Cue workspace: On the Macintosh, click the Version Cue icon on the menu bar and choose Version Cue CS2 Preferences; in Windows, double-click the Version Cue icon on the system tray at the bottom right of the screen. In the Version Cue CS2 Preferences dialog box, click the Settings tab and turn off the Version Cue CS2 workspace. Then, to export data, click on the Export tab and choose to export All Versions or Current Versions Only for your existing projects. Click the Browse button to navigate to a destination location, and then click Export.
Setting Advanced Preferences and Viewing Logs and Reports
You can set preferences for your workspace name, share status, log-file creation, and other aspects of your workspace. To access these preferences, on the Administration utility Home page, click Perform Advanced Tasks, or click the Advanced tab. Then click Preferences.
To view Workspace Info, the Workspace Log, and Reports, click the Advanced tab of the Administration utility, and then select the appropriate links.
Protecting Data
Version Cue automatically monitors the integrity of its database and file structure when it starts up (which is why Adobe recommends that you shut down and start up Version Cue on a regular basis). If it detects an error, Version Cue will perform a self-repair automatically, without even telling you!
If the database has become corrupt, Version Cue alerts you and gives you the option of running a more robust repair utility than the self-repair. In the unlikely event that neither repair solves the problem (according to the product manager, this hasn’t happened yet as we write this), you must manually export all affected projects to a new Version Cue workspace. Adobe has provided a file recovery index to do this task.
Uninstalling a Version Cue Workspace
Version Cue comes with an Uninstaller application (in Applications > Adobe Version Cue CS2). Use it when you want to uninstall a Version Cue workspace, rather than trying to delete Version Cue files manually.
For the specifics, see the “Uninstalling Creative Suite” section in Chapter 1, “Introducing Adobe Creative Suite 2.”
Migrating from Version Cue 1.0
If you want to use projects created in Version Cue 1.0 (installed with Adobe Creative Suite 1.x), you need to migrate your projects and user data to Version Cue 2.0. To do this, you use the Administration utility; for more information, see the topic “Migrating from Version Cue 1.0 to Version Cue 2.0” in Adobe Creative Suite 2 Help in the Adobe Help Center.
Setting up a Browser-based Review
It’s simple to set up and manage a browser-based review of PDF documents in your Version Cue workspace using the Version Cue Administration utility. You can also set up email-based reviews within Acrobat 7.0 Professional, part of Adobe Creative Suite 2. For more information on PDF reviews, see “Using a Browser-based Review (Version Cue)” in Chapter 14, “Creating and Using PDFs.”
Try It Out
Now that you’ve learned how the Version Cue workflow works, it’s time to try it out and see how you can take advantage of Version Cue to make your work environment more productive and efficient. Here are a few suggestions for how to integrate Version Cue into your workflow.
It’s always wise to start out small, and to test a new process in a limited way before implementing it throughout your entire workgroup.
You might set up a test environment on one computer that is not on the local area network, or is not used in daily production. Set up the Version Cue workspace initially as private. Experiment creating and working with a project to get a feeling for the way Version Cue works. Import some existing files into the project. Try out saving other files into the project and creating new versions and alternates.
If you work with others in a workgroup, practice with a colleague creating a shared project and its files. See what happens when both of you have a file open at the same time. Get a feeling for how often you need to save versions, and how to synchronize your working copy with the Version Cue workspace.
Finally, think through some of the issues we’ve discussed in this chapter: How you do want to create your projects — for each job, or on a client basis? Do you need to establish more elaborate user logins, passwords, and permissions, given the nature of your workgroup and the kind of projects you work on? Should you set up a server-based Version Cue workspace, or do you want it installed on individual workstations? You’ll have to figure out the answers to these and other questions based on your unique environment so you can integrate Version Cue into your workflow.