Chapter 17. To the Web
Most of our work is done for print output. But even die-hard print designers sometimes have to move over to web assignments — for example, adding some Photoshop or Illustrator images to a web site, converting an InDesign brochure into a web page, or creating simple animations from static artwork.
While you expect to find web features in GoLive and ImageReady, you might not realize how many web-related features are in our favorite print applications and how easy it is to create sophisticated web images in them.
In this chapter we’ll look at the web tools that you find in Photoshop, Illustrator, InDesign, and Acrobat. We’ll compare the web features found in Photoshop with the features in ImageReady.
We’re not going to look at the web features in GoLive. It’s a web-layout program, after all, so everything in it qualifies as going “to the web.” We will, however, look at some of the special features that help the other programs work better with GoLive.
When we started working on this book, the acquisition of Macromedia by Adobe had not been completed. Fortunately, as we’re finishing the book, the acquisition has just become final. So we’ll also take a moment to talk about the role of Macromedia Flash technology and how it relates to the Creative Suite applications.
Finally, we’ll look at other electronic information-delivery systems such as mobile phones and hand-held devices. These devices are the future of the web.
Web Graphics
Print designers save their graphic files as PSD, AI, TIFF, or EPS documents in order to use them in their print layouts. Web designers use very different formats. Here is a quick glossary of the type of formats for web graphics.
• GIF is used for artwork that has solid areas of color. GIF images are limited to 256 colors. However, most designers try to use even fewer colors to keep the file sizes as small as possible.
• JPEG is used primarily for photographic artwork. JPEG files can contain millions of colors. JPEG format uses compression to reduce file size. As the amount of compression increases, the more the quality of the image degrades.
• PNG can be saved as 8-bit (256 colors) or 24-bit (millions of colors) images. PNG files support a much more sophisticated form of transparency than GIF images can. Unfortunately, because of a problem with Microsoft Internet Explorer, PNG files are not used often in web graphics. See the sidebar “PNG: The Best Web Format That Nobody Uses.”
• SVG is a vector format that describes images as shapes, paths, text, and filter effects. Because they are very small, SVG files are used for web graphics as well as handheld devices such as cell phones. SVG-t is an alternate version of SVG files. These files are even smaller.
• SWF is the format for Flash files that are viewed in browsers and web devices. In addition to creating extremely small files, it also lets you create animations that contain sounds and movies.
• WBMP is the format for raster images that are viewed on cell phones. The WBMP format is 1-bit, which means the images are only black and white pixels. This format is no longer of primary importance, since many cell phones have colored screens.
Saving and Exporting Directly to Web Formats
When you choose Save As in Photoshop, the Format menu gives you a long list of options which includes CompuServe GIF, JPEG, PNG, and BMP — a lot of web formats. Choose Export in Illustrator, and the Format menu lets you select JPEG, PNG, BMP, or Macromedia Flash — again, all web formats. So why not use these easy methods to create web graphics? Are these formats less professional than the Save For Web dialog box (covered in the next section)?
We don’t mean at all to imply that these formats and methods don’t work, and give professional results — they do. The main reason why we dismiss saving or exporting web graphics this way is that while you can set your options for the files, there’s no way to preview what the image will look like. The whole point of creating web graphics is to do a careful balance between keeping the file size small and preserving the quality of the finished artwork. You can’t do that well without a preview, which is why we use, and advocate, the Save For Web dialog box.
Save For Web Dialog Box
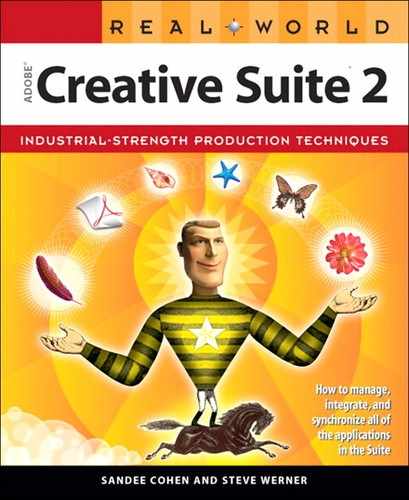
The Save For Web dialog box is your one-stop interface for creating almost every possible web graphic. You can find it in Photoshop, Illustrator, and GoLive. To open it in Photoshop or Illustrator, choose File > Save For Web (Figure 17-1). In GoLive, however, you need to import a smart object first before you can open the Save For Web dialog box. (See “Working with GoLive Smart Objects” in Chapter 9, “Smart Objects and Intelligent Layouts.”)
Figure 17-1. Save For Web dialog box as shown in Photoshop.
Most of the features are identical in all three applications, but a few of them appear in only one of the applications in the suite. Following is a brief description of the main areas and tools in the Save For Web dialog box.
• Optimization tabs allow you to split the dialog box into halves or quarters to compare different settings. This is especially helpful when deciding between different types of formats or choosing the compression or color settings for images.
• The Hand tool allows you to move around the dialog box.
• The Slice Select tool lets you select the slices in the image so that you can apply different optimization settings to the area within the slice. (Slices are rectangular areas that divide an image into smaller segments.) This tool only selects the slices in the Save For Web dialog box. The slices themselves need to have been created before opening the Save For Web dialog box.
• The Zoom tool allows you to zoom in or out on the image in the dialog box.
• The Eyedropper tool lets you pick a color from the image to use as the matte color into which transparent images can fade. The Eyedropper can also select the color to be inserted into slice backgrounds.
• Eyedropper color displays the color that has been selected by the Eyedropper tool. Click inside the Eyedropper color square to open the Color Picker.
• Show/Hide slices toggles the display of slices in the image.
• Optimization settings area displays the optimization controls for the various web formats. Photoshop, GoLive, and Illustrator allow you to save as GIF, JPEG, PNG-8, PNG-24, and WBMP. Illustrator adds SWF and SVG to the list. (GoLive also lets you save files in the SWF and SVG formats, but not through the Save For Web dialog box.)
• Color Table displays the colors in GIF and PNG-8 images.
• Image Size allows you to change the pixel dimensions of an image without leaving the Save For Web dialog box.
• Frame Controls become active after you’ve added animation frames to the document. They’re available only in Photoshop.
• Edit In ImageReady lets you quickly switch from the Save For Web dialog box in Photoshop to editing the image using ImageReady.
• Preview in Browser menu lets you select a browser to display the image at the current optimization settings.
• Color Information gives you the RGB, Alpha channel, Hexadecimal, and Index color information for wherever you move the cursor.
• Magnification menu lets you quickly move to a specific magnification setting.
As you set the optimization controls, you’ll see the file-transfer time listed below the preview of the image. Although these times are given using the ancient 28.8 Kbps measurement, they still give you a warning when your image will take too long to be seen.
When you have the optimization settings as you wish, click the Save button. This lets you name and save the web images. If you have created slices, you will also be given the opportunity to choose to save the HTML code that is necessary to reassemble the slices. (See the section “Slicing and Dicing Images” later in this chapter.)
Choosing Photoshop or ImageReady
Figure 17-2. Click the Edit In ImageReady (left) and Edit In Photoshop (right) buttons to quickly switch between Photoshop and ImageReady.

Slicing and Dicing Images
Many years ago, web designers discovered that large images could be made to download faster — or just appear to download faster — if the images were divided into separate areas (called slices) and assembled in the web browser using HTML tables. Slicing images also meant that certain areas of an image could have different optimization settings than other parts of the image. Slicing also let webmasters modify smaller sections of an image, rather than the entire image.
Photoshop, Illustrator, and ImageReady can slice images and generate the HTML code that reassembles them on a web page later. GoLive does not let you create or modify the position or size of slice. However, GoLive can read the slices created in the other programs and create the tables to hold them.
Creating Slices
There are several different ways to create slices. You can create slices manually or you can create slices automatically from the boundaries of a layer or object. You can also create slices from guides. Each technique has its own advantages and drawbacks.
User Slices
The most obvious way to create slices is to use the Slice tool found in the Tools palette of Photoshop, Illustrator, and ImageReady (Figure 17-3). The process is simple: you drag with the Slice tool to create the rectangle that defines the area of the slice. This manual method creates what’s known as a user slice. User slices can be resized or moved any way that you want. That makes them useful for targeting specific areas of an image that are not defined as an object or layer.
Figure 17-3. The Slice tools and Slice Select tools in Photoshop (left), Illustrator (center), and ImageReady (right).

In Illustrator you can also create user slices by selecting an object and choosing Object > Slice > Make From Selection. This creates a slice that is the same size as the selected objects.
Layer-based and Object-based Slices
The smarter way to create slices is to create layer-based slices. These are slices that automatically expand or contract to enclose the image on a layer. In Photoshop or ImageReady, select the layer that you want to convert into a slice, and then choose Layer > New Layer Based Slice. This creates a slice that is exactly the size of the pixels on that layer. Even better, the layer-based slice automatically adjusts its size if you change the size of the artwork in the layer.
You can create a similar type of slice in Illustrator, but it’s not called a layer-based slice. Select the object or group that you want to turn into a slice, and choose Object > Slice > Make. The slice will be tied to the underlying object and will resize accordingly. We call these object-based slices.
Unlike the layer-based slices in Photoshop, which are always connected to the size of the layer, these Illustrator slices will adjust to the size of the original object but can also be manually resized. Simply resize the artwork, and the slice adjusts accordingly.
If you manually resize the object-based slice, it immediately loses its connection to the size of the object below. From that point onward, the slice and the object no longer resize together.
Converting Layer-Based slices to User Slices
There are times when you may want to convert a layer-based slice in Photoshop or ImageReady into a user slice. For instance, you may want to expand the slice so that it neatly fills up an area in the artwork.
To do so in ImageReady, simply go to the Slices menu and choose Promote To User Slice. Since Photoshop has no Slices menu, you need to select the slice and then Control/right-click and choose Promote To User Slice from the context menu. (We don’t feel user slices are a promotion from layer-based slices, but that’s what Adobe calls it.) Once a slice has been promoted from layer-based to user slice, it can be moved or resized at will.
As mentioned in the previous section, Illustrator slices don’t need to be promoted. They can simply be selected and resized at any time.
Auto Slices
Slices are reassembled in web pages using HTML–based tables. However, tables can only contain rectangular cells in a grid-like structure. If you create a user or layer-based slice in the middle of an image, it needs to have supporting slices to fill the rest of the table and display the image correctly. These other, supporting slices are called auto slices (see Figure 17-4).
Figure 17-4. The two layer-based slices in the image generate the additional auto slices.

Photoshop, ImageReady, and Illustrator create auto slices as necessary when you create slices. The auto slices are indicated by lighter colors for their numbers.
Slices from Guides
You can create slices from guides that have been applied to a document. In Photoshop or ImageReady, first create the guides that you want to use as slices, and then choose the Slice tool in the Tools palette. Click the Slices From Guides button in the Options bar. This creates user slices from the areas defined by the guides. It also deletes any slices that were previously applied to the image.
To do the same in Illustrator, create the guides, and then choose Object > Slice > Create From Guides. As in Photoshop, this creates user slices that delete any previously created slices.
Dividing an Existing Slice
The Divide Slices command (see Figure 17-5) allows you to divide a slice area into a specific number of slices or to create the slices based on specific pixel sizes. In Photoshop, first choose the Slice tool or the Slice Select tool. Then Control/right-click to access the Divide Slices command. In ImageReady you can choose Slice > Divide Slices when any tool is selected.
Figure 17-5. Create a grid of horizontal and vertical slices using the Divide Slice dialog box.

The Divide Slices command works slightly differently in Illustrator than it does in Photoshop or ImageReady. In Photoshop or ImageReady, you can apply the Divide Slices command when you first create or open the document. This is because the entire image is automatically contained in a defined slice when you start a new document.
However, in Illustrator, a new document doesn’t have a slice in it until you define one, so you’ll have to define and select a slice before you can use the Divide Slices dialog box (Object > Slice > Divide Slices).
Working with and Viewing Slices
Working with slices is similar to working with any other object or layer. You can select, move, delete, and copy slices. However, there are a few special techniques you need to know.
Selecting and Moving Slices
Choose the Slice Select tool to select, move, and resize slices. To select multiple slices anywhere in the layout, Shift-click while you select them. Use the Option/Alt key to create a copy of a slice as you drag it.
The Save For Web dialog box has its own Slice Select tool. This tool allows you to select slices to apply specific optimization settings to them. However, you can’t move or resize the slices in the Photoshop or Illustrator Save For Web dialog box. If you need to resize or otherwise modify a slice, you need to quit this dialog box and then make your changes in the document window.
This is why ImageReady is the preferred application for working with slices. With ImageReady, you can move and select slices in the document window as well as set the slice options.
Viewing Slices
There are several ways to view slices, depending on the program and context in which you are viewing them. Here are the locations in which you can view them:
• Illustrator document window. Choose View > Hide Slices or View > Show Slices to hide or reveal the slices on the page.
• Photoshop document window. This is a two-step process. First choose View > Show and make sure that the Slices command is chosen in the Show submenu. Then choose View > Extras. This command shows and hides whatever items have been selected in the Extras submenu.
• Save For Web dialog box (Photoshop, Illustrator, and GoLive). Click the Toggle Slices Visibility button in the dialog box. This button uses the letter Q as a keyboard shortcut.
• ImageReady document window. Use the same View > Extras command that is in Photoshop, and you can choose Slices and Auto Slices from the Show submenu. You can also click the Toggle Slices Visibility button in the Tools palette (the same button as in the Save For Web dialog box, and the same Q keyboard shortcut to show and hide slices). You can also use the Hide Auto Slices button in the Options bar.
Assembling Slices
Once you have sliced an image into pieces, someone or something is going to have to put it back together. The language for assembling sliced images into a complete picture is called an HTML table. While there are those who can write their own code to reassemble sliced images, rest assured you don’t have to learn any code to create the tables for sliced images. Photoshop, Illustrator, and ImageReady do it all for you.
Setting Individual Slice Options
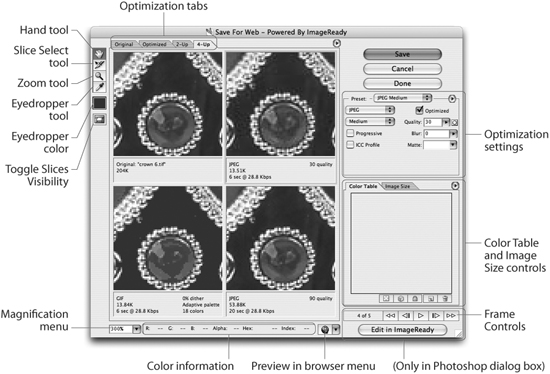
Once you’ve sliced an image, each individual slice can be set to specific properties. These slice options let you turn slices into image maps that contain links to other web pages or email addresses (see Figure 17-6).
Figure 17-6. The Slice Options dialog box in Photoshop (left) and Illustrator (center), and the Slice palette in ImageReady (right).
You access the slice options in Photoshop by selecting the slice or slices and then choosing Edit Slice Options from the context menu. You can also double-click with either of the slice tools over a slice area to open the Slice Options dialog box. In Illustrator you select the slice or slices and then choose Object > Slice > Slice Options. You access the slice options in ImageReady by selecting the slice or slices and then opening the Slice palette (Window > Slice).
You can set the following slice options:
• Type allows you to choose between the two types of slices. Image slices display the image underneath the slice. No Image slices allow you to enter your own custom text in the slice cell. This text is displayed on the web page as ordinary HTML text, not text that is contained in an image.
• Name is the name for the image generated by the slices. The default setup for the name is the name of the document followed by the number for the slice.
• URL allows you to add a link to another web page or email address. The area in the slice then becomes a hotspot to send the viewer to the new page or open the default mail program to send a message.
• Target specifies in what type of frame the link in the URL field will open (if you are using a frames-based web site). Blank opens the link a new frame or window. Self opens the link in the same frame or window. Parent opens the link in the parent frame-set of the link. Top replaces all the frames in the current browser window and opens the link in that window.
• Message Text, Message, or Status Bar Message is the text that appears in the status area in the browser. The default text for this field is the URL link.
• Alt Tag or Alt is the text that is displayed in place of the image when images have been turned off, or in non-graphical browsers. This alt tag is essential for creating web pages that meet the accessibility requirements for the blind because it can be read aloud by screen readers.
• Dimensions allow you to numerically set the position and size of the cell. The Dimensions controls are in the Slice Options dialog box in Photoshop and the Slice palette in ImageReady. In Illustrator, you can use the Control palette to set the dimensions of slices.
• Slice Background Type and Background Color or Background set the color for the transparent regions in Image slices or the background area for No Image slices.
Outputting the Slices and Table
This is the final step in creating a sliced image — outputting the images and the HTML code necessary to reassemble the slices in a table. If you’re in Photoshop or Illustrator, you can do this simply by choosing File > Save For Web. You then click the Save button to open the Save Optimized As dialog box (Figure 17-7).
Figure 17-7. Save Optimized As dialog box and related menus.

In ImageReady, the regular document window is the equivalent of the Save For Web dialog box. You choose File > Save Optimized or File > Save Optimized As to get to the Save Optimized As dialog box.
The options for the slice files are defined in the Save Optimized As dialog box:
• Format allows you to choose what types of files will be created. Most of the time you’ll choose HTML And Images. This creates the optimized files as well as the HTML code that assembles the files into a table. Images Only creates just the optimized files. Sandee uses this option when she wants to output just images for use in screen shots or illustrations of web page designs. HTML Only outputs just the code necessary to reassemble the images. This option is helpful if you have created No Image slices that you want to use as a table in a web page.
• Settings allows you to choose the options for creating the HTML code for your table. If you want to modify these settings, choose Other. This opens the Output Settings dialog box. If you are working in ImageReady, you have more controls in the Output Settings dialog box than you do if you access it through Photoshop or Illustrator. See the next section, “Choosing the Output Settings,” for more information on these options.
• Slices allows you to control which slices should be created. All Slices creates all the slices that were generated in the document. All User Slices creates all user and layer-based slices but omits the auto slices. Selected Slices creates only those slices that were selected when the Save Optimized As dialog box was opened.
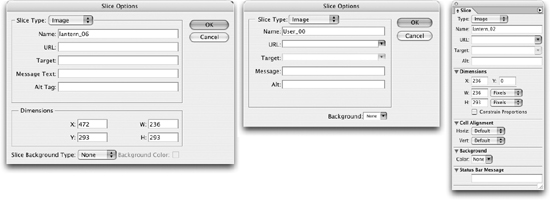
Choosing Output Settings
While image designers are interested mainly in the appearance and size of web graphics, web site designers need to manage the naming conventions, comments, and other advanced attributes of those images. You can control these output settings by choosing Other in the Settings menu in the Save Optimized As dialog box. This opens the Output Settings dialog box. If you have opened this dialog box through Image Ready, you will see seven sections (shown in Figure 17-8). If you have opened the dialog box through Photoshop or Illustrator, you will see only four sections.
• HTML lets you choose the type of HTML formatting and what to include with the file. You can also set the output to XHTML, which is a more stringent form of HTML. XHTML makes your table more compliant with the W3C web standards. (The W3C stands for the World Wide Web Consortium, an organization that establishes the standards for web pages and graphics.)
• Saving HTML Files (ImageReady only) controls the naming conventions when you output rollovers from a file.
• Slices lets you control the type of table that is created. You can also switch from an ordinary HTML table to CSS (cascading style sheets) to position the elements without using a table. (See the sidebar “Behind the Scenes: CSS Layers vs. Slice Tables” for a comparison of using the two features.)
• Image Maps (ImageReady only) sets which type of server will be used to handle the links in image maps.
• Background lets you add a background image to the HTML file. This background image resides under the images in the table.
• Saving Files allows you to control the naming conventions of the sliced files as well as their location.
• Metadata (ImageReady only) lets you choose the added information that is saved with the files. Deselect these options if you are concerned about file size.
Figure 17-8. All seven sections of the Output Settings dialog box in ImageReady.
Tip: Save Your Output Settings
Use the Save button to save the settings for all seven sections of the Output Settings dialog box. This adds the settings as a preset at the top of the dialog box.
Assembling Smart Object Slices in GoLive
Smart Objects in GoLive allow you to add native Photoshop and Illustrator files into GoLive web layouts and then use the Save For Web dialog box to optimize them. The real beauty of these Smart Objects is not just that they can be inserted into GoLive, but that any slices that were created in Photoshop, Illustrator, or ImageReady are recognized in GoLive’s Save For Web dialog box. (For more information on working with Smart Objects in GoLive, see “Smart Objects in GoLive” in Chapter 9, “Smart Objects and Intelligent Layouts.”)
Working with CSS Layers
CSS Layers are objects that are defined using Cascading Style Sheets. (We discuss Cascading Style Sheets in the “Cascading Style Sheets” section of Chapter 8, “Working with Style.”) As explained in the sidebar below, the tables that are generated to hold sliced images add unnecessary code and are cumbersome to work with. Fortunately, you can export images so that they are inside CSS Layers. Each CSS Layer can then be positioned easily within the web layout.
CSS Layers from Sliced Artwork
Photoshop, ImageReady, and Illustrator all allow you to export slices as CSS Layers using the Slices section of the Output Settings dialog box. Create the slices in the image as described in the previous section, “Slicing and Dicing Images.” Then follow these steps to create CSS Layers from slices.
1. In Photoshop or Illustrator, open the Save For Web dialog box, and set the options for the slices. In ImageReady, use the Optimization palette to set the options.
2. In Photoshop or Illustrator, click the Save button to open the Save Optimized As dialog box. In ImageReady, choose File > Save Optimized As.
3. In the Save Optimized As dialog box, choose HTML And Images from the Format list. This ensures that you have the code necessary to create the CSS Layers as well as the images.
4. Choose Other from the Setting list. This opens the Output Settings dialog box.
5. Set the Slice Output button to Generate CSS, as shown in Figure 17-9. Leave the Referenced list as By ID. This positions each slice using styles that are referenced by a unique ID. Click OK to return to the Save Optimized As dialog box.
Figure 17-9. Generate CSS controls in the Output Settings dialog box.

6. Use the Slices list to choose which slices should be converted to CSS Layers. We prefer the option for All User Slices. This limits the CSS Layers to only the areas inside the image that we officially designated with a slice boundary. This avoids creating extra CSS Layers that contain blank images.
7. Click Save. The images and HTML code that defines the CSS Layers are created.
CSS Layers from Illustrator Layers
Figure 17-10. Layers tab in the Save For Web dialog box in Illustrator.

Creating CSS Layers in GoLive
As much as we love cool features that let us integrate all the Creative Suite applications, if you want to put images from Photoshop, ImageReady, or Illustrator into CSS Layers, we suggest exporting the images as ordinary web graphics, using the GoLive command Special > Insert > Layer, and then adding the graphic within the layer. This way you can better control the size of the CSS Layers.
That’s not to say, however, that there aren’t special features within GoLive for working with CSS Layers. Our good friend, Lynn Grillo, alerted us to these cool tricks for working with CSS Layers in GoLive.
Pasting Images into CSS Layers
Ordinarily you will want to use Smart Objects (covered in Chapter 9) to insert Photoshop or Illustrator artwork into GoLive pages. However, here’s a neat way to put simple art, such as a gradient, into a GoLive layout.
Create the image in Photoshop. (For instance, create a black-to-white gradient 400 pixels wide by four pixels tall.) Then copy the Photoshop image and switch to GoLive.
In GoLive, create a CSS Layer and click inside it. Then paste the contents of the clipboard. This opens the Save For Web dialog box within GoLive, where you set the optimization controls for the image.
After you save the optimized art, the image appears inside the CSS Layer. The CSS Layer can then be resized and repositioned as desired. This technique also works with Illustrator artwork copied to the clipboard. This is exactly the sort of integration we like to see between the applications.
CSS Layers from a Tracing Image
GoLive also has Tracing Image feature that lets you place portions of a Photoshop or Illustrator file into a CSS Layer. Start by choosing Window > Tracing Image. This opens the Tracing Image palette. Click Source, and then use the link folder to choose the image that you want to place on the page. This image can be a web graphic or any of the Smart Object files such as native Photoshop, Illustrator, or PDF files. If you have chosen a PDF file, you can choose which page of it to insert.
The tracing image appears on the page. You can use the Tracing Image palette as shown in Figure 17-11 to change the opacity of the image so that it fades into the background of the page. Use the Hand tool to position the image on the page. You can also use the Crop tool to choose a specific portion of the image as artwork on the actual web page. Click the Cut Out button to open the Save For Web dialog box. You can then choose the optimization settings for the artwork.
Figure 17-11. Using the Crop tool in the Tracing Image palette.
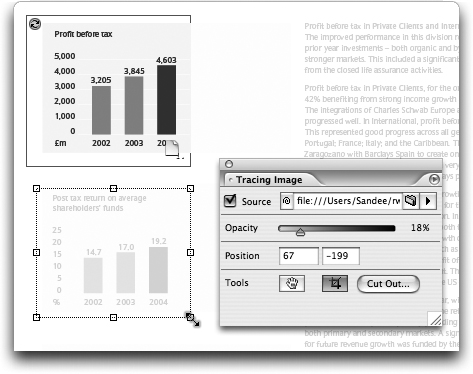
What we particularly like about the Tracing Image feature is that the Source image becomes a Smart Object for the portion of the image cut out of the page. This means if you make changes to the original Photoshop, Illustrator, or PDF document, those changes automatically update in the web graphic.
From InDesign to GoLive
Many versions ago, InDesign had a feature that exported InDesign pages into HTML code for the web. The results were mediocre at best, and often quite bad. Web designers hated the command because once they inherited the code, it took them hours to clean up the structure of the document. But print designers liked the command because it was simple.
Beginning with InDesign CS, Adobe replaced this export command with the more sophisticated Package For GoLive command. But the package feature looked scary, and few print designers wanted to use it. (We admit it. We were some of the people who shied away from working with Package For GoLive.) Designers complained that they wanted the old, one-step export to a complete HTML page.
Now that there have been two versions of the Package For GoLive feature, we’ve discovered there’s actually nothing complicated about working with it. It’s much simpler than we ever thought. And it actually can be made to work almost as easily as the original export as HTML command, but with better results.
Packaging a Document for GoLive
Package For GoLive is the best solution for anyone who wants to convert print layouts from InDesign into clean HTML pages. Here are the step-by-step directions for using this feature.
1. In GoLive, define your site. In the Site window, on the Extras tab, you will see an area for InDesign Packages (Figure 17-12).
Figure 17-12. GoLive site window with InDesign Packages area in the Extras tab.

2. In InDesign, choose File > Package For GoLive.
3. In the dialog box (Figure 17-13), specify the pages that you want to convert.
Figure 17-13. Package For GoLive dialog box in InDesign.

4. Choose the Encoding for the text on your web site. UTF-8 (Unicode Transformation Format) is the smallest (8-bit) format, the most commonly used format for web pages. UTF-16 handles more complex, 16-bit, character encoding, but is not necessary for most web pages. Shift-JIS is a complex format that can handle Japanese characters.
5. Click View Package When Complete if you want the package to automatically open in GoLive.
6. Select all the Copy To Package Sub-Folder options to ensure that the Smart Objects for placed Photoshop, Illustrator, PDF, and multimedia movie and sound files are packaged and transferred.
7. Click Package. If the file didn’t get saved to this location, move it to the proper directory for your GoLive web site (New Site > web-data > InDesign Packages). Having the InDesign package in this location ensures that it will be available in the Extras tab of the site window in GoLive.
Examining the Package Contents in GoLive
Once you’ve packaged the InDesign file, you’re ready to examine the contents of the package in GoLive. If you chose the View Package When Complete option in the Package For GoLive dialog box, GoLive opens automatically. If not, you’ll have to launch it yourself. Remember, all you’re doing here is looking at what’s in the package; you’re not creating anything at this point.
1. In GoLive, click the triangle to open the InDesign Packages item in the Extras tab of the site window. The package you created in InDesign is listed. Double-click to open the package window (Figure 17-14). You’ll see three controls at the top of the package window.
Figure 17-14. Contents of an InDesign Package, viewed in GoLive.
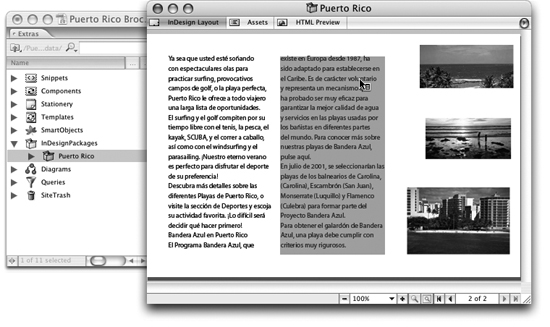
2. Click the control for InDesign Layout. This view shows you the information in the original layout. At the bottom of the window in this view, there are controls to move through the pages and zoom in on the layout.
3. Move your cursor over the various parts of the layout, such as an image or a text frame. As you do, that asset will be highlighted in green, indicating that the asset can be dragged from the Package window into your GoLive layout.
4. Click the control for Assets. This view displays the individual assets as they would be displayed in the Finder or Explorer folders. The assets are divided into subfolders for the stories, images, and multimedia files contained in the original InDesign layout.
5. Click the controls at the bottom of the Assets view to switch between list view and thumbnail view.
6. Click the control for HTML Preview. This is a special view that allows you to create a complete web page automatically. We’ll cover working with this view in the next section.
Creating an HTML Display
One of the biggest complaints with the earlier versions of the Package For GoLive command was that print designers really didn’t understand how to use the assets on web pages. They wanted something quick and easy to convert the package contents into a web design. That’s where the HTML Preview control comes into play.
1. With the InDesign package open in GoLive, click the HTML Preview control at the top of the package window. This changes the package window to display a preview of how the pages will look in an HTML layout.
2. If you’re in a rush, click the Optimize button in the Main Toolbar (Figure 17-15). This automatically adjusts the layout for the optimum display of the elements.
Figure 17-15. GoLive Main toolbar (top) with InDesign Package in HTML Preview mode (bottom).
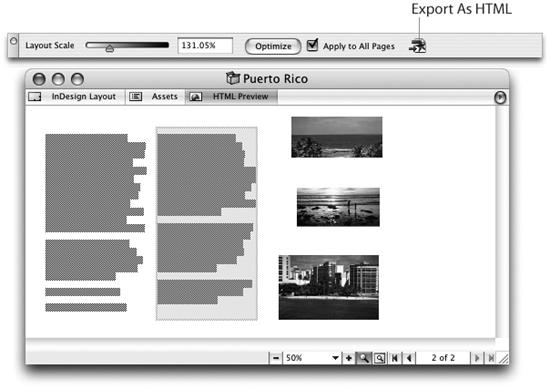
3. If you want to fuss a bit, use the Layout Scale slider in the GoLive Main toolbar to adjust the sizes of the elements of the page. This slider changes the proportions of the elements in the layout. You can make the text more important or the images more prominent. Don’t worry about getting things exact. You can always adjust them in your final GoLive layout.
4. Click the Export As HTML button in the Main toolbar and select the web-content folder where the pages should reside. Your pages appear in the site window. The pages can be modified or uploaded as needed.
Modifying the InDesign Package
Here’s where it gets interesting. The HTML pages maintain links to the original InDesign Package you created. So what if someone makes changes to the text in the original InDesign file?
All you have to do is repackage the InDesign document with the changes to replace the original package. This automatically updates the web page text to reflect the changes.
Taking PDF to the Web
We hear this all the time: “My boss wants me to convert our monthly newsletter from an InDesign file into something we can post on the web. But he doesn’t want the web page to look different from the original newsletter. What can I do?” The answer is “PDF! Post a PDF!”
The advantage of PDF over HTML is that it is intended to preserve the look and integrity of the original document. All the Adobe CS2 applications provide great controls for exporting PDF for different purposes.
Creating PDF Files for Web Viewing
Any PDF file can be posted as part of a web site. When you export the PDF file from InDesign or Illustrator, you should choose the Smallest File Size PDF preset, which makes PDF files suitable for quick download from the web. Or you could create a customized PDF preset to further control the settings. In addition, you should check the Optimized For Web setting on the General panel of the Export Adobe PDF or Save Adobe PDF dialog box. This control allows each page of a multi-page PDF file to be displayed, even if the entire file has not yet downloaded. This means your viewers can start reading the PDF document sooner. (For more information on working with PDF, see Chapter 14, “Creating and Using PDF Files.”)
PDF Files in a GoLive Site
It’s very simple to add a PDF file to your web pages. You can drag the PDF files from the Bridge directly into the GoLive site window. Then, you add a link where necessary to open the PDF file.
We would be remiss if we didn’t mention another important feature in GoLive for working with PDF files. When a PDF file is part of a GoLive site, you can open the PDF file within GoLive by double-clicking the PDF icon in the site window. This opens the PDF file in its own PDF Preview window.
Use the PDF Preview window to navigate through the document as you would in Acrobat itself. But the most exciting part of this is when you click the PDF Link Editing tab. This setting highlights all the links in the document. You can then easily create, modify, or delete the link areas in the PDF document, as well as modify or specify the actual link destinations (Figure 17-16).
Figure 17-16. PDF Link Editing in GoLive.

Animations
As soon as we say animation, most people think Flash. But there are more options for creating web animation than just Flash movies — for example, GIF animations and QuickTime movies.
This section shows you how to use your arsenal of applications to create more animated fun.
Creating GIF Animations
Years ago, the only format web designers used for animations was GIF. Web banner ads were exclusively GIF animations. But GIF animations have fallen out of favor. Consider the fact that the same content in a five-second GIF animation can run as long as 30 seconds in a Flash movie of the same file size. And the Flash movie can contain sounds and much more sophisticated animations. However, there are web sites that require GIF animations, rather than Flash movies. So it is important to be able to create GIF animations.
Both Photoshop and ImageReady create GIF animations. Choose Window > Animations to open the Animation palette (Figure 17-17). Each frame of the palette becomes another frame in the animation. You can move objects on layers to have them move from one animation frame to another. You can also select two frames in the Animation and use the Tween command to generate intermediate frames that create the steps between the two original frames.
Figure 17-17. Animation palette (top) and Layers palette with frame controls visible (bottom).
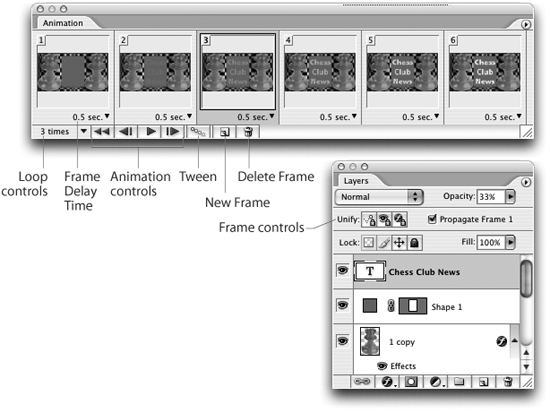
As you work with the Animation palette you’ll see additional features appear in the Layers palette — Unify and Propagate Frame 1 — that you don’t see when you’re working with “static” images (Figure 17-17). These controls allow you to create layer attributes and then apply them to just one frame in your animation or to all of the frames that follow it.
The Unify feature offers three options:
• Layer position sets the position of the image on the layer.
• Layer visibility controls the on/off visibility of the image on the layer. This visibility does not relate to the opacity of the layer.
• Layer style controls any style applied to the layer.
The Propagate Frame 1 feature allows you to automatically apply any changes to the first frame to the rest of the animation. If you don’t want the changes in frame 1 to be applied to the rest of the frames, deselect this option. This command is available only for the first frame of an animation. If you want the changes on a different frame to propagate to the rest of the frames, you can use the Unify controls or move that frame to the first frame position.
Saving GIF Animations
Once you’ve created the frames, it is rather simple to export the file as a GIF animation. Just choose GIF in the Save For Web dialog box (Photoshop) or the Optimized palette (ImageReady). There’s no need to specify anything special. The mere presence of the frames in the file is all you need to create the GIF animation.
Converting QuickTime Movies in ImageReady
This is one of those really esoteric features that few people know. You can use ImageReady to open a QuickTime movie and convert the QuickTime frames into animation frames. Sandee uses this technique when she wants to quickly take a series of screen shots when teaching an application. It’s also a good tool for ad agencies that need to convert movies into storyboards or keyframes for print ads.
Use a screen capture program, such as SnapzPro X (Mac) or SnagIt (Windows), to record what you’re working on as a QuickTime movie. (In Sandee’s case, that would be capturing all the dialog boxes and menus as she goes through a procedure.) Then, use ImageReady to open the QuickTime file. The frames from the movie appear in the Animation palette. Even better, each frame appears on its own layer.
Rather than manually exporting each layer as its own file, you can click the Edit in Photoshop button in the Tools palette. This moves the file from ImageReady into Photoshop. This means you can use the File > Scripts > Export Layers To Files command to quickly generate as many individual Photoshop documents as you want.
This technique can be used on any type of QuickTime movie.
Flash on the Web
A few years back you couldn’t go anywhere on the web without running into Flash. Web designers were given the instruction to “create a Flash web site” — even if there was no good reason to use it. It was as if just having the Flash technology was more important than the information it contained.
Fortunately things have calmed down, and these days Flash technology is being used appropriately. We are excited to see what will happen now that Flash is part of Adobe (see “Flash versus PDF: Who’s the Winner?” below).
Misconceptions about Flash
Flash has gotten a bum rap in recent years. People associate Flash with loud animations that pop up uninvited when you enter a web site. While it is certainly true that Flash can create those types of animations, it is also a terrific tool for creating rich, interactive content. There are quite a few misconceptions that people have about Flash files. Here’s our chance to debunk them.
• What you see on the web is a Flash file or Flash movie. No. Strictly speaking, what you view on the web is a SWF file. Flash (.fla) is the native file format of the Macromedia Flash application. (This name will change at some point to Adobe Flash.) You must export your Flash file as a SWF in order to have others view it on the web.
• You must use the Macromedia Flash application to create Flash files. Not true. There are a host of applications — including Illustrator and ImageReady, which we’ll cover here — that can create Flash movies.
• You must download the Flash plug-in in order to view the SWF. Well, that’s somewhat true. The person opening the SWF file does need the Flash plug-in in order to play the SWF. But most of the current browsers ship with that plug-in already installed. It’s only when a new version of the Flash plug-in comes out that people may need to download the viewer.
• Flash files are much smaller than ordinary files. Compared to what? Compared to the equivalent GIF animation, Flash files are much smaller. But if you fill a Flash movie with tons of pixel images and QuickTime movies, you’re going to create a large file.
Creating Flash Files and Movies
There are quite a few options in the Creative Suite applications for creating static Flash files as well as Flash movies. When we talk about static Flash files we mean a document that has only one page. A static Flash file can also refer to a multi-page document if it doesn’t automatically jump from one web page to another. Flash movies jump from one frame to another to create an animation. Flash movies can also have sound and QuickTime movies inside the pages.
Illustrator is our program of choice for creating static Flash files as well as Flash movies. In this section we’ll discuss two different methods for creating SWF files from Illustrator — both good, one richer than the other — and we won’t completely leave out GoLive either.
Save For Web as SWF
The simple, convenient method for saving an Illustrator document as a SWF file is by using the Save For Web dialog box (Figure 17-18). These are the settings you can choose:
• AI File To SWF File exports the artwork to a single frame. Use this setting if want to open the artwork in Macromedia Flash or if you do not want to animate the artwork.
• Layers To SWF Frames exports the artwork on each layer to a separate SWF frame. This creates an animated SWF.
• Compression compacts the file to its smallest possible size. Do not choose this option if you want to use the artwork in the Macromedia Flash application.
• Protect File keeps users from downloading or modifying the exported SWF file. This is another reason why the SWF format has gained popularity: SWF files can’t be pirated by others who view your site.
• Text As Outlines converts the text into paths so the viewers do not need to have those fonts installed on their machines.
• Loop sets the animation to play continuously instead of just once. This setting is available only if you have chosen Layers To SWF Frames.
• Curve Quality sets the quality of curves. A low number decreases the exported file size but will make curves look slightly chunky. A higher number increases creates a larger file size but makes the curves look better.
• Frame Rate sets the rate (in frames per second) at which the animation plays in the Flash player.
Figure 17-18. SWF settings in the Save For Web dialog box in Illustrator.
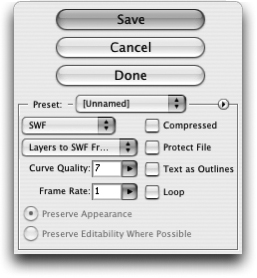
If you have selected AI File to SWF File, you have additional options for how the artwork should export:
• Preserve Appearance expands any strokes into fills and flattens any blending modes and transparency settings that aren’t supported by the SWF format.
• Preserve Editability Where Possible converts the Illustrator strokes to SWF strokes, and approximates or ignores transparency that isn’t supported by the SWF format.
Export as SWF in Illustrator
The Save For Web dialog box method, discussed above, is fine for simple files that can be exported without any further enhancements. But there’s another Illustrator feature — the Export As Macromedia Flash (SWF) command — that’s a powerhouse when it comes to creating rich Flash files.
To take advantage of the abilities of this export process, as you work in Illustrator, be sure to set up your document with layers for each frame of the Flash animation. In addition to the layers, however, you can apply blends that can be set to be animations in the finished SWF file. Figures 17-19 and 17-20 show the arrangement of layers and export settings for a Flash animation.
Figure 17-19. Arrangement of Illustrator artwork to create a Flash animation.

Figure 17-20. Macromedia Flash (SWF) Format Options dialog box set for the animation options.
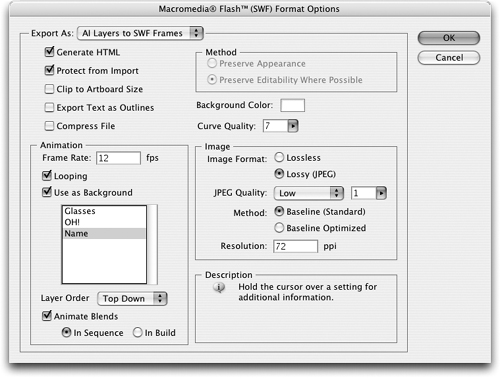
As you work, remember that some layers can be set as background layers that remain visible throughout the animation. Although they are called background layers, they do not have to be below the other layers in the artwork. In Figure 17-19, the Name layer is on top of the other layers. Then, in the final export options shown in Figure 17-20, the layer has been set to Use As Background. This keeps that layer visible as the rest of the animation plays.
Choose File > Export, and then choose Macromedia Flash (swf). This opens the Macromedia Flash (SWF) Format Options dialog box. Most of the settings in this dialog box are the same as the ones in the Save For Web dialog box, but as you might expect, you’ll find a few new ones:
• AI Layers To SWF Files exports the art in each Illustrator layer to a separate Flash file. Use this option if you would like to import the Illustrator artwork into the Macromedia Flash application.
• Generate HTML creates an HTML file that contains the code necessary to play the Flash file in a browser. You can copy and paste this code into your GoLive or Dreamweaver layouts.
• Clip To Artboard Size exports the file as the size of the Illustrator artboard page. With this open unchecked, the file is the size of the bounding box that contains the artwork.
• Background Color lets you assign a color to go behind the artwork. The default is white.
The Animation section controls are active only for the AI Layers To SWF Frames setting:
• Use As Background allows you to designate layers that will be visible throughout the animation. Check the option and then Shift-click to select as many of the named layers as desired.
• Layer Order can be set to Top Down or Bottom Up. This sets which layer should start the animation.
• Animate Blends can be turned on or off. If you turn it on, you can then choose In Sequence or In Build. In Sequence displays an element of the blend, and then removes it to display the next element. In Build displays an element of the blend, and then adds the next element in the blend to the display.
If you have any pixel images in the Illustrator artwork, or have applied any transparency or effects that will create pixel images, you can control the appearance of those pixel images in the Image section:
• Image Format lets you compress the images so the final SWF file is smaller. The Lossless setting uses a ZLIB compression that does not change the quality of the image. However, this creates a larger file than the Lossy (JPEG) setting.
• JPEG Quality sets the level of compression for the final image. If you have small shadows on artwork that is quickly moving around, you can get away with a very low quality. Increase the quality if you need a better appearance for people’s photos.
• Method specifies the type of JPEG compression: Baseline Standard or Baseline Optimized. Baseline Optimized applies additional optimization creating a smaller file. Really old web browsers didn’t support Baseline Optimized, but today there are few problems using this format.
• Resolution lets you choose the resolution for the images. If you expect your viewers to zoom in on the Flash images, you may want to set this number higher than the screen resolution of 72 ppi. You can set the resolution up to 2400 ppi.
Creating SWF files in GoLive
You don’t have to export Flash movies in Illustrator. Just bring the Illustrator file into GoLive as a Smart Object (see Chapter 9, “Smart Objects and Intelligent Layouts”). When you choose the Illustrator file, the Conversion Settings dialog box appears (Figure 17-21). Choose SWF from the format list. This opens up the exact same Macromedia Flash (SWF) Format Options dialog box shown in Figure 17-20. Set the export, appearance, and animation options as described in the previous section.
Figure 17-21. Conversion Settings dialog box in GoLive allows you to choose the format for Smart Illustrator artwork.

Quick Web Pages from Photoshop
You may have gotten the idea by now that we’re keen on automation and letting the software do the grunt work for us. The Web Photo Gallery (WPG) feature is one of the best-hidden secrets in Photoshop, and also one of our nominees for “most helpful automation tool for busy (or is that lazy?) professionals.” With just a few clicks in a series of dialog boxes, you can create sophisticated, interactive web pages complete with navigational elements and feedback forms. It’s the perfect solution for times when we need to get a whole mess of images up on the web quickly. Sandee uses it to quickly process a memory card’s worth of images from her camera into a series of web pages that can be reviewed by her clients. Even better, she can get feedback on the pages from people viewing the pages — all without her learning a single line of code!
Web Photo Gallery
To process a folder of images in Photoshop, choose File > Automate > Web Photo Gallery. To select specific images, go to Bridge and select the files you want to process. Then, from the Bridge menu, choose Tools > Photoshop > Web Photo Gallery. The Web Photo Gallery dialog box opens (Figure 17-22). Set the following options for the entire gallery:
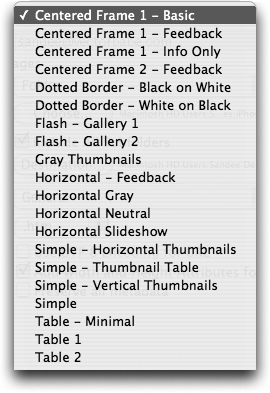
• Styles. Use the Styles menu (Figure 17-23) to choose the appearance of and features for the web pages. As you choose each style from the menu, a preview appears on the right of the dialog box. Some of the styles have additional features. The word Feedback next to the name of a style indicates that the web page has forms where viewers can comment on the image. The word Flash indicates that the page uses Flash technology to create automatic displays of the images. You can also add music as part of these Flash displays.
Figure 17-22. The six sections of the Web Photo Gallery dialog box.
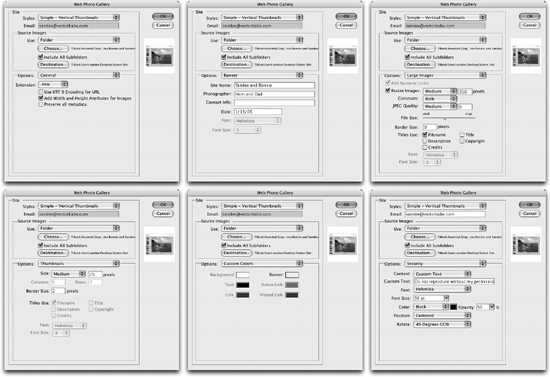
Figure 17-23. Styles menu for the Web Photo Gallery.
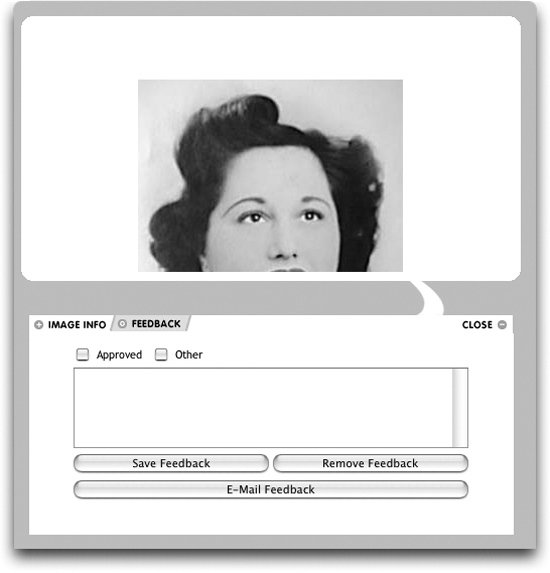
• Email. Use this field to enter the email address where you want feedback on the images to be sent. Figure 17-24 shows an example of the feedback area in the web photo gallery.
Figure 17-24. The feedback area allows visitors to add comments and send email feedback about each image in the Web Photo Gallery.
• Source Images. You can choose a folder containing the images or selected images from Bridge. Click the Destination button to set the folder where you want the web images to be located.
And then go into the following six panels and customize your settings there as well:
• General Options. This menu controls the extension for the web pages, encoding, width and height of the images, and the choice to preserve metadata of the images.
• Banner Options. Use the banner fields to insert the information that will be applied to the web pages. Not all template styles will use all the fields in the Banner options.
• Large Images Options. Set the size for the main images in the gallery and choose what information should be printed as the image titles.
• Thumbnail Options. Set the options for the navigational thumbnails.
• Custom Colors Options. Use these controls to customize the colors for the background, banner, text, and links.
• Security Options. You can apply a watermark of custom text, or the information stored in the metadata for the image. For instance, if you have copyright information for the images, you can set that to be automatically applied across each image.
Publishing the Web Photo Gallery
The final step in creating your web photo gallery is publishing the files to your web server.
We often use FTP (file transfer protocol) applications — such as Fetch on the Macintosh — when we exchange files with each other. But for publishing files for a web site that needs to be updated, you may find Adobe GoLive is a better choice.
You can publish web files directly from Adobe GoLive using the Publish Server tab in the site window or the file browser. Simply upload the web photo gallery folder to your server. All the necessary files are contained within that folder.
The major advantage of using GoLive for web publishing is that GoLive keeps track of any files you have added or modified, and takes care of the synchronization accordingly.
Layer Comps to WPG
As simple as it is to publish a web photo gallery from a folder of images, it is just as simple to create a web photo gallery from the layer comps in a Photoshop file. (See “Layer Comps” in Chapter 12, “The Flexibility of Layers,” for more information on working with layer comps.) The web photo gallery templates with the feedback forms are exceptionally useful if you want to have clients review your layer comps and send you their comments.
Open the file that has the layer comps, and then choose File > Automate > Layer Comps To WPG (Figure 17-25). Use the Browse button to choose the folder where the finished web pages should be placed. Use the Style field to type the name of the style of the web photo gallery that you want to use. (Yes, you have to manually write down the exact name of the style from the Web Photo Gallery dialog box, and then type it into the field. It’s horribly primitive, but we think you can handle it.) Finally, choose Selected Layer Comps Only if you want to publish only certain layer comps.
Figure 17-25. Layer Comps To WPG dialog box in Photoshop.

When you’ve set all your options, click Run. The script runs and creates the web photo gallery. Once you have created the folder, you can publish it using GoLive, as described in the previous section.
Mobile Devices and SVG
We bet you spend a lot of time in front of your computer. But we also bet that you spend as much — if not more — time with your cell phone. You may not be on the cell phone all the time, but we know you’ve got it with you a lot.
Sandee’s cell phone has all the bells and whistles she can load onto it. She can view the web, check email, take pictures and video, send those pictures and videos, check her calendar, send Instant Messages, play games, and even talk to friends. In fact, her phone isn’t really a cell phone. It falls under the category of a mobile device. The future of web information is not necessarily computers. It’s mobile devices such as phones, organizers, and pagers. And in that future, you’ll use the tools in Creative Suite to create graphics especially for mobile devices.
At the moment, there is no specific format or standard for graphics on mobile devices, but those graphics need to be very small. Flash (SWF) is a well-known, compact format. A lesser-known format, SVG (scalable vector graphics), also offers a great deal of promise for the future of mobile devices.
Creating SVG Files
You can create SVG files in either Illustrator or InDesign. Because the files are based on a vector format, they are smaller than bitmapped images. And, as the name suggests, they can be scaled up or down to fit many different-sized screens.
There are two ways to create SVG graphics in Illustrator. You can choose a Save option, or you can use the Save For Web dialog box. You can create SVG files from InDesign using File > Export. Each of these options is shown in Figure 17-26.
Figure 17-26. Creating SVG files: Illustrator SVG Options (left), Illustrator Save For Web controls (middle), and InDesign SVG Options (right).

Because there are so many variables for SVG files, you need to consult with the webmaster for your web site as to which options you should choose.
Looking to the Future
With the acquisition of Macromedia, there are many questions as to the future of the Creative Suite applications. We’ve already seen the Adobe Design Bundle, which combines Adobe Creative Suite 2 Premium software with Macromedia Flash Professional 8 software, in addition to the Adobe Web Bundle, which offers Macromedia Studio 8 together with the Adobe Creative Suite 2 Premium.
At this early stage after the acquisition, there is little integration in how the products work together. However, we have no doubt that there will be more features such as Smart Objects and Save For Web that will combine the applications into more powerful products.