Chapter 14. Creating and Using PDF Files
Adobe PDF (Portable Document Format) files are everywhere! Widely posted on the web for downloading, distributed on countless CDs (as electronic manuals for most of the software we buy, for example) — even used as the official format for downloading U.S. tax forms from the Internal Revenue Service — PDF files are now the standard electronic method for submitting drug approvals to the U.S. Food and Drug Administration and for filing cases in U.S. federal courts. More than 500 million people to date have received the free Adobe Reader software from Adobe for viewing PDF files.
PDF was developed by Adobe Systems as a way to view files on any computer platform, regardless of the software that created them — hence the word “portable” in the name. You can create a PDF file on the Windows platform, for example, and view it equally well on a Macintosh computer or even a handheld device — even if you don’t have the original application or the fonts that were used to create the file.
Because PDF files preserve the look and integrity of the original document, it’s usually the format of choice for creative professionals who want to send proofs to clients. Increasingly, commercial printers are accepting, and even encouraging their clients to submit, jobs in PDF for printing.
In this chapter, we’ll show you how PDF files can be created for many purposes, and how they can solve many graphic-production problems. The Adobe Creative Suite 2 applications are especially designed to customize creation of PDF files the way you need them, and also to import them the way you need them. Acrobat 7.0 Professional — included in the Premium Edition of Creative Suite — gives you powerful features for editing and working with PDF files.
We’ll show you how you can master creating and using PDF files, including the following:
• Using the new common interface in the Adobe Creative Suite 2 applications to create PDF files.
• Creating PDF files from non-Adobe applications using the Acrobat Distiller utility, included with Acrobat 7.0.
• Making use of Acrobat 7.0 to view, navigate, search, create, and repurpose PDF files.
• Editing raster images, graphics, text, and pages within a PDF file.
• Collaborating with your colleagues via PDF files, including creating review cycles.
• Developing enhanced features in PDF files in the CS2 applications, such as bookmarks, hyperlinks, and embedded movies or sounds.
• Using PDF files in CS2 applications, and exporting other formats from PDF files.
We’ll also suggest best practices for creating PDF files for particular purposes and alert you to how PDF files can get created incorrectly.
About PDF and Acrobat
It’s very common for users of the free Adobe Reader software to think that they have a copy of the Adobe Acrobat application. Acrobat is actually a family of software applications for creating, editing, and otherwise manipulating PDF files. PDF stores a document’s information and content — including its raster images, vector objects, and text — in a compact, platform-, application-, and usually, font-independent form. (Font-independent means that you don’t have to own a copy of the font that was used to create the document; it’s included in the PDF file. For comparison, think of receiving a Word document that was created using a font you don’t have….)
Here we discuss some basic concepts for working with PDF files, including distinctions among the various applications in the Acrobat family.
The Acrobat Family
The family of Adobe Acrobat software consists of four primary applications:
• Adobe Reader 7.0 (formerly known as Acrobat Reader) is a free application that can be downloaded from the Adobe web site (http://www.adobe.com). It is used for viewing, navigating, and printing PDF files. Adobe Reader cannot be used to edit or save a PDF. Later in this chapter, we’ll describe how Reader can be enabled to participate in an email-based review.
• Acrobat 7.0 Professional is a full-featured software product that can be purchased by itself or as part of Adobe Creative Suite 2 Premium Edition. It is a PDF viewer and editing application with a huge number of features for working with PDF files, including modifying them and their component objects; searching and repurposing PDF files; scanning and OCR conversion; adding comments; applying security settings; adding enhancements like links, actions, forms, and multimedia; and using advanced printing features.
• Acrobat 7.0 Standard shares some of the features of Acrobat 7.0 Professional, but lacks many of those most useful to creative professionals — for example, preflighting and correcting PDF files.
• Acrobat Distiller is a separate application included with Acrobat 7.0 Professional and Acrobat 7.0 Standard. Its function is to convert Adobe PostScript files into PDF files.
Figure 14-1. The Adobe Reader 7.0 application, used for viewing, navigating, and printing PDF files, can be downloaded free from the Adobe web site.

Adobe has also developed some additional members of the Acrobat family — such as Acrobat Elements and Adobe LifeCycle server products — for specialized markets. For more information, go to http://www.adobe.com/products/acrobat/main.html.
PDF Versions
PDF is not a static format. PDF and its specification have continued to evolve with each new Acrobat release to reflect new features. When you’re creating a PDF file, it’s important to save it with the correct compatibility for the features you want to include, and for how the file will be used (its destination). For more information, including a table comparing PDF versions, see “Setting Appropriate Compatibility” later in this chapter.
One File Doesn’t Fit All
Using Acrobat 7.0 Professional, you can create PDF files in a range of file sizes and with added elements. What’s important to keep in mind is that one size does not fit all uses.
PDF files can range from fat to thin and everywhere in between, because they can be created and used for myriad purposes: PDF files created for print can get huge if they contain high-resolution images, with fonts fully embedded. Others, for online viewing and quick downloading from the Internet or an intranet, are made as small as possible. Still others, appropriate for an eBook (electronic book) or printing on a desktop printer, can be medium-sized.
In addition, extra elements can be added to a PDF document — for example, bookmarks, links, or digital media to provide interactivity; comments as part of a review cycle; or security for a highly sensitive project. At other times, these extra elements need to be stripped out, such as when the file must be sent off to the printer.
If you want to use a PDF file for other than its original purpose, you may need to create a new version or repurpose an old one. For example, printing a small, low-resolution PDF file from the web may produce pixelated, low-resolution images and font substitutions. On the other hand, posting a multi-megabyte monster PDF file intended for print on your web site will only frustrate viewers, and they’ll probably choose not to look at it at all. (We discuss how to repurpose a file with the PDF Optimizer tool in “Acrobat 7.0 Professional Features.”)
Creating PDF Files in Creative Suite Applications
More than any other programs, the Adobe Creative Suite 2 applications are optimized from the get-go to make good PDF files. The CS2 applications use built-in core technologies that ensure consistency and reliability (as we describe in “Core Technologies That Bind” in Chapter 7, “Managing and Customizing the Interface”). One of these core technologies is the PDF Library, which manages the creation, rendering and display, editing, conversion, and printing capabilities of PDF files.
There are two primary ways to create PDF files from the Creative Suite applications. You can directly export a PDF file using the application’s Export or Save As command, applying settings to configure the PDF file as desired. The second, more traditional approach is still favored by some print service providers: In all the CS2 applications, you can create a PostScript file from the Print dialog box; then you process the PostScript file with Acrobat Distiller to create the PDF file. (For information on creating PDF files from Acrobat 7.0 Professional, see the following section, “Converting Files, Scans, and Web Pages to PDF.”)
We wholeheartedly recommend that, almost always, you should use the direct export method of creating PDF files. Using the PDF Library core technology, the direct export method is more efficient than the two-step Distiller process, can include all the PDF elements that PostScript can’t, and creates a clean, device-independent PDF file.
Directly Exporting PDF Files
New with the CS2 applications, the interface for creating PDF files is unified among the applications. Use any of these methods to export a PDF file:
• In InDesign, choose File > Export. Choose Adobe PDF from the Format menu, and click Save. You’ll see the Export Adobe PDF dialog box (Figure 14-2, top left).
Figure 14-2. The Adobe PDF export dialog boxes in InDesign (top left), Illustrator (top right), and GoLive (bottom) share a similar interface.

• In Illustrator, choose File > Save As. Choose Adobe PDF (pdf) from the Format menu, and click Save. You’ll see the Save Adobe PDF dialog box (Figure 14-2, top right).
• In Photoshop, choose File > Save As. Choose Photoshop PDF from the Format menu, and click Save. (See Figure 4-33 in Chapter 4, “Pixels and Raster File Formats.”)
• In GoLive, first click the PDF Preview button at the top of the window to view your web page. Then choose File > Export > HTML As Adobe PDF. The Export Adobe PDF dialog box appears (Figure 14-2, bottom).
Options differ somewhat between applications. For example, in InDesign you can choose a page range and create a PDF file from a spread — options that don’t make sense in Illustrator, Photoshop, or GoLive.
Using PDF Presets for Specific Output
All the CS2 applications share common PDF creation settings files, called presets. A preset is a predefined collection of settings based on best practices for specific output, such as Smallest File Size for posting on the web or Press Quality for high-end printing. You can apply them with one click. Not only do these presets work when directly exporting from InDesign, Illustrator, Photoshop, and GoLive, but these are the very same presets used in Acrobat Distiller 7.0 when processing PostScript files from Adobe and non-Adobe applications. (In fact, they’re based on the Acrobat Distiller .joboptions file format, the most widely used and accepted PDF creation settings format. Distiller refers to them as settings files. We discuss them in the following section, “PDF and Non-Adobe Applications.”)
In each of the applications, just choose a preset from the Adobe PDF Preset menu at the top of the Export or Save As dialog box.
All the CS2 applications except GoLive CS2 share five presets — High Quality Print, Press, Smallest File, and two PDF/X standards for the “blind transfer” of files to publications like magazines and newspapers. Some additional presets are optimized for particular applications. (You can also customize your presets; see the following section, “Creating Custom Presets.”)
• High Quality Print: Use this preset to create a PDF document for high-quality printing on desktop printers and proofers. Color and grayscale images are downsampled to 300 ppi. Colors are left unchanged (not converted to another color space). Transparency is retained (Acrobat 5 compatibility is the default — see the “Setting Appropriate Compatibility” section below).
• Press Quality: Use this preset for high-quality commercial printing. Color and grayscale images are downsampled to 300 ppi. RGB colors are converted to CMYK; CMYK values are unchanged. Transparency is retained (Acrobat 5 compatibility is the default). (See also the “Working with a Print Service Provider” section in Chapter 16, “Preflighting and Printing,” for more information about preparing files for print.)
• Smallest File Size: Use this preset for onscreen display, email, and the web. Color images are downsampled to 100 ppi, grayscale images to 150 ppi. Color is converted to sRGB. Transparency is retained (Acrobat 5 compatibility is the default).
• PDF/X-1a:2001 and PDF/X-3:2002: Choose one of these presets for the “blind exchange” of final print-ready PDF files and to reduce common errors in a document, such as missing fonts and images or incorrect color spaces. Transparency must be flattened. For details, see the sidebar, “The PDF/X Standards.”
• Standard (Distiller only): Similar to High Quality Print, this preset converts colors to sRGB and downsamples images to 150 ppi.
• PDF/A (Distiller only): This preset supports the draft ISO standard for long-term preservation (archiving) of electronic documents.
• Illustrator Default (Illustrator only): Use this preset when you plan to edit the file again in Illustrator, or place it in an application like InDesign, when the final use of the PDF file is unknown.
• GoLive Default (GoLive only): Use this preset to include PDF documents with embedded movies, layers, and interactive elements such as hyperlinks, forms, and rollovers.
• Mobile PDF (GoLive only): Use this preset to create PDF documents optimized for hand-held, mobile devices.
Table 14-1 shows the default PDF presets that are in each application.
Table 14-1. PDF Presets in Creative Suite Applications

Distilling PostScript Files into PDF
The second method for creating PDF files is more traditional and still favored by some print service providers. In this workflow, you first create a PostScript file using the Print dialog box in any CS2 application, and then process the PostScript file with Acrobat Distiller to create the PDF file.
Tip: One-Step Distilling with the Adobe PDF 7.0 Printer
You’ll probably find it’s easier to create a PDF file using the Adobe PDF printer driver (installed with Acrobat 7.0) than to create a PostScript file and process it through Distiller: Just select Adobe PDF 7.0 as the printer, choose your settings, and print. This creates the PDF file using Distiller in the background. For details, see the next section.
Because PostScript is an older technology than PDF, PostScript can’t support many features — notably, transparency, layers, tagged PDF (PDF containing document structural information, useful for a screen reader application, for example), and interactive elements like bookmarks and hyperlinks — to name but a few. Also, because it’s usually tied to printing to a specific printer, the document’s PostScript code sometimes is printer-specific: Halftone information or page sizes may be included when the PostScript file is created.
Until the arrival of InDesign CS2 and Illustrator CS2, some service providers learned to use the Distiller route for a very practical reason. With earlier versions of these applications, directly exported PDF files sometimes would fail to output on older PostScript RIPs (raster image processors), and would generate PostScript errors because of font problems. This is now changed, and there are few reasons anymore to use the Distiller method with the CS2 applications (see the sidebar “Good News About Embedded Fonts and Older Raster Image Processors”).
PDF and Non-Adobe Applications
In addition to working in Adobe Creative Suite, we often work with other applications — Microsoft Office applications like Word, Excel, or PowerPoint; other layout applications like QuarkXPress or PageMaker; and so on — and PDF files generated from them. You can create PDF files from these applications, using Acrobat Distiller or the Adobe PDF 7.0 printer driver, and you can receive them from colleagues who are using these applications.
Here’s how you can easily use Creative Suite to create and handle PDF files from these applications:
• Use the Adobe PDF 7.0 printer driver on your computer to print to PDF files in one step from any application on your computer. The printer driver is installed when Acrobat (either the Professional or Standard version) is installed. On either Macintosh or Windows, this printer shows up in the list of printers in the Print dialog box of any application. Figure 14-3 shows the Adobe PDF printer and its choices on the Macintosh. Figure 14-4 shows the options for the Adobe PDF printer in Windows. When printing, the Adobe PDF printer uses Distiller in the background. About the only reason we’ve found for using Distiller by itself is that you can use it to create watched folders (see the following section, “Acrobat Distiller Tips”).
Figure 14-3. Exporting to PDF from Microsoft Word on the Macintosh using the Adobe PDF 7.0 printer includes PDF Options (left); the PDF Options allow you to select PDF settings (right).
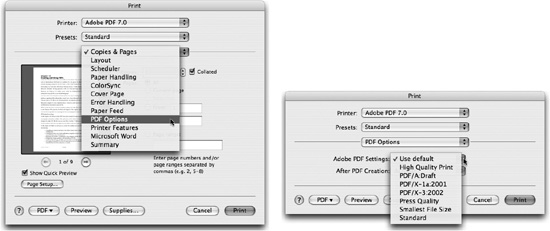
Figure 14-4. In the Windows Print dialog box, Adobe PDF appears as a printer (left). Click Properties to choose from the Default Settings preset files (right).

• Use Acrobat Distiller to convert a PostScript file from any application into a PDF file. Acrobat Distiller is automatically installed by Acrobat 7.0 Professional (included in the Premium Edition of Adobe Creative Suite 2). You can use the very same PDF presets (here called settings files) described in “Using PDF Presets for Specific Output.” We’ll give you some Distiller tips later in this section.
• If you have received PDF files that weren’t created correctly for your intended output, use Acrobat 7.0 Professional as needed to preflight and correct them. (For more information, see “Preflighting, Correcting, and Printing PDF Files” in Chapter 16, “Preflighting and Printing.”)
Working with PostScript and PDF Files
You may understandably be confused about the difference between PostScript and PDF files. Both of these file formats contain a description of the page elements — raster images, vector graphics, and type — in a document created in a particular application. So how do they differ?
PostScript Files
An older file format, PostScript is a page-description and programming language designed to control printers. PostScript code can be sent to different kinds of printers, and each will render it with the resolution, colors, and other features that are available on that device. The size of a PostScript file is usually larger than the original document it describes, because the graphics and fonts are embedded.
PostScript is sent in a stream to the raster image processor, or RIP, of a PostScript printer. The RIP interprets the code (parsing each instruction and carrying it out), rasterizes the code at the resolution of the printer, and finally images it. PostScript code is sequential, like the tape on a tape recorder; to get to a particular page, you have to “wind through” all the pages of PostScript code.
PDF Files
A PDF file contains the same images, graphics, and text as would a PostScript file, but stores them as an indexed database. It has references at the beginning of the file as to where each page begins. It’s got random access, like your computer’s hard drive (which is why you can jump to a particular page in a large PDF file very quickly).
PDF is usually more compact than PostScript because images can be compressed. Fonts can either be embedded or subsetted (described in the “Best Practices for Creating PDF Files” section below). PDF is more reliably constructed than PostScript (hence, with PDF you usually don’t get a message like a PostScript error). PDF also includes a navigation object layer — bookmarks, thumbnails, and links are stored separately from the page they reference. PDF files also support “new-fangled” stuff like layers, transparency, structured PDF, security, and so on, which PostScript can’t describe.
Creating PostScript Files
It’s beyond the scope of this book to tell you how to create PostScript files in your non-Adobe applications. In general, both Mac OS X and Windows 2000 and XP (the operating systems under which the CS2 applications run) can reliably create PostScript files that match how they would print to a PostScript printer.
Tip: Take Care with PDF Files Created Using Mac OS X
Mac OS X comes with the ability to create PDF files of its own. You can see this feature in the PDF menu at the bottom of Figure 14-3. (If you’re running version 10.3, you won’t see this menu, but just a PDF button.) Be aware that this method may work well for creating PDF files from simple applications such as a web browser or email software, but it’s not a good choice when working with graphics applications.
Acrobat Distiller Tips
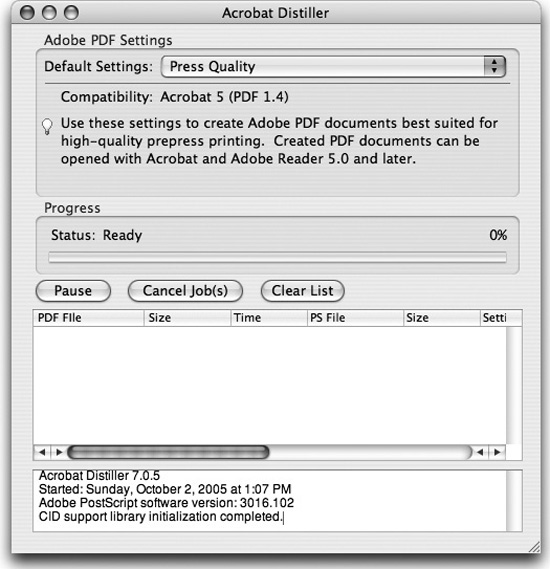
Of all the applications that are part of Adobe Creative Suite, Acrobat Distiller is probably the plainest and the most simply functional (Figure 14-5). All it does is convert PostScript files to PDF files. No fancy palettes here. Just the facts, ma’am!
Figure 14-5. The no-nonsense Acrobat Distiller window. Drag PostScript files into the window to convert them to PDF files.
Perhaps the most sophisticated function of Distiller is its ability to batch-process and “watch” folders, moving processed PDF files to an Out folder. This feature is available only with Acrobat 7.0 Professional (included in the CS2 Premium Edition).
Here are a few basic Distiller functions:
• To process a PostScript file, choose File > Open in Distiller, or simply drag the file anywhere onto the Distiller window. Distiller can batch-process multiple files, and it will display progress and a queue of the files it’s processing.
• To add a new settings (PDF preset) file, choose Settings > Add Adobe PDF Settings. You can also drag a settings file to the Distiller window, or just double-click the settings file to add it.
• To remove a settings file, choose Settings > Remove Adobe PDF Settings.
• (Acrobat 7.0 Professional only) To create drop folders onto which you can drop PostScript files for Distiller to process, choose Settings > Watched Folders. Each folder can have its own associated settings file; for example, one folder could be to create press-ready files and another to create web-ready files. Distiller watches the folders, begins processing a PostScript file when it’s dragged in, and, when processing is complete, moves the PDF file to an Out folder.
Best Practices for Creating PDF Files
Most people who create PDF files never get beyond the basics. In fact, they don’t need to, because Creative Suite applications provide PDF presets (settings files) that do all the heavy lifting. But if you spend a lot of time working with PDF files, it’s helpful to learn a few “best practices” for customizing your PDF files and PDF presets and really mastering PDF file creation. These best practices include choosing the most appropriate compatibility settings for the intended output, compressing files, deciding when to embed fonts, and handling color.
In this chapter, we can focus only on a few key issues. For more details, we recommend looking at two Adobe white papers — Adobe InDesign CS2 Printing Guide for Prepress Service Providers and Adobe Acrobat 7.0 Printing Guide, both found on the Creative Suite installation CDs (see “The Extras” section in Chapter 1 for the location).
Setting Appropriate Compatibility
The Compatibility options control which versions of Acrobat viewers can open PDF files as well as support for such features as transparency, layers, the blind exchange of print-ready files, and encrypting documents for security. (See Table 14-2 for more information.)
Table 14-2. Acrobat and PDF Compatible Features

These options are available when directly exporting PDF files from InDesign, Illustrator, Photoshop, and GoLive (which we’ll refer to as “the CS2 applications” in this section); and in Distiller. Choose from these options in the Compatibility pop-up menu:
• In the CS2 applications, in the Export Adobe PDF dialog box (see Figure 14-2), choose Acrobat 4, 5, 6, or 7 from the Compatibility menu.
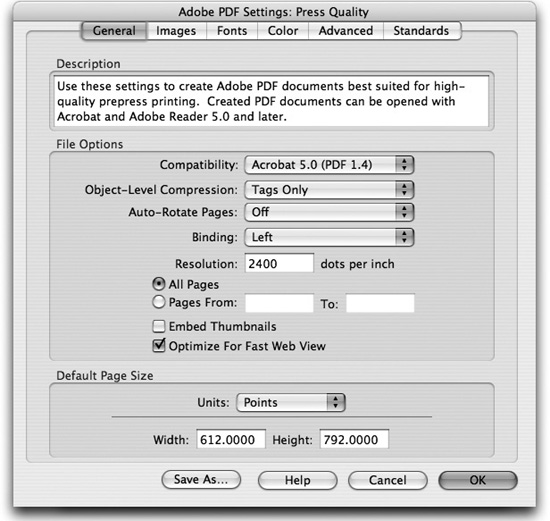
• In Distiller, after choosing to edit a settings file (choose Settings > Edit Adobe PDF Settings), click the General panel and choose Acrobat 3.0, 4.0, 5.0, 6.0, or 7.0 from the Compatibility menu (Figure 14-6).
Figure 14-6. Set Compatibility for Distiller in the General panel.
Here are some general recommendations for setting compatibility:
• To retain transparency in a file, choose Acrobat 5.0, 6.0, or 7.0 compatibility.
• To flatten transparency, choose Acrobat 3.0 or 4.0 compatibility.
• To retain layers created in Illustrator and InDesign, choose Acrobat 6.0 or 7.0 compatibility.
• To create PDF files for a sophisticated audience of graphic professionals (who likely keep their version of Acrobat or Reader up-to-date), choose Acrobat 6.0 or 7.0.
• To create PDF files for the widest possible audience, save with Acrobat 4.0 or 5.0 compatibility.
Downsampling and Compressing Files
Downsampling and compressing a PDF file can significantly reduce its size with little or no loss of detail, and can speed downloading. (Downsampling means reducing the resolution of an image.) To customize downsampling or compression, in the CS2 applications, use the Compression panel of the Export Adobe PDF dialog box; in Distiller, use the Images panel (Figure 14-7).
Figure 14-7. Resolution and compression settings in CS2 applications (left, showing InDesign) and in Distiller (right).

Two kinds of compression — lossy (JPEG) and lossless (usually ZIP) — can be applied to images in PDF files. Lossy compression will degrade quality somewhat, especially at low quality settings, but may not noticeably affect quality at higher settings. Choose Maximum or High Image Quality for press or print. For an important project, do visual tests to see what works best for your intended result.
Always determine resolution according to the intended use of the PDF file: For commercial printing, usually downsample images to 300 ppi. For best results for desktop printing, use a downsampling value between 150 and 200 ppi. For onscreen or web images, use a range between 72 and 100 ppi.
Embedding Fonts
Given the choice, it’s almost always a good idea to embed fonts. That way, anyone viewing the PDF file, regardless of their platform and whether they have the original font, will be able to see it, and print it, exactly as you would.
Choosing to Embed Fonts
You can choose how fonts in a PDF file are handled in CS2 applications using the Advanced panel, and in Acrobat Distiller using the Fonts panel (Figure 14-8). In the CS2 applications, fonts are always embedded. In Distiller, to embed fonts, check the Embed All Fonts option.
Figure 14-8. Set PDF font options in a CS2 application in the Advanced panel (left, showing InDesign), and in Distiller in the Fonts panel (right).

Tip: Detect Embedding Restrictions
Some fonts can be restricted by their font foundry to prevent embedding, editing, or both. InDesign can identify those using its Preflight feature. Distiller will show an error in its message log when a font cannot be embedded.
Tip: Embed Fonts in the PostScript File Before Distilling
If you’re creating your own PostScript files, be sure to choose the option in your printer driver or application to embed the fonts in the PostScript file. It’s impossible for Distiller to embed the fonts in the PDF file from the converted PostScript file if it can’t find them!
Subsetting Fonts
Whether to create a subset of fonts can be a complex decision. Subsetting stores only the characters actually used in the PDF file, not all the glyphs in the font. Subsetting has two purposes: To keep the file size down, and, more importantly, to prevent font substitution when a file is printed on another system. Subsetting is generally a good idea.
Distiller can specify a threshold percentage below which it embeds only a subset of the fonts (using the Subset Embedded Fonts When Percent Of Characters Used Is Less Than option). For example, with a threshold value of 35, if more than 35% of the characters are used, Distiller embeds the entire font. To ensure that Distiller subsets all fonts, enter a value of 100%.
In the CS2 applications, an equivalent option (in the Advanced panel of the Export Adobe PDF dialog box) defaults to subsetting at 100%. To turn off subsetting, set the threshold to 0%.
For some special fonts, such as dingbats or pi characters, Distiller may fully embed the font regardless of the subset value entered, to ensure that the proper characters are used when the PDF file is viewed and printed.
Handling Colors in a PDF File
The color settings for working with PDF files are quite complex. They specify how to represent color information in the exported or distilled Adobe PDF file. For example, if the original file used a mixture of RGB and CMYK objects, the color settings can control how the RGB objects are converted to CMYK upon export. All spot-color information is preserved during color conversion; only the process-color equivalents are converted to the designated color space.
We recommend that you read Chapter 10, “Color and Color Management,” for an overview of color issues in the CS2 applications. The most important settings are Color Conversion in the CS2 applications and Color Management Policies in Distiller (Figure 14-9).
Figure 14-9. Choose color settings when creating PDF files in the CS2 applications Output panel (left, showing InDesign) or in the Distiller Color panel (right).

In the CS2 applications, you have three options for color conversion:
• No Color Conversion will retain the color spaces of objects in the document, without conversion.
• Convert To Destination will convert objects with embedded profiles from their source profiles to the destination profile, and objects without profiles from the document working space to the destination profile. This option can be useful for converting RGB images as you export to PDF.
• Convert To Destination (Preserve Numbers) will convert objects with embedded profiles from their source profiles to the destination profile. The original CMYK color values of objects without profiles are preserved. (This is the default setting for the Press PDF preset and is preferred for a commercial printing workflow.)
In Distiller, you can choose from five color management policies:
• Leave Color Unchanged will not change device-dependent color spaces (RGB, Grayscale, and CMYK) and preserves device-independent colors.
• Tag Everything For Color Management (No Conversion) and Tag Only Images For Color Management (No Conversion) embed an ICC profile when the PostScript file is distilled. These two settings also convert RGB, Grayscale, and CMYK to device-independent color spaces.
• Convert All Colors To sRGB converts RGB and CMYK images to sRGB. This makes the colors device-independent.
• Convert All Colors To CMYK converts color spaces to DeviceGray or DeviceCMYK. This is preferred in a print-production workflow because it can convert RGB to CMYK. (This is the default for the Press Settings file.)
Exporting Extra PDF Features
In InDesign and Illustrator, you have options for exporting extra features that can be saved with a PDF file, as follows:
• In InDesign, you can create Tagged PDF. We discuss this in the following section, “Editing PDF Files and Their Elements.”
• In InDesign, you can include bookmarks, hyperlinks, and interactive elements. See the following section, “Adding Interactivity to PDF Files.”
• In InDesign and Illustrator, you can save top-level layers. See “Moving Layers to PDF Files” in Chapter 12, “Layers.”
Creating and Saving Custom PDF Presets
You can create and save customized preset files to call up specialized settings with a single click, to move them to another workstation, or pass them on to colleagues for their use. You might also get a preset from your print service provider to enable you to create PDF files the best way for the provider’s workflow. (We discuss more about this in “Working with a Print Service Provider” in Chapter 16, “Preflighting and Printing.”)
Choose from the following options to create and save a custom PDF preset file in the CS2 applications or a custom settings file in Distiller.
• In the CS2 applications, choose either File > Export or File > Save As. In the Export Adobe PDF or Save Adobe PDF dialog box, start with one of the default settings, and customize the settings for your needs using the guidelines in “Best Practices for Creating PDF Files.” Then click the Save Preset button at the bottom of the dialog box. Give the preset a meaningful name in the Save Preset or Save dialog box, and click OK or Save.
• In InDesign and Illustrator, choose additional options for editing, importing, and exporting PDF presets. In InDesign, choose File > Adobe PDF Presets > Define; in Illustrator, choose Edit > Adobe PDF Presets. Use the Adobe PDF Presets dialog box (Figure 14-10) to view a preset’s description, look at a summary of its settings, rename and delete presets, and load and save preset files.
Figure 14-10. In InDesign or Illustrator, use the Adobe PDF Presets dialog box to load and save PDF preset files.

• In Distiller, create a custom PDF Settings file by opening an existing file. Choose Settings > Edit Adobe Settings File. Then make changes using the guidelines in “Best Practices for Creating PDF Files.” Click Save As and enter a new name for your file.
Tip: Locate the Extras Presets Folder
Preset files for Rich Content PDF (for creating enhanced PDF in InDesign) and for the newer PDF/X-1a:2003 and PDF/X-3:2003 standards are included in the Extras folder created when you install Acrobat. (On the Macintosh, the path to the folder is Library > Application Support > Adobe PDF > Extras. In Windows, the path is Documents and Settings > All Users > Shared Documents > Adobe PDF > Extras.)
Custom preset files in CS2 applications and Distiller are saved with the .joboptions extension, in the same location as the default preset files, to make the new PDF preset available to all members of the Adobe Creative Suite 2:
• On the Macintosh, the file is stored at: Library > Application Support > Adobe PDF > Settings.
• In Windows, the file is stored at: Documents and Settings > All Users > Shared Documents > Adobe PDF > Settings.
Acrobat 7.0 Professional Features
Acrobat 7.0 Professional has such a wide range of capabilities for editing and working with PDF files that we can give only an overview and some starting points for your own exploration of this application. We’ll also provide some useful production tips for such tasks as navigating through Acrobat, and searching, combining or repurposing PDF files. In later sections in this chapter, we’ll focus on a few Acrobat features that we think are particularly worthy of discussion because of their novelty and utility, and some ways of moving PDF files into other applications.
Navigating and Viewing PDF Files
First and foremost, Acrobat is a PDF file viewer. Because its interface is so unlike the other members of the Adobe Creative Suite 2 family, it’s worth taking a minute to focus on where things are (Figure 14-11). We discuss why it’s so different in “And What’s With That Acrobat Interface Anyway?” in Chapter 7, “Managing and Customizing the Interface.”
Figure 14-11. The unique Acrobat 7.0 Professional interface.

Let’s point out a few of the more obvious differences that are useful when viewing and navigating.
• The Acrobat window has two panes. The Document pane, where you view the PDF file, is always open. The Navigation pane on the left can be opened by clicking a tab on the left side of the window, or by choosing View > Navigation Tabs, and selecting the tab that you want to open. Use the tabs to get to features like Bookmarks, Layers, Pages (formerly thumbnails), Comments, and so on.
• The main navigation tool is the Hand tool. If something’s not working the way you expect, make sure that the Hand tool is selected when navigating. You can turn on single-letter tool shortcuts (H for Hand, for example) by selecting Use Single-key Accelerators To Access Tools in Acrobat’s General preferences.
• The keyboard can be used for navigation. In Fit Page display (Command/Ctrl-0 [zero]), press Return/Enter to move forward through the document, or press Shift-Return/Enter to move backward. Pressing the Right Arrow or Down Arrow key moves ahead one page; the Left Arrow or Up Arrow key moves back one page.
• Acrobat remembers your previous page views, both the page you were on and the magnification at which you were viewing. Press the green buttons on the status bar to go to Previous View (left-pointing) or Next View (right-pointing), or press Command/Ctrl-Left Arrow for Previous View and Command/Ctrl-Right Arrow for Next View.
• Acrobat 7.0 doesn’t display the current page size by default. You must move your mouse cursor over the lower left corner of the page in the document pane; a tool tip will appear at the bottom left of the screen showing the page size.
• The status bar at the bottom contains both information and controls. At the bottom left, icons indicate special Acrobat features like layers and buttons to switch to full-screen view and to hide the toolbars. In the middle are navigation controls to move through pages. At the bottom right are buttons to switch between four page layouts — Single Page, Continuous, Facing, and Continuous – Facing.
• Acrobat toolbars can be customized. Most toolbars don’t show by default. See Chapter 7, “Managing and Customizing the Interface,” for details.
Searching PDF Files
One of the features that makes PDF files so powerful is that you can do text searches in them. (We wish we could offer you that feature in this book!) There are two methods of searching — the Find toolbar and the Search pane.
For a quick search of the currently active PDF document, choose Edit > Find (Command/Ctrl-F). The Find toolbar opens as a floating toolbar (Figure 14-12). Type a word in the field, and press Return/Enter. The first occurrence in the active document is highlighted. Then the Next and Previous buttons become available. Press Next to move to the next occurrence of the word, or Previous to move backward.
Figure 14-12. The Find toolbar provides a quick way of searching the currently active PDF file.

To search more than one open PDF document or extend your search to PDF files on your hard drive or across the Internet, use the more elaborate Search pane (Figure 14-11). To open the Search pane, click the Search button on the toolbar, or press Shift-Command/Ctrl-F.
In the Search pane, click a radio button to specify where you want to search: In The Current PDF Document or All PDF Documents In. If you select the latter, choose All Local Disks, or select locations from a menu, including drives, folders, and mounted volumes. To use more elaborate search criteria, click Use Advanced Search Options at the bottom of the pane. To search the Internet, click Search The Internet Using Yahoo! at the bottom of the Search pane. This searches for PDF files with your web browser.
Tip: Create a List of Search Instances
The Search pane is a good way to see a list of all instances of whatever you’re searching for, along with their locations. Since it’s a pane, you can keep it open while you’re reviewing the document itself.
Combining PDF Files
Acrobat 7.0 Professional makes it easy to combine two or more PDF files into one. Choose File > Create PDF > From Multiple Files, or click the Create PDF button on the toolbar and select From Multiple Files. The Create PDF From Multiple Documents dialog box appears (Figure 14-13).
Figure 14-13. Easily combine PDF files with the Create PDF From Multiple Documents dialog box.

Click the Choose button (Macintosh) or Browse button (Windows) in the Add Files section to select or multiple-select files to combine. There are buttons to Remove, Move Up, or Move Down files in the combining order. You can even preview a file by clicking the Preview button. When you’ve completed your list, click OK to concatenate the files into a single new PDF file.
Repurposing PDF Files
PDF files are created for many purposes, such as high-quality printing or web viewing, and you can’t expect a single file to meet every need. Sometimes a file must be repurposed. Now we’ll tell you how to do that using the PDF Optimizer.
Use the PDF Optimizer to optimize a number of features of PDF files — how large they are, what Acrobat Compatibility they have, whether they contain fonts or transparency, and other features. Choose Tools > Print Production > PDF Optimizer to open the PDF Optimizer dialog box (Figure 14-14).
Figure 14-14. The PDF Optimizer with controls to reduce file size and optimize a file for different uses.

Tip: Avoid the Reduce File Size Command
Acrobat 7.0 Standard has only one option for reducing file size, the File > Reduce File Size Command. If you have Acrobat 7.0 Professional, use the PDF Optimizer, which gives you much more control over optimizing, and avoid using the other command.
Here are some things you can do with the PDF Optimizer:
• Change the Acrobat compatibility by selecting a different compatibility option in the Make Compatible With menu.
• Choose different resolution and compression settings for a PDF file by selecting choices on the Image panel (shown in Figure 14-3). Image resolution is usually the largest contributor to large file size.
• Flatten the transparency in the PDF file by choosing commands on the Transparency panel. (We discuss more about flattening transparency, and the settings to choose in “Controlling Transparency Flattening” in Chapter 16, “Preflight and Printing.”)
• Remove unnecessary PDF objects, like comments or thumbnails, using the Discard Objects and Clean Up panels.
Tip: Check Settings and Save a Preset
Before clicking OK in the PDF Optimizer, check to make sure that settings you don’t intend (like compression) aren’t included. And, if you find yourself using the PDF Optimizer to perform the same function repeatedly, save your customized settings as a preset by clicking the Save button at the top of the dialog box. The settings will be available from the Preset menu at the top of the dialog box.
Converting Files, Scans, and Web Pages to PDF
Acrobat has a surprisingly large number of ways to create PDF files, in addition to the methods described earlier in “Creating PDF Files in Creative Suite Applications.”
Converting Files to PDF
Acrobat can open many file formats and convert them to PDF; simply choose File > Create PDF > From File, or press Command/Ctrl-N. On both Macintosh and Windows, you can open BMP, Compuserve GIF, HTML, JDF Job Definition, JPEG, JPEG2000, PCX, PNG, PostScript/EPS, Text, or TIFF files. On the Macintosh only, you can open PICT. In Windows only, you can open Autodesk AutoCAD, Microsoft Access, Microsoft Office (Word, Excel, and PowerPoint), Microsoft Publisher, Microsoft Visio, and Microsoft Project.
To control the conversions, click the Settings button in the Adobe PDF Settings dialog box, and choose from the available options. For example, the settings for opening a TIFF file are shown in Figure 14-15.
Figure 14-15. Adobe PDF Settings dialog box, showing compression and color management choices for converting a TIFF file.

Scanning and OCR Conversion
Acrobat includes both scanning and Optical Character Recognition (OCR) features that allow scanning a document and converting it to a PDF file. You can scan either text or images. Acrobat uses the TWAIN software that was probably installed with your scanner. (For the meaning of the word TWAIN, see the sidebar, “Shall the TWAIN Meet?”)
Begin by setting up your scanner as you normally would. Then choose from these options:
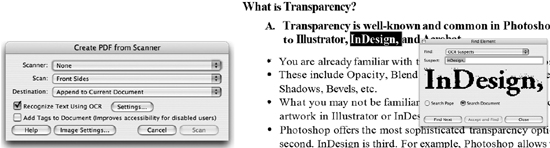
• In Acrobat, choose File > Create PDF > From Scanner. Choose scanning options; and then click the Image Settings button to choose image options (Figure 14-16, left). Optionally, choose Recognize Text Using OCR, and click Settings to choose options that control OCR conversion to text.
Figure 14-16. Create PDF From Scanner dialog box, showing controls for scanning and OCR conversion (left). The Find First OCR Suspect command identifies possible text errors in the OCR conversion (right).
• Scan documents using Photoshop or your scanner software, and use the OCR conversion feature afterwards: Open the scanned image in the document window (using the File > Create PDF > From File command); then choose Document > Recognize Text Using OCR > Start.
Using either workflow, choose a PDF Output Style to create archival documents or documents with editable and searchable text and graphics:
• For archival documents, choose Searchable Text (Exact) or Searchable Text (Compact). The image scan is kept in the foreground, with text hidden in the background. Text is searchable, but not correctable, in Acrobat. This could be used for a legal document, for example, where the image must be kept for archival purposes.
• For editable and searchable documents, choose Formatted Text & Graphics to discard the bitmapped image and replace it with editable and searchable text and graphics. Then use the Find First OCR Suspect feature (Document > Recognize Text > Find First Suspect) to open the Find Element dialog box (Figure 14-16, right). Use this feature to accept the suspect (possibly misconverted) word, or to correct it, and to continue examining and correcting text errors.
Converting Web Pages to PDF
Another way to create a PDF file is to convert web pages. A captured web page converts HTML, text, images, and most other valid web formats, while maintaining the dynamic web links on the pages. You can use this feature to archive web sites, or to make them available when you’re without an Internet connection.
(It’s also possible to use the PDF Printer in Mac OS X to convert web pages to PDF (choose File > Print, click PDF, and choose Save As PDF from the pop-up menu). However, this option does not maintain the dynamic links to other pages or sites.)
To convert one or more web pages, choose File > Create PDF > From Web. The Create PDF From Web Page dialog box acts as a web browser, letting you choose any URL on the Internet (Figure 14-17, left). You can choose how many levels deep of the web site you want to capture, as well as a host of other settings. To choose settings for a supported file type like HTML, for instance, click the Settings button. In the Web Capture Settings dialog box (Figure 14-17, right), click on the General tab. Select HTML in the File Type Settings area, and click the Settings button. You can choose how text, background, links, fonts, and so on will be previewed in the PDF page, similar to how those preferences are set in a traditional web browser.
Figure 14-17. Acrobat used as a web browser to convert web pages to PDF (left). Settings control the appearance and layout of the converted pages (right).

Click the Create button in the Create PDF From Web Page dialog box to have Acrobat begin downloading all the web elements you’ve selected on the selected web site. When the first page is complete, it’s displayed onscreen as a new PDF document (Figure 14-18). Optionally, as the pages are downloading, preview the download progress in the Web Capture Status dialog box (bottom right). Bookmarks can be saved with the PDF document to allow jumping to pages of a web site (left). Once the PDF pages are captured, pages can later be appended, web links can be viewed, and the entire site can be refreshed with a later version.
Figure 14-18. A captured web site converted to a PDF document maintains links to pages and external web sites.

Editing PDF Files and Their Elements
Acrobat is intended to “freeze” pages to maintain their original appearance and structure, regardless of where they are viewed. However, when you work with PDF pages, you may need to edit these pages, perhaps to make last-minute changes. Acrobat doesn’t have the tools for serious content-oriented editing. Instead, it provides some tools for production-oriented editing that fall into three categories — editing text, editing objects, and editing the pages of PDF files. If PDF files require more extensive editing, return to the application that created the files and make the edits there, and then recreate the PDF file.
Editing Text
Everyone at times has to make last-minute text changes on a file — altering a price or a few words in the text, for example. Acrobat lets you edit text in a PDF file with the TouchUp Text tool. However, how easily or whether you can “touch up” text at all depends on two factors: Was the file saved with tagged text, and is the original font installed on your computer?
To use the TouchUp Text tool, select it from Acrobat’s Advanced Editing toolbar. Better yet, choose Tools > Advanced Editing > Show TouchUp toolbar, which opens a small floating toolbar with both the TouchUp Text and the TouchUp Object tools.
Tagged versus Untagged Text
A PDF file containing tagged text gives you more control over text editing than with untagged text. Tagged text includes the document structure and describes the boundaries of paragraphs for Acrobat, for example, so edits can be restricted to that selection.
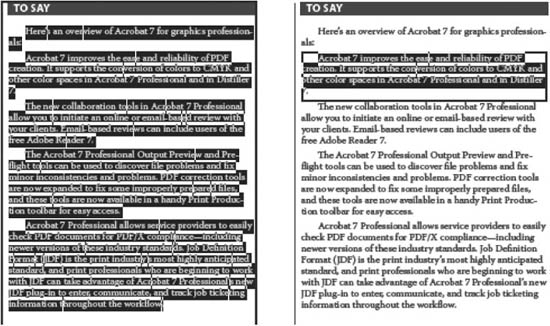
If no tagging has been done, selecting text in the PDF with the TouchUp Text tool displays a bounding box that indicates no paragraph structure in the file (Figure 14-19, left). When tagging is included, clicking in the text with the TouchUp Text tool shows the paragraph bounding box (Figure 14-19, right). Tagged text also is more readable by screen-reader applications, and includes more information if you later want to export text from the PDF file.
Figure 14-19. Untagged text, which lacks document structure, is more difficult to edit (left). Tagged text shows the bounding box of individual paragraphs (right).
InDesign is the only CS2 application in which you can create tagged text (select Create Tagged Text in the General panel of the Export Adobe PDF dialog box; see Figure 14-2, top). No such controls exist in the other CS2 applications.
Editing With or Without the Original Font Installed
To edit (add or replace) text containing a particular font, the font must be installed on your computer — located where Acrobat can recognize it. If an embedded or subsetted font is not installed, you can change certain appearance attributes (the type’s color, word or character spacing, or position, for example), but you can’t edit it. (We discuss font embedding and subsetting in the preceding section, “Best Practices for Creating PDF Files.”)
Using the TouchUp Text Tool
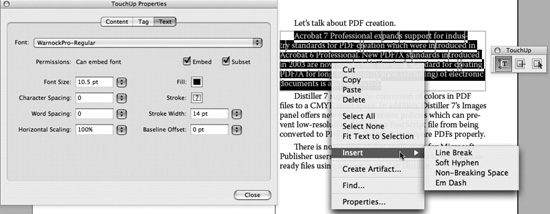
To use the TouchUp Text tool, select it, and then click in the text you want to edit. A bounding box will appear around it, as shown in Figure 14-19. Either drag to select text, or Control/right-click and choose Select All from the context menu (Figure 14-20). Type to replace the selected text, or press Delete to delete it. You can also choose Cut, Copy, or Paste from the context menu. Click an insertion point and type to insert text. You can edit only one line at a time. New to Acrobat 7.0, you can wrap text to the next line, but you must end lines manually with hard returns by pressing Return/Enter.
Figure 14-20. A variety of commands for editing text are available from the TouchUp Text context menu, including Properties, which opens the TouchUp Properties dialog box.
You can also add a single line of text in its own bounding box by Option/Ctrl-clicking. In the New Text Font dialog box, select a font and writing mode (probably Horizontal) and click OK. Then type to enter text.
Tip: The Select Tool is not the TouchUp Text Tool
Acrobat’s Select tool is used when you want to copy areas of text into another application, but not to edit the text.
Editing Text Attributes
To edit text attributes, highlight the text and choose Properties from the TouchUp Text tool context menu. In the TouchUp Properties dialog box, click the Text tab. Change attributes of selected type, including font, font size, fill, stroke, character and word spacing, horizontal scaling, and baseline offset.
Editing Objects
Acrobat’s TouchUp Objects tool can select objects on a PDF page. Choose it from the Advanced Editing or the TouchUp toolbar. Clicking an object on a PDF page displays a bounding box around it (Figure 14-21). The tool can select either vector or raster graphics, or text as an object (rather than the characters). You can use this tool to move objects around an individual page or delete them.
Figure 14-21. The TouchUp Object tool lets you select, move, or edit an image or page object.

Also use the TouchUp Object tool to initiate a process to edit an object. Acrobat can’t actually edit graphics itself, but it can call upon other members of the Adobe Creative Suite to share in the editing task. Before you can do object editing, you must select your touchup editors. Open the Acrobat TouchUp preferences (Figure 14-22). Click Choose Image Editor, and navigate to select Photoshop to do your image editing. Click Page/Object Editor, and navigate to select Illustrator to do your object editing. (You can select non-Adobe applications as touchup editors.)
Figure 14-22. Use the TouchUp Preferences to select your touchup editors.

To use external editors, follow these steps:
1. Select an image or object with the TouchUp Object tool; to select multiple objects, drag-select or Shift-select them. If you select a mix of objects and images, the Page/Object Editor will open to allow editing them.
2. In the Page/Object Editor, Control/right-click and select Edit Image(s) or Edit Object(s), depending on the selection. This launches the external editor and opens a temporary file in either Photoshop or Illustrator.
3. Use any of the tools in Photoshop or Illustrator to edit the image or object; if you add any new layers, you must flatten the changes.
4. In the external editor, choose File > Save, and close the temporary file. This applies the changes to the image or object.
Editing Pages
In addition to combining PDF files (described earlier in the same-named section), Acrobat includes various ways to edit the pages of a PDF file. Here are some of them:
• Moving or Copying Pages. Click the tab of the Pages panel to display it, and then select page icons (Shift- or Command/Ctrl-click to choose multiple pages). Press and drag page icons from one position to another to change the page order. Hold down the Option/Alt key to copy pages.
• Extracting Pages. Choose Document > Extract Pages to extract pages from a PDF document and save them as a separate file. Choose to extract them as separate pages, or to delete the pages after extraction.
• Inserting and Deleting Pages. Choose Document > Insert Pages to navigate to a PDF file, and then select which pages you want to insert. Choose Document > Delete Pages to select a range of pages in the current document to delete.
• Replacing Pages. After a quick edit, use this command to replace one page with another without having to recreate an entire PDF file. Choose Document > Replace Pages to select a PDF file from which to get the replacement page(s). You can also replace a range of pages in the current document with a range of pages in the selected document.
• Cropping and Rotating Pages. Choose Document > Crop Pages or Document > Rotate Pages to select a range of pages on which you’d like to change the dimensions of the pages’ crop margins or rotate the pages’ orientation in 90° increments.
Collaborating Using PDF Files
People who work in graphics production — writers, editors, art directors, production managers, and so on — need to review and comment on each other’s work. Adding editorial and production notes to PDF files simplifies the review process. Traditional colored pencils, sticky notes, highlighters, and long lists of comments written on a separate sheet now have electronic equivalents in Acrobat; these powerful commenting tools allow adding comments directly inline and throughout the PDF document itself. Acrobat 7.0 Professional lets you easily set up email-based reviews with others, even with users of Acrobat 6.0 and those with free Adobe Reader 7.0 software. Reviewers can use the built-in commenting tools and then email back their comments; you then can simply merge them all into a single document. You can also use Version Cue to set up browser-based reviews in which the document being reviewed resides in a collaborator’s Version Cue workspace.
Using Acrobat Commenting Tools
Acrobat features some very sophisticated tools for adding comments to a PDF file. They include equivalents of many of the traditional tools for marking up and annotating paper documents. To access the tools, open the Commenting toolbar by choosing Comments > Show Commenting toolbar, or, even easier, click the Comment & Markup button on the default Acrobat toolbar (Figure 14-23).
Figure 14-23. Acrobat commenting tools allow placing comments inline in your PDF document.

First, we’ll give you a rundown on Acrobat’s commenting tools, and how they’re used.
Notes Tool
The electronic version of the sticky note, the Notes tool is the most common Acrobat commenting tool. To create a note, select the Notes tool in the Commenting toolbar and drag on the PDF page to open a note window, or click where you want to locate the note (a note will open where you click). Clicking is faster, but dragging out a note lets you immediately control its size when opened. Then just type your comment. Use the Hand tool to move the comment. Resize a note by dragging its bottom-right corner. Change its color, author, subject, or other features by choosing Properties from the Options menu or Control/right-clicking the note to open a context menu.
Text Edit Tools
Use the Text Edit tools for marking insertions, deletions, and replacements of text, or to highlight or underline words. The Text Edit tools are located in the Text Edits menu when the Commenting toolbar is open. Choose Text Edits > Indicate Text Edits, and choose from the following options:
• To add text, click between words where you want to add text, and begin typing. A caret is inserted in the text, a Note window titled Inserted Text opens, and text is added to it.
• To replace text, select text, and begin typing. The selection is marked with a strike-through, and the inserted text appears in a new Note window titled Replacement Text.
• To delete text, select text, and then press Delete. The text is marked with a strikethrough.
• To highlight or underscore text, select text, and then choose Highlight Selected Text or Underline Selected Text from the Text Edits menu.
Stamp Tool
The Stamp tool is the electronic equivalent of a traditional rubber stamp. Click or drag to create an area for the stamp graphic. From the Stamp menu on the Commenting toolbar, you can choose from a variety of common stamps, like the Revised stamp shown in Figure 14-23. You can even create your own custom stamps.
Attach Tools
The attach tools let you attach different kinds of files to your PDF file. The File Attachment tool lets you attach any kind of file (not limited to CS2 application files), to send along with your PDF file. The Record Audio Comment tool provides an interface for recording audio comments. Be aware that adding attachments (especially audio) can significantly increase the file size.
Drawing Markup Tools
A second toolbar — available only in Acrobat 7.0 Professional — gives access to Drawing Markup tools. Choose Comments > Show Drawing Markups Toolbar.
A large number of drawing markup tools appear on this toolbar: Some tools enclose areas, useful when you want to mark an area of your PDF file for attention — the Rectangle, Oval, and Polygons tools. Others create different kinds of paths — the Arrow, Line, Polygon Line, and Pencils tools. Yet others are more specialized — the Pencil Eraser, Callout, Cloud, and Dimension tools.
We find one especially useful: The Text Box tool lets you drag out a rectangle, in which you can type text for a note to be displayed on the document page. Any note you make with it is more noticeable because you can make it really big and gaudy, and also no one can ignore it because they can’t close it!
Managing Comments
The Comments List includes controls to let you list, view, flag, summarize, search, and filter comments.
Much like the Reviewing pane in Microsoft Word when you’re using its markup features, the Comments List functions as the control center for working with comments in Acrobat. It lists all the comments in a PDF file; unlike the Word feature, the Comments List has its own menu of commands for working with comments (Figure 14-20). To open the Comments List, choose Comments > Show Comments List or click the Comments tab on the left side of the screen.
Tip: Make the Comments List More Manageable
As useful as the Comments List can be, it takes up a lot of screen space on a small monitor. To make its size more management, drag the Comments List by its tab over the document pane and release the mouse button. It then becomes a floating pane, which you can resize at the bottom-right corner (Figure 14-24).
Figure 14-24. Drag the Comments List to make it a separate, easily resizable pane.

You can view the Comments List expanded or collapsed. By default, the comments are listed by page, but you can change that by choosing another option (like Author) on the Comments List Sort By menu. Click the Expand All button to view all comments, or the Collapse All button to collapse them all. You can also click the Plus sign [+] icon beside each comment category or comment to expand a category or comment.
There are additional controls on the Comments List menu: Navigate up and down the list by clicking the green Next or Previous arrows. Reply to a comment by clicking the Reply button. Delete a comment by clicking the Trash icon. Flag a comment for a particular purpose by clicking the checkmark icon. Print comments or a summary of comments by clicking the printer icon. Search comments by clicking the magnifying glass icon. You can use the Show menu to select from a number of other commands for working with comments, including filtering which comments are visible.
Exporting and Importing Comments
To have colleagues comment on your PDF document, the simplest way is to email the PDF file to them. They will use the commenting tools as we’ve described in the previous section.
On completing their review, reviewers should export only the comments in a special file format called Form Data Format (FDF). An FDF file contains only the comments from a file, so it is much smaller than the original PDF file. To export an FDF file, choose Comments > Export Comments (Mac) or Comments > Export Comments > To File if an additional submenu appears (Windows).
To import colleagues’ comments into your PDF file, on receiving the FDF file, open the original PDF file, choose Comments > Import, and select the FDF file. Even quicker, double-click the FDF file, and you’ll be prompted to find the matching PDF file if it’s not open.
Creating an Email-based Review
Acrobat 7.0 includes a useful new feature that makes it easy to create and monitor an email-based review cycle with PDF files. The feature is especially well-designed for sending files to users new to a PDF review process. It includes a wizard to automate the review process for reviewers step-by-step. It provides excellent feedback to the recipient on how to participate in a review process. It easily merges returned comments, and even includes a Tracker feature for monitoring the progress of multiple email reviews.
Anyone who has either Acrobat Standard or Professional can initiate an email-based review. However, Acrobat Professional greatly enlarges the potential of this tool by enabling any users of the free Adobe Reader 7.0 to participate in a review. Users of Acrobat 6.0 can also participate in an email-based review that was initiated by someone using Acrobat 7.0 Standard or Professional.
Initiating an Email-based Review
Here are the steps to begin an email-based review:
1. Initiate the review. Choose Comments > Send For Review > Send By Email For Review, or click the Send For Review menu on the toolbar. The Send By Email For Review: Step 1 Of 3 dialog box appears (Figure 14-25).
Figure 14-25. When you choose to initiate an email review, a wizard steps you through.
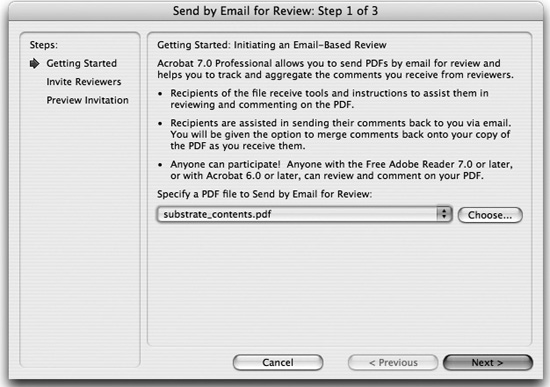
2. Select a PDF file. Select the PDF file you have open, or click the Choose button (Mac) or Browse button (Windows) and navigate to select one. Then click Next.
3. Invite reviewers. In the Step 2 Of 3 dialog box, enter the email addresses of each reviewer. You can click the Address Book button to open your email address book from which to select names.
4. Include Adobe Reader users. Optionally, click the Customize Review Options button in the Step 2 Of 3 dialog box, and check the Also Allow Users Of Free Adobe Reader 7.0 To Participate In This Review option. Click OK. Click Next.
5. Preview your invitation. If desired, customize the email that invites reviewers to participate, using the Invitation Message text field in the Step 3 Of 3 dialog box. Click Next.
6. Send the invitation. If necessary, switch to your email application to show a new email message, addressed to your recipients, with the PDF file marked as an attachment to the message. Click Send to send the message with its attachment.
Participating in a Review
To open your attachment, email recipients double-click it. Depending on the Acrobat viewer application they are using, the attachment opens in either Acrobat or Adobe Reader. Helpful information appears when they view the PDF file (Figure 14-26). The yellow information panel at the top indicates that they are beginning a review process. The How To panel tells them what they are to do. The Commenting palette is automatically opened.
Figure 14-26. Invitees to an email-based review see the Commenting toolbar open, with instructions to make the process easy.

Your reviewers will use the tools on the Commenting palette, as described in “Using the Acrobat Commenting Tools.” When finished reviewing, they need only click the Send Comments button to complete the process. The reviewer’s email application launches, showing an email addressed to the initiator of the review, and with the comments attached as an FDF file.
Receiving Reviews
On opening the FDF file containing your reviewer’s comments, you will be prompted to merge these comments with the original PDF file. Click OK to use the Comments List to view them.
The useful Tracker feature (choose Comments > Tracker) lets you monitor ongoing email-based reviews. The Tracker window lists all reviews and commands to do such things as send reminders to reviewers when they’re late in replying or email messages to all your reviewers.
Using a Browser-based Review (Version Cue)
Acrobat features several ways to review PDF files using a browser. Browser-based reviews offer the advantage of letting all reviewers see each other’s comments and reply to a colleague’s comments immediately.
One way to set up a browser-based review in Acrobat is to place a PDF file on a server that is accessible to your reviewers. If the server is correctly set up by an IT manager, all those with proper access to the server can view and comment on the PDF file using their web browsers. This is a difficult process to get right, and the feature has not been widely used.
However, an easier way to set up a browser-based review is if you have the Premium Edition of Adobe Creative Suite 2 and are using a Version Cue workspace. Reviewers must have Acrobat 7.0 Professional (included in the CS2 Premium Edition) to participate in a Version Cue review. The PDF file for review should already be located in the Version Cue workspace. (We describe how to create a Version Cue workspace in Chapter 13, “Integrating Version Cue into Your Workflow.” You should read that description before attempting to follow this process.)
To initiate a Version Cue PDF review, log into the Administration utility (see “Administering Version Cue” in Chapter 13). At the top of the page, click the Version Cue CS2 PDF Review link. The Version Cue CS2 PDF Review page appears (Figure 14-27).
Figure 14-27. If you are using Version Cue, use its Administration utility to share a PDF document with others in your workgroup by publishing it from your Version Cue workspace.

Click the Start A Review link to begin a PDF review with other colleagues who have access to your Version Cue workspace.
Briefly, here is the process: Select the PDF document you want to review, and click Start Review. In the Start Review page, enter review information, including listing reviewers and setting a review deadline. Send an email invitation to each reviewer, which includes a direct link to the document being reviewed. On receiving an email invitation, reviewers click the link to open the PDF document in their web browser. They use the Commenting tools to add annotations.
For more information on working with a Version Cue PDF review, see Version Cue Help.
Adding Interactivity to PDF Files
One of the most exciting aspects of working with PDF files is that they can include interactivity. You can create buttons that trigger actions, bookmarks that act as an electronic table of contents, hyperlinks that jump to a different page or to a web link, and you can include multimedia content such as movies, Flash animations, or sounds and sound effects. You can create these elements in InDesign, export your PDF file, and open it in Acrobat or Adobe Reader to activate the interactivity. You can also create notes in Photoshop that you can view and edit in Acrobat, or view and edit again when you return to Photoshop. Acrobat also has various tools for working with interactive elements.
Interactivity in InDesign
Of the Creative Suite applications, InDesign gives you the most ways to add interactivity to your PDF documents.
Interactive Elements
Here are interactive elements you can add in InDesign and export with a PDF file:
• Bookmarks. Add a navigational element that will be visible in the Acrobat or Reader Bookmark pane. Use bookmarks to create a table of contents structure for a PDF document. (Or create these automatically using InDesign’s Table of Contents feature.)
• Hyperlinks. Add a hotspot area to text or graphics that link to another part of the document, to another document, or to a web site. (You can also create hyperlinks using the InDesign Table of Contents or Indexing features.)
• Buttons. Add a hotspot area that can call out a variety of behaviors, including playing movies and sounds.
Example: Adding Bookmarks
We only have space to provide a simple example of creating interactivity in InDesign. For more information, we recommend you pick up Sandee Cohen’s InDesign CS2 Visual QuickStart Guide from Peachpit Press.
Start by creating bookmarks, with the Bookmarks palette (choose Window > Interactive > Bookmarks), that point to a page. To do this, make a page visible by double-clicking its icon in the Pages palette. Make sure that no existing bookmark is active (click the blank space at the bottom of the palette) and no text or graphic is selected. Option/Alt-click the New Bookmark icon at the bottom of the palette. This creates a new page bookmark. Repeat for other pages in your document (Figure 14-28, left).
Figure 14-28. Use the InDesign Bookmarks palette to create bookmarks for each document page (left). With a page bookmark active, select text and choose New Bookmark to create a bookmark for that text object (right).
To make a text bookmark, highlight a page bookmark in the Bookmarks palette. Then use the Text tool to select text on that page you’d like to make into a bookmark. Option/Alt-click the New Bookmark icon to create a text bookmark nested beneath the page bookmark (Figure 14-28, right). In our example, we repeated this process to add several text bookmarks.
Before exporting the InDesign files with interactive elements to PDF, in the General panel of the Export Adobe PDF dialog box (Figure 14-2, top left), check Bookmarks, Hyperlinks, and Interactive Elements to make sure that they’re included in the PDF document. (If you create a PostScript file and then process it through Distiller to create a PDF, all interactive elements will be stripped out.)
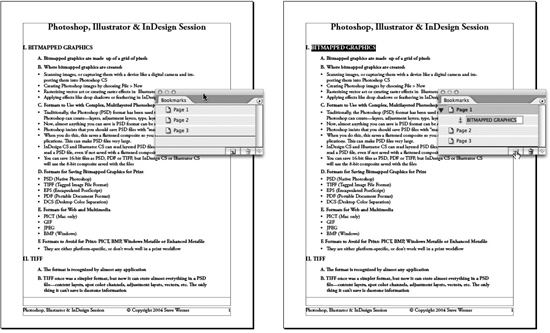
Open the resulting PDF file in Acrobat or Adobe Reader to view the bookmarks on the Bookmark pane (Figure 14-29). Click them to jump to the appropriate page element.
Figure 14-29. Export a PDF file from InDesign to Acrobat or Reader to view and click the bookmarks links on the Bookmark pane and jump to a reference.

Interactivity in Photoshop
In Photoshop, you can create two kinds of commenting — sticky notes and audio annotations — that you can then view and edit in Acrobat or view in Adobe Reader. You can also subsequently reopen the file in Photoshop with the commenting intact.
To create a sticky note, choose the Notes tool. In the Options bar, you can specify author, size, and note color. Click the tool anywhere in the image canvas to create a note. Click inside the note and type to create the comment. You can also create an audio annotation with the Audio Annotation tool. These notes allow you to record your own comments or add sounds to a file. (They were most likely added to Photoshop for those designers who can’t type comments.)
To export the notes in a PDF file, choose File > Save As, and select Photoshop PDF format. Choose Preserve Photoshop Editing Capabilities to be able to reopen the PDF file with any additional comments in Photoshop. By default, the annotations are exported with the PDF file. You can open them in Acrobat and Reader.
Interactivity in Acrobat 7.0 Professional
Acrobat 7.0 Professional gives you many tools, panes, and controls for working with interactive elements. Use Acrobat Help (Help > Complete Acrobat 7.0 Help) to read about these features:
• Bookmarks. Use the Bookmarks pane commands to create or modify bookmarks.
• Articles. Use the Articles panel to create articles that allow you to navigate through columns of text.
• Links. Use the Link tool to create and modify links that can trigger a variety of actions, or to navigate between PDF pages and documents or to web sites.
• Page Properties. Use the Pages pane to set actions that occur when opening or leaving a PDF page.
• Buttons. Create or modify buttons that trigger a variety of behaviors.
• Movies and Sounds. Import sound and video files with the Movie and Sound tools on the Advanced Editing toolbar, and control their play.
• Forms. Use the tools on the Forms toolbar to create forms that can be filled in, submitted, or printed.
Bringing PDF into Other Applications
Even though PDF is supposed to be a “final format,” there are those who want to bring PDF pages or elements into other applications. In this section, we summarize some different ways you can do this.
Using the CS2 Applications
Just as the CS2 applications are optimized for creating PDF, as we discussed at the beginning of this chapter, they are also well designed for placing or opening PDF files.
Placing PDF Files in InDesign, Illustrator, and GoLive
You can place PDF files in InDesign and Illustrator documents as linked graphics. You can also create Smart PDF objects in GoLive that allow you to place PDF files. We discuss both of these subjects in Chapter 9, “Smart Objects and Intelligent Layouts.”
Opening PDF Files in Illustrator
To open a PDF file in Illustrator, choose File > Open, and select a PDF file. If the file is multi-page, you’ll be prompted to select which page to open, because Illustrator can work with only one page at a time.
Occasionally, you can use this feature to edit text in Illustrator, although there are no guarantees as to how successful you will be. Adobe has never claimed that Illustrator was a PDF editor, so you’re on your own. Any fonts in the PDF file must be open on your system to enable editing the text without substituting fonts.
It’s likely that the text blocks in the PDF file are broken into “chunks.” You can Shift-select multiple type pieces with Illustrator’s Selection tool and copy them to the Clipboard. If you choose the Text tool, drag out a frame, and paste, sometimes you can reconstitute the text into a single frame.
To update the document after editing the text, choose File > Save.
Opening PDF Files in Photoshop
Sometimes you may need to rasterize a PDF file — turn it into pixels. You might do this, for example, if you were asked to produce a JPEG file of a PDF page. You can rasterize a PDF file in Photoshop by choosing File > Open. The fonts in the PDF files must be installed on your computer, or others will be substituted, changing the appearance. (You can also rasterize a PDF file by saving it from Acrobat in a raster format; see the following section, “Saving PDF Files in Other Formats.”) File > Open brings up the Import PDF dialog box.
In the Import PDF dialog box (Figure 14-30), thumbnails of the PDF pages appear on the left. You can Shift-select or Command/Ctrl-select to choose multiple pages. On the right, choose an image resolution, cropping, color mode, bit depth, and whether to anti-alias the image. Click OK to rasterize one or more pages and open them as separate Photoshop images. This is fairly memory-intensive, so be patient, and have lots of RAM available if you’re creating high-resolution images. When opened, you can save the files in any Photoshop format.
Figure 14-30. Choose the Photoshop Open command and select a PDF file to rasterize one or more pages of a PDF file.

Placing PDF Files in Photoshop
The Photoshop File > Place command lets you choose a PDF file to import as a graphic. In the Place PDF dialog box (Figure 14-31), use the Select menu to choose to place a PDF page or an image from a page. You can select only one image or page, and, unlike the Import PDF dialog box, the only options available are to select a page and crop it. Click OK to create a new layer in the current Photoshop document, and place the graphic. After it’s been placed, you can scale the bounding box of the placed graphic. Press Return/Enter to rasterize the image at the current resolution when you’re done scaling the bounding box.
Figure 14-31. Choose the Photoshop Place command and select a PDF file to place a page or image.

Saving PDF files in Other Formats
Most applications cannot place PDF files directly. Acrobat lets you select from a number other formats, using File > Save As. Here’s a quick list of what’s possible:
• Microsoft Word and Rich Text Format. Use these formats to open a PDF file in Microsoft Word or another word processor that can read Word or RTF files. Keep in mind that your success will depend on how well the PDF file was created. If it was saved with Tagged PDF (see the preceding section “Editing Text”), the conversion will work better than if the text were untagged.
• Encapsulated PostScript and PostScript. Use these formats in some printing work-flows, when a RIP or an application cannot read PDF directly.
• HTML 3.2, HTML 4.01 with CSS 1.0, XML 1.0, Text (Accessible), and Text (Plain). These choices give you options for text encoding and image formats.
• JPEG, JPEG2000, PNG, and TIFF. These formats will rasterize the pages. The Settings dialog box lets you select image-compression and color-management options.
Tip: Use PDF to Convert an InDesign Document into HTML
You may want to convert your InDesign documents into HTML files that can be posted on the web. While the best way is to use InDesign’s Package For GoLive feature, you can also export the InDesign document in PDF. Then, in Acrobat, use the Save As HTML 4.01 With CSS 1.0 option to convert the file.
The Universal Format
Adobe PDF has become the closest we have to a universal format: Virtually any kind of file on any computer platform can be turned into a PDF file. As we’ve seen, with Acrobat 7.0 Professional, even paper documents and web pages can be easily turned into PDF files. Once in PDF, the file can be sent to anyone, and that person can use the free Adobe Reader or Acrobat to view it just as the document was created.
Adobe Creative Suite 2 makes working with PDF easy. Its PDF presets make creating a PDF file from your CS2 applications a snap. Acrobat 7.0 Professional offers a host of ways to manipulate the PDF files you create. And you can place or open PDF in all the CS2 applications. You can use PDF files to solve many common production problems encountered by creative professionals. Use what you’ve learned in this chapter to spread the PDF gospel to others.