Chapter 4. Pixels and Raster File Formats
We live in a world filled with pixels. Although we may not think about it very often, we see innumerable images made up of tiny little squares throughout the day.
Adobe Photoshop and the other CS2 applications work with bitmapped (otherwise known as raster) images. The easiest way to think of a bitmapped image is as a grid of pixels (see Figure 4-1). A pixel is a “picture element,” and it’s the basic building block of a bitmapped graphic. When pixels are stored, they are saved into a raster file format.
Figure 4-1. A bitmapped graphic is made up of a grid of pixels.

In Chapter 5, “Getting to the Point of Vector Graphics,” we discuss the differences between working with vectors and working with pixels, so we won’t repeat that discussion here. We’ll just point out some of the main reasons pixels (and the images that are made from them) are so important:
• Pixels are created by scanners and digital cameras, or can be easily acquired by buying stock photography. While not everyone can learn the Pen tool (though we hope you will try!), almost everyone has access to a scanner or digital camera that can produce pixels.
• Pixels are your choice if you want to retain the naturally soft edges found in drop shadows, glows, feathered edges, and so on.
• Bitmapped images, composed of pixels, are generally simpler than vector graphics. They’re simpler to comprehend, and it’s generally easier for software to convert from one raster format to another than to convert vector formats.
In this chapter, we’ll focus on the world of pixels and raster file formats. We’ll talk about how we get pixels not only from the obvious places like scanners and digital cameras, but from less well-known sources. We’ll show how you can create pixels in InDesign and Illustrator, and cover the essentials of how pixels work, including three key concepts of dimensions, resolution, and bit depth.
We’ll discuss all the different ways you can work with pixels. Sometimes you interact with pixels directly, as you do in Adobe Photoshop when you paint with brushes or use the retouching tools. Other times, you manipulate all the pixels within the raster file (the stored pixels), particularly when you apply effects and commands to placed images in InDesign and Illustrator.
Finally, to use the pixels in another application, they must be saved in the proper format. We’ll explain what raster file formats will work for your particular workflow.
As big as this chapter is, we can’t cover everything about pixels here:
• Pixels can also have color and transparency. We discuss those concepts in Chapter 10, “Colors and Color Management,” and Chapter 11, “Transparency.”
• Pixels must be selected to apply a tonal or color adjustment, or to run a filter. We talk about this in the “Selecting and Moving Pixels in Photoshop” section in Chapter 7, “Managing and Customizing the Interface.”
• You can create layered compositions with pixels in Photoshop. We discuss this throughout Chapter 12, “The Flexibility of Layers.”
• Photoshop works in a color mode—usually Bitmap, Grayscale, RGB Color, CMYK Color, or Duotone—and includes three more specialized modes — Indexed Color, Lab Color, and Multichannel. To learn about color modes, read “Color Modes in Photoshop” in Chapter 10, “Colors and Color Management.”
Where Do Pixels Come From?
In the early ’90s Sandee and Steve used desktop scanners to work with grayscale or black-and-white images and low-resolution color comps. When we needed high-resolution images for printing we would buy them from a service bureau with a drum scanner, like the one where Steve worked. These days we can get very high-resolution pixels from a variety of sources, or we can create them within the applications of Adobe Creative Suite. Here’s a short summary of how.
Scanners
Pixels are digital data produced by the scanning process. There are many kinds of scanners, but most people are either scanning reflective art (artwork you can place on the glass of a scanner) or transparencies. The scanner illuminates the object being scanned — artwork, a slide or a film negative. These scanners use sensors that measure the amount of light reflecting from the art (flatbed scanners) or passed through a transparency (slide scanners). They usually use one of three kinds of sensors — CCD, CMOS, or PMT.
CCD and CMOS sensors measure the light. In a scanner, the sensors are arranged in rows (also known as linear arrays). Each sensor takes a single sample. If there were 400 sensors in an inch on the array, we would say the scanner samples 400 samples per inch. (PMT sensors are used in the drum scanners that are now a dying breed.) A motor moves the scanning head across the object being scanned.
The scanner then takes the electrical signal that represents a sample (which is analog data) and translates it into a number (which is digital data). To translate the analog sample into digital data, the scanner uses an analog-to-digital (A/D) converter. How accurately the scanner converts this information while suppressing inherent “noise” interference greatly determines the quality of the scanned image. Noise is random fluctuation in information due to imperfections in the analog equipment. These days, most scanners capture more information than is needed (see “Bit Depth,” below) as one strategy to correct for the inevitable noise which is part of the scanning process. Pixels — the digital data — are the end product of the scanning process. (Of course, this summary oversimplifies the process. We highly recommend Real World Digital Scanning and Halftoning from Peachpit Press for all the messy details.)
Photoshop does not actually scan images, but provides a connection to the scanner once you’ve installed the scanner software. Most scanners use their own software, which plugs into Photoshop to provide an interface for the scan.
Digital Cameras
Digital cameras today have become almost as popular as the cell phone, and the quality of consumer-level cameras now almost equals what professionals captured with the first digital cameras in the 1990s. Digital photography has evolved considerably since then, when a photographer likely would first take a photo with a film camera, have the film developed and turned into a transparency or print, and then scan the result — a time-consuming process.
You can visualize the digital camera as a portable scanner. It also uses CCD or CMOS sensors to capture the light of a scene in an area array camera. Where the film would be positioned behind the lens of a film camera, there is now an array of sensors to capture and digitize the light.
Digital cameras have several advantages over the film camera and scanner workflow:
• They eliminate the costs of Polaroids® (used for quick proofs), film, and processing for professional photographers.
• Digital cameras aren’t tethered to computers (except for studio digital cameras), giving you more flexibility and convenience, and a faster workflow.
• They capture a wider range of colors than film can.
• Traditional film photography has to compensate for the occasional visible pattern of silver halide points on the surface of film or paper. Digital cameras bypass the effects of this so-called film grain and the extra step of scanning properly.
Most digital cameras by default save captured digital images as JPEG files. Most use color filters over each sensor to split the incoming light into its red, green, and blue components. Each of these three components is actually a grayscale file. To store the JPEG data, the camera’s firmware performs a conversion on these channels of information, using on-camera settings for white balance, tone, saturation, and so on.
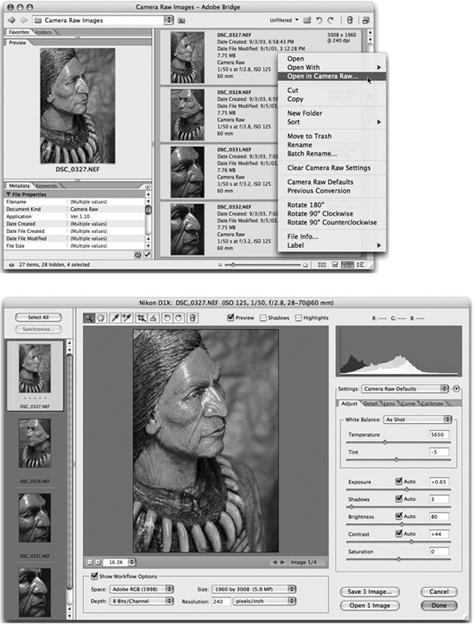
The Camera Raw Workflow
Many digital cameras support saving images in a camera raw file. This file stores the unprocessed image information captured by the camera’s sensors. This data is not processed by the camera’s software, but contains the original data — unlike JPEG files saved by the camera. There is not a single “raw” format; each camera has its own way of storing the digital data — for example, a Canon CRW file, or a Nikon NEF file. Camera raw files have become the electronic negative of digital cameras.
Adobe added a new digital camera workflow to Photoshop in 2003 when Adobe began selling the Camera Raw 1.0 Photoshop plug-in. The plug-in processes supported camera raw file formats using the Photoshop built-in camera profiles and EXIF data (information saved with an image by the camera).
Working with the “raw,” unconverted data gives a photographer much greater control over the interpretation of an image than was possible before (see the sidebar, “Camera Raw and CS2”). The image’s tone and color can be edited according to a photographer’s preferences, rather than the preferences of the camera software engineers. It’s similar to a chef who starts with all the raw ingredients for spaghetti sauce instead of trying to spice up a jar from the grocery store.
Tip: Converting Camera Raw Files
You may have files from cameras that aren’t recognized in Bridge. If that happens (as it did to us when working on this chapter), go to the Adobe Web site and download the Adobe DNG Converter. This is a utility that converts — with no loss of quality or information — proprietary camera raw files into the more-universal DNG (Digital Negative) format.
Figure 4-2. Select multiple images in Adobe Bridge and use the context menu to open them in the Camera Raw plug-in (top). The Camera Raw dialog box lets you apply settings to the open images simultaneously (bottom).
Stock Photography
For those of us like Steve and Sandee who aren’t photographers, another good option for getting pixels is to purchase stock photography or buy images directly from a photographer (when you have the budget for it).
Adobe has decided to make this process easier for graphics professionals by integrating a service for purchasing stock photography, called Adobe Stock Photos, into Adobe Creative Suite. It’s also available to those who purchase the individual CS2 applications. We talk about this in the “Accessing Adobe Stock Photos” section in Chapter 3, “View from the Bridge.”
Creating Bitmapped Graphics in CS2 Applications
You can also create pixels using Adobe Creative Suite 2 applications, sometimes in unexpected places. That’s what we’ll discuss next.
Creating Pixels in Photoshop
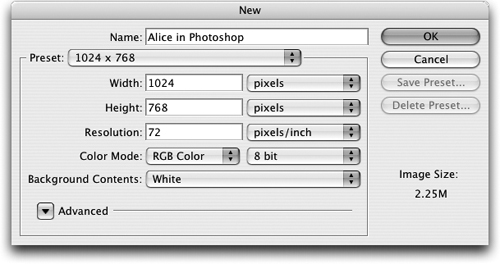
As you no doubt know, Photoshop CS2 is Pixel Central for Adobe Creative Suite 2. Even folks who know very little about computers have heard of Photoshop and its legendary abilities to transform images! (Photoshop has even been part of the plot of an episode of Friends.) Every time you choose File > New, you use the New dialog box to create a new pixel grid (see Figure 4-3). We’ll spend much of the next section telling you about the different kinds of editing controls in Photoshop for working with pixels.
Figure 4-3. Any time you use the New dialog box in Photoshop, you create a grid of pixels.
What’s less well known is that the other members of the Adobe Creative Suite 2 family — Illustrator and InDesign, in particular — are pretty adept at creating pixels too. Here are a couple examples:
Rasterizing Vectors in Illustrator
You can turn any Illustrator object into pixels by choosing Object > Rasterize or Effect > Rasterize (see Figure 4-4). We selected the vector paths of the playing cards and applied the Rasterize effect. In the Rasterize dialog box, choose the color model, resolution, background, and anti-aliasing for the rasterization effect.
Figure 4-4. The objects on the left are vector. Applying the Rasterize effect in Illustrator turns vector objects (left) into pixels, but as a live (editable) effect (right).

What’s the difference between these two confusingly similar commands? Choosing Object > Rasterize permanently changes the objects to pixels. Using the same command under the Effects menu creates a live effect that can be subsequently edited (see the sidebar, “Illustrator Filters vs. Effects”). When you then want to make the effect permanent, use the Expand Appearance command in the Object menu.
There are many reasons why you might want to rasterize artwork in Illustrator. You might want to apply a Photoshop filter or effect on the pixels, which you can’t do with vector objects. You might need to create pixels for a web or multimedia project. We talk about applying raster effects in the “Applying Filters and Effects” section below.
Tip: Use Effects to Retain Spot Colors
When you choose Object > Rasterize, any spot colors will be converted to process. Use Effect > Rasterize instead to preserve spot colors. This makes Illustrator even more powerful than Photoshop when it comes to working with spot colors. The same effect could not be applied as easily to spot colors in Photoshop. And it could never be edited later, as Illustrator’s Effects can.
Creating Drop Shadows in InDesign
InDesign can also create effects that are made up of pixels. You can apply live drop-shadow and feathering (soft-edge) effects either to InDesign-created objects like text frames, or to placed graphics. For example, to apply a drop shadow to any object, you choose Object > Drop Shadow. This applies a frame-based effect based on the settings in the Drop Shadow dialog box (see Figure 4-5). You’ll see commands similar to those for a Photoshop Drop Shadow layer effect — color, blending mode, opacity, X and Y offset, and blur.
Figure 4-5. The InDesign CS2 Drop Shadow dialog box lets you add drop-shadow effects to objects. There are controls to adjust Spread and Noise.
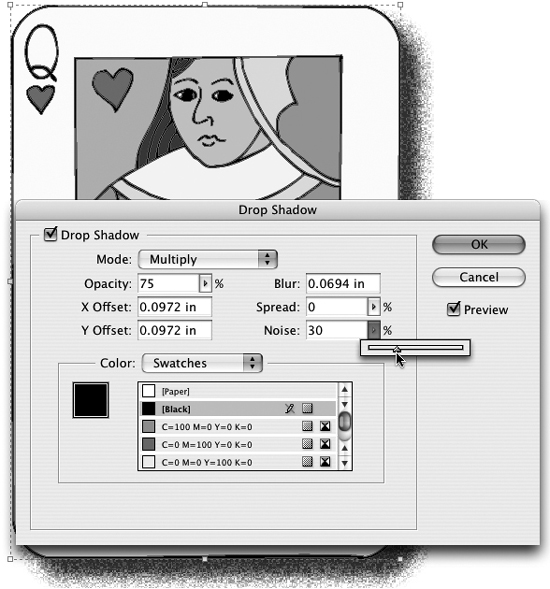
In InDesign CS2, you can also control the spread of the shadow. The Spread control determines the extent of the shadow and reduces the radius of the blur. The percentage is applied to the Blur value. The Noise control can add a grainy quality to the shadow, which can make it more realistic, or provide a “grungy” look. Noise is also helpful in avoiding the problem of banding, where the edge of the shadow can have sudden shifts in tone.
Pixel Essentials
Many people get very confused when you start throwing around words like bit depth or resolution to describe how bitmapped graphics work. But in order to master pixels in the Adobe Creative Suite applications, you need to understand a few essentials. We’ll try to keep it brief. There are three key interrelated concepts for you to grasp — dimensions, resolution, and bit depth.
Dimensions
When you capture an image with a digital camera or scanner, or when you choose File > New in Photoshop, you’re creating a grid of pixels of certain dimensions. The dimensions are the number of pixels in the horizontal (x) and vertical (y) directions.
When you scan (often by choosing your scanner’s software from the File > Import submenu in Photoshop), you choose settings that determine the pixel dimensions. The Import choices are particular to the scanner software you’re using. With a digital camera, the fixed area array of the sensors captures a grid of pixels of defined dimensions. Camera resolutions are usually referred to by the number of megapixels (millions of pixels) they capture. When you create a new document in Photoshop, the Width and Height fields in New dialog box (Figure 4-3) define the pixel dimensions.
When you increase the number of pixels in each dimension, you increase the file size proportionately. For example, if you start with a grid of 12 pixels x 12 pixels and increase the number of pixels on each side to 24, you quadruple the file size.
Resolution
Resolution is one of the most confusing and misused words in the language of computer graphics. Here’s a simple definition: It’s the number of squares of the grid in each unit of measurement, usually measured in inches or centimeters. For example, a low-resolution image used for screen display (like on the web) might have a resolution of 72 pixels per inch, while a high-resolution image used for commercial printing might have a resolution of 300 pixels per inch. What is important to realize is that the pixels are different sizes at the different resolutions. If you can fit 300 pixels in an inch, then they must be very tiny pixels; but if you can only fit 72 pixels in an inch, then they must be much larger pixels.
What’s confusing is that there can be several kinds of grids, which can refer to different kinds of things:
• Printer resolution is the grid of dots printed by a printer or imagesetter. This is measured in dots per inch.
• Sample resolution is the grid of samples captured by the scanner or digital camera. This is measured in samples per inch, often incorrectly referred to as dots per inch. When stored as digital data, these samples become pixels.
• Halftone resolution is the resolution of the “spot” — the pattern of printer dots used to reproduce images with halftones in commercial printing. This is measured in lines (meaning rows of spots) per inch.
• Image resolution is the grid of pixels that is manipulated by applications like Photoshop, Illustrator, and InDesign. That’s the resolution we’re talking about in this chapter.
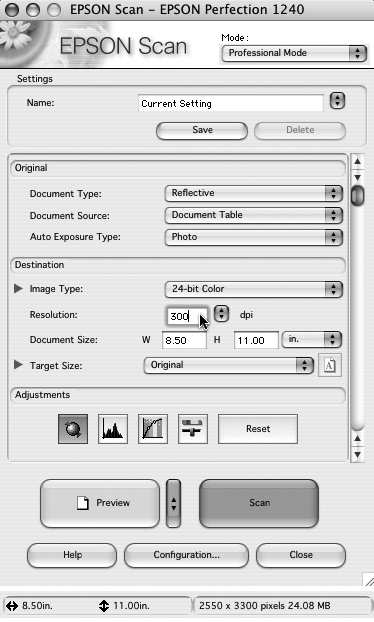
Sometimes the image resolution is determined when a file is created or a scan is captured. In the Photoshop New dialog box (Figure 4-3), notice that Resolution shows 72 pixels/inch. In Steve’s Epson scanner, the resolution is also determined at the time of scanning in the Resolution field (see Figure 4-6). In the Epson software, the pixel dimensions and file size are shown at the bottom of the Preview window, but you could calculate them using the Resolution and Document Size fields. In the example shown, if you multiply the Resolution (300) by the Document Size width (8.5) and height (11) fields, you can get the image dimensions of 2550 pixels wide by 3300 pixels high.
Figure 4-6. The Epson scanner software is used to define the Resolution and Document Size (left). With these settings, its Preview window displays the resulting pixel dimensions and file size (below).
Some images are created without storing a resolution. For example, if you use a low-end consumer digital camera to capture a JPEG image and you place it directly into a layout, you may find that it comes in at a huge size! The reason is that the image has no defined resolution (this is not required by the JPEG format). So the page-layout program figures that the resolution is 72 pixels per inch instead of the 300 pixels per inch (ppi) that is more common. When an image comes in with the bigger pixels of 72 ppi, it takes up much more space (on your screen, not on your disk) than the smaller pixels of 300 ppi. However, some digital cameras now store the resolution and other information in the metadata (which we talk about in “Mastering Metadata” section of Chapter 3, “View from the Bridge”). InDesign CS2 is now smart enough to be able to read the metadata if it’s present, and, if it finds no resolution data, can scale the image to some reasonable size.
Effective Resolution
If you take a 72-by-72-pixel image and scale it to 50% in InDesign or Illustrator, you are taking the same number of pixels and shrinking them to cover a smaller area. The image’s effective resolution becomes higher — 144 pixels per inch. If you scale the image up, so the pixels are made even bigger, then you reduce the effective resolution. Imagine that your image were transferred onto a piece of rubber. Now imagine you stretch the rubber image so that it becomes bigger. As the image becomes bigger, the quality of the art would deteriorate. That’s what happens as you scale an image up in size.
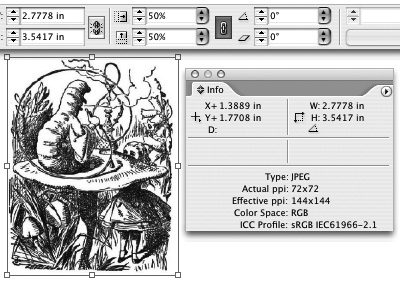
InDesign CS2 has a wonderful tool called the Info palette that tells you both the image resolution (which it calls Actual ppi) and the effective resolution (Effective ppi). Figure 4-7 shows the display of the Info palette and the Control palette (which shows the scaling) when an image is scaled smaller.
Figure 4-7. An image with a resolution of 72 pixels by 72 pixels has been scaled to 50% (see the Control palette above). The InDesign CS2 Info palette shows the effective resolution is now 144 ppi.
Bit Depth
The third essential concept is bit depth. This is the number of bits required to describe an image. Computers store data as bits of information. Since computers are binary, each bit is either on or off. With created or sampled black-and-white images, this means each pixel can be either black or white. These images are called 1-bit images, and they’re referred to as Bitmap mode in Photoshop.
With grayscale images, you can sample or create 256 shades of gray. This takes eight times as many bits to store as do black-and-white images (2 × 2 × 2 × 2 × 2 × 2 × 2 × 2 = 256), so these are sometimes called 8-bit images.
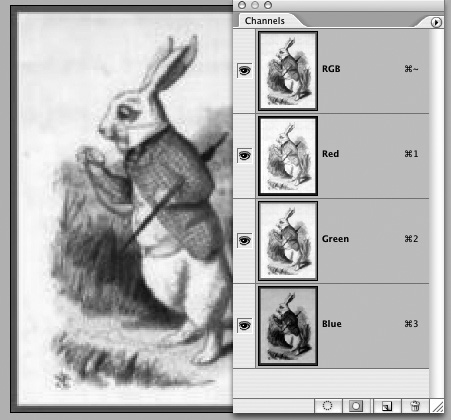
Since scanners and digital cameras work with light, their primary colors are red, green, and blue. In order to capture a color image, they have to capture three grayscale images — one for each color. In Photoshop, we see these as channels in the Channels palette (see Figure 4-8) — each of which represents a grayscale channel for the three primary colors. This makes RGB color images 24-bit. The three channels are composited into the RGB image we see on the computer display. (For printing, the three RGB channels are converted to a four-channel CMYK image — cyan, magenta, yellow, and black.)
Figure 4-8. A color scan opened in Photoshop’s Channels palette. The Red, Green, and Blue channel thumbnails preview the three grayscale images composited into the RGB image we see onscreen.
“High-Bit” Capturing
In the early days of desktop scanning, most scanners only captured 8 bits of data per channel (in a grayscale image, for example). Scanner technology has advanced, and today even inexpensive consumer scanners capture at least 12 bits of data for a grayscale scan (or 36 bits for a color scan). Some scanners can even record as many as 48 bits per color sample.
Many scanners that capture more than 24 bits per sample of color information automatically compress this to just 24 bits when saving the final scan file. This can be a very good thing, because these “high-bit” scans create large file sizes, and are slower to process. However, if you want to make major tonal or color corrections using Photoshop’s powerful features, it’s better to save this “high-bit” information. Photoshop supports 16 bits per channel in its images. Older versions of Photoshop provided only limited editing features with “high-bit” data, but each new version has added new ones. In Photoshop CS2, even more filters have been upgraded to 16-bit compatibility, including Liquify and Lens Blur.
Calculating File Size
When you know the pixel dimensions of an image and its bit depth, you can then calculate its file size. This will help you ensure that you have the right amount of information for your particular workflow. Black-and-white images are the smallest. Grayscale images are eight times as large. Capturing pixels in color creates a file three times as large as grayscale.
Tip: New Dialog Box Calculator
When trying to figure out how big a capture to make, you can use the Photoshop New dialog box as a calculator (Figure 4-3). In the menus beside the Width and Height fields, choose pixels, and enter the dimension of an image. Choose Bitmap, Grayscale, or RGB Color in the Color Mode menu. (If you’re doing a high-bit capture, change the menu to the right of Color Mode to 16 Bit.) Photoshop then calculates the image size and displays it on the right side of the dialog box.
That covers just the basics. If you’d like to learn more about working with these concepts, as well as how to make the best use of your scanner, we highly recommend Real World Scanning and Halftoning, which goes into a lot more detail.
Working with Pixels and Raster Files
While all of the Adobe Creative Suite applications work with pixels to some degree, there’s no doubt that Photoshop is the pixel king (or queen). Although you can work with vectors in type, paths, and shape layers in Photoshop, most of its hundreds of tools and menu commands are dedicated to selecting and modifying pixels. Commands either work on all the pixels in an image or on those that you’re selected. So most of this section will be devoted to Photoshop.
You’re working with a raster file, rather than editing actual pixels, most of the time when you work in Adobe Bridge, Illustrator, and InDesign. By raster file we mean the pixels that have been stored so they can be used in another application. However, when you work with a raster file, you affect the way it’s displayed or printed, but the underlying pixels are left untouched. In this section, we talk about what each application can do when you’re working with pixels (see Table 4-1).
Table 4-1. Working with Pixels or Raster Image Files in CS2 Applications

Viewing and Managing Raster Image Files
People who work with images extensively spend a lot of time managing the raster image files they have scanned, captured with their camera, purchased, or otherwise created. Image files must be previewed, ranked, sorted, and cataloged. Files that come from digital cameras with obscure names like “IMG_0130.JPG” must be renamed. Meaningful metadata must be added to the file to store information like copyright data and keywords so the images can be found again when needed.
Adobe Bridge gives users the functions they need to manage image files, incorporating and augmenting file-browser features:
• Bridge previews all Adobe file types.
• Bridge lets you preview pages within a PDF file, InDesign files and templates, and Illustrator files.
• Bridge lets users view thumbnails of their images, view metadata, move, rotate, and rename files. Users can also sort thumbnails by several criteria and assign ranking values.
• Bridge has its own menus, and lets you run automation routines within the Browser interface.
• Bridge fully integrates the Camera Raw plug-in.
For more information on these features, see Chapter 3, “View from the Bridge.”
Photoshop can, of course, still work with files individually — previewing them when opening, rotating, renaming, and so on — but for productively working with large numbers of files, you should use Adobe Bridge.
In the file-management category, InDesign and Illustrator are limited to previewing raster image files. (We talk about rotating pixels versus files in the “Rotating Pixels or Transforming Raster Files” section below.) InDesign has the ability to preview any Photoshop file that it can place. It can build previews of an image even if a thumbnail preview hasn’t been saved with the file.
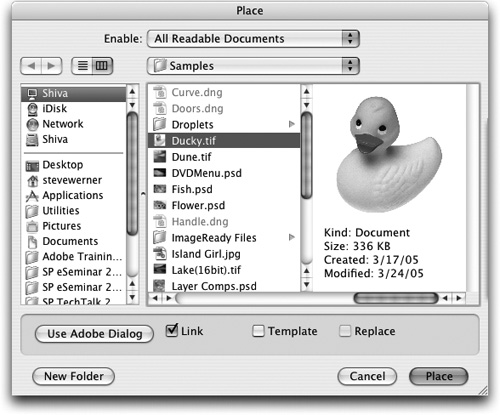
Illustrator’s abilities depend on the operating system setting you choose in the Open or Place dialog box. On the Macintosh, Steve sees previews because he likes to work in Mac OS X column view (see Figure 4-9). Sandee prefers list view, because that shows her files in chronological order, so she doesn’t see previews. (Windows has similar settings.) But both of us prefer Adobe Bridge because it always shows previews, and you can drag images directly into either InDesign or Illustrator layouts.
Figure 4-9. When you open or place an image, you may see a preview depending on your operating system settings. Mac OS X’s column view is shown.
Cropping Images and Masking Raster Files
It’s always a good principle to start large when you’re capturing or creating an image. You can always crop down an image at a later stage in the layout. You can never be sure when you might need those extra pixels.
But where do you do your cropping — in Photoshop, or when you’re making a layout in InDesign or Illustrator? You can, of course, do either — but with a difference. When you’re cropping in Photoshop, you’re usually cropping away pixels. In InDesign or Illustrator, you’re only hiding (or masking) the part of the picture you don’t want to see.
Cropping in Photoshop
After you drag out a cropping area with the Crop tool, you can get a very nice preview of the part of the image being cropped away (see Figure 4-10). You can then tweak your crop by dragging the corner or side handles before you press Return or Enter.
Figure 4-10. Use the Crop tool in Photoshop to crop an image. If you’re working on a non-background layer, you have the option to save pixels outside of the visible area of the crop.

Another trick is that you can rotate the image while cropping: If you move your cursor outside of the cropping marquee, you’ll see the double-arrow cursor that indicates you can rotate; just drag to rotate by hand.
Tip: Save Data Outside the Crop
What if you think you might need that data again? You can still save it! The key is that you have to make sure that you aren’t on a Background layer (if necessary, double-click the layer to make it Layer 0, a non-background layer). When you drag out the cropping rectangle, click the Hide button beside Cropped Area. Cropping will only hide the cropped pixels, even if you save the file. If you need to retrieve the hidden pixels, re-crop the picture by dragging outside the image’s visible rectangle.
Masking Raster Images
InDesign and Illustrator don’t have cropping tools. Instead, they allow you to create a mask, which hides part of an image. In InDesign, for example, the simplest way to mask an image is to use the Selection tool, and drag in the corner handles to mask away the part of the image that you want to hide.
Illustrator works a little differently: After placing an image file, you must create a new path to use for masking. But it doesn’t necessarily have to be a rectangle: An ellipse, or any shape, will work. Place the masking path on top of the image, select both objects, and choose Object > Clipping Path > Make (Figure 4-11, left).
Figure 4-11. Illustrator uses the Clipping Mask command to mask an image (left). InDesign can do a similar effect with the Paste Into command (right).
InDesign can do that trick too, using the little-used Paste Into command (Figure 4-11, right). You can mask any image inside a path or frame. Create the frame (we used an ellipse). Then select the image, and cut it to the clipboard. Select the frame, and choose Edit > Paste Into. Then use the Direct Selection tool to click the masked image, and move it within the frame.
Scaling and Resampling
Now here’s where our discussion of image resolution is going to come in handy: We’re going to talk about the difference between scaling pixels and image files, and resampling pixels.
Scaling Pixels or Raster Files
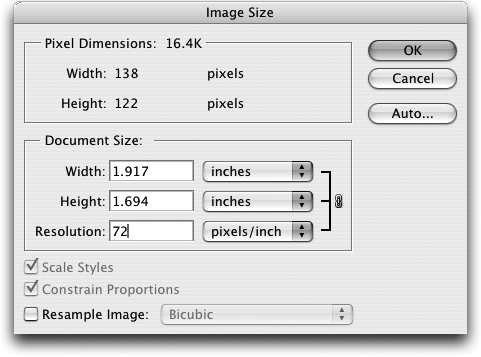
In Photoshop, you scale pixels by choosing Image > Image Size. When you want to scale — which does not change the pixel dimensions of the image — you uncheck the Resample Image check box at the bottom of the dialog box (see Figure 4-12). Notice that when you do this the Pixel Dimensions section of the dialog box is now static. Entering a new Resolution value arranges the same pixels over a larger or smaller physical area. A higher resolution results in smaller document dimensions; a lower resolution results in larger document dimensions. But the pixels themselves are unchanged.
Figure 4-12. Photoshop’s Image Size dialog box has two functions: Here it is resizing an image because the Resample Image option is unchecked. The pixel dimensions don’t change.
You can’t scale pixels in InDesign or Illustrator. Instead, after you place an image file, you can scale it as we talked about in the “Resolution” section above. You can do this with the Control or Transform palette, the Scale or Free Transform tool, or by dragging the corner bounding box handles in either application. When you scale the image size up or down using any of these methods, you are changing the effective resolution.
Resampling Pixels
Resampling an image is a process that can only be done in the Suite in Photoshop, and it’s done in the very same dialog box as when you scale an image. When you resample a bitmap, you change the pixel dimensions of the image.
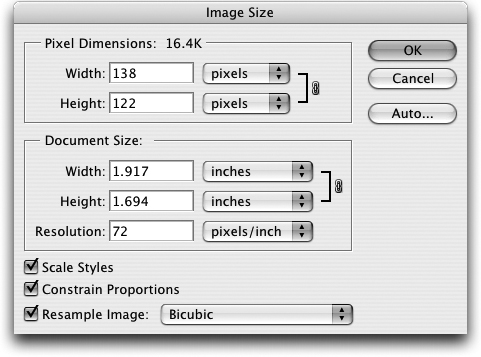
If you want to downsample an image, or reduce its resolution, start by checking the Resample Image check box (see Figure 4-13). Now notice that the Pixel Dimensions are not locked. If you enter a lower resolution, Photoshop removes pixels from the image, while maintaining the document’s physical size. If you want to increase the resolution, this is usually called interpolation. Photoshop has to manufacture pixels where there were none before. This is a potentially more dangerous process, and it tends to produce images that are soft or blurry. It can’t add detail to an image where it isn’t present in the original.
Figure 4-13. When Resample Image is selected in the Image Size dialog box, images can either be downsampled or interpolated, changing the pixel dimensions.
While we implied that you couldn’t resample in InDesign, that’s not completely true. If you choose File > Print in InDesign, and select the Graphics panel, you can choose an option to send image data with optimized subsampling. This is useful when you want to print low-resolution proofs of high-resolution images to an inkjet or laser printer. InDesign samples down the images and sends only the amount of information necessary to the currently selected printer, speeding up printing. But it doesn’t change the pixel data itself, only what’s sent to the printer.
Rotating Pixels or Transforming Raster Files
Photoshop is the only CS2 application that can actually rotate pixels, even though you can flag files for rotation in Adobe Bridge. We cover that story in detail in the “Rotating Images” section of Chapter 3, “View from the Bridge.”
InDesign and Illustrator can’t rotate pixels in a linked image file like Photoshop can; they can only transform the entire image file. You can rotate the linked image file using the Control or Transform palette, or with the Rotate or Free Transform tool, but it’s the file that’s transformed, not the pixels in the file. (If you were to open the image in Photoshop after rotating them in InDesign or Illustrator, the pixels would look unrotated.) If you embed the image pixels in InDesign or Illustrator, you can then transform the embedded pixel data. (We talk about linking and embedding graphics in the “Linked Files in InDesign and Illustrator” section in Chapter 9, “The Genius of Smart Objects”.)
Adjusting Pixel Tone and Color
Adjusting tone and color means changing the actual values of the pixel data. With a couple of exceptions that we’ll mention below, we’re now working in Photoshop territory. (This is not the same as color management, which we talk about in Chapter 10, “Colors and Color Management.” Color management is concerned with how color changes when images are moved between different devices like scanners, monitors, and printers.) Here we’re concerned with how image tones and colors are adjusted, either to remove perceived imperfections or to achieve a particular tone or color effect.
With a grayscale image, tonal adjustment means shifting values of individual pixels between the 256 possible values in an 8-bit image (or more in a “high-bit” capture saved as a 16-bit image). With a color image, it means changing values in each of the grayscale “planes” that comprise the image — red, green, and blue for an RGB image, or cyan, magenta, yellow, and black for a CMYK image. (With a black-and-white image in Bitmap mode in Photoshop, the only image adjustment available is Invert, and the only available tools are Brush, Eraser, Clone Stamp, and Pattern Stamp tools.)
When you adjust tones and colors, it’s important to realize that you’re inevitably losing some information as you shift the values on each of these grayscale or color channels. In an 8-bit image, you have only 256 values to start with, so performing several successive corrections can reduce the number of tones in the image. This reduction creates what is called posterization (which will be visible on the Histogram palette in Photoshop as gaps — see below).
To get around the problem of posterization, either minimize your adjustments or use one of these strategies:
• Start with as much data as possible. If your scanner or camera will permit it, import and work with 16-bit files. These files, while much larger, have many more levels of tone to work with so are less susceptible to posterization.
• Use adjustment layers. Adjustment layers also require more RAM and create bigger files. We cover this feature in “Layer Types” in Chapter 12, “The Flexibility of Layers.”
Adjusting Tones in Photoshop
Adjusting tones is important for taking a dull, flat image and turning it into one that grabs your attention. It can take a dark, murky picture and makes its detail visible.
There are four primary tools for adjusting the tones of an image: the Histogram and Info palettes, and the Levels and Curves dialog boxes. Almost all of the commands for adjusting tone and color are found on the Adjustments submenu in the Image menu.
The Histogram palette (Window > Histogram; see Figure 4-14) is a bar chart of the tonal range. It plots levels of tone along the horizontal axis, and the number of pixels at each level along the vertical axis. (Choose Expanded View from the palette menu to see additional information.)
Figure 4-14. When adjusting tones in Photoshop, use the Histogram and Info palettes to see the effect of the changes you make.
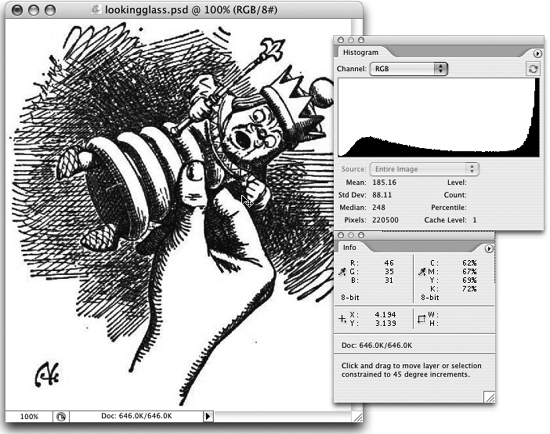
The Info palette (Window > Info; see Figure 4-14) uses the Eyedropper tool to measure the tones and colors in the image. It’s an informational display which lets you see the effect of tonal and color adjustment presented in a Before/After format when you’re using one of Photoshop’s many adjustment tools. You can choose the color model(s) you want to display.
When you select the Eyedropper tool, the Options bar shows the Sample Size menu. Here you can choose the number of pixels used — Point Sample (a single pixel), 3 × 3 Average, or 5 × 5 Average.
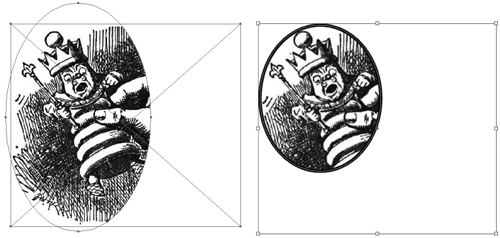
The Levels dialog box (Image > Adjustments > Levels; see Figure 4-15) provides controls over tone which are both easy to learn and still very powerful. For the simplest adjustments, use the three Input Levels controls — the three triangles immediately under the histogram. These let you control, from left to right, the black point (darkest part of the image), the gamma (midtone of the image), and the white point (lightest part of the image).
Figure 4-15. We lightened the highlights of this image using the Levels dialog box.
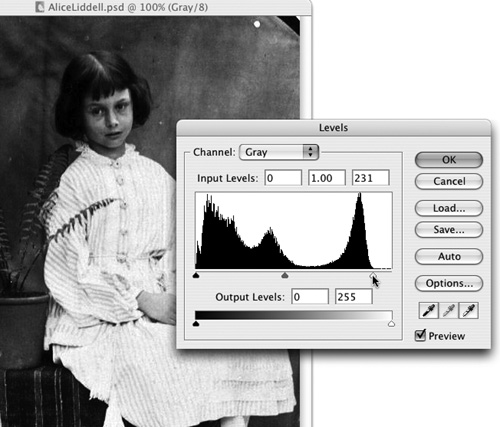
Here are some examples of how to use the Levels command:
• Drag the white point triangle to the left to lighten highlights (this is what we did to the image in Figure 4-15). The preview updates when you make this change. If you save the file and reopen it, you’ll see the updated histogram. The image shown is a grayscale image, but if you’re working on a color image, you can also make adjustments to the individual color channels.
• Move the black point triangle to the right to darken the shadows.
• Move both the white and black triangles toward the center to increase the image’s contrast.
• Move the gamma (middle) triangle to adjust the midtones without changing the highlights or shadows.
The Curves dialog box (Image > Adjustments> Curves; see Figure 4-16) displays a graph that plots the input level (existing pixel values) along the bottom, and output level (corrected values) up the side. When you first open the dialog box, the graph shows a 45° line, and as you make adjustments, the shape of the curve changes.
Figure 4-16. We lightened the midtones of this image with the Curves dialog box.

Here are some simple examples of how to use the Curves controls:
• Drag a point at the middle of the curve to lighten the midtones (we did this in Figure 4-16, using an Input of 50 and dragging up and to the left).
• Clip the black and white pixels (and give the image more contrast) by moving the curve’s endpoints horizontally toward the center of the graph. This has the same effect as moving the black and white triangles in the Levels dialog box.
• Make the image flatter (less contrasty) by moving the curve’s endpoints vertically toward the center of the graph.
The Curves dialog box is more challenging to learn than the Levels command, but gives a Photoshop professional lots of control over tonal and color adjustments. We highly recommend Real World Adobe Photoshop CS2 from Peachpit Press to learn more about tonal and color adjustment tools in Photoshop.
Adjusting Color in Photoshop
Adjusting color is a more complex topic than adjusting tone. If you’re new to working with color, you might want to look at Chapter 10, “Colors and Color Management,” first.
Traditionally, those who work with color-correcting images tend to work in this order:
• Retouch to remove spots, dust, and scratches.
• Adjust overall tone for the image.
• Adjust overall color for the image.
• Select parts of the image for selective tonal and color adjustment.
• Apply sharpening and other image optimization for a specific kind of image usage.
The primary tools in Photoshop for working with color are the same as for working with grayscale correction — the Histogram and Info palettes and the Levels and Curves dialog boxes. However, Photoshop has developed a host of supplementary tools and commands for color adjustments. Here are some of the most important:
• The Hue/Saturation command (Image > Adjustments> Hue/Saturation) lets you make overall adjustments to the hue, saturation, and lightness of the entire image when you have the Master setting selected (see Figure 4-17). You can also adjust these values for specific primary and secondary colors by selecting Reds, Yellows, Greens, Cyans, Blues, or Magentas in the Edit menu.
Figure 4-17. The Hue/Saturation dialog box lets you adjust hue, saturation, and lightness of an entire image when you choose the Master setting.

• The Color Balance command (Image > Adjustments > Color Balance) lets you make separate color adjustments to shadows, midtones, and highlights. Professional retouchers generally prefer to use the Curves dialog box because it gives them more control.
• The Replace Color command (Image > Adjustments > Replace Color) lets you select a range of colors and replace them with different colors. It has sliders for hue, saturation and lightness.
• The Channel Mixer command (Image > Adjustments > Channel Mixer) lets you change the strength of the effect of each of the channels that make up the color image.
Using Color Filters in Illustrator
Steve and Sandee almost always do tonal and color adjustments in Photoshop because it offers by far the most control over the process. However, Illustrator has a few color-adjustment commands in the Filter > Colors submenu. (What Photoshop calls “image adjustments,” Illustrator calls “filters.”) These filters adjust the color for both selected vector objects and embedded images. For example, you can use the Convert To Grayscale command to change selected objects into grayscale!
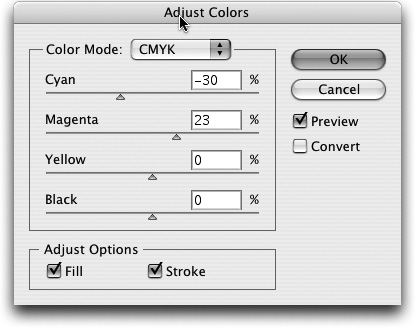
One filter worth taking a look at is the Adjust Colors dialog box (Filter > Colors > Adjust Colors; see Figure 4-18). When you have selected vector objects and embedded images, you can adjust the color components of the selected objects. For example, when you’re working in CMYK color space, CMYK mode lets you increase or decrease the cyan, magenta, yellow, and black percentages of all non-global process colors. If you check Convert, any global or spot colors will be adjusted as well.
Figure 4-18. The Illustrator Adjust Colors dialog box lets you change the color of both vector and raster objects.
Colorizing Pixels and Raster Images
Adding color to a black-and-white or grayscale image is called colorizing. As with the other tasks in this section, there are two approaches. Photoshop changes the color of the actual pixels of an image. InDesign and Illustrator both have controls for colorizing grayscale and color image files. (With the latter approach, it appears that the pixels have changed in InDesign or Illustrator in the onscreen or printed artwork; instead, the change is applied to the raster file. After colorizing the pixels, if you were to open the file in Photoshop, the pixels themselves would still be black-and-white or grayscale.)
Colorizing in Photoshop
We’ve found two primary methods for adding color to grayscale images in Photoshop.
When you want to create a quick colorizing effect, you can convert the image to RGB (Image > Mode > RGB Color). Then choose Image > Adjustments > Hue/Saturation, and, if you check the Colorize option, you can adjust the Hue, Saturation, and Lightness sliders to add color (Figure 4-19).
Figure 4-19. Add color to a grayscale image by changing it to RGB and using the Colorize option in the Hue/Saturation dialog box.

(See the color version on page C-3 of the Color Insert.)
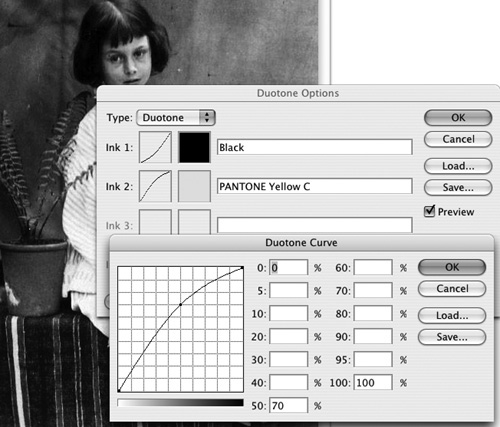
For more control, you can start with a grayscale image, and create a duotone image. If necessary, choose Image > Mode > Grayscale to convert the image to grayscale. Then choose Image > Mode > Duotone. The image will appear with one black channel in the Duotone Options dialog box. Click the color box beside Ink 2 to add a second color (or add additional colors for a tritone or quadtone). Then click the curve box beside each ink and drag the curve or add new control points in the Duotone Curve dialog box.
Figure 4-20. You have more control over colorizing an image in Photoshop by creating a duotone.
(See the color version on page C-3 of the Color Insert.)
Colorizing in InDesign and Illustrator
Colorizing a black-and-white or grayscale image file is incredibly easy in InDesign or Illustrator. In InDesign, you can colorize either a grayscale or black-and-white image if it’s in TIFF, JPEG, or PSD format, but it may not have any transparency. You can use process or spot colors. The key is to choose the right tool. You must click the image with the hollow-arrow Direct Selection tool. You can then use either the Swatches or Color palette to apply color, or use the tint slider to modify the color.
For Illustrator CS2, colorizing a grayscale image is a new feature. (It has had the capability of colorizing black-and-white images for several versions.) You can colorize PSD, TIFF, JPEG, and even PDF black-and-white and grayscale images. Just click the image with the Selection tool and choose a color on the Control or Swatches palette (or drag and drop a color, if you like).
While it is convenient to colorize images this way, the more sophisticated controls are found in the Duotone Options in Photoshop.
Painting and Retouching
Sometimes you want to change a raster image, either subtly — such as removing small scratches or dust in the image — or more radically — such as changing the photography to look more like an oil painting or watercolor. This is definitely Photoshop’s arena. It provides a mind-boggling array of tools for painting and retouching.
Painting Tools
Sandee and Steve aren’t fine artists, so we can’t tell you how to create artistic effects (many books do that). However, we can point you to some of Photoshop’s more important painting tools because everyone will use them once in a while, even in a production environment.
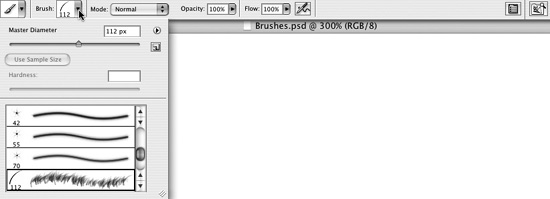
• The Brush tool is used to create brushes of all shapes and sizes, which can be used for retouching in production, or for fine art. There are two ways to pick a brush. For a quick brush selection, choose the Brush tool from the Tools palette, and then click the menu to the right of the brush size preview on the Options bar. Here you can quickly select a brush preset or change a brush size (Figure 4-21).
Figure 4-21. Pick a brush quickly from the brush presets on the Options bar.
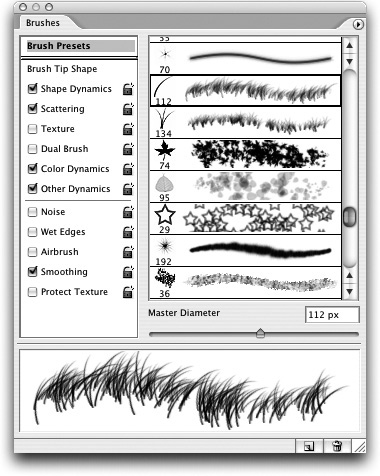
But when you really want to customize your brushes, click the Toggle The Brushes Palette button at the far right of the Options bar. This opens the Brushes palette (Figure 4-22). Here you can modify settings for a brush, with a live preview at the bottom of the palette, or even define your own custom brush shapes.
Figure 4-22. The Brushes palette in Photoshop provides a multitude of commands to modify brush settings.
When you’re using the Brush tool to make corrections, paint onto a layer mask. This doesn’t change the actual pixels of the layer until you’ve applied the layer mask. Until then, you can change your mind, and repaint. We discuss more about layer masks in the “Masking Layers” section in Chapter 12, “The Flexibilty of Layers.”
• The Pencil tool is the only tool that doesn’t create soft, antialiased edges. This makes it the perfect tool to edit black-and-white bitmaps.
• There is a host of painterly filters available under the Photoshop Filters menu. The easiest way to experiment with them is with the Filter Gallery. Since there are so many filters, you can preview your image while you try out filters. You can even see the effect of multiple filters as the same time!
Retouching Tools
When images are sampled with a scanner, the process usually transfers imperfections — dust, scratches, specks, and spots. Almost every image requires at least a small amount of retouching. But as everyone knows, we can also use Photoshop to change reality — to remove the power lines from an image that distract from the subject we’re trying to show, for example. For these kinds of jobs, Photoshop provides retouching tools.
First, there was the Clone Stamp tool (known as the Rubber Stamp tool in early Photoshop versions). The Clone Stamp tool makes a copy of pixels (called sampling) in one area of the image when you Option/Alt-click with the tool, and then paints with that copy elsewhere in the image when you drag the tool. However, this tool has its limitations when the tone or color of the source and the destination are different.
But Photoshop CS2 has added some other new tools to make the retouching process even easier:
• The Healing Brush and Patch tools give better results than the Clone Stamp tool by taking into account the luminosity and tonal values of the area where you’re painting and adjusting for them.
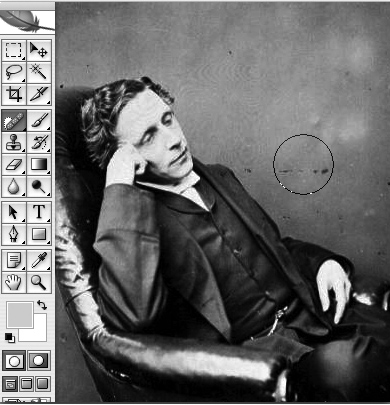
• With the Spot Healing Brush tool (Figure 4-23), you don’t have to sample another area. With a single click over the area needing retouching, the Spot Healing Brush analyzes the area around, and automatically samples the “best pixels” to use for healing the area. (We found that if it doesn’t seem to work the way you expect, undo, and then offset your click a short distance. Then it will use the new selection of pixels to make its analysis.)
Figure 4-23. We chose the Spot Healing Brush tool to eliminate imperfections in this image (left). After applying it, most of the spots in the area where we clicked disappeared (right).
• The Dust And Scratches filter can provide a quick way to remove dust and scratches from a scanned image. Just be sure to use it in moderation — unlike the healing and patch tools mentioned above, it will blur your image and remove the image’s texture, if used at too high a setting.
Applying Filters and Effects
“Filters and effects” is really a hodge-podge category. The tools in the Photoshop Filter menu and the Illustrator Filter and Effects menus can perform many different kinds of operations: They can blur or sharpen pixels, add textures or noise, distort images, add artistic effects, or even mask away unwanted parts of an image.
Photoshop Filters
In addition to the filters we’ve already mentioned, here are a few of the most important ones:
• The Noise filters (Filter > Noise submenu) can be used for both artistic and production purposes. They can create texture to add interest to an image. They can also be used to smooth gradients that show banding or drop shadows.
• The Blur filters (Filter > Blur submenu), especially the Gaussian Blur, can be used to soften an image and reduce the effect of artifacts. Softening the edges of a selection (or using the Feather command) is also useful after creating a silhouette.
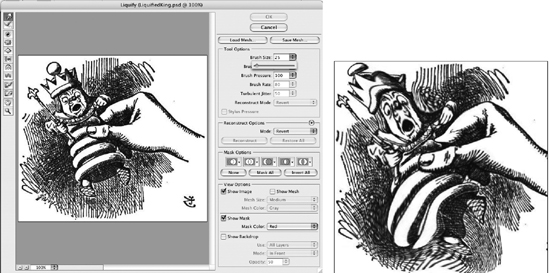
• The Liquify filter (Filter > Liquify) is perhaps the one that can be the most fun to use (Figure 4-24). It can be used to pull, twist, and distort an image. It uses one of the “supersized” dialog boxes that provide their own working environment and take over your screen. Within the dialog box, select any of the liquify tools on the left side, and adjust the brush size (the left and right bracket keys make this faster). Then just drag over your image to produce the distortion effect. (Behind the scenes, it’s using a mesh to store the distortions, just like the Warp effect that we describe in the “Mesh, Blend, Warp and Brush Objects” section of Chapter 5, “Getting to the Point of Vector Graphics.”)
Figure 4-24. The Liquify filter dialog box provides controls for distorting an image (left). The results of the distortion are shown on the right.
• The Extract filter (Filter > Extract) provides another tool to silhouette an image, in addition to the tools for making selections we mention in the “Selecting and Moving Pixels in Photoshop” section in Chapter 7, “Managing and Customizing the Interface.” It opens up another supersized dialog box, with controls for highlighting the edge, and indicating the portion of the image to be kept.
• The Vanishing Point filter (Filter > Vanishing Point) creates perspective planes in your image. You can then use its tools to paint, clone, and drag objects around corners and into the distance.
Illustrator’s Raster Filters and Effects
Illustrator has filters and effects that can create pixels as well. They’re found in the Filter and Effect menus (Figure 4-25). Many of the commands here can either be applied to Illustrator vector objects or to embedded raster objects (they can’t be applied to linked images). For the difference between filters and effects, see the sidebar “Filters versus Effects.”
Figure 4-25. The Effect menu in Illustrator is divided between Illustrator Effects and Photoshop Effects. The Stylize commands (to create drop shadows, feathering, or glows) create raster objects.

The Effect menu is divided into two parts: Most of the effects listed in the section headed Illustrator Effects keep vector objects as vector — for example, those which change the shape of paths, or apply distortion effects. But the Drop Shadow, Feather, Rasterize, Inner Glow, and Outer Glow commands produce raster objects. In addition, 3D Extrude & Bevel and 3D Revolve produce raster objects when raster images or gradients are in mapped artwork. Effects in the Illustrator Effects section can be applied to either CMYK or RGB objects.
The effects in the Photoshop Effects portion of the Effect menu can be applied only when you’re in RGB color mode, with the exception of the Blur effects, the Pixelate effects, and the Unsharp Mask command. Illustrator CS2 now has an Effect Gallery for experimenting with these effects, just like in Photoshop. If you apply one of these artistic effects to a vector object, and then expand the appearance, you will also create an embedded raster object.
Setting Resolution for Illustrator Raster Effects
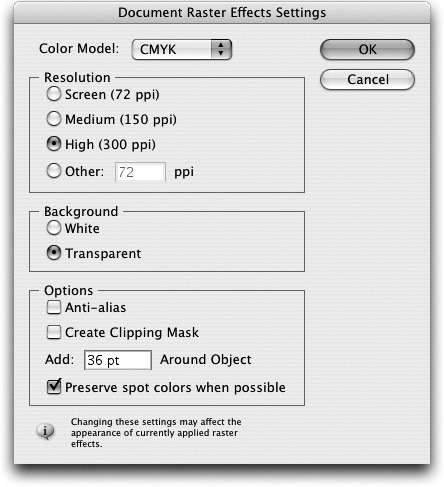
If you’re planning to print Illustrator artwork that contains raster effects, it’s important to set a resolution that’s appropriate for your printing process. The resolution of Illustrator raster effects is a document-wide setting found by choosing Effect > Document Raster Effects Settings. In the Document Raster Effects Settings dialog box (Figure 4-26), the resolution is set to screen resolution (72 ppi) by default for faster screen redraw. If you don’t change that setting to something more appropriate for higher resolution and quality output, that’s the way the effect will print!
Figure 4-26. If you’re printing Illustrator artwork that contains raster effects, it’s important to choose the appropriate resolution in the Document Raster Effects Setting dialog box.
One other difference between the Illustrator and Photoshop Effects is that the Illustrator effects like Feather, Inner Glow, Outer Glow, and Drop Shadow are measured in ruler units (such as points). Photoshop Effects — the effects under the Blur submenu, for example — are measured in pixels. If you change Illustrator’s Document Raster Effects Settings, the strength of the effect will change. Effects under the Pixelate submenu are also resolution-dependent. So after changing the Document Raster Effects settings, re-examine your artwork carefully.
Now in Illustrator CS2, you can apply spot colors to raster effects like drop shadows. These will print correctly as composites or separations, and will print as spot colors when placed in applications like InDesign.
Sharpening Images
Whether you create images for print, multimedia, or the web, you will probably need to sharpen them. Whenever you scan or capture an image with your camera, you always lose some sharpness when an image is digitized. It’s just part of the process, and capturing more resolution won’t help. Since our eyes are attuned to looking for the edges of things, viewers of your images will always notice a soft edge. The process of printing — whether on an inkjet printer or a printing press — also causes a loss of sharpness. The answer is to sharpen your images.
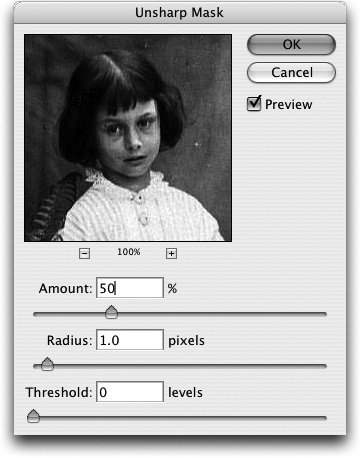
Traditionally, the best place to do image sharpening is with Photoshop’s Unsharp Mask filter (Filter > Sharpen > Unsharp Mask; Figure 4-27). The name is no doubt confusing to you! It derives from earlier photographic methods of sharpening. It has three controls: Amount controls the intensity of the sharpening. Radius sets the width of the effect that the sharpening filter puts around edges; it’s dependent on image resolution. Threshold determines how different pixels are before the sharpening takes effect. This is a complex subject: Real World Adobe Photoshop CS2 devotes a whole chapter to it.
Figure 4-27. The Unsharp Mask filter gives you three controls for sharpening.
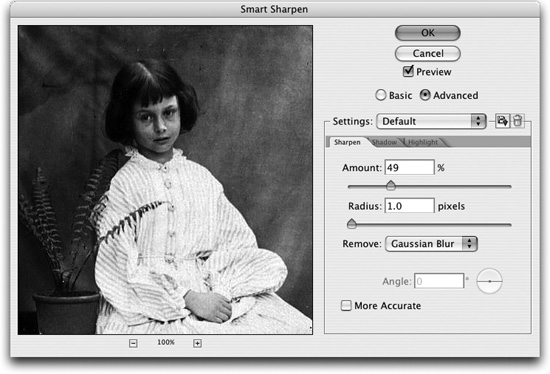
Photoshop CS2 provides a Smart Sharpen filter, which is drawing rave reviews from most graphics professionals who have worked with it (Figure 4-28). It has several advantages over the Unsharp Mask filter. It reduces some problems, like color halos, caused by sharpening. The filter provides a large preview, an easier interface, and the ability to have separate controls for sharpening in shadows and highlights. You can — finally — save your settings for reuse (they will be stored in the Settings menu within the dialog box).
Figure 4-28. The Smart Sharpen filter provides large previews, an easier interface, and the option to save settings.
Just to be complete, we’ll mention that Illustrator CS2 also has filters and effects for unsharp masking as well, found on submenus under the Filter and Effects menus. The controls work the same as in the Unsharp Mask filter in Photoshop, but only when you’ve embedded the image you’re editing in an Illustrator document. Sandee and Steve prefer to do our image work in Photoshop, but the controls are there in Illustrator if you need them.
Saving Pixels
Once you’ve created and modified pixels, you need to save them in a file format that you can work with in your workflow. Photoshop CS2 offers a huge number of possible formats for saving raster files. Each file format offers advantages and disadvantages. Which ones should you use? That’s what we’ll discuss in this section.
The first time you save an image in Photoshop CS2, you’re confronted with the Save As dialog box (Figure 4-29). This gives you both the choice of what format to save in, and some options about which file attributes to be saved with the file. Some of the file formats allow you to save alpha channels (saved selections), layers, annotations, and spot colors. You can also control whether you embed an ICC profile in the image. (We discuss profiles in “ICC Profiles” in Chapter 10, “Colors and Color Management.”)
Figure 4-29. When you save an image in Photoshop CS2, you can choose both a file format and options for how to save it (left). If you choose a format that doesn’t support all the kinds of information in your file, you’ll see warning icons, and you just save a copy (right).
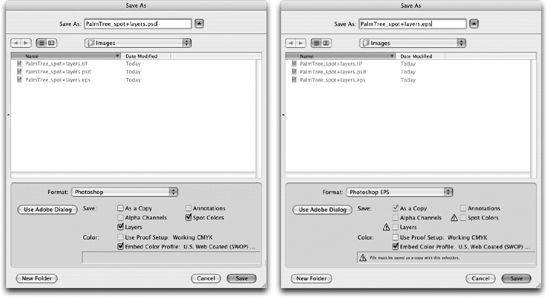
Sometimes your image may contain information that a file format doesn’t support (Figure 4-29). Then you’ll see warning icons beside certain options. You’ll be forced to do a Save A Copy. This strips out the information the format can’t handle (flattening layers, for example) so it can be saved in that format.
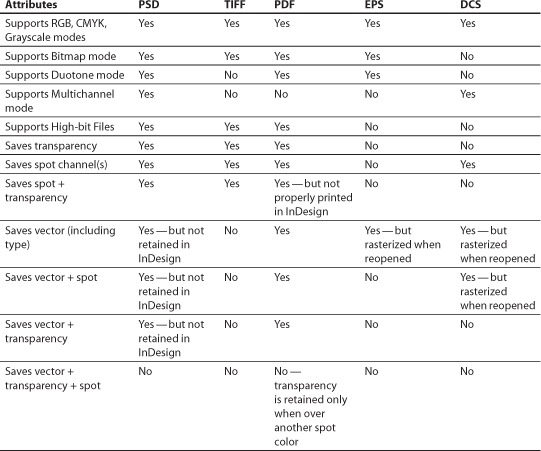
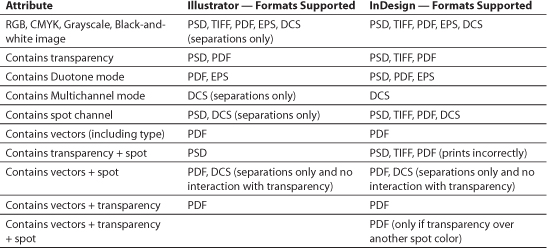
There are five preferred formats when you’re saving images for print — PSD, TIFF, PDF, EPS, and DCS. In Adobe Creative Suite 2, these images are usually saved from Photoshop to be placed into InDesign and Illustrator. There is no format that supports all possible raster file attributes at the same time. Table 4-2 summarizes which attributes are saved by each format. We explain what each format is best (and worst) for in this section. (We discuss how to save images for the web in the “Saving in Formats for Web or Multimedia” section below and Chapter 17, “To the Web.”)
Table 4-2. Pixel attributes saved with different print file formats
Photoshop Format
The Photoshop PSD format is sometimes referred to as Photoshop’s native file format. It’s the default format for saving images in Photoshop. It can store all attributes that Photoshop can create — including all its color modes, layers, adjustment layers, type, layer effects, paths, transparency, spot colors, and vector masks. However, not all of this information is retained when you place a PSD file in InDesign or Illustrator.
When you save in the Photoshop format, by default you’re prompted to save with “maximum compatibility” (Figure 4-30). When you do this, Photoshop includes in the file a flattened composite that you can use in other applications (or if the file needs to be opened in an future version of Photoshop that handles layer blending differently).
Figure 4-30. The Maximize Compatibility dialog box insists quite strongly that you need to leave this feature turned on.
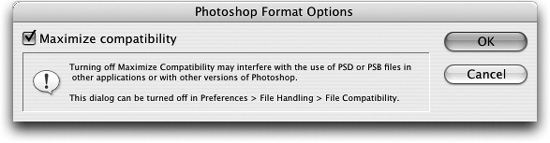
When should you save a composite? In most cases, InDesign and Illustrator can read the layers from a Photoshop PSD file, even without the composite. So if your files are simple, you can get away with not saving the composite if your disk space is at a premium. Definitely choose this option if you plan to place a 16-bit PSD file in InDesign or Illustrator, or if you will use the image with non-Adobe applications. The dialog box can be turned off in Photoshop File Handling Preferences.
The Photoshop format is usually the best format for when a file will be placed in InDesign or Illustrator. If you’re using your files in Adobe Creative Suite, it means that you can save your files in one format — instead of having to save out flattened TIFFs as you have to do with QuarkXPress (see the sidebar, “Workflow Advantages of Native File Formats”).
However, the PSD format will not properly retain either vector masks or type created in Photoshop. Vector masks and type are stored if you need to reopen the Photoshop file, but vectors will be rasterized at the resolution of the image if you place it in InDesign or Illustrator.
TIFF
TIFF is an acronym for Tagged Image File Format, although no one ever calls it that any more. While Photoshop is an Adobe format that is read by many applications, TIFF is a published industry-standard file format that can be read by virtually every program that works with raster images. This format may be your best bet if you must save images for use in non-Adobe applications like QuarkXPress.
TIFF was once a simple format, but in its current incarnation it can store almost everything in a PSD file — layers, spot color channels, adjustment layers, vectors. The only attribute it can’t save is information saved in Duotone mode.
However, just because TIFF can save this information doesn’t mean that InDesign, Illustrator or other applications can print it properly. InDesign CS2 can do better than Illustrator CS2. InDesign can read TIFFs with spot channels and transparency, but Illustrator cannot. Vector information cannot be retained in either application; it will be rasterized.
When you save layers and more complex attributes in a TIFF image, it always saves a flattened version, just like PSD. InDesign and other applications use the flattened version of the file. Illustrator doesn’t handle TIFF very well; it can only place the simplest of TIFF files (see Table 4-3).
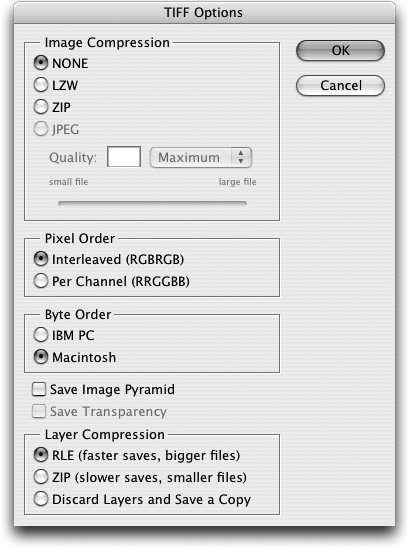
When you save a TIFF, an additional dialog box gives you some options for compressing the image (Figure 4-31). If you choose ZIP or JPEG options for image compression, you’ll be warned that older TIFF readers (for example, the one in QuarkXPress) may not support it, but InDesign CS2 and Illustrator CS2 do. However, you should be careful in applying compression because sometimes RIPs don’t support it properly. Be sure to check with your service provider before sending them compressed TIFFs. You can ignore the Mac or IBM PC options because almost all applications can read either kind.
Figure 4-31. The TIFF Options dialog box gives you choices for compressing TIFF images.
Encapsulated PostScript (EPS)
Encapsulated PostScript (usually just referred to as EPS) is an outgrowth of the PostScript language that we talk about in Chapter 5, “Getting to the Point of Vector Graphics”). It provides a way of saving objects — vector and bitmapped — into a layout or illustration application.
While some people prefer EPS out of habit, this is in fact an outmoded file format with several limitations:
• It is designed for PostScript printers. It consists of high-resolution PostScript data that can be read by a PostScript RIP, and a low-resolution preview. If you have a PostScript printer, what gets printed is the high-resolution information. However, if you have a non-PostScript printer (which is what most inkjet printers are), only the low-resolution portion prints. (InDesign CS2 is smart enough to be able to rasterize the PostScript information for non-PostScript printers as well!)
• EPS files don’t support transparency. Whenever you have transparency in your file and save it in the EPS format, it will get flattened.
• EPS files can store vector information. However, it’s one-way only. If you open Photoshop EPS files with vectors back into Photoshop, they’ll be rasterized!
• The information in an EPS file is encapsulated, so it can’t be changed when it’s in a layout. This means you can’t colorize an EPS file.
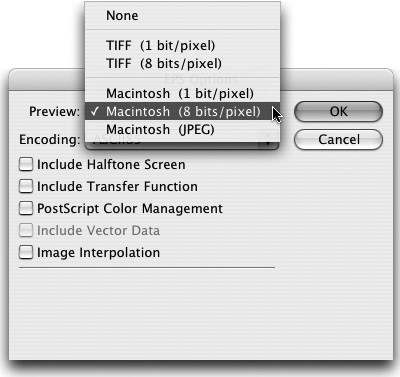
When you save an EPS file, you have options for how it’s saved (Figure 4-32). The most important choice is the preview. On the Macintosh, you have five kinds of preview options (shown); in Windows, your only choice is TIFF. The TIFF preview has the advantage of being a cross-platform format. The Macintosh preview is a PICT, which doesn’t work on a PC. InDesign is smart enough to be able to generate a preview, even if one is not saved with the file.
Figure 4-32. The EPS Options dialog box lets you choose the format of the preview saved with the file.
DCS
DCS stands for Desktop Color Separations. Originated by Quark in the early 90s, in its earlier form (version 1.0), this format allowed you to pre-separate a CMYK image and save four high-resolution image files — one for each color — and a low-resolution preview file — five files altogether.
This was succeeded by DCS 2.0, which allows you to save the preseparated files into a single file. It also allows you to include spot channels.
DCS is really a variant of EPS, with most of the disadvantages of that file format. The biggest problem is that DCS is only intended for printing color separations. However, many of the workflows in today’s world, notably PDF, require composite files instead. In a composite workflow, what will get printed from a DCS is only the low-resolution preview.
The good news is that if you have some legacy DCS files created in Photoshop, InDesign CS2 can composite them so they’ll print well either as composite or separated. Unfortunately, you can only placed linked DCS files for separations in Illustrator CS2. You can’t embed them or print a composite.
PDF stands for Portable Document Format, and most people know this format as a way of creating files from an application so they can be opened on any computer platform without having the original application. However, here we’re talking about Photoshop PDF, and this format has evolved to become (along with PSD) a most useful format in which to save raster information for other Adobe Creative Suite applications. (We talk about other ways this powerful format can be used in Chapter 14, “Creating and Using PDFs”.)
PDF supports all the elements of a Photoshop file including layers, transparency, spot colors, vector masks, type, and so on. When you save as Photoshop PDF in Photoshop CS2, a new Save Adobe PDF dialog box offers many options (Figure 4-33). To provide for more consistent PDF creation, this is the same dialog box that appears when you export PDF from InDesign CS2 and Illustrator CS2. There are five panels of choices. On the General Panel (shown), you would normally check Preserve Photoshop Editing Capabilities if you want to be able to open the layered file again in Photoshop. There are compression options in the Compression panel.
Figure 4-33. In Photoshop CS2, the Save Adobe PDF dialog box is much improved and is now consistent with PDF export from other CS2 applications.

PDF is not as well supported in Illustrator CS2 as it is in InDesign CS2. InDesign can read spot channels in a Photoshop PDF file, but Illustrator cannot. Both, however, can read Photoshop transparency. Where PDF really excels is in retaining type and vector masks saved from Photoshop. This is what we use it for the most. Unlike the PSD format, PDF preserves the high-resolution vectors. The only inconvenience is that you must turn on the Overprint Preview feature (View > Overprint Preview) to be able to preview those vectors onscreen.
PDF has one additional quirk: While Photoshop PDF seems to support transparency, spot colors, and vector elements, it only shows the transparency if it is over a different spot color, which is very limiting.
The Bottom Line
We know the preceding discussion may be confusing. We’ll summarize it by saying that most of the time Steve and Sandee prefer to save our images in the Photoshop PSD format. This is the most compatible format for both InDesign CS2 and Illustrator CS2, and it saves almost all the information we need to save.
The other format we use is Photoshop PDF. We tend to use that mainly to save Photoshop files when we’ve created type or vector elements. Neither one of us bothers with TIFF, DCS, or EPS files.
Table 4-3 summarizes how InDesign and Illustrator compare in what formats they support.
Table 4-3. Pixel formats supported by Illustrator CS2 and InDesign CS2
Saving in Formats for Web or Multimedia
The formats required for saving pixels for the web or multimedia are different than those used for print. These formats are designed primarily for onscreen viewing.
PICT
This is a Macintosh-only format. Originally, this was the format that supported the QuickDraw drawing environment (now replaced by PDF in Mac OS X). It includes support for both vector and bitmapped images.
It doesn’t handle CMYK, and supports only RGB plus one extra channel. It’s mostly used for multimedia work. You should not place this format in InDesign or Illustrator.
Compuserve GIF
Compuserve originally developed the Graphics Interchange Format for its proprietary online information service. The format has long since left Compuserve behind, and is now used for viewing images on the web. Photoshop GIFs are always 8-bit indexed color images, giving them a very small file size.
JPEG
This is now primarily a web format, although it can be used in printing. The biggest problem of using JPEG format for printing is that the compression it uses is lossy — meaning that images degrade in quality if you frequently open and close them. For the purposes of printing, InDesign and Illustrator decompress a JPEG image and send it to a printer as if it were a TIFF file.
On the web, JPEGs are the only good way to display color images.
PNG (Portable Network Graphic)
This format provides great support both for 8-bit indexed color and full 24-bit color. It also has full 8-bit transparency with alpha channels. Unfortunately, PNG has never been widely supported by users or web browsers.
Getting Pixel Smart
The more you learn about pixels, the more you’ll start to see them everywhere. We are exposed to countless images every day through a variety of media — commercially printed brochures and posters, laser or inkjet printed documents, the web, multimedia displays, even on our cell phones! The likelihood is that the great majority of these images were handled with one or more of the applications of Adobe Creative Suite.
When you learn the essentials of handling pixels and raster files — for example, how much resolution is appropriate for your target output, how to adjust image tone and color, the proper file format in which to save an image, and how to place it into a layout or web page — you’ll be prepared to work with images of your own with greater confidence. The applications of Adobe Creative Suite will help to make this process easy for you by working really well together in moving your pixels to their final destination.