
Chapter 3. View from the Bridge
Graphic designers and professionals are visual people. We lay out our pages by selecting tools and dragging objects or moving pixels around the document, and we can immediately see the results of our actions. If we’re working with images, we make adjustments to tone or color, or apply a filter, and we get immediate visual feedback about the changes we make.
Adobe Creative Suite 2 introduces an new application — Adobe Bridge — for visually managing the different file types we’ll work on within the CS2 applications — InDesign layouts, Illustrator documents, Adobe PDF files, every kind of image file, even dynamic media files like QuickTime movies. Just as the Bridge on the starship Enterprise was the main hub for all the ship’s departments, the Adobe Bridge helps you work better with all the CS2 applications.
In this chapter we’ll introduce you to Adobe Bridge and cover its major features. (We’ll point you to other chapters for some of its more specialized features.) Here are some of the things you can do using the Bridge:
• Browse: You can browse your files and folders in a variety of different ways: as thumbnails, in a filmstrip format, showing detailed file information, even in a slide show.
• Manage files and folders: You can manage your files and folders the same way as you do in your operating system — adding, moving, copying, reorganizing, and deleting them — but doing it in a more comfortable visual manner.
• Drag graphics into other applications: You can even drag graphics directly from Bridge into your InDesign or Illustrator layout to place them or into your GoLive Site window for inclusion in your web projects. This can save you time when working in a graphics-rich project.
• Search: You can view and search for information about files, called metadata. Some metadata is created automatically by CS2 applications. For example, InDesign CS2 can now save font and swatch information with its files. You can add other metadata so you can use it later in your production process.
• Compare file versions: If you’re using the Version Cue CS2 file-management utility, you can now visually manage your files, including versions and alternate file variations. (We discuss working with Version Cue projects in Chapter 13, “Integrating Version Cue into Your Workflow.”)
• Locate royalty-free images: Within Adobe Bridge, you can search for, download, and try out royalty-free stock photos from the new Adobe Stock Photo service. If you choose to purchase them, you can do so through the Bridge, and then quickly relink your layout to the high-resolution images.
• Process Camera Raw images: If you’re a photographer, Adobe Bridge is your access point to the Camera Raw plug-in for processing Camera Raw images from your digital camera. (To work with the Camera Raw plug-in with images from a digital camera, see the “Camera Raw and CS2” sidebar in Chapter 4, “Pixels and Raster Formats.”)
• Access Help files: If you own the Suite (as opposed to individual CS2 applications), you can use Adobe Bridge to get quick access to application Help files and tips and tricks, and you can run automation scripts. (See “Using Bridge Center as a Portal to your CS2 Workflow” below for more information. For information on workflow automation scripts, see Chapter 15, “Automating Your Work.”)
• Synchronize color settings: Adobe Bridge gives the ability to synchronize color settings across Suite applications. (See Chapter 10, “Color and Color Management.”)
A note for those of you who work with images a lot: It is important to realize that Adobe Bridge is not an asset manager or cataloging software. While it can give you access to all of the kinds of files you work with, whether they are on your hard drive, removable media or a network volume, it doesn’t catalog information about files that are archived on media like CDs or DVDs that are not currently mounted.
Browsing Through Your CS2 Files
The Adobe Bridge is a chameleon — designed to adapt itself to your style of working and your workflow. Some people want to work mostly with file thumbnails. Others want to focus more on the information associated with a file — data like its creation date, file type, image resolution, and color space. Some may be more process-oriented and want to view the versions and alternate variations of files that were developed in producing a project. Adobe Bridge lets you quickly change these different views of the files, gives you many ways of rearranging the Bridge workspace for your particular needs, and lets you save the customized layouts. In this section, we’ll show you how to navigate through your file system with this new, visual tool, and show you a variety of ways of more intuitively managing files and folders in Adobe Bridge.
Previewing Suite Files
Bridge has four standard views to choose from. You can switch between the views by selecting them from the View menu, or clicking the icon at the lower right corner of the Bridge window. You can also display files as a full-screen slide show.
Thumbnails View
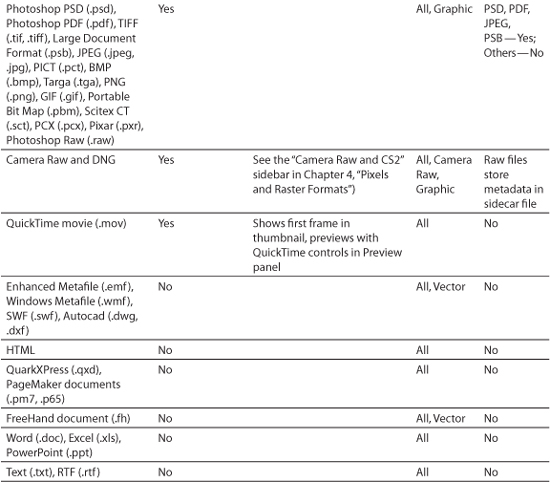
In Thumbnails view, Adobe Bridge shows equal-sized thumbnail previews for all the supported file formats. These formats include InDesign, Illustrator, Adobe PDF files, almost all image files, and some others as well, as shown in the following table. Folders, as well as files in unsupported file formats, display the icon used in the operating system.
Adobe Bridge lets you select the thumbnail size of the file preview — varying continuously from tiny to huge (Figure 3-1). You can also press Command/Ctrl-= [equal sign] to incrementally enlarge the thumbnails, and Command/Ctrl-- [hyphen] to reduce them.
Figure 3-1. As you drag the slider at the bottom of the Bridge Preview window, it dynamically adjusts the size of the previews from small (left) to large (right).

In its default thumbnail size, Bridge displays the filename under the thumbnail. In Bridge General Preferences, you can turn on one, two, or three lines of metadata (you choose which items). Figure 3-2 shows one line underneath the images. If space is too tight, the display of metadata is discarded. However, at any time you can pause over a thumbnail to read a tool tip with file information.
Figure 3-2. Metadata for ratings, filename, and modification date are displayed under the file thumbnails. Additional metadata includes dimensions and keywords.

Tip: What Do the Small Icons Mean?
Small icons sometimes appear at the bottom right of a thumbnail to provide file status (for example, File Open, Adobe Stock Photos Comp, Edited in Camera Raw, or Version Cue status). To understand what the icon means, switch to Details view.
There are many alternative ways of viewing the thumbnails. You can:
• Toggle on and off View > Thumbnail Only (Command/Ctrl-T) to instantly hide and show file information.
• Hide folders in the window by deselecting View > Show Folders.
• Display normally hidden files by choosing View > Show Hidden Files.
• View only certain kinds of thumbnails — Graphic Files, Vector Files, or Camera Raw Files — or choose All Files from the View menu. (See Table 3-1 to see which file formats are displayed in each view.)
• Sort the thumbnails by different file attributes (for example, Filename, Document Kind, Date Created, Date Modified, etc.) by choosing Sort from the View menu in either ascending or descending order. You can also manually drag thumbnails to create your own arrangement.
Table 3-1. Adobe Bridge File Format Previewing (not all supported formats listed)

Filmstrip View
The Filmstrip view shows the currently selected thumbnail enlarged, with all thumbnails arranged in a strip (Figure 3-3). This is useful for such tasks as choosing between a number of images.
Figure 3-3. The Bridge Filmstrip view shows an enlarged view of the featured thumbnail with the rest of the items displayed in a row or, alternately, in a column next to the featured item.
To toggle between a horizontal or vertical filmstrip, click the Switch Filmstrip Orientation button at the bottom right of the large thumbnail. To move through the files, click the small left- and right-pointing triangle (or press the Left Arrow or Right Arrow keys). If the large thumbnail displays a PDF file, you can navigate through the pages of that PDF using the arrows.
The alternative ways of viewing a folder described for Thumbnails view (for example, showing thumbnails only) work in Filmstrip view as well. In Filmstrip view, the sizing slider changes the size of the thumbnails on the filmstrip, but has no effect on the large thumbnail.
Details View
This view shows the thumbnails on the left, with important file metadata on the right. The metadata displayed includes Filename, Date Created, Date File Modified, Dimensions (pixel) and Resolution, Author, Keywords, Description, Copyright Notice, Color Mode, Document Kind, Exposure, and Focal Length (Figure 3-4). If there is too much metadata to display in one column to the right of the thumbnail, it will continue in a second column.
Figure 3-4. In the Details view you see an enlarged thumbnail (left) and metadata with a thumbnail preview (right).

If you’re using a Version Cue workflow, you’ll also see Version Cue information displayed, including File Status, Version Number, Version Comments, and Alternates.
Versions and Alternates View
If you’re working in Version Cue, you can track the versions of your assets, and you can create alternative graphics that can be easily swapped. This view makes those attributes visible. (For more information, see Chapter 13, “Integrating Version Cue into Your Workflow.”)
A quick way to switch between views is to press Command/Ctrl- [backslash] to move forward and Shift-Command/Ctrl- [backslash] to move backward.
Slideshow
A fifth view displays the files in the currently selected folder as a slideshow that is shown full screen (choose View > Slide Show or Command/Ctrl-L). This is a quick and easy way to view files in a large format.
The first time you run a slide show, the Adobe Bridge Slideshow Commands screen appears, giving you some keystroke commands for controlling display (Figure 3-5). You can bring this up at any time while in a slide show by pressing H. To navigate, use the Command/Ctrl and the Left and Right Arrow keys, and you can pause or resume the cycle with the spacebar. Press the Esc key to exit the slideshow.
Figure 3-5. The Bridge Slideshow Commands are displayed over the image in the slideshow.

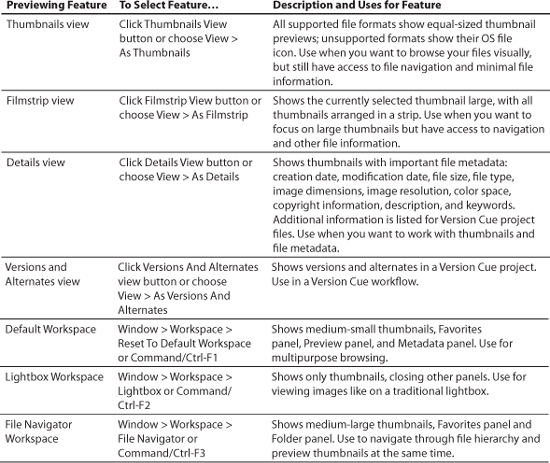
Table 3-2 summarizes the different viewing options available in Adobe Bridge, as well as the default workspaces (see “Saving and Deleting Bridge Workspaces” later in this chapter).
Table 3-2. Adobe Bridge Viewing Options
Setting up the Adobe Bridge Work Area
You can set up your Bridge work area to match your style and workflow. By default, a single window appears when you open Bridge. You can open new windows at any time by choosing File > New Window (Command/Ctrl-N). Each window can have its own layout (Figure 3-6). You can select a pre-made layout, or you can customize your own.
Figure 3-6. The components of a Bridge window.
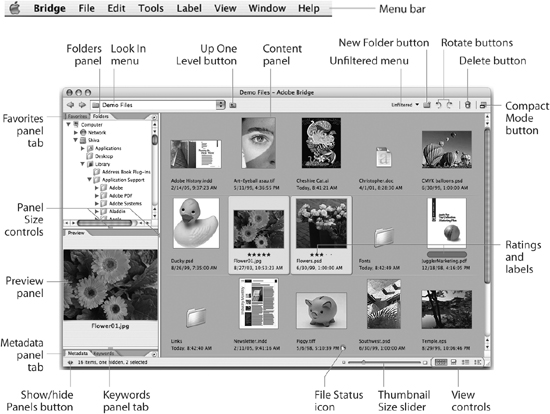
The Bridge Window
Here are the main components of a Bridge window (some may be hidden in a some layouts):
• The Folders panel shows the hierarchy of folders on your computer. You use it to navigate through your file hierarchy. There are two items at the top level: Computer (Mac) or My Computer (Win) and Version Cue. Within Computer/My Computer are shown all your mounted volumes — hard drives, removable media, and mounted network volumes. When you insert a CD or DVD, it appears here. Use the File > Eject command to eject the media. You can’t use Adobe Bridge to mount network volumes or dismount them. Selecting Version Cue makes available Version Cue Workspaces.
• The Favorites panel shows a selection of popular starting points and folder locations. Most are the same on both Mac and Windows; these include Bridge Center, Adobe Stock Photos, Collections, Desktop, Version Cue, and Adobe Photoshop CS2 (to switch to Photoshop). A few are slightly different on each platform. On the Mac, you have Computer (which behaves the same as choosing Computer in the Folders panel), Documents, Pictures, and Home. In Windows, you have My Computer (same as on the Folders panel), My Documents, and My Pictures. We’ll discuss most of these items below. You can turn off the ones you don’t want in Bridge General Preferences.
• The Preview panel shows a large preview of the selected file. It’s separate from, and usually larger than, the thumbnail in the Content panel.
• The Metadata panel shows metadata for the selected file. If more than one file is selected, the display shows shared data. (For more information, see “Mastering Metadata” in this chapter.)
• The Keywords panel lets you add keywords to create consistent metadata.
• The Content panel is the larger panel on the right that contains thumbnails and file information, using the selected view.
• The menu bar appears at the top of the screen (Mac) or at the top of the Bridge window (Windows).
• The Shortcut buttons are found in a row at the top of the window. From left to right, they include Go Back and Go Forward (which act as they do in a web browser), Go Up, New Folder, Rotate 90° Counterclockwise, Rotate 90° Clockwise, Delete Item, and Switch Mode buttons (which change depending on your current mode).
• The Look In menu lists the folder hierarchy, favorites, and recent folders.
• Tool tips appear when you pause over a thumbnail, unless you’ve turned that option off in Bridge General Preferences.
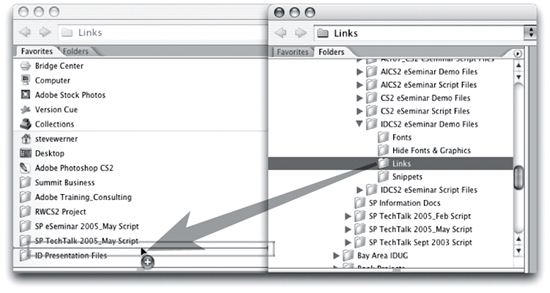
Tip: Customize Your Favorites.
Customizing your Favorites panel is one of the most productive ways of working in Adobe Bridge. You can add folders that you access frequently by either selecting a folder and choosing File > Add To Favorites, or dragging a folder into the Favorites panel. A nice way of loading up favorite folders is to create a second window and navigate to view the folder you want to add. Then drag the folder from that window into the Favorites panel in the first window (Figure 3-7). When you move between favorite items, an insertion point will appear. To remove a favorite, choose File > Remove From Favorites.
Figure 3-7. You can customize your Favorites panel by dragging a folder from the second Bridge window (right) to the Favorites panel in the fi rst window (left). When you’re between favorite items, you’ll see an insertion point.
Rearranging Your Work Area
Each window contains one or more panels. You can customize the layout of a Bridge window in a number of ways. You can open, close, and resize panels, but you can’t drag them outside the window. (They don’t act like palettes do in other CS2 applications.)
Here are a few ways you can rearrange the panels:
• Drag a panel by its tab into another panel.
• Drag the horizontal divider bar between panels to resize them.
• Drag the vertical divider between the panels and the Content panel to resize them.
• Click the Show/Hide Panels button to toggle on and off the display of the panels to the left of the Content area (or press Option/Alt-Command/Ctrl-T).
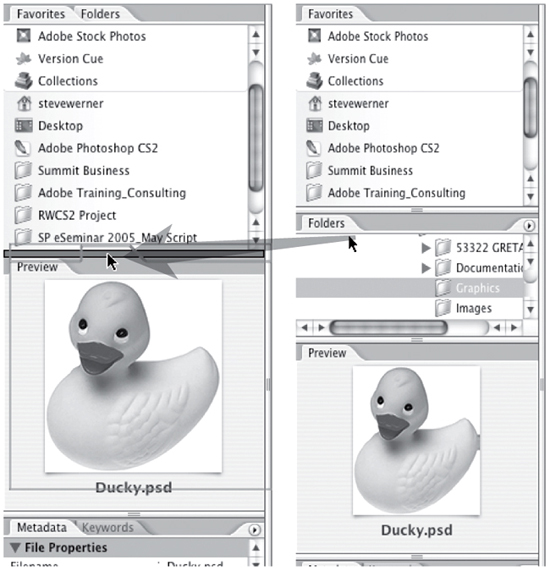
When you have two panels in the same window pane, you can drag each into its own separate panel so both can be viewed at the same time (Figure 3-8). Drag one tab to the divider bar between panes, and when the bar changes color, drop it. The result is two separated panels.
Figure 3-8. The Favorites and Folders panels by default share the same window pane. Drag the tab of one panel over the horizontal divider bar until the separator changes color, then drop the panel. The result is two separated panels.
Saving and Deleting Bridge Workspaces
Workspaces are controls that make it easy to change the arrangement of the Bridge windows and panes. Adobe Bridge comes with five default workspaces that you can select by choosing Window > Workspace and then selecting a command (Figure 3-9). Each of these default workspaces are created for specific workflows.
Figure 3-9. Use the Workspace submenu to select one of the default workspaces or to save or delete a custom workspace.

Like other applications of Adobe Creative Suite 2, Adobe Bridge lets you save custom workspaces that reflect your own work habits. (See Chapter 7, “Managing and Customizing the Interface,” for more information on working with workspaces.)
We describe the default workspaces and what they are optimized for in Table 3-2, “Adobe Bridge Viewing Options.”
To reuse your customized workspace, save the current arrangement of the panels in a Bridge window by choosing Save Workspace. In the Save Workspace dialog box, give the workspace a name and a keyboard shortcut. Optionally, you can also save the window location. Choose Delete Workspace to remove a custom workspace (you can’t remove the default workspaces).
Navigating, Selecting, and Opening Files
You can navigate to the files on your computer, on removable media, or on mounted network volumes in several ways:
• Use the Folder panel to move up and down through your file hierarchy. Click the triangle (Mac) or the plus sign (Windows) next to a folder, or double-click a folder to open it.
• Use the Go Up shortcut button or press Command/Ctrl-Up Arrow to go up a level in the file hierarchy.
• Select a folder in the Favorites panel to open it quickly.
Tip: Dragging to the Preview panel
A quick way to open a folder or view a file is to drag its icon from a Bridge window, the Macintosh Finder, or Windows Explorer into the Bridge Preview panel.
You select files as you would in your operating system. Clicking on a thumbnail selects it. To select more than one file, hold down the Shift key to select contiguous files, or hold down the Command/Ctrl key to select noncontiguous files. You can also choose Edit > Select All (Command/Ctrl-A), Edit > Deselect All (Shift-Command/Ctrl-A), or to Edit > Invert Selection (Shift-Command/Ctrl-I).
If you like to use the keyboard, you can also move the focus of your selection with the arrow keys, left or right, or up or down.
The easiest way to open any file in Adobe Bridge is simply to double-click its preview either in the Content panel or the Preview panel. You can also choose File > Open (Command/Ctrl-O), or press Return/Enter). Sometimes, a file may not open in the application you are expecting (see “Using Bridge with Other CS2 Applications”).
Making Bridge Your File Manager
Adobe Bridge can become your full-time file manager, performing most of the functions you now do in your operating system. Using thumbnails and metadata, you can work more visually than was possible in the past, using drag-and-drop, or copy and paste. You can also perform many functions from context menus and many functions that you can’t do in the operating system, such as rotating images or labeling and ranking images.
Working with Files and Folders
Most of the file-management functions in Adobe Bridge work exactly as you would expect:
• To rename a file or folder, click the name, type a new name and press Return/Enter. You can also use the Batch Rename command as discussed in Chapter 15, “Automating Your Work.”
• To copy a file or folder, select the files and folders and copy them (Edit > Copy, Command/Ctrl-C). Then navigate to a new location and paste (Edit > Paste, Command/Ctrl-V). Alternatively, you can Option-drag (Mac) or Ctrl-drag (Windows).
• To move files to another folder, select the files and drag them to the new location.
• To duplicate a file or folder, choose Edit > Duplicate (Command/Ctrl-D).
• To create a new folder, choose File > New Folder (Shift-Command/Ctrl-N), or click the New Folder shortcut button.
• To delete a file or folder, select it and click the Delete Item shortcut button, press the Delete key, or choose File > Move To Trash (Mac) or File > Send To Recycle Bin (Windows).
• To show the location of a file or folder in your operating system, select the item and choose File > Reveal In Finder (Mac) or File > Reveal In Explorer (Windows).
• To drag a file out of Bridge, select the file and drag it onto the desktop or into another folder. This moves the file (Mac) or copies it (Windows) into the new location.
• To drag a file into Bridge, select the files on the desktop, in a folder, or in an application that supports drag-and-drop, and drag them into the Content panel of the Bridge. If the files are on the current mounted volume, they will be moved into the one displayed. If they are on a different mounted volume, they will be copied into the Bridge.
We discuss placing files from the Bridge into CS2 applications in the “Using Bridge with Other CS2 Applications” section below, and we talk about searching for files in the “Mastering Metadata” section below.
Rotating Images
Adobe Bridge allows you to rotate images if they are JPEG, PSD, TIFF, or Camera Raw. It looks, and is, easy — you choose one of three rotation commands from the Edit menu — but what you really have to know is that only Photoshop can actually perform the rotation.
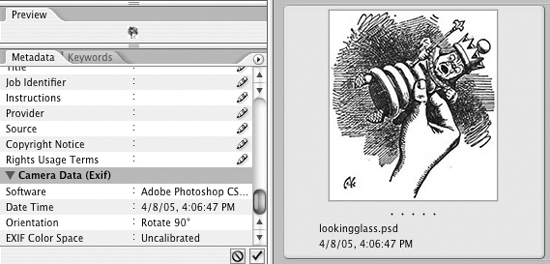
When you mark a file for rotation, Adobe Bridge doesn’t rotate the file, it sets a flag in the Orientation field of the Camera Data (EXIF) metadata (see Figure 3-10). If you place a file in this state into InDesign or Illustrator, the image won’t appear rotated, because its pixels haven’t yet been changed — Photoshop is the only CS2 application that can actually rotate the pixels. If you double-click the image in Bridge, it will open in Photoshop and the rotation appears on-screen. However, the pixels aren’t rotated until you save the file in Photoshop. Bridge updates its EXIF metadata to show that the Orientation is Normal (unrotated). (We hope Adobe adds the ability to rotate images in Bridge itself in its next version; it’s a hassle to have to open and save in Photoshop every image you want to rotate!)
Figure 3-10. When you choose one of the Rotation commands in the Bridge Edit menu, it sets the Orientation field in the metadata. However, you have to open the file in Photoshop and save the file to actually rotate the pixels.
Labeling and Rating Files
Adobe Bridge enhances the capabilities of the Photoshop File Browser to flag and rank image files by letting you apply labels and ratings to any type of file. The two systems are independent of each other. Both are now stored in the file metadata to make it more permanent and portable.
Labels
Labeling files in Bridge means assigning a color to their thumbnails as a way to organize files into categories. The color appears underneath the thumbnail in Thumbnails or Filmstrip view and to the right of the thumbnail in Details or Versions and Alternates view. For example, if you are working on files in production, you can label files with one color to indicate that they need editing, a different color for files that need proofing, and a third color for files that are completed.
To apply a label, select one or more files, and choose a color from the Label menu. To remove a color label, choose Label > No Color. If you like, you can give the color a name that will be retained in the file metadata, using Bridge Labels Preferences.
Ratings
Ratings can be assigned to selected files, from zero to five stars. You can use ratings to rank files from best to worst, for example. There are several ways to apply ratings. In Thumbnails view (unless the thumbnails are very small), you can click the dot representing the number of stars to apply. You can also choose commands from the Labels menu or use keystrokes to apply a rating number or to increase or decrease the rating.
Selecting and Filtering Labels and Ratings
To filter your view of labeled or unlabeled files, choose Edit > Select Labeled, or Edit > Select Unlabeled. You can also filter which files are viewed — for example, if you want to display only those files with a certain rating or a particular label color. The various filtering options also have keyboard shortcuts.
Figure 3-11. Ratings have been applied to some files (left). Selecting a command from the Filter menu separates out files that don’t match the criteria (right).
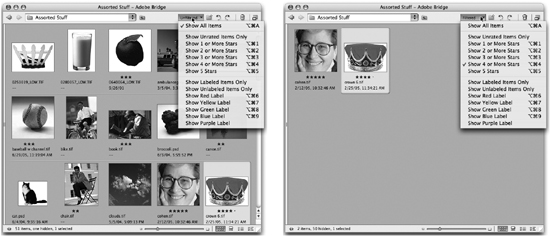
Tip: Combining Labels and Ratings
View filters are cumulative. Adobe Bridge only shows files that meet the criteria of all applied filters. If you choose Filter > Show Red Label, Bridge only shows files with red labels. If you then choose Filter > Show 3 Or More Stars, only files with a red label and ranked 3 or more stars will appear. You can use the Show All Items command to removing all the filtering.
Mastering Metadata
One of the biggest challenges of being a creative professional is organizing and retrieving your files. The Adobe Creative Suite 2 applications make this process easier by using a standard for storing metadata — the information about files — in a format called Extensible Metadata Platform (XMP). Metadata is stored so it that it can be carried through the production process. As an example, most digital cameras store information about how an image was captured. Adobe Bridge and the CS2 applications retain this data in the image file so that you can read this information about the image even after it has been modified in Photoshop and placed into InDesign.
Viewing and Editing Metadata
Many of the powerful features of the Adobe Bridge that allow you to organize, search for, and track your projects depend on XMP metadata. Some metadata is stored automatically — by a digital camera, or by an application. Other metadata may be used by a workflow system like Version Cue, which stores information such as the comments attached to each version of a file. A photographer, an art director, or a production manager can add other metadata relevant to their work. For example, a photographer may want to add copyright information or a keyword to an image.
You can view the metadata attached to a file in several places in Adobe Bridge. In the “Previewing Suite Files” section above we already discussed seeing metadata in Details view and in tool tips. But the primary places for viewing and editing metadata are the Metadata panel and the File Info dialog box. Use the Metadata panel when you want to easily view metadata associated with a file. If you need to add or modify metadata, it’s easier to use the File Info dialog box.
Metadata Panel
Using this panel you can view and edit metadata, search for files using metadata, and use templates to add or replace metadata (Figure 3-12).
Figure 3-12. You can view information about the selected InDesign file in the Metadata panel. Font and swatch color information is stored with an InDesign CS2 file.
What kind of metadata is included here? In Figure 3-12 above, we’ve selected the thumbnail of an InDesign CS2 file. Among the metadata we can view in the Metadata panel is information about the fonts and swatches stored in the file. Table 3-3 lists the primary kinds of metadata you’ll find in this panel. Since XMP is extensible (that is, it can be easily customized if you’re a little bit geeky) you might find other categories as well.
Table 3-3. Metadata panel information

To view metadata in the Metadata panel, it’s helpful to choose the Metadata workspace that enlarges that panel (Window > Workspace > Metadata Focus). You can select one or more files and view the information in each of the categories stored there. As necessary you can click the triangle beside a category to open it up, or use the scroll bars to see hidden categories.
A menu at the top right of the panel (Figure 3-12) lets you choose Bridge Metadata Preferences to control which categories are visible. You can increase or decrease the font size in the panel, and you can begin a file search by choosing the Find command (see “Searching Files and Metadata” below).
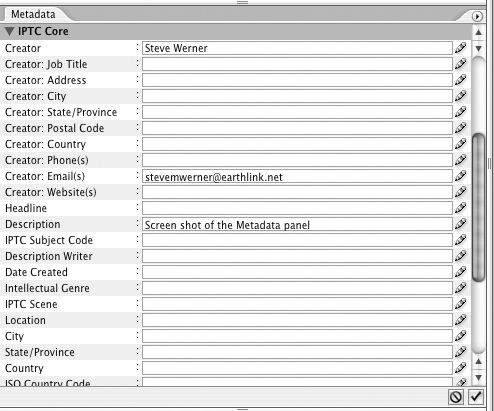
Metadata in the IPTC section is editable (as indicated by the pencil icon). When you enter information, you can click the Cancel button at the bottom right to cancel an entry, or the Apply button to apply the change (Figure 3-13).
Figure 3-13. You can edit information in the Metadata panel.
File Info Dialog Box
The second primary location for viewing and editing metadata is the File Info dialog box (Figure 3-14). To open it, choose File > File Info in Adobe Bridge (this command also appears in other CS2 applications). You’ll see that this displays the metadata in a somewhat different format. Categories appear down the left side. When you click one, for example, Camera Data 1, you see information on the right. Some of the information is read-only, and some can be edited.
Figure 3-14. The File Info dialog box has been part of the interface in past versions of Adobe applications.
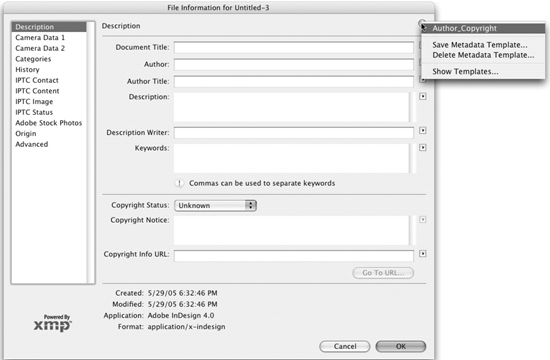
Adding and modifying metadata is somewhat easier here than in the Metadata panel. For example, you can create a metadata template to simplify the process of applying metadata repeatedly to many files. To create a template, simply fill in the values and select Save Metadata Template from the menu at the upper right (Figure 3-14). Once you’ve saved a template, apply it to new files by choosing the name of the template from the same menu in the File Info dialog box. You can also use the template in the Metadata panel of Adobe Bridge. The template also works in the Metadata panel — you can choose it from the Metadata panel menu and then append or replace the metadata. You can also append and replace template metadata from the Tools menu in Adobe Bridge. Another shortcut is available in the dialog box: After you’ve entered information in a field, the triangle icon at the right side of the field shows a popup menu that makes it easy to select that information again.
Keywords Panel
You may wish to assign keywords to files to make it easier to search for them. The Keywords panel makes easy to consistently identify files based on their content (Figure 3-15). For example, instead of labeling some of your images with a car keyword and others with an automobile keyword, you can create lists of keywords to use. Then when you search for the keyword in a file, you’re more likely to find all the ones you want. You can create your keywords in advance, much like creating styles or swatch colors in InDesign or Illustrator.
Figure 3-15. You can create keywords and sets of keywords in the Keywords panel, and then assign them to images.
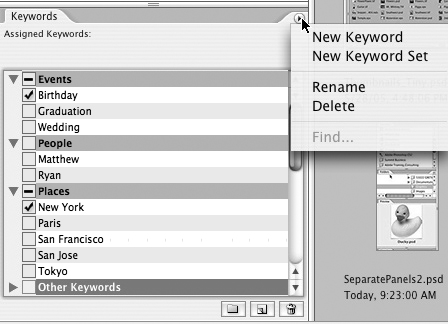
Adobe Bridge comes with some default keywords that you’re unlikely to use (unless you have friends named Matthew and Ryan), but have been supplied to help you understand the way keywords work. You can create a new keyword by clicking the New Keyword button at the bottom of the panel or choosing the command from the panel menu. You can also rename or delete the default keywords from the menu or a context menu.
The Keywords panel lets you create categories of keywords that it calls keyword sets, and you can expand a set by clicking the triangle to display its keywords. The Keywords panel comes with three default sets — Events, People, and Places — that can also be renamed or deleted. You can create new sets by clicking the New Keyword Set button or choosing that command from the menu. If you like, you can drag keywords between keyword sets.
To apply a keyword to one or more selected files, double-click the keyword or click in the column to the left of the keyword. The checkbox indicates that the selected images contain the keyword.
If you delete a keyword, it is simply removed from the set. It isn’t removed from images that have already been tagged with it. The keyword then is moved to another set called Other Keywords.
Searching for Files and Metadata
The Adobe Bridge provides a Find command for searching folders and subfolders for particular files, folders, and for the metadata within files.
Using the Find Command
You can choose to do a search by choosing Edit > Find (Command/Ctrl-F), or by choosing Find from the Metadata and Keywords panel menus (Figure 3-16). The Find dialog box initially shows the current folder in its Look In menu, but you can browse to choose another. There are also some other options:
• You can search all subfolders in the current folder.
• If you’re searching a Version Cue project folder, you can search for past versions of files as well as current ones.
• You can display the results in a new browser window by checking the Show Find Results option. Otherwise, the results appear in your current Bridge window.
Figure 3-16. When you choose Edit > Find, the dialog box lets you search a folder of your choice (and optionally subfolders) using a variety of criteria (left). The results can be displayed in separate window (right).
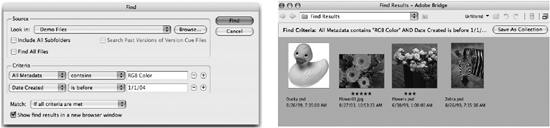
You can select from multiple criteria in the leftmost Criteria menu, including Filename, File Size, Date Created, Document Kind, Label, Rating, Keywords, Description, Comments (for a Version Cue file), and All Metadata. To use more than one criterion, click the + [plus] button to the right of it. To remove a criterion, click the – [minus] button. In Figure 3-16, we searched some images linked to an InDesign file, using two criteria — looking for a filename that contained the text “jsoi” and also looking for metadata in the images that indicates they were in RGB color mode. Because we chose that option, the results appeared in a separate Bridge window.
Creating a Collection from a Search
Once you have your search results, you can optionally save them as a collection. In the Search Results window, simply click the Save As Collection button; you’ll be prompted to name the collection. To view a collection, either select Collections in the Favorite panel (you may need to turn that on in Bridge General Preferences) or find it in the Look In menu. It will appear with a special icon (Figure 3-17). Double-click the selection you want, and a new Bridge window will open containing the results of the search. Collections don’t duplicate your images into a new folder; rather, they are the instructions to display that set of images.
Figure 3-17. When you save a collection, you can select it again. Double-clicking the item opens the results in a new Bridge window.

Using Bridge with Other CS2 Applications
You can, of course, use the Adobe Bridge at any time to preview graphic files and to manage the files on your computer. But the real fun begins when you start to use Bridge with your other CS2 applications. That’s when you’ll really start to make changes in the way you work. For example, if you’re placing a lot of images into an InDesign or Illustrator project, you don’t need to use the Place command: You just drag-place the files from Adobe Bridge.
Setting Up an Adobe Bridge Workflow
You may want to perform a couple of short steps as you begin to use a Bridge-to-CS2-application workflow.
Previews and File Associations.
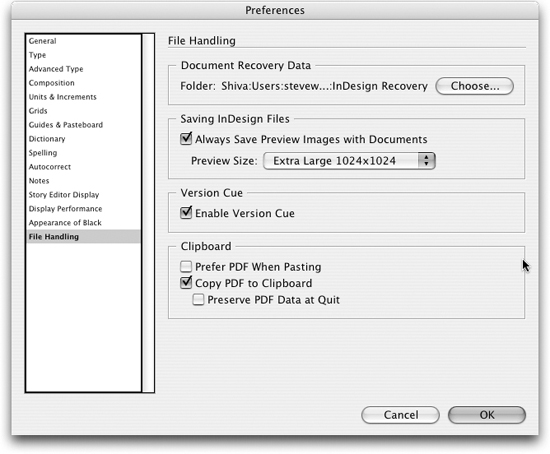
In InDesign, make sure that you have set your preferences to save image previews. In InDesign CS2, in File Handling Preferences, check the Always Save Preview Images With Documents option (Figure 3-18). You can choose the size of your previews — 128 x 128, 256 x 256, 512 x 512, or 1024 x 1024 pixels. In InDesign CS, check Save Document Preview Image, but you have no option for the preview size.
Figure 3-18. In InDesign CS and CS2, you must turn on image previews in the File Handling Preferences.
Illustrator, Photoshop, and PDF files are previewed without having to set any special preferences. For details, see Table 3-1, “Adobe Bridge File Format Previewing.”
So that you won’t be surprised if double-clicking a JPEG file opens it in the wrong application, you should also set preferences for what application will open the file automatically when you choose File > Open or double-click a file in the Adobe Bridge window. You set this in Adobe Bridge File Type Associations Preferences (Figure 3-19).
Figure 3-19. Using Bridge File Type Association preferences, you can determine which application will open a specific file type.

For any file type, you can click the name of the application (or None) or you can click Browse to locate a different application than the ones listed. This preference controls the application that opens in Bridge; it doesn’t affect the application that may be opened in your operating system, where the settings can be different. You can also choose File > Open With (or use the context menu) to choose the name of a different application (or application version) to open a particular file.
Bridge Viewing Modes and Switching Shortcuts
To make it easier to move between Adobe Bridge and the CS2 applications, it also helps to use Bridge’s three viewing modes, and some shortcuts for switching back and forth.
When you open Adobe Bridge, it’s in Full mode, displaying all the panels that you last selected. However, it’s inconvenient to work in other applications when Bridge is in a full-sized display. So, at any time, you can switch to Compact mode by clicking the Switch To Compact Mode button at the upper right corner of the window, or by pressing Command/Ctrl-Return/Enter (Figure 3-20).
Figure 3-20. You can switch back and forth between Bridge Full mode (above) and Compact mode (right) with a button or a keystroke.

Compact mode shows only the Content pane thumbnails, but the most common commands are available from the popup menu at the upper right. By default, the Compact mode window floats above all other windows, making it always visible and easy to drag an image into a layout. (However, if you prefer, you can turn that option off by deselecting Compact Window Always On Top on the popup menu.)
When you’re in Compact mode, you can return to Full mode by clicking that button at the top right of the window (or pressing Command/Ctrl-Return/Enter), and letting the Bridge window move behind other windows. You can also click another button to switch to Ultra-compact mode, further reducing the window to a single strip (Figure 3-21). Use buttons again to switch out of Ultra-compact mode.
Figure 3-21. To make the Bridge window as small as possible, choose Ultra-compact mode.
![]()
There are also several shortcuts for opening Adobe Bridge from your CS2 applications and for returning to your other applications from Bridge:
• Each of the other CS2 applications (except Adobe Acrobat) has a special button for jumping to Adobe Bridge (Figure 3-22). For InDesign and Illustrator, it’s found on the right end of the Control palette. For Photoshop, it’s on the right end of the Options Bar. For GoLive, it’s in the Adobe Services section of the toolbar at the top of the window. Clicking the button opens the last-opened Bridge window.
Figure 3-22. Click the Adobe Bridge button in a CS2 application to jump to Bridge.
![]()
If you hold down the Command/Ctrl key, clicking the Bridge button opens this window to a maximized size. If you hold down Option/Alt-Command/Ctrl, it opens a new Bridge window. (For some reason, the modifiers don’t work in GoLive.)
• Within each of these four applications, you can choose File > Browse (or press Option/Alt-Command/Ctrl-O) to open or switch to Adobe Bridge.
• After you’ve switched to Bridge, you can choose File > Return To [application name] In Bridge, or press Option/Alt-Command/Ctrl-O again to jump back to that application.
Working with InDesign Files
InDesign has long had the ability to drag files from the Desktop into a layout. When you do so, you create a link to the high-resolution file as if you had chosen File > Place. This works for any file format that InDesign can read, including non-Adobe formats like Microsoft Word files. However, dragging files from the Desktop is often inconvenient because you have to resize your window to be able to see the Desktop at the same time.
Dragging Files from Bridge
Adobe Bridge makes it much easier to drag in files: You can now drag one or more files from the Bridge window into your InDesign layout using Bridge’s Compact mode, making it easy to see both windows at the same time (Figure 3-23, left). The ( ) [parenthesis] icon that appears when you move your cursor over an existing frame indicates that the file will be placed within the frame. A square-cornered icon indicates that the file will be placed in a new frame. If you drag multiple files, you see a special icon that shows a stack of images (Figure 3-23, right). The files will be placed in a stack with a small overlap between frames.
Figure 3-23. You can change your Bridge window to Compact mode to make it easy to drag into an InDesign layout (left). If you drag multiple files, you see a special icon (right).

We find this workflow is very easy when you have a lot of images to place. Immediately after you drop the image, it’s handy to minimize the Bridge window by choosing Window > Minimize, or clicking the minimize button. The biggest downside of the workflow is that you don’t have access to the Show Import Options checkbox. For example, if you want to drag an Adobe PDF file onto an InDesign page, you can only place the first page; if you use the Place command, you have options in InDesign CS2 to choose which pages to place.
Tip: Drag-Placing in Other Applications
Drag-placing files can work with non-Adobe applications too. Try dragging images into your text editor or your email application if they support drag-and-drop. We used Adobe Bridge to place screen captures into our Microsoft Word manuscript before we laid out this book in Adobe InDesign!
InDesign Snippet Files
You can also drag from InDesign CS2 into Adobe Bridge. InDesign can export individual objects on a page as snippet files, to share with others or to stash in a personal snippet collection for ongoing use. Bridge makes it easy to do that. Snippets are based on the InDesign Interchange (INX) format, which underlies other aspects of InDesign CS2.
To create a snippet, first put Bridge in Compact mode so you can see both windows (Figure 3-24). Then select some page objects on an InDesign spread. Drag them directly into the Adobe Bridge window. A new snippet file appears. InDesign automatically gives the file a name like “Snippet_2FBAC117D.inds” and creates a preview; you can rename the file to something more meaningful.
Figure 3-24. Drag-select some elements of an InDesign page with the Bridge window visible (left). When you drag them into the Bridge window, a reusable snippet is created (right).

To place the snippet, just open or create another InDesign document. You can either place the snippet by choosing File > Place, or you can drag it onto the current page. InDesign recreates the exact elements you dragged into Bridge, and places them in the same relative location on the new page.
Snippets copy everything selected in an InDesign spread, but they don’t include the linked images. If you want to send images inside a snippet, use the Embed File command in InDesign’s Links palette menu. This allows you to send the snippet to someone else with the images embedded in it. When the snippet is opened, the recipient can use the Unembed File command on the Links palette menu to recreate a linked image.
InDesign Templates
InDesign CS2 allows you to create template files. The application also comes with some template files for common layouts. For some unknown reason, InDesign hides the template files that come with it in a distant location. Template files are in this path on the Mac: Library > Application Support > Adobe > Templates > InDesign. In Windows, they’re in this path: Program Files > Common Files > Adobe > Templates > InDesign.
If you create your own template file, InDesign CS2 saves it in a special format (with the .indt extension), which forces you to save and rename the file, preserving the template layout. The good thing is that Adobe Bridge can display as previews all the pages of a template file created in InDesign CS2 (but not a template file from InDesign CS). You can switch between pages in Bridge in the Preview panel, and in the large thumbnail in Filmstrip view (see Figure 3-25).
Figure 3-25. You can preview individual pages of an Adobe PDF file or InDesign CS2 template in Filmstrip view (or in the Preview panel).

Working with Illustrator Files
Much of the workflow we described for working between InDesign and Adobe Bridge also works for Illustrator. You can drag-place image and Adobe PDF files into Illustrator, creating a full-resolution linked file. Use the same method of dragging from Adobe Bridge when it’s in Compact mode. However, Illustrator can’t create snippet files.
Illustrator also allows you to create template files with the .ait extension. They can be previewed in Adobe Bridge, but since Illustrator creates only a single page on the pasteboard, there are no multiple pages.
Working with Adobe Photoshop and Camera Raw Files
A camera raw file contains unprocessed picture information from a digital camera’s sensors. Many digital cameras can save this information in a camera raw file. Each digital camera manufacturer has developed its own format. Camera raw files created by a supported camera can be processed by the Camera Raw plug-in. (We discuss digital cameras and the Camera Raw plug-in in the “Camera Raw and CS2” sidebar in Chapter 4, “Pixels and Raster Formats.”)
Adobe Bridge can preview Camera Raw files. When you first view thumbnails and preview camera raw files, you see the files with default image settings. If you have installed Adobe Photoshop CS2 or Adobe Creative Suite 2, you can use the Camera Raw plug-in. If you’ve installed one of the other Adobe products that install Adobe Bridge, you can still preview camera raw files, but you can’t edit them.
You can use the Camera Raw plug-in to adjust camera raw images in a number of ways that we discuss in the “Camera Raw and CS2” sidebar in Chapter 4, “Pixels and Raster Formats.” When you make the adjustments, the original camera raw files are preserved. The adjustment settings are stored on a per-image basis in the Camera Raw database file, or in sidecar XMP files (stored in the same folder as the raw image). From the Camera Raw dialog box, you can save the processed files in Digital Negative (DNG), JPEG, TIFF, or Photoshop PSD formats.
Here are some ways of opening and processing camera raw files with Adobe Bridge. For example, you can:
• Open Camera Raw files directly in Adobe Photoshop without opening the Camera Raw dialog box; simply select the camera raw images, hold down the Shift key, and choose File > Open, or Shift-double-click a camera raw image. Photoshop applies either the default settings or your adjusted settings. (In the Camera Raw dialog box, you can change the default settings and save adjusted settings for each camera.)
• Process camera raw image files in the Camera Raw dialog box. Select one or more camera raw images and choose File > Open In Camera Raw (or press Command/Ctrl-R). The Camera Raw dialog box appears, with the Done button as the default for closing the dialog box after adjusting settings.
• Choose File > Open With > Photoshop CS2. The Camera Raw dialog box appears, with Open as the default button for opening the images in Photoshop.
For more detailed information about working with camera raw files, we recommend Bruce Fraser’s Real World Camera Raw with Adobe Photoshop CS2 from Peachpit Press.
Note these shortcuts for moving between Photoshop and Adobe Bridge:
• Photoshop has a special shortcut for returning to Bridge from Photoshop. Choose File > Close And Go To Bridge (or press Shift-Command/Ctrl-W). This closes the current file and returns to Bridge.
Working with Adobe PDF and GoLive Files
If you’re previewing an Adobe PDF file or InDesign CS2 template, Adobe Bridge includes a control for paging through the document, or jumping to a particular page (Figure 3-25). There is no way, however, to drag a file from Adobe Bridge into Adobe Acrobat. Adobe PDF is considered for the most part as a “final format,” so there are limited ways a PDF file can be edited.
GoLive supports dragging assets from a Bridge window into one of its site windows for inclusion in a web project (Figure 3-26). This ensures that the asset is tracked and managed with the rest of your web content.
Figure 3-26. You can drag an asset from Adobe Bridge into a GoLive 2 site window.

Accessing Adobe Stock Photos
Adobe Stock Photos is a new service from Adobe, and Adobe Bridge is your access point to use it. Adobe Stock Photos provides you with a way to preview, try out, and purchase royalty-free images from a number of major stock-photo houses. What makes Adobe Stock Photos special is the way it works so seamlessly within your Adobe Creative Suite applications.
Workflow Overview
Royalty-free images are offered by the stock photo industry for a single fee, which you pay at purchase without additional charges. The pricing of images is based on file size (physical resolution), not on how you are using the file.
There are some restrictions on image use. Click the Terms Of Service link on the home page of Adobe Stock Photos for details.
Many stock-photo agencies provide for keyword search for their own images. However, Adobe offers a search for images from several major stock photo agencies — Getty Images, Comstock Images, DigitalVision, zefaimages, Amana Images and others. When you search for images, you see a selection from all of the providers.
Important: In order to use this service you must have a broadband Internet connection. The service is not available from a dial-up connection.
The basic workflow for Adobe Stock Photos is as follows (and is also shown in Figure 3-27):
• Search and browse for images within Adobe Bridge.
• When you find images you want to try, download free, low-resolution JPEG versions of the images. You can rename or open the images for modification in Photoshop.
• Place your comps in a layout in InDesign or Illustrator.
• Print proofs with the low-res comps to use to get approvals from your client.
• If your client approves an image, select the image in your CS2 application and choose to purchase it.
• Switch to Adobe Bridge automatically, and the image is added to your shopping cart.
• Complete the purchase of the high-resolution file, and download it.
• Relink the high-resolution file in your layout.
Figure 3-27. Overview of the Adobe Stock Photos workflow

Searching and Browsing for Images
You get to Adobe Stock Photos from within the Bridge. You can click on Adobe Stock Photos on the Favorites panel, choose Edit > Search Adobe Stock Photos, or click the Stock Photos icon in Bridge Center (see below). This will launch the Adobe Stock Photos application, and you will be taken to the Stock Photos home page (Figure 3-28). The appearance of the information on this page may change as the service evolves, but the principal choices shown should remain the same.
Figure 3-28. The Adobe Stock Photos home page contains a Search field and a link to browse for images.

You can click on the Overview tab to learn more about Adobe Stock Photos. The News & Offers tab provides the latest information about new image libraries, discounts, and promotions. The Providers tab gives you a list of the stock photos agencies currently included.
Usually you’ll perform a search for images to use in your layout by typing in the Search field under the Adobe Stock Photos logo. If you’re just starting a new project, you might want to enter one or more search terms and click the Search button (Binoculars icon) to start the search. If you prefer to see the categories of images that are included, you can also click on the Browse tab on the home page.
The search results will begin appearing as thumbnails in the Bridge window, where you can view them (Figure 3-29). You can use the Bridge tools to apply ratings, labels, and filtering, as well as view metadata about individual images.
Figure 3-29. When you view the Adobe Stock Photos search results, you can use all the features of the Bridge interface.

From the Search Results window, you can also click on the Get Price & Keywords button to view the prices for different image sizes and the keywords for the image (Figure 3-30). (The first time you click on this button, you’ll be prompted to select your locale, among the 27 countries that Adobe Stock Photos serves. The country setting can be changed in Bridge Adobe Stock Photos Preferences.)
Figure 3-30. The Get Price & Keywords window shows the different image sizes available and prices for each.

At this point, you can close the Get Price & Keywords window and click the Advanced Search button (Binoculars with a + [plus] icon). With an advanced search, you can set up multiple criteria to refine the search. For example, you might want to view only color images or those with a particular orientation.
Your previous searches are saved into the Previous Searches folder. You can choose this in the Favorites panel at any time to view the images.
Downloading Comp Images
When you’re viewing thumbnails, and you find some images you’d like to try out, you can download low-resolution comps. Unlike in some services, Adobe Stock Photo comps have no watermarks. Simply choose an image and click the Download Comp button.
All of the comps you download are stored in a folder called Downloaded Comps, listed in the Favorites panel (Figure 3-31). Note that they show an icon indicating a downloaded comp.
Figure 3-31. You can view Downloaded Comps at any time in the Favorites panel.

The names of downloaded comps are cryptic combinations of letters and numbers. It’s a good idea to rename the comps with a more meaningful name. Just click on a name to select it, and type in a new name. (You don’t need to worry about not being able to purchase the high-resolution version if you’ve renamed the file. The Adobe Stock Photos metadata is saved with the file and will travel with it, even if renamed.)
You can also select a comp and choose File > Open With > Adobe Photoshop CS2 (or double-click to open it in Photoshop if you’ve set that up in Bridge File Type Associations Preferences). Here you can edit the image any way you like and save it in another fi le format like Photoshop PSD, without affecting the Adobe Stock Photos metadata. You can view it in Photoshop by choosing File > File Info.
Placing the Images in a Layout
Now it’s time to place the comp into your layout. You can now drag-place it into InDesign CS2 or Illustrator CS2, using the technique we described in “Working with InDesign Files” above.
After placing the image, if you choose Window > Links In InDesign or Illustrator, you can see a special icon that identifies the image as an Adobe Stock Photos comp image (Figure 3-32), even if you’ve renamed the image or modified its file format. You can see the metadata if you choose Link File Info from the Links palette menu.
Figure 3-32. In the InDesign Links palette menu, you can view metadata about an Adobe Stock Photos comp image or choose to purchase it.

Comps are not licensed for reproduction, but you can use them in mock-ups and preliminary work. You can print out a comp of the layout for a client to approve the images you’ve selected. However, because the image contains metadata, it will always be marked with the icon of an Adobe Stock Photos comp, as described in the next section.
Purchasing a High-Resolution Version
Once a design has been approved, you can easily purchase the high-resolution version of a comp image. You aren’t licensed to use comps for high-resolution reproduction. Your print service provider can recognize them in two ways. They will appear with a special icon in the Links palette indicating an Adobe Stock Photos comp, and they’ll be flagged when the service provider does a preflight check (File > Preflight) in preparation for output.
Here’s how to purchase high-resolution versions of your Adobe Stock Photos comps:
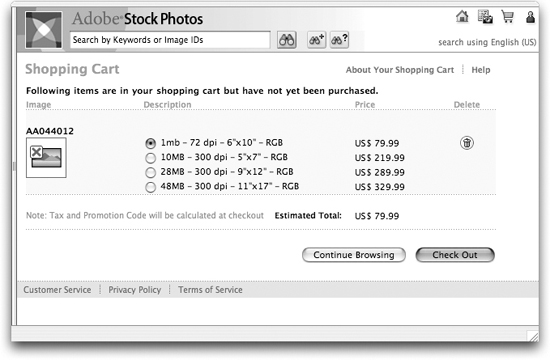
1. Highlight the name of the comp image in the Links palette and select Purchase This Image (Figure 3-32). This opens Adobe Bridge and a dialog box telling you that the image has been added to your shopping cart. Click the View Shopping Cart button to open it (Figure 3-33) and see the images that you haven’t yet purchased. Choose the file size (image resolution) you wish to purchase, and then click Check Out. Or remove images from your shopping cart by clicking the small trash can (Delete) icon.
Figure 3-33. The Shopping Cart window shows you a list of images you have selected but not purchased.
2. If you have an account, you’ll be prompted to enter your email address and password. If you don’t have an account, you can click on the Set up an Account button and follow directions. Alternatively, you can purchase images as a guest. You’ll be prompted for billing information.
Even though you may be purchasing images from different image libraries, the shopping cart combines them into one order, and you’ll purchase them as a single transaction from Adobe Stock Photos.
3. When you complete the purchase process, click the Purchase Now button to complete the checkout process. Your purchase is processed; you are then prompted to download your photos.
4. Click Start Download. After the photos are saved, click View Purchased Images if you want to start working with them right away. You can always view your purchased images in the Favorites panel.
Now you can return to your InDesign or Illustrator layout and use the Links palette to relink to the high-resolution images you’ve purchased.
Of course, it’s always a good practice to immediately back up your purchases to another location, or to include this location in your normal backup procedure.
Tip: Update to the Latest Version
Use the Help > Update feature in Adobe Bridge (and your other CS2 applications) to update to the latest version of the application. For example, in August 2005, Adobe posted an update to Adobe Stock Photos, which gave it access to new stock-photo collections and included some small enhancements and bug fixes.
Using Bridge Center as a Portal to Your CS2 Workflow
If you have purchased Adobe Creative Suite, the Bridge Center serves as a portal to the Adobe Creative Suite workflow. Bridge Center is found only when Adobe Bridge is installed as part of Adobe Creative Suite. It’s not found in the version of Bridge installed in individual applications.
If you choose to use it, the Bridge Center can be your entry point for several Bridge functions. It also provides quick access to recent files and folders, RSS newsreaders for up-to-the-minute news, tips and tricks for Adobe CS2 applications, color management features, Help documentation, and even Version Cue projects. (RSS stands for Really Simple Syndication and is described in the section below.)
You open Bridge Center by clicking it on the Favorites panel (Figure 3-34). (If you don’t see the Bridge Center in the Favorites panel, turn it on in the Bridge General Preferences.)
Figure 3-34. Use the Bridge Center as a portal to other Bridge and CS2 features.

Here are the features found in the Bridge Center:
• Saved File Groups lists sets of files you’ve saved as a group, even if they exist in different applications. You can close and save your currently opened files as a group by clicking Save Open Files in a File Group. You’ll be prompted for a group name, which will appear in the Saved File Groups pane. When you open a saved file group, Bridge opens the current version of these files. In practice, we don’t find this feature all that useful; its implementation is somewhat awkward and inflexible.
• Recent Folders and Recent Files list what their names describe. Clicking on the name of a folder opens that folder in the Content panel. Clicking on the name of a file opens the file.
• RSS Reader makes visible news in RSS, an XML format for distributing web content. By default it gives access to Resource Center Events, Resource Center Tips & Tricks, and Adobe Studio Exchange. You can add an RSS site by clicking the + [plus] icon to the right of the RSS Reader heading. Click Open Settings to set how often RSS sites are checked. You can also manually update the Reader by clicking Update Now.
• Tips And Tricks lists tips and tricks for Adobe Creative Suite and other Adobe applications.
• Shortcuts: There are shortcut buttons to jump to Adobe Stock Photos, to open a new Version Cue project, to start the Adobe Help Center, and to open Color Settings.
Trying New Workflows
In this chapter we introduced you to Adobe Bridge, a new application in Adobe Creative Suite 2. We’ve shown you how it provides a more visual way of working with files from InDesign and Illustrator, as well as PDF and image files. We’ve suggested some ways that you can make it your hub when working with the Suite.
Experiment with the new features and techniques we’ve shown you here, and adapt them to the way you work. You’ll find the effort worth it, because using Adobe Bridge can integrate your use of the Creative Suite applications and improve your productivity.