
Chapter 2. Networking
2.0 Introduction
The Raspberry Pi is designed to be connected to the internet. Its ability to communicate on the internet is one of its key features and opens up all sorts of possible uses, including home automation, web serving, network monitoring, and so on.
The connection can be wired through an Ethernet cable (at least in the case of most models), and newer models generally have built-in WiFi.
Having a connected Raspberry Pi also means that you can connect to it remotely from another computer. This is very useful for situations in which the Raspberry Pi itself is inaccessible and does not have a keyboard, mouse, and monitor attached to it.
This chapter gives you recipes for connecting your Raspberry Pi to the internet and controlling it remotely over a network.
2.1 Connecting to a Wired Network
Solution
First, if you have a model A or A+ version of a Raspberry Pi (1, 2, or 3), or a Pi Zero, there is no RJ45 connector for Ethernet. In this case, your best option for internet access is to use a wireless USB adapter (see Recipe 2.5).
If you have a model B or B+ Raspberry Pi (1, 2, or 3) then you are in luck; just plug an Ethernet patch cable into its RJ45 socket and then connect the other end to a spare socket on the back of your home router (Figure 2-1).

Figure 2-1. Connecting Raspberry Pi to a home hub
The network LEDs on your Raspberry Pi should immediately begin to flicker as the Raspberry Pi connects to your network.
Discussion
Raspbian is preconfigured to connect to any network using Dynamic Host Configuration Protocol (DHCP). It will automatically be assigned an IP address as long as DHCP is enabled on your network.
If the LEDs blink but you cannot connect to the internet on your Raspberry Pi using a browser, check that DHCP is enabled on your network management console. Look for an option like that shown in Figure 2-2.

Figure 2-2. Enabling DHCP on your home hub
See Also
To connect to a wireless network, see Recipe 2.5.
2.2 Finding Your IP Address
Problem
You want to know the IP address of your Raspberry Pi so that you can communicate with it, whether connecting to it as a web server, exchanging files, or controlling it remotely with SSH (Recipe 2.7) or VNC (Recipe 2.8).
Solution
An IPv4 address (as used for local addresses) is a four-part number uniquely identifying a computer’s network interface within a network. Each part is separated from the next part by a dot.
To find the IP address of your Raspberry Pi, you need to issue this command in a Terminal window:
$ hostname -I
192.168.1.16 fd84:be52:5bf4:ca00:618:fd51:1c .....
The first part of the response is the local IP address of your Raspberry Pi on your home network.
Discussion
A Raspberry Pi can have more than one IP address (i.e., one for each network connection). So if you have both a wired connection and a wireless connection to your Pi, it would have two IP addresses. Normally, however, you would connect it by only one method or the other, not both. To see all the network connections, use the ifconfig command:
$ ifconfig

eth0      Link encap:Ethernet  HWaddr b8:27:eb:d5:f4:8f
          inet addr:192.168.1.16  Bcast:192.168.255.255  Mask:255.255.0.0
          UP BROADCAST RUNNING MULTICAST  MTU:1500  Metric:1
          RX packets:1114 errors:0 dropped:1 overruns:0 frame:0
          TX packets:1173 errors:0 dropped:0 overruns:0 carrier:0
          collisions:0 txqueuelen:1000
          RX bytes:76957 (75.1 KiB)  TX bytes:479753 (468.5 KiB)

lo        Link encap:Local Loopback
          inet addr:127.0.0.1  Mask:255.0.0.0
          UP LOOPBACK RUNNING  MTU:16436  Metric:1
          RX packets:0 errors:0 dropped:0 overruns:0 frame:0
          TX packets:0 errors:0 dropped:0 overruns:0 carrier:0
          collisions:0 txqueuelen:0
          RX bytes:0 (0.0 B)  TX bytes:0 (0.0 B)

wlan0     Link encap:Ethernet  HWaddr 00:0f:53:a0:04:57
          inet addr:192.168.1.13  Bcast:192.168.255.255  Mask:255.255.0.0
          UP BROADCAST RUNNING MULTICAST  MTU:1500  Metric:1
          RX packets:38 errors:0 dropped:0 overruns:0 frame:0
          TX packets:28 errors:0 dropped:0 overruns:0 carrier:0
          collisions:0 txqueuelen:1000
          RX bytes:6661 (6.5 KiB)  TX bytes:6377 (6.2 KiB)
Looking at the results of running the ifconfig command, you can see that the Pi in question is connected by both a wired connection (eth0) with an IP address of 192.168.1.16 and a wireless connection (wlan0) with an IP address of 192.168.1.13. The lo network interface is a virtual interface that allows the computer to communicate with itself.
See Also
Wikipedia has everything you want to know about IP addresses.
2.3 Setting a Static IP Address
Solution
There are two ways of doing this. One method uses your network controller (your home hub). The second method uses the Raspberry Pi itself.
The method using the network is generally preferable, but the second method, in which the Raspberry Pi determines its own IP address, is worth doing if you intend to move your Raspberry Pi between different networks and want to keep the IP address the same.
All the computers, TVs, phones, and other internet-enabled devices in your home are generally connected to the internet via the hub that links your phone line, 4G, or a fiber-optic cable to your house. All of these devices, whether they connect to the hub by WiFi or via a direct cable connection, are said to be part of your Local Area Network (LAN).
By default, when you connect a new device to your LAN (such as a Raspberry Pi), either by plugging it in with an Ethernet cable or by using WiFi, the LAN controller (your hub) will use a system called DHCP to allocate an IP address for the new device. This address will be allocated from a pool of IP addresses that might range from 192.168.1.2 to 192.168.1.199 (or maybe 10.0.0.2 to 10.0.0.199). In other words, just the last part of the four-part IP address changes for each device connected to the LAN.
When DHCP allocates an IP address to a device, it does so with a lease time, which is how long that device will be guaranteed to keep the IP address without risk of it being allocated to some other device. Generally speaking, the default for this lease time is fairly short; on my hub, it’s a week. This means that the IP address of my Raspberry Pi can change without warning after a week, and if the Pi is being used in a project without keyboard, mouse, and monitor, it can be difficult to find its IP address to allow me to connect to it. This is why I might want to set a static IP address for your Raspberry Pi.
Setting the IP address using the network
One way to ensure that your Raspberry Pi’s IP address doesn’t change is to simply go to your hub control interface and change the DHCP lease time to a much higher value. To access this interface, you will need to use a computer (it could be your Raspberry Pi, but it doesn’t have to be) and go to a specific address that is often written on the hub, described as router address or admin console address. For my router this is http://192.168.1.1. There will also be a username and password to be entered. These are not the same as the WiFi access point name and password. They’re often also written somewhere on the hub and often have default values of admin and password, respectively.
After you are connected, you will need to hunt around your admin console’s various pages for any mention of DHCP settings, which should look something like Figure 2-3.

Figure 2-3. Changing the DHCP lease time
Change the “Lease duration” (or whatever it’s specifically labeled for your hub) to the maximum allowed.
One downside of extending the lease duration like this is that it applies to all the devices on your LAN. So if you have a lot of devices, it’s possible that you might run out of IP addresses because DHCP is unable to reallocate old IP addresses until the lease period has expired.
A better approach is to use something called DHCP reservation. This instructs DHCP to permanently allocate a particular IP address to a particular device. In Figure 2-4, you can see that I have allocated the IP address of 192.168.1.3 to the device raspberrypi-Ethernet (a Raspberry Pi connected by Ethernet cable to the hub).

Figure 2-4. Allocating a DHCP reservation
From now on, whenever that Raspberry Pi is connected to the LAN, it will be assigned the IP address 192.168.1.3, and DHCP will not allocate that IP address to any other device.
Setting the IP address using the Raspberry Pi
The second approach to setting a static IP address for a Raspberry Pi uses the Raspberry Pi itself rather than the LAN. In effect, the Raspberry Pi is requesting, from the hub, the IP address it would like to use.
Allowing your Raspberry Pi to decide its own IP address runs slightly contrary to the way things usually work on a network, where the LAN determines the IP address. The danger is, of course, that the LAN’s DHCP controller has already allocated that IP address to some other computer. Similar problems arise if you have more than one Raspberry Pi, both trying to use the same IP address. IP addresses can’t be shared; in this event, one of the Raspberry Pis won’t connect to the network.
If you want to use the approach described in this section, you need to ensure that your IP address is unique for a particular Raspberry Pi and that you chose a static IP address for your Raspberry Pi that is outside of the DHCP range. For example, looking at Figure 2-3, you can see that the DHCP-allocated IP address range is from 192.168.1.2 to 192.168.1.199. So, if we picked a static IP address of 192.168.1.210, we know it won’t be reallocated. Note that each of the number parts of an IP address is between 0 and 255, so, for example, 192.168.1.300 is not a valid IP address.
Your Raspberry Pi will have a different IP address for each network connection. In this example, we will make the IP address static and the same for both WiFi and Ethernet cable.
To edit this file, type the following command in the Terminal:
$ sudo nano /etc/dhcpcd.conf
First, decide on an IP address to use. You need to pick one that is both unused by any other machine on the network and outside the range of the IP addresses used by DHCP. In this case, I will use 192.168.1.210. Then I’ll modify the contents of the file, adding the following lines to the end of the file:
interface eth0
static ip_address=192.168.1.210/24
static routers=192.168.1.1
static domain_name_servers=192.168.1.1

interface wlan0
static ip_address=192.168.1.210/24
static routers=192.168.1.1
static domain_name_servers=192.168.1.1
Note that, as I mentioned earlier, I have set the same IP address for both network interfaces (Ethernet and WiFi). If both connections are available, the first one to connect will shut the other out from using that IP address. In practice, this means that the Ethernet connection will win because it’s much faster to connect than WiFi.
The IP address used for the routers and domain_name_servers settings is the IP address you use to connnect to your hub’s admin console.
Many hubs use the aforementioned IP addressing range. The address next to the entries routers and domain_name_servers is the same address as you will find written on your hub as its admin console address.
However, if your hub uses the less common addressing format of 10.0.0.1, you will need to change all the instances of 192.168.1 in our earlier example to 10.0.0.
Once the changes are made, save the file by pressing Ctrl-X and then pressing Y. For a guide to using the nano editor, see Recipe 3.7.
You will need to reboot your Raspberry Pi by running sudo reboot before the changes take effect.
Discussion
Networking has changed a lot with different versions of Raspbian. These instructions apply to the latest (as of this writing) version of Raspbian (Buster). If you don’t have the latest version of Raspbian, you should get it, because Raspbian is always evolving and improving. You can learn how to do this in Recipe 3.40. To find out what version of Raspbian you have, see Recipe 3.39.
See Also
Wikipedia has everything you want to know about IP addresses.
2.4 Setting the Network Name of a Raspberry Pi
Solution
There are several ways of doing this. Whichever method you use, make sure that the network name you choose does not contain spaces and contains only letters, numeric digits, and the hyphen (-) character.
In all three methods, you also need to restart your Raspberry Pi for the changes to take effect.
Setting the network name using the Raspberry Pi Configuration tool
Unless you are running your Raspberry Pi headless (without monitor and keyboard attached), the simplest way to set the network name of your Raspberry Pi is to use the Raspberry Pi Configuration tool. To open this, go to the Raspberry Pi menu, select Preferences, and then click Raspberry Pi Configuration. Then click the System tab (Figure 2-5).

Figure 2-5. Changing the Hostname using the Raspberry Pi Configuration tool
Change the name in the Hostname field to your preferred name and then click OK. You are then prompted to reboot so the changes will take effect (Recipe 1.16).
Setting the network name using the command line (the easy way)
You can also change your Raspberry Pi’s network name from the command line using the raspi-config tool. Run the following command in a Terminal session:
$ sudo raspi-config
This opens the raspi-config tool. Use the up/down cursor keys to select Network Options and then press return. This opens a form in which you can enter the new network name (Figure 2-6). Note that this interface uses only the command line, so you can use it from an SSH session (Recipe 2.7).

Figure 2-6. Setting the network name of a Raspberry Pi using raspi-config
Setting the network name using the command line (the hard way)
If you really want to do it the hard way, you can also directly edit the files that control the Raspberry Pi’s network name. There are two files that you need to change.
First, edit the file /etc/hostname. You can do this by opening a Terminal window and typing the command:
$ sudo nano /etc/hostname
Replace raspberrypi with a name of your choice.
Second, open the file /etc/hosts in an editor using the command:
$ sudo nano /etc/hosts
The file will look something like this:
127.0.0.1       localhost
::1             localhost ip6-localhost ip6-loopback
fe00::0         ip6-localnet
ff00::0         ip6-mcastprefix
ff02::1         ip6-allnodes
ff02::2         ip6-allrouters

127.0.1.1       raspberrypi
Change the name at the end of the file (raspberrypi) to your preferred new name.
Discussion
Changing the name of your Pi can be very useful, especially if you have more than one Pi connected to your network.
See Also
See Recipe 2.3 to change the IP address of your Raspberry Pi.
You can also set the network name of your Raspberry Pi using PiBakery—see Recipe 1.8
2.5 Setting Up a Wireless Connection
Solution
There are various methods of setting up a WiFi connection with your Raspberry Pi.
Setting up WiFi from the Pixel Desktop
Setting up WiFi in the latest Raspbian is really easy. In the upper-right corner of your screen, click the network icon (the two computers) (Figure 2-7). You are then presented with a list of WiFi networks. Select your network; a prompt appears in which you can enter your Pre Shared Key (password). Enter your password. After a while, the network icon will switch to the standard WiFi symbol, and you will be connected.

Figure 2-7. Connecting to a WiFi network
Setting up WiFi using the command line (the easy way)
This method of setting up WiFi is great if you are setting up your Raspberry Pi so that, after you configure it, you can use it without keyboard and monitor attached. However, you will need to have network access to the Raspberry Pi temporarily connecting it to your hub using an Ethernet cable (Recipe 2.1).
Run the following command to start the raspi-config utility:
$ sudo raspi-config
Then, from the menu that opens, select Network Options (use the cursor keys and press Enter) and then select WiFi (Figure 2-8).

Figure 2-8. Setting up WiFi using raspi-config
A prompt appears, asking for the SSID (WiFi name) and password.
Setting up WiFi using the command line (the hard way)
You can also set up a wireless connection by using the command line to edit the necessary file directly. To do so, edit the file /etc/wpa_supplicant/wpa_supplicant.conf by using the following command:
$ sudo nano /etc/wpa_supplicant/wpa_supplicant.conf
Scroll down to the end of the file and then add the following lines:
network={
        ssid="my wifi name"
        psk="my wifi password"
}
Change the values for ssid and psk to match your WiFi’s name and password, respectively.
For the changes to the file to take effect, reboot your Raspberry Pi.
Discussion
WiFi uses quite a lot of power, so if you find your Pi rebooting unexpectedly or not booting properly, then you might need to use a larger power supply for it. Look for a supply that is 1.5A or higher; if you are using a Raspberry Pi 4 and are hanging high-power USB peripherals on it, use a 3A power supply.
If you are using your Raspberry Pi as a media center (see Recipe 4.1), then there will be a settings page on which you can connect the media center to your network using WiFi.
See Also
For a list of WiFi adapters that are compatible with the Raspberry Pi, go to https://oreil.ly/67Mn1.
For more information on setting up a wired network, see Recipe 2.1.
For information on using the nano editor, see Recipe 3.7.
To set up a WiFi connection using PiBakery, see Recipe 1.8.
2.6 Connecting with a Console Lead
Solution
Use a console cable (a special lead that you need to buy separately—see “Miscellaneous”) to connect to a Raspberry Pi.
To use this method, you will need to enable the Serial interface. This means that, at least while you are setting up your Raspberry Pi, you will need to have a keyboard, monitor, and mouse attached.
To enable the Serial interface, go to the Raspberry Pi menu, select Preferences, and then click Raspberry Pi Configuration. Select the Interfaces tab and then click the Enabled button for Serial Port, as shown in Figure 2-9.

Figure 2-9. Enabling the Serial interface using the Raspberry Pi Configuration tool
As with most Raspberry Pi configurations, you can also use the command-line raspi-config tool by running this command in a Terminal session:
$ sudo raspi-config
Select Interfacing Options and then Serial, as shown in Figure 2-10.

Figure 2-10. Enabling the Serial interface using the raspi-config tool
Console cables are great for a Pi that is going to be used headless—that is, without keyboard, mouse, or monitor.
The console cable shown in Figure 2-11 is available from Adafruit.

Figure 2-11. A console cable
Connect the lead as follows and by referring to Figure 2-11.
-
Connect the red (5V) lead to the 5V pin, one pin to the left of the edge of the GPIO header.
-
Connect the black (GND) lead to GND on the next pin to the left on the Raspberry Pi.
-
Connect the white lead (Rx) to Raspberry Pi GPIO 14 (TXD), to the left of the black lead.
-
Connect the green lead (Tx) to GPIO 15 (RXD), to the left of the white lead on the Raspberry Pi.
If you use a different lead, the wire colors might well be different, so always check the documentation for the lead or elseyou risk damaging your Raspberry Pi.
Note that the USB lead also provides 5V on the red wire, with enough power for the Pi on its own but not with a lot of devices attached.
If you are a Windows or macOS user, you will need to install drivers for the USB lead, which are available here for Windows and here for macOS. Linux users usually don’t need to install any drivers for these leads.
To connect to the Pi from macOS, you will need to run the Terminal and enter the following command:
$ sudo cu -l /dev/cu.usbserial -s 115200
After connecting, press Enter, and the Raspberry Pi login prompt should appear (Figure 2-12). The default username and password are pi and raspberry, respectively.

Figure 2-12. Logging in with a console cable
If you are trying to connect to your Raspberry Pi from a Windows computer, you need to download the terminal software called Putty.
When you run Putty, change the “Connection type” to Serial and set the speed to 115200. You also need to set the “Serial line” to be the COM port in use by the cable. This might be COM7, but if that does not work, check it by using the Windows Device Manager.
When you click Open and press Enter, the Terminal session should start with a login prompt.
Discussion
The console cable can be a very convenient way of using your Pi if you are traveling light, because it provides both power and a way to control the Pi remotely.
The console lead has a chip in the USB end that provides a USB-to-Serial interface. This sometimes (depending on your operating system) requires the installation of drivers on your PC. You should be able to use any USB-to-serial converter as long as it has the necessary drivers for your PC.
Plugging the sockets of the lead into the right places is made easier if you carefully glue (or tape) the four sockets together in the right order so that they fit over the GPIO header in a block.
Finding the right position on the GPIO header is made easier if you use a GPIO template like the Raspberry Leaf (see Recipe 9.1). The Raspberry Pi pinouts are shown in Appendix B.
See Also
You can find out more about using the serial console at this Adafruit tutorial. Adafruit also sells console cables. The lead used here is one supplied by Adafruit (product code 954).
2.7 Controlling the Pi Remotely with SSH
Solution
Before you can connect to your Raspberry Pi using SSH, you must turn on SSH. On newer versions of Raspbian, you can use the Raspberry Pi Configuration tool (Figure 2-13), which you can find on the Main menu under Preferences. Just select the box for SSH and then click OK. You are then prompted to restart.
If you prefer to use the command line, use the raspi-config application. You can start this at any time by entering the following command in Terminal:
$ sudo raspi-config
Click the Interfaces tab, scroll down to the SSH option, and then click the Enabled button.

Figure 2-13. Turning on SSH using the Raspberry Pi Configuration tool
If you are using macOS or have Linux installed on the computer from which you want to connect your Pi, all you need to do to connect is open a Terminal window and enter the following command:
$ ssh 192.168.1.16 -l pi
Here, the IP address (192.168.1.16) is the IP address of your Pi (see Recipe 2.2). You are then prompted for your password and logged in to the Pi (Figure 2-14).

Figure 2-14. Logging in with SSH
To connect from a Windows computer, you will need to use Putty (Recipe 2.6) to start an SSH session.
Discussion
SSH is a very common way of connecting to remote computers; any commands that you could issue on the Pi itself, you can use from SSH. It is also, as its name suggests, secure because the communication is encrypted.
Perhaps the only drawback is that it is a command-line rather than graphical environment. If you need access to the full Raspberry Pi desktop environment remotely, you need to use VNC (Recipe 2.8) or RDP (Recipe 2.9).
2.8 Controlling the Pi Remotely with VNC
Solution
Use the preinstalled VNC software on Raspbian. However, to do so, you will first need to configure your Raspberry Pi to turn it on. You can do this using the Raspberry Pi Configuration tool, which you can find in the Preferences section of the Main menu on the Raspberry Pi desktop. Click the Interfaces tab, scroll down to the VNC option, select the Enabled button, and then click OK (Figure 2-15).

Figure 2-15. Turning on the VNC interface
If you don’t mind your virtual screen being very low resolution, you can skip ahead in this recipe to connect to your Raspberry Pi remotely, but in all likelihood, you will want to increase the resolution. To do this, edit the config.txt file by using the following command:
$ sudo nano /boot/config.txt
Find the lines that look like this:
# framebuffer_width=1900
# framebuffer_height=1024
Remove the # character at the beginning of each line to enable the new screen width and height, as shown here:
framebuffer_width=1900
framebuffer_height=1024
You need to reboot for the changes to take effect.
To connect to the Pi from a remote computer, you need to install VNC client software. RealVNC VNC Viewer is a popular choice and is available for Windows, Linux, and macOS.
When you run the client program on macOS or a PC, you will be asked to enter the IP address of the VNC server to which you want to connect (the IP address of your Pi).
You are then prompted for your password (Figure 2-16).

Figure 2-16. Authenticating a VNC connection
The Catchphrase and Signature are security devices designed to alert you if someone is hacking your Raspberry Pi. If either changes when you authenticate another time, your Raspberry Pi might be compromised.
Discussion
Although you can do most things with SSH using the command line, sometimes it is useful to have access to the graphical environment of your Raspberry Pi.
The Raspberry Pi’s VNC server automatically starts when you reboot, as long as the VNC option is enabled.
See Also
See also this Adafruit tutorial.
See also Recipe 2.9.
You can also enable VNC while setting up a new Raspberry Pi using PiBakery.
2.9 Controlling the Pi Remotely Using RDP
Solution
Install the XRDP software on your Raspberry Pi by entering the following commands:
$ sudo apt-get update
$ sudo apt-get install xrdp
After the software is installed, it will automatically start the xrdp service, which ensures that xrdp will automatically start when the Raspberry Pi is rebooted.
If you have Windows 7 or later, it already includes an RDP client for connecting to your Raspberry Pi. To access it, click All Programs on your Start menu, then select Accessories, and then click Remote Desktop Connection. For older versions of Windows, you can download the client from: ModMyPi.
macOS users can download the Microsoft RDP client for macOS from the App Store (it’s free).
A client for Linux machines is available from http://www.rdesktop.org.
When you start your RDP client, you will first need to add a new connection. Enter the IP address of your Raspberry Pi as well as your username and password (Figure 2-17), which are the same as your usual Raspberry Pi login—that is, a username of pi and a password of raspberry, unless you have changed it.
You will probably also want to pick a Resolution and clear the “Start session in full screen” option.

Figure 2-17. Making a new RDP connection with Microsoft remote desktop software
Discussion
RDP does the same job as VNC but works more efficiently and therefore refreshes the contents of the screen more smoothly.
See Also
See also Recipe 2.8.
2.10 File Sharing on a Mac Network
Solution
The macOS operating system includes built-in support for file viewing in Finder over the network (Figure 2-18). However, you must make some configuration changes on your Raspberry Pi for macOS to view network files on your Raspberry Pi.

Figure 2-18. Raspberry Pi in the macOS Finder
You will need to know the IP address of your Raspberry Pi (Recipe 2.2).
On the Raspberry Pi, install netatalk by using the following commands:
$ sudo apt-get update
$ sudo apt-get install netatalk
Next, back on your Mac, in the Finder menu, select Go, click Connect to Server, and then enter afp://192.168.1.210 as the server address (using the IP address for your Raspberry Pi, of course, not the one shown here). Then, click Connect. You are then prompted to log in (Figure 2-19).

Figure 2-19. Connecting to a Raspberry Pi from the macOS Finder
Log in using the name pi and your password, which will be raspberry, unless you have changed it. The Finder should then show you the contents of your home directory on the Raspberry Pi.
There are a few more configuration changes to make on the Raspberry Pi, which will automatically mount your Raspberry Pi on your Mac’s filesystem:
$ sudo apt-get update
$ sudo apt-get install avahi-daemon
$ sudo update-rc.d avahi-daemon defaults
Next, type this command:
$ sudo nano /etc/avahi/services/afpd.service
Paste the following code into the file. This is a lot to type, so if you are reading a paper copy of this book, you can copy and paste it from this web page. Just scroll down until you find this chapter and recipe:
<?xml version="1.0" standalone='no'?><!--*-nxml-*-->
<!DOCTYPE service-group SYSTEM "avahi-service.dtd">
<service-group>
   <name replace-wildcards="yes">%h</name>
   <service>
      <type>_afpovertcp._tcp</type>
      <port>548</port>
   </service>
</service-group>
To set the daemon running so that this happens automatically whenever your Raspberry Pi boots up, type this command:
$ sudo /etc/init.d/avahi-daemon restart
Switch back to your Mac, and you should now see your Raspberry Pi in the Finder.
Discussion
Being able to move files easily between your Mac and your Raspberry Pi is very useful. It means that you can use files on your Pi without having to hook up a separate keyboard, mouse, and monitor.
You can also open files on the Raspberry Pi as if they were on your Mac. This has the advantage that you can edit them using TextMate or your favorite macOS text editor.
If you’re using Windows or Linux, you can also share files by configuring your Raspberry Pi to work as Network Attached Storage (NAS); see Recipe 2.11.
See Also
The instructions here were adapted from this tutorial, which credits Matt Richardson and Shawn Wallace’s book Getting Started with Raspberry Pi (O’Reilly) as the original source.
2.11 Using a Raspberry Pi for Network Attached Storage
Solution
The solution to this problem is to install and configure Samba. To do this, issue the following commands:
$ sudo apt-get update
$ sudo apt-get install samba
$ sudo apt-get install samba-common-bin
Next, attach the USB hard drive to the Raspberry Pi. It will automatically mount in your /media/pi folder. To check that it’s there, run this command:
$ cd /media/pi
$ ls
The drive should be listed with whatever name you gave it when you formatted it. It will automatically mount itself whenever the Raspberry Pi reboots.
You next need to configure Samba so that the drive can be shared on the network. To do this, you first need to add a Samba user (pi). Enter the following command and type in a password:
$ sudo smbpasswd -a pi
New SMB password:
Retype new SMB password:
Added user pi.
You now need to make some changes to the file /etc/samba/smb.conf, so enter this command:
$ sudo nano /etc/samba/smb.conf
The first line you’re looking for is near the top of the file:
workgroup = WORKGROUP
You only need to change this if you plan to connect from a Windows machine. This should be the name of your Windows workgroup. For Windows XP, the default is MSHOME; for newer versions of Windows, it is HOME (but check on your Windows network). Note that generally connecting to NAS in a mixed network of Macs and Windows PCs (and, for that matter, Linux machines) works just fine.
The next change to be made is further down the file in the Authentication section. Find the following line:
# security = user
Remove the # from the beginning of the line to activate the line and turn security on. Finally, scroll to the end of the file and add the following lines:
[USB]
path = /media/pi/NAS
comment = NAS Drive
valid users = pi
writeable = yes
browseable = yes
create mask = 0777
public = yes
Save the file and then restart Samba by entering the following:
$ sudo /etc/init.d/samba restart
If all is well, your USB drive should now be shared on your network.
Discussion
To connect to the drive on a macOS, select Go, and then, from the Finder menu, click Connect to Server. Next, in the Server Address field, enter smb://raspberrypi/USB. A login dialog box opens, in which you need to change the username to pi (Figure 2-20).
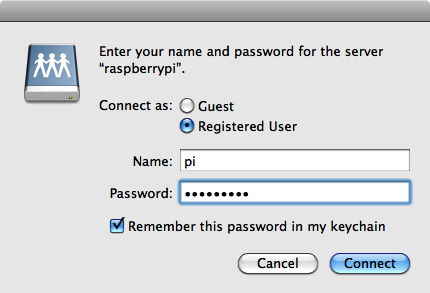
Figure 2-20. Connecting to NAS with the macOS Finder
If you are connecting to NAS from a Windows machine, the exact procedure will vary depending on your version of Windows. However, the basic principle is that at some point you will need to enter the network address, which should be \raspberrypiUSB (Figure 2-21).

Figure 2-21. Connecting to NAS from Windows
You are then prompted for the username and password before you can use the NAS disk (Figure 2-22). You should only have to do this the first time. After the network place is added, you should be able to navigate directly to it in File Explorer.

Figure 2-22. Browsing NAS on Windows
If you are a Linux user, the following command should mount the NAS drive for you:
$ sudo mkdir /pishare
$ sudo smbmount -o username=pi,password=raspberry //192.168.1.16/USB /pishare
See Also
You might want to change your Raspberry Pi’s network name to something inappropriate like “piNAS” (see Recipe 2.4).
2.12 Network Printing
Solution
Use Common Unix Printing System (CUPS).
Start by entering the following commands into a Terminal to install CUPS (this can take some time):
$ sudo apt-get update
$ sudo apt-get install cups
Give yourself admin privileges for CUPS by entering the following command:
$ sudo usermod -a -G lpadmin pi
This last command adds the lpadmin group used by CUPS to the user pi so that you have permission to print.
CUPS is configured via a web interface. Start Chromium, and then on the Main menu, in the Internet group (or click on the icon on your desktop), navigate to the address http://localhost:631.
On the Administration tab, choose the Add Printer option. This displays a list of printers that are on the network or are connected directly to the Raspberry Pi’s USB port (Figure 2-23).

Figure 2-23. Discovering printers with CUPS
Follow the series of dialog boxes to set up the printer.
Discussion
When you’re finished, you can test out the printer by firing up LibreOffice. Type some text, and when you go to print it, you should see your newly added printer available for printing (Figure 2-24).

Figure 2-24. The print dialog box
See Also
See also the official CUPS website.