![]()
New with Oracle Database 12c is Oracle Multitenant. This feature allows you to create and maintain many pluggable databases within an overarching multitenant container database. Following is a concise introduction to pluggable terminology.
A multitenant container database (CDB) is defined as a database capable of housing one or more pluggable databases. A container is defined as a collection of data files and metadata that exist within a CDB. A pluggable database is a special type of container that can be easily provisioned by cloning another database. If need be, a pluggable database can also be transferred from one CDB to another.
Every CDB contains a master set of data files and metadata known as the root container. Each CDB also contains a seed container, which is used as a template for creating other pluggable databases. Each CDB consists of one master root container, one seed container, and zero, or one or more, pluggable databases.
A pluggable enabled CDB must be created with the ENABLE PLUGGABLE DATABASE clause. A database that was not created in this manner (a non-CDB) cannot contain pluggable databases. A non-CDB was the only type of database available prior to Oracle Database 12c. Each CDB consists of the following elements:
- One root container, named CDB$ROOT. The root contains the master set of data dictionary views, which have metadata regarding the root as well as every child pluggable database within the CDB.
- One static seed container, named PDB$SEED. This container exists solely as a template for providing data files and metadata used to create new pluggable databases within the CDB.
- Zero, or one or more, pluggable databases (with a maximum of 252). Each pluggable database is self-contained and functions like an isolated non-CDB database. Additionally, each pluggable database contains its own data files and application objects (users, tables, indexes and so on). When connected to a pluggable database, there is no visibility to the root container or any other pluggable databases present within the CDB.
New with Oracle Database 12c there is a CDB level of data dictionary views that overarch the DBA/ALL/USER-level views. The CDB-level views report across all containers (root, seed, and all pluggable databases) in a CDB. For instance, if you wanted to view all users within a CDB database, you would do so from the root container, by querying CDB_USERS. If you’re not using a CDB, then DBA_USERS is still an accurate view for reporting all user information. Many of the data dictionary views now contain a new column, named CON_ID, that is a unique identifier for each container within the CDB. The root container has a CON_ID of 1. The seed has a CON_ID of 2. Each new pluggable database created within the CDB is assigned a unique sequential container ID.
Table 23-1 defines terms used in a pluggable database environment. Refer back to this table as you read through this chapter.
Table 23-1. Summary of Pluggable Database Terms
| Term | Meaning |
|---|---|
| Container database (CDB), multitenant database | A database capable of housing one or more pluggable databases |
| Pluggable database, (PDB) | A set of data files and metadata that can be seamlessly transferred from one CDB to another |
| Root container | A master set of data files and metadata containing information regarding all containers within a CDB. The root container is named CDB$ROOT. |
| Container | A collection of data files and metadata. Can be root, seed, or a pluggable database. |
| Seed pluggable database | A template of data files and metadata used to create new pluggable databases. The seed pluggable database is named PDB$SEED. |
| Plugging | Associating the metadata and data files of a pluggable database with a CDB |
| Unplugging | Disassociating the metadata and data files of a pluggable database from a CDB |
| Cloning | Creating a pluggable database from a copy of another database (seed, PDB, or non-CDB) |
| CON_ID | A unique identifier for each container within a CDB. The CDB-level views contain a CON_ID column that identifies the container with which the information being viewed is associated. |
| CDB data dictionary views | Views that contain metadata regarding all pluggable databases within a CDB. These views only display meaningful information when queried via a privileged connection from the root container. The pluggable databases must be open for use. |
| non-CDB database | An Oracle database created without the pluggable database feature enabled (the only type of database that was available prior to 12c) |
The goal of this chapter is to make you proficient in administering a container/pluggable database environment. By the end of this chapter, you should understand how to create a pluggable environment, provision pluggable databases, connect and navigate within a pluggable database, and transfer pluggable databases from one CDB to another. The foundation for this starts with understanding the pluggable architecture.
![]() Note Oracle Multitenant is an extra cost option available with the Enterprise Edition. However, it is available for use with one pluggable database for all editions. Check the Oracle licensing guide for details.
Note Oracle Multitenant is an extra cost option available with the Enterprise Edition. However, it is available for use with one pluggable database for all editions. Check the Oracle licensing guide for details.
Understanding Pluggable Architecture
Pluggable databases have some important architectural differences with a non-CDB database environment. Figure 23-1 displays a container database, named CDB, that contains a root container, a seed database, and two pluggable databases, named SALESPDB and HRPDB.
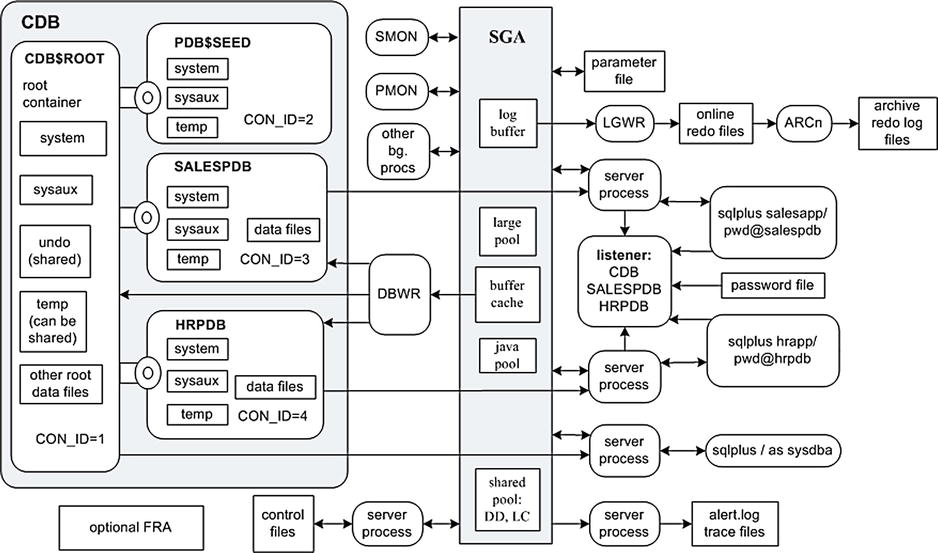
Figure 23-1. Pluggable database architecture
Take a minute to inspect Figure 23-1. If you’re a curious DBA, most likely dozens of thoughts immediately come to mind. The following list highlights some key points to understand about the new architecture in Figure 23-1:
- A connection to the CDB database is synonymous with connecting to the CDB$ROOT root container. The main purpose of the root container is to house metadata for any associated PDBs.
- You can access the root container via the SYS user, just as you would a non-CDB database. In other words, when logged in to the database server, you can use OS authentication to connect directly to the root container without specifying a username and password (sqlplus / as sysdba). You do not need a listener running to connect to the root container.
- The seed pluggable database container (PDB$SEED) only exists as a template for creating new pluggable databases. You can connect to the seed, but it is read-only, meaning you can’t issue transactions against it.
- Besides the two default containers (root and seed), for this particular CDB, two additional pluggable databases have been manually created, named SALESPDB and HRPDB (more on creating pluggable databases later in the chapter).
- Pluggable databases exist within individual namespaces. Pluggable databases must be unique within the CDB, but objects within a pluggable database follow the namespace rules of a non-CDB database. For example, tablespace names and user names have to be unique within the individual pluggable databases, but not within the CDB.
- Each pluggable database has its own SYSTEM and SYSAUX tablespaces and, optionally, a TEMP tablespace.
- If a pluggable database does not have its own TEMP file, it can consume resources in the root container TEMP file.
- The SYSTEM tablespace of each pluggable database contains information regarding the pluggable database metadata, such as its users and objects; these metadata are accessible via the DBA/ALL/USER-level views from the pluggable database and are visible via CDB-level views from the root container.
- The character set defined for the CDB is also used for all associated PDBs.
- You can set the time zones for the CDB and all associated PDBs or you can set the time zone individually per PDB.
- Figure 23-1 shows a non-RAC configuration, so there is only one memory allocation and one set of background processes. In other words, there is one instance. All pluggable databases within the CDB use the same instance and background processes. If this were a RAC configuration, then any connections to the RAC instance would share that instance and background processes.
- The CDB instance is started and stopped while connected as SYS to the root container. You can’t start/stop the CDB instance while connected to a pluggable database.
- There is one initialization parameter file that is read by the instance when starting. A privileged user connected to the root container can modify all initialization parameters. In contrast, a privileged user connected to a pluggable database can only modify parameters applicable to the currently connected pluggable database. When connected to a pluggable database and modifying initialization parameters, these modifications only apply to the currently connected pluggable database and persist for the pluggable database across database restarts. The ISPDB_MODIFIABLE column in V$PARAMETER shows which parameters are modifiable while connected as a privileged user to a pluggable database.
- Application users can only access the pluggable databases via a network connection. Therefore, a listener must be running and listening for service names corresponding to associated pluggable databases. If a listener is not running, then there is no way for an application user to connect to a pluggable database.
- The individual pluggable databases aren’t stopped or started per se (not in the terms of a database instance). When you start/stop a pluggable database, you are not allocating memory or starting/stopping background processes. Rather, pluggable databases are either made available or not (open or closed).
- There is one set of control files for the CDB. The control files are managed while connected to the root container as a privileged user.
- There is one UNDO tablespace for the CDB. All pluggable databases within the CDB use the same UNDO tablespace (if RAC, then one active undo tablespace per instance).
- There is one thread of redo (per instance) that is managed while connected to the root container as a user with appropriate privileges. Only privileged connections to root can enable archiving or switching online logs. Connections to users with SYSDBA privileges to pluggable databases cannot alter online redo or archiving settings.
- There is one alert log and set of trace files for a CDB. Any applicable database messages for associated pluggable databases are written to the common CDB alert log.
- Each container is assigned a unique container ID. The root container is assigned a container ID of 1; the seed database is assigned a container ID of 2. Each subsequently created pluggable database is assigned a unique sequential container ID.
- There is one FRA for the CDB. Separate directories are not created for pluggable databases within the FRA. RMAN backup files, control files, and online redo logs are placed in a directory associated with the CDB and are not segregated by pluggable database.
- The Flashback Database feature is turned on and off via a privileged connection to the root container. You cannot enable flashback at the pluggable database level.
- AWR, ADDM, and ASH reports are issued across all PDBs in the CDB. Resource consumption is identified per pluggable database.
- When resolving SQL performance issues, queries are associated with a particular pluggable database via the CON_ID column in views such as V$SQL and V$SQLAREA.
The prior list may seem long, but once you digest the nuances of a pluggable database environment, you’ll be able to effectively implement and manage this technology. One of the main points here is that you can have dozens or more securely isolated pluggable databases housed within one CDB with only one instance (memory and background processes), one thread of redo, and one set of control files to manage.
It’s fairly common for a specific application to request that its database objects (users, tables, indexes, and so on) be placed in a database isolated from other applications. Reasons cited for doing this are often security issues or performance concerns. Before the advent of pluggable databases, think about how you solved the requirement of separate environments for various applications and development teams. Two common solutions employed are as follows:
- Create a separate database for each team/application that needs an environment. Sometimes this approach is implemented with one database per server, which often translates into additional hardware and licensing costs.
- Create separate environments within one database. Usually this is achieved through separate schemas and distinct tablespaces. This approach requires that there not be any database object naming collisions between applications, for example, with objects such as user names, tablespace names, and public synonyms.
Starting with Oracle Database 12c, pluggable databases give you another tool for addressing the prior needs. Pluggable databases provide the security isolation requirement; there is no direct access from one pluggable database to another. Even a user connected with SYSDBA privileges to a given pluggable database has no direct SQL access to other pluggable databases within the CDB. This is just like with non-CDB databases. From a security and application perspective, you have totally isolated pluggable databases within the larger CDB.
As a DBA, instead of having to implement and maintain dozens of individual databases and associated operational tasks (such as provisioning new databases, installs, upgrades, tuning, availability, monitoring, replication, disaster recovery, and B&R), you can manage any number of pluggable databases as if they were one database. From the root container perspective, it’s similar to managing one non-CDB database.
Another significant advantage of the pluggable architecture is that a pluggable database can easily be cloned or transferred from one CDB to another. This allows for more options when performing tasks such as provisioning new databases, upgrading databases, load balancing, or moving application data from one environment to another (such as from a development database to a test database). Creating a new environment can be done by cloning another pluggable database. And, moving a pluggable database from a CDB simply requires that you unplug (via SQL commands) the pluggable database from the CDB and then associate the metadata and data files (plug in) with a new CDB.
A pluggable environment has some interesting B&R architectural aspects. The following list highlights these features:
- While connected to the root container with SYSDBA or SYSBACKUP privileges, you have the option of backing up all the data files within the CDB (root, seed, and all pluggable databases) via one backup command. You also have the choice of performing B&R tasks at a pluggable database level of granularity.
- While connected directly to a pluggable database with SYSDBA or SYSBACKUP privileges, you can only back up and recover data files associated with the currently connected pluggable database; you cannot view or operate on the root container data files or other pluggable database data files.
- An incomplete recovery of the entire CDB must be performed with a connection to the root container with SYSDBA or SYSBACKUP privileges. All data files within the CDB (root container and associated pluggable databases) are unavailable during an incomplete recovery of the entire CDB.
- A direct connection to a pluggable database with SYSDBA or SYSBACKUP privileges can perform an incomplete recovery only on the currently connected pluggable database without affecting any other pluggable databases within the CDB.
- Because there is a shared UNDO tablespace, any point-in-time incomplete recoveries of a pluggable database will also have to temporarily restore the root container’s UNDO tablespace to an auxiliary database location so that it can participate in the point-in-time recovery of the pluggable database.
This means that as a root-level DBA, you can treat B&R operations as if they were one database. From the pluggable perspective, if need be, you can perform B&R per pluggable database.
![]() Note See Chapters 18 and 19 for examples of using RMAN to back up, restore, and recover in a pluggable environment.
Note See Chapters 18 and 19 for examples of using RMAN to back up, restore, and recover in a pluggable environment.
Tuning Nuances
Tuning in a pluggable environment presents new challenges. For example, when an application team complains about the poor performance of a pluggable database, because all pluggable databases within the CDB share the same instance, background processes, and disk storage, how do you know which pluggable database within the CDB might be consuming inordinate amounts of resources? To determine which pluggable database is performing poorly, you’ll have to be aware of all the pluggable databases within the CDB and how to use the CDB-level views to identify resource consumption per CDB.
The AWR, ADDM, and ASH reports now show resource usage at the pluggable database level; this will allow you to focus your tuning efforts on the appropriate pluggable database. For any homegrown tuning SQL queries that you’ve written, you’ll need to modify these to report on the CDB-level views where appropriate. Likewise, when analyzing SQL statements, you’ll have to consider which pluggable database the SQL statement is executing within.
The previous sections of this chapter place an emphasis on discussion of the pluggable architecture. Before creating a CDB, it’s critical that you understand these architectural underpinnings; hence, the lengthy introduction to this topic. Now that you have a pluggable foundation, you’re ready to turn theoretical concepts into usable and sustainable database technology. The first real task at hand is to create a CDB.
PLUGGABLE SHIPPING CONTAINERS: STRENGTH IN NUMBERS
Security: Pluggable databases within a CDB are similar to the shipping containers present on a large merchant ship. Each container is securely isolated and self-contained. If you were to find yourself inside a particular shipping container, you wouldn’t necessarily be aware of any other containers on the mother ship. The captain (SYS connection to the root container) is aware of all the containers on the vessel and can view the contents of each container via the shipping manifest (CDB-level metadata views).
Granularity: If need be, repair and maintenance can be performed at the container level. Likewise, you can take pluggable databases offline for maintenance without affecting any other pluggable databases within the CDB.
Synergy: Each container efficiently shares the ship’s communal resources, such as the engine, crew, and navigation systems. This is similar to pluggable databases’ sharing a common SGA, UNDO tablespace, FRA, parameter file, and redo stream (online redo logs and archive redo logs) as well as background processes and control files. Economies of scale are generated through sharing a mutual database infrastructure; hardware and human resource (DBA) costs are spread across many databases.
Provisioning: For this analogy, assume that you can easily replicate a shipping container (perhaps with a giant three-dimensional scanner/printer); this would allow you to create containers as copies of existing containers. Similarly, pluggable databases can quickly and efficiently be created from existing databases (seed, pluggable database, or non-CDB).
Transferability: When required, a shipping container can be easily transferred to another form of transportation (another ship, a freight train, or piggyback on a semi-truck). In the same way, pluggable databases can be easily unplugged and plugged into other CDBs. It doesn’t necessarily matter if the destination CDB is the same version and type as the source CDB.
Creating a CDB
To use the pluggable database feature, you have to specifically create a pluggable enabled CDB. There are a several different techniques for creating a CDB:
- Manually issuing the SQL CREATE DATABASE command
- Using DBCA
- Generating the required scripts with the DBCA, and then manually running the scripts to create a CDB
- Using RMAN to duplicate an existing CDB
The next two sections focus on showing you how to create a database with the CREATE DATABASE command and the DBCA. For details on using RMAN to duplicate a CDB or pluggable database, see RMAN Recipes for Oracle Database 12c, second edition, by Darl Kuhn (Apress, 2013).
First, ensure that your ORACLE_SID, ORACLE_HOME, and PATH variables are set for your CDB environment (see Chapter 2 for details on setting OS variables); for example,
$ export ORACLE_SID=CDB
$ export ORACLE_HOME=/u01/app/oracle/product/12.1.0.1/db_1
$ export PATH=$ORACLE_HOME/bin:$PATH
Next, create a parameter initialization file in the ORACLE_HOME/dbs directory. Make certain you set the ENABLE_PLUGGABLE_DATABASE parameter to TRUE. Here, I’ve used an OS text editor to create a file named initCDB.ora and placed within it the following parameter specifications:
db_name='CDB'
enable_pluggable_database=true
audit_trail='db'
control_files='/u01/dbfile/CDB/control01.ctl','/u01/dbfile/CDB/control02.ctl'
db_block_size=8192
db_domain=''
memory_target=629145600
memory_max_target=629145600
open_cursors=300
processes=300
remote_login_passwordfile='EXCLUSIVE'
undo_tablespace='UNDOTBS1'
Now, use an OS text editor to create a file named credb.sql, and place within it an appropriate CREATE DATABASE statement:
CREATE DATABASE CDB
   MAXLOGFILES 16
   MAXLOGMEMBERS 4
   MAXDATAFILES 1024
   MAXINSTANCES 1
   MAXLOGHISTORY 680
   CHARACTER SET US7ASCII
   NATIONAL CHARACTER SET AL16UTF16
DATAFILE
'/u01/dbfile/CDB/system01.dbf' SIZE 500M
   EXTENT MANAGEMENT LOCAL
UNDO TABLESPACE undotbs1 DATAFILE
'/u01/dbfile/CDB/undotbs01.dbf' SIZE 800M
SYSAUX DATAFILE
'/u01/dbfile/CDB/sysaux01.dbf' SIZE 500M
DEFAULT TEMPORARY TABLESPACE TEMP TEMPFILE
'/u01/dbfile/CDB/temp01.dbf' SIZE 500M
DEFAULT TABLESPACE USERS DATAFILE
'/u01/dbfile/CDB/users01.dbf' SIZE 50M
LOGFILE GROUP 1
        ('/u01/oraredo/CDB/redo01a.rdo') SIZE 50M,
        GROUP 2
        ('/u01/oraredo/CDB/redo02a.rdo') SIZE 50M
USER sys    IDENTIFIED BY foo
USER system IDENTIFIED BY foo
USER_DATA TABLESPACE userstbs DATAFILE
  '/u01/dbfile/CDB/userstbsp01.dbf' SIZE 500M
ENABLE PLUGGABLE DATABASE
SEED FILE_NAME_CONVERT = ('/u01/dbfile/CDB','/u01/dbfile/CDB/pdbseed'),
There are a few clauses of the CREATE DATABASE statement relevant only to pluggable databases. For instance, the ENABLE PLUGGABLE DATABASE clause is required if you want to create a pluggable database within the CDB. The USER_DATA TABLESPACE clause specifies that an additional tablespace be created within the seed database; this tablespace will also be replicated to any pluggable databases that are cloned from the seed database. Also, the SEED FILE_NAME_CONVERT specifies how the seed database files will be named and in what directories they will be located.
Next, ensure you have created any directories referenced in the parameter file and the CREATE DATABASE statement:
$ mkdir -p /u01/dbfile/CDB/pdbseed
$ mkdir -p /u01/dbfile/CDB
$ mkdir -p /u01/oraredo/CDB
Now, start up your database in nomount mode, and run the credb.sql script:
$ sqlplus / as sysdba
SQL> startup nomount;
SQL> @credb.sql
If successful, you should see this:
Database created.
Oracle recommends that you use the catcon.pl Perl script to run any Oracle supplied SQL scripts for a CDB. Therefore to create the data dictionary for a CDB use the catcon.pl Perl script. First change directories to the ORACLE_HOME/rdbms/admin directory:
$ cd $ORACLE_HOME/rdbms/admin
Now use catcon.pl to run the catalog.sql script as SYS:
$ perl catcon.pl -u sys/foo -s -e -d $ORACLE_HOME/rdbms/admin -b catalog1
catalog.sql > catcon-catalog.log
Next, use catcon.pl to run the catproc.sql script as SYS:
$ perl catcon.pl -u sys/foo -s -e -d $ORACLE_HOME/rdbms/admin -b catproc1
catproc.sql > catcon-catproc.log
After you have created the data dictionary, as the SYSTEM schema, create the product user profile tables:
$ perl catcon.pl -u system/foo -s -e -d $ORACLE_HOME/sqlplus/admin -b pupbld1
pupbld.sql > catcon-pupbld.log
At this point, you should have a fully functional CDB database and can start creating pluggable databases within it.
Using the DBCA
You can use the DBCA utilityto create a CDB through either a graphical interface or the command-line mode. When using the graphical interface, you’ll be prompted as to whether or not you want to create a CDB.
This example walks you through using the command-line mode. First, ensure that your ORACLE_SID, ORACLE_HOME, and PATH variables are set for your CDB environment (see Chapter 2 for details on setting OS variables); for example,
$ export ORACLE_SID=CDB
$ export ORACLE_HOME=/u01/app/oracle/product/12.1.0.1/db_1
$ export PATH=$ORACLE_HOME/bin:$PATH
Now, use the DBCA to create a CDB. When using the command-line mode of the DBCA, you must specify the createAsContainerDatabase clause. The following bit of code creates a database named CDB:
dbca -silent -createDatabase -templateName General_Purpose.dbc -gdbname CDB
-sid CDB -responseFile NO_VALUE -characterSet AL32UTF8 -memoryPercentage 30
-emConfiguration LOCAL -createAsContainerDatabase true
-sysPassword foo -systemPassword foo
The prior code must be entered on one line (it only appears here on multiple lines in order to fit on the page). The SID that you provide (in this example, CDB) must not exist in your oratab file. On Linux systems the oratab file is usually located in the /etc directory. On other Unix systems (such as Solaris) the oratab file is generally located in the /var/opt/oracle directory.
After pressing the Enter key, you should see some output similar to this:
Copying database files
...
9% complete
41% complete
Creating and starting Oracle instance
43% complete
48% complete
...
It will take the DBCA assistant several minutes to create the new CDB. Ensure that you have enough disk space available when creating this database (approximately 5GB should be enough). After the DBCA is finished running, you should have a fully functional CDB database and can start creating pluggable databases within it.
Generating CDB Create Scripts via DBCA
You can use the DBCA to generate the scripts required to create a CDB, and then you have the option of manually running the scripts to carry out the process. This next bit of code invokes the DBCA utility from the command line and generates the scripts needed to create a CDB named CDB1:
dbca -silent -generateScripts -templateName General_Purpose.dbc -gdbname CDB1
-sid CDB1 -responseFile NO_VALUE -characterSet AL32UTF8 -memoryPercentage 30
-emConfiguration LOCAL -createAsContainerDatabase true
-sysPassword foo -systemPassword foo
The prior code must be entered on one line when executed. Here is a snippet of typical output:
Database creation script generation
1% complete
.....
100% complete
Look at the log file "/orahome/app/oracle/admin/CDB1/scripts/CDB1.log"...
After the DBCA is finished running, change the directory to the location of the newly generated scripts:
$ cd $ORACLE_BASE/admin/CDB1/scripts
Now, display the scripts in the directory:
$ ls
Here is some sample output:
CDB1.log                  cloneDBCreation.sql       lockAccount.sql
CDB1.sh                   init.ora                  postDBCreation.sql
CDB1.sql                  initCDB1Temp.ora          postScripts.sql
CloneRmanRestore.sql      initCDB1TempOMF.ora       rmanRestoreDatafiles.sql
tempControl.ctl
To create the database, run the CDB1.sh script:
$ CDB1.sh
The prior shell script calls CDB1.sql, which subsequently invokes the RMAN utility. RMAN creates the required data files from a backup and also creates a database named CDB1. You should be able to start the database after you’ve set your ORACLE_SID OS variable to contain the name of the freshly created CDB.
Verifying that a CDB was Created
To verify whether a database was created as a CDB, first connect to the root container as SYS:
$ sqlplus / as sysdba
You can now confirm that the CDB was successfully created via this query. If a database was created as a CDB, the CDB column of V$DATABASE will contain a YES value:
SQL> select name, cdb from v$database;
Here is some sample output:
NAME      CDB
--------- ---
CDB       YES
At this point, you should have two containers in your CDB database: the root container and the seed pluggable database. You can check with this query:
SQL> select con_id, name from v$containers;
Here is some sample output:
CON_ID NAME
------ --------------------
     1 CDB$ROOT
     2 PDB$SEED
You should also have data files associated with the root and the seed database. You can view the data files associated with each container via this query:
SQL> select con_id, file_name from cdb_data_files order by 1;
Here is some output:
CON_ID FILE_NAME
------ -------------------------------------------------------
     1 /u01/app/oracle/oradata/CDB/system01.dbf
     1 /u01/app/oracle/oradata/CDB/sysaux01.dbf
     1 /u01/app/oracle/oradata/CDB/undotbs01.dbf
     1 /u01/app/oracle/oradata/CDB/users01.dbf
     2 /u01/app/oracle/oradata/CDB/pdbseed/system01.dbf
     2 /u01/app/oracle/oradata/CDB/pdbseed/sysaux01.dbf
Note that if you had selected from DBA_DATA_FILES instead of CDB_DATA_FILES, you would only see the four data files associated with the root container (the container you’re currently connected to); for example,
SQL> select file_name from dba_data_files;

FILE_NAME
--------------------------------------------------
/u01/app/oracle/oradata/CDB/system01.dbf
/u01/app/oracle/oradata/CDB/sysaux01.dbf
/u01/app/oracle/oradata/CDB/users01.dbf
/u01/app/oracle/oradata/CDB/undotbs01.dbf
Administrating the Root Container
When you manage a CDB, for the most part, you are connecting to the root container as SYS and performing tasks as you would with a non-CDB database. However, there are several points to be aware of that are specific to maintaining a CDB. The following tasks can only be performed while connected to the root container with SYSDBA privileges:
- Starting/stopping instance
- Enabling/disabling archive log mode
- Managing instance settings that affect all databases within the CDB, such as overall memory size
- B&R of all data files within the database
- Managing control files (adding, restoring, removing, and so on)
- Managing online redo logs
- Managing the root UNDO tablespace
- Managing the root TEMP tablespace
- Creating common users and roles
These topics are discussed in the following sections.
Connecting to the Root Container
Connecting to the root container as SYS allows you to perform all the tasks you normally associate with database administration. You can connect as SYS locally from the database server through OS authentication or a network connection (which requires a listener and password file).
If you have access to the database server, you can connect to the CDB the same as you would a non-CDB database. First, ensure that the required OS variables have been set (see Chapter 2 for details):
$ echo $ORACLE_SID $ORACLE_HOME

CDB /u01/app/oracle/product/12.1.0.1/db_1
When using OS authentication, you can connect to the CDB root container without specifying a username and password:
$ sqlplus / as sysdba
You can verify the SYS connection to the root container, as shown:
SQL> show user con_id con_name user

USER is "SYS"

CON_ID
------------------------------
1

CON_NAME
------------------------------
CDB$ROOT
USER is "SYS"
Through Network
If you’re initiating a remote connection through the network, then you need to first set up a listener on the target database server and create a password file (see Chapter 2 for details). Once a listener and password file are established, you can connect remotely over the network, as shown:
$ sqlplus user/pass@connection_string as sysdba
For details on how to implement a listener in a pluggable environment, see the section “Managing a Listener in a Pluggable Database Environment,” later in this chapter.
Displaying Currently Connected Container Information
From SQL*Plus there are a couple of easy techniques for displaying the name of the CDB that you’re currently connected to. This example uses the SHOW command to display the container ID, the name, and the user:
SQL> show con_id con_name user
You can also display the same information via an SQL query:
SELECT SYS_CONTEXT('USERENV', 'CON_ID') AS con_id,
SYS_CONTEXT('USERENV', 'CON_NAME') AS cur_container,
SYS_CONTEXT('USERENV', 'SESSION_USER') AS cur_user
FROM DUAL;
Here is some sample output:
CON_ID               CUR_CONTAINER        CUR_USER
-------------------- -------------------- --------------------
1                    CDB$ROOT             SYS
Starting/Stopping the Root Container
You can only start/stop the CDB while connected as a privileged user to the root container. The procedure for starting and stopping the root container is the same as for a non-CDB database. To start a CDB, first connect as SYS, and issue the startup command:
$ sqlplus / as sysdba
SQL> startup;
Starting the CDB database does not open any associated pluggable databases. You can open all pluggable databases with this command:
SQL> alter pluggable database all open;
To shut down a CDB database, issue the following command:
SQL> shutdown immediate;
Just as with a non-CDB database, the prior line shuts down the CDB instance and disconnects any users connected to the database. If any pluggable databases are open, they are closed, and users are disconnected.
There are two types of users in a pluggable environment: local and common. A local user is nothing more than a regular user that is created in a pluggable database. The local type of user in a pluggable database behaves the same as a user in a non-CDB environment. There’s nothing special about administering local users. You administer them as you would a user in a non-CDB environment.
A common user is a new concept in Oracle Database 12c and only pertains to a pluggable database environment. A common user is one that exists in the root container and in every pluggable database. This type of user must be initially created in the root container and is automatically created in all existing pluggable databases as well as in any pluggable databases created in the future.
![]() Tip The SYS and SYSTEM accounts are common users that Oracle creates automatically in a pluggable environment.
Tip The SYS and SYSTEM accounts are common users that Oracle creates automatically in a pluggable environment.
Common users must be created with the string C## or c## at the start of the username. For instance, the following command creates a common user in all pluggable databases:
$ sqlplus / as sysdba

SQL> create user c##dba identified by foo;
Common users must be granted privileges from within each pluggable database. In other words, if you grant privileges to a common user while connected to the root container, this does not cascade to the pluggable databases. If you need to grant a common user a privilege that spans pluggable databases, then create a common role, and assign it to the common user.
What use is there for a common user? One situation would be the performance of common DBA maintenance activities across pluggable databases not requiring SYSDBA-level privileges. For example, you want to set up a DBA account that has the privileges to create users, grants, and so on, but you don’t want to use an account such as SYS (which has all privileges in all databases). In this scenario, you would create a common DBA user and also create a DBA common role that contains the appropriate privileges. The common role would then be assigned to the common DBA.
Much like you can create a common user that spans all pluggable databases, you can, in the same manner, create a common role. Common roles provide a single object to which you can grant privileges that are valid within all pluggable databases associated with the root container.
A common role is created in the root container and is automatically created in all associated pluggable databases as well as any pluggable databases created in the future. Like common users, common roles must start with the C## or c## string; for example,
$ sqlplus / as sysdba
SQL> create role c##dbaprivs container = all;
Next, you can assign privileges, as desired, to the common role. Here, the DBA role is assigned to the previously created role:
SQL> grant dba to c##dbaprivs container = all;
Now, if you assign this common role to a common user, the privileges associated with the role are in effect when the common user connects to any pluggable database associated with the root container:
SQL> grant c##dbaprivs to c##dba container = all;
To report on all containers (root, seed, and all pluggable databases) within a CDB, you must follow this procedure:
- Connect to the root container as a user with privileges to view the CDB-level views.
- Make sure your query uses the CDB-level views where appropriate.
- Ensure that any pluggable databases you wish to report on are open. If the pluggable databases are not open, then no information will be displayed.
Here is a query that uses the CDB-level views to report basic space usage information relating to all containers within a CDB:
SET LINES 132 PAGES 100
COL con_name        FORM A15 HEAD "Container|Name"
COL tablespace_name FORM A15
COL fsm             FORM 999,999,999,999 HEAD "Free|Space Meg."
COL apm             FORM 999,999,999,999 HEAD "Alloc|Space Meg."
--
COMPUTE SUM OF fsm apm ON REPORT
BREAK ON REPORT ON con_id ON con_name ON tablespace_name
--
WITH x AS (SELECT c1.con_id, cf1.tablespace_name, SUM(cf1.bytes)/1024/1024 fsm
           FROM cdb_free_space cf1
               ,v$containers   c1
           WHERE cf1.con_id = c1.con_id
           GROUP BY c1.con_id, cf1.tablespace_name),
     y AS (SELECT c2.con_id, cd.tablespace_name, SUM(cd.bytes)/1024/1024 apm
           FROM cdb_data_files cd
               ,v$containers   c2
           WHERE cd.con_id = c2.con_id
           GROUP BY c2.con_id
                   ,cd.tablespace_name)
SELECT x.con_id, v.name con_name, x.tablespace_name, x.fsm, y.apm
FROM x, y, v$containers v
WHERE x.con_id          = y.con_id
AND   x.tablespace_name = y.tablespace_name
AND   v.con_id          = y.con_id
UNION
SELECT vc2.con_id, vc2.name, tf.tablespace_name, null, SUM(tf.bytes)/1024/1024
FROM v$containers vc2, cdb_temp_files tf
WHERE vc2.con_id  = tf.con_id
GROUP BY vc2.con_id, vc2.name, tf.tablespace_name
ORDER BY 1, 2;
Here is some sample output:
           Container                                   Free            Alloc
    CON_ID Name            TABLESPACE_NAME       Space Meg.       Space Meg.
---------- --------------- --------------- ---------------- ----------------
         1 CDB$ROOT        SYSAUX                        42              780
                           SYSTEM                         7              790
                           TEMP                                           88
                           UNDOTBS1                     206              230
                           USERS                          4                5
         2 PDB$SEED        SYSAUX                         2              640
                           SYSTEM                         5              260
                           TEMP                                           87
********** *************** *************** ---------------- ----------------
sum                                                     266            2,880
Make sure any pluggable databases you want to report on are open before attempting to query the CDB-level views. If a pluggable database is not open, it won’t appear in the report output. For reference, here’s the statement again to open all pluggable databases:
SQL> alter pluggable database all open;
![]() Tip Reporting on tablespace and data file usage for an individual pluggable database isn’t significantly different from reporting on the space in a non-CDB database. First, connect directly to the pluggable database as a user that has privileges to select from the DBA-level views. Then, run a report that queries the space-related views. See Chapter 4 for a query for reporting on space usage in a non-CDB.
Tip Reporting on tablespace and data file usage for an individual pluggable database isn’t significantly different from reporting on the space in a non-CDB database. First, connect directly to the pluggable database as a user that has privileges to select from the DBA-level views. Then, run a report that queries the space-related views. See Chapter 4 for a query for reporting on space usage in a non-CDB.
Once you connect as a common user (such as SYS) to any container within the database (either the root or a pluggable database), you can use the ALTER SESSION command to switch to another container for which you have been granted access. For example, to set the current container to a pluggable database named SALESPDB, you would do as follows:
SQL> alter session set container = salespdb;
You can switch back to the root container by specifying the CDB$ROOT:
SQL> alter session set container = cdb$root;
You don’t need a listener to be up and running or a password file to switch containers. As long as the common user has privileges, then the user is successfully switched to the new container context. Having the ability to switch containers is especially useful when you need to connect to a pluggable database to troubleshoot issues and then connect back to the root container.
Creating a Pluggable Database within a CDB
After you’ve created a CDB, you can start creating pluggable databases within it. When you instruct Oracle to create a pluggable database, under the covers, it is actually copying data files from an existing database (seed, pluggable database, or non-CDB) and then instantiating the CDB with the new pluggable database’s metadata. The key here is to correctly reference what database you want Oracle to use as a template for creating the new pluggable database.
There are several tools for creating (cloning) a pluggable database; namely the CREATE PLUGGABLE DATABASE SQL statement, the DBCA utility, and Enterprise Manager Cloud Control. This chapter focuses on using SQL and the DBCA utilities. If you understand how to create pluggable databases using SQL and DBCA, you should easily be able to use the Enterprise Manager screens to achieve the same objectives.
With the CREATE PLUGGABLE DATABASE statement, you can use any of the following sources to create a pluggable database:
- Seed database
- Existing pluggable database (either local or remote)
- Non-CDB database
- Unplugged pluggable database
With the DBCA, you can create a pluggable database from any of the following sources:
- Seed database
- RMAN backup
- Unplugged pluggable database
In the following sections, all the CREATE PLUGGABLE DATABASE variants of creating a pluggable database are covered. With the DBCA, I only show how to create a pluggable database from the seed database. You should be able to modify that example for your various needs.
The CREATE PLUGGABLE DATASE statement can be used to create a pluggable database by copying the seed database’s data files. To do this, first connect to the root container database as the SYS user:
$ sqlplus / as sysdba
The following SQL statement creates a pluggable database named SALESPDB:
CREATE PLUGGABLE DATABASE salespdb
ADMIN USER salesadm IDENTIFIED BY foo
FILE_NAME_CONVERT = ('/u01/app/oracle/oradata/CDB/pdbseed',
                     '/u01/app/oracle/oradata/CDB/salespdb'),
After running the prior code, you should see some output similar to this:
Pluggable database created.
![]() Note If you’re using OMF, you don’t need to specify the FILE_NAME_CONVERT clause when creating a pluggable database, because Oracle automatically determines the names and locations of the pluggable database data files.
Note If you’re using OMF, you don’t need to specify the FILE_NAME_CONVERT clause when creating a pluggable database, because Oracle automatically determines the names and locations of the pluggable database data files.
Note that the FILE_NAME_CONVERT clause in this example has two strings. One specifies the location of the seed database data files:
/u01/app/oracle/oradata/CDB/pdbseed
The second string is the location where you want the new pluggable database’s data files created:
/u01/app/oracle/oradata/CDB/salespdb
You’ll have to modify these strings to the appropriate values for your environment.
There are several options available when using the CREATE PLUGGABLE DATABASE statement to create a pluggable database. Table 23-2 summarizes the meanings of the various clauses.
Table 23-2. Pluggable Database Creation Options
| Parameter | Description |
|---|---|
| ADMIN USER | A local user that is created and used for administrative tasks. This user is assigned the PDB_DBA role. |
| MAXSIZE | Maximum amount of storage a pluggable database can consume; if not specified, then there is no limit to the amount of storage a pluggable database can use |
| MAX_SHARED_TEMP_SIZE | Maximum amount of shared temporary tablespace that can be used by sessions connected to the pluggable database |
| DEFAULT TABLESPACE | Specifies the default permanent tablespace assigned to new users created within the pluggable database |
| DATAFILE | Path and file name of the data file associated with the default tablespace |
| PATH_PREFIX | Specifies that any new data files added to the pluggable database must exist within this directory or its subdirectories |
| FILE_NAME_CONVERT | Specifies the location of the seed database data files and the location where they should be copied |
Cloning an Existing Pluggable Database
You can create a pluggable database from an existing pluggable database within the currently connected (local) CDB, or you can create a pluggable database as a copy of a pluggable database from a remote CDB. These two techniques are detailed in the next two sections.
Local
In this example an existing pluggable database (SALESPDB) is used to create a new pluggable database (SALESPDB2). First, connect to the root container, and place the existing source pluggable database in read-only mode:
$ sqlplus / as sysdba
SQL> alter pluggable database salespdb close;
SQL> alter pluggable database salespdb open read only;
Now, run the following SQL to create the new pluggable database:
CREATE PLUGGABLE DATABASE salespdb2
FROM salespdb
FILE_NAME_CONVERT = ('/u01/app/oracle/oradata/CDB/salespdb',
                     '/u01/dbfile/CDB/salespb2')
STORAGE (MAXSIZE 6G MAX_SHARED_TEMP_SIZE 100M);
In the prior example the data files (associated with SALESPDB) in the /u01/app/oracle/oradata/CDB/salespdb directory are used to create data files in the /u01/dbfile/CDB/salespdb2 directory. The destination directory will be created for you if it doesn’t pre exist. You can also specify governing restrictions on the cloned pluggable database, such as limiting its maximum size to 6GB and the maximum amount of shared resources it can consume in the shared temporary tablespace to 100MB.
Remote
You can also create a pluggable database as a clone of a remote pluggable database. First, you need to create a database link from the CDB to the pluggable database that will serve as the source for the clone. Both the local user and the user specified in the database link must have the CREATE PLUGGABLE DATABASE privilege.
This example shows a local connection as SYS to the root container. This is the database in which the new pluggable database will be created:
$ sqlplus / as sysdba
In this database, create a database link to the pluggable database in the remote CDB. The remote CDB contains a pluggable database named SALESPDB, with a user that has been created with the CREATE PLUGGABLE DATABASE privilege granted to it. This is the user that will be used in the database link:
create database link salespdb
connect to mv_maint identified by foo
using 'speed2:1521/salespdb';
Next, connect to the remote database that contains the pluggable database that will be cloned:
$ sqlplus sys/foo@speed2:1521/salespdb as sysdba
Close the pluggable database, and open it in read-only mode:
SQL> alter pluggable database salespdb close;
SQL> alter pluggable database salespdb open read only;
Now, connect to the destination CDB as SYS, and create the new pluggable database by cloning the remote pluggable database, as shown:
$ sqlplus / as sysdba

CREATE PLUGGABLE DATABASE salespdb3
FROM salespdb@salespdb
FILE_NAME_CONVERT = ('/u01/app/oracle/oradata/CDB/salespdb',
                     '/u01/dbfile/CDB2/salespdb3'),
Cloning from a Non-CDB Database
There are three ways of creating a pluggable database from an existing non-CDB:
- Using the DBMS_PDB package to generate metadata and then creating the pluggable database with CREATE PLUGGABLE DATABASE SQL statement
- Data Pump (using the transportable tablespace feature)
- GoldenGate replication
The following example uses the DBMS_PDB package to create a pluggable database from a non-CDB. For details on Data Pump and GoldenGate, see the Oracle Database Utilities Guide and GoldenGate-specific documentation, respectively, available from the Technology Network area of the Oracle web site (http://otn.oracle.com).
![]() Note When using the DBMS_PDB package to convert a non-CDB to a pluggable database, the non-CDB must be Oracle12c or higher.
Note When using the DBMS_PDB package to convert a non-CDB to a pluggable database, the non-CDB must be Oracle12c or higher.
First, place the non-CDB in read-only mode:
SQL> startup mount;
SQL> alter database open read only;
Then, run the DBMS_PDB package to create an XML file that describes the structure of the non-CDB database:
BEGIN
  DBMS_PDB.DESCRIBE(pdb_descr_file => '/orahome/oracle/ncdb.xml'),
END;
/
After the XML file is created, shut down the non-CDB database:
SQL> shutdown immediate;
Next, set your oracle OS variables (such as ORACLE_SID and ORACLE_HOME), and connect to the CDB database that will house the non-CDB as a pluggable database:
$ sqlplus / as sysdba
Now, you can optionally check to see if the non-CDB is compatible with the CDB in which it will be plugged. When you run this code provide the directory and name of the XML file that was created previously:
SET SERVEROUTPUT ON
DECLARE
hold_var boolean;
begin
hold_var := DBMS_PDB.CHECK_PLUG_COMPATIBILITY(pdb_descr_file=>'/orahome/oracle/ncdb.xml'),
if hold_var then
  dbms_output.put_line('YES'),
else
  dbms_output.put_line('NO'),
end if;
end;
/
If there are no compatibility issues, a YES is displayed by the prior code; a NO is displayed if the pluggable database is not compatible. You can query the contents of the PDB_PLUG_IN_VIOLATIONS view for details on why a pluggable database is not compatible with a CDB.
Next, use the following SQL to create a pluggable database from the non-CDB. You must specify details such as the name and location of the previously created XML file, the location of the non-CDB data files, and the location where you want the new data files created:
CREATE PLUGGABLE DATABASE dkpdb
USING '/orahome/oracle/ncdb.xml'
COPY
FILE_NAME_CONVERT = ('/u01/dbfile/dk/',
                     '/u01/dbfile/CDB/dkpdb/'),
If successful, you should see this:
Pluggable database created.
Now, connect as SYS to the newly created pluggable database:
$ sqlplus sys/foo@'speed2:1521/dkpdb' as sysdba
As a last step, run the following script:
SQL> @?/rdbms/admin/noncdb_to_pdb.sql
You should now be able to open the pluggable database and begin using it.
Unplugging a Pluggable Database from a CDB
Before plugging a pluggable database into another CDB, it must first be unplugged. Unplugging translates to disassociating a pluggable database from a CDB and generating an XML file that describes the pluggable database being unplugged. This XML file can be used in the future to plug the pluggable database into another CDB.
Here are the steps required to unplug a pluggable database:
- Close the pluggable database (which changes its open mode to MOUNTED)
- Unplug the pluggable database via the ALTER PLUGGABLE DATABASE ... UNPLUG command
First, connect to the root container as the SYS user, and then close the pluggable database:
$ sqlplus / as sysdba
SQL> alter pluggable database dkpdb close immediate;
Next, unplug the pluggable database. Make sure you specify a directory that exists in your environment for the location of the XML file:
alter pluggable database dkpdb unplug into
'/orahome/oracle/dba/dkpdb.xml';
The XML file contains metadata regarding the pluggable database, such as its data files. This XML is required if you want to plug the pluggable database into another CDB.
![]() Note Once a pluggable database is unplugged, it must be dropped before it can be plugged back into the original CDB.
Note Once a pluggable database is unplugged, it must be dropped before it can be plugged back into the original CDB.
Plugging an Unplugged Pluggable Database into a CDB
Before a pluggable database can be plugged into a CDB, it must be compatible with a CDB in terms of data file endianness and compatible database options installed. You can verify the compatibility via the DBMS_PDB package. You must provide as input to the package the directory and name of the XML file created when the pluggable database was unplugged. Here is an example:
SET SERVEROUTPUT ON
DECLARE
hold_var boolean;
begin
hold_var := DBMS_PDB.CHECK_PLUG_COMPATIBILITY(pdb_descr_file=>'/orahome/oracle/dba/dkpdb.xml'),
if hold_var then
  dbms_output.put_line('YES'),
else
  dbms_output.put_line('NO'),
end if;
end;
/
If there are no compatibility issues, a YES is displayed by the prior code; a NO is displayed if the pluggable database is not compatible. You can query the contents of the PDB_PLUG_IN_VIOLATIONS view for details on why a pluggable database is not compatible with a CDB.
Plugging in a pluggable database is done with the CREATE PLUGGABLE DATABASE command. When you plug a pluggable database into a CDB, you must provide some key pieces of information, using these two clauses:
- USING clause: This clause specifies the location of the XML file created when the pluggable database was unplugged
- COPY FILE_NAME_CONVERT clause: This clause specifies the source of the pluggable database data files and the location where the pluggable database data files will be created within the destination CDB.
To plug in a pluggable database, connect to the CDB as a privileged user, and run the following:
CREATE PLUGGABLE DATABASE dkpdb
USING '/orahome/oracle/dba/dkpdb.xml'
COPY
FILE_NAME_CONVERT = ('/u01/app/oracle/oradata/CDB1/dkpdb',
                     '/u01/dbfile/CDB2/dkpdb'),
You can now open the pluggable database and begin using it.
Using the DBCA to Create a Pluggable Database from the Seed Database
You can use the DBCA utility to create a pluggable database from the seed database by specifying the –createPDBFrom DEFAULT clause. Here is an example that creates a pluggable database named HRPDB within a CDB named CDB:
dbca -silent -createPluggableDatabase -sourceDB CDB -pdbName hrpdb
-createPDBFrom DEFAULT
-pdbAdminUserName adminplug -pdbAdminPassword foo
-pdbDatafileDestination /u01/dbfile/CDB/hrpdb
The prior lines of code must be entered on one line. Also, if the pluggable database destination directory doesn’t exist, the DBCA will automatically create it. As the command progresses, you should see output similar to this:
Creating Pluggable Database
4% complete
12% complete
...
Completing Pluggable Database Creation
100% complete
Look at the log file "/orahome/app/oracle/cfgtoollogs/dbca/CDB.log" for further details.
As a last step, you should inspect the log file and ensure that there were no issues with the creation of the pluggable database.
Checking the Status of Pluggable Databases
After creating a pluggable database, you may want to check its status. You can view the status of all pluggable databases within a CDB while connected as a privileged user in the root container. For instance, a user with DBA privileges can report on the status of all pluggable databases via this query:
SQL> select pdb_id, pdb_name, status from cdb_pdbs;
Here is some sample output:
    PDB_ID PDB_NAME             STATUS
---------- -------------------- -------------
         2 PDB$SEED             NORMAL
         3 SALESPDB             NORMAL
         4 HRPDB                NORMAL
This next query reports on whether or not the pluggable databases are open:
SQL> select con_id, name, open_mode from v$pdbs;
Here is some sample output:
    CON_ID NAME                           OPEN_MODE
---------- ------------------------------ ----------
         2 PDB$SEED                       READ ONLY
         3 SALESPDB                       READ WRITE
         4 HRPDB                          READ WRITE
If you run the prior queries while connected directly to a pluggable database, no information will be displayed in CDB_PDBS. Also, the V$PDBS will only display information for the currently connected pluggable database.
Administrating Pluggable Databases
You can perform many database administrative tasks while connected directly to the pluggable database. You can open/close a pluggable database, check its status, show currently connected users, and so on. You can administer a pluggable database as a privileged connection (such as SYS) to the root container, or you can perform tasks while connected as a privileged user directly to the pluggable database itself.
Keep in mind that when you connect as SYS to a pluggable database within the CDB, you can only perform SYS-privileged operations for the pluggable database to which you are connected. You cannot start/stop the container instance or view data dictionary information related to other pluggable databases within the CDB.
Connecting to a Pluggable Database
You can connect to a pluggable database as SYS either locally or over the network. To make a local connection, first connect to the root container as SYS, then use the SET CONTAINER command to connect to the desired pluggable database:
$ sqlplus / as sysdba
SQL> alter session set container=salespdb;
The prior connection doesn’t require a listener or password file; a connection over the network requires both. This next example makes a network connection via SQL*Plus and specifies the host, listener port, and service name of the pluggable database:
$ sqlplus sys/foo@speed2:1521/salespdb as sysdba
If you’re unsure how to set up a listener and a password file, see Chapter 2. For instructions on how to register a pluggable database service name with the listener, see the next section.
Managing a Listener in a Pluggable Database Environment
Recall from Chapter 2 that a listener is the process that enables remote network connections to a database. Most database environments require a listener in order to operate. When a client attempts to connect to a remote database, the client provides three key pieces of information: the host the listener is on, the host port the listener is listening on, and a database service name.
Each database has one or more service names assigned to it. By default there is usually one service name that is derived from the database unique name and domain. You can manually create one or more service names for a database. DBAs sometimes create more than one service so that resource usage can be controlled or monitored for each service. For example, a service may be created for a sales application, and a service may be created for the HR application. Each application connects to the database via its service name. The service connection information appears in the SERVICE_NAME column of the V$SESSION view for each session.
If you start a default listener with no listener.ora file in place, the PMON background process will automatically register any databases (including any pluggable) as a service:
$ lsnrctl start
Eventually (after a minute or two), you should see the databases (including any pluggable) registered with the default listener.
![]() Note When starting the listener, if there is a listener.ora file present, the listener will attempt to statically register any service names that appear in the listener.ora file.
Note When starting the listener, if there is a listener.ora file present, the listener will attempt to statically register any service names that appear in the listener.ora file.
By default the pluggable databases are registered with a service name that is the same as the pluggable database name. The default service is typically the one that you would use to make SYS connections:
$ sqlplus sys/foo@speed2:1521/salespdb as sysdba
You can verify which services are running by connecting as SYS to the root container and querying:
SQL> select name, network_name, pdb from v$services order by pdb, name;
You can also verify which services a listener is listing for via the lsnrctl utility:
$ lsnrctl services
Oracle recommends that you configure an additional service (besides the default service) for any applications that need to access a pluggable database. You can manually configure services by using the SRVCTL utility or the DBMS_SERVICE package. This example shows how to configure a service via the DBMS_SERVICE package. First, connect as SYS to the pluggable database that you want to create the service in via the default service:
$ sqlplus sys/foo@speed2:1521/salespdb as sysdba
Make sure the pluggable database is open for read-write mode:
SQL> SELECT con_id, name, open_mode FROM v$pdbs;
Next, create a service. This code creates and starts a service named SALESWEST:
exec DBMS_SERVICE.CREATE_SERVICE(service_name => 'SALESWEST', network_name => 'SALESWEST'),
exec DBMS_SERVICE.START_SERVICE(service_name => 'SALESWEST'),
Now, application users can connect to the SALESPDB pluggable database via the service:
$ sqlplus user/pass@speed2:1521/saleswest
![]() Caution If you have multiple CDB databases on one server, ensure that the pluggable database service names are unique across all CDB databases on the server. It’s not advisable to register two pluggable database databases with the exact same name with one common listener. This will lead to confusion as to which pluggable database you are actually connecting to.
Caution If you have multiple CDB databases on one server, ensure that the pluggable database service names are unique across all CDB databases on the server. It’s not advisable to register two pluggable database databases with the exact same name with one common listener. This will lead to confusion as to which pluggable database you are actually connecting to.
Showing the Currently Connected Pluggable Database
From SQL*Plus there are a couple of easy techniques for displaying the name of the pluggable database that you’re currently connected to. This example uses the SHOW command to display the container ID, the name, and the user:
SQL> show con_id con_name user
Here is some sample output:
CON_ID
------------------------------
3

CON_NAME
------------------------------
SALESPDB

USER is "SYS"
You can also display the same information via an SQL query:
SELECT SYS_CONTEXT('USERENV', 'CON_ID') AS con_id,
SYS_CONTEXT('USERENV', 'CON_NAME') AS cur_container,
SYS_CONTEXT('USERENV', 'SESSION_USER') AS cur_user
FROM DUAL;
Here is some sample output:
CON_ID     CUR_CONTAINER   CUR_USER
---------- --------------- ----------
3          SALESPDB        SYS
Keep in mind that the SYS_CONTEXT function can be used to display other useful information, such as the SERVICE_NAME, DB_UNIQUE_NAME, INSTANCE_NAME, and SERVER_HOST; for example,
SELECT
 SYS_CONTEXT('USERENV', 'SERVICE_NAME') as service_name,
 SYS_CONTEXT('USERENV', 'DB_UNIQUE_NAME') as db_unique_name,
 SYS_CONTEXT('USERENV', 'INSTANCE_NAME') as instance_name,
 SYS_CONTEXT('USERENV', 'SERVER_HOST') as server_host
from dual;
Starting/Stopping a Pluggable Database
When you start/stop a pluggable database, you aren’t starting/stopping an instance. Rather, you are making the pluggable database either available or unavailable, open or closed. You can change the open mode of a pluggable database from either a connection to the root container as SYS or a direct connection to the pluggable database as SYS.
From Root Container
To change the open mode of a pluggable database from the root container, do as follows:
$ sqlplus / as sysdba
SQL> alter pluggable database salespdb open;
You can also start a pluggable database in a particular state, such as read-only:
SQL> startup pluggable database salespdb open read only;
To close a pluggable database, you can specify the name of the pluggable database:
SQL> alter pluggable database salespdb close immediate;
You can also open or close all pluggable databases while connected to the root container as SYS:
SQL> alter pluggable database all open;
SQL> alter pluggable database all close immediate;
From Pluggable
To open/start a pluggable database, connect to the pluggable database as SYS:
$ sqlplus sys/foo@salespdb as sysdba
SQL> startup;
To shut down the database, issue the following command:
SQL> shutdown immediate;
Modifying Initialization Parameters Specific to a Pluggable Database
Oracle allows some initialization parameters to be modified while connected as a privileged user to a pluggable database. You can view these parameters via the following query:
SELECT name
FROM v$parameter
WHERE ispdb_modifiable='TRUE'
ORDER BY name;
Here is a snippet of the output:
NAME
------------------------------
sort_area_size
sql_trace
sqltune_category
star_transformation_enabled
statistics_level
When you make initialization parameter changes while connected directly to a pluggable database, these changes only affect the currently connected pluggable database. The parameter changes do not affect the root container or other pluggable databases. For example, say you wanted to change the value of OPEN_CURSORS. First, connect directly to the pluggable database as a privileged user, and issue the ALTER SYSTEM statement:
$ sqlplus sys/foo@speed2:1521/salespdb as sysdba
SQL> alter system set open_cursors=100;
The prior change modifies the value of OPEN_CURSORS only for the SALESPDB pluggable database. Furthermore, the setting of OPEN_CURSORS for SALESPDB will persist across database restarts.
Occasionally, you may be required to rename a pluggable database. For instance, the database may have been originally misnamed, or you may no longer be using the database and want to append an _OLD to its name. To rename a pluggable database, first connect to it as a SYSDBA-privileged account:
$ sqlplus sys/foo@invpdb as sysdba
Next, stop the pluggable database, and restart it in restricted mode:
SQL> shutdown immediate;
SQL> startup restrict;
Now, the pluggable database can be renamed:
SQL> alter pluggable database INVPDB rename global_name to INVPDB_OLD;
Limiting the Amount of Space Consumed by a Pluggable Database
You can place an overall limit on the amount of disk space a pluggable database can consume. I would recommend placing some reasonable limit on the overall size of each pluggable database, especially if you work in an environment in which there are different DBAs or groups managing separate pluggable databases within the same CDB, and each DBA/group is unaware of the space that the other databases are consuming.
In this example an overall limit of 20GB is placed on a pluggable database. First, connect to the pluggable database as SYS:
$ sqlplus sys/foo@speed2:1521/salespdb as sysdba
Then, alter the pluggable databases’ maximum size limit. This command limits the size of the pluggable database to a maximum of 2GB:
SQL> alter pluggable database salespdb storage(maxsize 20G);
Viewing Pluggable Database History
If you need to view when a pluggable database was created, you can query the CDB_PDB_HISTORY view, as shown:
COL db_name FORM A10
COL con_id FORM 999
COL pdb_name FORM A15
COL operation FORM A16
COL op_timestamp FORM A10
COL cloned_from_pdb_name FORMAT A15
--
SELECT db_name, con_id, pdb_name, operation,
       op_timestamp, cloned_from_pdb_name
FROM cdb_pdb_history
WHERE con_id > 2
ORDER BY con_id;
Here is some sample output:
DB_NAME    CON_ID PDB_NAME        OPERATION        OP_TIMESTA CLONED_FROM_PDB
---------- ------ --------------- ---------------- ---------- ---------------
CDB             3 SALESPDB        CREATE           04-DEC-12  PDB$SEED
CDB             4 HRPDB           CREATE           10-FEB-13  PDB$SEED
In this way, you can determine when a pluggable database was created and from what source.
Occasionally, you may need to drop a pluggable database. You may want to do so because you don’t need the pluggable database anymore or because you are transferring (unplugging/plugging) to a different CDB and you want to drop the pluggable database from the original CDB. If you need to remove a pluggable database, you can do it in two ways:
- Drop the pluggable database and its data files.
- Drop the pluggable database, and leave its data files in place.
If you never plan on using the pluggable database again, then you can drop it and specify that the data files also be removed. If you plan on plugging the pluggable database into a different CDB, then (of course) don’t drop the data files, as doing so removes them from disk.
To drop a pluggable database, first connect to the root container as a privileged account, and close the pluggable database:
$ sqlplus / as sysdba
SQL> alter pluggable database dkpdb close immediate;
This example drops the pluggable database and its data files:
SQL> drop pluggable database dkpdb including datafiles;
If successful, you should see this message:
Pluggable database dropped.
This next example drops a pluggable database without removing the data files. You may want to do this if you’re moving the pluggable database to a different CDB:
SQL> drop pluggable database dkpdb;
In this manner, the pluggable database is disassociated from the CDB, but its data files remain intact on disk.
Summary
New with Oracle Database 12c, a pluggable database is a collection of data files and metadata that exist within a CDB. Pluggable databases have several interesting architectural features:
- When connected to a pluggable database, you have no visibility to other pluggable databases that exist within the CDB. It’s as if you are connected to an isolated database.
- Multiple pluggable databases share common database resources (memory structures, background processes, and so on) within the CDB. From the root container level, you can manage many DBA databases as if they were one database.
- You can shut down a pluggable database without affecting other pluggable databases within the CDB.
- New pluggable databases can be quickly created by cloning the seed database, an existing pluggable database, or a non-CDB.
- Pluggable databases can be easily transferred from one CDB to another by unplugging from one CDB and plugging the pluggable database into another CDB.
These features provide new ways in which you can create and manage databases. The main advantage of pluggable database technology is that it allows you to consolidate many databases into one overarching database. This generates economies of scale, in that more databases can be implemented and maintained on fewer servers with less support personnel. As a DBA, understanding this technology and how to implement it makes you all the more valuable to your company.
Godspeed.