
CHAPTER 6
![]()
Web Performance Optimizations
The last chapter explored the results of the W3C’s first steps at standardizing performance in a browser, the Performance object. Chapter 5 looked at each of the APIs in the Performance object; you saw how to gather and derive performance metrics from the Performance Timing object, how to use the Performance Navigation object to determine how users are coming to your sites, and how the Performance object exposes high-resolution time to allow us to track timing data below the millisecond limit.
Based on all of that, you updated perfLogger library to incorporate all of the great metrics that the Performance object provides. You built shims into perfLogger in order to use high-resolution time with browsers that support it, and fall back gracefully for those that don’t.
You then took all of this new data and expanded the R scripts to chart out what this data says about our users, their connections, and their browsers.
And now this chapter you will use all of the tools that we have created thus far, and all of the tools that we looked at in Chapter 2, to quantify the benefits possible from some web performance optimization tips— specifically, how JavaScript can block page rendering and how you can use JavaScript to postpone the loading of heavier pieces of content. Remember that web performance is the time that your content takes to be delivered to your end user, including network latency and browser render time.
Optimizing Page Render Bottlenecks
The first place we will look to optimize is the rendering of content in the browser. This issue is outside of any network latency concerns; it simply means how fast the browser will process and render content to present to the end user. Let’s first take a look at how drawing our content to the screen works in modern browsers.
As discussed in Chapter 1, modern browsers are made up of several interacting components. There is a UI layer that draws the client-facing interface for the browser, including the location bar, the back and forward buttons, and any other chrome that the browser may have. The end user interacts with the UI layer and from the UI layer drives the rest of the application.
We have a network layer that handles network connections, establishing TCP connections, and performing the HTTP roundtrips. The network layer also provides content to the rendering engine.
The rendering engine handles painting the content to the screen. When it encounters JavaScript, it hands it off to the JavaScript interpreter. See Figure 6-1 for an annotated look at the high-level architecture of modern browsers.
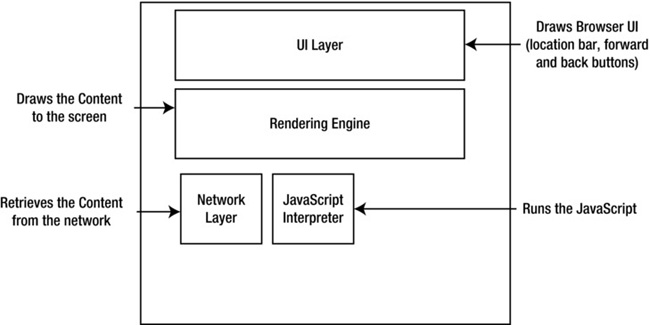
Figure 6-1. Annotated browser architecture
So as I said, the rendering engine— be it Gecko, or WebKit, or what have you—retrieves content from the network layer. It has a finite bus size, so it pulls in the data in chunks and passes the chunks into its own workflow.
The workflow is a process with several steps. First the content is parsed, meaning that the markup is read as characters and undergoes lexical analysis, in which the characters are compared to a rule set and converted to tokens based on the rule set. The rule set is the DTD that we define in our HTML document; it specifies the tags that make up the version of the language that we will use. The tokens are just the characters broken into meaningful segments.
For example, the network layer may return the following string:
<!DOCTYPE html><html><head><meta charset="UTF-8"/>
This string would get tokenized into meaningful chunks:
<!DOCTYPE html>

<html>

<head>

<meta charset="UTF-8"/>
The rendering engine then takes the tokens and converts them to DOM elements. The DOM elements are laid out in a render tree that the rendering engine then iterates over. In the first iteration the rendering engine lays out the positioning of the DOM elements, and in the next it paints them to the screen. See Figure 6-2 for this workflow.

Figure 6-2. Rendering engine workflow
Normally during this process, if the rendering engine identifies an external script during tokenization, it pauses parsing the content and begins downloading the script. The rendering engine only resumes parsing after the script has been downloaded and executed. This causes a potential bottleneck in the time it takes for content to be displayed to the end user. See Figure 6-3 for a flowchart of this potential bottleneck.
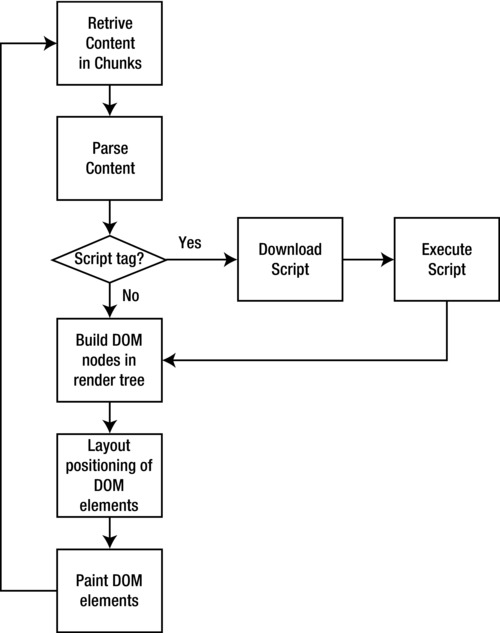
Figure 6-3. Script tags encountered during parsing
To get around this potential issue it has generally been good practice1 to place all script tags at the bottom of your HTML, so that any pause in rendering to process the JavaScript is done after the page is fully rendered.
Script Loading
Another option is to load remote JavaScript files programmatically. This is called script loading and allows us to trick the rendering engine, let’s look at how.
Remember that the workflow we’ve just explored for how the rendering engine pauses applies to external scripts. The browser looks for the src attribute of the script tag, which tells it that it must download a remote resource. If it encounters a script tag without a src attribute, the rendering engine simply passes the code to the JavaScript Interpreter for execution.
So what we can do is create inline JavaScript to append script tags to the document dynamically, like so:
<script>

var script = window.document.createElement('SCRIPT'),

script.src = src;

window.document.getElementsByTagName('HEAD')[0].appendChild(script);

</script>
This code snippet uses the document.createElement() function to create a new script tag and store it in a variable named script. It sets the src attribute of the new script tag to point to a remote JavaScript file, and appends the new script tag to the Head section of the document.
That’s fairly simple, so let’s flesh that out into a real example that we can use.
First create a namespace, which you can call remoteLoader:
var remoteLoader = function remoteLoader(){


return{


}

}();
Within remoteLoader, create a private function to construct the script tags, using much the same logic outlined in the previous snippet. Call the function constructScriptTag() and pass in a URL to use as the source of the script tag:
function constructScriptTag(src){

    var script = window.document.createElement('SCRIPT'),

    script.src = src;

return script;

}
Within the returned object, create a single public function called loadJS(), with a parameter named script_url:
loadJS: function(script_url){


}
__________
1 At least since Steve Souders wrote about it in his book High Performance Web Sites: Essential Knowledge for Front-End Engineers (O’Reilly 2007).
Within loadJS you’ll put in some branching logic to test whether the passed-in value is an array or a string. That will provide some flexibility to use our API to load either a single JavaScript file or a list of JavaScript files.
To test this, look at the typeof the variable. Arrays return a type of "object", and strings return "string". To be able to tell an array from other types of objects, you need to use the instanceof operator on the variable. The instanceof operator tests whether the object on the left has an instance of the constructor on the right in its prototype chain— In other words, is it an instance of that constructor?
if(typeof script_url === "object"){

if(script_url instanceof Array){

}

}else if(typeof script_url === "string"){


}
Flesh out the string branch first, since it will be the simplest. Just make a call to the constructScriptTag() function and pass in script_url. Then append the element that gets returned to the head of the document.
else if(typeof script_url === "string"){

window.document.getElementsByTagName('HEAD')[0].appendChild(constructScriptTag(script_url));

}
The array branch will iterate through the array of URLs, create a new script tag for each one, and use a document fragment to store all of the new elements. It will then append them all at once to the head. I’ll talk at length about document fragments in the next chapter.
if(script_url instanceof Array){

var frag = document.createDocumentFragment();

     for(var ind = 0; ind < script_url.length; ind++){

          frag.appendChild(constructScriptTag(script_url[ind]));

     }

window.document.getElementsByTagName('HEAD')[0].appendChild(frag.cloneNode(true) );

}
Your completed code should look like this:
var remoteLoader = function remoteLoader(){

     function constructScriptTag(src){

          var script = window.document.createElement('SCRIPT'),

          script.src = src;

          return script;

     }


      return{

          loadJS: function(script_url){

               if(typeof script_url === "object"){

                    if(script_url instanceof Array){

                         var frag = document.createDocumentFragment();

                         for(var ind = 0; ind < script_url.length; ind++){

                              frag.appendChild(constructScriptTag(script_url[ind]));

                         }

                         window.document.getElementsByTagName('HEAD')[0].appendChild(frag.

cloneNode(true) );

                    }
               }else if(typeof script_url === "string"){

                 window.document.getElementsByTagName('HEAD')[0].appendChild(constructScriptTag(

script_url));

               }

          }

     }

}();
To use it you can pass in either a string or an array, as shown in the following code snippets:
<script>

     remoteLoader.loadJS("/lab/perfLogger.js"); // passing in a string

</script>


<script>

     remoteLoader.loadJS(["/lab/perfLogger.js", "jquery.js"]); // passing in an array

</script>
async
Another option to prevent blocking the rendering engine is to use the async attribute for script tags. Introduced in HTML 5, the async option is a native attribute that will tell the browser to load the script asynchronously. It is supported in all modern browsers, and even Internet Explorer starting with version 10. (Prior to version 10 Internet Explorer used a proprietary attribute called defer.) The async attribute optionally accepts a Boolean value; just including it in a script tag with no value defaults to true.
<script src="[URL]" async=true></script>

<script src="[URL]" async></script>
When using async you don’t know when the file will be downloaded, so you can attach an onload event handler to the script tag. This will allow you to invoke or instantiate any code that will need to be run when the file is downloaded:
<script src="[URL"] async onload="init();]"></script>
Compare Results
If you’ve read this far you know what will come next—let’s run a multivariate test and compare the results of each method that we have just covered!
For this test you will create a baseline, a page with no optimizations for external scripts at all. Load perfLogger.js in the head of this baseline file.
<head>

… [snip head content]

<script src="/lib/perfLogger.js"></script>

<script>

perfLogger.startTimeLogging("page_render", "timing page render", true, true);

</script>

</head>
Now create a file that uses remoteLoader to load in perfLogger.js via code. You’ll load remoteLoader.js in the head, and then invoke loadJS in the body section:
<head>

…[snip head content]

<script src="/lib/remoteLoader.js"></script>

</head>

<body>

<script>

remoteLoader.loadJS("/lab/perfLogger.js");

</script>

… [snip body content]

<script>

perfLogger.showPerformanceMetrics();

</script>

</body>
And finally, create a page that uses the async attribute in the script tag:
<head>

…[snip head content]

<script async src="/lab/perfLogger.js"></script>

</head>

<body>

… [snip body content]

<script>

perfLogger.showPerformanceMetrics();

</script>

</body>
Now take each of these pages and run them through WebPagetest.
Use the same content for each of these pages—a snapshot of the main page of my web site tom-barker.com. The URLs are as follows:
Figures 6-4 to 6-6 show our high-level summary times for each test.
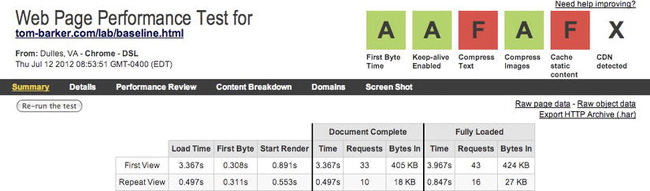
Figure 6-4. WebPagetest results summary for baseline

Figure 6-5. WebPagetest results summary for script dynamically loaded

Figure 6-6. WebPagetest results summary for script async
From these results you can see that the difference in overall load times is negligible, but the consistent difference here is the first byte time and start render. The remoteLoader.js page gives the best start render time, over 350 milliseconds faster than the baseline and 160 milliseconds faster than the async page.
There are tradeoffs; the total load time is longer, but the page is rendered faster so it looks like it loads faster to our end users.
To see why the start render is faster, let’s look at the waterfall charts. Figures 6-7 to 6-9 show the waterfall charts for our tests.
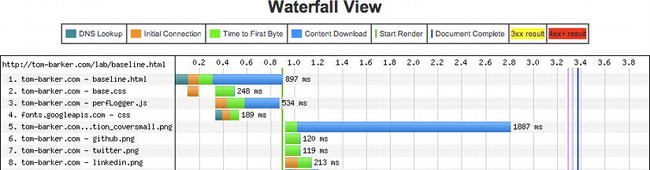
Figure 6-7. Waterfall chart for our baseline file
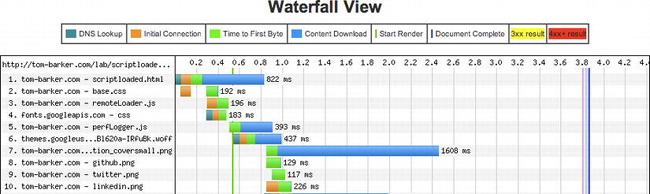
Figure 6-8. Waterfall chart for our scriptloader file
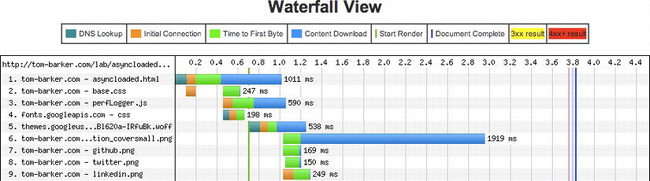
Figure 6-9. Waterfall chart for our async file
In these waterfall charts we can see how perfLogger.js impacts the items below it in the sequence.
For the baseline (Figure 6-7) we can see that while the browser is connecting to perfLogger.js it is also connecting to and downloading our web font, but once the browser begins downloading perfLogger.js, all other progress is halted until that download is finished. This is evidenced on lines 5 to 8 of Figure 6-7, where each PNG on those lines waits until around the 897 millisecond mark before it begins, which is when perfLogger.js finishes downloading.
For our script-loaded test (Figure 6-8) you can see that the browser is not blocked by downloading perfLogger.js. On line 6 you see our web font file downloading in parallel with perfLoader.js.
The same goes for our async test (Figure 6-9), where we can see that the browser downloads an external CSS file and a web font file both in parallel with our perfLoader.js file. We can see these on lines 3 to 5.
And finally, let’s take a look at the results of our perfLogger</code>; metrics for each page.
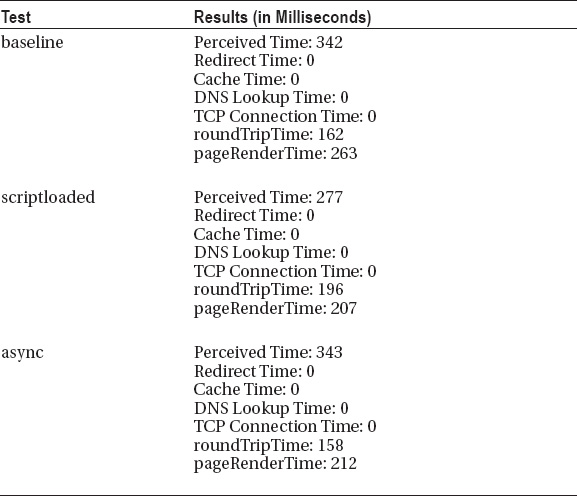
We can see that there are improvements in the perceived time and page render time at an individual test level, but if we run these tests at a large scale, will these improvements be averaged out or do they reflect a larger performance improvement?
Luckily we built perfLogger to save all of our results, so let’s take a look at our log file and parse the results in R.
First write a new R function to create data frames by URL:
getDFByURL<-function(data,url){

     return(data[grep(,url, data$URL)])

}
Next create a new function called comparePerfMetricsbyURL:
comparePerfMetricsbyURL<-function(){

}
Within this function create variables for each test, using the getDFByURL() function that you just created:
baseline <- getDFByURL(perflogs, "http://tom-barker.com/lab/baseline.html")

scripted <- getDFByURL(perflogs, "http://tom-barker.com/lab/scriptloaded.html")

async <- getDFByURL(perflogs, "http://tom-barker.com/lab/asyncloaded.html")
Then create a data frame to hold the mean page render times for each test URL, and a data frame to hold the mean load time for each test URL. You’ll also update the column names for each data frame to make sure you get neat descriptive x-axis values for the chart:
meanRenderTimes <- data.frame(mean(baseline$PageRenderTime), mean(scripted$PageRenderTime),

mean(async$PageRenderTime))


colnames(meanRenderTimes) <- c("Baseline", "Script Loaded", "Async")


meanLoadTimes <- data.frame(mean(baseline$PerceivedLoadTime), mean(scripted$PerceivedLoadTime),

mean(async$PerceivedLoadTime))


colnames(meanLoadTimes) <- c("Baseline", "Script Loaded", "Async")
And finally create bar charts with these data frames:
barplot(as.matrix(meanRenderTimes), main="Average Render Time
By Test Type", ylim=c(0, 400),

ylab="milliseconds")


barplot(as.matrix(meanLoadTimes), main="Average Load Time
By Test Type", ylim=c(0, 700),

ylab="milliseconds")
Our completed function should look like this:
comparePerfMetricsbyURL<-function(){

     baseline <- getDFByURL(perflogs, "http://tom-barker.com/lab/baseline.html")

     scripted <- getDFByURL(perflogs, "http://tom-barker.com/lab/scriptloaded.html")

     async <- getDFByURL(perflogs, "http://tom-barker.com/lab/asyncloaded.html")


     meanRenderTimes <- data.frame(mean(baseline$PageRenderTime), mean(scripted$PageRenderTime),

mean(async$PageRenderTime))

     colnames(meanRenderTimes) <- c("Baseline", "Script Loaded", "Async")

     meanLoadTimes <- data.frame(mean(baseline$PerceivedLoadTime), mean(scripted$PerceivedLoadTi

me), mean(async$PerceivedLoadTime))

     colnames(meanLoadTimes) <- c("Baseline", "Script Loaded", "Async")


     barplot(as.matrix(meanRenderTimes), main="Average Render Time
By Test Type", ylim=c(0,

400), ylab="milliseconds")

     barplot(as.matrix(meanLoadTimes), main="Average Load Time
By Test Type", ylim=c(0, 700),

ylab="milliseconds")

}
The charts that this code generates can be seen in Figures 6-10 and 6-11.

Figure 6-10. Average render time for each test
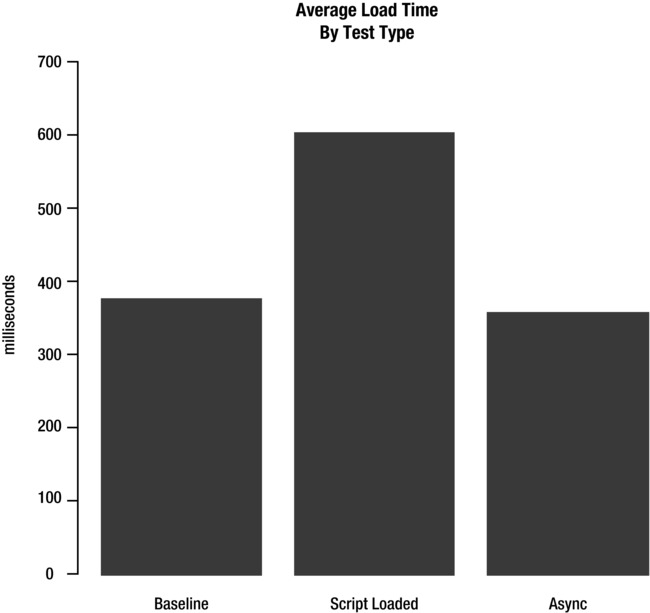
Figure 6-11. Average load timer for each test
So we can see that these benefits are somewhat intangible. The page is visible sooner to the end user, so it appears to load faster, but according to our technical measurements it doesn’t really load faster. In fact, it looks like it takes slightly longer to load in the case of the script loader because there are extra assets to load. Remember, performance is a moving target and highly nuanced.
The thing to keep in mind is that the way we are measuring our performance with these charts, it looks like it’s taking about as long, or a little longer because we are counting done at the onload event of the page. If we don’t need our external scripts available before the onload event we can use a design pattern called lazy loading to load our scripts after the onload.
Lazy Loading
We will now look at lazy loading, a way to programmatically delay the loading of assets. We will look at what lazy loading is, as a design pattern, and how we can use it tactically to improve the web performance of our pages.
The Art of Lazy Loading
At a very high level, lazy loading is a design pattern in which we postpone the creation or initialization of something until it is absolutely necessary (See Figure 6-12).

Figure 6-12. Lazy loading sequence diagram
There are several implementations of this pattern:
- The virtual proxy pattern
- The lazy initialization pattern
- Value holder pattern
In the virtual proxy pattern, shown in Figure 6-13, we instantiate a stub and load in the actual implementation when it is needed and expose it (usually via composition). This pattern is generally used when applications have modules or components that are not always needed, or needed immediately—much like JavaScript files that may not be needed before the page loads.

Figure 6-13. The Virtual Proxy pattern
In the lazy initialization pattern we check whether the object exists (is it null?), and if it doesn’t yet exist, we instantiate it. This is probably the pattern that most people have used and never even realized it was lazy initialization. This pattern is most often used when declaring objects or namespaces in JavaScript. If our namespace exists, use it; if not, create it.
if (obj == null){

     obj = new obj();

}

return obj;
Finally the value holder pattern is where we call a public function of an object to get an instance of the object. The object is instantiated only on the first call of the function. The value holder pattern is most commonly used as part of the implementation of a singleton pattern.
![]() Note Design patterns are core algorithmic patterns that have been identified and named to create a vocabulary that describes in a simple vernacular the steps needed to solve common problems. The seminal work on design patterns is the original book Design Patterns: Elements of Reusable Object-Oriented Software, by Erich Gamma, et.al. (Addison-Wesley 1994).
Note Design patterns are core algorithmic patterns that have been identified and named to create a vocabulary that describes in a simple vernacular the steps needed to solve common problems. The seminal work on design patterns is the original book Design Patterns: Elements of Reusable Object-Oriented Software, by Erich Gamma, et.al. (Addison-Wesley 1994).
The idea of anti-patterns has since been identified as well. Anti-patterns are the inverse of design patterns, common, systemic repeatable mistakes that once identified can be avoided. It is hugely useful to learn at least some of both. All of human history and science is built on the idea of recording previous learning and building on top of it. We avoid re-inventing the wheel. This is the idea of design patterns and anti-patterns: we’ve identified issues and the most effective way to solve them; let’s instead focus on new challenges and solve those, and preserve our new findings for future posterity.
It is also much simpler and takes fewer words to refer to something as a factory rather than refer to that same something as an object that generates other objects.
Lazy Loading Scripts
When we don’t need our JavaScript code to be available as soon as the page loads, we can script-load our external JavaScript after the window.onload event. This is lazy loading our scripts. Let’s take a look at how we can lazy-load our scripts and see what kind of benefit to performance we can get from that. Then we’ll evaluate the results.
Set Up Lazy Loading
To start with, create a new test URL to experiment with. You’ll take the script-loaded page from the previous examples and rename it lazyloadscript.html. You’ll also be updating our remoteLoader object.
In the new lazyloadscript.html page, you’ll add a script tag and some JavaScript. This will check whether the window.attachEvent function is available in the current browser. The attachEvent function accepts two parameters: the event to attach to, and the function to invoke when the event occurs. If the current browser supports window.attachEvent, you’ll pass in the onload event and the call to remoteLoader.loadJS to load the remote scripts.
If attachEvent is not supported, instead use window.addEventListener() to the same effect. Here’s the code:
<script>

if (window.attachEvent)

     window.attachEvent('onload', remoteLoader.loadJS("/lab/perfLogger.js"));

else

     window.addEventListener('load', remoteLoader.loadJS("/lab/perfLogger.js"), false);

</script>
Technically, you’ve just lazy-loaded the remote script loading—but there’s an issue. Right now we don’t know when the remote script has finished loading. If you try to make the call to perfLogger.showPerformanceMetrics() and the script hasn’t just loaded but also executed, then you will get an error.
So you need to make some modifications. You need to be able to know when the script has loaded and run the performance test after it is loaded. So you need to make the remoteLoader.loadJS function accept a callback.
![]() Note Callbacks are functions that we pass in to other functions as variables. The function that accepts the callback can then execute the callback function. This is one of the very beautiful things about functional programming, that we can pass functions around between functions or objects. it opens up other ways of changing functionality without inheritance.
Note Callbacks are functions that we pass in to other functions as variables. The function that accepts the callback can then execute the callback function. This is one of the very beautiful things about functional programming, that we can pass functions around between functions or objects. it opens up other ways of changing functionality without inheritance.
So let’s go into remoteLoader and update the constructScriptTag() and loadJS() functions. Add a second parameter to their signature, this will be the callback function.
loadJS: function(script_url, f){

}


function constructScriptTag(src, func){

}
Within constructScriptTag(), you’ll check to see if a callback has been passed in; and if it has, add an onload attribute to the script object and assign the callback function to that onload attribute. This will make the browser execute this callback function when the script has completed loading the file. In truth, it will act different ways, depending on the browser. It may call the callback function every time the state changes on the connection, just like an AJAX transaction. So you’ll code defensively around this in the callback function:
if(func){

script.onload  = func;

}
Your updated remoteLoader file should now look like this:
var remoteLoader = function remoteLoader(){

     function constructScriptTag(src, func){

          var script = window.document.createElement('SCRIPT'),

          script.src = src;

          if(func){

               script.onload  = func;

               }

          return script;

     }


     return{

          loadJS: function(script_url, f){

               if(typeof script_url === "object"){

                    if(script_url instanceof Array){

                         var frag = document.createDocumentFragment();

                         for(var ind = 0; ind < script_url.length; ind++){

                              frag.appendChild(constructScriptTag(script_url[ind]), f);

                         }

                         window.document.getElementsByTagName('HEAD')[0].appendChild(frag.

cloneNode(true));

                    }

               }else if(typeof script_url === "string"){

               window.document.getElementsByTagName('HEAD')[0].appendChild(constructScriptTag(sc
ript_url, f))

               }

          }

     }

}();
Now update your code snippet in the page to pass in a callback function. Stub out the function and just call it init:
<script>

if (window.attachEvent)

     window.attachEvent('onload', remoteLoader.loadJS("/lab/perfLogger.js"), init);

else

     window.addEventListener('load', remoteLoader.loadJS("/lab/perfLogger.js", init), false);

</script>
Next let’s flesh out our init function. We know we want to call perfLogger.showPerformanceMetrics() here, but since it’s possible for the browser to call this function when the script is loaded (but not yet executed) and then again when the interpreter has executed the script, you’ll need to check if perfLogger has been initialized yet.
<script>

function init(){

     if(perfLogger){

          perfLogger.showPerformanceMetrics()

     }

}

</script>
Your complete code example should look like this:
<script src="/lab/remoteLoader.js"></script>

<script>

function init(){

     if(perfLogger){

          perfLogger.showPerformanceMetrics()

     }

}


if (window.attachEvent)

     window.attachEvent('onload', remoteLoader.loadJS("/lab/perfLogger.js"), init);

else

     window.addEventListener('load', remoteLoader.loadJS("/lab/perfLogger.js", init), false);

</script>
Analyze and Chart Your Results
If you put this up in a production environment and gather data from end users you’ll then be able to visualize the metrics for this page and compare it to our other methods.
To do that, let’s update our R script to compare our lazy loaded example against our previous examples.
In the comparePerfMetricsbyURL() function, add a new data frame for the new URL:
lazy <- getDFByURL(perflogs, "http://tom-barker.com/lab/lazyloadscript.html")
And include the new variable in the meanRenderTimes and meanLeadTimes data frames:
meanRenderTimes <- data.frame(mean(baseline$PageRenderTime), mean(scripted$PageRenderTime),

mean(async$PageRenderTime), mean(lazy$PageRenderTime))


colnames(meanRenderTimes) <- c("Baseline", "Script Loaded", "Async", "Lazy Loaded")
meanLoadTimes <- data.frame(mean(baseline$PerceivedLoadTime), mean(scripted$PerceivedLoadTime),

mean(async$PerceivedLoadTime),mean(lazy$PerceivedLoadTime))


colnames(meanLoadTimes) <- c("Baseline", "Script Loaded", "Async", "Lazy Loaded")
Your updated comparePerfMetricsbyURL() function should now look like this:
comparePerfMetricsbyURL<-function(){

     baseline <- getDFByURL(perflogs, "http://tom-barker.com/lab/baseline.html")

     scripted <- getDFByURL(perflogs, "http://tom-barker.com/lab/scriptloaded.html")

     async <- getDFByURL(perflogs, "http://tom-barker.com/lab/asyncloaded.html")

     lazy <- getDFByURL(perflogs, "http://tom-barker.com/lab/lazyloadscript.html")


     meanRenderTimes <- data.frame(mean(baseline$PageRenderTime), mean(scripted$PageRenderTime),

mean(async$PageRenderTime), mean(lazy$PageRenderTime))

     colnames(meanRenderTimes) <- c("Baseline", "Script Loaded", "Async", "Lazy Loaded")

     meanLoadTimes <- data.frame(mean(baseline$PerceivedLoadTi

me), mean(scripted$PerceivedLoadTime), mean(async$PerceivedLoadTime),mean(lazy$PerceivedLoadTime))

     colnames(meanLoadTimes) <- c("Baseline", "Script Loaded", "Async", "Lazy Loaded")


     barplot(as.matrix(meanRenderTimes), main="Average Render Time
By Test Type", ylim=c(0,

400), ylab="milliseconds")

     barplot(as.matrix(meanLoadTimes), main="Average Load Time
By Test Type", ylim=c(0, 700),

ylab="milliseconds")

}
Let’s look at the charts that this code generates, shown in Figures 6-14 and 6-15.

Figure 6-14. Average render time with lazy loading example
Figure 6-14 is the average render time. Remember from Chapter 5 that we calculate render time as being Date.now() minus performance.timing.domLoading, where domLoading is when the document begins to load. That means that this metric is actually rendered meaningless when we lazy-load, because we don’t start lazy loading until after the document is finished loading, so Date.now() is delayed to whenever the asynchronous loading of the script file is complete.
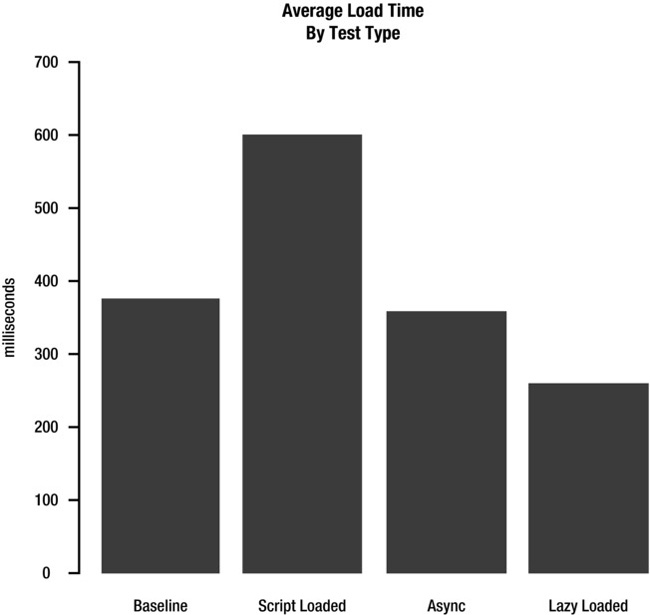
Figure 6-15. Average load time with lazy loaded example
Now Figure 6-15 begins to tell the real story. It charts the times spent from the beginning of the navigation request to when the page is loaded, the lazy-loaded script is loaded, and the init function is called. This is a genuine representation of the full load time, and from here you can see that we get significant gains by lazy loading. The results are 100 milliseconds faster on average than our baseline and async tests, and 350 milliseconds faster on average than our script-loaded test.
![]() Note We didn’t just mechanically look at our charts and declare a winner. We considered the context of what the charts were telling us; we thought about the full picture of the data in the charts and made sense of them.
Note We didn’t just mechanically look at our charts and declare a winner. We considered the context of what the charts were telling us; we thought about the full picture of the data in the charts and made sense of them.
Let’s see how this test fares in WebPagetest. Our test URL and our test results URL are as follows:

For Figure 6-16 when we compare the raw numbers to our previous tests we see benefits. Our repeat view load time and repeat view document complete are the fastest out of every test. But the real victory here is the repeat view document Fully Loaded time, 2 seconds faster than our async time, 500 milliseconds faster than our script loaded test, and 100 milliseconds faster than our baseline.
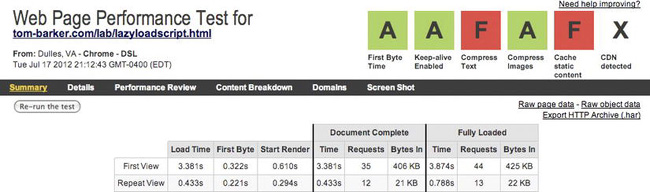
Figure 6-16. WebPagetest summary results for lazy-loaded test (note the first view and repeat view rows)
You can see in Figure 6-17 that just as in our script-loaded example, we don’t have the overhead of the initial time to connect, but with our lazy load test we have a much smaller download time, and the total time is only 113 milliseconds, compared to 534 milliseconds in our baseline test and 393 milliseconds for our script-loaded example.

Figure 6-17. WebPagetest waterfall view for our lazy load test
Clearly lazy loading our scripts is the way to go for optimal load times; we just need to be sure to fire off our subsequent code that uses these scripts in a callback function. And we need to be sure that we don’t need these scripts before the page load.
Lazy Loading CSS
We’re on a roll and seeing great results with lazy loading, so let’s keep going! Let’s build on the success we saw with lazy loading our external JavaScript and lazy load our CSS as well. Then we’ll look at our results.
Set Up CSS Lazy Loading
First take our lazy loaded page and save it as a new file, lazyloadcss.html. We’ll keep our JavaScript files being lazy loaded and we’ll augment the file, as well as our remoteLoader.js file to handle lazy loading our CSS files.
In lazyloadcss.html create a function called fetch(). This function will hold the call to remoteLoader.loadJS. Also stub out calls to a function that we will define soon called loadCSS(). Your complete fetch function should look like the following:
<script>
function fetch(){
remoteLoader.loadJS("/lab/perfLogger.js", init)
remoteLoader.loadCSS(["/style/base.css", "http://fonts.googleapis.com/css?family=Metrophobi
c&v2"])
}
</script>
Next update the code that attaches the lazy-loading functionality to the window load event. Replace the call to remoteLoader with a call to the fetch function. We’ll use fetch() to lazy load all of our JavaScript and all of our CSS, including our web fonts.
<script>

if (window.attachEvent)

     window.attachEvent('onload', fetch);

else

     window.addEventListener('load', fetch, false);

</script>
The updated JavaScript in lazyloadcss.html should now look like the following:
<script>
function init(){
if(perfLogger){
perfLogger.showPerformanceMetrics()
}
}
function fetch(){
remoteLoader.loadJS("/lab/perfLogger.js", init)
remoteLoader.loadCSS(["/style/base.css", "http://fonts.googleapis.com/css?family=Metrophobi
c&v2"])
}
if (window.attachEvent)
window.attachEvent('onload', fetch);
else
window.addEventListener('load', fetch, false);
</script>
Next let’s update our remoteLoader file. Start by renaming the constructScriptTag function to constructTag to make it more general, and pass in a third parameter to specify the type of tag that you’ll be constructing:
Within constructTag you will first create a variable to hold whatever tag you create, and then branch the logic based on the value of type, which identifies whether it’s for JavaScript or for CSS. And after the if else if statement, return el.
function constructTag(src, func, type){

     var el;

     if(type === "JS"){


     }}else if(type==="CSS"){


}

return el;

}
In the JavaScript branch, put the logic held over from constructScripTag, but retrofitted to use the new el variable. Remember, that means building a script tag, setting the src attribute, and assigning the callback:
if(type === "JS"){

el = window.document.createElement('SCRIPT'),

     el.src = src;

     if(func){

          el.onload  = func;

     }

}
In your CSS branch, build a link element, set the type attribute, set the rel, and finally set the href to point to the passed-in CSS file:
else if(type==="CSS"){

el = document.createElement('link'),

     el.type = 'text/css';

     el.rel = 'stylesheet';

     el.href = src

}
Now you need to pull all of the functionality out of loadJS and move it to its own function, which you can call processURLs. Pass in the same parameters, and add in a parameter for type that you will pass in to constructTag:
function processURLs(script_url, f, type){

     if(typeof script_url === "object"){

          if(script_url instanceof Array){

               var frag = document.createDocumentFragment();

               for(var ind = 0; ind < script_url.length; ind++){

                    frag.appendChild(constructTag(script_url[ind]), f, type);

               }

window.document.getElementsByTagName('HEAD')[0].appendChild(frag.cloneNode(true));

          }

     }else if(typeof script_url === "string")}

window.document.getElementsByTagName('HEAD')[0].appendChild(constructTag(script_url, f, type))
     }

}
And finally, you’ll add the load statements:
loadCSS:function(script_url){

processURLs(script_url, null, "CSS")

},


loadJS: function(script_url, f){

processURLs(script_url, f, "JS")

}
Your updated remoteLoader file should now look like the following:
var remoteLoader = function remoteLoader(){

     function constructTag(src, func, type){

          var el;

          if(type === "JS"){

               el = window.document.createElement('SCRIPT'),

               el.src = src;

               if(func){

                    el.onload  = func;

                    }

          }else if(type==="CSS"){

               el = document.createElement('link'),

               el.type = 'text/css';

               el.rel = 'stylesheet';

               el.href = src

          }

          return el;

     }


     function processURLs(script_url, f, type){

          if(typeof script_url === "object"){

               if(script_url instanceof Array){

                    var frag = document.createDocumentFragment();

                    for(var ind = 0; ind < script_url.length; ind++){

                         frag.appendChild(constructTag(script_url[ind]), f, type);

                    }

                    window.document.getElementsByTagName('HEAD')[0].appendChild(frag.

cloneNode(true));

               }

          }else if(typeof script_url === "string"){

          window.document.getElementsByTagName('HEAD')[0].appendChild(constructTag(script_url,

f, type))

          }

     }


     return{

          loadCSS:function(script_url){

               processURLs(script_url, null, "CSS")
          },


          loadJS: function(script_url, f){

               processURLs(script_url, f, "JS")

          }


}();
Analysis and Visualization
Great! Now let’s take a look at our new test page in WebPagetest (see Figure 6-18). Our URLs are as follows:


Figure 6-18. WebPagetest summary results for lazy loading
Look at these results! Our load times and start-render times are around 200 milliseconds better for our first view and repeat view. Our document complete times have similar benefits. The waterfall chart in Figure 6-19 helps us see why this is.
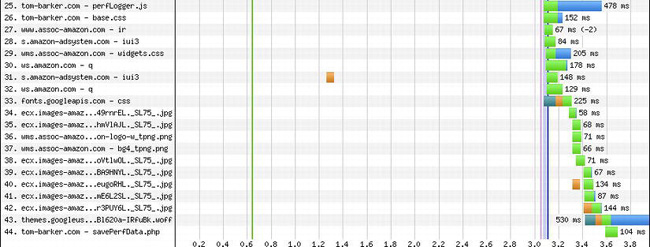
Figure 6-19. WebPagetest waterfall view for our lazy loading test
From the waterfall chart we can see that perfLogger.js, base.css, and our web fonts were all pushed down to after the page had loaded, lines 25, 26, 33 and 43 respectively.
This means that the actual content of the page was loaded first, the page was usable, and it was available to our audience before the heaviest of the presentation layer content was loaded. That’s definitely a win.
Let’s look to see if our Navigation Performance bears that out as well (see Figures 6-20 and 6-21).

Figure 6-20. Comparing average load time for each test type
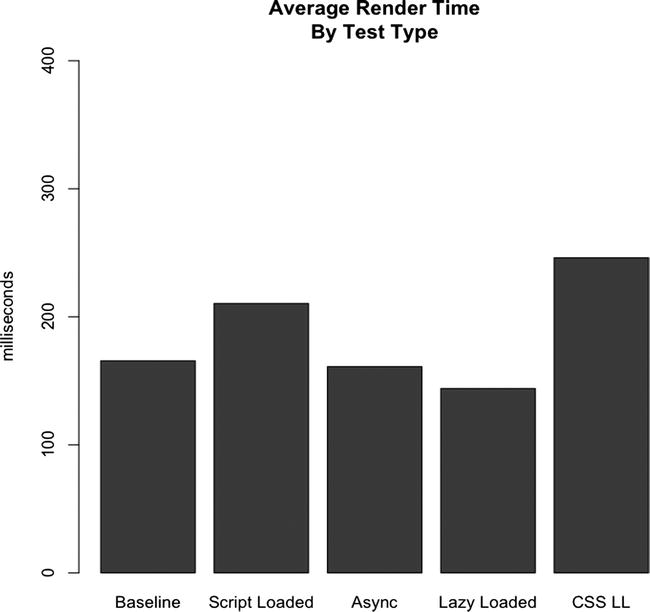
Figure 6-21. Comparing average page render time for each test type
What is this? Clearly lazy loading alters our timing data because of how the sequence of events is altered. But here we see that even our render time is thrown off by lazy loading our CSS and the JavaScript that we use to gather the metrics.
We can adjust this by not lazy loading perfLogger.js. If we put perfLogger back inline we see the data in Figures 6-22 and 6-23 instead:
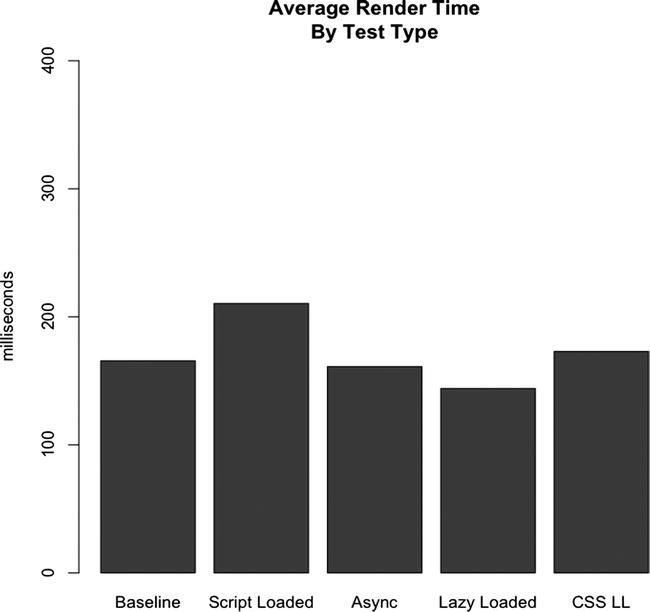
Figure 6-22. Adjusted Results of Average Page Render Time, with perfLogger not lazy loaded

Figure 6-23. Adjusted results of average page load time, with perfLogger not lazy loaded.
That’s better. By inlining perfLogger, we no longer block the loading and executing of it, so that our methodology doesn’t interfere with the recording of our data.
This is a valuable lesson— always be careful that your metrics are not being altered by the way you are capturing them. The only way to do this is to give your data a thorough analysis; never take your results at face value.
Why Not to Lazy Load Images
After what we’ve explored so far this chapter, it might be tempting to go and try to lazy load as much as possible. But lazy loading is not a silver bullet. You need to be sure that the content isn’t needed on page load. You also need to understand how your page will function with JavaScript turned off.
The way we would lazy load images would be to alter the HTML of the page to remove the contents of the src attribute of each image. We could just move the contents of the src attribute to an attribute in the image tag of our own design, maybe the rel attribute. This would prevent the images from being downloaded:
<img src="#" rel="[path to image]" />
Then, on loading we could use JavaScript to iterate through all of the image tags on the page and set each one’s src attribute to the content of the new attribute:
<script>

function lazyloadImages(){

     var img = document.getElementsByTagName("img");

     for(var x = 0; x<img.length; x++){

          img[x].src = img[x].rel;

}

</script>
But there are several reasons or scenarios where that’s not a good idea, mostly because of issues that prevent our JavaScript from loading the images at all. If a user comes to our site with JavaScript turned off, they won’t get any images loaded at all. If we use third-party ads on our site, it’s possible for the third party JavaScript code to have an error and prevent any of our images from loading. When search engine spiders come to index our pages there is a chance that they won’t see our images, so they will cache our page with no images and display our page preview with no images. The most significant reason, though, is that using the rel attribute to hold the image path is not a semantically correct way to use the markup.
Note that being semantically correct in the context of HTML means that we are retaining the meaning of the tag name in our usage of the tag; we use HTML tags because of what the tags say about the data that they contain, instead of what visual decoration the browser may assign to the tag. If we use tags meaningfully—for example using <p> tags for paragraphs not for visual spacing—then external applications accessing our pages, like search engines or screen readers should be able to parse the information in the pages meaningfully. It also allows us to separate content from presentation.
Summary
This chapter explored in greater detail how we can use JavaScript to improve aspects of web performance, specifically how the browsers parse and render our content, and the potential bottlenecks in this process. We looked at ways to prevent the blocking of other content by downloading of external JavaScript file, including using the new async attribute, and creating the script tags programmatically.
We explored the lazy-loading design pattern and used it to download our external JavaScript after all of our other content was loaded on the page. We expanded that concept to lazy load our CSS files, and considered how we could lazy load our images as well, but some reasons why we may not want to.
In each example we used the tools that we developed and existing tools to analyze and visualize our results.
Chapter 7 will look at ways to improve our runtime performance.