
Benefits of camera raw
The Camera Raw workspace
Setting preferences
Creating snapshots
Exporting RAW images
Many of the higher-end digital cameras support a file format that is commonly called camera raw. If your camera supports this format and you are serious about creating great photographs, you probably want to be shooting in camera raw.
Is camera raw really all that? Well, when you capture a picture in the standard JPEG format, the camera takes the image from the image sensor and processes it before saving it to your memory card. This reduces the file size, but it discards image information that could have been used to refine your photo.
The camera raw format, on the other hand, saves the unprocessed file, preserving all the image data, so you can process it manually later. It's like being able to process your own negatives, tweaking them to get the color and lighting just right.
This chapter introduces you to the camera raw format, explaining why camera raw is superior to JPEG and the advantages and disadvantages of using it. I also explain what a DNG file is and introduce you to the Camera Raw workspace, explaining the tools and showing you how to set preferences.
Camera raw formats have been around for a few years now, and many photographers won't shoot in anything else. The ability to use all the image data captured by the camera's sensors, which amounts to trillions of colors, is a heady feeling. The fact that camera raw also stores your settings as metadata that not only is always connected to your file, no matter where you go, but is also completely changeable is frosting on the cake. If you're wondering why all this should matter to you, I'll explain.
The sensors in your digital camera that register the light coming into your camera and convert it into a digital image are called CMOS (Complementary Metal Oxide Semiconductor) sensors. Don't worry; I'm not planning to remember that either. The point is that when your camera is set to shoot JPEG images, your camera settings (such as the exposure or white balance) determine how the information is processed and everything that is considered extra data is discarded. After the image is processed, it is compressed, further reducing the quality and size, to create a JPEG file. When you download that JPEG file onto your computer and make changes to it in Photoshop, every change further reduces the quality of your image.
But that's not the worst of it. What happens to your photos when you've set your camera's white balance to capture in fluorescent lighting and you forget to change it back as you step outside to get a few more shots? Not a pretty picture—and impossible to fix adequately with a JPEG image.
A camera raw file, on the other hand, does not discard any of the information gathered by the CMOS sensors. Instead, it processes it according to your camera's settings, saves those settings as the default settings in the metadata, and then saves all the information gathered by the CMOS sensors as the image file.
This can happen because cameras can capture as much as 14 bits per color channel, but JPEGs can store only 8 bits per channel. Camera raw files, on the other hand, can store up to 16 bits per channel.
With 8 bits per channel, each color channel can have 256 distinct tones. Using 8 bits per channel allows an image file to contain over 16 million different colors. With 16 bits per channel, each color channel can have 65,536 distinct tones. Using 16 bits per channel allows an image file to contain trillions of different colors.
You may be asking yourself if you really need that many different colors, especially since the human eye can detect only about 7 million colors at best. But you'd be surprised at the difference using 16 bits per channel can have when adjusting levels on problem images. The more tones per channel, the more options Photoshop has when adjusting the levels in an image. For example, an image that is almost completely bleached out by overexposure or completely black from underexposure can be salvaged into a printable form using 16 bits per channel.
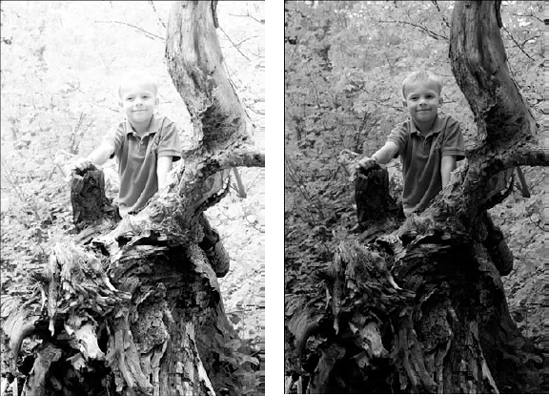
This means that more information is available to draw from than you can see in your image. For instance, consider the first example shown in Figure 7.1. This photo is seriously overexposed. At first glance, you might think that the photo doesn't have enough pixel information to save it. If it were a JPEG image, you'd be right; those pixels would be gone, or at least very faded.
Lucky for me, this photo was taken in camera raw. The pixel information isn't missing; my camera was just set to a higher exposure than it should have been. With a few tweaks in Adobe Camera Raw, I can readjust the exposure settings, in effect reinterpreting the information captured by the CMOS sensors and recovering most of the color information, as you can see in the second photo in Figure 7.1. A definite advantage!
Note
Open Figure 7-01 from the book's Web site. Can you recover the highlights?
Changes made in a camera raw format are saved as metadata. All photo files have metadata—embedded information that tags along with the file. Even scanned photo files have at least the date they were created and their size embedded as information that your computer can access and display, even if your photo isn't open in a photo-editing application. Photos taken with a digital camera have a good deal more information. You'll find almost everything you want to know about an individual photo file—the date and time it was taken; what camera was used; if the flash was used, suppressed, or not needed; focal length; white balance setting; and the list goes on. Figure 7.2 is just a sample of the metadata available for an image.
Note
Bridge displays metadata in its own panel. You can find more information about metadata in Chapter 6.

In a camera raw file there is even more information. I told you that even camera raw files are processed by your camera. The difference is that the processing information is saved, not as the image file itself, as it is with a JPEG, but as metadata that is stored with the file.
When you open a file in a camera raw format, it opens in the Camera Raw application that ships with Photoshop. The version that comes with Photoshop CS5 is Camera Raw 6. This application allows you to make changes to your image, but unlike changes made to a JPEG image, these changes are not permanent, nor do they erode the quality of the pixels. That's because the changes you make are also saved as metadata.
This is how it works. If you've used Photoshop or another digital photo-editing application to change the exposure or color of your JPEG or TIFF photos in the past, you are going to be impressed by how clean and easy it is to change a camera raw image. When you change the color or lighting of a JPEG image in a standard editor, what you see in the photo is what you get. In other words, the visible pixels are all you have to work with, and when you change settings such as the brightness or saturation, you actually alter the existing pixels in the photo file. If you adjust the exposure a little too high, leaving areas of your photo completely white (specular highlights), that color information is irretrievable after you've saved the photo. Other changes to your photo can leave "bruises," eroding the quality as well as the believability of your photo.
Changing the settings of a camera raw image is very different. You aren't actually changing the pixels in the photo; you are simply changing the way the pixel information is interpreted by changing the metadata. Because there is so much more of that information than there is in a JPEG file, you have much greater latitude for interpreting that information. You never lose color information in a camera raw file because if you set the exposure too high, it is always retrievable just by readjusting the settings.
Note
Non-destructive editing holds true as long as you are processing your photo in Camera Raw. After you open it in Photoshop and make changes to it, you are required to save it in a standard image format. The raw file isn't overwritten; you simply create a new JPEG, TIFF, or PSD file in addition to the raw file.
So mess with your camera raw files as much as you want. If you go overboard with the settings, no worries; you can just hit the default button and everything goes back to the way it started. You can do this even after the file has been closed and reopened, or even if you are in a completely different camera raw editor. You also can save your own settings as well as the default settings so they are retrievable even after you've made other changes to them.
Okay, I'll freely admit that you shouldn't use camera raw for absolutely everything. It's not strictly necessary if you are taking a picture of your gaming system to post on eBay, for instance. For one thing, you'll just have to convert your photo into a JPEG in order to post it anyway, and that brings me to the first drawback of camera raw.
You've probably noticed that I've referred to camera raw formats. I haven't even shown enough respect to capitalize camera raw. That's because it's not a universal format—there are at least as many camera raw formats as there are brands of cameras that capture it. It seems everyone wants to design camera raw their own way. Because so many formats are constantly being added, it's hard to find applications that read them. Windows can't even preview or display camera raw files without a plug-in, and eBay certainly doesn't recognize any of them.
It's conceivable that some of these formats won't stand the test of time and that 10 or 15 years from now, you won't be able to open your camera raw files. This is bad news for those of you who own laser discs! The difference is that instead of just having to spend more money on the same movie, you are losing your irreplaceable photographs.
There is good news, however. Even as more and more camera raw formats become available, Adobe's Camera Raw editor continues to be updated so those formats can be read. At least for now, you are probably covered.
The even better news is that Adobe has introduced a camera raw format that they are trying to make an industry standard for camera raw—the DNG file. Using Adobe's DNG converter, you can convert your camera raw files (whatever format they are currently) to DNG files. Adobe's been around a long time, and DNG is not proprietary. I'm willing to bet on them.
I'll talk a little more about DNG files later in this chapter when I discuss camera raw file types.
Another downside, at least for now, of camera raw formats is their sheer size. At over twice the size of their largest JPEG counterparts, they can fill up memory cards and even hard disks at an astonishing rate. Even as memory cards and disks become bigger, so does the megapixel capability of cameras. If you take lots of pictures (and who doesn't, in this digital age?), you'll want to be sure that you have plenty of memory on hand to store them.
Another consequence of having such big file sizes is that computer processing time is significantly increased—not only when you actually take the pictures, but also after those photos are imported into Bridge and Photoshop. These files are harder for Bridge to manage because of their sheer size. Every change you make to them in Photoshop takes longer to process than it would in smaller files.
The good news here is that Camera Raw handles these files really well. The changes you make to your photos in Camera Raw happen in real time. Processing in Camera Raw, especially after you get the hang of the application, doesn't need to take more than a few seconds.
It's not just computer processing time that is an issue; what about your own personal time? Doesn't it take lots of extra time to process all those camera raw images so they look good? If you are taking hundreds or even thousands of shots in one photo shoot, isn't it too much to ask that you would need to go back and process each of those images?
Actually, this is a misconception. It doesn't take more of your time to work with camera raw files; it actually takes less. Consider these facts:
The camera raw files are already processed according to your camera settings and look just like the same shot taken with a JPEG setting. If your camera settings were right on, great! You don't even need to open your photos in Camera Raw.
When you do open your photos in Camera Raw, processing them is simpler by far than using adjustments in Photoshop to clean your image. With all the extra color information at your fingertips, finding the right settings is simple.
You can batch process your raw images. If you have taken several photos in the same lighting conditions, for instance, you can adjust the white balance on all of the photos at the same time.
If you aren't using your photos in a composite or adding special effects to them, there's no need to open them in Photoshop. You can even save a JPEG copy (or one of several other file formats) right from Camera Raw. With that taken into consideration, even the increased computer processing time doesn't seem to weigh in as a huge time factor.
I've already explained that there are as many or more camera raw file types as there are camera brands that capture them. Some of the more notable ones are Canon's formats (CR2, CRW), Nikon's formats (NEF, NRW), and Sony's formats (ARW, SRF, SR2), just to name a few. Your camera has its own format, and you should get to know the ins and outs of that particular format because no two are exactly alike. If you have a newer or less common format, you may want to be sure you can open your files in Camera Raw. You could look for supported formats, but the easiest way is just to try to open a photo in Camera Raw. If it works, you're good to go.
Note
Adobe is constantly updating the supported raw formats. If your files don't open on the first try in Camera Raw, make sure you've installed the latest updates.
When you change a supported file format using Camera Raw, those changes are saved as metadata so your settings are permanent unless you want to change them. The caveat is that even though Adobe can access many camera raw file formats, they are still proprietary, so Adobe can't change those files. Adobe gets around this by creating a second sidecar file that contains the new metadata. This sidecar file has the extension XMP. When you start to see these files floating around in your photograph folders, you'll know what they are. Don't worry about them too much; they are called sidecar files for a reason. They are connected to the camera raw file they interpret and move right along with it if you save it in a different location.
No matter what raw format your camera supports, if Adobe supports it, you can convert your files to DNG files.
The DNG file extension stands for Digital Negative, and it is Adobe's own camera raw format. Many proponents are fighting for it to become an industry standard. This would alleviate the fear of losing your valuable image data in the future as camera raw formats are dropped and no support is available for them in new software applications.
You can convert your camera raw files into DNG files by downloading the DNG converter from Adobe's Web site (www.Adobe.com). It's free and simple to use. It takes a bit of time to run, so plan on walking away from your computer while it processes your files.
Tip
Bridge also converts your raw files to DNG files while they are being imported from your camera or card reader. Choose Bridge as the method of importing these files and check Convert to DNG in the dialog.
There are two excellent reasons to convert your camera raw files into DNGs and one drawback.
DNG is becoming a popular and accepted file format. A few cameras out there even capture in DNG, including Leica, Samsung, Casio, and Hasselblad. You can easily convert your camera raw files into DNG files using the converter and open it in several applications that support it. The chance of it becoming obsolete is small, and its popularity precludes it from doing so without plenty of warning.
Because DNG is Adobe's native camera raw format, Camera Raw has the power to save the metadata straight to the file, eliminating the need to add the XMP sidecar file. This means less clutter and less chance of your settings getting lost in the shuffle.
The downside of DNG is the unwillingness of certain vendors to work and play well with others. Sony, Canon, and Nikon have been known to encrypt their camera raw formats so that some of the information is accessible only using their proprietary raw processing applications. This means that you may not have access to all the possible information just by processing your files in Camera Raw. If you were to convert an encrypted file into a DNG, it stands to reason that you would lose any encrypted information.
Opening camera raw files isn't any different from opening any other type of file. Find your file or files in Bridge and double-click them to open them. Photoshop launches if it's not already open, but Camera Raw also launches, allowing you to process your image before opening it in Photoshop for the more "traditional" editing process. If you are just cleaning up an image, Camera Raw can do all the editing required for most photos.
Note
Although you can open several files in Camera Raw at once, you need to do this all at the same time. If you try to open an additional file while Camera Raw is already launched with a file open, your new file won't open until you've exited the current instance of Camera Raw.
You also can open JPEG and TIFF files in Camera Raw. This gives you a quick editor for adjusting color and light in these file types. To open these files in Camera Raw, right-click the thumbnail in Bridge and select Open in Camera Raw. You also can set the preferences in Camera Raw to automatically open when these files are opened in Photoshop. You can learn more about how to do this in the discussion of preferences later in this chapter.
Note
When you use the Open in the Camera Raw option after right-clicking an image, Camera Raw opens in Bridge instead of Photoshop.
The Camera Raw dialog box opens every time you open a camera raw file, even if it's a file that you've already processed. Don't worry; the settings are just as you left them. You can either readjust them or click Open Image to access Photoshop.
Tip
You really don't need to open Camera Raw every time you want to work with a raw image in Photoshop. If you've already processed your photo and like your settings, or you're just satisfied with the way the photo looks, press the Shift key as you double-click to open it, and it opens directly into Photoshop, bypassing Camera Raw.
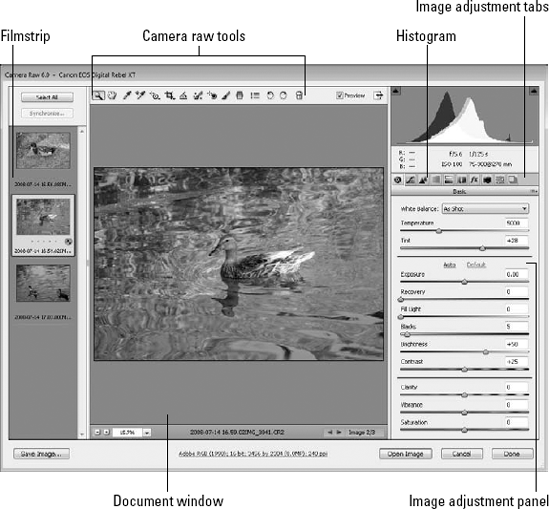
Now that you understand the basics of how camera raw files work, it's time to start editing them. I start by introducing you to the Camera Raw workspace. These are the main features of the Camera Raw workspace, as labeled in Figure 7.3.
Document Window: The Document window displays the document that is currently selected in the filmstrip. At the bottom, you see the Zoom Level drop-down menu. From this menu, you can select a zoom percentage or the fit-to-screen option. Next to the Zoom Level, the document name is displayed. On the bottom right of the document window are arrows that let you toggle through the documents in the filmstrip.
Filmstrip: The filmstrip shows all the documents that are currently open in Camera Raw. You can select more than one by pressing the Shift or Ctrl (

Camera Raw tools: These are the tools that help you make adjustments in Camera Raw. These tools do everything from setting the White Balance to correcting red eye.
Histogram: The Histogram is a very important feature of correctly setting the levels of colorxs and brightness values in your image. Understanding the histogram helps you make better adjustments. If you are unsure what the histogram represents and how to use it, please review Chapter 4.
Document Window: The Document window displays the document that is currently selected in the filmstrip. At the bottom, you see the Zoom Level drop-down menu. From this menu, you can select a zoom percentage or the fit-to-screen option. Next to the Zoom Level, the document name is displayed. On the bottom right of the document window are arrows that let you toggle through the documents in the filmstrip.
Filmstrip: The filmstrip shows all the documents that are currently open in Camera Raw. You can select more than one by pressing the Shift or Ctrl (
Camera Raw tools: These are the tools that help you make adjustments in Camera Raw. These tools do everything from setting the White Balance to correcting red eye.
Histogram: The Histogram is a very important feature of correctly setting the levels of color and brightness values in your image. Understanding the histogram helps you make better adjustments. If you are unsure what the histogram represents and how to use it, please review Chapter 4.
Image adjustment tabs: You can adjust a camera raw image in several ways, from color settings to lens adjustments. These are all represented in these tabs, which you learn more about in this and the next chapter.
Image adjustment panel: The Image adjustment panel changes based on the Image adjustment tab that's selected. Each panel has several different adjustment settings that modify the way your image is interpreted.
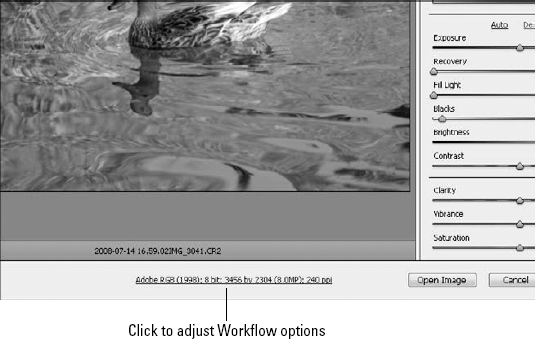
At the bottom of the Camera Raw workspace is a blue readout that is seemingly a modest bit of information. On the contrary, it is really anything but unassuming. Not only is it very important information, but it deals with important settings as well. Clicking it, as shown in Figure 7.4, brings up the Workflow Options dialog box, as shown in Figure 7.5
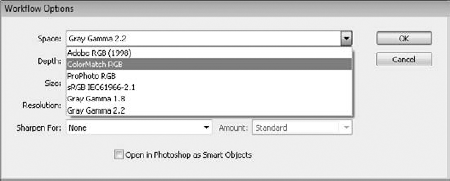
The first setting in the Workflow options is labeled Space, and it allows you to set the color space you want to work in. You can choose from four color profiles and two grayscale profiles (if you have changed your raw file to grayscale), as shown in Figure 7.6. If you don't see the profile you want, choose ProPhoto RGB and convert to your desired color space after opening your image in Photoshop.
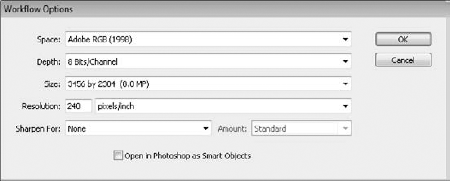
The Depth setting allows you to choose to work with either 8 bits per channel or 16 bits per channel. Remember that the bits-per-channel setting determines how many tones your color channels can contain. At 8 bits per channel, you have access to over 16 million colors, but 16 bits per channel gives you trillions of colors. The more colors you have access to, the easier and better your corrections in Camera Raw are. It stands to reason that you want to work at 16 bits per channel as often as possible.
So why is it that when you open Camera Raw for the first time, it is set at 8 bits per channel? Well, although technology is getting better all the time, there are still a limited number of file types and applications that can support 16-bit/channel images. When you change the setting in Camera Raw to 16 bits per channel and open your image in Photoshop, for instance, a few options—such as the Filter Gallery—are grayed out because they doesn't support 16 bits per channel.
The bottom line? You probably want to work with images that are set at 16 bits per channel to make any adjustments necessary in Camera Raw. If you want to make changes to your image that require an 8-bits-per-channel setting, you can change your Image mode to 8 bits per channel in Photoshop by choosing Image
Note
I'm pretty sure that Adobe sets your images to 8 bits per channel in the Camera Raw workspace as a default because they don't want you to pull your hair out over not having access to the Filter Gallery in Photoshop later on. When you set your images to 16 bits per channel, that setting stays set until you change it, so the next photo you open in Camera Raw also is set to 16 bits per channel. Remember this small detail so you won't pull your hair out over options you think you should have in the Photoshop workspace. Take a deep breath, and remember to convert your image back to 8 bits per channel.
You can adjust the size of your image in Camera Raw by resampling it, just as you would in Photoshop. This is one change in Camera Raw that is destructive. Whenever you resample an image, you trust an algorithm to selectively add or destroy pixels to make your image larger or smaller. Although resizing is often necessary, resizing an image over and over is unwise.
You can make your image smaller by choosing a megapixel size with a minus sign next to it or make it larger by choosing a megapixel size with a plus sign next to it, as shown in Figure 7.7. You can return to the original size by choosing the megapixel size in the middle. The one benefit of a camera raw file here is that returning to this original size restores your original settings. (If you did this in Photoshop with a JPEG, it would just resample to the original size.)
Notice that these sizes don't show your image dimensions. The dimensions of your image are based not only on the number of pixels, but also on the resolution. Changing the resolution does not change the number of pixels used in your image, however.

Setting the resolution of your photo changes the print size and quality. It takes the available pixels and determines how many of them to pack into a linear inch. Your computer screen displays at 72–96 ppi (pixels per inch) and many digital cameras shoot at that resolution, leaving you with a photo with huge dimensions. When you take your photo in to be printed, the photo processor resizes your photos to the appropriate size and resolution, starting with the resolution. A photo printed at 72 dpi looks extremely pixilated, giving it a jagged look. Increasing the resolution to at least 200 dpi gives you a much better result.
Increasing the resolution automatically reduces the size of your image without resampling it. Instead of spreading 72 pixels per inch over 30 inches of photo, you can use the same pixels to pack 300 pixels per 7 inches of photo, giving you not only a better print resolution, but a more reasonable print size.
This allows you to apply output sharpening for Screen, Glossy paper, or Matte paper. This option is best used when you are planning to use your image straight from Camera Raw without opening in Photoshop. Sharpening an image is usually the last step you take before output because sharpening not only loses its effectiveness as other adjustments and filters are placed over it, but it is also one of the more destructive edits, making visible changes to the pixelization of your photo.
After you have chosen an output to Sharpen for, you can choose to sharpen a high, standard, or low amount.
Opening your raw image as a Smart Object makes it a little more complicated to work with in Photoshop, but it protects it from the Photoshop edits and allows you to open it back up in Camera Raw and make additional changes to it. Smart Objects operate very differently from image files. You can't make adjustments directly to them—limiting changes to the layer adjustments. The filters added to a Smart Object also are added as separate sublayers. After you've learned more about Smart Objects and how they work, the benefits and drawbacks of this option will be clearer to you.
Note
You learn more about Smart Object layers in Chapter 10.
Now that you've seen the Workflow options, the blue readout at the bottom of Camera Raw should make sense to you. You can glance down at any time to check your Workflow option settings and click to make changes if they are not set correctly for the image you are working on.
Note
The Workflow Options settings stay the same as the last time you set them even if you are working on a new image in Camera Raw. Even if you resize an image, the next image is set to the same resize option. This is convenient if you want your color workspace to always be set to ColorMatch RGB, but it's something to be aware of when working with different sizes of documents that you may or may not want sharpened.
The Camera Raw preferences can be accessed by clicking the Open Preferences icon in the tool menu, as shown in Figure 7.8. Preferences allow you to make changes to the way the image file is handled in Camera Raw. You find these options in the Preferences dialog box:
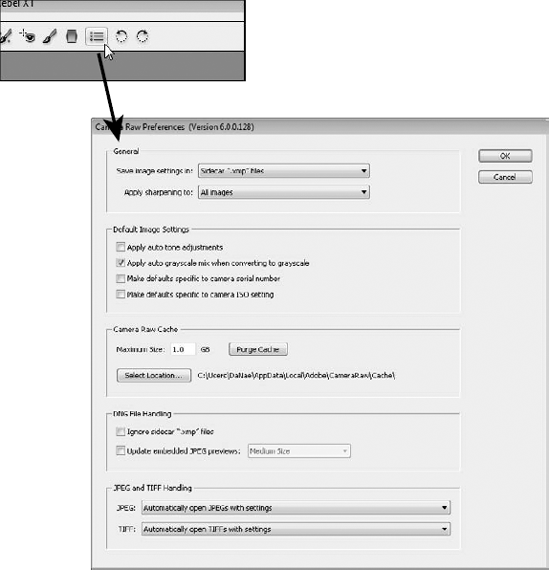
Figure 7.8. You can reset Camera Raw preferences by opening the Preferences dialog box in the tool menu.
The General preferences allow you to change your image and sharpness settings. You can choose to save your changes to a raw file as a DNG file or a XMP file and choose where to store that XMP file. You also can decide to apply sharpness to the saved file or just to the preview.
Changes made to camera raw images are not actually stored in the raw image file. Instead these changes are stored in separate location. These settings can be stored in one of three ways; as a sidecar file with a filename ending in .xmp, in a camera raw database that Photoshop provides on the local computer, or as part of a Digital Negative (DNG) file.
The sidecar .xmp files are files with the same name as the camera raw image file, except they end in .xmp. These files have the advantage of being able to transfer from one computer to another along with the camera raw image.
The camera raw database is a simple database that is part of the Photoshop application on the computer. Using the camera raw database means that you do not need to worry about any secondary files; however, the database is not available if you open the image on other computers.
If you choose to save your camera raw files in the DNG format, the settings you make in Camera Raw are embedded into the file, eliminating the need for a sidecar .xmp file and making the settings portable. DNG files are discussed in depth later in this chapter.
Note
The default preferences you configure are applied only to camera raw images that have not been opened in Camera Raw. Camera raw images that have been opened before use their previous settings. This is an excellent reason to review and set your preferences long before you open more than one file in Camera Raw.
This setting gives you the option to sharpen the image preview only, which is the one you're looking at in the document window, or to sharpen the image output as well by selecting all images. This setting works with the Sharpness slider in the Detail tab. If you choose to sharpen the preview images only, the Sharpen slider does not affect the output image. You may or may not want to sharpen your images at this stage, but you probably want the Sharpness slider to be an accurate representation of the sharpness applied, so this setting is best set to all images.
The default image settings allow you to apply auto adjustments to images that are opened in Camera Raw. Auto adjustments override the settings applied to your image by your camera, but they are non-destructive and changeable, so you can tweak your images on a case-by-case basis.
You can also make your preferences specific to the camera or ISO setting in this area of the Camera Raw Preferences. That means that the preference settings will only be applied to the camera used in the selected image or the ISO setting of the selected image.
When you open an image in Camera Raw, it reads the settings made by the camera to the metadata of your image and previews your image with those settings. If you check Apply auto tone adjustments, Camera Raw reads all the metadata and tries to apply its own settings for the best image. You also can apply auto settings by clicking the Auto link in the Basic panel, so I recommend you leave this option unchecked and try the auto settings on a photo-by-photo basis.
When you create a grayscale image from a raw image by selecting the Convert to grayscale option in the HSL/Grayscale panel, you are presented with a color mixer that allows you to set the grayscale tones of the various color information in your image. By default, Camera Raw sets those tones to an auto balance, hoping for the best mix to begin with. This is a good place to start, so I recommend leaving this setting checked.
This specifies the amount of space allotted to Camera Raw for processing information. The higher the memory, the more temporary information Camera Raw can store on your computer. That memory on your computer is always allocated to Camera Raw, however, making it useless for anything else. The default is set to 1GB. If you increase the size, it can make processing time in Camera Raw faster. You can choose to create this cache on any drive connected to your computer.
The settings in this area deal with DNG files. If you are using DNG files, you can choose from these options.
If you have decided to work using the DNG file format, selecting the Ignore sidecar ".xmp" files setting stores your settings embedded in your DNG file and an XMP file is not created.
Choose these options for either JPEG or TIFF files:
Disable JPEG/TIFF support: This prevents JPEGs or TIFFs from being opened in Camera Raw.
Automatically open JPEGs/TIFFs with settings: You can specify whether to open a JPEG or TIFF in Camera Raw. To open one of these file types in Camera Raw, right-click the image preview in Bridge and choose Open in Camera Raw.
Automatically open all supported JPEGs/TIFFs: This automatically opens supported JPEGs and TIFFs in Camera Raw before opening them in Photoshop. You can make tonal and color changes faster in Camera Raw than in Photoshop, but you don't have the tonal range that you do with a raw image. These changes are permanent and destructive to a JPEG or TIFF file.
The Camera Raw panel menu is accessed by clicking the Panel Menu icon under the Image Adjustment tabs as shown in Figure 7.9. In this menu, you have the following options:

Image Settings: This option applies to images that you have previously opened and changed in Camera Raw. A check mark next to it indicates previous settings. After making additional changes, you can select this option to return to those settings.
Camera Raw Defaults: If your image is newly opened in Camera Raw, this option is selected. You can click it at any time to return to the original camera raw settings.
Previous Conversion: This option applies the settings used for the last image open in Camera Raw to the current image. This is handy if you have photos that were taken at the same time with the same camera in the same lighting conditions.
Custom Settings: After you make changes to an open image, the Custom Settings option is checked. This allows you to check the original image by selecting Camera Raw defaults or Image Settings and then returning to the changed image by clicking Custom Settings.
Preset Settings: This option displays any Presets you have applied to your image.
Apply Preset: This option displays a Preset menu that allows you to apply presets to your image. If you apply more than one preset, it is added to the previous preset(s) unless it falls into the same category. For instance, applying Clarity +15 to Exposure +25 sets both Clarity and Exposure to those values. Applying Clarity +15 to Clarity +25 simply reduces the clarity from +25 to +15.
Apply Snapshot: This option allows you to load any snapshots you have taken in the Snapshot panel. I show you how to do this later in this chapter.
Clear Imported Settings: This option allows other applications that use Camera Raw, such as Photoshop Elements, to clear the settings created using Photoshop. Because fewer options are available to users of Photoshop Elements, this clears settings that these users have no access to and can't modify.
Export Settings to XMP: You can export the current settings to the XMP file by clicking this option. This is only a temporary save, however. When you click Done or Open Image, these settings are overwritten by the current settings. You can click Cancel, however, and these settings become the saved default.
Update DNG Previews: This option allows you update the JPEG previews in your DNG file. You also can set the size of these previews. If you've set your preferences to update these previews, they are updated when you close or export your image.
Load Settings: This option allows you to load a saved setting.
Save Settings: This option allows you to save your settings as a preset. A dialog box opens that gives you the option to select or deselect each setting individually to save in your preset. The preset is saved as a XMP file in the location of your choice. The Preset panel allows you to save and load your setting easily. Learn more about it later in this chapter.
Save New Camera Raw Defaults: Choose this option to save your current settings as the Camera Raw defaults. This gives you the power to change default settings that you may not like, such as automatic sharpening.
Reset Camera Raw Defaults: This option resets the defaults to the original Camera Raw settings.
As you make changes to your images in Camera Raw, you may want to save several versions of those changes. For instance, you may want to save the original image and the special effect you created with it. Using the Snapshots panel, you can create and save different versions of your image that are saved as metadata and are always accessible.
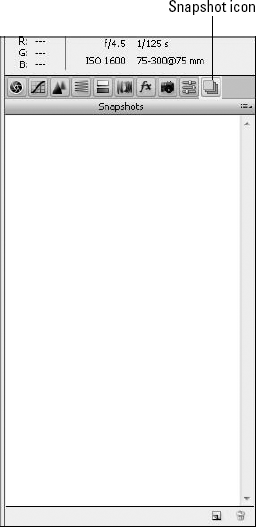
Click the Snapshots Image adjustment tab to open the Snapshots panel, as shown in Figure 7.10. There's not much here, just an empty panel with a New Snapshot and Delete icon at the bottom. Before you create a Snapshot, you should change the settings of your image. You learn more about that in Chapter 8, but for now you can either take a snapshot from the default settings or make some simple changes before you do.
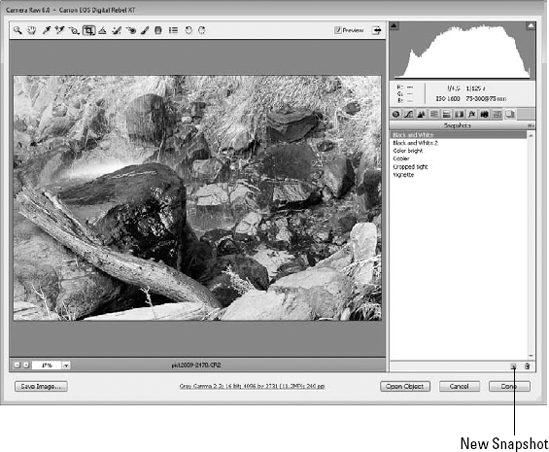
To create a snapshot, click the New Snapshot icon at the bottom of the Snapshot panel. A dialog box opens allowing you to name the snapshot you've just created. After you name it and click OK, the dialog box closes and the Snapshot name appears in the Snapshot panel, as shown in Figure 7.11. You can continue to create as many snapshots as you need.
Note
You can access Figure 7-11 with the saved snapshots on the book's Web site.
You can access these snapshots at any time by simply clicking the name in the Snapshot panel. When you are finished in Camera Raw, the snapshot that is selected is the exported image.
As you adjust the settings in Camera Raw, keep in mind that they can be used on more than just the image you are adjusting. You can save them as presets and use Bridge to apply them to other images. You also can apply them to other images within Camera Raw.
Open the Preset panel by clicking the Preset tab. Just like the Snapshot panel, the Preset panel is pretty bare until you add your own presets to it. Click the Add New Preset icon on the bottom of the Preset panel. The dialog box shown in Figure 7.12 opens, giving you the option to choose which settings will be saved in the new preset. You also can name your preset so you can find it easily.

After you have created a preset, you can change your settings to match it by highlighting it in the Preset panel. You also can access them in Bridge by choosing Edit
When you are finished with your image in Camera Raw, you have several options for exporting it. Using the buttons at the bottom of the screen, as shown in Figure 7.13, you can open your image in Photoshop, cancel your changes and close your image, or click Done to close your image with the new settings saved.
Note
If you have selected "Open in Photoshop as Smart Objects" in your Workflow Options, the Open button reads "Open Object(s)" rather than "Open Image(s)".

You also have several options when you click the Save Image button and open the Save Options dialog box, as shown in Figure 7.14. Camera raw formats are large, unwieldy, and generally not accepted for printing or sharing on the Web. In order to make your camera raw files share-friendly, you need to save them as a more accepted file format, generally JPEG. You also can convert your files to DNGs, TIFFs, or PSDs.

Destination: First, you can choose to save your files in the same location from which you opened them, or you can choose a new location in which to save them.
File Naming: You have several options when it comes to naming your file or multiple files. The batch saving options allow you to name your files in a specified sequence. You can also choose a new file format to save your file.
Batch saving options: You have several batch saving options; I've chosen a few of these options in Figure 7.14 as an example. If you have several photos open in Camera Raw, you can change their filenames and save them in sequence using these options.
File Extension: Using the File Format drop-down menu, you can save your file as a DNG, JPEG, TIFF, or PSD file (and choose whether the extension appears in caps or not). You should know the pros and cons of each by now.
Format: This is automatically chosen when you choose your file extension, or vice versa. The option you choose here changes the dialog box to display the options for each file format.
After you are finished setting your options, click Save and your file is saved according to your settings. This does not replace your original camera raw file, of course; it creates a new file.
By this time, you should have a really good basic idea of why camera raw formats have become so popular and why it is important to have a non-proprietary format to save these files in. In addition, you should know quite a bit about the Camera Raw workspace including the following:
Where the tools and menus are found and how to access them
How to set your workflow options and preferences
How to create several different snapshots of your image settings
How to open your images in Photoshop or export them as different file types