

CHAPTER
12
PeopleSoft Test Framework
 he PeopleSoft Test Framework (PTF) is a client-side, metadataaware automated testing facility. It uses Internet Explorer to record and run functional test scripts. In this chapter you will learn how to install, configure, and use the PeopleSoft Test Framework.
Installing PeopleSoft Test Framework
PTF is a multitier testing tool. As we saw in Chapter 2, Application Designer may connect in two-tier, direct-to-database, or three-tier Application Server mode. PTF connects to the web server. Although I’m tempted to call this “four-tier mode” (client, web server, application server, database), most sites will configure proxies, load balancers, Secure Sockets Layer (SSL) accelerators, and other network devices between the client and the web server.
The first step in the installation process is to verify system connectivity and prerequisites. Once satisfied, we can run the installation process.
Environment Prerequisites
PTF accesses test metadata through an HTTPS connection to Integration Broker. This means a properly configured environment includes Integration Broker and has SSL enabled.
Enable SSL
PTF requires SSL communication between the PTF client and the PeopleSoft Integration Gateway. It is not enough to terminate SSL early using an SSL load balancer or SSL accelerator. PTF’s service operations are marked as requiring SSL, causing Integration Broker to verify that data is transmitted over a secure protocol. Integration Broker will fail if the incoming request is sent over HTTP.
| NOTE
Carrying SSL through to the PeopleSoft web server is required only for web services. Standard PeopleSoft Internet Architecture (PIA) access still supports early SSL termination. |
Configure Integration Broker
Integration Broker’s architecture is very similar to PeopleSoft’s Pure Internet Architecture, but with a lot more flexibility and a lot fewer conventions. It consists of Application Server processes and a gateway service. Online applications have portals, integration tools have gateways, but portals and gateways are the same: they both have the definition gate, door, or entrance. The following steps offer a basic outline to assist you in configuring Integration Broker.
Enable Pub/Sub Configure the Application Server to start the Integration Broker Publication and Subscription services. Figure 12-1 shows the
psadmin configuration menu.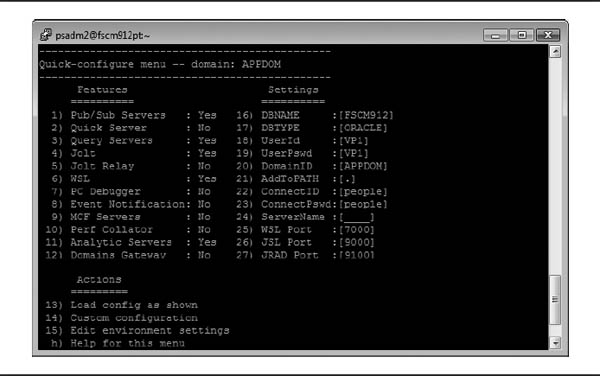
FIGURE 12-1. Configuration menu for
psadminGateway Configuration Next, log into your PeopleSoft online application as an administrator and do the following:
1. Navigate to PeopleTools | Integration Broker | Configuration | Gateways.
2. Open the LOCAL gateway and verify the URL setting.
3. If the Connectors grid is empty, click the Load Gateway Connectors button to populate the grid. Figure 12-2 shows the LOCAL gateway’s settings.

FIGURE 12-2. LOCAL Gateway settings
4. The gateway URL points to Integration Broker’s servlet. You can click the Ping Gateway button to confirm the URL, but a properly secured gateway may contain a URL that is not accessible outside the application’s network. My gateway URL, for example, is http://fscm912pt:8000/PSIGW/PeopleSoftListeningConnector. Notice the protocol is HTTP, not HTTPS, and the server name lacks a domain. Services inside my secure PeopleSoft network communicate through plain HTTP. Any service trying to connect from outside that network, however, must use SSL and specify a fully qualified server/domain name. The URL, therefore, to ping my gateway from outside the PeopleSoft network is https://fscm912pt.example.com/PSIGW/PeopleSoftListeningConnector. Verify that your gateway is running by attempting to access the fully qualified HTTPS (secure) URL for your gateway. A properly configured gateway will appear similar to the one shown next.

5. Select the Gateway Setup Properties link to configure PeopleSoft nodes with which this gateway will communicate. At a minimum, configure the gateway’s default Application Server and the default local node’s Application Server. Figure 12-3 shows the LOCAL gateway’s node settings.

FIGURE 12-3. Gateway node settings
| NOTE
PeopleSoft stores these settings in the integrationGateway.properties file within the PSIGW/WEB-INF servlet directory. Regenerating PIA will overwrite this file, requiring reconfiguration. |
Service Configuration To facilitate moving definitions between systems, PeopleSoft does not hard-code web service end points in schemas. Configure the web service end point for Integration Broker by navigating to PeopleTools | Integration Broker | Configuration | Service Configuration. If you are using PeopleTools 8.51, enter the Target Location and Secure Target Location. For PeopleTools 8.52 and later, click the Setup Target Location link and enter the appropriate URLs. Figure 12-4 shows a PeopleTools 8.52 service target configuration.

FIGURE 12-4. Service target configuration
Node Configuration Integration Broker is a form of Enterprise Service Bus (ESB), routing information between nodes. To function properly, Integration Broker needs to know a message’s sender and the intended recipient. PTF uses two nodes: ANONYMOUS and the default local node. Both the ANONYMOUS and the default local node are delivered by PeopleSoft. Configure nodes by navigating to PeopleTools | Integration Broker | Integration Setup | Nodes. Select the ANONYMOUS node and update the Default User ID. Figure 12-5 shows the ANONYMOUS node configuration.

FIGURE 12-5. ANONYMOUS node configuration
| NOTE
PTF’s use of the ANONYMOUS node is not necessarily intentional. ANONYMOUS is the name of the node Integration Broker uses for anonymous service requests. |
A node’s default user must have access to any service operations requested by that node. PTF uses the PTTS_TEST service. Following the principle of least privilege, I recommend creating an unprivileged user and adding only permission lists required to execute anonymous services. Whichever user you choose for the ANONYMOUS node, ensure that the user has permission to execute PTTS_TEST service operations (PTF User role is discussed later in the section, “User Configuration”).
After saving the ANONYMOUS node, identify your default local node. From the node search page, find the node that has a 1 in the Local Node column, and a Y in the default local node column. The default local node of a fresh PeopleSoft installation always starts with
PSFT_. The following list contains the names of each delivered application’s default local node. Your default local node will have this name only if this is a new, preconfigured installation. A production system should not use these node names (see the upcoming Caution).■ PSFT_CR PeopleSoft Customer Relationship Management
■ PSFT_EP PeopleSoft Financials/Supply Chain Management
■ PSFT_HR PeopleSoft Human Capital Management
■ PSFT_HR PeopleSoft Campus Solutions 9.0 (same as HCM 9.0)
■ PSFT_LM PeopleSoft Enterprise Learning
■ PSFT_PA PeopleSoft User Interaction Hub (formerly PeopleSoft Enterprise Portal)
■ PSFT_PF PeopleSoft Enterprise Performance Management
| CAUTION
Node names play a significant role in PeopleSoft security. No two nodes should have the same name. A PS_TOKEN generated by one server will be accepted by another server if that other server is configured to trust the node identified by the PS_TOKEN. For example, a developer may have access to authenticate as a manager in a development Human Capital Management (HCM) system but not in a production system. If your development and production nodes have the same names and your Financials system is configured to trust the HCM system, then that developer can craft a PS_TOKEN cookie to authenticate against the Financials production system as the manager identified by the PS_ TOKEN cookie. |
Open the node and switch to the Connectors tab. Click the Ping Node button to verify the default local node’s configuration. A ping attempts to connect to the application server identified within the Gateway node configuration. Since this is the default local node, we are really asking the application to ping itself. If you see “Success” in the Message Text column, then the node is configured properly. Figures 12-6 and 12-7 show the node Connectors tab and ping results, respectively.

FIGURE 12-6. Default local node Connectors tab

FIGURE 12-7. Connector ping results
Domain Status Navigate to PeopleTools | Integration Broker | Service Operations Monitor | Administration | Domain Status and confirm that your domains are active. Depending on your configuration, you may have multiple domains. Not every domain has to be active. PTF will have to connect to the Application Server Pub/Sub services, so at least one domain will have to be active. Figure 12-8 shows the Domain Status page.
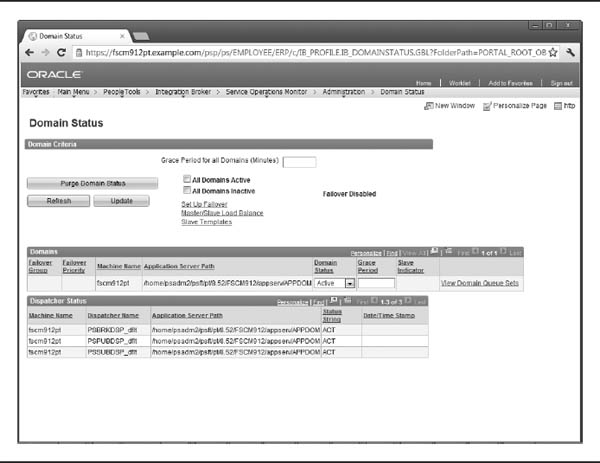
FIGURE 12-8. Domain Status page
| NOTE
If your site has multiple domains and you aren’t familiar with the domain configuration, find out who configured your domains and ask that person which one to activate. |
User Configuration
PTF includes three roles: PTF User, PTF Editor, and PTF Administrator. The PeopleTools PeopleBook: PeopleSoft Test Framework chapter “Installing and Configuring PTF,” section “Setting Up Security,” shows an excellent table describing the access provided by each role. In summary, to run tests only, you’ll grant a user the PTF User role. If a user will change, create, or run tests, then you’ll give that user the PTF Editor role. Users who run PTF reports as well as modify and run tests require the PTF Administrator role.
Web Profile Configuration
Identify the web profile in use by the system you plan to test. The only sure way to determine which web profile your server uses is to check the value of the
WebProfile key within the portal servlet’s configuration.properties file. If your architecture uses only one web profile (as opposed to two separate web servers running KIOSK and PRO), then you can determine the currently loaded web profile from PeopleTools | Web Profile | Web Profile History. The profile that has the most recent Profile Was Loaded value is the one that is currently in use.Edit the web profile by navigating to PeopleTools | Web Profile | Web Profile Configuration. Switch to the Debugging tab and verify that the following checkboxes are selected:
■ Show Connection & Sys Info
■ Generate HTML for Testing
Figure 12-9 shows the Web Profile Debugging tab.

FIGURE 12-9. Web Profile Debugging options
PTF Online Configuration Options
As previously mentioned, PTF requires SSL. You may configure PTF to allow untrusted SSL connections by navigating to PeopleTools | Lifecycle Tools | Test Framework | Define Configuration Options and selecting the Allow Untrusted SSL checkbox. This is important if your site uses an untrusted, self-signed digital certificate.
Trust in this regard is a matter of implicit versus explicit trust. PTF will implicitly trust a certificate signed by a known certificate authority. You must explicitly choose to trust a certificate that is not signed by a reputable certificate authority.
| CAUTION
Be aware that accepting untrusted SSL certificates may compromise security. |
While viewing the PTF online configuration options, you can add a row for each Process Scheduler you intend to use with PTF.
Browser Settings
PTF is a .NET application that records and plays tests through Microsoft’s Internet Explorer. Add the site you will be testing to your browser’s trusted sites security zone. For more information about Internet Explorer’s security zones, see Microsoft’s documentation online. Microsoft maintains configuration steps for each browser and operating system version.
Install PTF
The PTF installation program is delivered with the PeopleTools file server installation. Launch the installation program,
%PS_HOME%setup PsTestFrameworksetup.exe. The installation wizard is rather short, allowing you to select a target install location, and that is it. Accept the defaults, clicking Next and Finish when prompted.My First Test
When a user performs a functional test, that user logs into PeopleSoft and visually verifies something—a value on a page, results of a calculation or process, and so on. An automated test, therefore, must be able to navigate to a particular location within the PeopleSoft application and then verify “something.” Automated tests often include some type of action, such as adding a new row or changing a value on a page, but this is not required. Later in this chapter, we will create a PTF test that performs the following:
1. Logs into PeopleSoft as user
CROTH2. Navigates to PeopleTools | Security | User Profiles | User Profiles
3. Adds the role PTF User to operator ID AERICKSON
4. Verifies that AERICKSON has the role PTF User
Before creating this test, however, PTF requires some configuration. Specifically, we have to create a connection profile to tell PTF where to find and store tests, and we need to create an execution profile to identify the system to test.
Creating a Profile
Launch PeopleSoft Test Framework. When the Signon dialog appears, create a profile for the system you plan to test. Figure 12-10 shows the PTF Signon dialog with a fully configured profile.

FIGURE 12-10. PTF Signon dialog with a configured profile
| NOTE
On Windows 7, launch PTF by right-clicking the icon and selecting Run As Administrator. Administrator access is required to attach to and record browser sessions. |
A profile consists of a name, a connection string, proxy information, the target node ID, and credentials.
Database Name
The Database Name field uniquely identifies a profile. The field is not used within a connection string, so it does not have to contain the target database’s name. Enter a unique, meaningful description.
Server:Port
PTF uses the value entered into Server:Port to generate a web service end point. If the target system uses the default SSL port (443), the port is not required. Alternatively, you may enter the full HttpListeningConnector URL. A full URL may be necessary if a particular implementation uses URL fragments to reverse-proxy SSL requests as in https://peoplesoft.example.com/fscm/PSIGW/HttpListeningConnector. If you choose to use a full URL, be sure to use the HTTPS protocol. PTF attempts a secure tunnel connection regardless of the URL’s protocol.
Use Proxy Checkbox
If your network architecture requires you to connect to PeopleSoft through a proxy server, select the Use Proxy checkbox and fill in the Proxy Information section. Later you will see how to use an HTTP debugging proxy to troubleshoot PTF connection issues.
Node ID
Node ID is required only if the target Integration Broker gateway is shared among multiple PeopleSoft applications. The node ID is not required if the target node is configured as the gateway’s default application server.
User ID
Enter a PeopleSoft user ID that has one of the three roles: PTF User, PTF Editor, or PTF Administrator. If your environment has no PTF test cases or Execution profiles, log in as a PTF Administrator. You will need this role to create an Execution profile. The PTF user ID does not require access to the PeopleSoft features you plan to test. Later you will create an Execution Profile that specifies the PeopleSoft Operator ID.
| NOTE
Tests run as valid PeopleSoft application users. The PTF access ID is not necessarily the same operator ID used to perform tests. Test case operator IDs are stored with preconfigured execution options that can be shared by multiple tests. |
Password
Enter the PTF user’s password.
Troubleshooting Connections
The following is a list of common connection issues and potential solutions.
Connection Errors
When PTF is improperly configured, you may experience one of the following errors while trying to log into PTF.
There was an error when PeopleSoft Test Framework was trying to login This is a very generic error. In a few paragraphs you will learn how to use Fiddler to determine the root cause of this error message.
InnerException: The remote name could not be resolved DNS resolution failed. Try pinging or using
nslookup, dig, or another command-line tool to determine whether the host is accessible through your network.InnerException: Unable to connect to the remote server PTF was able to determine the IP address for the target host but was not able to connect. Verify the port number as well as your local and server firewall rules.
InnerException: The remote name could not be resolved: ‘http’ This error means the URL entered into the Server:Port field was prefixed with http instead of https. Since the URL did not begin with https, PTF assumed the part before the colon (:) was the server name and the part after the colon was the port number. In this case, the part before the colon is http, causing PTF to attempt to connect to a server named http.
Authentication Errors
Have you ever seen the error in Figure 12-11? PTF displays this error message if its authentication service operation failed. This does not necessarily mean that you entered the wrong password.
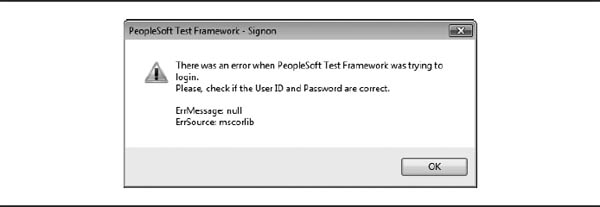
FIGURE 12-11. Generic error dialog
The service operation might fail for several reasons:
■ Invalid password
■ Invalid user ID
■ User does not have a PTF role
■ Network configuration
You need to see the XML response to know exactly why the service operation failed. Since Integration Broker writes failures to the
errorLog.html file, it is possible to review errors from a web browser by navigating to your site’s integration gateway—for example, https://fscm912pt.example.com/PSIGW/errorLog.html. I find this approach works well the first time, but browsers, proxies, and even WebLogic prefer to cache this HTML document, making it nearly impossible to reload. Furthermore, a secure PeopleSoft installation would not allow web access to the errorLog.html (or msgLog.html) file. These files may contain highly confidential information and should be tightly guarded.An alternative method is to place a “man in the middle”(see the OWASP web site at www.owasp.org/index.php/Man-in-the-middle_attack) to capture and decipher PTF’s SSL communication. The Fiddler debugging proxy works very well for this. Fiddler is a web-debugging proxy tool that appears as a standard proxy server with this difference: Fiddler logs and organizes communication for analysis purposes.
Debugging with Fiddler Fiddler is an extremely valuable debugging tool. I use it to troubleshoot all kinds of connection issues—from report node configuration to Integration Broker. You can download Fiddler from www.fiddler2.com/.
To view SSL-encrypted communication, you will need to configure Fiddler to pretend to be the server receiving the SSL request. Open Fiddler and choose Tools | Fiddler Options from the Fiddler menu bar.
Switch to the HTTPS tab and select the Decrypt HTTPS Traffic checkbox. When prompted to Trust the Fiddler Root certificate, select No. Selecting Yes will add this bogus certificate to your trusted certificate store and could pose a significant security risk. Figure 12-12 shows the Fiddler Options dialog for HTTPS.

FIGURE 12-12. Fiddler Options dialog
When configured to decrypt HTTPS traffic, Fiddler will receive SSL CONNECT requests and present its own certificate. Any application receiving this certificate will know it is untrusted and will automatically generate an error. PTF, in fact, will accept Fiddler’s certificate only if you enable Allow Untrusted SSL within PTF’s online options. After Fiddler negotiates a secure connection with the client, it logs the request and then plays the client role, connecting to the destination server using SSL as if Fiddler were the real client.
Next, while still viewing Fiddler’s options, switch to the Connections tab. The Connections tab specifies the port Fiddler uses to listen for proxy requests. Look for the box labeled Fiddler Listens On Port and make note of the port number. The default is port 8888.
After configuring Fiddler, launch PTF and configure it to use Fiddler as the proxy server by enabling the Use Proxy option, and then selecting the Proxy Information link. If Fiddler is running on your local workstation, enter the server name localhost and the port on which Fiddler listens (usually 8888). Figure 12-13 shows the Proxy Information dialog.

FIGURE 12-13. PTF Proxy Information dialog
| NOTE
Fiddler connects to upstream proxy servers using the same proxy settings as Internet Explorer. |
Click OK to dismiss the Proxy Information dialog and then attempt to connect. PTF will perform its usual login routine with Fiddler capturing all of the traffic. When PTF displays the connection error, switch to Fiddler. Fiddler’s user interface consists of a list of HTTP transactions on the left and transaction details on the right. The upper portion of the right-hand frame contains PTF request information and the lower portion contains Integration Broker responses. Figure 12-14 shows Fiddler identifying an underlying connection error as “UserID CROTH not authorized for Service Operation PTTST_LOGIN.”

FIGURE 12-14. Fiddler analysis window
| TIP
Fiddler automatically updates your web browsers to run all traffic through Fiddler. You can pause browser logging by removing the checkmark next to the File | Capture Traffic menu item. Fiddler will continue to log all traffic for applications specifically configured to use Fiddler, such as PTF. |
The following is a list of connection errors and potential solutions:
■ User password failed. (158,45) Either the user ID or the password is incorrect.
■ UserID XYZ not authorized for Service Operation PTTST_LOGIN User XYZ is not a member of one of the three PTF roles.
■ Https required for Service Operation PTTST_CONFIG Network configuration issue. SSL termination occurs before Integration Broker.
Execution Profiles
Execution profiles (also known as execution options) tell PTF how to connect to the system under test. PTF stores execution profiles within the database to which the session is connected. Each database may have several execution profiles. All PTF users connecting to that server may share these profiles. Because the information contained within an execution profile is potentially sensitive in nature, only PTF Administrators may update the profiles.
To create an execution profile, look for the very first menu item in the PeopleSoft Test Framework menu bar. The menu item is named after the Connection profile name used to connect to PTF. Since I named my profile FSCM 9.1 UAT, my menu item is named FSCM 9.1 UAT. From this menu item, select Execution Options. Click the Insert button in the upper-right corner of the dialog to create a new execution profile.
General Options
As shown in Figure 12-15, each execution profile identifies the target system, the application user credentials, a process scheduler server, as well as miscellaneous runtime options.

FIGURE 12-15. Execution Options dialog
| NOTE
As with any PeopleSoft password, execution profile passwords are stored and transported as encrypted strings. |
When you’re naming an execution profile, create a name that identifies the target system as well as the application user. This will assist PTF users in selecting the correct profile. Additionally, profile names may not contain the following characters:
&, ?, /, *, ’, “, or spaces.Unlike the PTF connection URL, the Execution Option Application URL may be HTTP or HTTPS. Although its use is strongly encouraged, SSL is not required. Potentially sensitive information may pass between the client and server while a test is being performed.
The Execution Options dialog also allows an administrator to specify whether or not to save a component or submit a process run request. When these options are set to Yes, a user can test transaction and run control pages without actually saving data. This allows a PTF user to repeat tests without database changes.
Advanced Options
The Advanced Options tab allows an administrator to configure multiple portals (EMPLOYEE, CUSTOMER, SUPPLIER, and so on) for a test. A supply chain test, for example, may use both the EMPLOYEE and the SUPPLIER portals.
The Advanced Options tab also allows an administrator to specify whether or not the execution profile supports persistent variables. Figure 12-16 shows an execution profile’s Advanced Options dialog.

FIGURE 12-16. Advanced Options dialog
PeopleTools Options
Switch to the PeopleTools tab and enter information about your local workstation. PeopleTools options are used by a small number of tests. Changing these options requires the PTF Administrator role to prevent PTF users from selecting databases and PS_HOME configurations that administrators have not approved. Figure 12-17 shows the PeopleTools tab.

FIGURE 12-17. PeopleTools tab
Maintaining Execution Profiles Online
A PTF Administrator can maintain most Execution Profile options online by navigating to PeopleTools | Lifecycle Tools | Test Framework | Define Execution Options. From this component, an administrator can maintain all options except passwords.
Creating a Test
With PTF configured, we can create a test. The test we will create inserts the PTF User role into a user profile and then confirms this change. This test will use the FSCM_UAT_CROTH execution profile we created earlier.
Figure 12-18 shows the PTF Application window showing the PTF Explorer. The server I’m using has no test cases, so the PTF Explorer is empty. Nevertheless, the Explorer does contain a single folder named
myFolder, which is a special folder that contains tests created by and visible only to the logged-in user. Even members of the PTF User role can create and maintain tests in myFolder. Since this is just a sample, we will create our new test within myFolder.
FIGURE 12-18. PTF Application window showing the PTF Explorer
Create a Folder
PTF stores tests, test cases, and logs within a folder. Select
myFolder from the PTF Explorer and then choose Create | Folder from the PTF menu bar. Name the new folder ADD_ROLE_TO_USER. As with execution profile names, folder names may not contain spaces, &, ?, /, *, ’, or ". Figure 12-19 shows the new folder within PTF Explorer.
FIGURE 12-19. PTF Explorer with a new folder
Create a Test
To create the test, select the
ADD_ROLE_TO_USER node within myFolder. Choose Create | Test from the PTF menu bar. PTF will display a new, empty test editor window (Figure 12-20).
FIGURE 12-20. New PTF test
Record Test
Open the test recorder by selecting Test | Open Test Recorder from the PTF menu bar. The PTF Recorder toolbar will appear (Figure 12-21).
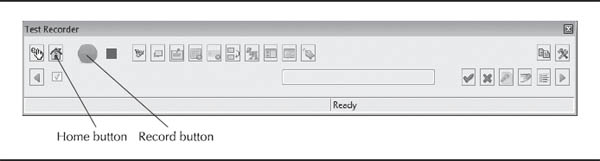
FIGURE 12-21. Recorder toolbar in Test Recorder
From the Recorder toolbar, click the Home button. When you move your mouse over the button, the Recorder toolbar’s status bar will display the text, “Start web client and go to the default URL.” The default URL is the URL identified in the execution options as the application URL.
When PTF is ready to record, the right side of the status bar will contain the text, “Ready.” If it displays the text “Browser not hooked,” it means PTF is not able to record actions within Internet Explorer. If the status bar says, “Ready,” you can click the Record button. The recorder listens for changes within the state of PeopleSoft pages and records those changes. Figure 12-22 shows the Recorder toolbar while a test is being recorded.

FIGURE 12-22. Recorder toolbar while recording a test
| NOTE
PTF will display the message “Browser not hooked” if you are using Windows 7, have User Account Controls enabled, and did not launch PTF as an administrator. To fix this issue, run PTF as an administrator. |
With the recorder running, switch to Internet Explorer and log in. The Recorder toolbar will display each action and each changed value. Notice that the Recorder toolbar displays an encrypted password rather than the plaintext password.
Complete the following actions:
1. Navigate to PeopleTools | Security | User Profiles | User Profiles.
2. Open a user profile. Since I am using the FSCM demo database, I chose AERICKSON.
3. Switch to the Roles tab.
4. Add a new row to the User Roles scroll area.
5. Enter the role name PTF User.
6. Save the component.
7. Return to the User Profile search page and reopen the User Profile you were just editing.
8. Find the PTF User role within the User Roles scroll area.
9. Drag the Verify button from the Recorder toolbar over the PTF User value. This will add a Verify step to the test case to confirm that the PTF User role exists within the user’s list of available roles.
10. Log out.
11. Click the Stop button in the Recorder toolbar.
Your test case should look something like Figure 12-23. Save the test case as
ADD_ROLE_TO_USER.
FIGURE 12-23. Test case
Clean the Recorded Test
We have now satisfied our initial requirements: Create a test that adds the PTF User role to AERICKSON and verify the results. At this very moment, this snapshot in time, the test works exactly as recorded. As recorded, the test makes some assumptions that may change and aren’t necessary for successful execution. For example, the recorder captured every menu item click. The underlying assumption is that the menu will never change. The test also assumes that the value PTF User will exist in a specific row number of the User Roles scroll area. The test may fail if someone changes AERICKSON’s roles. Our objective is to test existence, not row number.
The test contains one more significant flaw: It recorded the username and password entered when logging into PeopleSoft. My concern is not the presence of the password, because it is encrypted. The problem is that the test case is supposed to run using the Execution Profile credentials, not credentials hard-coded into the test case. Let’s fix these issues: credentials, navigation, and scroll handling, as well as other issues we identify while cleansing the test case.
Dynamic Authentication Our test case should run using the credentials specified within the selected Execution Profile, not as the user specified while recording the test case. The first step in the test case editor has a Type of Browser and an Action of Start. Valid Type values include Browser, Link, Button, Text, as well as several others. The Browser value tells PTF to perform a Browser action. The Start action tells PTF to launch Internet Explorer and navigate to the URL specified within the selected Execution Profile. To transform this step into one that uses the Execution Profile’s authentication options, change the Action from Start to Start_Login. Now that authentication is handled by the browser action, delete the next three steps: Text, Pwd, and Button.
Why does PTF insert a Start action instead of a Start_Login action? The answer: flexibility. If your system is configured for anonymous access, you may want to test components without logging into PeopleSoft.
Direct Component Navigation If your test case contains active steps that have
id=pthnavbca_PORTAL_ROOT_OBJECT in the Recognition column, then odds are very good that your test case uses menus to navigate to components. It is important to note whether the menu navigation steps are active. With some recordings, I noticed that PTF correctly identifies the target component and inserts menu navigation steps, but marks them as inactive, preferring the more direct Page/Prompt action. If PTF properly inserted a Page/Prompt action with Recognition set to MAINTAIN_ SECURITY.USERMAINT.GBL, then your test case will bypass menus and go direct to the component. If you fall into the first category, the one without a Page/Prompt action, then identify the first row containing id=pthnavbca_PORTAL_ROOT_OBJECT. If you deleted the extraneous credential information, this step should be the second step. Change the Type column value to Page and the Action to Prompt. In the Recognition column, enter MAINTAIN_SECURITY.USERMAINT.GBL. This represents the menu, component, and market of the target component. Enter update in the value column. We want PTF to navigate to the component’s search page in update mode as opposed to add or correct history mode. Delete the remaining Link rows that identify the component’s menu navigation path.Correct Search Page Handling A search page allows a user to find and select a specific transaction. Identifying a transaction usually involves entering information into search keys, clicking the search button, and then selecting a particular row from the search results. Unless you are testing a search page, configure your test case to use Level 0 search keys and to use the Page/PromptOk action instead of the
#ICSearch Button/Click action. In this test case, the #ICSearch button immediately follows the AERICKSON row (the fourth row). For that #ICSearch row, change the Type to Page and the Action to PromptOk. Delete the value in the Recognition column.Returning to a Search Page When recording the test, we clicked the Return To Search button to reload the AERICKSON user profile. PTF recorded that Return to Search action as a
#ICList button click. This is acceptable, but we can do better. We don’t actually want to return to the search results. Rather, we want to relaunch the component as if performing a brand new search. Change the #ICList row to a Page/Prompt action that navigates to MAINTAIN_SECURITY.USERMAINT.GBL in update mode (just like the initial navigation).Depending on how PTF recorded your test, the row following the
#ICList row contains either a Page/PromptOk action or a Link/Click action. Regardless of the current action, change it to a Text/Set_Value action. Set the Recognition field to Name=PSOPRDEFN_SRCH_OPRID and enter AERICKSON into the value field. We want to perform the same sequence as our initial search.Add a new row just below the Text/Set_Value row you just edited. Set the Type to Page and select PromptOk for the Action.
Insert a Page/Go_To action immediately following the Page/PromptOk action. Set the Recognition field to
Roles. This action tells PTF to switch to the Roles tab within the component.Scroll Handling The Text/Verify action within our test case expects to find the value
PTF User in row 38. As previously mentioned, that may or may not be the correct location. The test’s only stated requirement is that PTF User exist within the User Roles scroll area. Whether it is in row 38 is irrelevant.We just finished configuring the Return to Search behavior. The step immediately following the Return to Search and Page/Go_To Roles steps is an Image/Click step that commands PTF to click the View All link within the User Roles scroll area. We clicked this link while recording the test case to view row 38. Effective scroll handling does not require this step. Replace the existing Image/Click action with a Scroll/Key_Set action. Make the following changes to the Scroll/Key_Set row:
■ Set the Scroll ID column to 1.
■ Change the Recognition field to
Type=Text;Name=PSROLEUSER_ VW_ROLENAME.■ Set the Value field to
PTF User.The Scroll/Key_Set action configures PTF to perform a scroll-based key search. When creating your own scroll searches, be sure to create a row for each key within the Scroll area.
Insert a row immediately following the Scroll/Key_Set row and configure it as follows:
■ Set the Scroll ID to 1.
■ Set Type to Scroll.
■ Set Action to Action.
■ Enter
ret=&Scroll1 into the Recognition field.■ Enter
sel into the Value field.This new row commands PTF to execute the key-based search that we configured through the Scroll/Key_Set steps. The phrase
ret=&Scroll1 tells PTF to place the return value of the selection action (the row’s index) in a variable named &Scroll1.The final step is to configure the Text/Verify step to use the row identified by the Scroll/Action row. The row immediately following the Scroll/Action row should have a Recognition value of
Name=PSROLEUSER_ VW_ROLENAME$xx, where xx represents a row number. Change the Recognition field to this: Name=PSROLEUSER_VW_ROLENAME&Scroll1.The recorded test case initially contained 22 steps. After cleanup, we are down to 18 steps. Figure 12-24 shows the updated PTF test case.

FIGURE 12-24. Updated PTF test case
Run a Test
Run the test by choosing Test | Run from the PTF menu bar. PTF will launch Internet Explorer and run through each of the recorded steps. Upon completion, PTF will open the test execution log for review. Confirm that the result field contains the text “Pass.” If it doesn’t, review the log for errors, resolve any issues, and then rerun the test. Figure 12-25 shows part of the execution log.
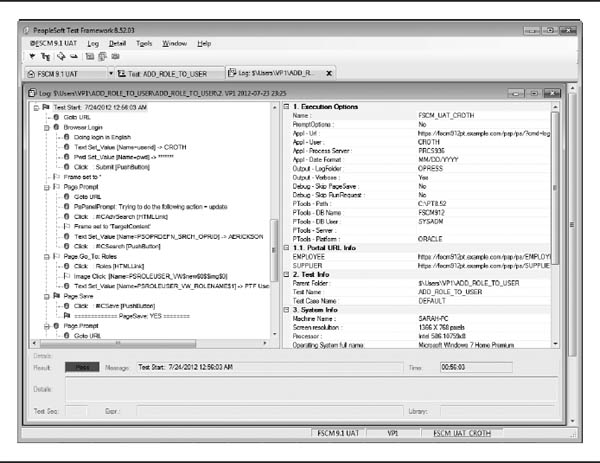
FIGURE 12-25. Test case execution log
| TIP
Does your site have a lot of test cases and nested test hierarchies? When communicating with colleagues, rather than sending the navigation path, right-click the test case and chose Copy Link To Clipboard. Send the clipboard contents to your coworker, instructing him or her to paste the contents into the Quick Open dialog available by choosing the Window | Quick Open PTF menu item. |
Stop on Error
If we attempt to rerun the
ADD_ROLE_TO_USER test case, PTF will insert the role PTF User a second time. This insertion will generate a unique constraint error when PTF attempts to save the component. We can avoid this problem by raising an error if the PTF User role exists and configuring PTF to stop when it encounters an error. To determine whether the role already exists, locate the first Page/Go_To action and insert two rows below that action. In the first row, do the following:■ Set the Scroll ID to 1.
■ Change the Type to Scroll.
■ Select the Action of Key_Set.
■ Enter a Recognition of
Type=Text;Name=PSROLEUSER_VW_ ROLENAME.■ Set the Value field to
PTF User.In the second row, do the following:
■ Set the Scroll ID to 1.
■ Change the Type to Scroll.
■ Select the Action of Action.
■ Enter a Recognition of
&ret=&Scroll1.■ Set the Value field to
not.Before running the test, choose Debug | Stop on Error from the PTF menu bar. Now when the test runs, it will exit if AERICKSON already has the PTF User role. Figure 12-26 shows the modified test case.

FIGURE 12-26. Test case that uses the not action
| NOTE
Rather than expecting each user to configure Stop on Error, run the test from a shell test and add an Execution/StopOnError step. |
Reviewing Logs
PTF creates and retains logs of important test case information. PTF’s log viewer presents this information in a graphical hierarchy showing the status of each step within a test case. The first step in our
ADD_ROLE_TO_USER test case, for example, contains the action Browser/Start_Login. PTF’s log viewer expands this step into two hierarchical branches in a tree, the login having multiple child branches. Each node within the tree contains an icon depicting the step’s execution status. This icon makes it visually easy to identify errors within a PTF log.When a script fails, PTF records a screenshot of the active page and saves it with the offending action in the test execution log. You may view the screenshot at any time by double-clicking the LogScreenShot node within PTF’s log viewer. Figure 12-27 shows a log with three separate executions, each with a different result: a script failure, a success, and a step failure.

FIGURE 12-27. PTF log viewer
Using PTF to Verify and Reset Configurations after Upgrade
After upgrading, you may find that a patch contains information that overwrites site-specific configurations. For example, a patch that includes node configuration changes may overwrite the Default User ID of the WSDL_NODE. We can record a simple PTF test case to verify this type of configuration reset and run that test after applying maintenance. Figure 12-28 shows a simple eight-step test that verifies the Default User ID of the WSDL_NODE.

FIGURE 12-28. WSDL_NODE validation test
Using conditionals, we can configure this test and actually change the value of the WSDL_NODE if PTF discovers the value is incorrect. Figure 12-29 shows the altered test case. Notice that the test case performs a save using Integration Broker’s custom save button and then performs a Verify step to confirm the results.
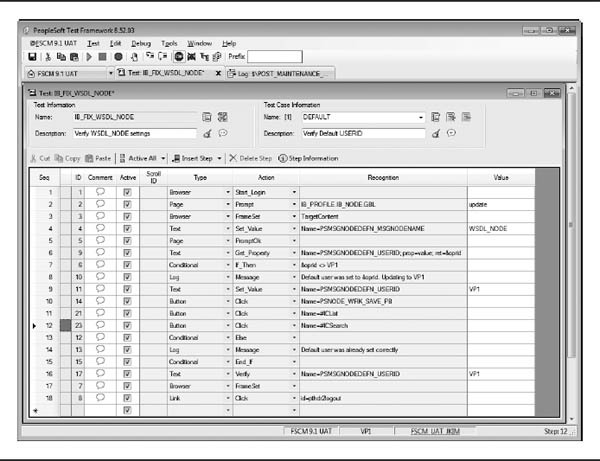
FIGURE 12-29. Test case that resets the WSDL_NODE
Saving an Integration Broker definition displays a Save confirmation dialog. Configuring Message Recognition allows PTF to respond to such dialogs. To access Message Recognition, click the second button to the right of the test name—the icon with a green checkmark. Figure 12-30 shows the Message Recognition dialog for the WSDL_NODE reset test case.

FIGURE 12-30. Message Recognition dialog
Library Tests
A library is a reusable test case fragment. As you develop tests and recognize common patterns, you can extract those patterns into test libraries. Test libraries allow test editors to adhere to the Don’t Repeat Yourself (DRY) software development best practice. The DRY principle simplifies tests by minimizing the amount of steps per test and reduces test maintenance by centralizing common actions.
Create a test library as you would any other test. To designate the test as a library, open the test’s properties and check the box labeled Library Test. Optionally, enter any parameters other tests should pass to this test. Figure 12-31 shows a library test that copies the default Workflow Operator ID into a variable for use by other tests.

FIGURE 12-31. Example PTF library test
Call a PTF library by inserting a Test/Exec action step into your PTF test case. When inserting a test library, PTF will add an ellipsis (…) button to the Recognition field. Click the button to select a library and test case, or type the library name into the Recognition field and enter the test case name into the Value field. For tests that contain parameters, enter them in the Recognition field along with the library name using this format:
Do not include spaces after the semicolons. A library designed to use parameters references them in Recognition and Value fields using the syntax
%param.FirstName%.When calling a library, make sure you understand its runtime context and place the library within your test case accordingly. For example, if you create a test case that verifies a page value against a library’s variable and the library requires navigation, call the library first. Likewise, when writing libraries, consider and document the runtime context. If a library includes navigation, note this in the comments.
Automated Test Suites
PTF attempts to emulate the online user experience: entering data, clicking buttons, pausing for results, and so on. A test pretty much consumes the workstation (or remote desktop session) of the logged-in user. Rather than opening and running tests individually, PTF allows editors to group PTF tests into shell tests. A shell test is a controller test that sets execution options and manages test execution flow. In this regard, a shell test is synonymous with the more broadly recognized term test suite.
Creating Shell Tests
Create a shell test by selecting a folder in the PTF Explorer tree and then choosing Create | Shell Test from the PTF menu bar. The shell test editor looks very similar to other test editors, but it includes fewer actions. As controllers, shell tests may perform only process flow actions, such as executing other tests or queries or setting variable values.
When you are creating shell tests to serve as traditional test suites, the best practice is to create each test as an autonomous unit, logging in and out of the browser within each test. Alternatively, shell tests may comprise multiple test case libraries, acting as a test case composition or orchestrator.
Test Case Reporting
PTF includes reports for identifying test coverage and test change impact as well as viewing test details and test comparisons. A PTF administrator can access these reports from the PeopleTools | Lifecycle Tools | Test Framework navigation. Of particular note are the coverage and change impact reports. Both of these reports search for tests related to project definitions. The coverage report identifies items within a project that are not “covered” by tests—which means those items are not tested. The change impact report identifies tests that may be affected by a change project. For example, if a change project removes a component from a menu, Page/Prompt actions using that menu/component combination will fail.
Conclusion
In this chapter you learned how to record, modify, and run PTF tests. Follow all the normal best practices when writing tests. Most important, Primum non nocere: First, do no harm. Next time someone in your organization performs functional testing, instead of running that test from a printed script in a notebook, record the test. Recording the test will help your organization build a test library and reduce your standard functional testing effort.
..................Content has been hidden....................
You can't read the all page of ebook, please click here login for view all page.