

CHAPTER
4
Data Archive Manager
 ven though a database has an unlimited appetite, we often work in an environment with limited resources. Large amounts of data can have a significant impact on disk, memory, and CPU utilization. When your tables grow too big for their disks, you have some decisions to make: archive or add more resources?
Data Archive Manager is a tool you can use for moving online transaction data into online history tables. The point of this migration is to free important online transaction processing (OLTP) resources while continuously maintaining access to historical data.
In this chapter, you will learn how to use Data Archive Manager to move data from transaction tables into history tables. We will first run through an archive and restore process using a delivered Data Archive Manager definition and then we will build our own.
Running a Delivered Data Archive Manager Process
To archive a transaction effectively, an analyst must identify the full ancestry of a transaction (parent/child relationships) as well as any outstanding related transactions. For example, archiving vendor information involves identifying the vendor address, tax information, and so on, as well as identifying any open purchase orders, requisitions, and such against that vendor. Considering, for example, that my Financials/Supply Chain system has more than 65,000 tables, properly identifying these relationships is a daunting task. Fortunately, several PeopleSoft modules include their own Data Archive Manager definitions.
Let’s review the vendor Data Archive Manager configuration to get a better understanding of Data Archive Manager, and then run it to see what happens.
A Data Archive Manager definition consists of the following:
■ History tables
■ Archive objects
■ Application engine programs (optional)
■ Archive queries
■ Archive templates
We will get a taste of history tables now, but I’ll save a more detailed discussion until we build them (later in this chapter).
PeopleTools includes a Data Archive Manager Homepage (Figure 4-1). To use this homepage, log into your PeopleSoft online application as a PeopleTools user (a user with the PTPT1200 permission list). If your PeopleSoft installation is using the older 8.4+ left-hand navigation menu, then use the menu to expand the nodes PeopleTools | Data Archive Manager and then select Homepage. Otherwise, from the upper left-hand corner, select Main Menu | PeopleTools | Data Archive Manager | Homepage.

FIGURE 4-1. Data Archive Manager Homepage
Archive Objects
From the Data Archive Manager Homepage, click the Manage Archive Objects link. Figure 4-2 shows a partial screenshot of the Vendor archive object. An archive object contains a collection of mappings that identify source transaction record definitions and their corresponding target history record definitions.

FIGURE 4-2. Vendor archive object
To ensure a complete transaction archive, archiving data starts with a base, or header, record. Oftentimes the base record is the Level 0 record for a component. By definition, child, or detail, records contain the same keys as the base record plus at least one additional key field. Data Archive Manager will use the keys from the base record to identify rows in child records. The base record in an archive object represents that Level 0 record. Each archive object can have only one base record.
When defining an archive object, be sure to include all descendant record definitions. A descendant record left in a transaction table without a corresponding parent is considered an orphan. Likewise, an archived transaction without all of its descendant records is incomplete.
Archive Templates
Return to the Data Archive Manager Homepage by selecting the Homepage link in the header menu breadcrumb trail. After arriving on the homepage, select the Manage Archive Templates link. Figure 4-3 shows the
AP_VNDR archive template.
FIGURE 4-3.
AP_VNDR archive templateArchive templates describe how to archive data. They associate archive objects with selection queries as well as specify pre- and post-processing programs. Notice that this vendor archive template includes five selection queries. When we run this template, we will use only one of those queries. Each query offers a different mechanism for identifying rows to archive. Archive template queries are PeopleSoft queries that were saved as query type Archive.
| TIP
When searching for archive queries in Query Manager, switch to Advanced Search and change the Query Type field to Archive. The basic name search does not return Archive queries. |
Archive Processing
There are four types of archive processes:
■ Selection Copy items to history tables.
■ Delete Delete items from main transaction tables.
■ Rollback Copy items from history tables to main transaction tables.
■ Remove from History Delete items from history tables.
The selection process type uses a selection query with bind variables. All other process types require a batch identifier generated from a prior selection process. There is no right or wrong order for archive processing. The only requirement is that you start with selection processing. Generally speaking, an archive process follows this flow:
1. Selection
2. Delete
A restore follows this flow:
1. Rollback
2. Remove from history
Selection Processing
Return to the Data Archive Manager Homepage and select the Archive Data To History link. Create a new run control for your archive process. I recommend using a naming convention that identifies your archive template, selection method, and selection parameters followed by the process type. In Figure 4-4, I created a run control named
AP_VNDR_SETID_SHR03_SELECT to identify that I am running the AP_VNDR template that selects SetID of SHR03.
FIGURE 4-4.
AP_VNDR_SETID_SHR03_SELECT run controlOn the run control page, click the Define Binds link to enter query criteria. The View Details link displays a list of each record to be archived as well as the selection SQL and the number of affected rows.
After running the archive process, you can query the corresponding history tables to view copied data. When I ran this process in my Financials and Supply Chain Management (FSCM) 9.1 demo database, Data Archive Manager added three rows to the
PS_AP_ARC_VENDOR_H table with the batch number 1. My database actually includes four vendors with a SetID of SHR03, but only three were selected. This is because one of the vendors has open, related transactions. It would not be wise to archive and delete a vendor required to finalize a related transaction. Keep this in mind when you’re writing your own selection queries.| NOTE
Selection processing only copies rows into history tables. It does not delete them from the main transaction tables. |
Delete Processing
Delete processing is nearly identical to selection processing. Use the breadcrumb (or left-hand) menu to navigate to PeopleTools | Data Archive Manager | Archive Data to History. Then do the following:
1. Create a new Run Control ID.
2. Select the
AP_VNDR archive template.3. Choose a Process Type of Delete.
4. Select an existing Batch Number.
Figure 4-5 shows the
AP_VNDR template configured for delete processing. Running this process will delete previously selected rows from the main transaction tables. Click the View Details link to review the SQL statements that Archive Manager will use to perform the deletes.
FIGURE 4-5. Data Archive Manager delete processing
Running this process on my FSCM 9.1 demo database deleted three rows from the
PS_VENDOR table.Rollback Processing
Rollback processing copies rows from history tables back into transaction tables. The only difference between a rollback run control and a delete run control is the process type. For the rollback run control, select a Process Type of Rollback. Figure 4-6 shows my Rollback run control.
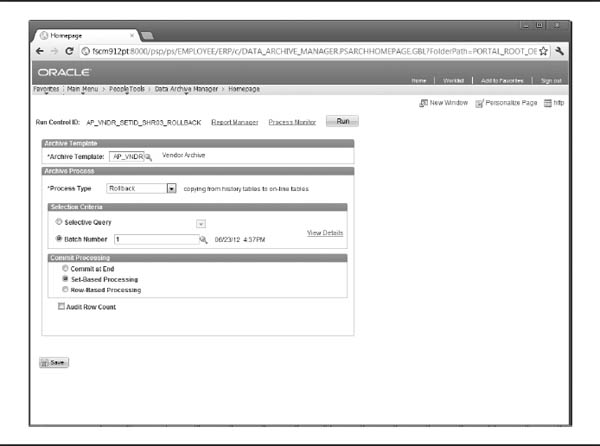
FIGURE 4-6. Rollback processing
When I ran this process against my FSCM 9.1 demo database, it copied three rows from the
PS_AP_ARC_VENDOR_H table back into the PS_VENDOR table. I could then navigate to Vendors | Vendor Information | Add/Update | Vendor to see all four vendors from SetID SHR03.At this point, both my history tables and my transaction tables contain copies of the same data. What happens next depends on what I need:
■ If my intention for restoring is just to review the data, but not update it, I may choose to leave the historical data alone for now. Later, I can rerun the delete process to remove the rows from the transaction tables.
■ If I intend to begin using the restored data like any other live data, I can either consider the historical data as versioned history or delete the historical data.
■ If I choose to keep the historical data as a type of versioned history, however, it is important that I recognize that any rollback of that versioned history will overwrite the current transaction data.
Depending on the selection schemes, keeping versioned history in this manner can get messy.
| CAUTION
Delete processing must precede rollback processing. Rollback processing performs inserts. Failure to perform delete processing will result in unique constraint violations. Prior to running a rollback, make sure you run a delete. Running a delete twice has no negative impact. Once the rows are deleted, they don’t exist. Successive deletes will just result in zero rows processed. |
Remove From History Processing
If you decide to copy rows from history tables back into transaction tables, it is a good idea to purge those rows from the history tables. This helps you avoid the potential scenario in which someone restores a prior history batch over updated transaction data. Figure 4-7 shows the Remove From History process type. It is the same interface used in delete and rollback processing, except the Process Type field was changed to Remove From History.

FIGURE 4-7. Remove From History processing
| CAUTION
Running Remove From History deletes all data associated with that batch. The only way to recreate that batch is to rerun the selection process with the same criteria. Considering that most selection criteria involve a point in time, re-creating that exact batch may be very difficult, if not impossible. |
Auditing Archives
On the Data Archive Manager Homepage, you will see the Audit Archiving link. If you click this link, the Audit Archive page displays every table touched by archive processing including the template, date/time, process, batch number, operator ID, run control ID, process instance, and SQL.
Creating Your Own Archives
The remainder of this chapter will show you how to create your own archive processes. Creating an archive process requires that you have exceptional knowledge of the target transaction as well as all related transactions. For example, archiving personal data records without archiving related job records would result in orphaned job data.
Archiving User Profiles
The user profile is a critical component of PeopleSoft transactional systems. Several transactions within a PeopleSoft application maintain audit history through a user profile foreign key, and deleting user profiles would eliminate this audit history. If your company has a relatively stable workforce and changes to user profiles are rare, you may have no need for archiving user profiles. On the other hand, if your workforce fluctuates drastically, your user profile tables may contain more inactive than active users. If your organization fits this latter category, you may be interested in finding a way to move this seemingly unnecessary data out of the main security tables.
| CAUTION
PeopleSoft ensures uniqueness of user profiles through the user profile primary key. If you move inactive profiles to history tables, you run the risk of introducing duplicate user profiles. |
The delivered
userexport.dms file gives us insight into the user profile relational model. This script includes the following record definitions:
Most of the records follow the standard parent/child relational design pattern, with
PSOPRDEFN being the clear ancestor of the user profile hierarchy. Unfortunately, few transaction relational models follow a perfect ancestral design pattern with only one forefather. The user profile data model is no exception. Consider PSOPERDEFN and PSUSERATTR, for example. Both records PSOPRDEFN and PSUSERATTR have the same key structure: OPRID. Since PSUSERATTR would not exist without PSOPRDEFN, we can clearly consider PSUSERATTR a dependent of PSOPRDEFN. Data Archive Manager doesn’t see it this way, however. It expects to start with a single record, known as the base record, and work downward. Here is Data Archive Manager’s relational rule: Every record in a data archive object must include the same key structure as the base record plus at least one additional key field.Data Archive Manager does not accept sibling relationships. When adding new rows to a data archive object, PeopleCode will test the key structure of each record to ensure that the keys conform to this relational rule.
Data Archive Manager just needs “law-abiding” metadata. Whether or not the metadata matches the database’s version of the relational model is irrelevant. To work around this rule, we can create updateable views and register those views as the archiving records. Before building our history tables, let’s create the required archive record metadata.
Creating Conforming Metadata
As mentioned, the records
PSUSERATTR and PSROLEUSER do not conform to the Data Archive Manager base record relational rule. PSUSERATTR does not have enough keys and the PSROLEUSER key has the wrong field name. We will satisfy Data Archive Manager by creating views for each of these nonconforming record definitions.1. In Application Designer, open the
PSUSERATTR record definition.2. From the Application Designer menu bar, choose File | Save As.
3. Name the new record
OP_USERATTR_V.4. When prompted to copy the record’s PeopleCode, select the No button.
5. Double-click the
HINT_QUESTION field and mark it as a key field. No, HINT_QUESTION won’t become a key field within the database. This is just metadata and exists solely for PeopleTools’ benefit. It will have no impact on the way the PSUSERATTR table operates.6. Switch to the Record Type tab and change the Record Type to SQL View.
7. Select the Click To Open SQL Editor button and enter the following SQL:
Figure 4-8 shows the new
OP_USERATTR_V record definition.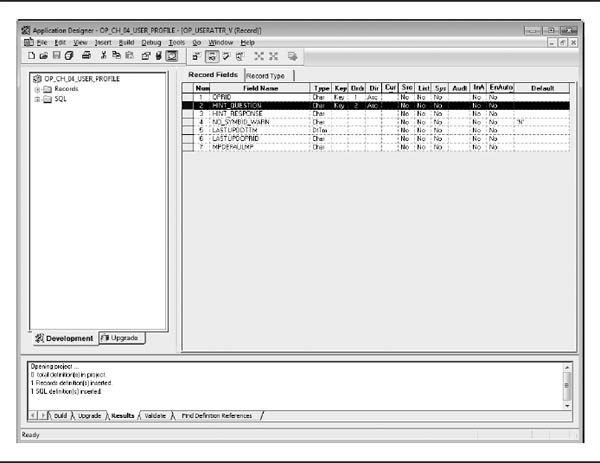
FIGURE 4-8.
OP_USERATTR_V record definition8. In similar manner, open the record definition
PSROLEUSER and save it as OP_ROLEUSER_V. The key structure for this record is valid, but the first field name does not match the base record’s key field name.9. From the Application Designer menu bar, select Insert | Field.
10. In the selection criteria name field, enter OPRID.
11. Select the Insert button once to populate the search results list, and then double-click the OPRID field in the search results list. This will insert the OPRID field into the OP_ROLEUSER_V record definition.
12. From the record’s field list, now four fields long, move the OPRID field to the number one position.
13. Double-click the field to view its properties and mark the field as a Key field.
14. After configuring the OPRID field, select the ROLEUSER field and remove it from the OP_ROLEUSER_V record definition. Figure 4-9 shows how this record definition should appear after making these field changes.
FIGURE 4-9.
OP_ROLEUSER_V record definition
15. Switch to the Record Type tab and change the type to SQL View.
16. Open the view’s SQL editor and enter the following SQL:
The
userexport.dms file lists one more nonconforming table: PS_ROLEXLATOPR. This table is not directly used by the User Profile component because the key structure does not conform to the User Profile component’s key structure. The User Profile component uses the PSROLEXLATOPRVW view instead.17. Open the record definition
PSROLEXLATOPRVW and save it as OP_ROLEXLATOP_V.18. Mark the
ROLEUSER field as a key and save the definition. Figure 4-10 shows the OP_ROLEXLATOP_V record definition.
FIGURE 4-10.
OP_ROLEXLATOP_V record definitionBuilding History Tables
History tables are clones of regular transaction tables that include the
PSARCHIVE_SBR subrecord. To create a history table for the PSOPRDEFN transaction table, follow these steps:1. In Application Designer, open the record definition PSOPRDEFN.
2. From the Application Designer menu bar, choose File | Save As. Name the record
OP_OPRDEFN_H.3. Choose Insert | Subrecord. Select the subrecord
PSARCHIVE_SBR.4. Move the
PSARCHIVE_SBR subrecord to the beginning of the field list (position number 1).5. Save the new record definition.
Figure 4-11 shows this new record definition.

FIGURE 4-11.
OP_OPRDEFN_H record definitionRepeat this same process for the record definitions listed in the following table, naming each according to the table below. When prompted to copy a record’s PeopleCode, choose No. The records with names ending in
_V and VW are views, not tables. When cloning them, be sure to change the Record Type to SQL Table.
After defining these records (views and history tables), assuming you added them all to the same project, build the project by selecting Build | Project from the Application Designer menu bar. Choose the build options Create Tables and Create Views.
| NOTE
Some companies require DBA approval before you can build record definitions. If you find yourself in this category, choose the Build Execute Option of Build Script File. Otherwise, choose Execute And Build Script. |
Archive Object Metadata
With our history tables defined, we can create an archive object to map each source table to a history table.
1. Log into your online PeopleSoft application and use the PeopleSoft navigation menu to open PeopleTools | Data Archive Manager | Manage Archive Objects.
2. Add the new value
OP_USER_PROFILE.3. Set the description to User Profiles and add the following record mappings, being sure to mark PSOPRDEFN as the Base Record:
Figure 4-12 shows the new archive object.

FIGURE 4-12.
OP_USER_PROFILE archive objectCreate an Archive Query
The archive object maps the movement of data from transaction tables into history tables. Next we create a query to tell Data Archive Manager which rows to move from the transaction tables into the history tables. Our example will use the
LASTSIGNONDTTM field to archive rows for all users that haven’t logged in since a specified date.| NOTE
The example criterion is very simplistic and ignores important facts, such as legitimate medical leave, suspension, and so on. We recommend that you add more criteria based on your organization’s business requirements. |
1. Log into your PeopleSoft application and navigate to Reporting Tools | Query | Query Manager.
2. Create a new query. Add the record
PSOPRDEFN.3. On the query tab, select the field
OPRID.4. Add the following criteria to the query:
LASTSIGNONDTTM < prompt. The prompt should have a Date type and a format of None. The query’s SQL should resemble this:

5. Save the query. Name it
OP_USER_PROFILE_ARCH_ALL.6. Set the Query Type to Archive.
7. Set the Owner to Public.
The Query Type and Owner attributes are critical. Figure 4-13 shows the query’s attributes.
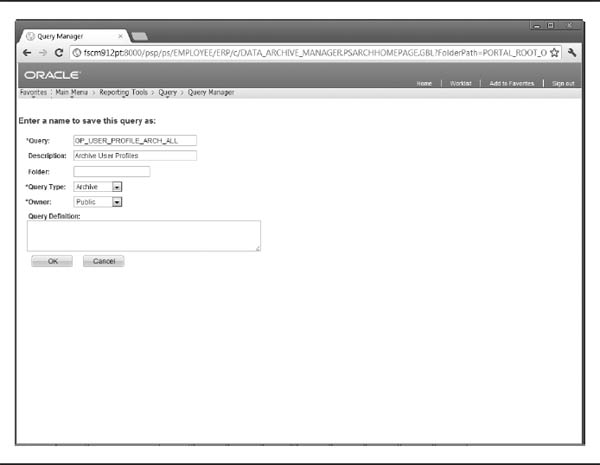
FIGURE 4-13. Query
OP_USER_PROFILE_ARCH_ALL save propertiesArchive Template Metadata
The archive template unites the various pieces of archive metadata to tell Data Archive Manager exactly how to run an archive or restore process. The template associates the transaction/history table mapping (archive object) with our new selection query.
Now, create a new archive template and name it
OP_USERP. Set the Archive Object to OP_USER_PROFILE and select the Base Object checkbox. Figure 4-14 shows the new archive template.
FIGURE 4-14.
OP_USERP archive templateArchive templates also allow for per-process pre- and post-application engine programs. A preprocessing program allows for complex selection rules. For example, I could write a multiple-step Application Engine program that writes base record keys to a table. The archive selection query would then join to this table, determining the rows to archive. After the archive process finishes, a post-processing Application Engine program would clear out the selection table to prepare it for the next archive process.
Run the Archive Process
To run the User Profile Archive process, navigate to PeopleTools | Data Archive Manager | Archive Data To History. Then do the following:
1. Create a new run control named
OP_USER_PROFILE_SELECT.2. Select the Archive Template
OP_USERP.3. Choose the Selective Query
OP_USER_PROFILE_ARCH_ALL (the only one in the list).4. Click the Define Binds hyperlink within the Selection Criteria section of the run control page.
5. Within the Define Binds dialog, click the Reset Query Bind Variables button. This will allow you to specify a value for the Last Signon Date query prompt field.
My demo database contains profiles for users who haven’t logged in since October 2001. To archive all users who haven’t logged in since December 31, 2002, I select a Last Signon Date of 01/01/2003. Figure 4-15 shows this new run control.

FIGURE 4-15.
OP_USER_PROFILE_SELECT run control definitionAfter running the selection process, both my transaction and history tables now contain the same selected user profiles. At this point, as long as a user profile is not locked, I can still use it to gain access to my system. To remove the selected rows from the transaction tables, I will rerun the archive process, but this time I’ll select the delete process type.
Delete processing does not use the selection query. This means I can actually log in as one of the archived users, updating the last sign-on time, and then run the delete process to delete that previously archived user. Of course, any changes made to the user between archive and deletion would be lost. Instead of a selection query, delete processing requires the selection batch number. You can find the batch number in the process scheduler message log for the selection process.
Archiving Process Scheduler Data
The process scheduler polls the primary process request table on interval to identify queued processes. Keeping the process scheduler tables lean generally improves process scheduler performance. The problem with purging process scheduler information is that many batch processes log the process instance. If, upon reviewing data, you discover a discrepancy and want to review the batch parameters, message log, and so on, chances are pretty high that the process scheduler data is gone. An alternative that may offer the same performance improvement as purging process scheduler tables is to move that data into history tables.
Creating Conforming Metadata
PeopleTools delivers a Data Mover script named
prcsclr.dms that administrators use to purge the process request tables. This Data Mover script contains a list of all the tables we need to archive. Much like the prior user profile example, some of the process scheduler tables contain nonconforming key structures. A conforming key structure is a composite key that contains the same key fields as the base record plus at least one additional field. Before creating history tables, we must create updatable views for these nonconforming records.We will use
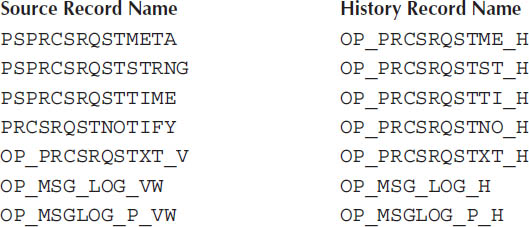
PSPRCSRQST as our base record. Most of the records listed in prcsclr.dms contain the same key field as PSPRCSRQST: the PRCSINSTANCE field. Some, however, use the field PROCESS_INSTANCE, whereas others have no key at all. Of those that have the same key field, some don’t have a composite key. Once again, we will generate conforming key metadata by creating views for each record that has a different key structure.To create the first view, do the following:
1. Open the record definition
PSPRCSRQSTTEXT in Application Designer.2. Choose File | Save As and name the new record
OP_PRCSRQSTXT_V.3. Double-click the PRCSINSTANCE field to view the field’s properties and mark it as a key field.
4. Do the same for field
RQSTTEXTTYPE. In Figure 4-16, the OP_PRCSRQSTXT_V record definition shows both fields marked as keys.5. Switch to the Record Type tab and change the type to SQL View.
6. Select the Click To Open SQL Editor button and enter the following SQL:
7. Do the same for each record in the following table:
a. Save it under the name given in column two.
b. Mark field 2 as a key field.
c. Change the Record Type to SQL View.
d. Set the SQL using the value in column three.


FIGURE 4-16.
OP_PRCSRQSTXT_V record definitionFigure 4-17 shows the new
OP_PRCSQUE_VW record definition with appropriate key definitions.
FIGURE 4-17.
OP_PRCSQUE_VW record definitionTwo of the record definitions listed in
prcsclr.dms use a different field definition to represent the same key data. We will use SQL views to create matching metadata so Data Archive Manager can correctly select related rows.The
MESSAGE_LOG and MESSAGE_LOGPARM record definitions have keys, but their names are different from their related record definitions. To resolve this issue, we will clone the MESSAGE_LOG and MESSAGE_LOGPARM records into views and replace the PROCESS_INSTANCE field with PRCSINSTANCE. The process is very similar to creating the OP_PRCSRQSTXT_V view. When adding the PRCSINSTANCE field, be sure to make it the first field in the list and mark it as a key. Figure 4-18 shows the new OP_MSG_LOG_VW clone of the MESSAGE_ LOG record definition.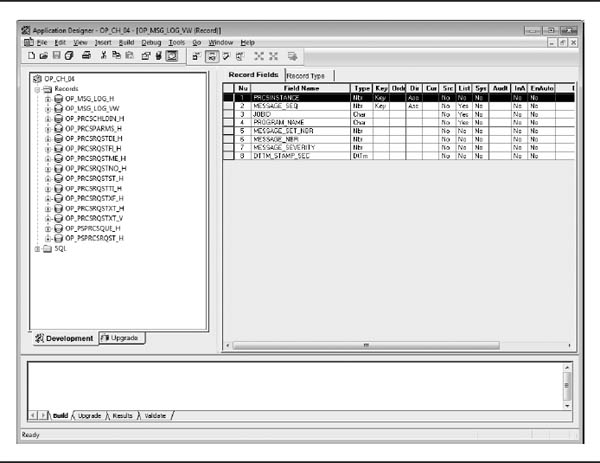
FIGURE 4-18.
OP_MSG_LOG_VW record definitionChange the Record Type of
OP_MSG_LOG_VW to SQL View and insert the following SQL:Follow the same steps we used to clone
MESSAGE_LOGPARM into OP_MSGLOG_P_VW, replacing the PROCESS_INSTANCE field with PRCSINSTANCE. Then add the following SQL to the view definition:Building History Tables
To configure the Data Archive Object properly, we must create a history table for each record listed in the
prcsclr.dms script. Open Application Designer and follow these steps:1. Open the record definition
PSPRCSRQST.2. Choose File | Save As. Name the record
OP_PSPRCSRQST_H.3. Choose Insert | Subrecord. Select the subrecord
PSARCHIVE_SBR.4. Move the PSARCHIVE_SBR subrecord to the beginning of the field list (position number 1).
5. Save the new record definition.
Figure 4-19 shows this new record definition.

FIGURE 4-19.
OP_PSPRCSRQST_H history record definitionRepeat this same process for the record definitions listed in the following table, naming each according to names in the table. When prompted to copy a record’s PeopleCode, choose No.

| NOTE
The last three definitions were views. When you’re creating history tables for these views, be sure to change the history table’s Record Type to SQL Table. |
After you’ve defined these records (views and history tables), assuming you added them all to the same project, build the project. Choose Build | Project. Then choose the build options Create Tables and Create Views.
Archive Object Metadata
With our history tables defined, we can create an archive object containing each definition. Log into your online PeopleSoft application and use the PeopleSoft menu to navigate to PeopleTools | Data Archive Manager | Manage Archive Objects. Add the new value
OP_PRCS_SCHED. Enter the description Process Scheduler Requests and create the following record mappings. Be sure to mark PSPSPRCSRQST as the base record.

Figure 4-20 shows the configured archive object.

FIGURE 4-20.
OP_PRCS_SCHED archive objectCreate an Archive Query
Log into your online PeopleSoft application and navigate to Reporting Tools | Query | Query Manager. Then do the following:
1. Create a new query and add the record
PSPRCSRQST.2. Select the field
PRCSINSTANCE.3. In the Criteria tab, add Not In List criteria to field RUNSTATUS using the list values 5, 6, 7, 16. These are process statuses that we do not want to archive.
4. Add Less Than criteria to field
RUNDTTM.5. Choose Prompt for expression 2.
6. Create the new prompt with a Type of Date and a Format of None. After configuring the query, its SQL should resemble this:

7. Save the query as Type Archive and set the Owner to Public. Name the new query
OP_PSPRCSRQST_ARCH_ALL.Create an Archive Template
In your PeopleSoft application online, navigate to PeopleTools | Data Archive Manager | Manage Archive Templates, and then do the following:
1. Create a new Archive Template named
OP_PRCS.2. Choose the archive object
OP_PRCS_SCHED and mark it as the base object.3. Select the query
OP_PSPRCSRQST_ARCH_ALL. Figure 4-21 shows the new OP_PRCS archive template.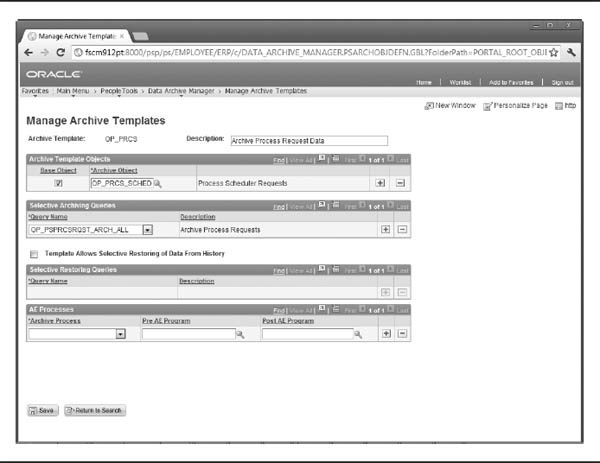
FIGURE 4-21.
OP_PRCS archive templateRun the Archive Process
To run the Process Scheduler archive process, navigate to PeopleTools | Data Archive Manager | Archive Data to History; then do the following:
1. Create a new run control named
OP_PSPRCSRQST_SELECT.2. Select the Archive Template
OP_PRCS.3. Choose the Selective Query
OP_PSPRCSRQST_ARCH_ALL (the only one in the list).4. Click the Define Binds hyperlink and then the Reset Query Bind Variables button. This will allow you to specify a value for the Run Date query prompt. For testing purposes, I selected today as my Run Date. This archives all completed or canceled requests older than today. Figure 4-22 shows this new run control.
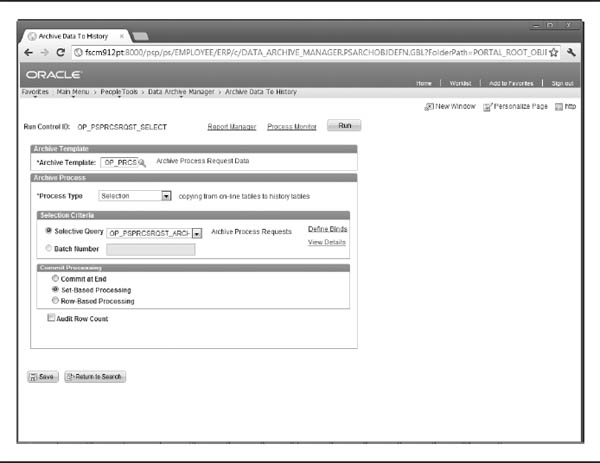
FIGURE 4-22.
OP_PRCS selection processing run controlExtending Delivered Archive Definitions
It is quite common to extend delivered transactions by creating sibling records that share a common key structure. When archiving delivered transactions, you will likely want to include these custom records in the archive batch. To ensure batch consistency, create history tables (and possibly views) to match your sibling records and then add them to the delivered archive object definitions. This approach, however, may create additional work at upgrade time. Delivered archive definitions are owned by Oracle and will likely be overwritten at upgrade. Be sure to note your changes.
In the last chapter we learned how to use Data Mover to import and export data. One method to persist archive definition customizations across upgrades is to export all custom rows from
PSARCHOBJREC prior to upgrade. You may then import those rows back into PSARCHOBJREC post upgrade. Following a consistent, unique record naming convention will help you identify custom record definitions.Conclusion
In this chapter you learned how to use Data Archive Manager to keep transaction tables lean and well performing. When creating your own archive definitions, be sure to consider the related transaction impact of moving transactions into history tables. It would not be appropriate to archive a transaction that has open related transactions. For example, archiving a vendor that has open vouchers would make generating payments extremely difficult!
..................Content has been hidden....................
You can't read the all page of ebook, please click here login for view all page.