

CHAPTER
2
Data Management with Application Designer
 pplication Designer is an application development environment for PeopleSoft developers. Don’t tell the developers, but Application Designer is really a metadata management tool.
Abstract Data Modeling
When a user enters information into a PeopleSoft page and then saves that page, where is that information stored? When a user selects a value from a list, from whence did that list originate? The answer to both questions is the physical implementation of a data model. The PeopleSoft database is the persistence layer for a PeopleSoft application, and the data model is the blueprint.
Database systems use the term “table” to describe a collection of columns and rows. The term “column” is often synonymous with the term “field.” The term “record” refers to a single row within a table. A record definition is a collection of fields describing that single row. A collection of records is known as a table. Therefore, in this chapter, when you see record, it refers to a single row in a table; a record definition identifies a record’s blueprint, and a table is a physical representation of a record definition, which, by definition, is a collection of records.
Field Definitions
From the database’s perspective, a field is an attribute of a table. A field does not exist without its table. As far as the database is concerned, two fields with identical definitions in two different tables have no relationship. The two fields may contain completely different data. If a relationship is supposed to exist between the two fields, the database expects to find some type of relationship definition, such as a foreign key constraint.
PeopleSoft takes a different approach, however. Field definitions are independent objects that may be associated with database tables. By convention, two tables containing the same field definition should contain the same data. A field’s placement within a table determines the field’s relationship to like-named fields in other tables. For example, the
PSOPRDEFN, PS_OPR_ DEF_TBL_AP, and PS_VOUCHER tables all contain the field named OPRID. In each of these tables, the OPRID field has the exact same definition: character with a length of 30. If you compare the data in the OPRID field among these three tables, you should find similar values. In PSOPRDEFN and PS_OPR_DEF_ TBL_AP, OPRID is identified as a key field. OPRID is not part of the PS_ VOUCHER record’s primary index. From this information, we infer that OPRID in PS_VOUCHER is a foreign key to both PS_OPR_DEF_TBL_AP and PSOPRDEFN.Sometimes a record contains multiple fields with similar meaning but different data. Continuing with the
PS_VOUCHER example, this table has OPRID, KK_TTRAN_OVER_OPRID, and OPRID_LAST_UPDT fields. Each of these OPRID fields represents a foreign-key relationship to PSOPRDEFN (and potentially some other OPRID table, such as PS_OPR_DEF_TBL_AP).If two fields in two separate tables have the same name, and both of those tables are included in the same transaction, the PeopleSoft component processor will infer a relationship between those fields. This is important when defining database hierarchies. Hierarchies are common in relational databases. The PeopleSoft Financials and Supply Chain Management application, for example, has several hierarchies. Vouchers, Journal Entries, and Purchase Orders all have header tables and line tables.
Some tables, however, have fields with the same name and same meaning, but no relationship.
EFFDT and DESCR are examples of this type of field. The DESCR field is a common fixture of prompt tables. This field serves the same purpose in each table, but no relationship exists between the two fields.Creating Field Definitions
As a financial analyst and accountant, my top priority was reporting. The effort required to prepare a report was directly related to database design. Reporting typically requires combining information from a variety of systems with related information. Typically, an analyst has to scrub and reformat data before it can be related. For example, one table may store department ID as a character field while another stores the exact same values in a number field. Because these fields have different types, some database systems won’t allow them to be joined together. We can certainly understand two separate systems having different designs. The most frustrating situation, however, is to find one system employing two different designs for the same data. An example of this is a department lookup table that defines department ID as a character, whereas the related transaction tables define department ID as a numeric field.
When they are designing data structures using standard database management tools, database designers find it very easy to create these types of inconsistencies. Database designs often start with a table and relegate fields to the low position of table attributes with no provision for reconciling related attributes between tables. Application Designer protects against this type of inconsistency by defining fields as standalone definitions. Every Application Designer–built table that contains a particular field will define that field using the exact same DDL.
Let’s create a field definition to see how it works.
1. In Application Designer, select File | New. Application Designer will respond by displaying the New Definition dialog box, which contains a list of possible object types.
2. From this dialog, choose Field. Application Designer will display the field’s editor window (Figure 2-1), where you can specify both data and display attributes.
3. Set the Field Type to Character (the default value) and set the Field Length to 10. Application Designer will use these values when generating DDL for tables that include this field. For most database platforms, Character is a loose term for at least two different field types:
CHAR and VARCHAR. Which one will Application Designer choose? We will let Application Designer answer that question later when we build a table from a record definition.4. Next, Application Designer requires that we specify a Field Label before saving. Enter OP_DOC_ID as the Label ID, Document ID as the Long Name, and Doc ID as the Short Name. Field labels are used by the PeopleSoft application when displaying a field’s information. They have nothing to do with the data model. Fields often have multiple labels. The URL field, for example, has nine labels, one for each type of URL stored in the database. By convention, the first Field Label has the same name as the field.
5. Choose File | Save. When prompted, name this field OP_DOC_ID.

FIGURE 2-1. Application Designer field definition editor
The finished field definition in Application Designer is shown in Figure 2-2.
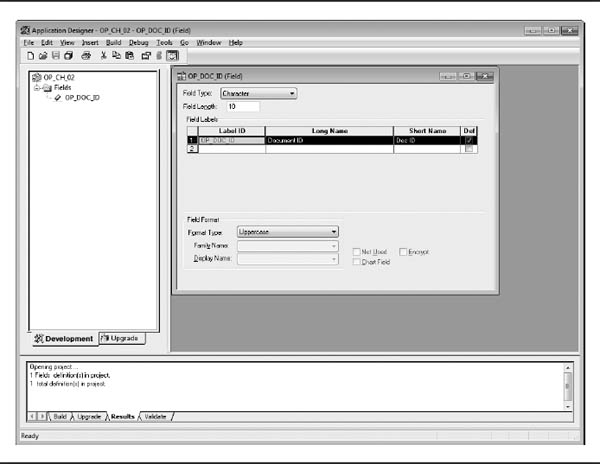
FIGURE 2-2.
OP_DOC_ID field definitionRecord Definitions
“Record” is the generic Application Designer term given to any row/column container. Of the seven record definition types, only three will become database-managed definitions: SQL Table, SQL View, and Temporary Table. The other four represent in-memory PeopleSoft-specific row/column containers.
Record definitions require predefined fields. Every field on a record must exist in Application Designer before it can be added to a record. This requires careful planning and design before you construct record definitions.
Creating Record Definitions
Let’s create a record definition to store URL’s (bookmarks) of valuable PeopleTools data management pages that exist on the open Internet.
1. Choose File | New.
2. When prompted to select a definition type, choose Record.
3. Application Designer will respond by displaying an empty Record designer. Add fields to this record definition by choosing Insert | Field.
4. In the Insert Field dialog (Figure 2-3), enter the Name as OP_DOC_ID.
5. With the Insert Field dialog still open, add the
DESCR and URL fields.6. When finished, close the Insert Field dialog by clicking the Cancel button.
7. Save the record definition as
OP_DM_DOCS. This name will appear in the title bar of the edit window, as shown in Figure 2-4.
FIGURE 2-3. Insert Field dialog

FIGURE 2-4.
OP_DM_DOCS record definitionUpon saving, depending on your database platform, you may see a Change Space dialog (Figure 2-5). Some database platforms, such as Oracle and DB2, use tablespaces to manage data files. The Available Space Name drop-down list shows the available tablespaces within your PeopleSoft database. If your database uses tablespaces to manage storage, select an appropriate tablespace from the drop-down menu. For this example, choose PTTLRG.

FIGURE 2-5. Change Space dialog
| NOTE
If the Available Space Name drop-down list is empty, run setspace.sqr to update PeopleSoft’s tablespace metadata. Running setspace.sqr is a database creation step that is very easy to miss because it has no impact until you try to add new record definitions. |
Which Tablespace Should I Choose?
Most PeopleSoft modules, such as eProcurement or Absence Management, have
APP, LRG, and WORK tablespaces. The general guideline is to place configuration data in APP, transaction data in LRG, and working storage in WORK. Your DBA may have additional recommendations. For example, your DBA might prefer to create a new tablespace for custom tables.PeopleTools stores the list of available tablespaces in
PSTBLSPCCAT. If the tablespace you require isn’t displayed in the list, run setspace.sqr to update Application Designer’s metadata. The setspace.sqr program inserts rows into PSTBLSPCCAT only for tablespaces that have existing tables. If the tablespace is empty, you can insert a row into PSTBLSPCCAT by cloning an existing row in PSTBLSPCCAT. For example, suppose I create a new tablespace named OPLRG on Oracle using DDL:
I could insert a row into
PSTBLSPCCAT using SQL: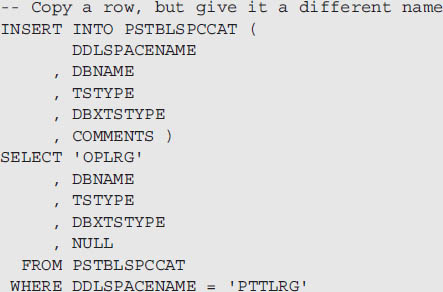
Building Record Definitions
We have now defined enough metadata to build a physical table from this record definition.
1. In the Application Designer editor window, choose Build | Current Definition.
2. In the Build dialog box (Figure 2-6), select Create Tables from the Build Options and select Build Script File from the Build Execute Options. This will generate the DDL necessary to construct this physical table, but it won’t actually run the DDL against the PeopleSoft database.
3. Click the Build button to generate the DDL.
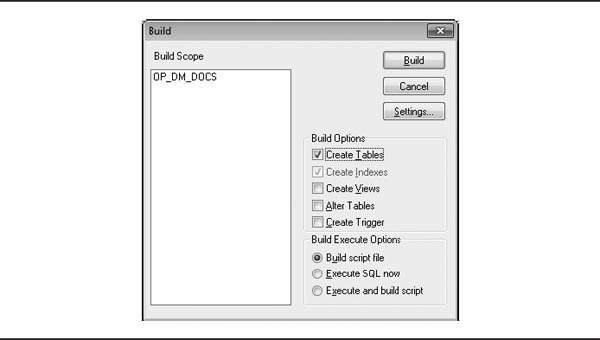
FIGURE 2-6. Build dialog
| NOTE
Build is a generic term that refers to any action that alters the design of the PeopleSoft database. This includes creating as well as altering definitions. |
The DDL creation step should run quickly. As the process runs, PeopleSoft will log information about the build process to the Build tab displayed at the bottom of Application Designer. The contents should resemble these:
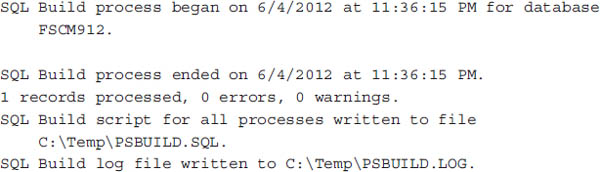
In the log output, take note of the line
1 records processed, 0 errors, 0 warnings. Resolve any errors or warnings before continuing.The generated DDL should be similar to this:

4. After verifying the generated DDL you can do one of the following:
■ Run it directly in your preferred SQL tool (as the database or schema owner).
■ Hand it off to your DBA for review and execution.
■ Rerun the Application Designer build process and choose Execute SQL Now from the Build Execute Options in the Build dialog.
5. To alter the DDL that the Application Designer generates, choose Tools | Data Administration | Record DDL…
6. From the Maintain Record DDL dialog (Figure 2-7), you can preview the DDL that Application Designer will generate or change DDL parameter values. For example, to change the Oracle
MAXEXT parameter, select the parameter in the dialog and then click the Edit Parm button.
FIGURE 2-7. Maintain Record DDL dialog
What fun is a table without any data? To make our examples more interesting, insert some of your favorite PeopleSoft data management documents into this table. Here is an SQL script containing a few of my favorites:

Altering Tables
Let’s add a few common audit fields to our new
OP_DM_DOCS record definition. In Application Designer, choose Insert | Field. Insert the fields OPRID_ENTERED_BY, OPRID_MODIFIED_BY, and LAST_DTTM_UPDATE (Figure 2-8). Then save the record.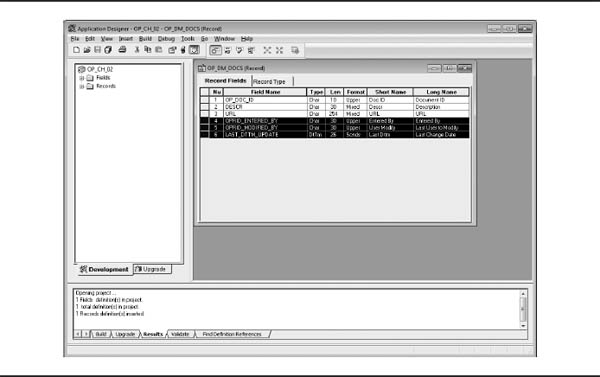
FIGURE 2-8.
OP_DM_DOCS with audit fieldsRecall that Chapter 1 discussed the three layers of a PeopleSoft database. Adding fields to a record definition updates the PeopleTools layer, the set of tables used by the PeopleSoft runtime to display and validate information. To populate these fields, we need to alter the database physically. This
ALTER step will update the system layer.To alter a table, choose Build | Current Definition. Application Designer will display the Build dialog (Figure 2-9). This time, instead of selecting the Create Tables build option, select Alter Tables. When Alter Tables is selected, notice that Application Designer automatically disables the Create Indexes and Create Trigger options.

FIGURE 2-9. Build dialog for
OP_DM_DOCSAn
ALTER operation can be very destructive, however. Changing field sizes, dropping fields, and other such operations can result in data loss and corruption. Build settings offer us control over these types of operations. With the Build dialog open, click the Settings button to open the Build Settings dialog. Figure 2-10 shows the settings we used to alter the OP_DM_DOCS table after adding three fields to the record definition.
FIGURE 2-10. Alter build settings
The four radio buttons on the left side of the Alter settings tell Application Designer how to handle destructive operations. The Alter Any checkboxes on the right specify the types of
ALTER operations to perform. The Alter Table Options group box contains the only setting we changed. The default option is Alter By Table Rename, which does the following, in order:1. Creates a new table using the updated record definition.
2. Copies data from the original table into the new table (includes inserting default values into the new fields).
3. Drops the original table.
4. Renames the new table to match the original name.
5. Builds all the indexes.
Alter By Table Rename is a safe way to perform an
ALTER, but it may not be the most efficient way. Because our ALTER is not destructive and does not involve data conversions, we can choose either method: Alter In Place or Alter By Table Rename.When you are satisfied with the
ALTER settings, click OK in the Build Settings dialog to return to the Build dialog. When you are altering records, in the Build Execute Options section of the Build dialog, the option Build Script File is selected by default.It is a good practice to review
ALTER scripts before executing them. Ensure that Build Script File is selected and click the Build button. When the process completes, review the Build tab at the bottom of Application Designer. Verify that there are no errors, and then double-click the row containing the generated SQL Build script. The generated script should look similar to the following (comments added for clarity):

Notice that we added three fields, but only two received default values and constraints. PeopleSoft does not allow
NULLs in character and numeric fields. Date and time fields, however, may accept NULL values. The default value for date and time fields is NULL—the very same value supplied by the database when the field was added to the table.If you are satisfied with the script, build the record definition again. In the Build dialog, choose the Alter Tables build option and the Execute And Build Script option. Click the Build button to complete the
ALTER.When adding fields to tables, data administrator should have a pretty good understanding of the new information those fields will contain. If this is the case, feel free to modify the update section of the generated script. For example, if the new fields are supposed to contain values from other tables within the database, you can modify the updates to include subqueries. Unfortunately, Application Designer will not run your modified script, so you will need to run it with your preferred SQL tool.
Indexes
PeopleSoft applications use indexes for two purposes: for constraints and performance. A primary key definition is an example of an index-based constraint. Alternate search keys are examples of performance indexes.
Creating Indexes
Let’s add primary and alternate search keys to our new record
OP_DM_DOCS.1. Open the record
OP_DM_DOCS in Application Designer.2. Select the
OP_DOC_ID field by clicking anywhere within the first row.3. Choose Edit | Record Field Properties to open the Record Field Properties dialog.
4. In the Keys column at the left (Figure 2-11), check the boxes Key, Search Key, and List Box Item.
5. Click OK to return to the editor window.

FIGURE 2-11.
OP_DOC_ID index definition in the Record Field Properties dialogEvery field marked as a Key field will become part of a table’s primary key. Oracle recommends that all Key fields be listed before other fields and arranged by cardinality, lowest to highest. For example, most transaction tables have a composite key comprising a
BUSINESS_UNIT as well as some other key field (VOUCHER_ID, EMPLID, and so on). BUSINESS_UNIT has a very low cardinality, whereas the other key field usually has a high cardinality. In delivered record definitions, you will notice that BUSINESS_UNIT is usually listed first, and the high-cardinality field is listed second.| NOTE
Cardinality refers to the distribution of unique values within a database column. High cardinality means each row contains a unique value. A column with few unique values, such as Business Unit or Set ID, however, has a low cardinality. |
Alternate search keys will become performance-based indexes. In the
OP_DM_DOCS record definition in the editor window, select the DESCR field. Then choose Edit | Record Field Properties. In the Record Field Properties dialog, check the boxes for Alternate Search Key and List Box Item. Click OK to save the record definition.Building Indexes
Let’s build the indexes defined thus far.
1. Choose Build | Current Definition.
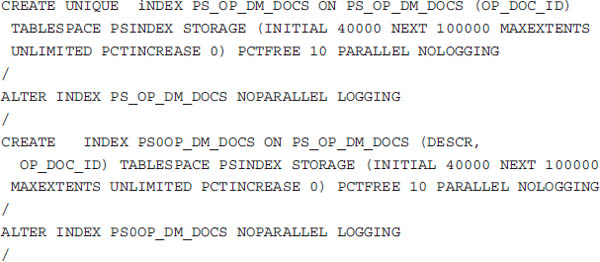
2. When the Build dialog appears, select Create Indexes from Build Options and select Build Script File from Build Execute Options. This will generate an SQL script that resembles the following:
3. If your DDL is satisfactory, rerun the build step, but this time, in the Build dialog, choose Execute And Build Script from the Build Execute Options, and then click Build.
Through Application Designer, we can review and change an index’s DDL in a manner similar to the way we configure table DDL. To view or modify index definitions, choose Tools | Data Administration | Indexes to open the Change Record Indexes dialog (Figure 2-12).

FIGURE 2-12.
OP_DM_DOCS indexesIn the Change Record Indexes dialog, we can add new indexes, edit existing indexes, and even change the DDL for a particular index. Later, we will add more fields to this record and then use this dialog to create new indexes. Notice the first index definition is of type Key and contains one field. This is the primary key and will share the same name as the base table:
PS_OP_DM_DOCS.Index 0 (zero) in the second entry represents the search and alternate search keys. These fields are grouped into a single index because they are typically used together on PeopleSoft search pages.
Select the index 0 line and click the Edit DDL button. The Maintain Index DDL dialog opens (Figure 2-13). The top portion of this dialog contains platform-specific DDL parameters and default values. You can override these default values by selecting a parameter and clicking the Edit Parm button.

FIGURE 2-13. Maintain Index DDL dialog with a
BITMAP overrideFor example, scroll down the list to the Oracle Platform and select the
BITMAP parameter. Since this parameter has no default value, the BITMAP keyword will be left off the index, creating a B-tree index. To create a Bitmap index instead of a B-tree index, click the Edit Parm button and, in the Override Column, enter an Override Value of BITMAP and then click OK to return to the Maintain Index DDL dialog. You’ll see the parameter appear for the Oracle platform in the dialog (Figure 2-13).Index Tablespace
The default PeopleSoft index DDL places all indexes in the same tablespace:
PSINDEX. Placing all indexes in the same tablespace is not recommended. In his book, PeopleSoft for the Oracle DBA (Apress, 2012) David Kurtz says:You can typically expect the total volume of index segments to be greater than the total volume of table segments in a PeopleSoft database. So, the index tablespace can be larger than all the table tablespaces put together. As such, a monolithic index tablespace can produce administrative problems and risks. For example, if you have a file corruption to a database in this tablespace, the scope of the recovery operation is much wider and more complex.
David’s book shows how to update the DDL templates to insert indexes into tablespaces named after their tables. Using David’s approach, our
OP_DM_DOC indexes would go in a tablespace named PTTLRG_IDX. We will discuss modifying the DDL templates later in this chapter in the section, “Managing DDL Models.”Adding Custom Indexes
DBAs are often tasked with identifying database performance issues. A proactive DBA will review a list of common, long-running SQL statements and look for ways to optimize performance. Adding indexes is a common optimization technique. Generating these indexes outside of PeopleTools has unfortunate side effects, however, because any Application Designer maintenance involving that same record definition will delete the externally generated index. Often, this deletion is transparent, causing performance to degrade and requiring the DBA to repeat his or her analysis and resolution steps.
| TIP
Be sure to add indexes to your projects. The only way to see a custom index is through a dialog buried in the Data Administration menu. Custom indexes are very easy to miss during project migration. |
An alternative is to make PeopleTools aware of custom indexes by adding them to a record’s metadata within Application Designer.
OPRID_ ENTERED_BY and OPRID_MODIFIED_BY will contain a PeopleSoft user ID. They are foreign keys to the OPRID field of record PSOPRDEFN.Let’s create custom indexes for these fields as well as the
LAST_DTTM_ UPDATE field. (Secure Enterprise Search incremental build queries use LAST_DTTM_UPDATE to identify changes.)1. In Application Designer, choose Tools | Data Administration | Indexes.
2. Click the Add Index button to create a new index. Application Designer will display the Add Index dialog (Figure 2-14).
3. Select options appropriate for your index and enter some comments. For this example, accept the defaults.
4. Click OK to close the dialog and add fields to the index.
5. From the Record Fields list, select the
OPRID_ENTERED_BY field and use the < (less than symbol) shuttle button to add the field to the index.6. Repeat the same steps for the
LAST_DTTM_UPDATE field. Figure 2-15 shows how the Change Record Indexes dialog should appear after adding these indexes.
FIGURE 2-14. Add Index dialog for the
OPRID_ENTERED_BY field
FIGURE 2-15. Change Record Indexes dialog
| NOTE
Notice that we didn’t create an index for OPRID_MODIFIED_BY. Proper indexing is critical to database performance, and too much indexing can be just as detrimental as too little indexing. Most database platforms are smart enough to use partial indexes, so it may be appropriate to create a single, composite index for both OPRID_ENTERED_BY and OPRID_ MODIFIED_BY. |
Altering Tables with Indexes
Earlier in the chapter, we reviewed table
ALTER options with an emphasis on the table’s structure. But what happens when altering tables with indexes? Here are the same ALTER statements presented early, but with indexes added (indexes are in boldface).Here’s an
ALTER by table rename:

Here’s an
ALTER in place:
Indexes are an important consideration when you’re altering tables. Notice that the Alter By Table Rename option does not create indexes until after dropping the original table. If your
ALTER reduces the length of a key field, and that truncation results in duplicate rows, you won’t find out about it until the script attempts to build the unique index—after the script drops the original table!Indexes can also have an impact on
ALTER performance. An ALTER often involves inserts, updates, data conversions, and data validations. Sometimes a bulk update or insert will execute faster if you first drop a field’s index and then re-create the index when the operation completes.Views
A data administration discussion would be incomplete without a mention of database views. To create a view with Application Designer, do the following:
1. Create a new record definition.
2. Change the Record Type to SQL Table.
3. Enter the appropriate SQL text.
The columns from the view’s SQL select list must match the fields in the record’s field list. The
SELECT field names and types do not have to match, but the number in the field does. Selected field types should be compatible with the record’s field metadata. In Chapter 4 we will create views whose SELECT field names don’t match the record’s field names.Application Designer’s view metadata allows a developer to specify key structures—but do not confuse them with real database keys. Application Designer won’t actually build database keys for these views. Rather, PeopleTools uses them to build search pages, identify relationships, and so on.
Managing DDL Models
Application Designer uses parameterized templates called models to generate DDL. Administrators can access and modify these templates online by navigating to PeopleTools | Utilities | Administration | DDL Model Defaults. PeopleSoft maintains a separate set of models for each supported database platform. From this page, you can add parameters, change parameter defaults, and modify the overall DDL template. Keep in mind that PeopleTools patches and upgrades may overwrite your DDL changes.
| TIP
You can hide DDL parameters from your RDBMS by wrapping them with inline comments. |
Data and System Audits
The PeopleSoft-delivered audit programs identify inconsistencies within PeopleTools definitions as well as between metadata layers (PeopleTools and database). Essentially, a PeopleSoft audit helps you identify trash in your system and then offers suggestions for cleaning up the mess.
DDDAUDIT
The
DDDAUDIT program identifies discrepancies between the PeopleTools and database metadata layers. Table 2-1 shows the relationship between PeopleTools metadata tables and database system tables. The relationship mapping in Table 2-1 is not perfect, however. For example, PSSQLDEFN contains all SQL definition types, not just SQL for views. Likewise, PSRECFIELD contains field definitions as standalone definitions; databases do not use this concept.
TABLE 2-1. PeopleTools/System Table Relationships
To run the
DDDAUDIT report, do the following:1. Log into your PeopleSoft application and navigate to PeopleTools | Process Scheduler | System Process Request.
2. Add a new run control named something meaningful—such as
DDDAUDIT.3. Click the Run button and select the process that has the description Data Designer/Database Audit. Click OK to continue.
4. When the process completes, look in the process output for the file named
dddaudit%.sqr (the real filename will contain your process instance).The
DDDAUDIT report lists database and PeopleTools definitions that don’t conform to PeopleSoft development best practices. Just because an item is listed in the audit report, however, does not mean it is wrong. For example, the report section named TABLE-2 contains tables defined in Application Designer that were not built—that is, they don’t exist in the database. In a production system, you would expect all Application Designer SQL tables to exist in the database, but intentionally choosing not to build a record is not an error.Use good judgment when interpreting the
DDDAUDIT report. Generally speaking, to remove an item from the report, open Application Designer and either build, alter, or delete the definition. Tables and views that exist in the database but not in Application Designer need to exist in Application Designer only if you plan to use PeopleTools metadata features (Meta-SQL, PeopleCode, and so on). An SQL Table defined in Application Designer that does not exist in the database needs to be built only if it will actually store data. If you don’t plan to use the table to store data, you may want to consider using the Record Type tab to change the type to Derived/Work. To resolve the issue of tables that have an SQL table name that differs from the record definition name, either save the record definition using the same name shown in the Non-Standard SQL Table Name property of the Record Type tab or change the Non-Standard SQL Table Name property to match the record definition name. It is best to reconcile differences between record definitions that exist in both metadata stores. Otherwise, patches and upgrades may overwrite the database version.SYSAUDIT and SYSAUD01
The
SYSAUDIT reports are similar to the DDDAUDIT report in that they check for inconsistencies within a PeopleSoft application. Unlike DDDAUDIT, which compares PeopleTools metadata to database metadata, the SYSAUDIT reports focus strictly on PeopleTools metadata. Use the SYSAUDIT reports to identify a variety of inconsistencies including Application Engine programs without sections, fields with multiple default labels, rowset-based messages that reference nonexistent record definitions, and similar issues.To run the
SYSAUDIT report, navigate to PeopleTools | Utilities | Audit | Perform System Audit. Create a new run control and select the definition types to audit. Resolve any issues identified by the SYSAUDIT report.| NOTE
The PeopleBook “PeopleTools Data Management: Ensuring Data Integrity” contains resolution suggestions for each exception. If you do not have PeopleBooks installed at your site, you can find an Oracle-hosted version online within the PeopleTools PeopleBook at http://www.oracle.com/pls/psft/homepage. |
The
SYSAUD01 report is part two of SYSAUDIT. To run SYSAUD01, navigate to PeopleTools | Process Scheduler | System Process Requests and run the SYSAUD01 report. For exceptions noted in the report, follow the same resolution recommendations offered for the SYSAUDIT report.Conclusion
Proper database design has a significant impact on system performance and user productivity. Even though several tools are available for database design and administration, using PeopleSoft’s Application Designer will help you keep your PeopleTools and system metadata in sync.
..................Content has been hidden....................
You can't read the all page of ebook, please click here login for view all page.