
Not all problems concerning world and player interaction need to be handled by a fully fledged physics API—sometimes a much more basic and lightweight system is just enough for our purposes. This is why in this recipe we dive into the collision handling system that is built into the Panda3D engine.
This recipe relies upon the project structure created in Setting up the game structure found in Chapter 1,
Let's go through this recipe's tasks:
- Open
Application.pyand add the include statements as well as the constructor of theApplicationclass:from direct.showbase.ShowBase import ShowBase from panda3d.core import * import random class Application(ShowBase): def __init__(self): ShowBase.__init__(self) self.cam.setPos(0, -50, 10) self.setupCD() self.addSmiley() self.addFloor() taskMgr.add(self.updateSmiley, "UpdateSmiley")
- Next, add the method that initializes the collision detection system:
def setupCD(self): base.cTrav = CollisionTraverser() base.cTrav.showCollisions(render) self.notifier = CollisionHandlerEvent() self.notifier.addInPattern("%fn-in-%in") self.accept("frowney-in-floor", self.onCollision) - Next, implement the method for adding the
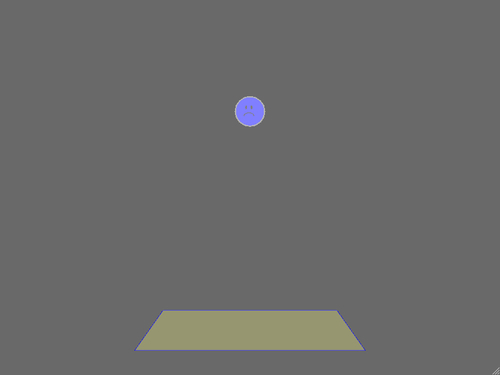
frowneymodel to the scene:def addSmiley(self): self.frowney = loader.loadModel("frowney") self.frowney.reparentTo(render) self.frowney.setPos(0, 0, 10) self.frowney.setPythonTag("velocity", 0) col = self.frowney.attachNewNode(CollisionNode("frowney")) col.node().addSolid(CollisionSphere(0, 0, 0, 1.1)) col.show() base.cTrav.addCollider(col, self.notifier) - The following methods will add a floor plane to the scene and handle the collision response:
def addFloor(self): floor = render.attachNewNode(CollisionNode("floor")) floor.node().addSolid(CollisionPlane(Plane(Vec3(0, 0, 1), Point3(0, 0, 0)))) floor.show() def onCollision(self, entry): vel = random.uniform(0.01, 0.2) self.frowney.setPythonTag("velocity", vel) - Add this last piece of code. This will make the
frowneymodel bounce up and down:def updateSmiley(self, task): vel = self.frowney.getPythonTag("velocity") z = self.frowney.getZ() self.frowney.setZ(z + vel) vel -= 0.001 self.frowney.setPythonTag("velocity", vel) return task.cont - Hit the F6 key to launch the program:
We start off by adding some setup code that calls the other initialization routines. We also add the task that will update the smiley's position.
In the setupCD() method, we initialize the collision detection system. To be able to find out which scene objects collided and issue the appropriate responses, we create an instance of the CollisionTraverser class and assign it to base.cTrav. The variable name is important, because this way, Panda3D will automatically update the CollisionTraverser every frame. The engine checks if a CollisionTraverser was assigned to that variable and will automatically add the required tasks to Panda3D's update loop.
Additionally, we enable debug drawing, so collisions are being visualized at runtime. This will overlay a visualization of the collision meshes the collision detection system uses internally.
In the last lines of setupCD(), we instantiate a collision handler that sends a message using Panda3D's event system whenever a collision is detected. The method call addInPattern("%fn-in-%in") defines the pattern for the name of the event that is created when a collision is encountered the first time. %fn will be replaced by the name of the object that bumps into another object that goes by the name that will be inserted in the place of %in. Take a look at the event handler that is added below to get an idea of what these events will look like.
After the code for setting up the collision detection system is ready, we add the addSmiley() method, where we first load the model and then create a new collision node, which we attach to the model's node so it is moved around together with the model. We also add a sphere collision shape, defined by its local center coordinates and radius. This is the shape that defines the boundaries; the collision system will test against it to determine whether two objects have touched.
To complete this step, we register our new collision node with the collision traverser and configure it to use the collision handler that sends events as a collision response.
Next, we add an infinite floor plane and add the event handling method for reacting on collision notifications. Although the debug visualization shows us a limited rectangular area, this plane actually has an unlimited width and height. In our case, this means that at any given x- and y-coordinate, objects will register a collision when any point on their bounding volume reaches a z-coordinate of 0. It's also important to note that the floor is not registered as a collider here. This is contrary to what we did for the frowney model and guarantees that the model will act as the collider, and the floor will be treated as the collide when a contact between the two is encountered.
While the onCollision() method makes the smiley model go up again, the code in updateSmiley() constantly drags it downwards. Setting the velocity tag on the frowney model to a positive or negative value, respectively, does this in these two methods. We can think of that as forces being applied. Whenever we encounter a collision with the ground plane, we add a one-shot bounce to our model. But what goes up must come down, eventually. Therefore, we continuously add a gravity force by decreasing the model's velocity every frame.
This sample only touched a few of the features of Panda3D's collision system. The following sections are meant as an overview to give you an impression of what else is possible. For more details, take a look into Panda3D's API reference.
In the sample code, we used CollisionPlane and CollisionSphere, but there are several more shapes available:
CollisionBox:A simple rectangular shape. Crates, boxes, and walls are example usages for this kind of collision shape.CollisionTube:A cylinder with rounded ends. This type of collision mesh is often used as a bounding volume for first and third person game characters.CollisionInvSphere:This shape can be thought of as a bubble that contains objects, like a fish bowl. Everything that is outside the bubble is reported to be colliding. ACollisionInvSpheremay be used to delimit the boundaries of a game world, for example.CollisionPolygon:This collision shape is formed from a set of vertices, and allows for the creating of freeform collision meshes. This kind of shape is the most complex to test for collisions, but also the most accurate one. Whenever polygon-level collision detection is important, when doing hit detection in a shooter for example, this collision mesh comes in handy.CollisionRay:This is a line that, starting from one point, extends to infinity in a given direction. Rays are usually shot into a scene to determine whether one or more objects intersect with them. This can be used for various tasks like finding out if a bullet shot in the given direction hit a target, or simple AI tasks like finding out whether a bot is approaching a wall.CollisionLine:LikeCollisionRay, but stretches to infinity in both directions.CollisionSegment:This is a special form of ray that is limited by two end points.CollisionParabola:Another special type of ray that is bent. The flying curves of ballistic objects are commonly described as parabolas. Naturally, we would use this kind of ray to find collisions for bullets, for example.
Just like it is the case with collision shapes for this recipe, we only used CollisionHandlerEvent for our sample program, even though there are several more collision handler classes available:
CollisionHandlerPusher:This collision handler automatically keeps the collider out of intersecting vertical geometry, like walls.CollisionHandlerFloor:LikeCollisionHandlerPusher, but works in the horizontal plane.CollisionHandlerQueue:A very simple handler. All it does is add any intersecting objects to a list.PhysicsCollisionHandler:This collision handler should be used in connection with Panda3D's built-in physics engine. Whenever a collision is found by this collision handler, the appropriate response is calculated by the simple physics engine that is built into the engine.