
No matter if it is professional film production or photography, neither of these professions will release a piece of work without a serious amount of color editing in post-production. Proper color grading sets the overall tone and emotion of the final picture, making the sunrise scenes look warm, and movies that are set in an arctic environment feel as cold as ice.
These effects can also be achieved with some shader code and enable you to further tweak the look and feel of your games. Choosing the right color palette is a very important measure for setting and transporting mood and emotion in visual media, which includes video games.
It's a rather small change to put into your rendering pipeline but the results might have a big impact on how your scenes will be perceived by players.
This recipe builds upon the sample code presented in Building custom effects, the second recipe in this chapter. Follow the instructions of said recipe up to step 1 so you are ready to implement the setupPostFx() method and add the required shaders.
These steps will show you how to implement color grading in Panda3D:
- Add this method to the
Applicationclass:def setupPostFx(self): self.filterMan = FilterManager(self.win, self.cam) colorTex = Texture() finalQuad = self.filterMan.renderSceneInto(colortex = colorTex) finalQuad.setShader(loader.loadShader("color.cg")) finalQuad.setShaderInput("color", colorTex) - Add a new text file called
color.cgto theshadersdirectory. - Open
color.cgin an editor and add the following code://Cg void vshader(float4 vtx_position : POSITION, out float4 l_position : POSITION, out float2 l_texcoord : TEXCOORD0, uniform float4 texpad_color, uniform float4x4 mat_modelproj) { l_position = mul(mat_modelproj, vtx_position); l_texcoord = (vtx_position.xz * texpad_color.xy) + texpad_color.xy; } #define overlay_blend(base, blend) (base < 0.5 ? (2.0 * base * blend) : (1.0 - 2.0 * (1.0 - base) * (1.0 - blend))) #define overlay_add(base, blend) (base + blend) #define overlay_mul(base, blend) (base * blend) void fshader(float2 l_texcoord : TEXCOORD0, uniform sampler2D k_color : TEXUNIT0, out float4 o_color : COLOR) { float gamma = 1.2; gamma = 1 / gamma; float3 lift = float3(1.05, 1.05, 1.1); float3 blend = float3(0.1, 0.1, 0.5); float weight = 0.5; float4 color = tex2D(k_color, l_texcoord); color.rgb = pow(color.rgb, gamma); color.rgb = saturate(overlay_mul(color.rgb, lift)); float3 tint = saturate(overlay_blend(color.rgb, blend)); color.rgb = lerp(color.rgb, tint, weight); o_color = color; } - In Netbeans, press F6 to run the application:
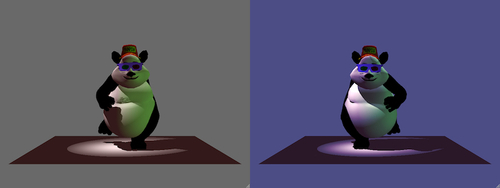
Looking at the two screenshots (original color on the left, modified scene on the right) we can see that the color balance of the scene has changed dramatically due to our new filter. We shifted the color palette of the final image towards a cold and blue look, setting a nightly and full moon mood.
In this recipe, we are using only one render target that draws scene color into colorTex. This texture will be uploaded to the graphics card and used by our shader.
The shader found in color.cg is where all the color magic happens, so let's take a closer look!
Inside the fshader() function, which is the pixel shader applied to the final fullscreen quad, we first define a few parameters that will influence the color balance of our scene.
With the gamma variable, we change the gamma correction. The input color will be raised by the reciprocal of this value, resulting in a non-linear change in color intensity. Values greater than 1 will give low color intensities a boost, making the scene appear brighter, but also washed out as contrast decreases. With values below one, everything will appear dark with a lot of contrast and with lower intensities converging towards black.
The lift variable will be used with the overlay_mul() macro, multiplying the input color. With this, you can increase and decrease the intensities of color channels, emphasizing one channel while eliminating another one.
Using the blend variable, we define a color which is first blended with the source color using the overlay_blend() macro, which applies the overlay blending formula you may know from Photoshop or similar tools. This formula causes color channels with low intensities to be pushed harder towards the desired value than higher intensities, resulting in a balanced push towards the desired color. The result from this calculation is then linearly interpolated with the original color value, using weight to define how these colors are blended together.
In principle, what we do in our shader is similar to the steps we'd follow in an image manipulation program. First we change gamma correction and apply a channel multiplication filter. Then we create a new layer by blending the original image with a single color. Finally we alpha blend this layer onto our scene.