
An effect you can very commonly see in photography is objects that are very close to or very far away from the point of view. Therefore, appearing fuzzy and blurred while the middle portion of the image appears focused and sharp, emphasizing an object of interest in the scene. This focused part of the scene is referred to as 'depth of field'.
In this recipe you will learn how to mimic this cinematic effect in a post-processing filter. This will help you to emphasize the visual depth of a scene and focus a point of interest while blurring the background and foreground.
Set up the project structure found in Setting up the game structure, add a directory called shaders inside the project directory, make sure it is in the engine's search path and you're ready to go!
This recipe requires you to write some Python and Cg code as presented in the following steps:
- Paste the following code into
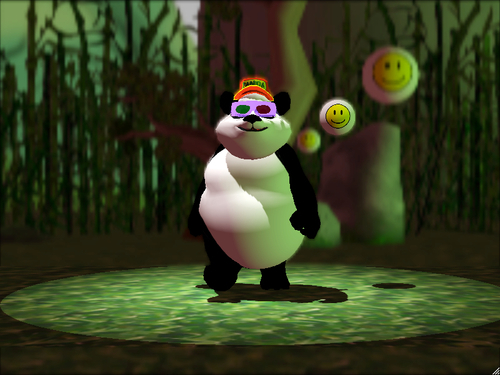
Application.py:from direct.showbase.ShowBase import ShowBase from direct.actor.Actor import Actor from panda3d.core import * from direct.filter.FilterManager import * class Application(ShowBase): def __init__(self): ShowBase.__init__(self) self.setupScene() self.setupLight() self.setupPostFx() def setupScene(self): self.panda = Actor("panda", {"walk": "panda-walk"}) self.panda.reparentTo(render) self.panda.loop("walk") smiley = loader.loadModel("smiley") smiley.reparentTo(render) smiley.setPos(5, -15, 10) smiley = loader.loadModel("smiley") smiley.reparentTo(render) smiley.setPos(5, 0, 10) smiley = loader.loadModel("smiley") smiley.reparentTo(render) smiley.setPos(5, 20, 10) self.world = loader.loadModel("environment") self.world.reparentTo(render) self.world.setScale(0.5) self.world.setPos(-8, 80, 0) self.cam.setPos(0, -40, 6) self.cam.node().getLens().setNearFar(1.0, 300.0) - Add this method to the
Applicationclass:def setupLight(self): ambLight = AmbientLight("ambient") ambLight.setColor(Vec4(0.2, 0.1, 0.1, 1.0)) ambNode = render.attachNewNode(ambLight) render.setLight(ambNode) dirLight = DirectionalLight("directional") dirLight.setColor(Vec4(0.1, 0.4, 0.1, 1.0)) dirNode = render.attachNewNode(dirLight) dirNode.setHpr(60, 0, 90) render.setLight(dirNode) pntLight = PointLight("point") pntLight.setColor(Vec4(0.8, 0.8, 0.8, 1.0)) pntNode = render.attachNewNode(pntLight) pntNode.setPos(0, 0, 15) self.panda.setLight(pntNode) sptLight = Spotlight("spot") sptLens = PerspectiveLens() sptLight.setLens(sptLens) sptLight.setColor(Vec4(1.0, 1.0, 1.0, 1.0)) sptLight.setShadowCaster(True) sptNode = render.attachNewNode(sptLight) sptNode.setPos(-10, -10, 50) sptNode.lookAt(self.panda) render.setLight(sptNode) render.setShaderAuto() - After the
setupLight()method, add this last piece of code toApplication.py:def setupPostFx(self): self.filterMan = FilterManager(self.win, self.cam) colorTex = Texture() blurTex = Texture() depthTex = Texture() finalQuad = self.filterMan.renderSceneInto(colortex = colorTex, depthtex = depthTex) blurQuad = self.filterMan.renderQuadInto(colortex = blurTex, div = 4) blurQuad.setShader(loader.loadShader("blur.cg")) blurQuad.setShaderInput("color", colorTex) finalQuad.setShader(loader.loadShader("depth.cg")) finalQuad.setShaderInput("color", colorTex) finalQuad.setShaderInput("blur", blurTex) finalQuad.setShaderInput("depth", depthTex) - Add two new files called
blur.cganddepth.cgto theshaderssubdirectory. - Open
blur.cgand add the following code://Cg void vshader(float4 vtx_position : POSITION, out float4 l_position : POSITION, out float2 l_texcoord : TEXCOORD0, uniform float4 texpad_color, uniform float4x4 mat_modelproj) { l_position = mul(mat_modelproj, vtx_position); l_texcoord = (vtx_position.xz * texpad_color.xy) + texpad_color.xy; } void fshader(float2 l_texcoord : TEXCOORD0, uniform sampler2D k_color : TEXUNIT0, out float4 o_color : COLOR) { float4 color = tex2D(k_color, l_texcoord); int samples = 16; float step = 0.001; for (float i = -(samples / 2) * step; i <= (samples / 2) * step; i += step) color += tex2D(k_color, l_texcoord + float2(i, 0)); color /= (samples + 1); samples /= 2; for (float i = -(samples / 2) * step; i <= (samples / 2) * step; i += step) color += tex2D(k_color, l_texcoord + float2(0, i)); color /= (samples + 1); o_color = color; } - After pasting this piece of shader code to
depth.cgyou are done with coding for this sample://Cg void vshader(float4 vtx_position : POSITION, out float4 l_position : POSITION, out float2 l_texcoord : TEXCOORD0, uniform float4 texpad_color, uniform float4x4 mat_modelproj) { l_position = mul(mat_modelproj, vtx_position); l_texcoord = (vtx_position.xz * texpad_color.xy) + texpad_color.xy; } float linearZ(uniform sampler2D tex, float2 uv) { float near = 1.0; float far = 300.0; float z = tex2D(tex, uv); return (2.0 * near) / (far + near - z * (far - near)); } void fshader(float2 l_texcoord : TEXCOORD0, uniform sampler2D k_color : TEXUNIT0, uniform sampler2D k_blur : TEXUNIT1, uniform sampler2D k_depth : TEXUNIT2, out float4 o_color : COLOR) { float z_max = 0.3; float z_min = 0.16; float z = linearZ(k_depth, l_texcoord); float4 color = z > z_max ? tex2D(k_blur, l_texcoord) : z < z_min ? tex2D(k_blur, l_texcoord) : tex2D(k_color, l_texcoord); o_color = color; } - To run the sample, hit the F6 key and watch how out-of-focus objects are being blurred:
Before applying our post-processing effect, we need a scene which is created by the methods setupScene() and setupLight(). We also configure the near and far clipping planes of our camera using setNearFar() to define the depth boundaries of our scene.
Next, in setupPostFx(), we put together our render buffer setup. We're rendering scene color to colorTex and the depth buffer to depthTex. Additionally, we create an intermediate render step that produces a blurred and downsampled version of our color buffer.
Blurring the color buffer is implemented in the pixel shader of blur.cg. Here we first blur horizontally by taking the average of the color values to the left and the right of the current pixel. The same is done in vertical direction too, using only half as many samples as the horizontal blur. We're doing this to make the blur look more balanced, as using the same amount of samples tends to emphasize the vertical blur.
To create the final effect, the untouched scene color, the blurred scene, and the depth texture are passed to the depth of field shader found in depth.cg. First, notice the values z_max and z_min, which define the boundaries for the depth of field. Every pixel that has a scene depth below z_min or above z_max will appear blurred.
The depth values are converted to normalized, linear values produced by the linearZ() function to make it easier to define the blur boundaries. In our sample, everything that is below the first 16% of depth into the scene or further away than 30% of the maximum depth is blurred.
The line that chooses the color sample might look a bit cryptic, but does a really simple thing using nested ternary operators. First the depth value is checked against z_max. If it is greater, the current pixel will be sampled from the blurred texture. If not, there are two branches left—either z is smaller than z_min, which will also result in the blurred texture being used, or not—which means that we're in focus and the unaltered version of the pixel is drawn to the screen.