
Modern graphics cards and graphics APIs like Direct3D or OpenGL allow developers to program, and therefore customize, the behavior of parts of the graphics pipeline using shader programs, written in a C-like programming language. These shader programs define how vertices are being transformed, which textures are used for retrieving color values, and which final color pixels we have on the screen.
Luckily, Panda3D adds a very nice abstraction layer on top of this shader system, which is called the shader generator. As soon as you call the setShaderAuto() method on a node in the scene graph, the shader generator kicks in and pieces together the right shaders, depending on the render state (textures, colors, lights, and so on.) of your objects.
Sometimes the built-in shader generator and the code it creates may not suit your needs. Therefore, this recipe will explore and show how to add a custom shader generator to Panda3D.
This recipe requires you to modify and build the source code of Panda3D. Please take your time to review Building Panda3D from source code to get set before proceeding with the following steps. You can find this recipe in Chapter 1.
Complete the following steps to create a custom shader generator:
- From the top level directory of your unpacked Panda3D source tree, navigate to the subfolder
pandasrcpgraphnodes. - Create two new files called
customShaderGenerator.handcustomShaderGenerator.cxx. - Open
customShaderGenerator.hand add the following code:#ifndef CUSTOMSHADERGENERATOR_H #define CUSTOMSHADERGENERATOR_H #include "shaderGenerator.h" class EXPCL_PANDA_PGRAPHNODES CustomShaderGenerator : public ShaderGenerator { PUBLISHED: CustomShaderGenerator(PT(GraphicsStateGuardianBase) gsg, PT(GraphicsOutputBase) host); virtual ~CustomShaderGenerator(); virtual CPT(RenderAttrib) synthesize_shader(const RenderState *rs); public: static TypeHandle get_class_type() { return _type_handle; } static void init_type() { ShaderGenerator::init_type(); register_type(_type_handle, "CustomShaderGenerator", ShaderGenerator::get_class_type()); } virtual TypeHandle get_type() const { return get_class_type(); } virtual TypeHandle force_init_type() {init_type(); return get_class_type();} private: static TypeHandle _type_handle; }; #endif - Open the file
customShaderGenerator.cxxand add these lines of code:#include "customShaderGenerator.h" TypeHandle CustomShaderGenerator::_type_handle; CustomShaderGenerator::CustomShaderGenerator(PT(GraphicsStateGuardianBase) gsg, PT(GraphicsOutputBase) host) : ShaderGenerator(gsg, host) { } CustomShaderGenerator::~CustomShaderGenerator() { } CPT(RenderAttrib) CustomShaderGenerator:: synthesize_shader(const RenderState *rs) { }The last line of
customShaderGenerator.cxxhas to be blank for the code to compile properly! - Open
shaderGenerator.cxxand copy and paste the method body ofsynthesize_shader()to thesynthesize_shader()method incustomShaderGenerator.cxx. - In
customShaderGenerator.cxx, replace all occurrences ofsaturate(dot(l_eye_normal.xyz, lvec.xyz))withsaturate(0.5 * dot(l_eye_normal.xyz, lvec.xyz) + 0.5). - Open the file
lightLensNode.h. Find the following code lines and add the highlighted code:friend class GraphicsStateGuardian; friend class ShaderGenerator; friend class CustomShaderGenerator;
- In the file
pgraphnodes_composite2.cxx, find the line that reads#include "shaderGenerator.cxx"and add the line#include "customShaderGenerator.cxx"below it. - Open
config_pgraphnodes.cxx. Below the line#include "shaderGenerator.h", add the line#include "customShaderGenerator.h". Also find this line of code:ShaderGenerator::init_type();. Add a new line below, containingCustomShaderGenerator::init_type();. - Go to the
pandasrcdxgsg9subdirectory of the source tree. - In the file
dxGraphicsStateGuardian9.cxx, add the line#include "customShaderGenerator.h"below the other includes. Also find and replace the following code line with the highlighted one:_shader_generator = new ShaderGenerator(this, _scene_setup->get_display_region()->get_window()); _shader_generator = new CustomShaderGenerator(this, _scene_setup->get_display_region()->get_window());
- Repeat step 11 for the file
glGraphicsStateGuardian_src.cxxin thepandasrcglstuffsubdirectory. - Proceed through the steps of Building Panda3D from source code to compile your custom build of Panda3D.
We begin implementing our custom shader generator by defining the interface of our new CustomShaderGenerator. We derive this class from the default shader generator and declare our own constructor, destructor, and synthesize_shader() implementations. The code of the synthesize_shader() method will later be handling the generation of the shader code.
Don't be irritated by the PUBLISHED: line and the TypeHandle code. This stuff is needed internally to register the class and methods with Python.
We then proceed to add method implementations to customShaderGenerator.cxx. The constructor calls its base constructor and the destructor remains empty. The real magic happens within the synthesize_shader() method, which we base upon the code of the original code to remain compatible with the existing render states. Unfortunately, the shader generator system is not written in a very modular way, which means we need to copy the method body of the original implementation of the method.
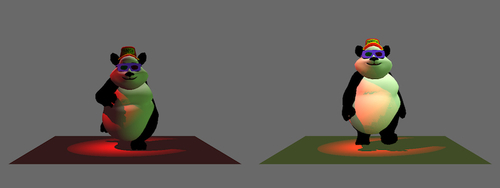
For the purpose of this recipe, we then change the standard Lambert lighting equation slightly by moving the range of possible results from [-1, 1] to [0, 1], making lit scenes appear brighter, as shown in the following comparison with the standard implementation to the left and our custom lighting to the right:
In step 7, we declare our CustomShaderGenerator class to be a friend of LightLensNode, because our base class needs to access some private and protected members of this class when the shader is put together.
The last steps before we can compile our custom version of Panda3D are necessary to add the new class to the build system and register it with the Python API. The most important steps in this closing part are 11 and 12, where we replace the instantiation of the standard ShaderGenerator class with our CustomShaderGenerator.
This recipe only made very slight changes to the original implementation of the shader generator. For more extensive changes to this system, you might consider taking a close look at the ShaderGenerator class and its analyze_renderstate() method, which operates on instances of RenderState to determine which shader parts are then needed in synthesize_shader() to produce the proper shader permutation.